
Learn about Adobe’s new Creative Cloud connections with Adobe Experience Manager Assets that enable seamless workflows across departments. Join this hands-on lab to learn more about the new capabilities including Adobe Asset Link and support for Adobe Stock within AEM Assets. Adobe Asset Link is a natively build part of your Creative Cloud for enterprise subscriptions, that connects uniquely to Adobe Experience Manager. Asset Link allows teams to design, revise, review and approve any asset (housed in Experience Manager Assets) directly in Photoshop CC, Illustrator CC, or InDesign CC. Adobe Stock service provides designers and businesses with access to millions of high-quality, royalty-free photos, vectors, illustrations, videos, templates, and 3D assets for all their creative projects. AEM users are now able to find, preview, and license Adobe Stock assets without leaving the AEM workspace.
If you’re a creative, you don’t want to have to learn a digital asset management (DAM) platform just to access and edit your work. If you’re a marketer, you shouldn’t have to understand the ins and outs of Photoshop just to leave feedback. No matter your role on the team, the more time you spend trying to understand a new platform, the less time you have to create meaningful content for your customers.
Adobe Experience Manager Assets meets you where you are. Whether you’re a marketer looking to provide comments on an asset, or a creative trying to make requested changes quickly, Adobe asset link helps you optimize your workflow with the only native connection to Creative Cloud on the market today. Instead of having to manage yet another bulky integration, use single sign-on with your Creative Cloud account credentials to access DAM and Creative Cloud assets directly in Photoshop CC, Illustrator CC, and InDesign CC. From there, it’s easy to check out files, automatically version the asset, and have changes integrated into the DAM. The workspace makes it simple for your team to collaborate and deliver compelling digital experiences.
If you are a marketer, you always want to use appealing creative assets for your marketing campaigns, ads, websites, etc. Adobe Experience Manager Assets offers an excellent platform for storing, searching and managing assets within AEM for your marketing needs. Another great place where a marketer can look for stunning options is Adobe Stock – which provides access to millions of high-quality, royalty-free photos, vectors, illustrations, videos, templates, and 3D assets.
Organizations can integrate their Adobe Stock enterprise plan with AEM Assets to ensure that licensed assets are broadly available for their creative and marketing projects; with the powerful asset management capabilities of AEM. This integration helps marketers find high-quality stock assets for use in all their marketing efforts without leaving the AEM UI.
A local environment with the following tools and technologies installed:
A local author instance of AEM 6.5 should be installed running locally on port 4502
WKND site is planning to announce the "Summer SkateFest 2019" with skate events in and around Los Angeles on their home page. They have a carousel component where new banners highlighting the events have to be added. As a marketer, you have been assigned the task to create and design the home page along with the help of creatives in your organization. Let us explore the WKND site home page and asset folder.
Navigate to WKND site home page
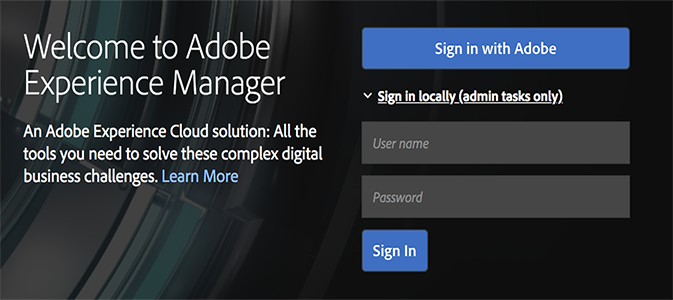
Login to your lab machine with the following credentials
Open the browser and navigate to your local AEM instance
Select Sign In locally (admin tasks only), and enter the following credentials
Figure 1: AEM Login
Navigate to Sites > WKND Site > Home
Select the Home by clicking on the preview thumbnail and use (e) on your keyboard or click on the Edit button to open the page for editing
Click on the Preview option (top-right corner)
Navigate to WKND asset folder and upload assets
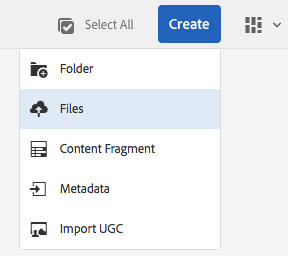
Notice the Summer SkateFest 2019 folder that's already created for your task. The folder is currently empty. Let us find some assets that we can use for our home page banner.
Open the Summer SkateFest 2019 folder and upload files from your local resources folder. Click Create and select Files to navigate to the exercise-1.2 folder and upload all images.
Figure 2: File Upload
At this point, as a marketer, you were able to upload files to AEM Assets from your local drive. These assets could be used for the home page banners.
In the previous exercise, as a marketer, you were able to upload some files to AEM Assets, that could be used for the Summer SkateFest 2019 home page banner. However, marketers thrive to provide appealing content to customers to increase user engagement on their web site. A marketer is no longer restricted to using assets from previous campaigns, ads or assets that exist only within AEM Assets. With the new AEM Assets and Adobe Stock integration, a marketer can access all assets required for delivering great content. It gives you access to over 100 million high-quality photos, illustrations, videos, templates and 3D assets to choose from, all without leaving AEM Assets. You can quickly preview, license and save these assets to AEM Assets for your campaign. let us explore this new capability.
Different options to search for Stock Assets within AEM Assets
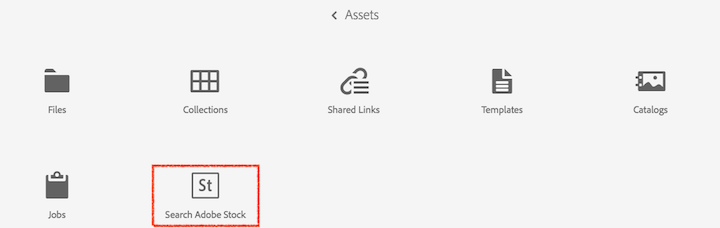
Open your browser and navigate to your local AEM instance
Select Assets and click on the Search Adobe Stock option
Figure 3: Search Adobe Stock
Notice the massive list of Stock assets that gets displayed within your AEM UI.
Figure 4: Asset Card - Stock Icon
![]()
Notice the Adobe Stock watermark, Stock File number and Stock icon on each asset card.
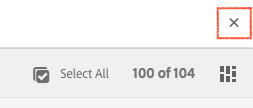
Click on the close icon, and it should take you back to your AEM home screen.
Figure 5: Close - Stock Search Result
Navigate to Assets > Files and click on the OmniSearch icon.
Remove the existing location filter and in the 'Type to Search' field enter Location and select the Location as Adobe Stock.
Figure 6: Asset Card - Stock Icon
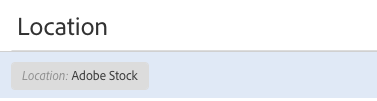
Notice the massive list of Adobe Stock assets that gets displayed within your AEM UI.
In exercise 2.1, we learned two ways to perform an Adobe Stock asset search. Firstly, using AEM home page - Adobe Stock search option and secondly using the location filter.
Preview and license Adobe Stock Asset to AEM Assets.
We have three skating images that we uploaded to our Summer SkateFest 2019 folder. As a marketer, now you have access to millions of Adobe Stock images, so let us explore more options.
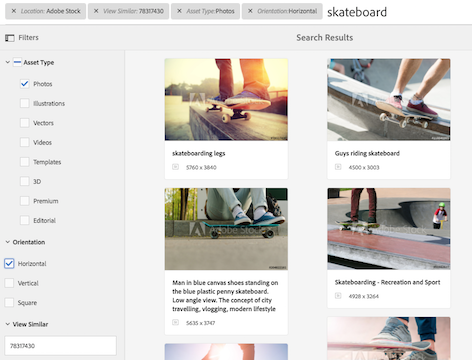
Adobe Stock assets displayed here include photos, videos, templates, etc. from Adobe Stock. We are looking for an Adobe Stock photo that could be used for our home page banner. Let us filter our search.
Click on the filter option and ![]() and then select the following parameters:
and then select the following parameters:
Figure 7: Stock Search - Using Filters
Select a file that's not previously licensed, and you can notice a top toolbar with various options.
Assets already licensed under your organization can be noticed with a blue licensed text banner over the asset card. These assets can be used without the need to license them again. Just save the asset to your desired AEM Assets folder.
Enter Project name..* - Summit
Enter Cost center..* - CC101
Enter Country - USA
Figure 8: License & Save dialog
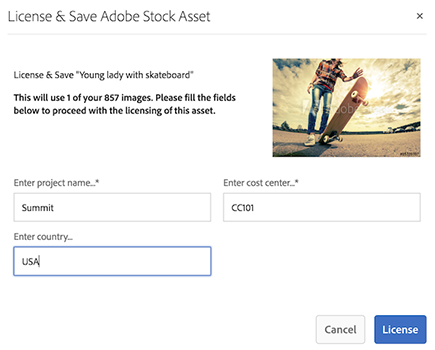
License & Save dialog can be customized based on your organizational requirements in Admin Console
Summer SkateFest 2019 folder now has a number of skateboard images selected by a marketer to be used as banner images. These assets can be added to a Collection and later shared with creatives for additional editing.
Add assets to a Collection
Click on ![]() assets option and then click on add To Collection
assets option and then click on add To Collection ![]()
Create a new Collection and name it as Summer SkateFest 2019
Figure 9: Create Collection
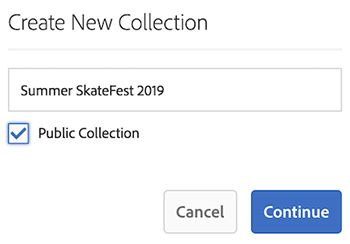
Click Add to finish adding assets to your new Collection.
Click on AEM logo in the top left corner and navigate to Assets > Collection and open the collection that you created in the previous step
In the previous lesson, as a marketer, you were able to select assets from various sources and create a collection. In this lesson, you will be playing the role of a creative, who is going to review the assets and make necessary modifications using your favorite Creative Cloud application.
To review the assets created by a marketer in AEM, a creative does not have to learn a new platform (AEM) and does not need to worry about getting access or any help. They can stick to their favorite Creative Cloud app and easily collaborate with marketers using Adobe Asset Link. Let's explore.
From your desktop, launch the Creative Cloud Desktop application.
Figure 10: Launch the Creative Cloud Desktop Application 
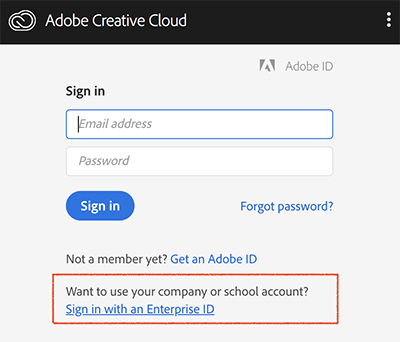
Click Sign in with an Enterprise ID option.
Figure 11: Creative Cloud Enterprise Login
Log in using the credentials below.
Figure 12: Creative Cloud User ID
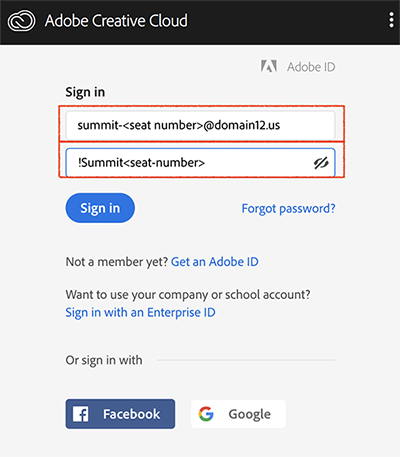
Creative Cloud User Credentials
For Example, seat number 1 would have the following credentials:
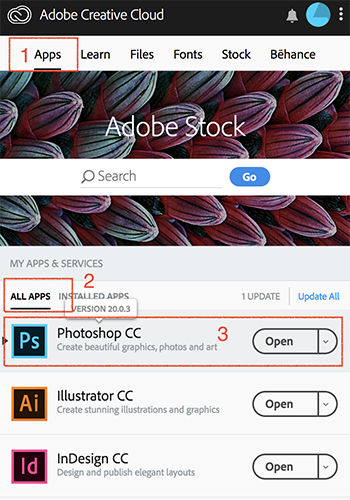
Select Apps and under Installed Apps, open Adobe Photoshop CC.
Figure 13: Creative Cloud Apps
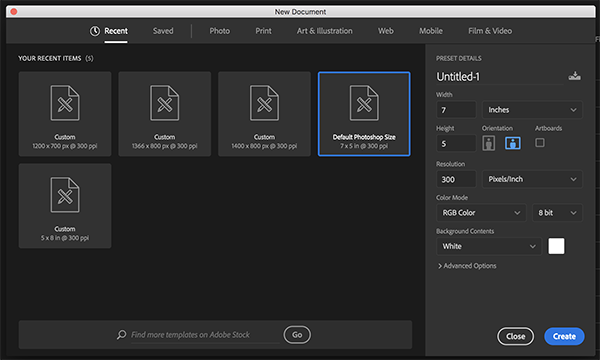
Open a new photoshop file, select default photoshop size and then click Create.
Figure 14: Photoshop New File
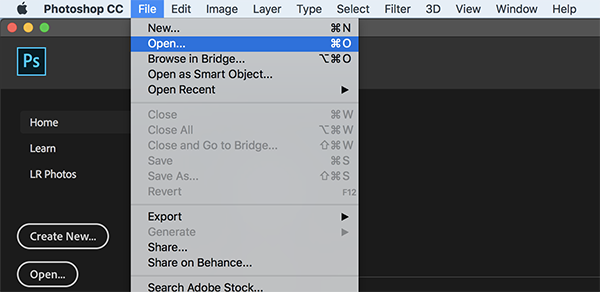
Figure 15: Photoshop File Size
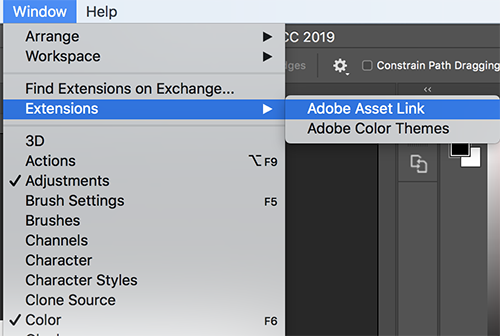
From the top toolbar, select Window > Extension > Adobe Asset Link
Figure 16: Adobe Asset Link - Extension
You can notice the Adobe Asset Link In-App panel that gets displayed within Adobe Photoshop
Figure 17: Adobe Asset Link - In-App Panel
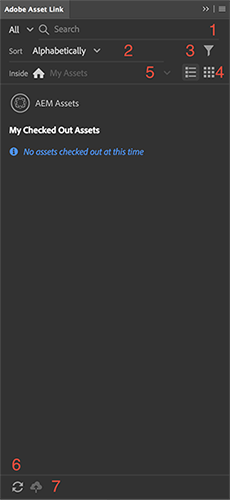
Quickly search AEM Assets within Adobe Asset Link In-App panel
Sort AEM Assets using the following options:
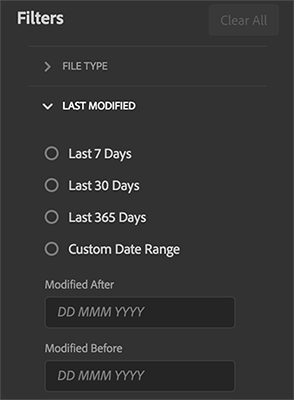
Filter assets
Figure 18: In-App Panel - Filter
View options
Current AEM Assets folder
Refresh Content
Upload asset to AEM Assets
AEM Asset Check Out / Modify / Check In - using In-App Panel
Click on ![]() icon to open AEM Assets and then select Collections
icon to open AEM Assets and then select Collections
You can notice the Summer SkateFest 2019 Collection created by a marketer in the previous lesson. 3. Open Summer_skatefest 2019 collection folder and view the list of options (![]() ) available for an asset.
) available for an asset.
Figure 19: File Options

Select the file Check Out option and you can notice the file open in Photoshop.
Figure 20: Check Out
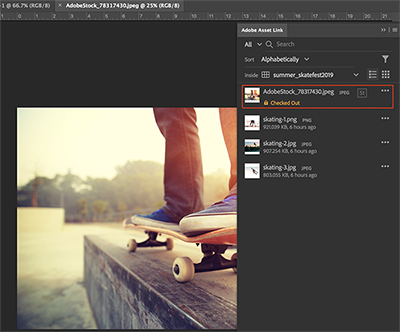
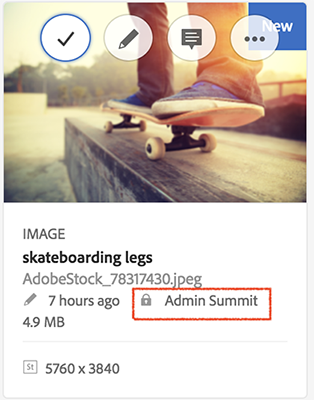
Note the file status is now changed to Checked Out. This asset will be no longer be available to other AEM Asset users or creatives for any changes. The asset is currently locked by the user who checked out the file.
Navigate to AEM Assets Collections and view the file properties. You can notice the lock icon on the asset card and name of the user who has checked out the asset.
Figure 22: Check Out Card View
Adobe Creative Cloud creates a local copy of the asset on your local machine when you check out an asset, and it can be found in the following directory.
Figure 23 : Check Out - Local machine
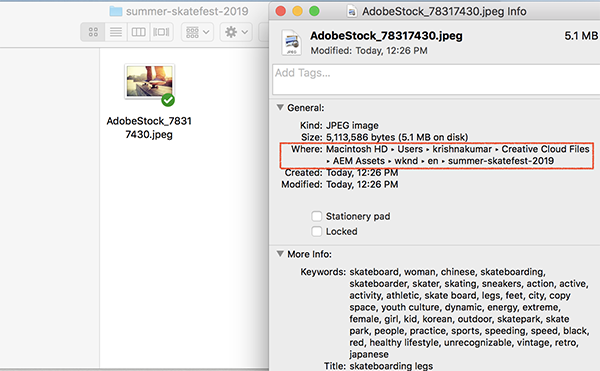
After checkout, the file will also be synced to the Creative Cloud which allows creatives to collaborate independently of AEM Assets. You can log into https://assets.adobe.com/files and find your checked out asset.
Switch to Adobe Photoshop and let us make some changes to our checked out file
From the Photoshop top toolbar, make the following edits to your checked out asset :
From the Asset Link panel, select the file options (![]() ) and then click Check-In.
) and then click Check-In.
Optionally, you can provide a comment for your edits and then click Check-In
Notice the asset lock release for the file upon successful Check In.
Click on the file options (![]() ) and select File Details
) and select File Details
Figure 24: File Details Versions
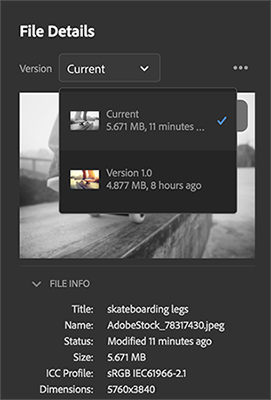
Select the version dropdown, and you can see the list of all versions for this file and then close the window.
Switch to your AEM Assets window and refresh your screen to notice the recently checked in asset changes.
Open the file and select the timeline option from the top left corner to view the version history and comments.
Figure 25: File Details Timeline
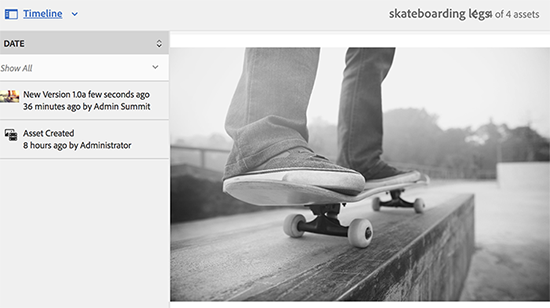
Select the version submitted by the creative, and you can notice a handle towards the right side of the image.
Figure 26: File Difference Review

Drag the handle to the left side, and you can notice the difference between the current version and the previous version
Figure 27 : File Difference Review

Close file view window and switch back to Photoshop.
Use AEM Assets with InDesign and Adobe Asset Link
From your Creative Cloud Desktop application launch Adobe InDesign
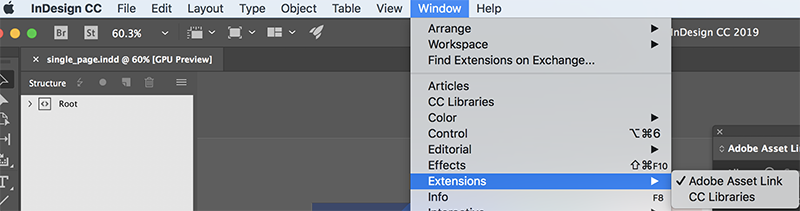
From the top toolbar, select Window > Extension > Adobe Asset Link
Figure 28: Adobe Asset Link - Extension
From the In-App panel, select AEM Assets > Templates > WKND Site Brochures
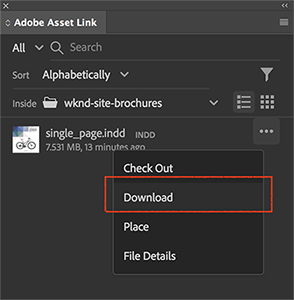
Click on the single_page.indd file options (![]() ) and select Download
) and select Download
Figure 29: Adobe Asset Link - Download
A single_page.indd file should now be open as a new document in your InDesign application.
Select the mountain bike image on the InDesign file
Navigate to AEM Asset Collections folder within the in-app panel and open the Skate Fest folder
Click on the asset file options (![]() ) and select Place
) and select Place
Figure 30: Adobe Asset Link - Place

Place option would add the asset to your canvas. In our case, it would replace the Mountain Bike image with the Adobe Stock asset from AEM Assets
Save your changes by pressing Cmd+S or File > Save
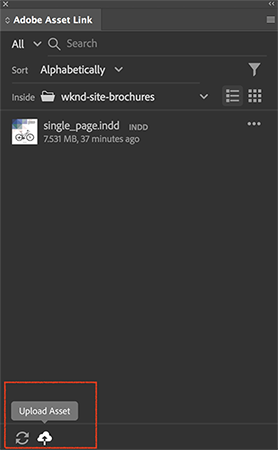
From the In-App panel, select AEM Assets > Templates > WKND Site Brochures
From the Asset Link panel, click on the upload option
Figure 31: Adobe Asset Link - Upload
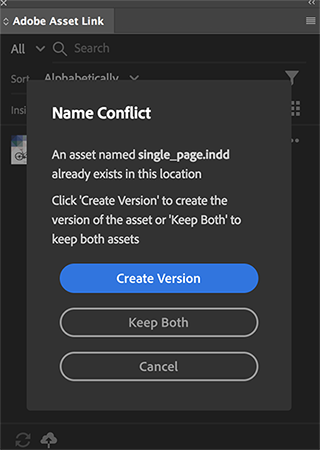
Click Upload and create a new version for the InDesign file.
Figure 32: Adobe Asset Link - Upload
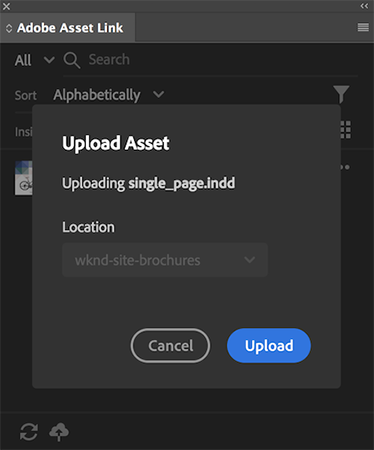
Figure 33: Adobe Asset Link - Create Variation
In the previous lesson, as a creative, you were able to review the assets and make necessary modifications using your favorite Creative Cloud Application. In this lesson, you would be playing the role of a marketer who would be reviewing the changes made by a creative user and use these assets to author WKND site home page and then finally push your changes live.
Edit WKND Site Home Page
Open your browser and navigate to your local AEM instance
Navigate to Sites > WKND Site > Home
Select the WKND Home page and open to edit it.
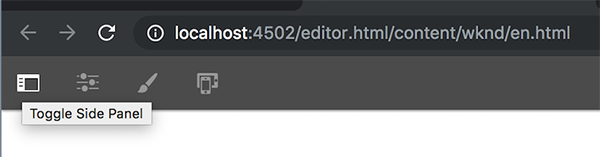
Make sure the page is in edit mode and from the top left corner click on the toggle side panel option.
Figure 34: Adobe Asset Link - Create Variation
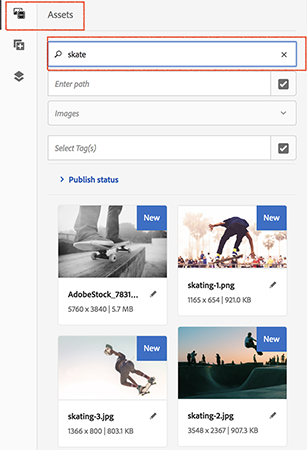
Click on the asset finder option and then search for skate images.
Figure 35: Asset Search - Skate
Click on the Carousel component and then under the panel list options choose the 1st panel and you can notice the Mountain Biking Panel under Teaser 1
Figure 36: Teaser Panel
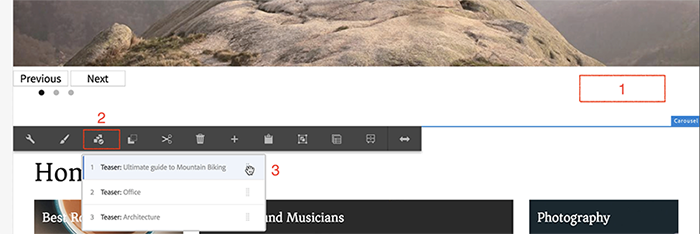
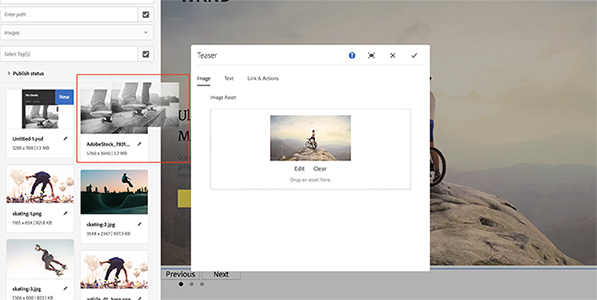
Select Teaser 1 and click Configure to change the banner image.
Figure 37: Teaser 1 - Mountain Biking
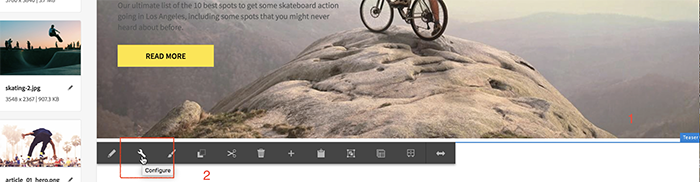
Drag-drop the Adobe Stock image from the asset finder onto the teaser component to replace the image.
Figure 38: Teaser 1 - Skate Image Replcaement
Under the text tab, provide the following details
Under Link and Actions, change the content path to: * Content path : /content/wknd/en/Events/la-skate-seashores
Repeat steps 6-9 for Teaser 2 and Teaser 3 and use the details below:
Teaser 2
Teaser 3:
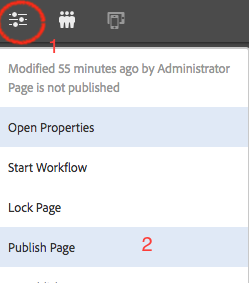
Click Preview to view your changes before we publish it live
If everything looks good, click on the page information icon and publish your changes
Figure 39: Page Publish
Open a new tab and navigate to http://localhost:4503/content/wkdn/us/en.html to view your changes pushed live
Quick Summary and Review
If you’re a creative, you don’t want to have to learn a digital asset management (DAM) platform to access and edit your work. If you’re a marketer, you shouldn’t have to understand the ins and outs of Photoshop to leave feedback. No matter your role on the team, the more time you spend trying to understand a new platform, the less time you have to create meaningful content for your customers.
If you are a marketer, you always want to use appealing creative assets for your marketing campaigns, ads, websites, etc. Adobe Experience Manager Assets offers an excellent platform for storing, searching and managing assets within AEM for your marketing needs. Another great place where a marketer can look for stunning options is Adobe Stock – which provides access to millions of high-quality, royalty-free photos, vectors, illustrations, videos, templates, and 3D assets.
Adobe Experience Manager Assets meets you where you are. Whether you’re a marketer looking to provide comments on an asset, or a creative trying to make requested changes quickly, Adobe asset link helps you optimize your workflow with the only native connection to Creative Cloud on the market today. Instead of having to manage yet another bulky integration, use single sign-on with your Creative Cloud account credentials to access DAM and Creative Cloud assets directly in Photoshop CC, Illustrator CC, and InDesign CC. From there, it’s easy to check out files, automatically version the asset, and have changes integrated into the DAM. The workspace makes it simple for your team to collaborate and deliver compelling digital experiences.
Using the additional resources below, try to integrate Creative Cloud applications with AEM Assets and implement the use cases we discussed in this lab