Machine learning and data science are reshaping how digital asset management systems operate by improving productivity and reducing time to market, while also generating new insights for marketers and content managers. With Adobe Experience Manager rapidly adopting these futuristic technologies and offering newer features, it is important for the users to discover how these advancements within AEM Assets can be incorporated in the current processes & workflows.
This lab aims to help you with the practical steps to leverage the advanced capabilities of AEM such as Smart Tagging to enrich your assets and derive more value out of them. You will also uncover best practices around enhancing the efficacy of search using features such as Visual search as well as Custom Smart Tags that help you contextualize auto-tagging to your business needs. Further, the lab will demonstrate how you can extend the reach of assets to more regions, channels and users by employing translation service in the most critical user action such as asset search.
Following are the key learnings that you will be able to take away after completing this lab:
In this lab guide, we will use the following conventions:
For access to any of the AEM environments, you need credentials. You will use the following user/password combination to login to AEM:
User: admin
Password: admin
For any references to lab credentials or a log in state of the exercises below, use the credentials given above.
|
|---|
|
|
|
Understand how Artificial Intelligence can help automate tagging and enhance discoverability of assets
Explore improve relevance of assets and efficacy of search through tag moderation capability
When you are dealing with large volumes of assets, improper and inconsistent metadata/tags for the assets can be a huge problem. This makes it extremely hard to discover these “dark assets” later for use, thus increasing time to market significantly due to inefficiencies getting introduced.
Smart Tagging feature in AEM comes to rescue here by automatically identifying the relevant tags applicable to the assets using AI and allowing the marketer to manage these tags and enhance the discoverability of these assets.
In this lesson, we will leverage smart tagging to automatically tag assets that are uploaded into a particular folder and further learn how to moderate and curate the suggested tags
The following exercises will help you understand how to leverage the Smart Tagging capabilities of AEM. The exercises below assume that you are logged into AEM as described in Lab Credentials section on Page 3 above.
With all the configurations in place, the authors can designate specific folders in which the assets are expected to be automatically tagged. The following steps show how to create such a folder in AEM.
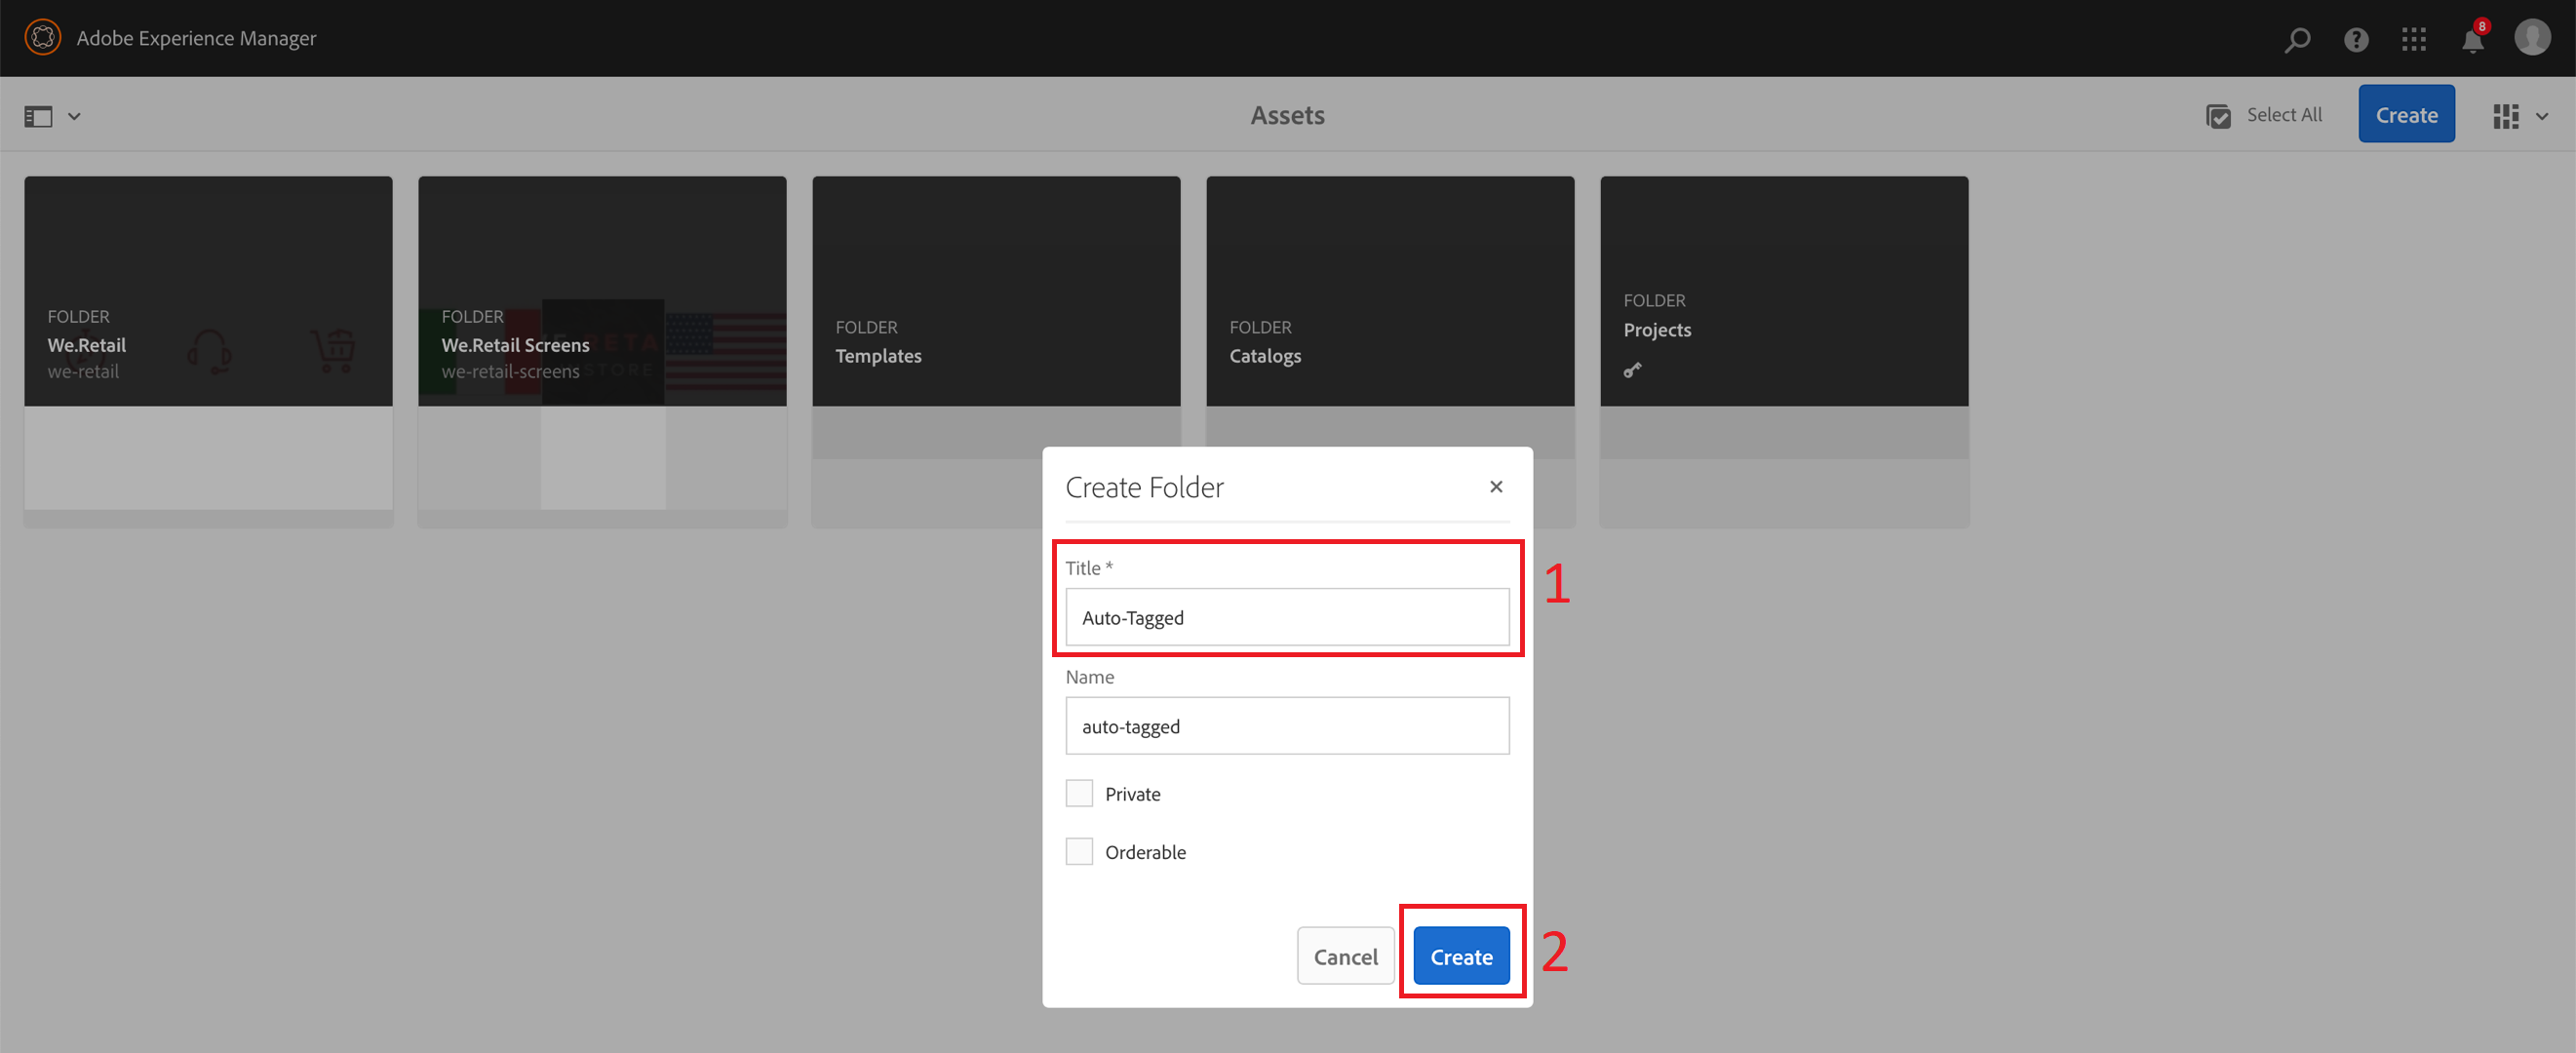
Step1: Create a new folder
Having logged into AEM, go to the following location in your local AEM instance: http://localhost:4502/assets.html/content/dam
Click on Create button on the top right corner
Select Folder in the fly-out menu
Provide the Title for the new folder as Auto-Tagged
Click on the Create button to create the new folder
Step2: Enable Smart Tagging on the new folder
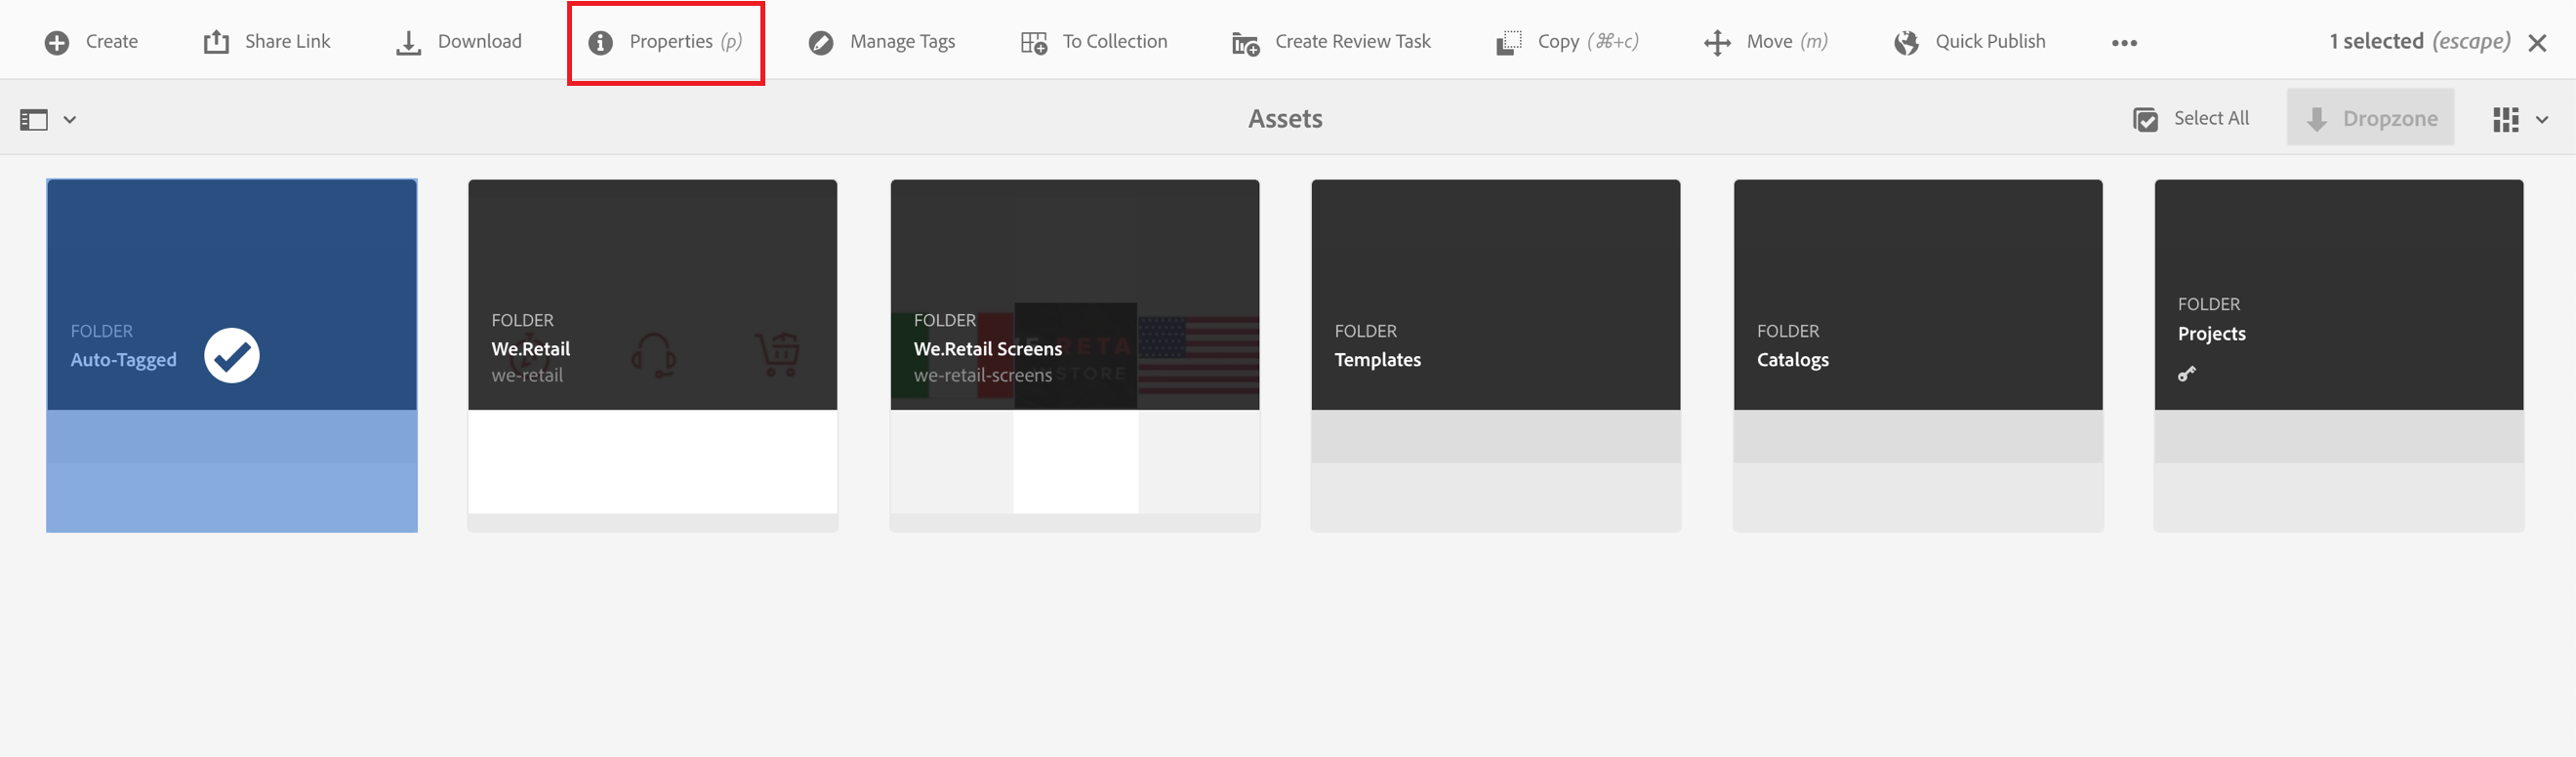
Select the Auto-Tagged folder by hovering over the folder name and selecting the check mark icon
Click on the Properties link in the top menu bar to open the folder properties
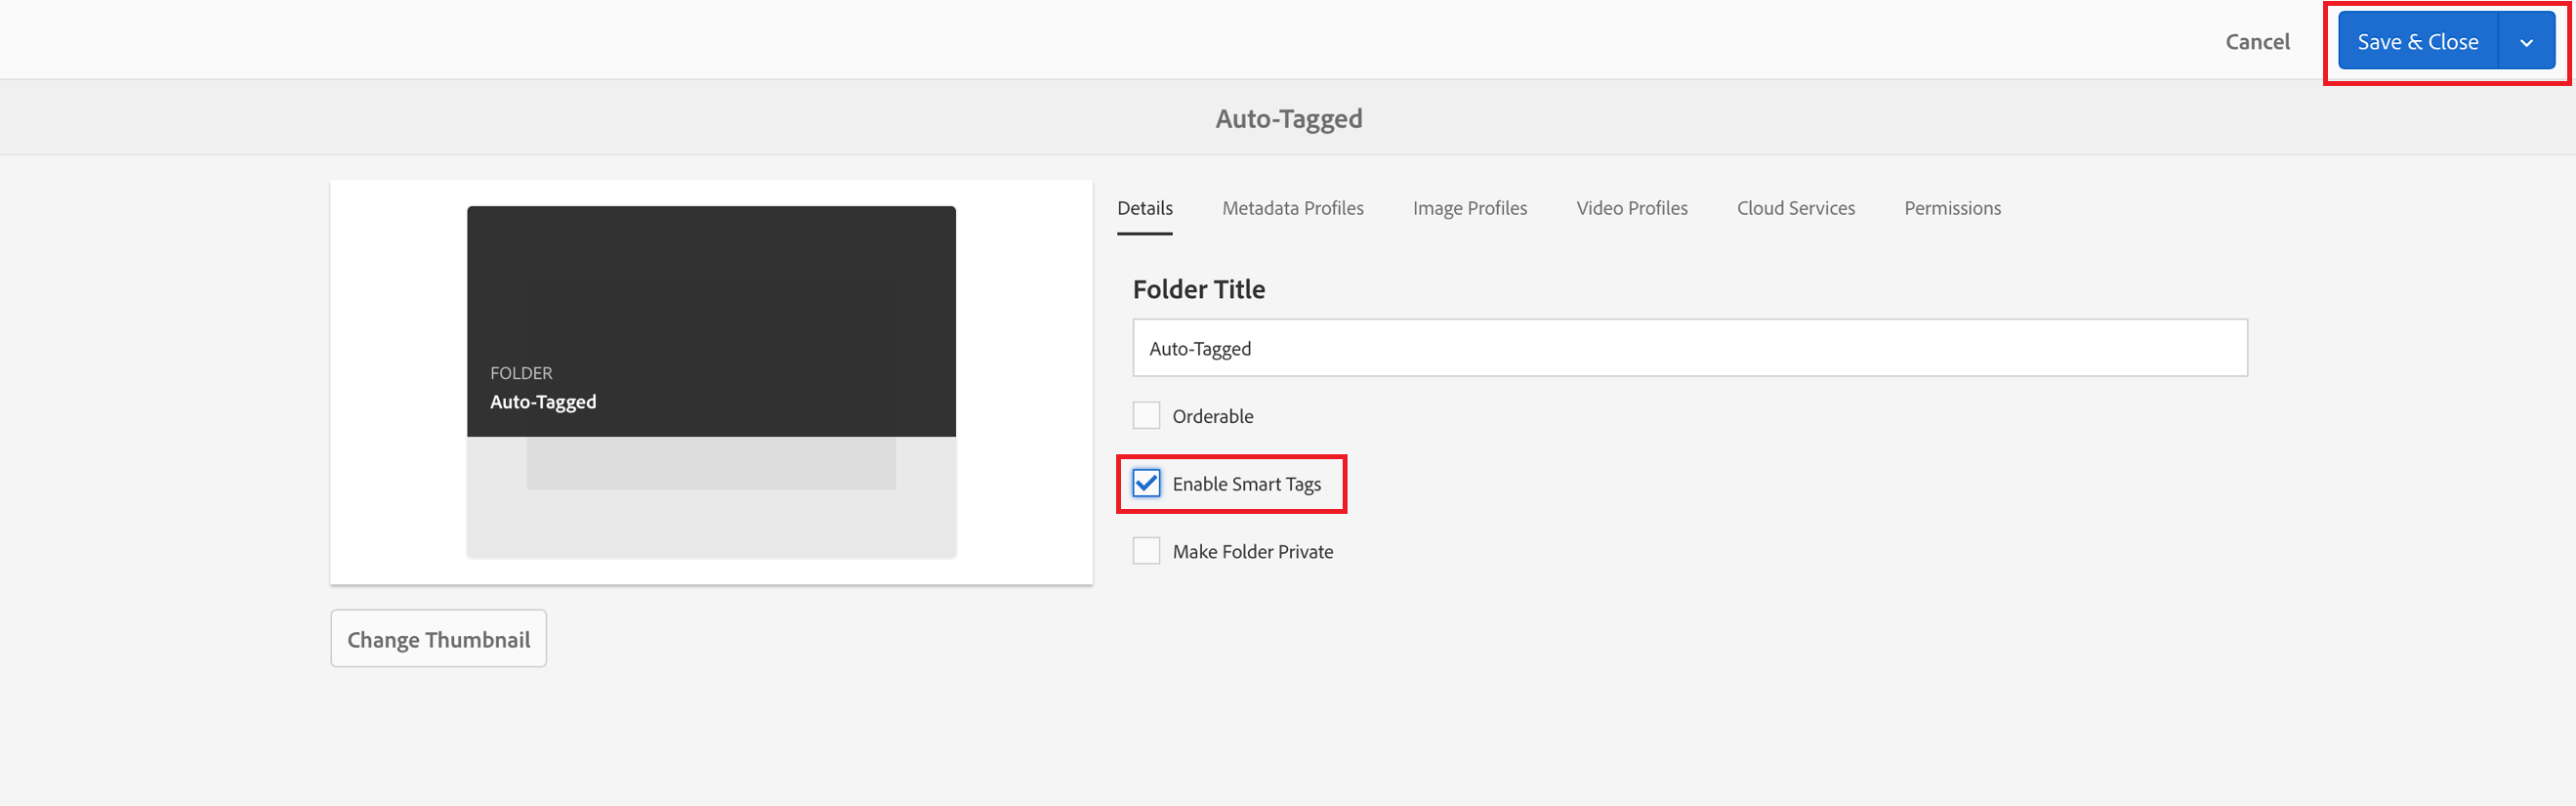
With these steps, you have setup the Auto-Tagged folder to automatically tag any assets that are placed in this folder.
With the folder enabled for auto-tagging, it is now time to upload the assets that we want tagged, into this folder.
Step 1: Go into the folder
Step 2: Open the folder on the desktop that contain the assets
Open Finder on the desktop
Navigate to Desktop > Assets > Lesson 1 > Auto-Tagged folder

Step 3: Pull all the assets from the folder into AEM
Select all the files in that folder
Drag-&-drop them onto the AEM window in the browser
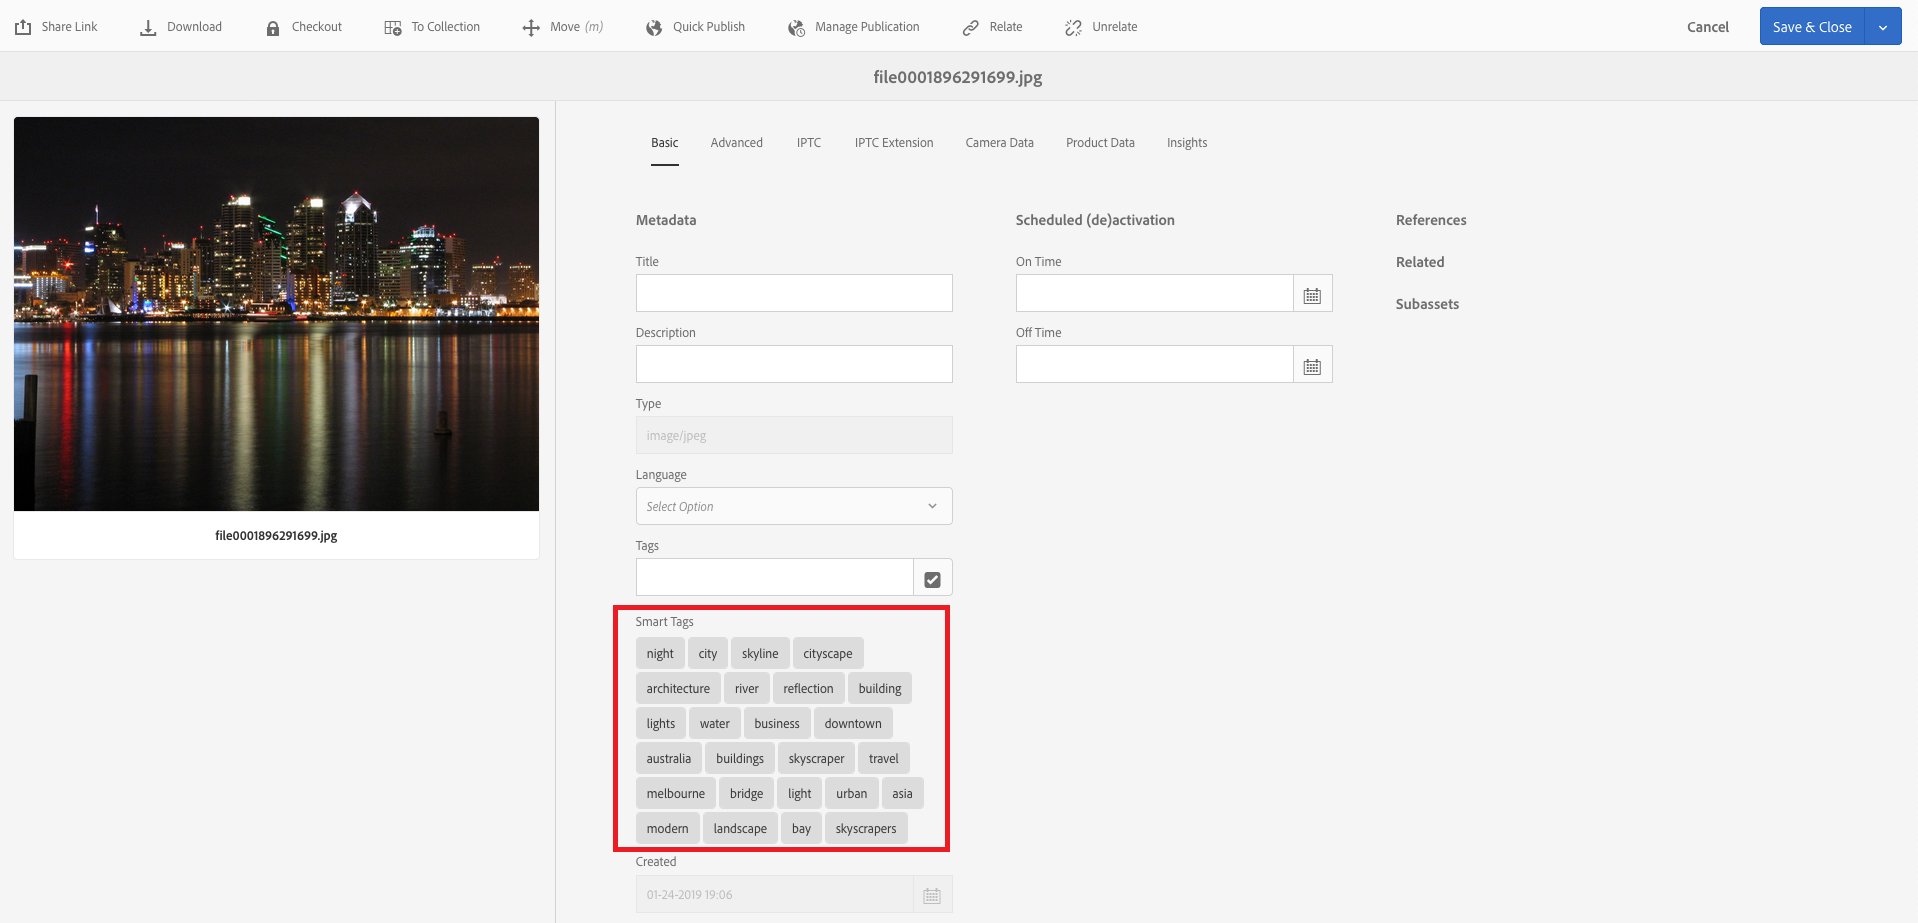
Step 4: View the asset properties to see the applied tags
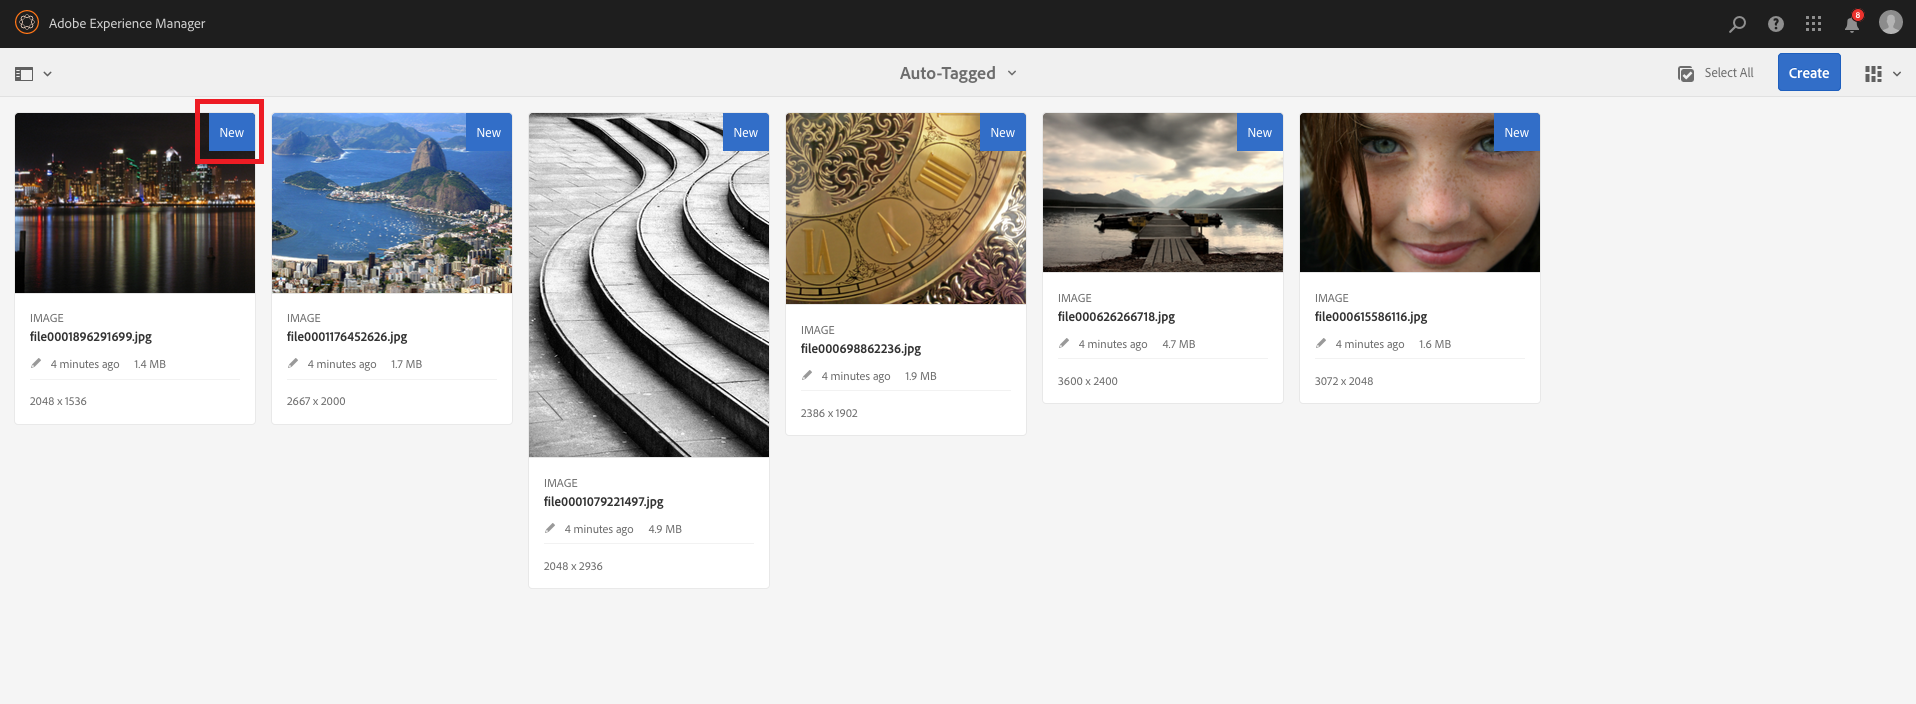
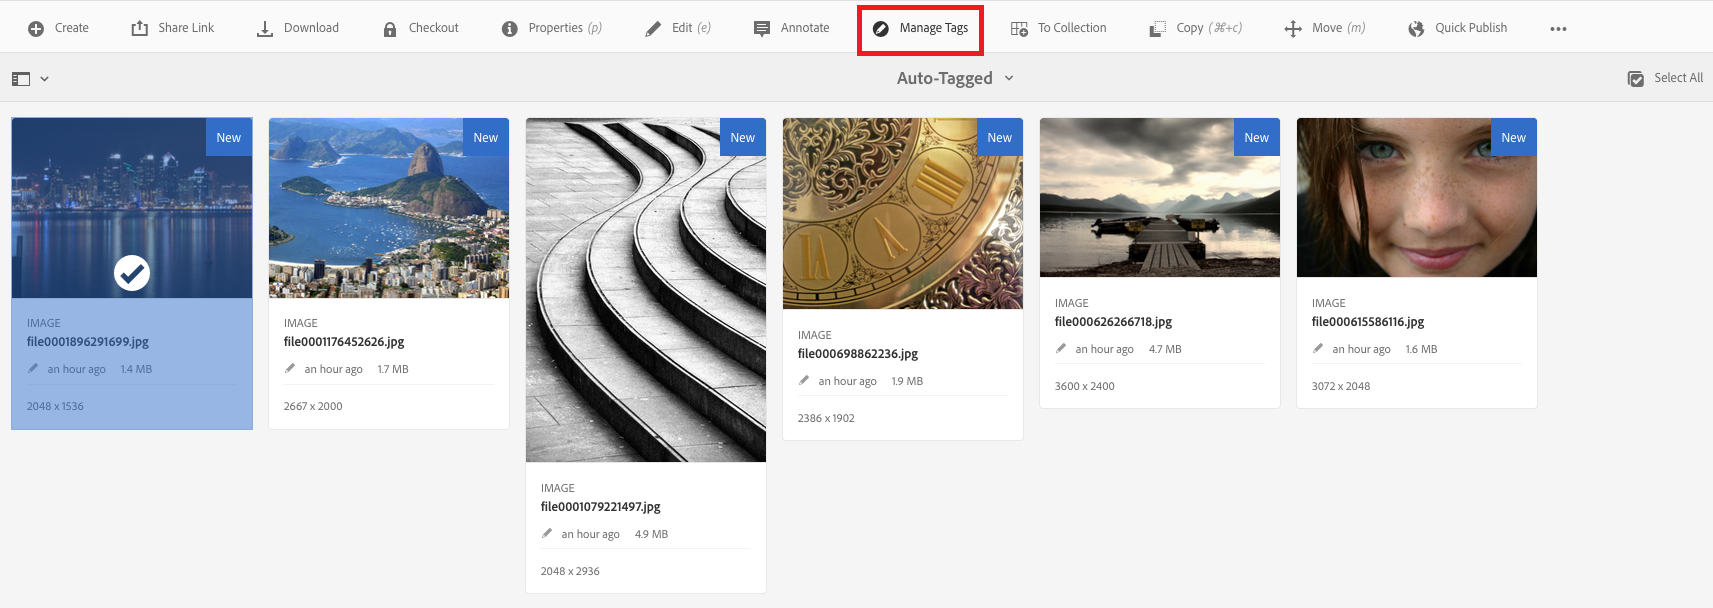
Wait for the processing of the assets to be completed which may take 1-2 minutes, then refresh the page
Once the processing is done, all the assets are shown with a New label on the right corner
 |
Auto-tagging assets using workflows There is an alternate way to auto-tag assets on demand instead of doing it on upload into AEM. This method is using the Smart tagging workflow. Following are the steps to be followed for it:
Once the workflow completes by running in the background, the selected assets would have been auto-tagged by the Smart Tagging service |
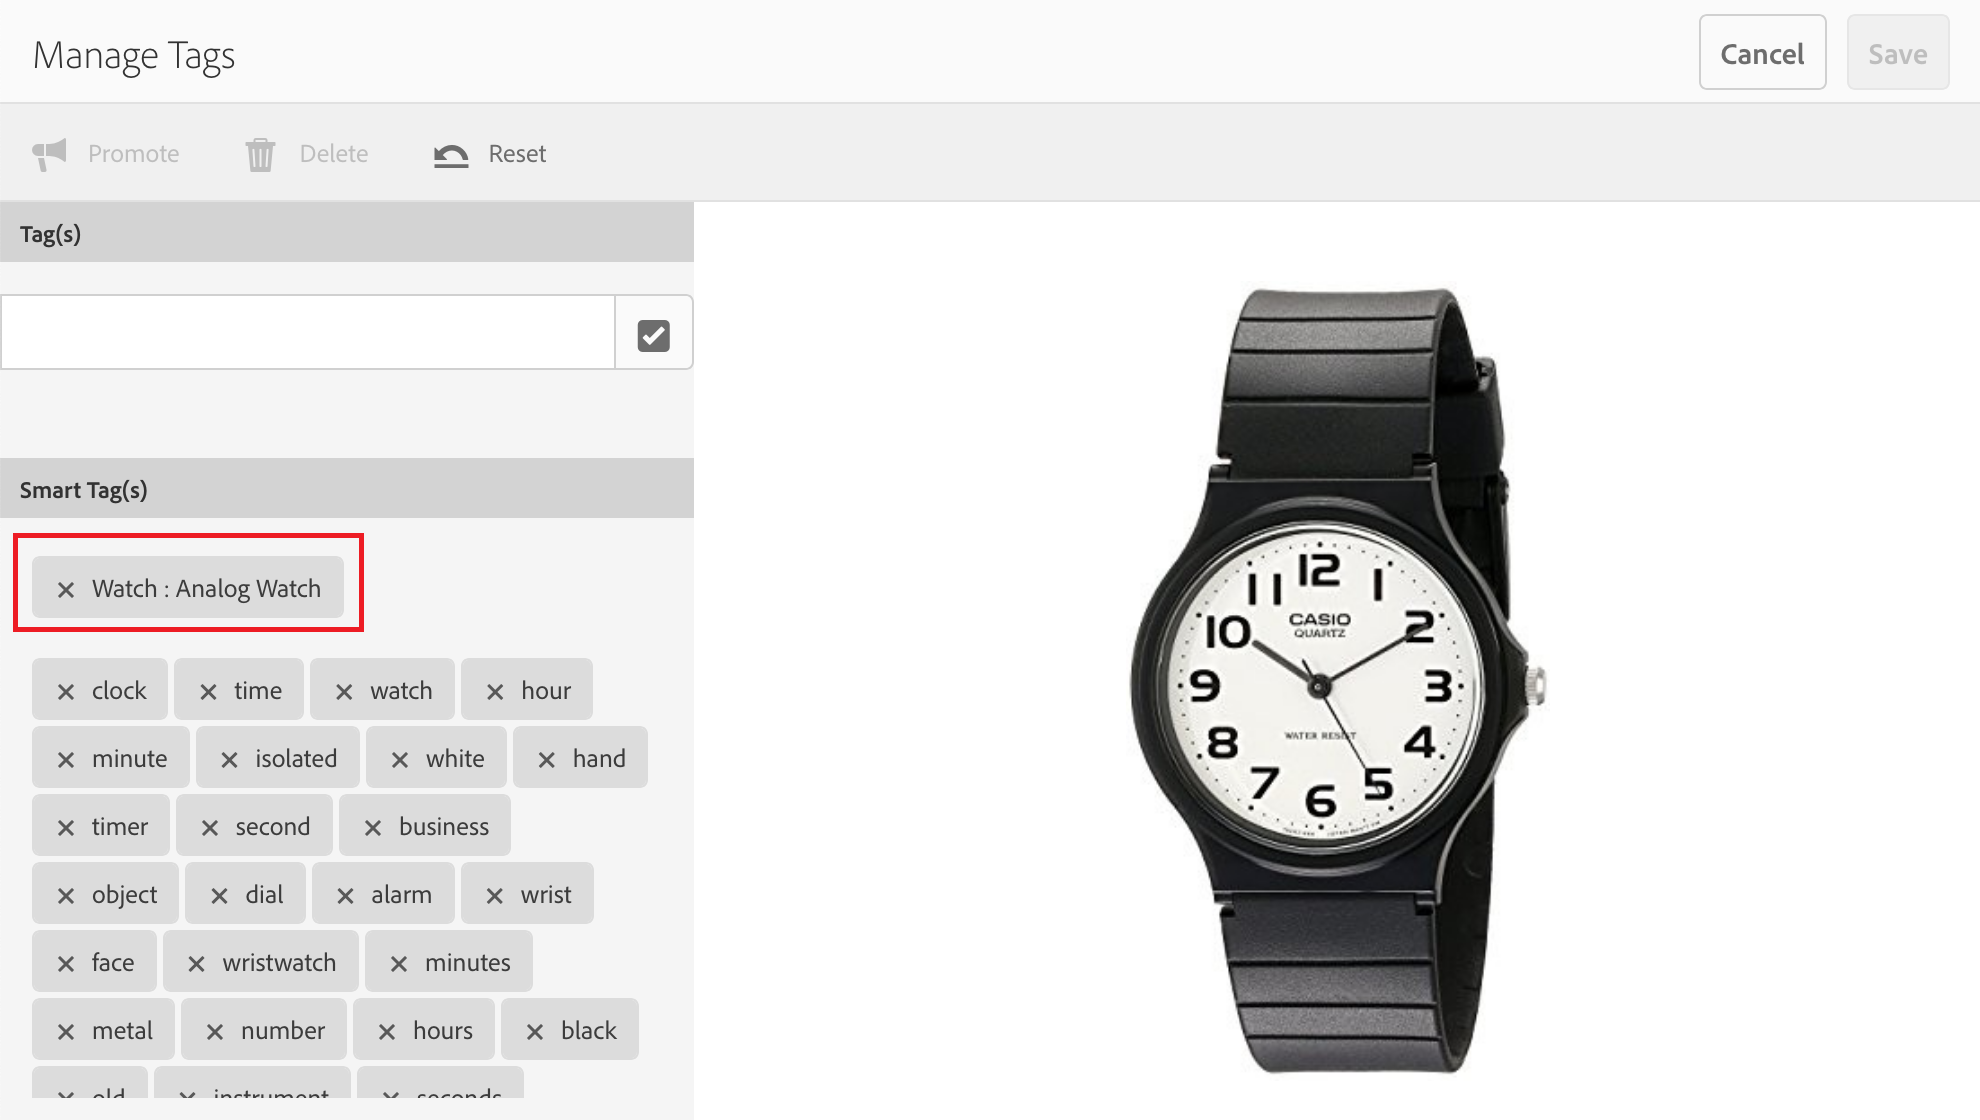
While the AI algorithm does a great job of suggesting many relevant tags, the control is finally in the hands of the user to curate and refine the suggested tags further to boost the search-ability of these images that are auto-tagged by the algorithm.
In this exercise, we will look at how to moderate the tags on the assets in AEM
Step 1: Select folder or image for which tags need to be moderated
While remaining logged in, go to the Auto-Tagged folder created earlier: http://localhost:4502/assets.html/content/dam/auto-tagged
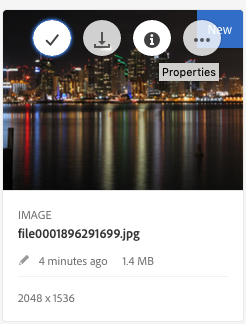
Select any asset by hovering over and clicking on the check mark
Click on Manage Tags from the menu bar at the top of the screen
Step 2: Purge the unwanted tags that are not relevant to the asset
In the tag moderation screen, select the tags that are not relevant to the image, by clicking on them. For example, in the image below, consider the following tags are not relevant and select them by clicking on them
Once selected, click on Delete button on the top left part of the screen to remove these tags from the image
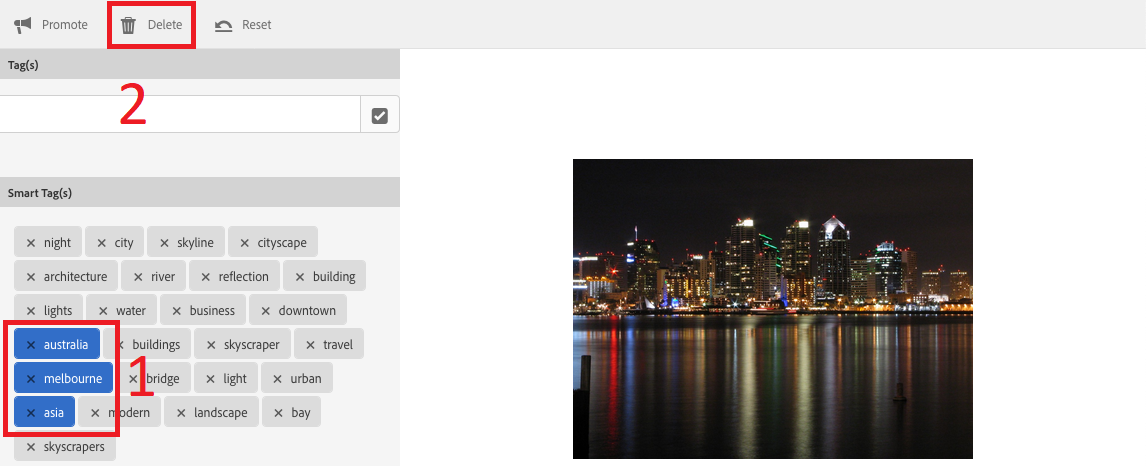
Step 3: Promote the relevant tags
We also want to indicate a higher priority to some of the more relevant tags by promoting them. We do this by selecting the relevant tags and clicking on the Promote button on the top menu bar. In this example asset, let us promote the following tags:
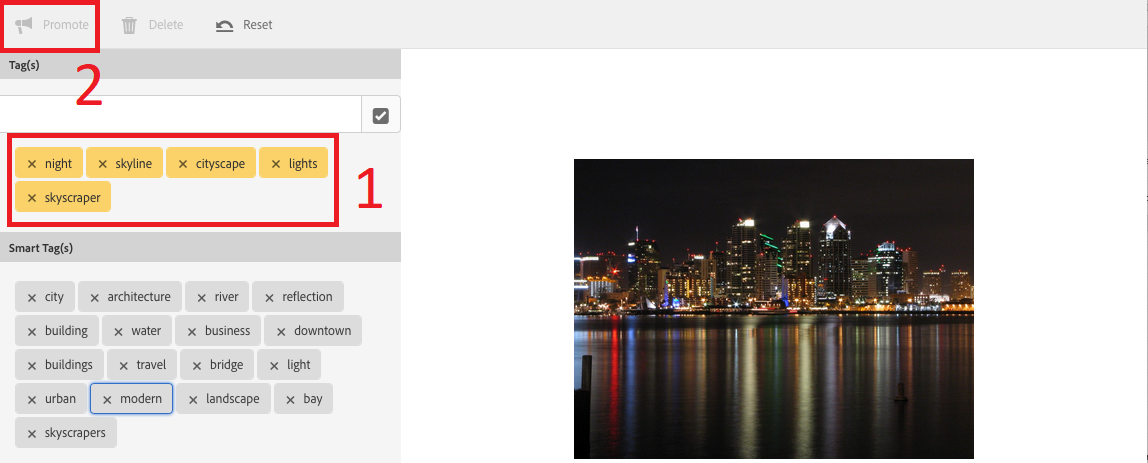
Finally click on Save button to save the changes done to the tags for the image
The Tag moderation screen allows you to switch between multiple assets of that folder and perform similar moderation on all the assets
With these steps, you have curated the auto-suggested tags to suit your assets while promoting the more relevant tags to boost the search-ability of these images greatly
By running the assets through the auto-tagging process, we have brought out the ‘dark assets’ to the surface with appropriate metadata information applied on them. In this exercise, let us see the effects that auto-tagging and tag moderation processes have on the search experience for the users
Step 1: Navigate to the Assets folder in AEM
|
Quick Tip: The Power of Omni-Search Omni-search is the global search form available in the header section of AEM across all the pages. Omni-search allows you to quickly search within specific locations of AEM. For example, if you enter location a suggested list of applications will appear. Select one and any search you execute will only generate results from that particular section of AEM. Quick way to make results granular and relevant! You can open AEM Omni-search using either of the 2 options below
|
Step 2: Initiate a new search using one of the promoted tags
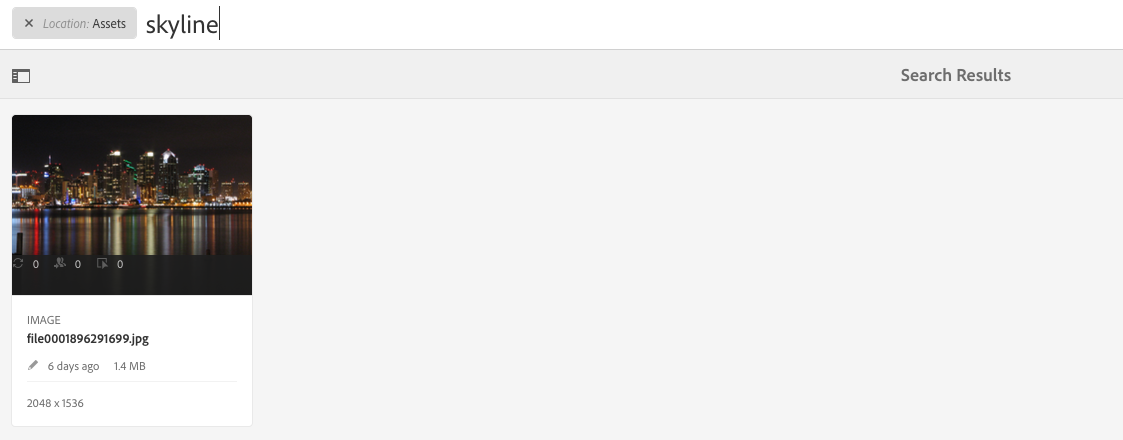
Click on the lens icon at the top right corner of the screen to open the Omnisearch
Enter the term skyline in the Omnisearch and hit enter
The search results page will bring up the same image that we had tagged earlier using the Smart Tagging service
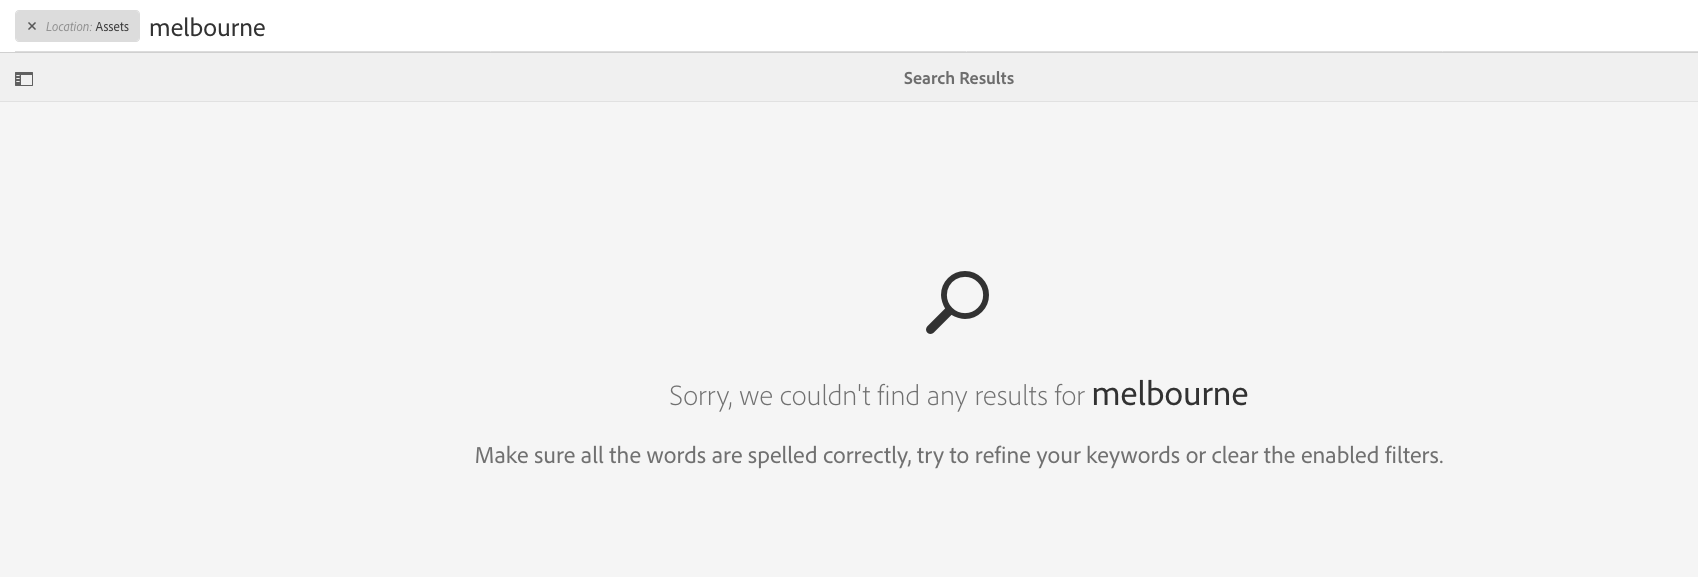
Step 3: Initiate a new search using one of the deleted tags
Click on the lens icon again to open the Omnisearch
Enter the term melbourne in the Omnisearch and hit enter
This time the search results page comes back empty
This exercise clearly demonstrates how the Tag management capabilities in AEM add value by making the assets more discoverable through the tags and also help in increasing the efficacy of the search through tag moderation.
|
Setting up Smart Tagging service on a new AEM instance
|
Understand how you can train the Smart Tagging service in AEM with your custom tags
Learn to apply the trained custom tags onto new assets ingested into AEM
Enterprises are increasingly relying on rich metadata associated with their digital assets. This metadata is often organized into a controlled vocabulary in the form of a Taxonomy. While the Smart Tagging capability provides a huge productivity boost for tagging the assets, these tags are based on natural language vocabularies. Tagging the assets based on a custom taxonomy that is specific to each business or domain will take the discoverability of the assets to a whole different level.
To facilitate such Enhanced tagging capabilities, AEM allows you to train the Smart Tags service to take into account your custom taxonomy based on a set of sample assets that are representative of the concepts prevalent in a business or domain. The Machine Learning capabilities of AEM Assets will learn from the training assets and taxonomies and further apply those custom tags to the new assets coming in, thus making them more relevant.
The exercises in this lesson will demonstrate the Enhanced Smart Tagging capabilities in AEM and lets you understand the process to be followed to train and use the service effectively.
To demonstrate the Enhanced Smart Tag capabilities, the following exercises assumes that we are dealing with assets related to different types of Watches. The exercise will show you how we can train the Smart Tagging service to differentiate between Analog and Digital watches using a set of training assets. Towards the end of the exercise, we will upload a mix of both types of images and check how the tagging service automatically applies appropriate tags to the assets.
In order to train the Smart Tagging service with your custom tags, you have to have a well-structured taxonomy of tags that effectively represents the concepts applicable to your business or domain. For this lab, a sample taxonomy has already been setup, that you can use for training the Smart Tagging service. This exercise walks you through the sample taxonomy structure, in preparation for the next exercises.
Step 1: Review the taxonomy
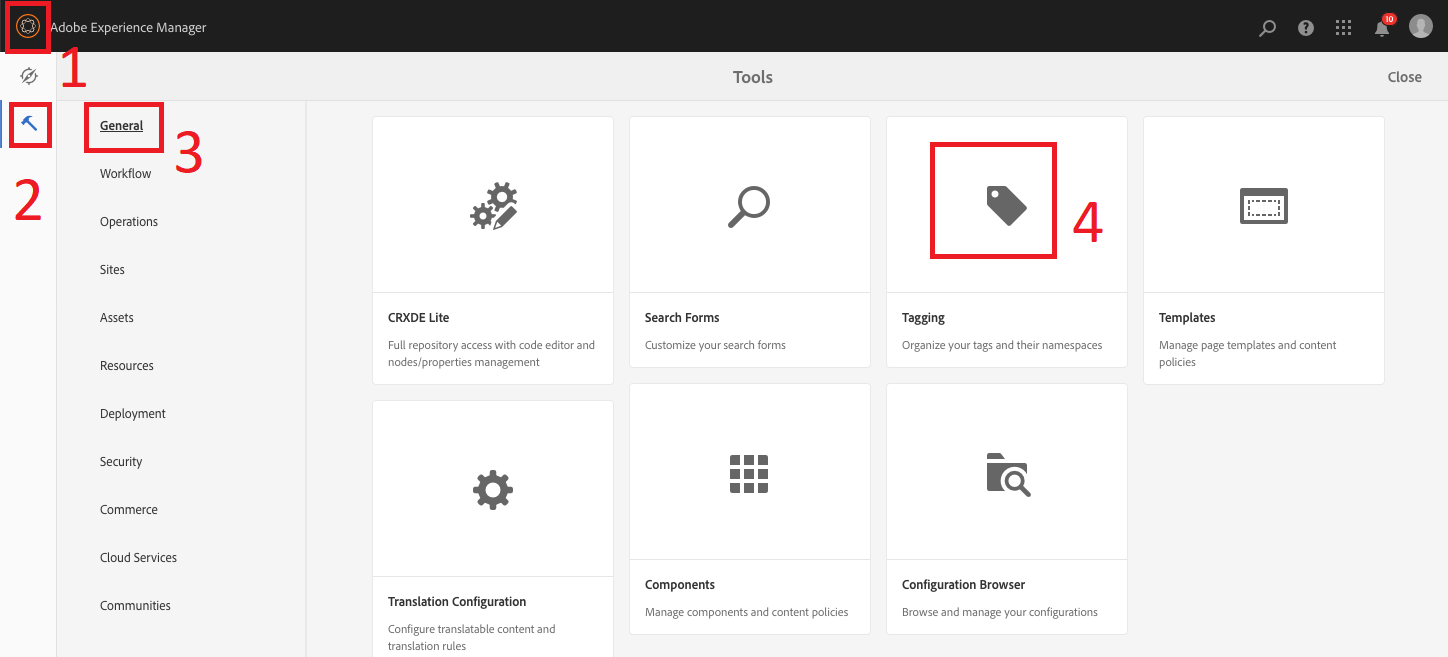
Open Global Navigation by clicking on the AEM Logo ( ) the upper left corner of the screen.
Select the Tools ( ) icon from the left railing. The right panel will default to General.
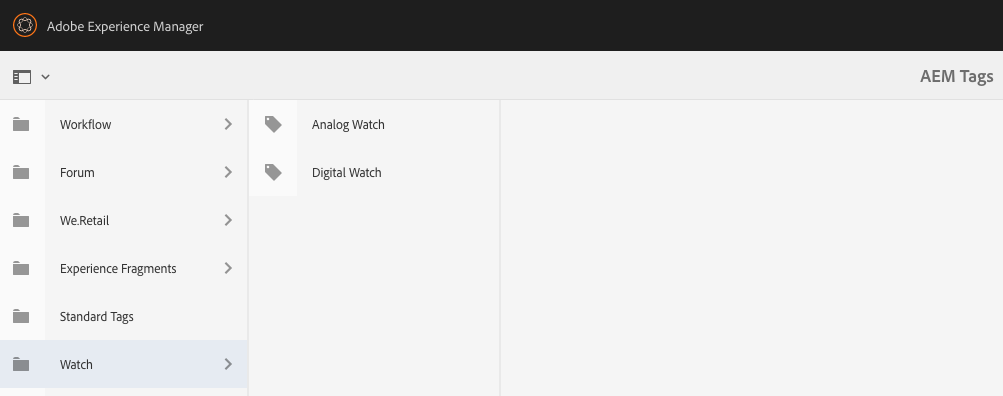
Navigate to the Tagging card on the right to open your Tag Manager console
Click on the Watch namespace in the left column to open the next level tags
You will notice that the taxonomy contains the following tags:
In the next exercises, you will be using these tags to train the Smart Tagging service.
With the custom taxonomy in place, it is time to setup sample assets that are required for training the Smart Tagging service with the custom tags. This is done by uploading a sample set of assets that are representative of the concepts or tags that you want the smart tagging service to learn. This exercise demonstrates the process to carry out such a training.
Step1: Create the folder structure in AEM for training
Having logged into AEM, go to the following location in your local AEM instance: http://localhost:4502/assets.html/content/dam
Click on Create button on the top right corner
Select Folder in the fly-out menu
Provide the Title for the new folder as Watches
Click on the Create button to create the new folder
Step2: Enable Smart Tagging on the new folder
Select the Watches folder by hovering over the folder name and selecting the check mark icon
Click on the Properties link in the top menu bar to open the folder properties
Check the Enable Smart Tags option and then click on Save & Close
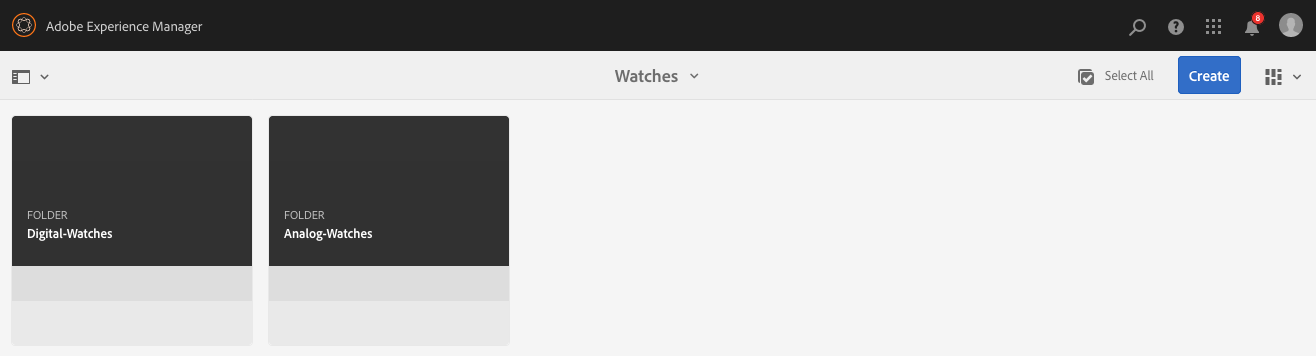
Step 3: Create the Sub-folders
Go into the Watches folder by clicking on the folder name
Follow the Steps 1 & 2 above to create two sub-folders within Watches folder, as per below structure:
Step 4: Upload the first set of sample assets for Analog Watches
Go into the Watches > Analog Watches folder in AEM by clicking on the folder name
Open Finder on the desktop
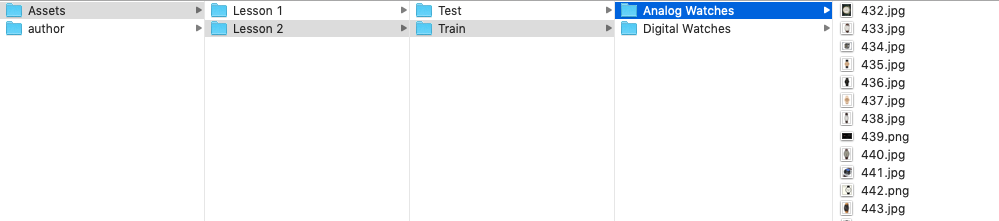
Navigate to Desktop > Assets > Lesson 2 > Train > Analog Watches folder
Select all the files in that folder
Drag-&-drop them onto the AEM window in the browser
Wait for the processing of the assets to be completed which may take 1-2 minutes, then refresh the page
Once the processing is done, all the assets are shown with a New label on the right corner
Step 5: Tag the assets with the custom tag for Analog Watches
Go into the Watches > Analog Watches folder in AEM
Click on Select All button on the top menu bar next to the Create button
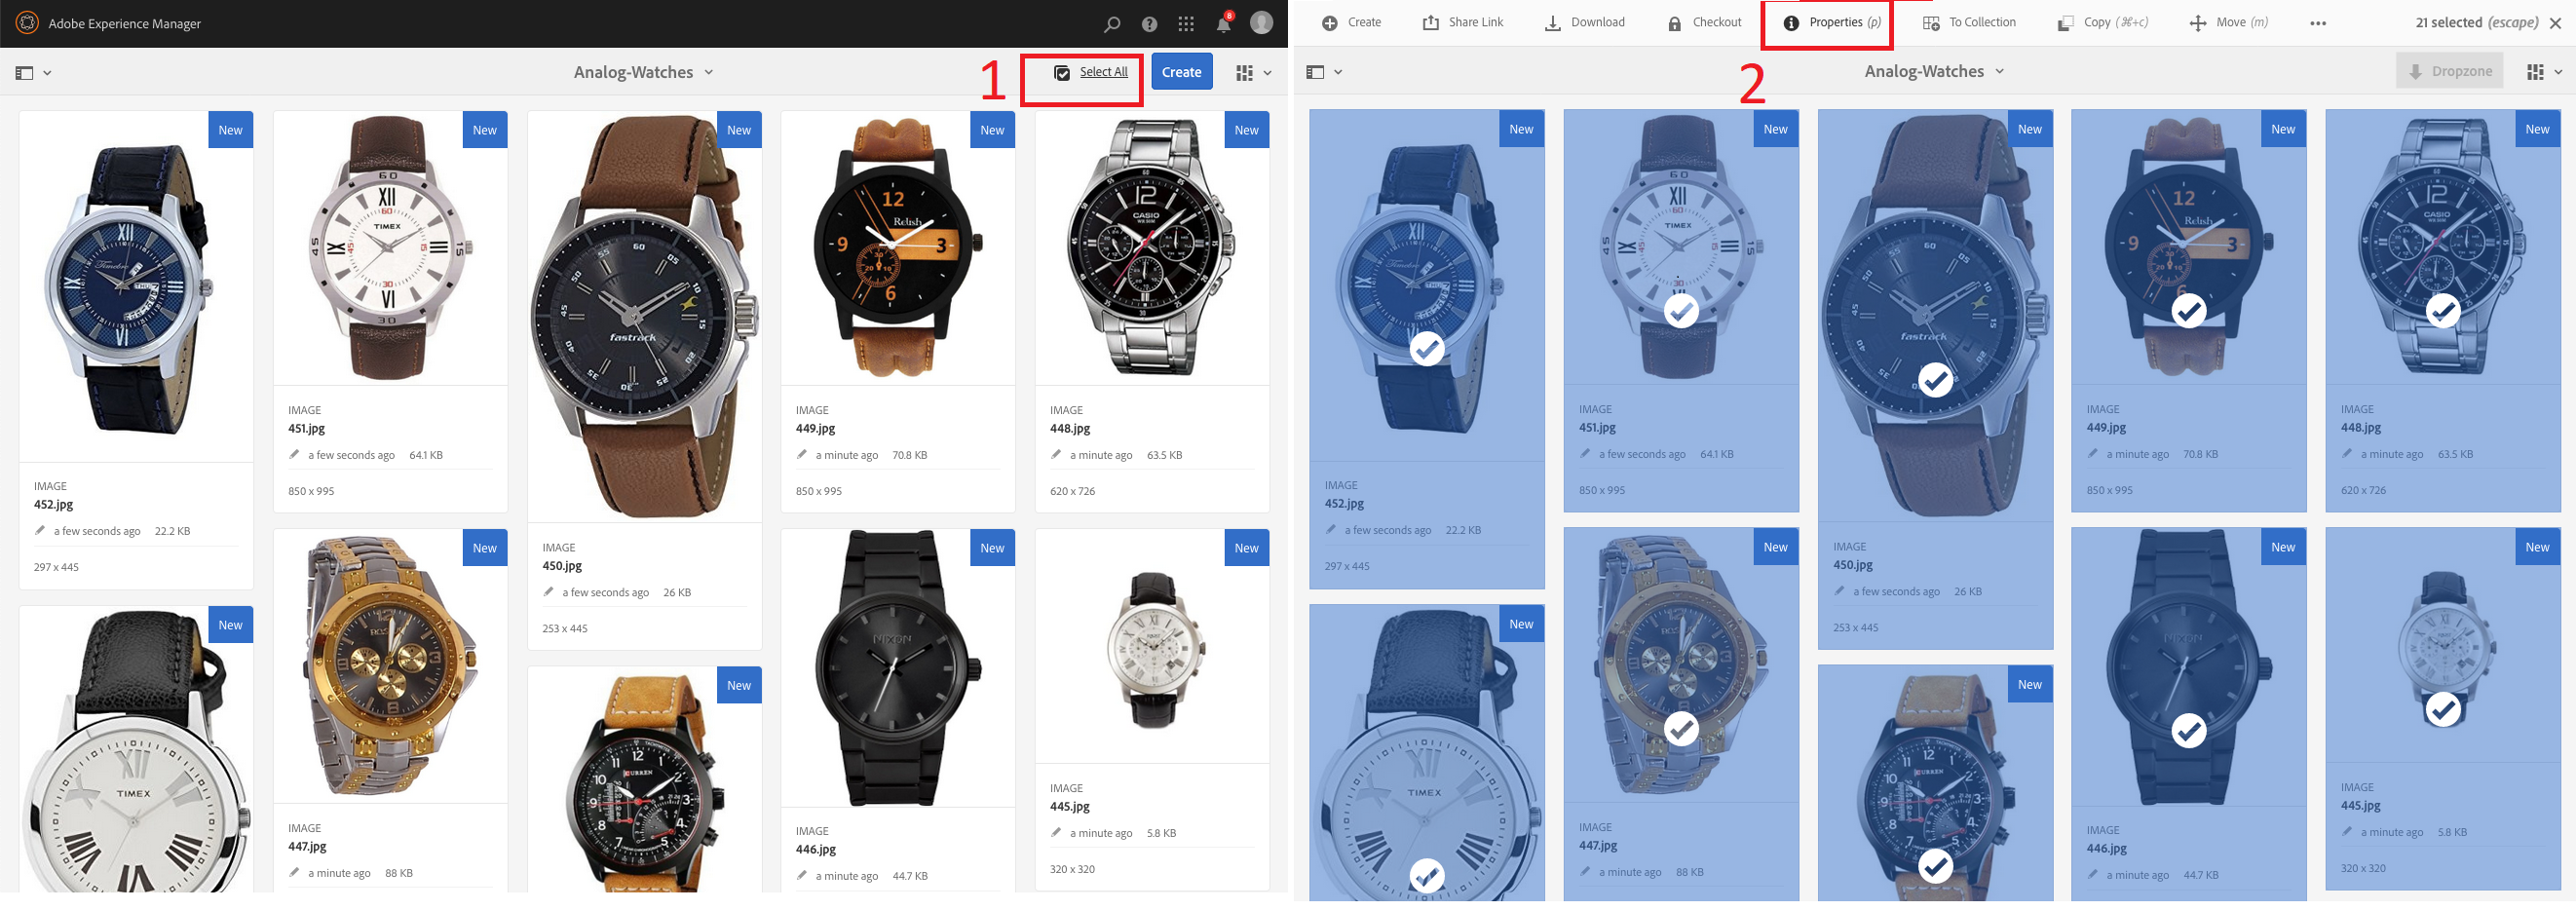
In the properties screen, open the Tag browser by clicking on the check mark under Tags section
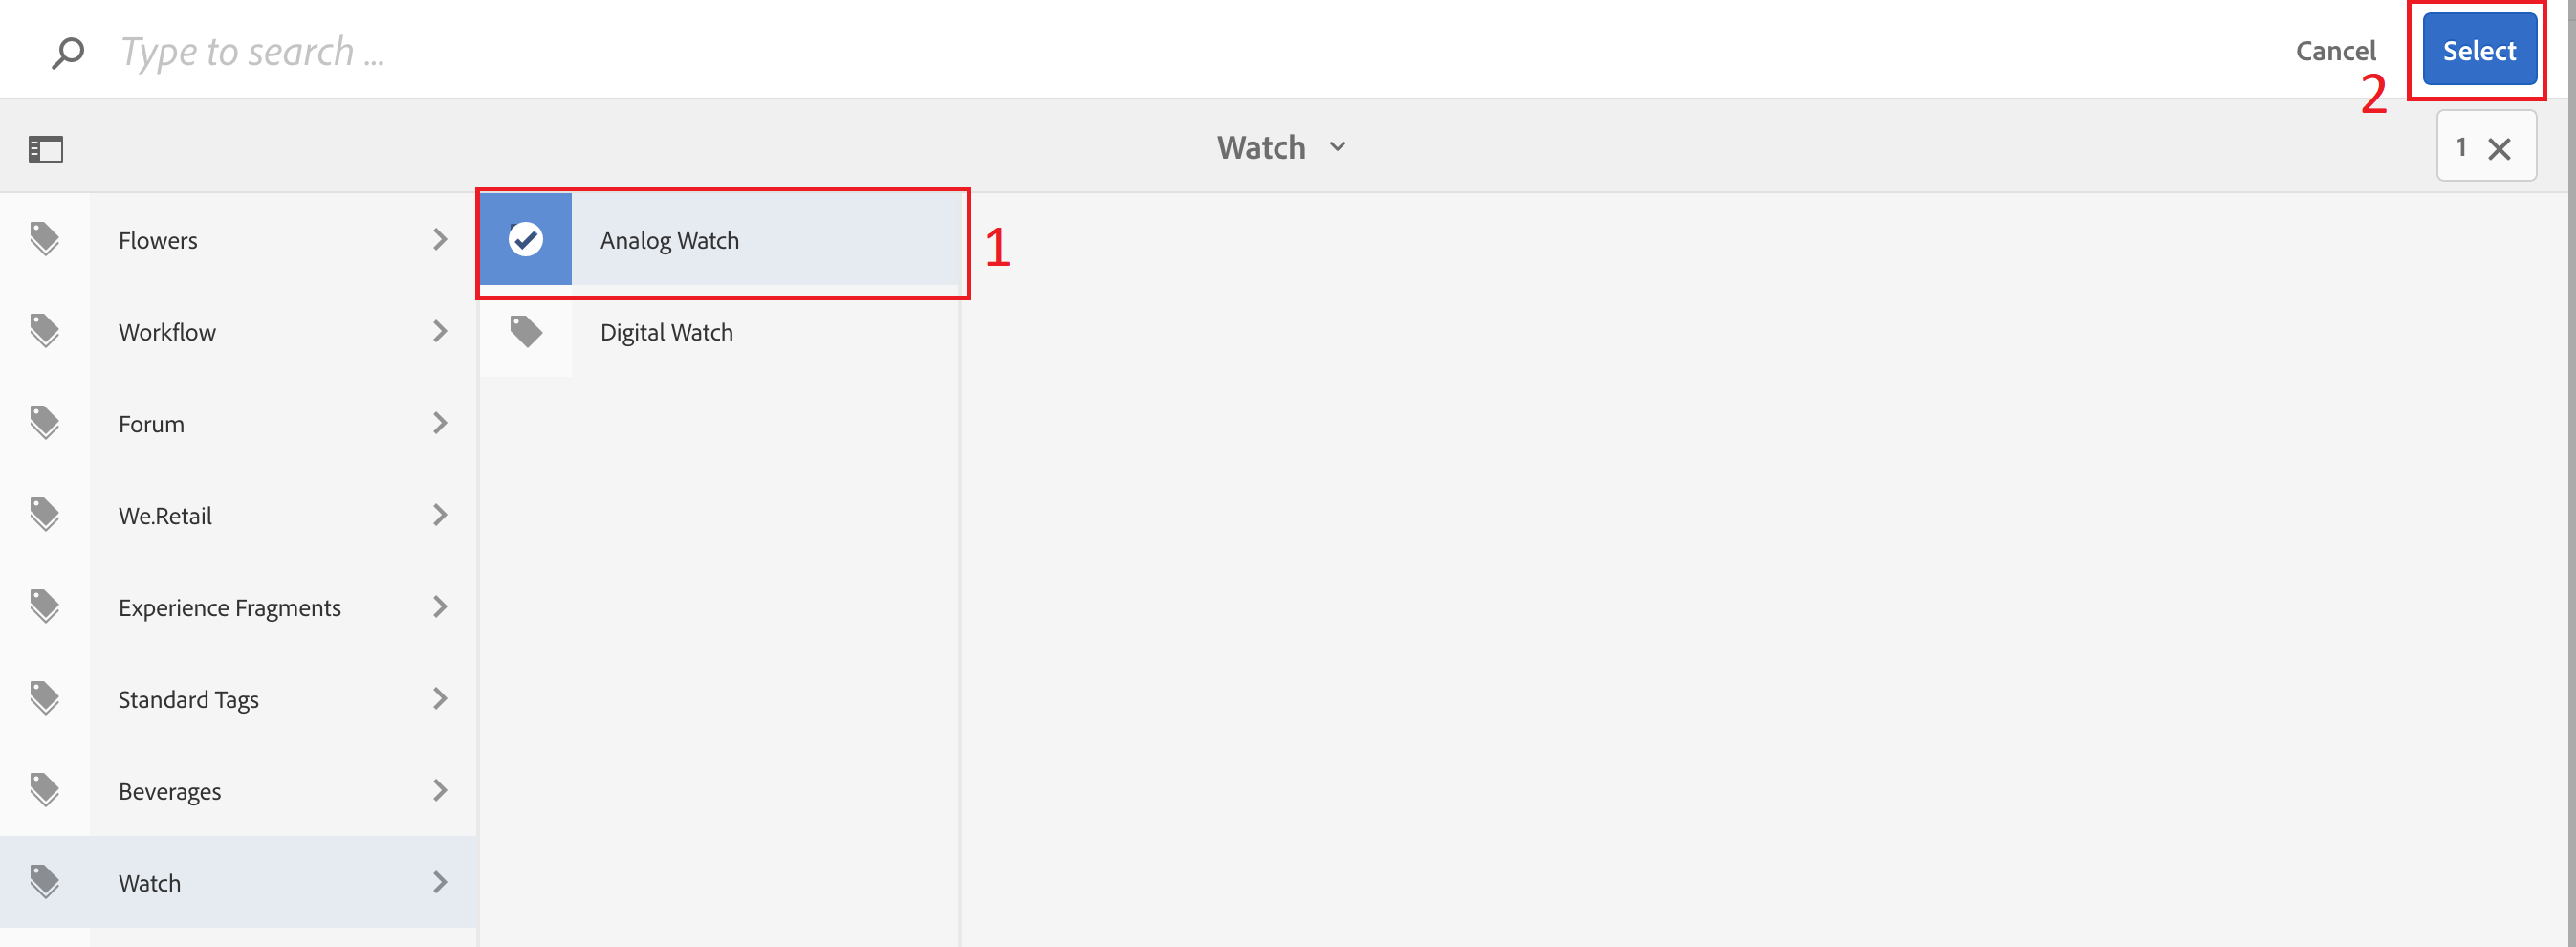
Navigate to Watch > Analog Watch in the tag hierarchy and select the tag, then click on Select button to apply the tag
Step 6: Upload a second set of sample assets for Digital Watches
Go into the Watches > Digital Watches folder in AEM by clicking on the folder name
Open Finder on the desktop
Navigate to Desktop > Assets > Lesson 2 > Train > Digital Watches folder
Select all the files in that folder
Drag-&-drop them onto the AEM window in the browser
Wait for the processing of the assets to be done which may take 1-2 minutes, then refresh the page
Once the processing is done, all the assets are shown with a New label on the right corner
Step 7: Tag the assets with the custom tag for Digital Watches
Go into the Watches > Digital Watches folder in AEM
Click on Select All button on the top menu bar next to the Create button
In the properties screen, open the Tag browser by clicking on the check mark under Tags section
Navigate to Watch > Digital Watch in the tag hierarchy and select the tag, then click on Select button to apply the tag
Finally click on the Save & Close button on the properties screen, then check the Append option and click on Submit button to save the tag successfully.
|
Choosing the Training Assets Training the Smart Tag service to tag images automatically with custom tags requires certain qualities in the training images
|
Having setup sample assets with the necessary tags for training, the final step for successfully completing the training process is to run those sample assets through the training workflow so that the Smart Tagging service can process and learn the custom tags.
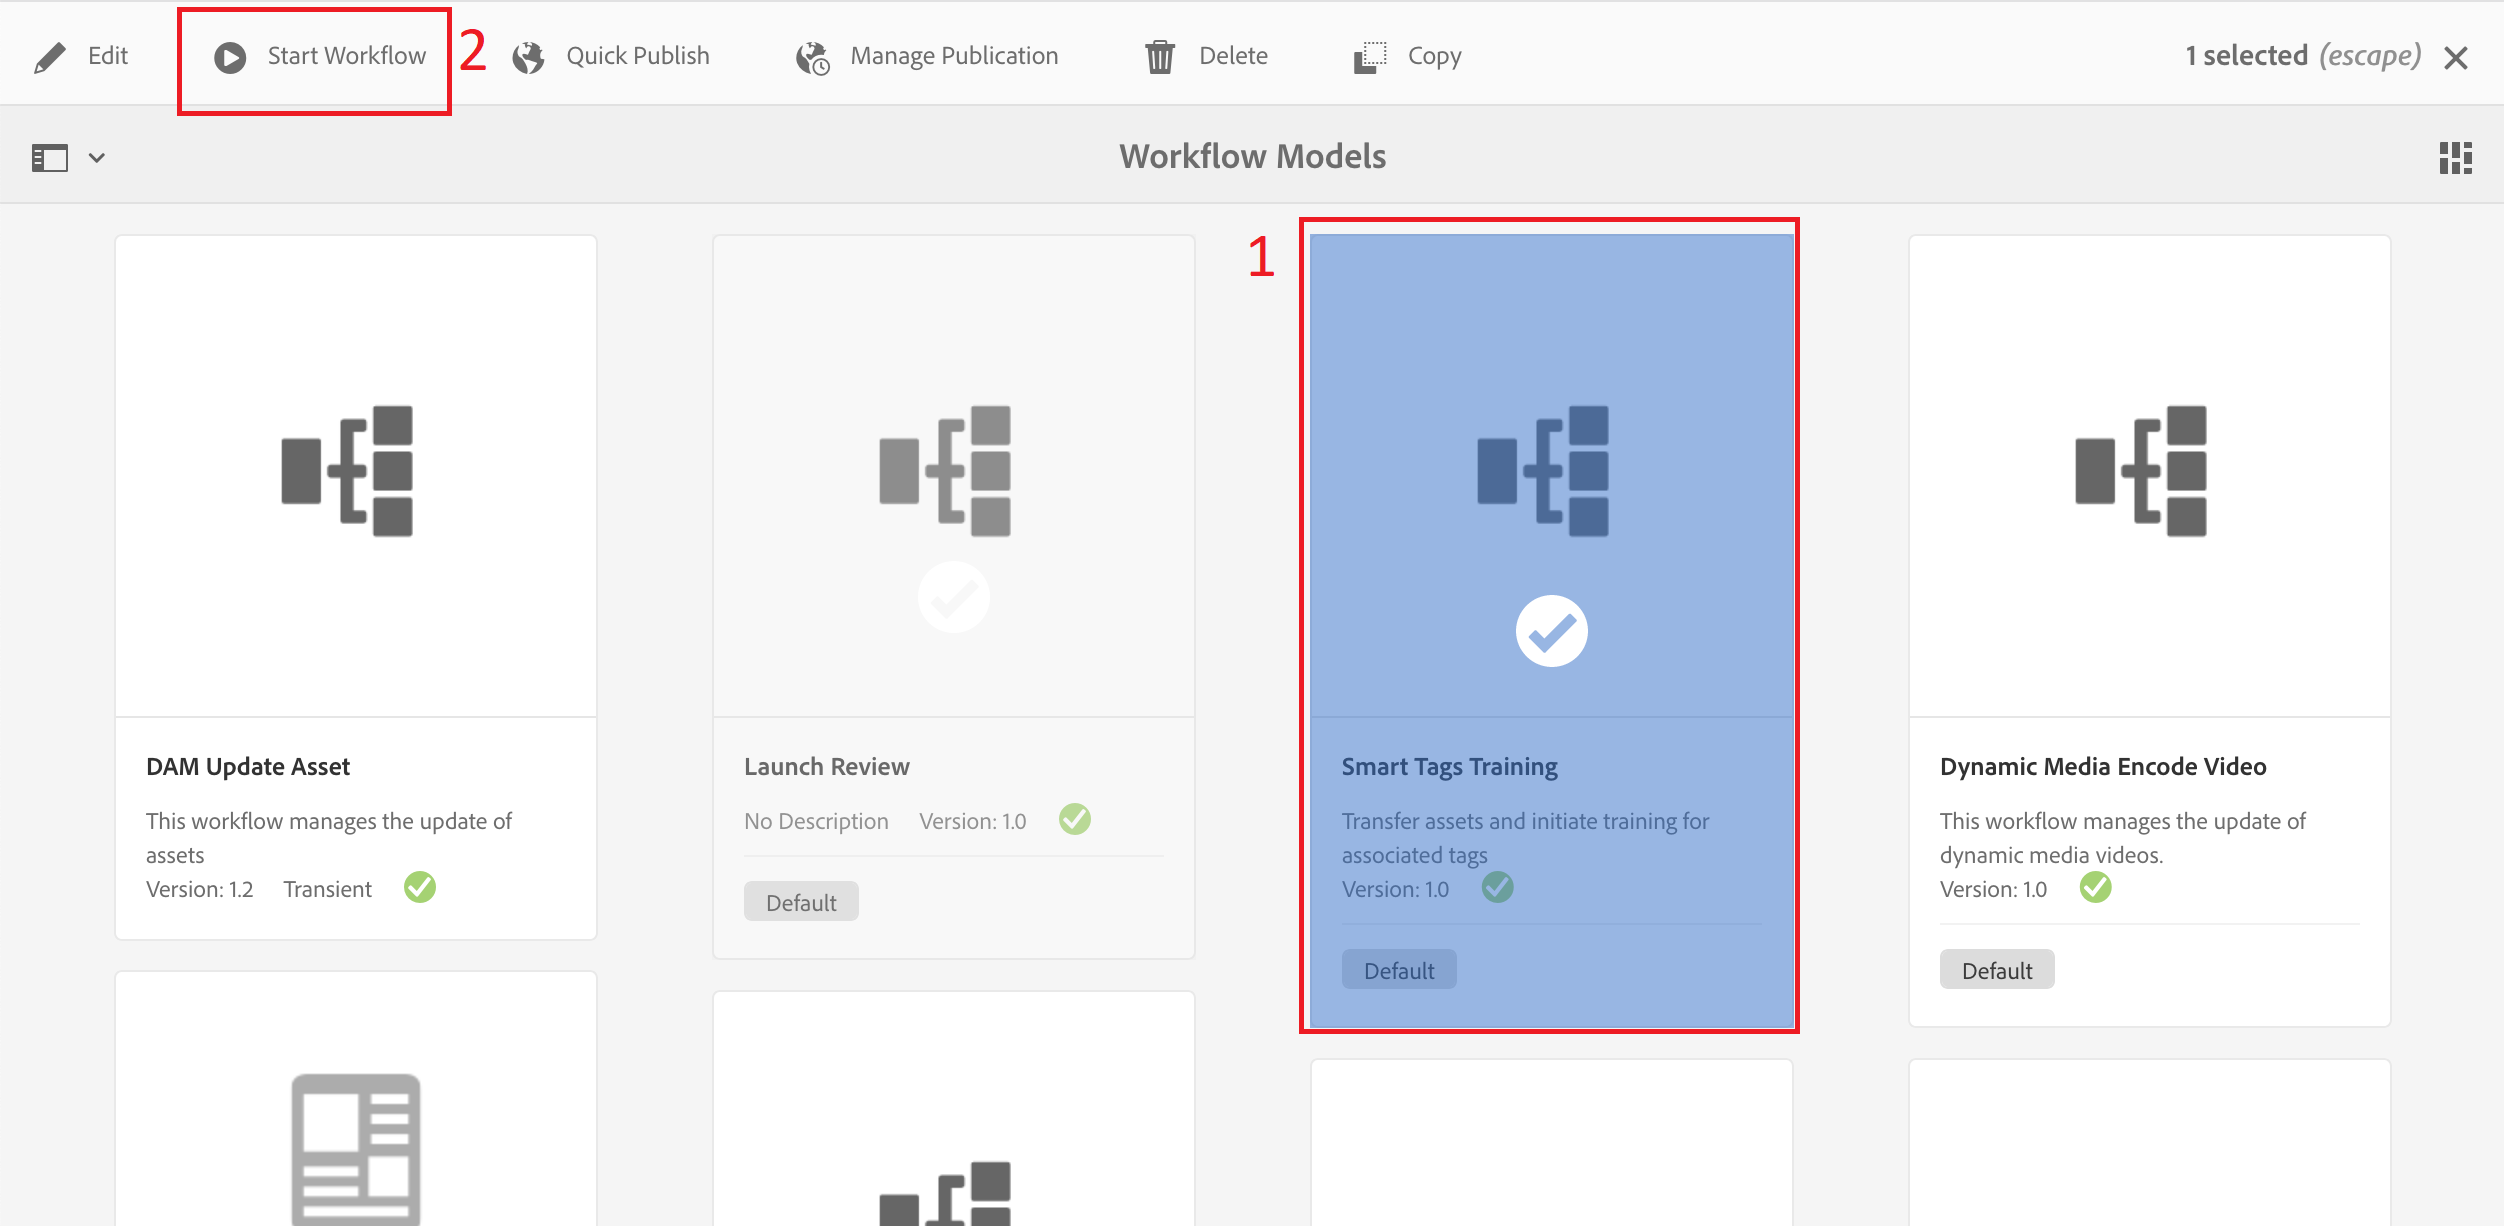
Step 1: Locate the workflow model for Smart Tags Training
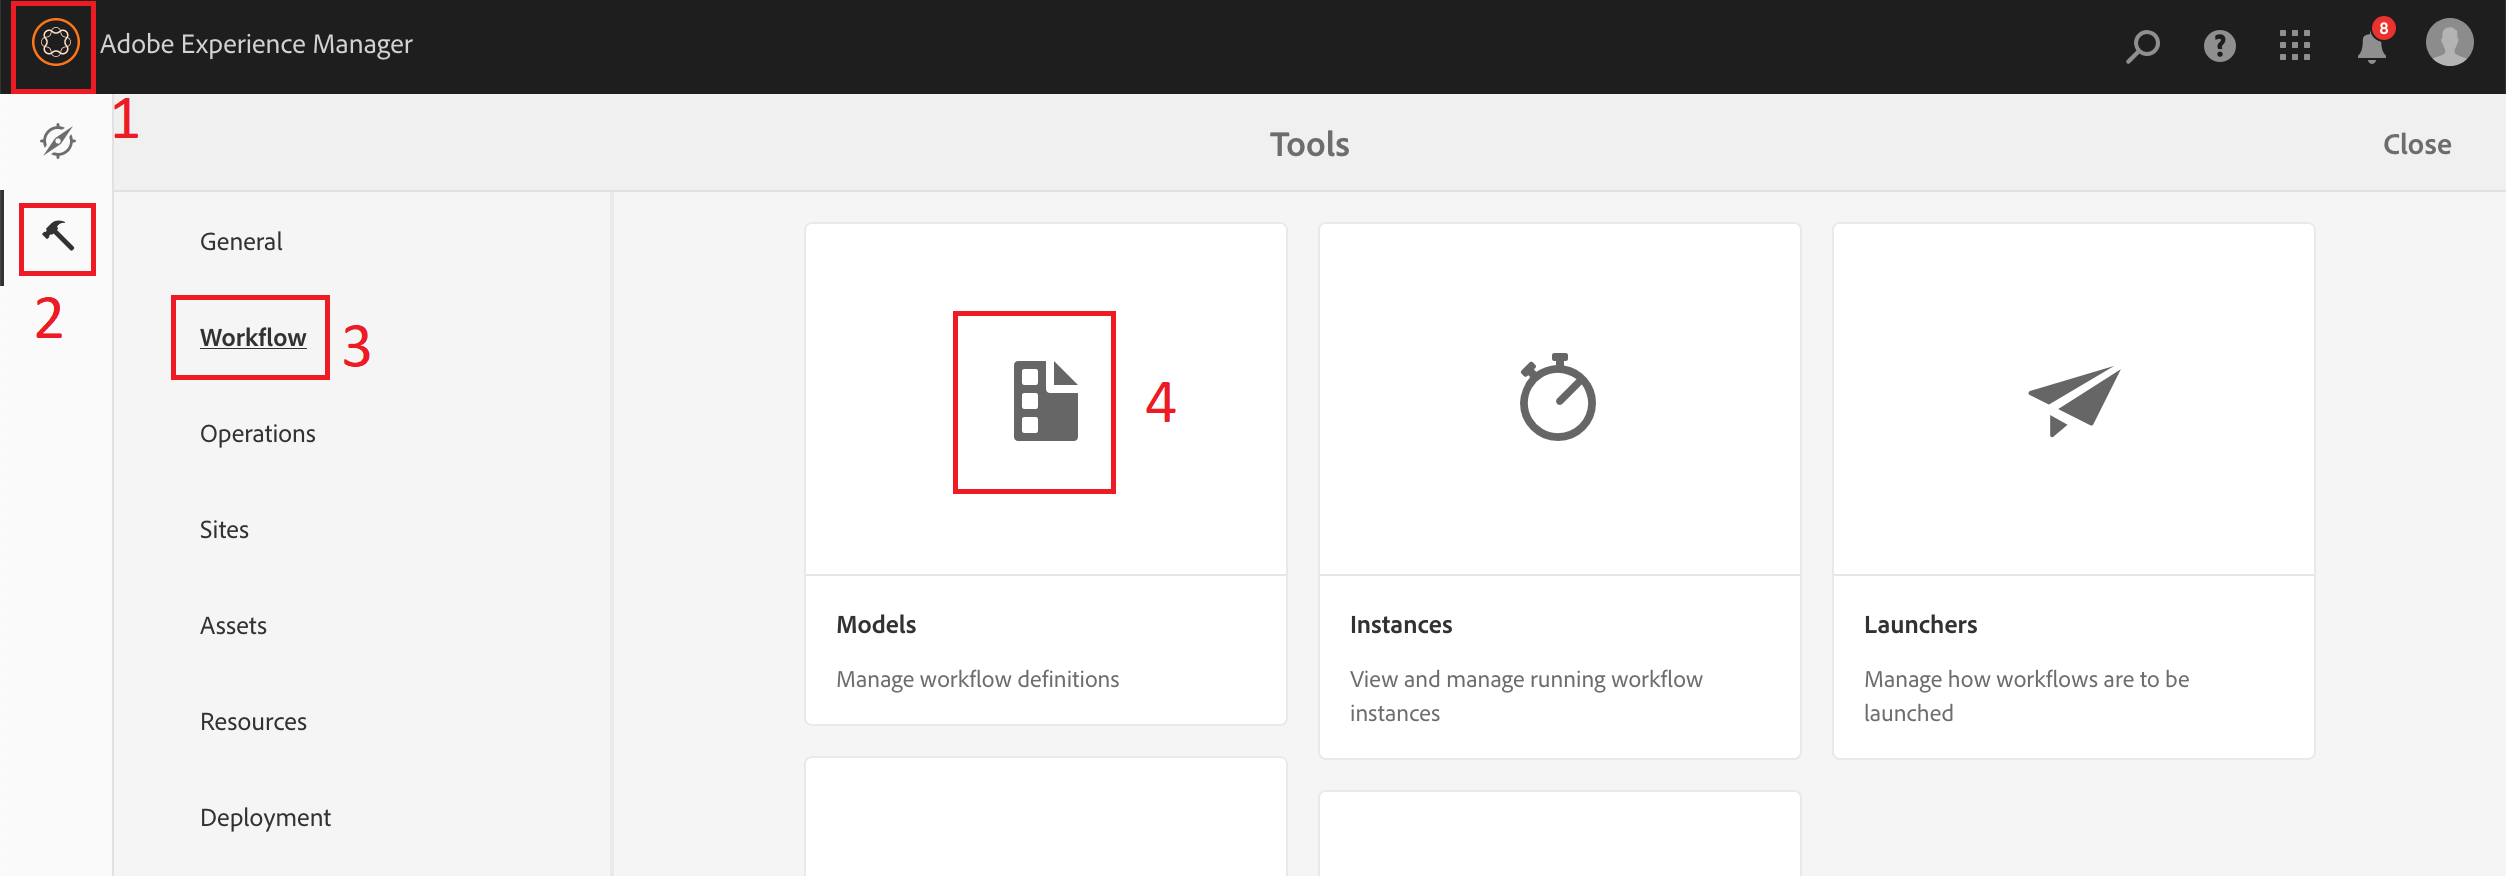
Open Global Navigation by clicking on the AEM Logo () the upper left corner of the screen.
Select the Tools () icon from the left railing. Then select the Workflow item in the middle pane that opens up the workflow related cards on the right pane
Step 2: Start the Smart Tags Training workflow
Look for the workflow model Smart Tags Training in the workflow model listing page
Select the workflow model by hovering over the card and click on the check mark icon
Click on Start Workflow item on the top menu bar
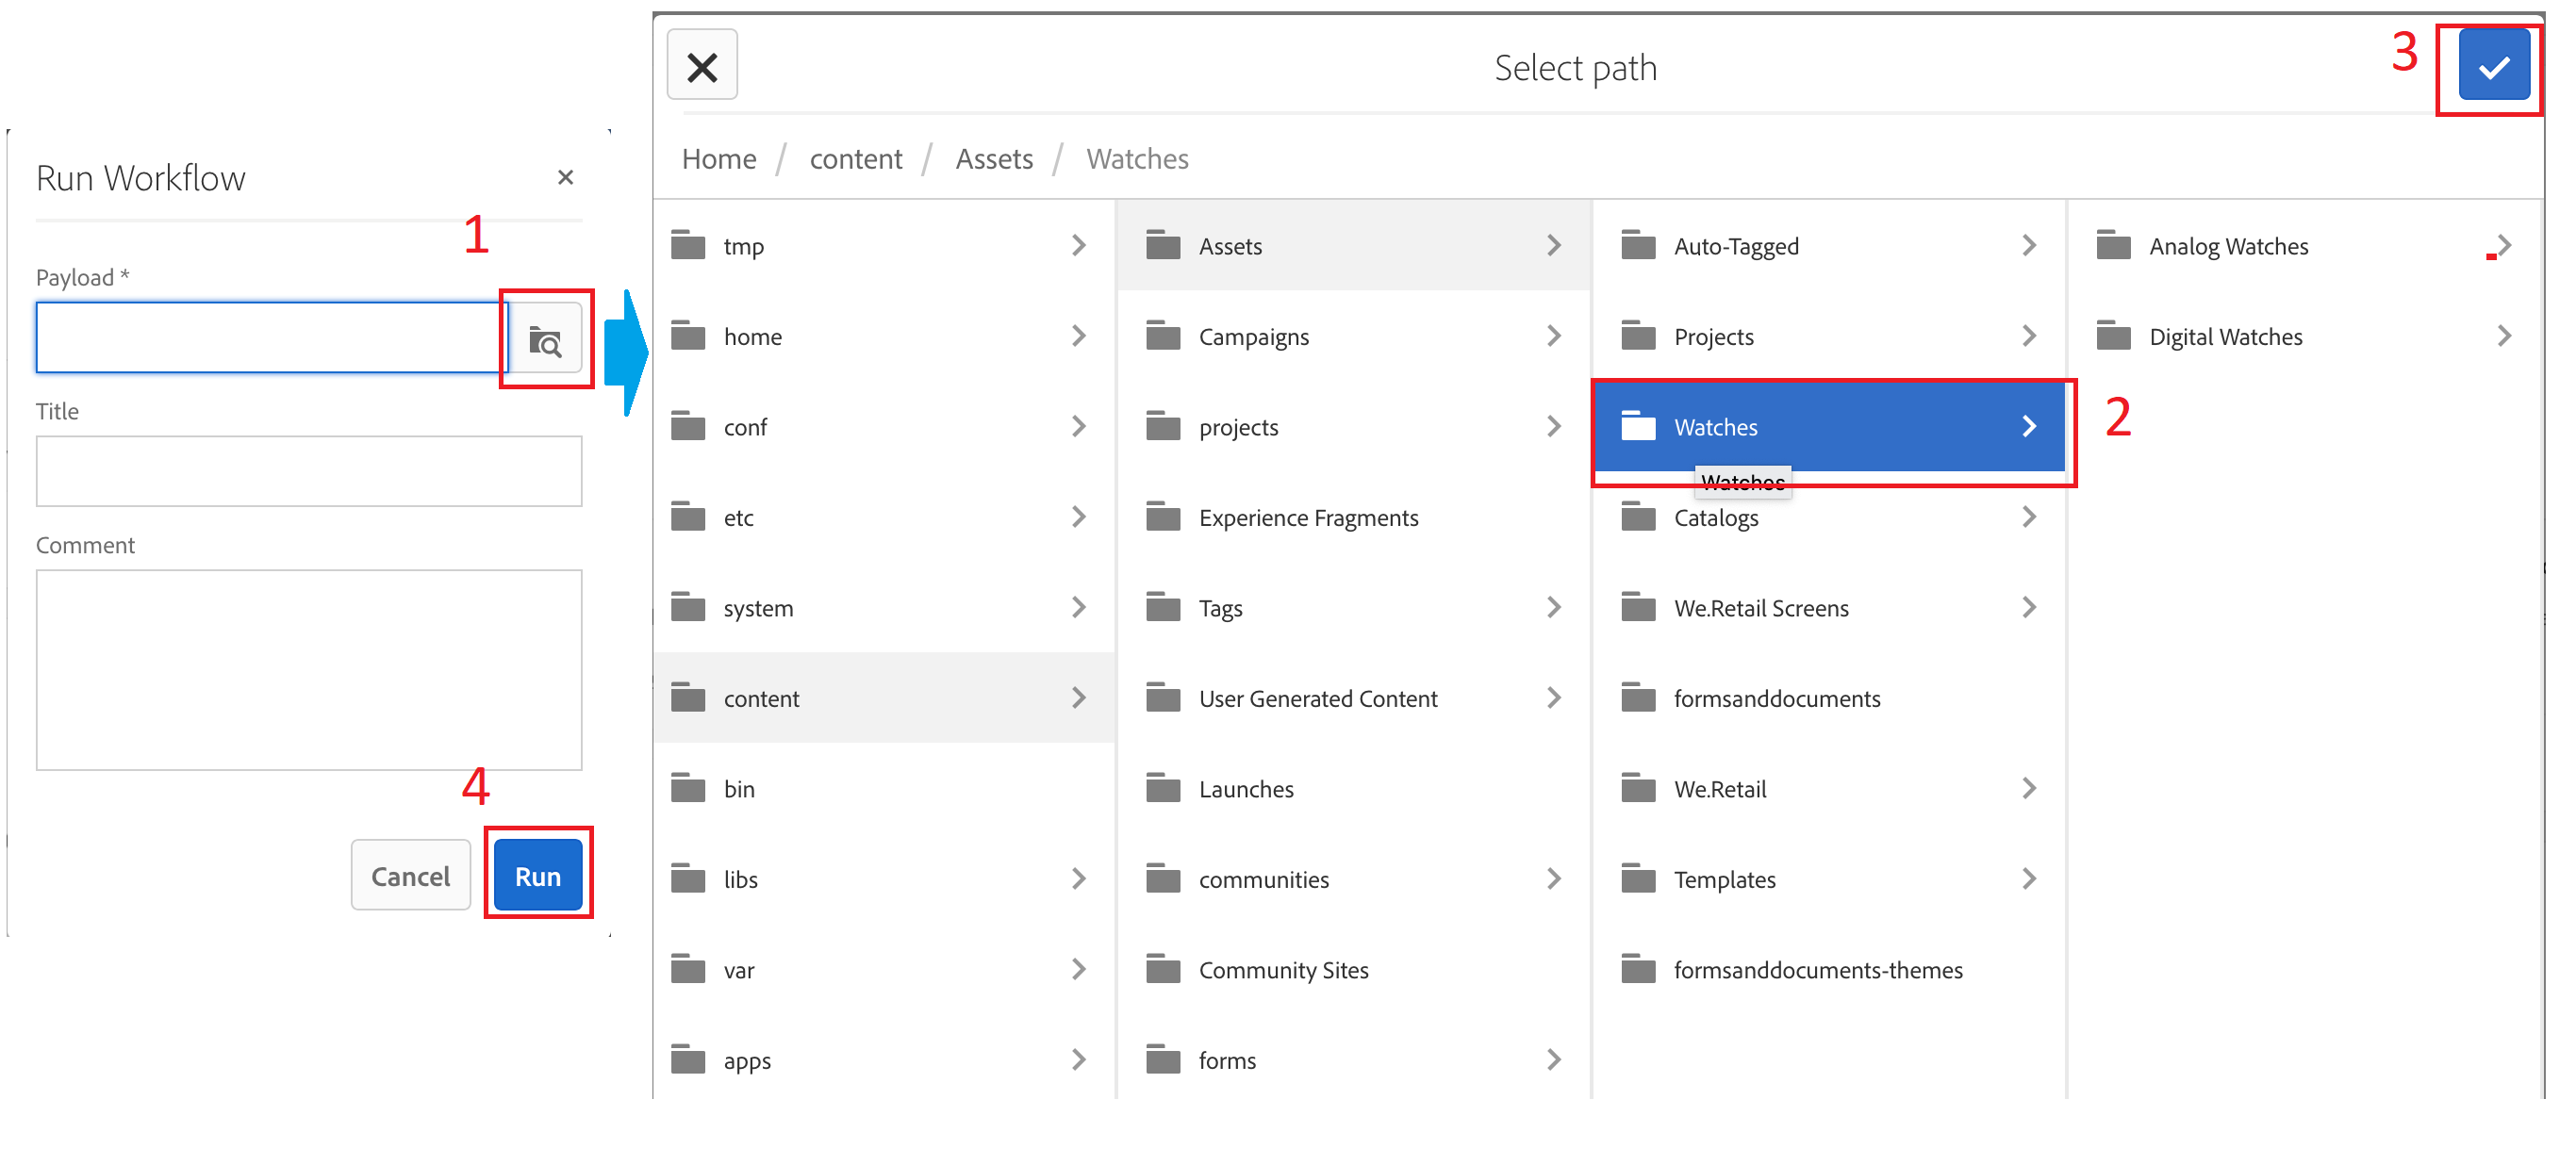
In the popup dialog of the workflow, click on the browse icon under Payload field to select the right payload folder
Choose the parent folder Watches as the payload for the workflow by navigating to the path content > Assets > Watches and then clicking on the check box
Give a Title and Description of your choice in the workflow dialog and then click on Run button
This step triggers the Smart Tags Training workflow and lets it run in the background
Once this workflow is completed, the Smart Tagging service would have been trained with the custom tags that you had setup for the sample assets
|
Verifying status of the training To check whether the Enhanced Smart Tags service is trained on your tags with the training set of assets, review the training workflow report from the Reports console.
|
Once the training is done, the tagging service is equipped to identify relevant assets that get uploaded and then automatically tag with appropriate tags.
This exercise demonstrates how the application of the previously trained custom tags works. In this exercise, we will upload some new assets into a designated folder and then validate that the trained custom tags are applied on them.
Step 1: Create a new folder for uploading test assets
Having logged into AEM, go to the following location in your local AEM instance: http://localhost:4502/assets.html/content/dam
Click on Create button on the top right corner
Select Folder in the fly-out menu
Provide the Title for the new folder as Watches Test
Click on the Create button to create the new folder
Step 2: Enable Smart Tagging on the new folder
Select the Watches Test folder by hovering over the folder name and selecting the check mark icon
Click on the Properties link in the top menu bar to open the folder properties
Check the Enable Smart Tags option and then click on Save & Close
Step 3: Upload test assets for auto-tagging
Go into the Watches Test folder in AEM by clicking on the folder name
Open Finder on the desktop
Navigate to Desktop > Assets > Lesson 2 > Test folder
Select all the files in that folder
Drag-&-drop them onto the AEM window in the browser
Wait for the processing of the assets to be done which may take 1-2 minutes, then refresh the page
Once the processing is done, all the assets are shown with a New label on the right corner
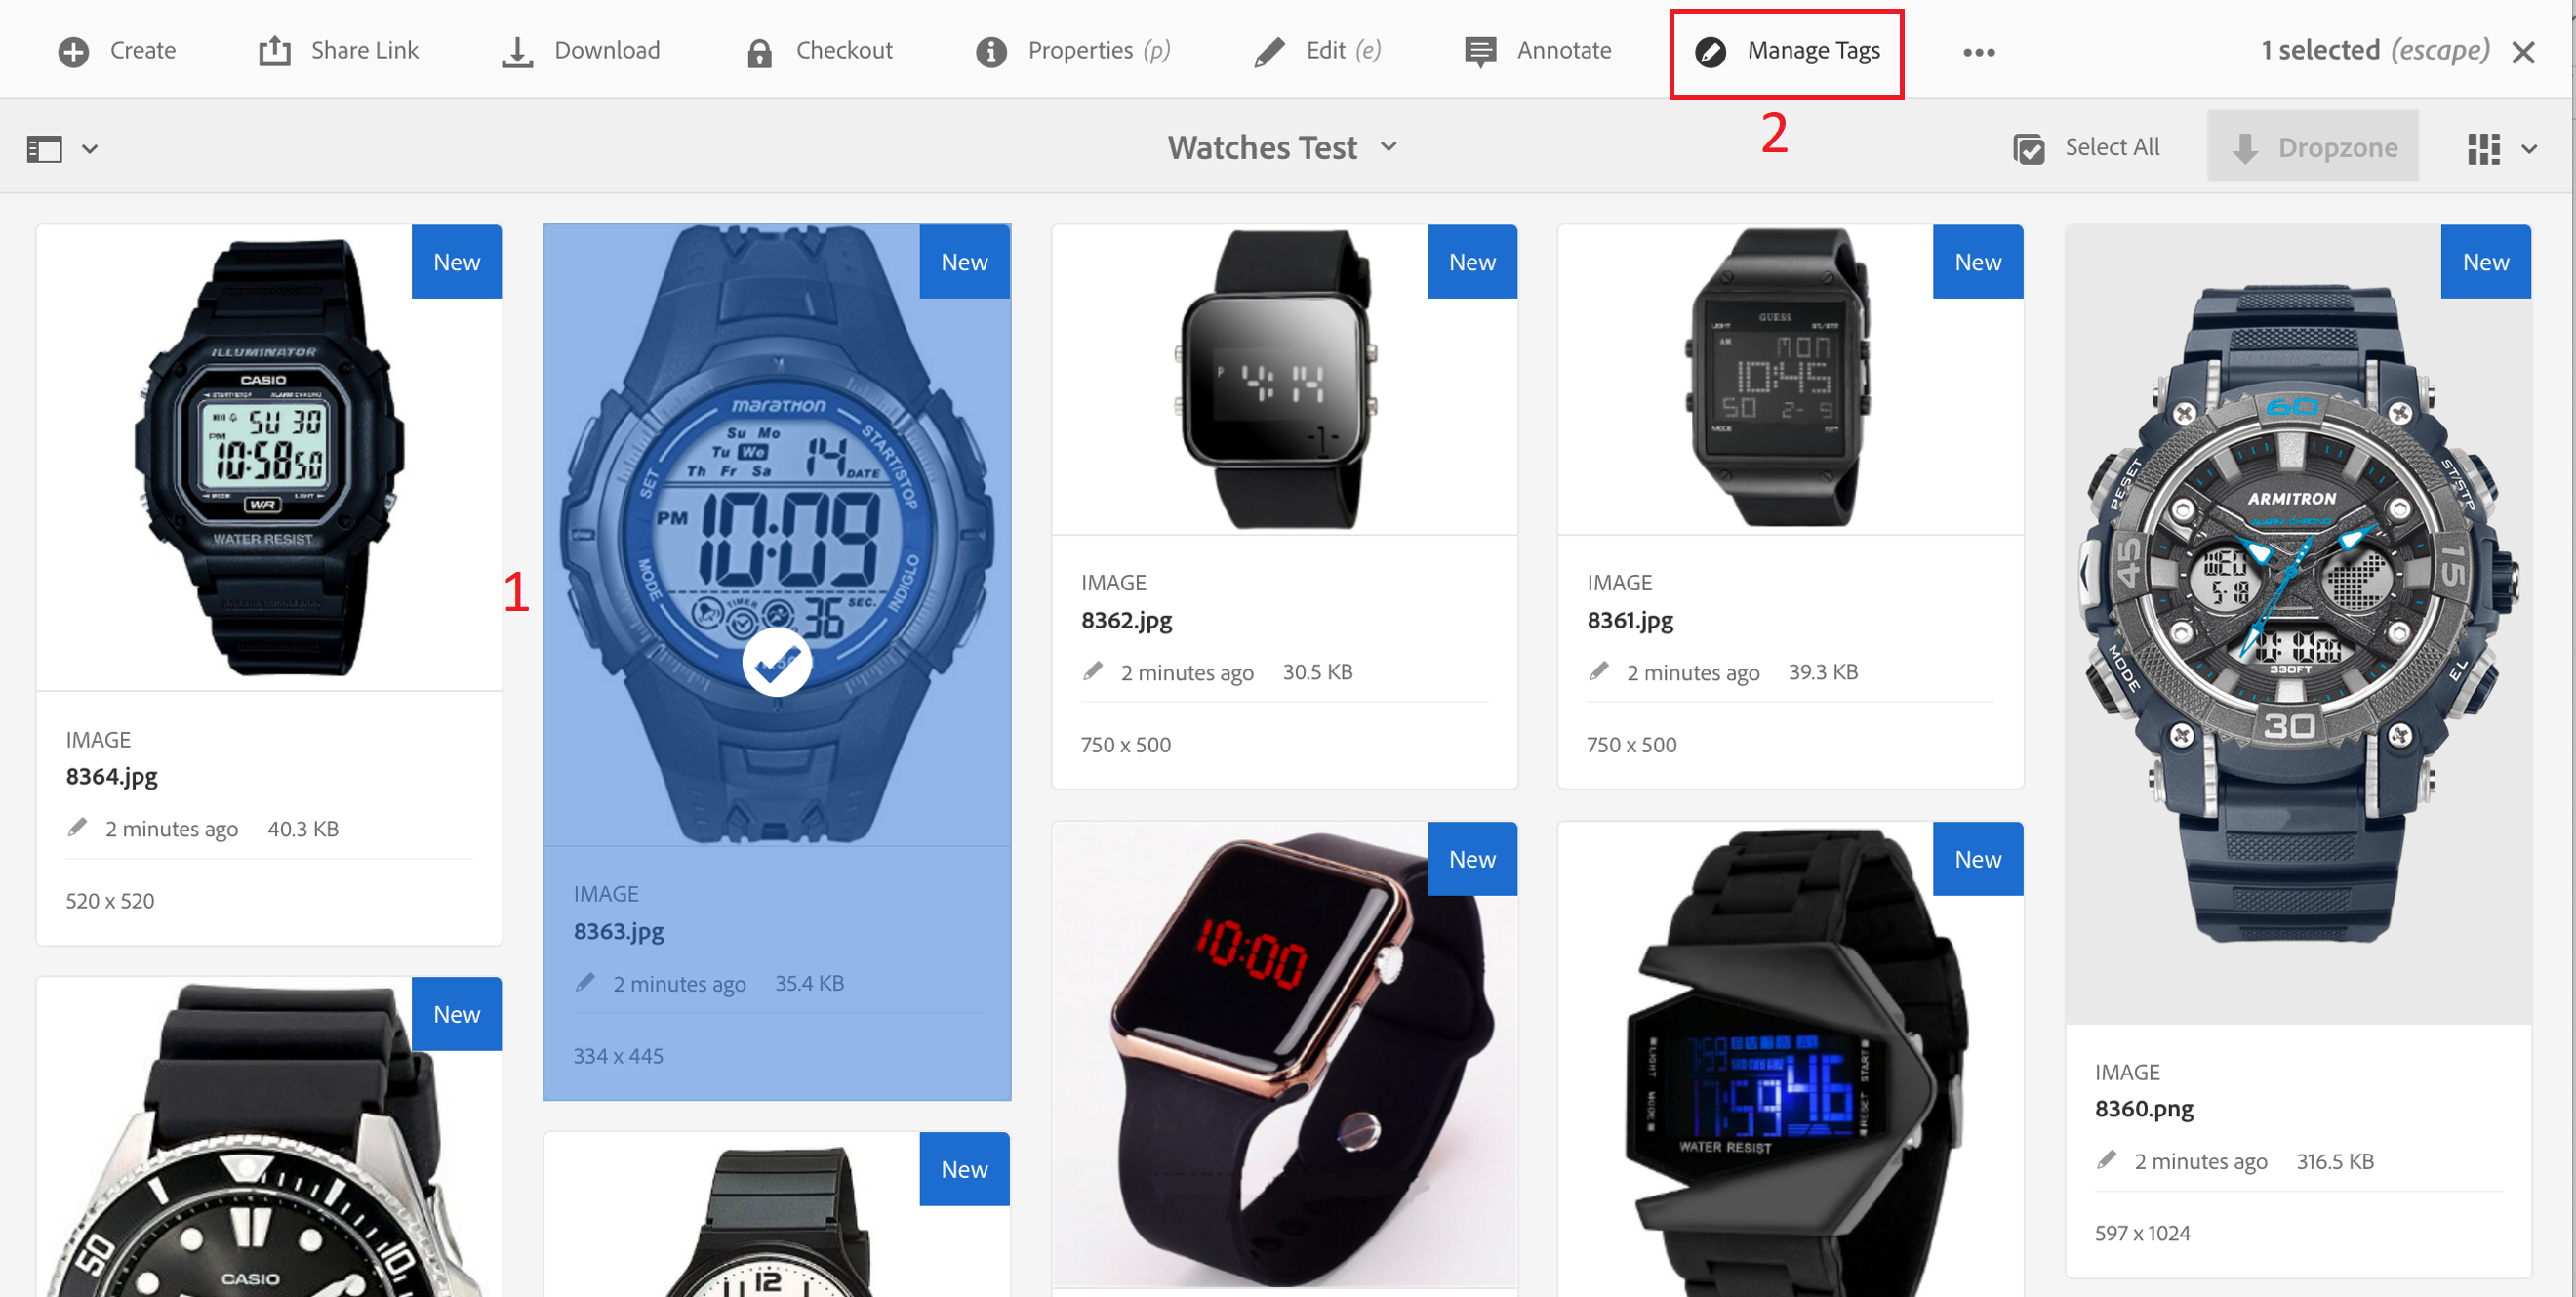
Step 4: Check properties of the assets for validating application of custom tags
Go into the Watches Test folder in AEM by clicking on the folder name
Select any asset by hovering over the asset and selecting the check mark icon
Click Manage Tags option from the menu bar at the top
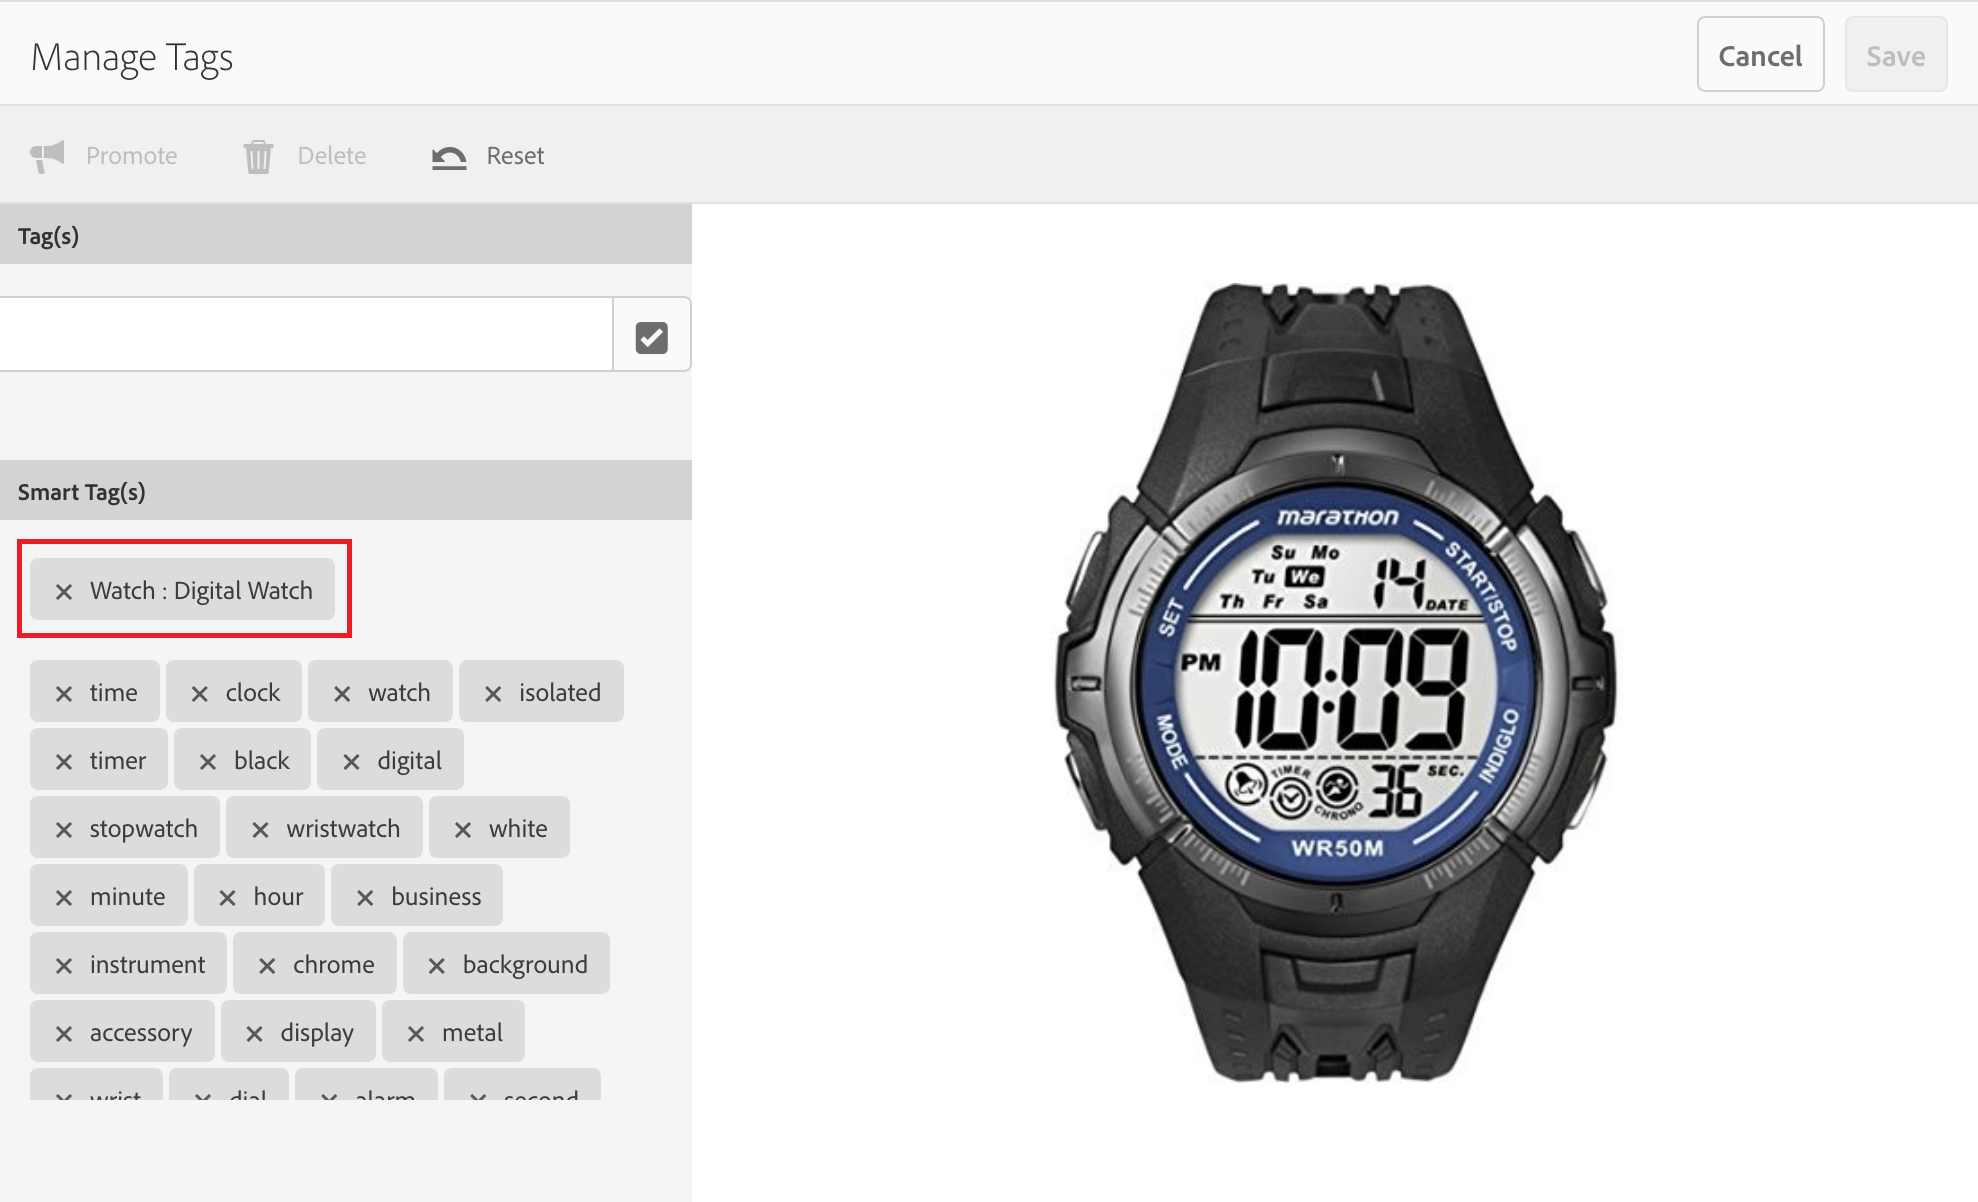
You will notice that the asset would have one of the custom tags (that were part of the training) depending on which asset you are looking at
Use asset switcher arrows below the asset preview to switch between the assets and observe the application of the custom tags
Any new assets ingested after the training can potentially be tagged with the custom tags based on the subject of the images being ingested
Many enterprises have a streamlined process for production of assets that is done centrally. And often the assets are organized and setup with metadata and tags in English. However, the assets are required by the global teams for use in their regional digital properties. Discovery of the right assets continues to be a big challenge when a global team is trying use a centralized Digital Asset Management System.
AEM brings a versatile feature that allows global users search for assets in the language of their choice and use the assets effectively. With the Smart Translation Search capability, AEM automatically translates the non-English keywords into their equivalent English terms and brings up the relevant assets in the search results. And it offers this capability without the Asset managers spending any effort on tagging or organizing the assets to support the non-English users.
The exercises below will demonstrate how the feature actually works and also summarizes the pre-requisites and dependencies required for making this feature work.
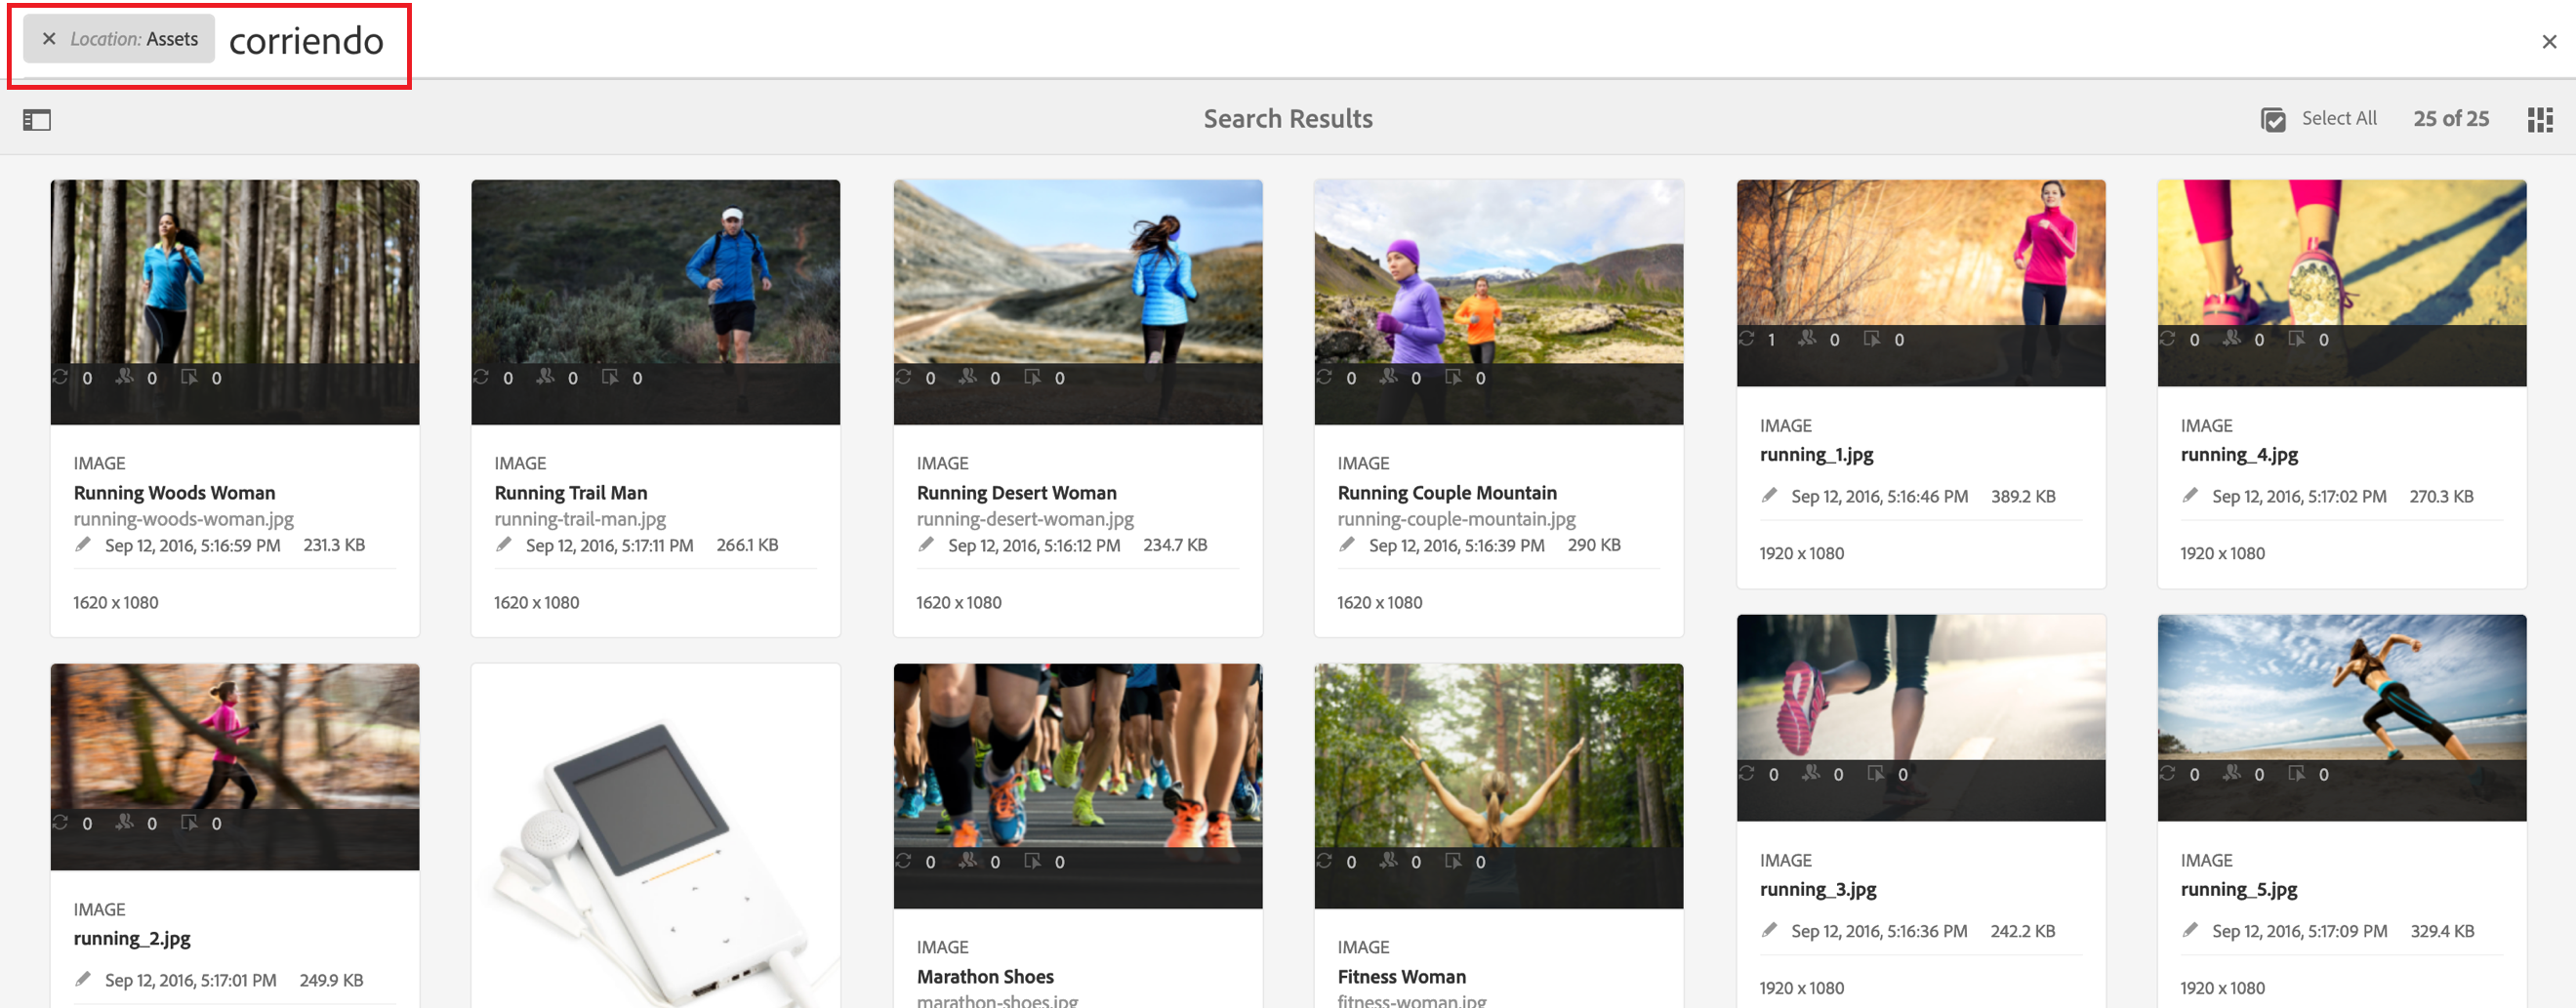
This is a simple exercise that demonstrates the way marketers can use non-English keywords to discover assets of their interest. For this lab, your AEM instances have been configured to support searches in Spanish language as part of the Smart Translation Search capability.
Step 1: Navigate to the Assets folder in AEM
Step 2: Initiate the search with the non-English keyword through the Omnisearch
Click on the lens icon at the top right corner of the screen to open the Omnisearch
Enter the term corriendo which is the Spanish translation of the term running in English
The search results page will list all the assets that are related to the term running, even though the search was triggered with the word corriendo
The same feature will work for broader searches in AEM across the content from Sites and Assets, when initiated from the home screen of AEM.
|
Setting up Smart Translation Search AEM for Smart Translation Search requires setup and configuration of some additional libraries as well as configuring the right language packs that contain the translations used by AEM. The following steps describe the process to setup Smart Translation Search:
The detailed steps to configure the Smart Translation Search are described on the following page: https://helpx.adobe.com/experience-manager/kt/assets/using/smart-translation-search-technical-video-setup.html |
Experiences expressed visually are more appealing compared to the expression in words. The same principles apply to discovery of assets as well. While the rich metadata on the assets really helps the users search and locate for the right assets, the ability to search more assets similar to a given assets immensely helps the users to locate the right assets.
The Asset Visual Search feature in AEM brings this ability in the hands of the marketers. With this feature, the users can not only look for more assets similar to any given asset, but it also helps the users refine the search greatly using the visual content of an asset.
This exercise demonstrates the usage of the Visual search feature in AEM and provides a preview of the necessary configuration required to make this feature work.
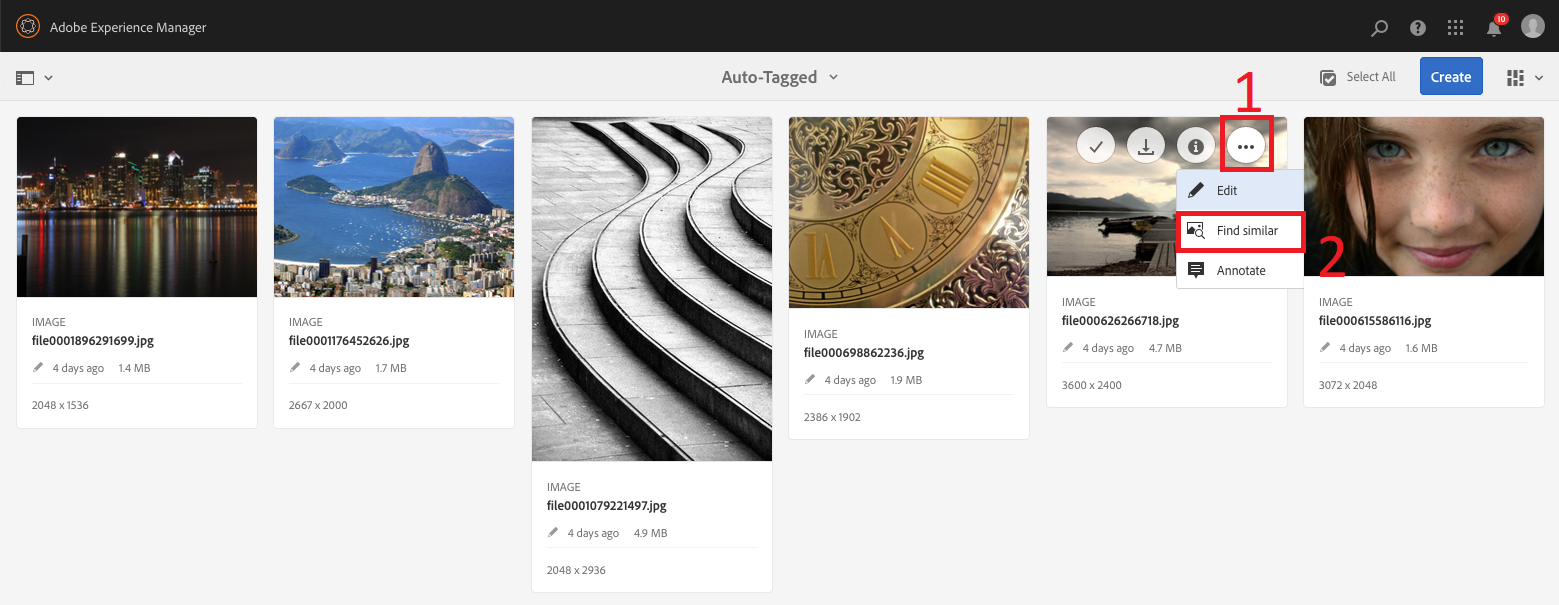
Step 1: Navigate to the ‘Auto-Tagged’ folder that we created earlier
Having logged into AEM, go to the following location in your local AEM instance: http://localhost:4502/assets.html/content/dam/auto-tagged
Step 2: Choose the ‘Find Similar’ action from the ‘More actions’ menu for any of the asset
Hover on the image that you are interested in, then click on the ellipsis (…) icon to open More actions menu
For this example, we are using the image with lake and clouds that together form a clear subject to search for
Then click on the Find similar item from the drop-down list
This exercise demonstrates an alternate way the Visual search can be used to discover the right assets in AEM.
Step 1: Navigate to the Assets folder in AEM
Step 2: Search the Asset repository with a keyword
Invoke the search with the key watch
You will see the results page with different images of watches
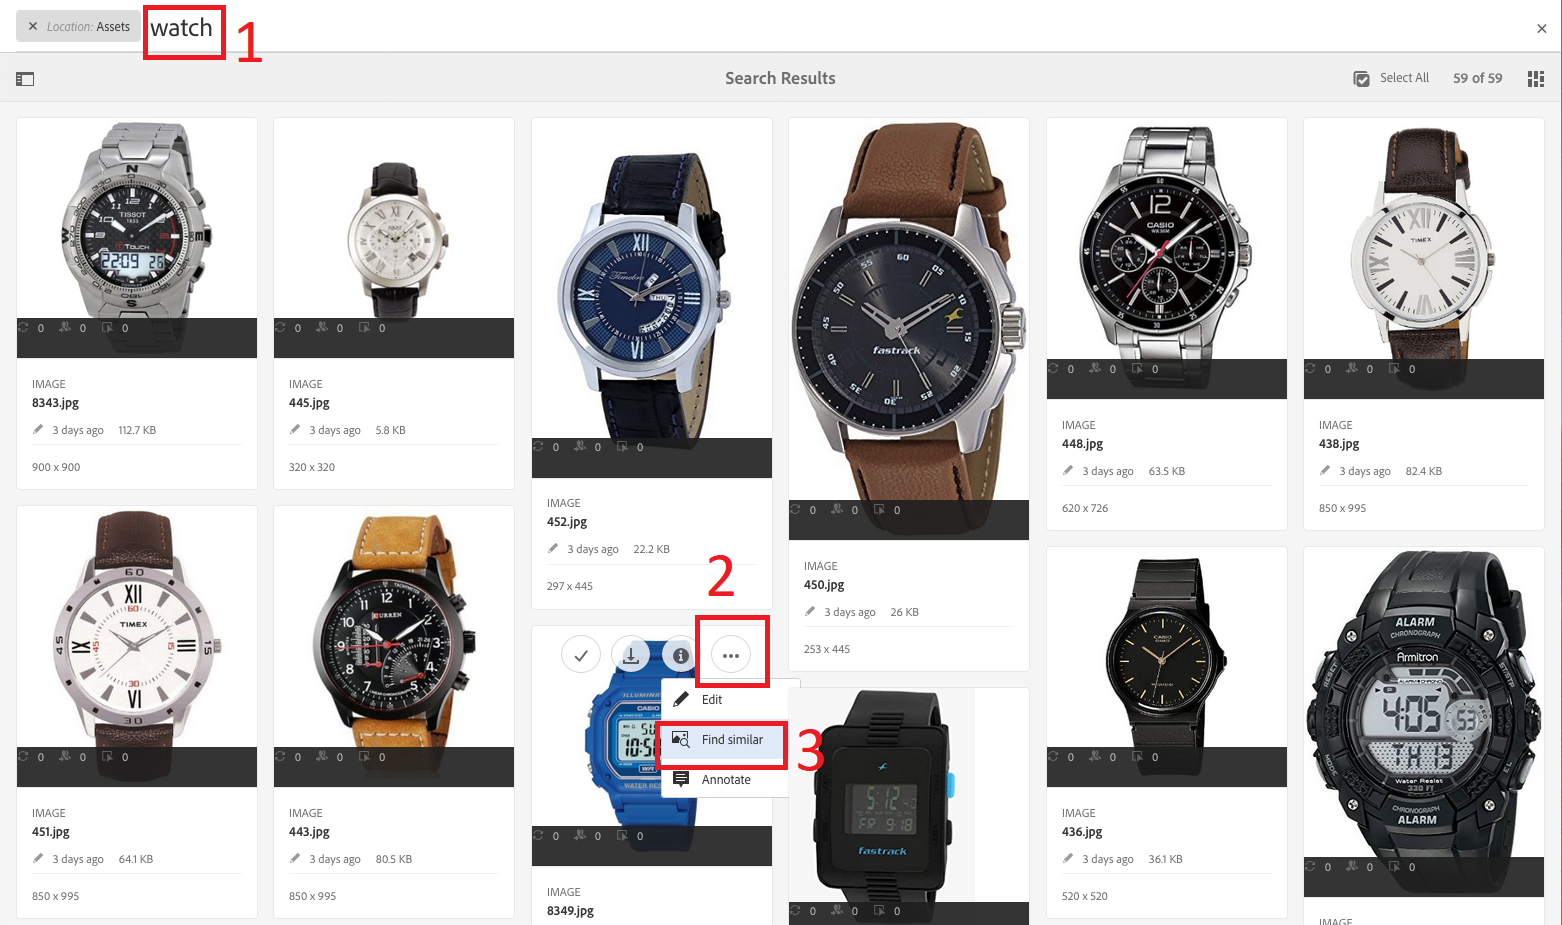
Hover on any digital watch and open the More actions menu
Choose the Find similar action from the drop-down menu
You will see that the search results page now shows digital watches based on the updated request

|
Availability of Visual / Similarity Search The exercise above was a sneak preview of the Visual search capability that will be introduced into AEM product eventually. The feature is still in development and internal testing phases. It will be made available to the AEM customers at a later time. |
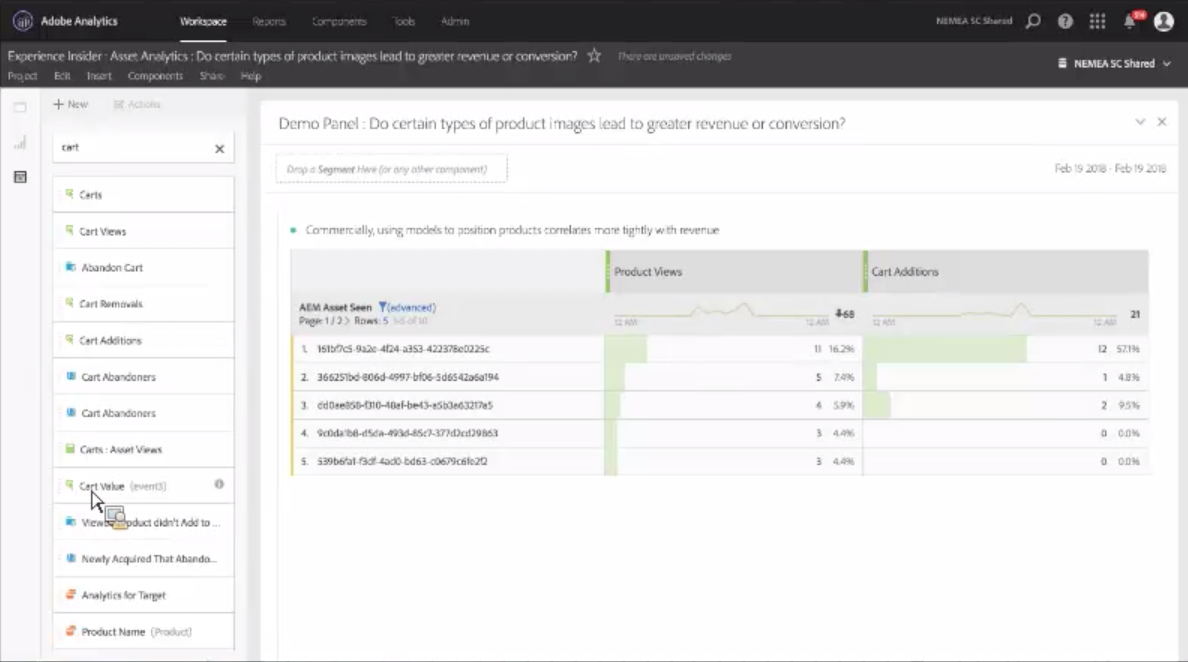
Asset Insights provides a capability that is unique to AEM which allows the marketers to measure the use and reach of their assets across different digital properties and thus derive insights around the efficacy of the assets. While the default Asset Insights capabilities provide a view into the usage of the assets, it is possible to extend the scope of the insights to associate the assets to business-centric metrics such as successful conversions and revenue.
This demo aims to walk you through the possible approach for enhancing the Asset Insights implementation to derive deeper insights around the use and reach of assets and thus helping the marketers fine tune their asset and content creation strategies for the future campaigns.
Assuming that the AEM server has already been configured with Asset Insights, this section outlines the additional steps required to enrich the insights gathered for the assets and further use them to drive better search and reuse of assets in AEM.
Step 1: Setup profiles to apply custom metadata
The insights around the assets can be enriched by capturing and sending relevant metadata for each asset out to Analytics
This is best enforced by using a Metadata Profile that is configured to apply appropriate metadata on the relevant folders
In the subsequent steps, this custom metadata will be sent over to Analytics so that it can add to the dimensions for drawing insights
For example, you can capture the type of product image being used on the website, apart from the default asset clicks and impressions coming asset insights. You can do this by doing the following:
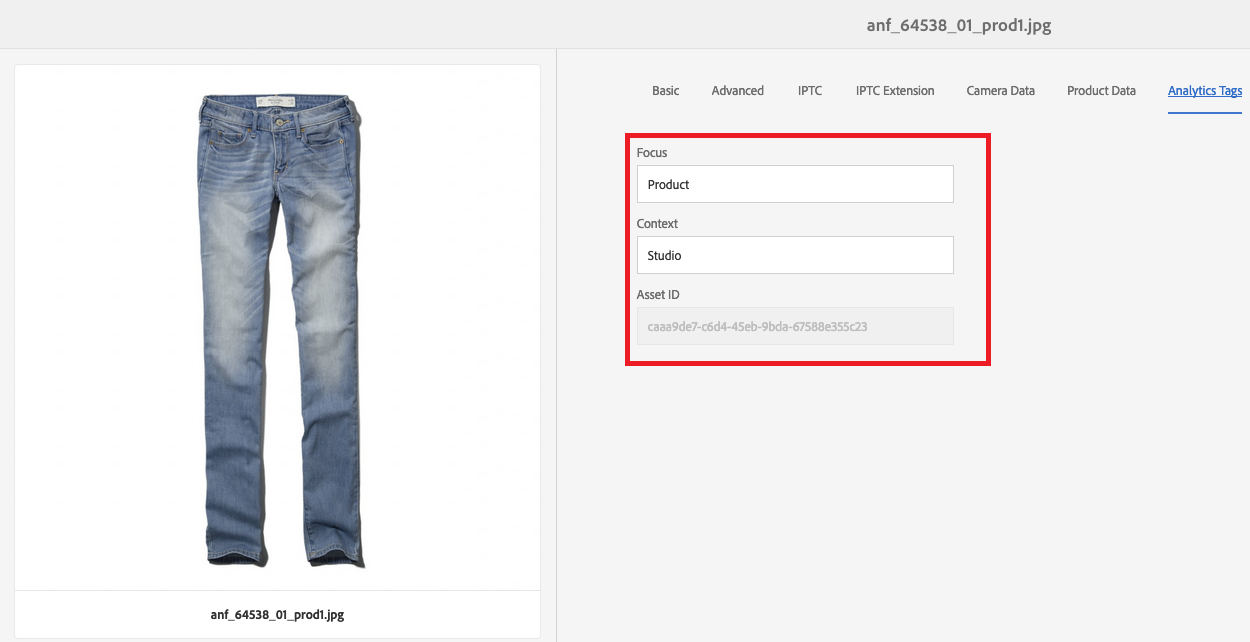
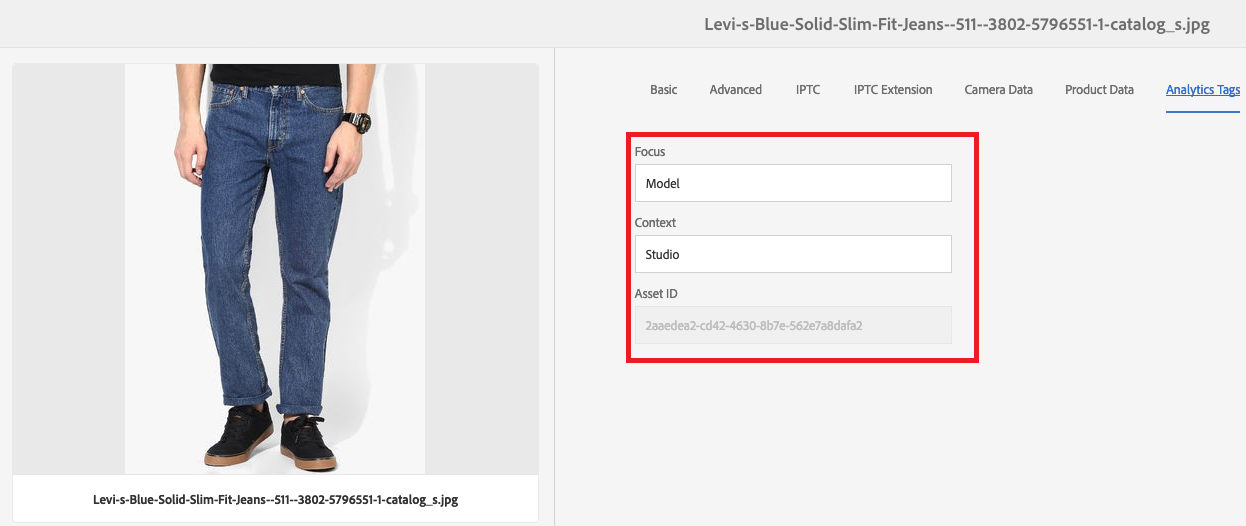
Create a custom metadata field called Focus, that can indicate whether the image is focused on the product only or has a model promoting the product
Create a metadata profile for product focused images that automatically sets this metadata field to Product
Similarly Create another metadata profile for product images with a model that automatically sets the metadata field to Model
Finally apply the profiles on appropriate folders so that the images get the right metadata values when uploaded
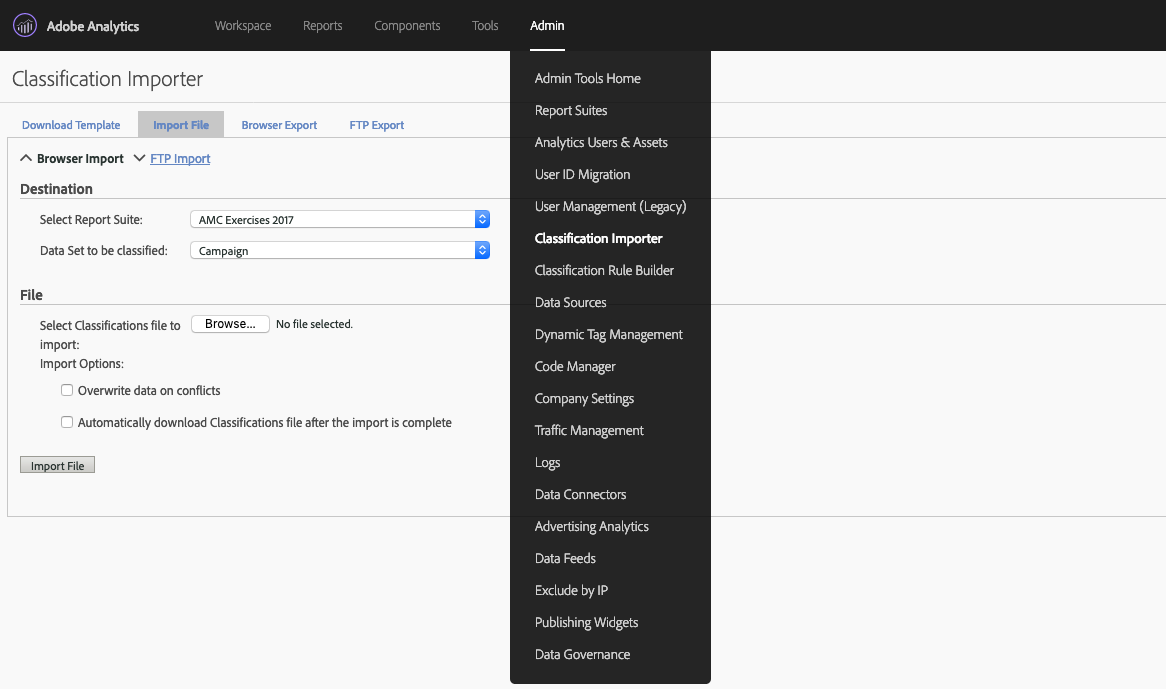
Step 2: Upload the custom metadata into Analytics as Classifications
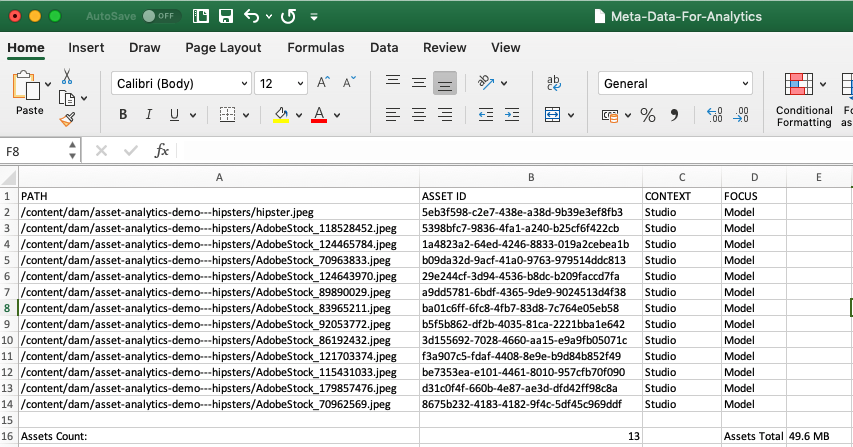
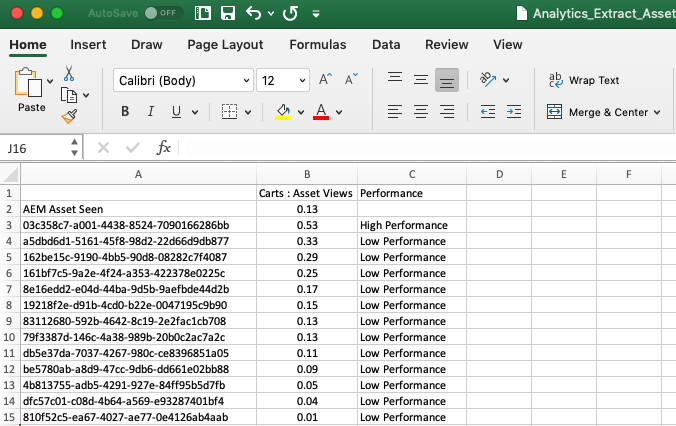
Using the Asset Reports feature of AEM, you can extract both the Asset ID (jcr:uuid) as well as the metadata fields applicable into a CSV file
Finally upload this data into Analytics using the Classification Importer. Ensure that the data format is compliant to the standards defined by the importer
Step 3: Use Analysis Workspace to create suitable reports & views
Analytics would now have the asset usage data coming in from the pages through the Analytics calls and it also has the classification data for the assets that was uploaded in the previous steps
Using the Analysis Workspace, you can create different views and reports by playing with the combinations of the different dimensions that are part of the standard Asset Insights as well as the custom metadata that has been brought in through classification
Step 4: Export the report data including the metadata associations
Having setup necessary visualizations in Analysis Workspace to bring out the deeper insights around the assets, it is now time to export these insights along with their correlations to the asset ids
The export operation creates a CSV file containing the various dimensions mapped to the corresponding asset ids
Create additional columns with derived fields based on the metrics received from Analytics. For example, based on # of views or Cart values associated with the assets, you can infer popularity and hence efficacy
Step 5: Import this data into AEM as metadata
For you to use these insights back in AEM, you have to import these values as metadata that are applied on the corresponding assets in AEM
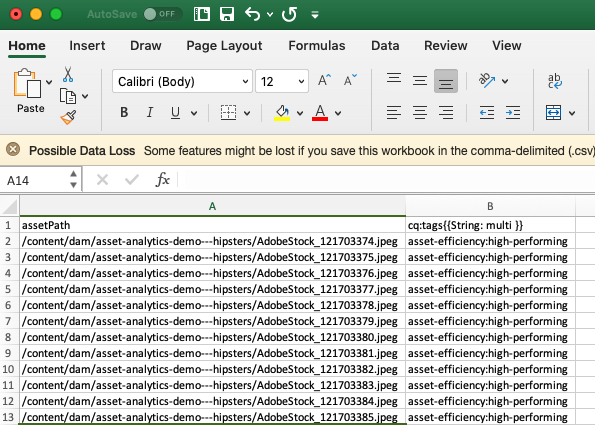
You can do this operation with the help of the Bulk Metadata Import capability of AEM
The import file should contain the asset path mapped to the dimensions pulled out from Analytics and it should comply to the format prescribed by AEM
Step 6: Create Smart Collections using the enhanced metadata
With the dimension from the asset insights now being available as metadata, it is possible for the users to search for assets based on these dimensions
Further setting up Smart Collections will automatically collate all the related assets into that collection thus making it extremely easy for users to find assets and use them in the right contexts
In this lab, you have explored how AEM helps you enhance the discoverability of assets and improve the search experience using Machine Learning and AI capabilities of AEM. Following are some suggested next steps towards adopting these features: