
In this lab you will learn how to provide Content Authors & Marketers greater input & control over the experiences delivered to consumers who interact with Chat Bots (eg Microsoft Bot Framework) and Voice Based Experiences (e.g. Amazon Alexa)
First you will experience an example of personalized content within a live Chatbot, and run a basic generic bot.
You will then create and reuse content from Adobe Experience Manager within the Bot using Content Fragments & Experience Fragments via standard Content Services APIs
Finally, you will also use Adobe Target to provide an optimized and personalized experience
Most ChatBot & Voice UI solutions today are based on a client (a web component on a page, or device such as the Amazon Echo) which communicates with the back end via a NodeJS like environment. Without getting into a discussion on the differences between AWS Lambda & Microsoft Azure Functions, it's worth noting that the architecture is very similar, with only the platform nuances for the user experience requiring effort.
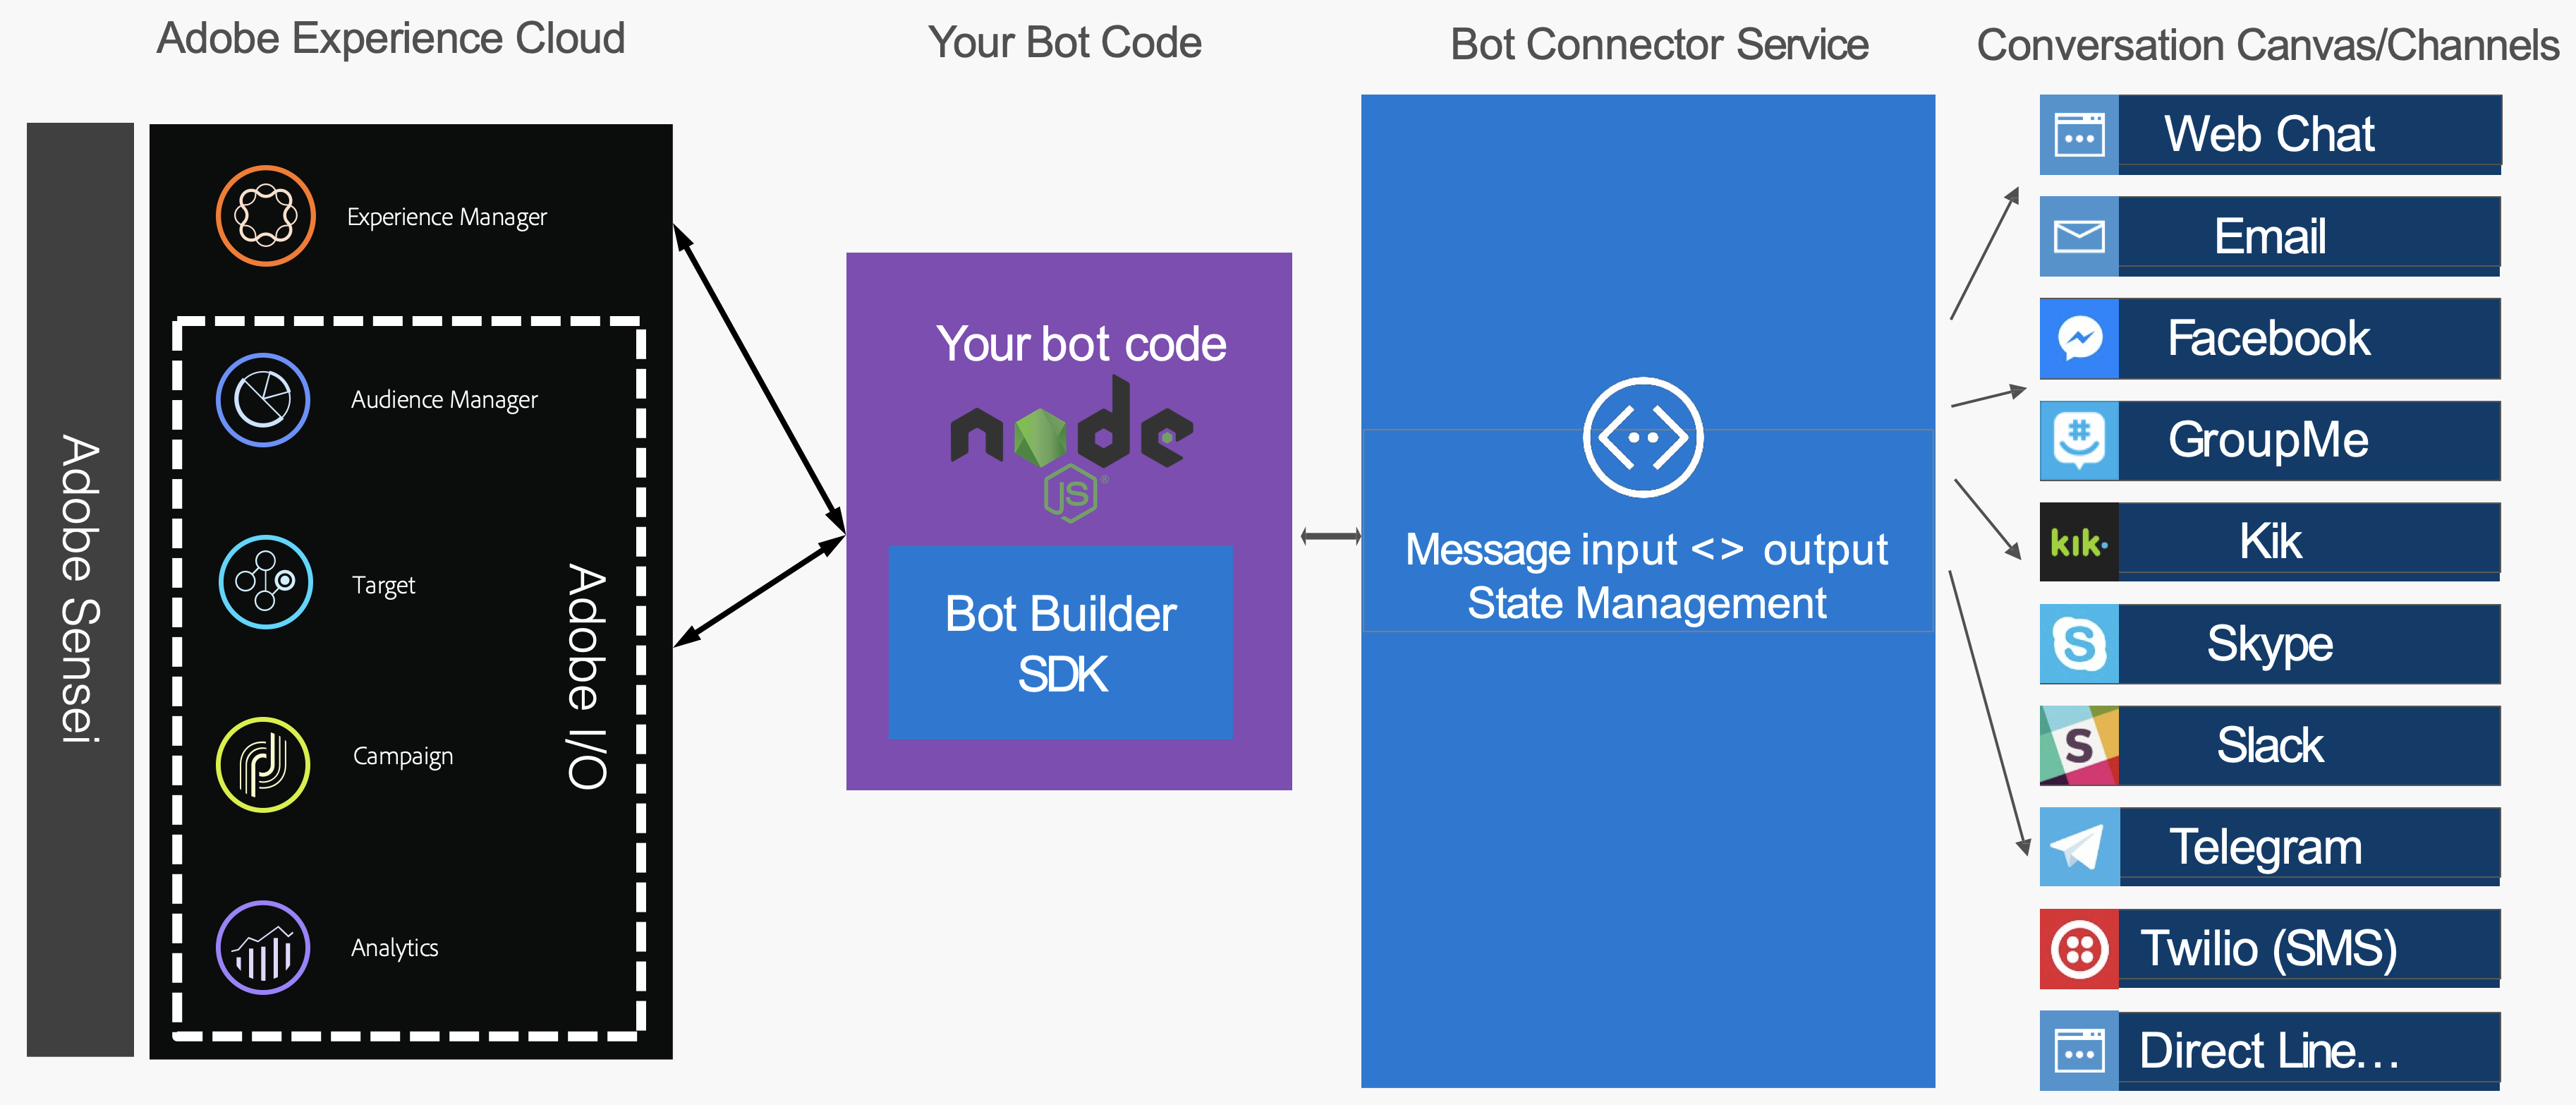
Whether building for Chat Bots or Alexa Skills, in many cases you can get a lot of value by extending your base Node.JS project with integrations with the Adobe Experience Cloud. That is our focus for the lab.
Example use cases for integration are as follows;
Lets start by opening up a page in AEM and adding a chat component, so we can see how a completed bot might behave.
Login to your lab machine with the following credentials
Open up the Credit Card example page where we will add the Chatbot
Open your browser to http://localhost:4502
Click on Sites -> weFinance APAC -> Language Masters -> En -> Personal -> Credit Cards. Select & open.
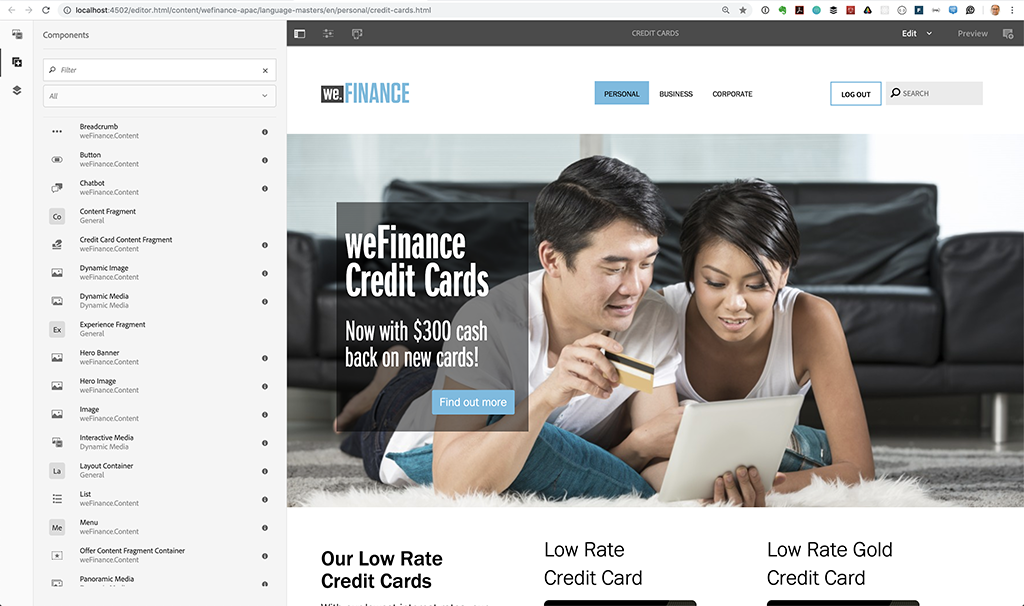
Make sure you are in edit mode, then from the Components Panel, drag the "Chatbot" component to the bottom of the page. The chatbot should appear.
Switch to Preview mode and the Bot should load.
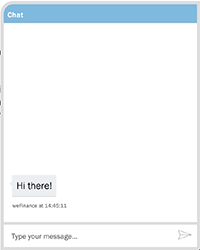
Let's interact with our first example bot
The Bot returns 3 offers in a carousel.

The decision for which offer to display was made by Adobe Target
The images and text were coming from Adobe Experience Manager
The interactions are being captured for analysis in Adobe Analytics.
If you are new to bots, you might be wondering how the magic is happening between typing something and getting a result. Each phrase you enter is commonly referred to as an utterance. Utterances are mapped to Intents, typically by an Machine Learning engine like Microsoft's LUIS. Once the Intent is mapped, the execution logic can be mapped.
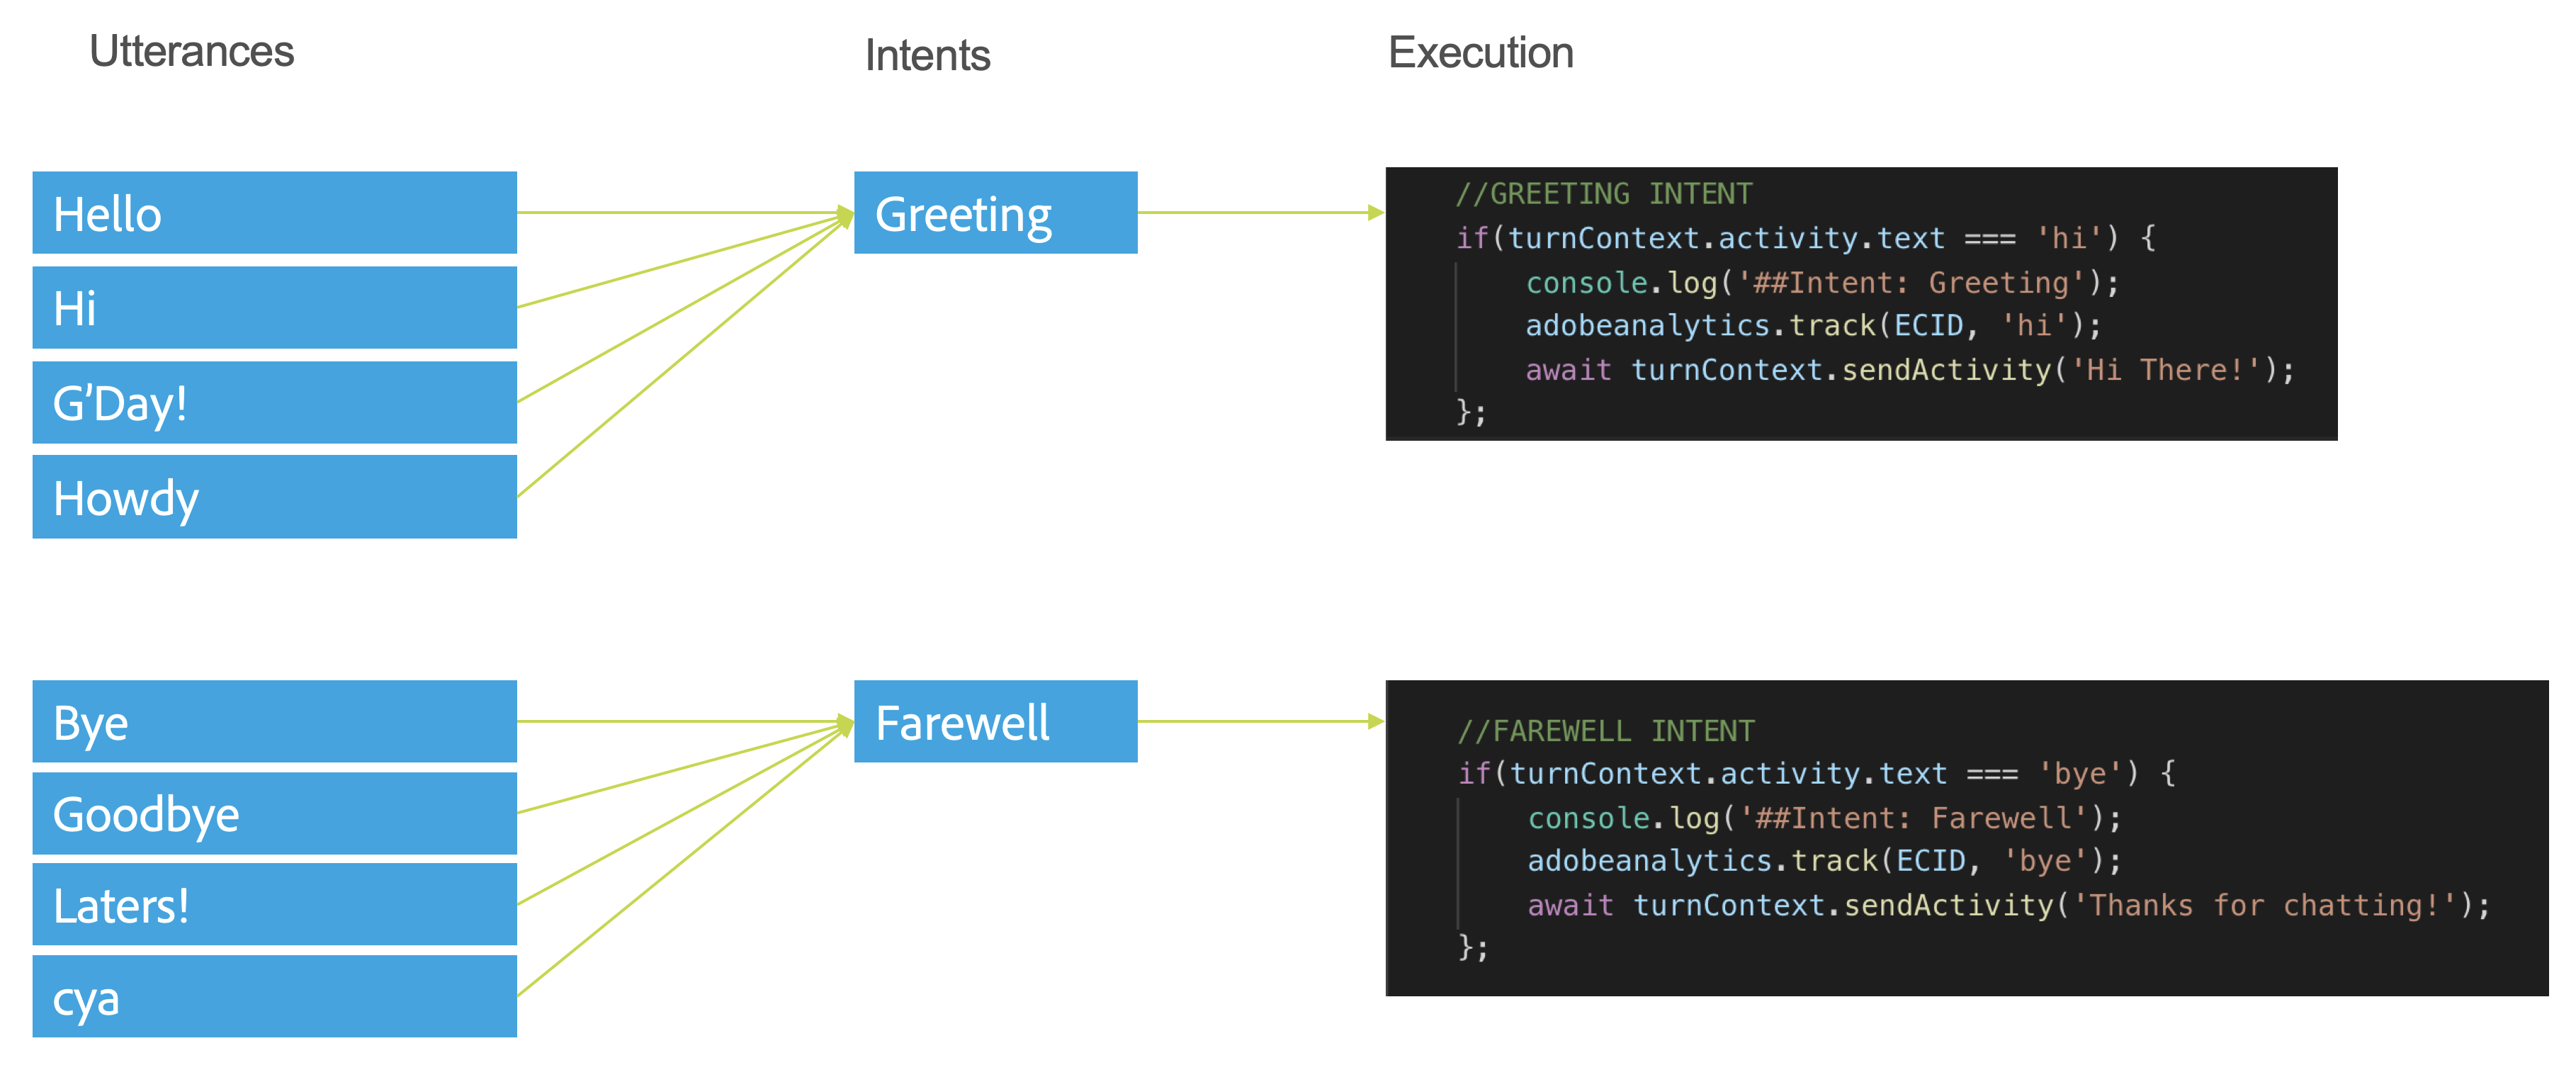
Note that for this lab we will be bypassing the use of LUIS and just mapping phrases directly to Intents to simplify the lab.
Switch back to Edit Mode in AEM, and select the Bot (you may have to refresh the browser window if its not highlighting)
Click on the Wrench to open the Chatbot properties. Note that the Bot ID & Bot Secret are entered into the component here. This is where you would normally add the connection details of your completed bot. We'll be creating a new bot, but thought it worthwhile to show how the final result is integrated back into a site.
Note! In a production scenario you most likely want to hide these properties away from a casual content author so its not changed by user error. This is out of scope for the lab and presented this way for simplicity.
We will be building capabilities into a sample bot throughout this lab. While not trying to teach everything about building Bots in this lab, I'll try and cover some of the basics.
To build a bot using Microsoft Bot Framework you typically need access to a Microsoft Azure account. For the sake of the lab we will keep things as simple as possible, so we will use the Microsoft Bot Framework emulator to emulate the Chatbot Client (a very useful tool during development) and run Node.JS locally to test the backend functionality of our bot.
Look for the "Bot Framework Emulator" in your Mac's Dock and open it.
Click "Open Bot" on the Welcome Screen and browse within the project files for "weFinanceBot.bot"
The Bot Emulator will load the Bot definition and is ready for interaction.
Try typing a message.. it wont work as there is no server running yet!
Open up Visual Studio Code from your Mac's Dock
Ensure the project is loaded, otherwise select File -> Open..
Open the Terminal within VS Code by selecting Terminal -> New Terminal
Run the following two commands to initialise the bot
If all goes well, you should see the following
Switch back to the Emulator and type "hi"
The Bot should respond with "Hi There!".
Lets see how this works.
Open up bot.js in Visual Studio Code
In this simplified example, there are a few things to call out
Let's try a couple of things
We will be calling on Adobe Experience Manager & Adobe Target in the next few lessons, but lets not get the core support in place. This will also enable us to track our bot using Adobe Analytics.
Let's add the Helper definitions and links to property setup files.
Open snippets/ex1.3.1.js and examine the code
// Get Properties
const PropertiesReader = require('properties-reader');
const properties = PropertiesReader('properties.config');

// Adobe Helper functions
const AEMXFHelper = require('./helpers/aem-xf');
const AEMCFHelper = require('./helpers/aem-cf');
const AEMDialogHelper = require('./helpers/aem-dialog');
const TargetHelper = require('./helpers/target');
const AnalyticsHelper = require('./helpers/analytics');
var aemxfmanager = new AEMXFHelper(properties);
var aemcfmanager = new AEMCFHelper(properties);
var aemdialogmanager = new AEMDialogHelper(properties);
var targetmanager = new TargetHelper(properties);
const adobeanalytics = new AnalyticsHelper();

// Adobe Experience Cloud ID (out of scope for this lab)
var ECID = "labuser";

// Here is a short code snippet
console.log("Hello World!");
There are a number of helper functions supplied as part of this Lab in the /helpers directory. The code above loads and initializes them. Lets look at the Adobe Analytics example.
Open bot.js
// Adobe Summit Lab 729 - Chatbot example

const { AttachmentLayoutTypes, ActivityTypes, CardFactory } = require('botbuilder');
const { ChoicePrompt, DialogSet, NumberPrompt, TextPrompt, WaterfallDialog, Dialog, DialogTurnStatus } = require('botbuilder-dialogs');

// Get Properties
const PropertiesReader = require('properties-reader');
const properties = PropertiesReader('properties.config');

// Adobe Helper functions
const AEMXFHelper = require('./helpers/aem-xf');
.... //GREETING INTENT
if(turnContext.activity.text === 'hi') {
console.log('##Intent: Greeting');
adobeanalytics.track(ECID, 'greeting');
await turnContext.sendActivity('Hi There!');
};Restart the bot (Control-C then type npm start -> return)
Switch back to the Bot Emulator
Switch to VS Code
Analytics tracking intent: byeFor more information on the Adobe Analytics NPM module: https://www.npmjs.com/package/adobe-analytics-di
See the results in Adobe Analytics
Open this Adobe Analytics Link
Click "To login via the Experience Cloud ID, click here"
Click "Sign in with an Adobe ID"
Username: mszulc+lab05@adobetest.com
Password: summit
If a pop up to enter your phone number appears, click "skip"
Click "Real Time" at the bottom of the list of reports.
You should see a report similar to the image below.
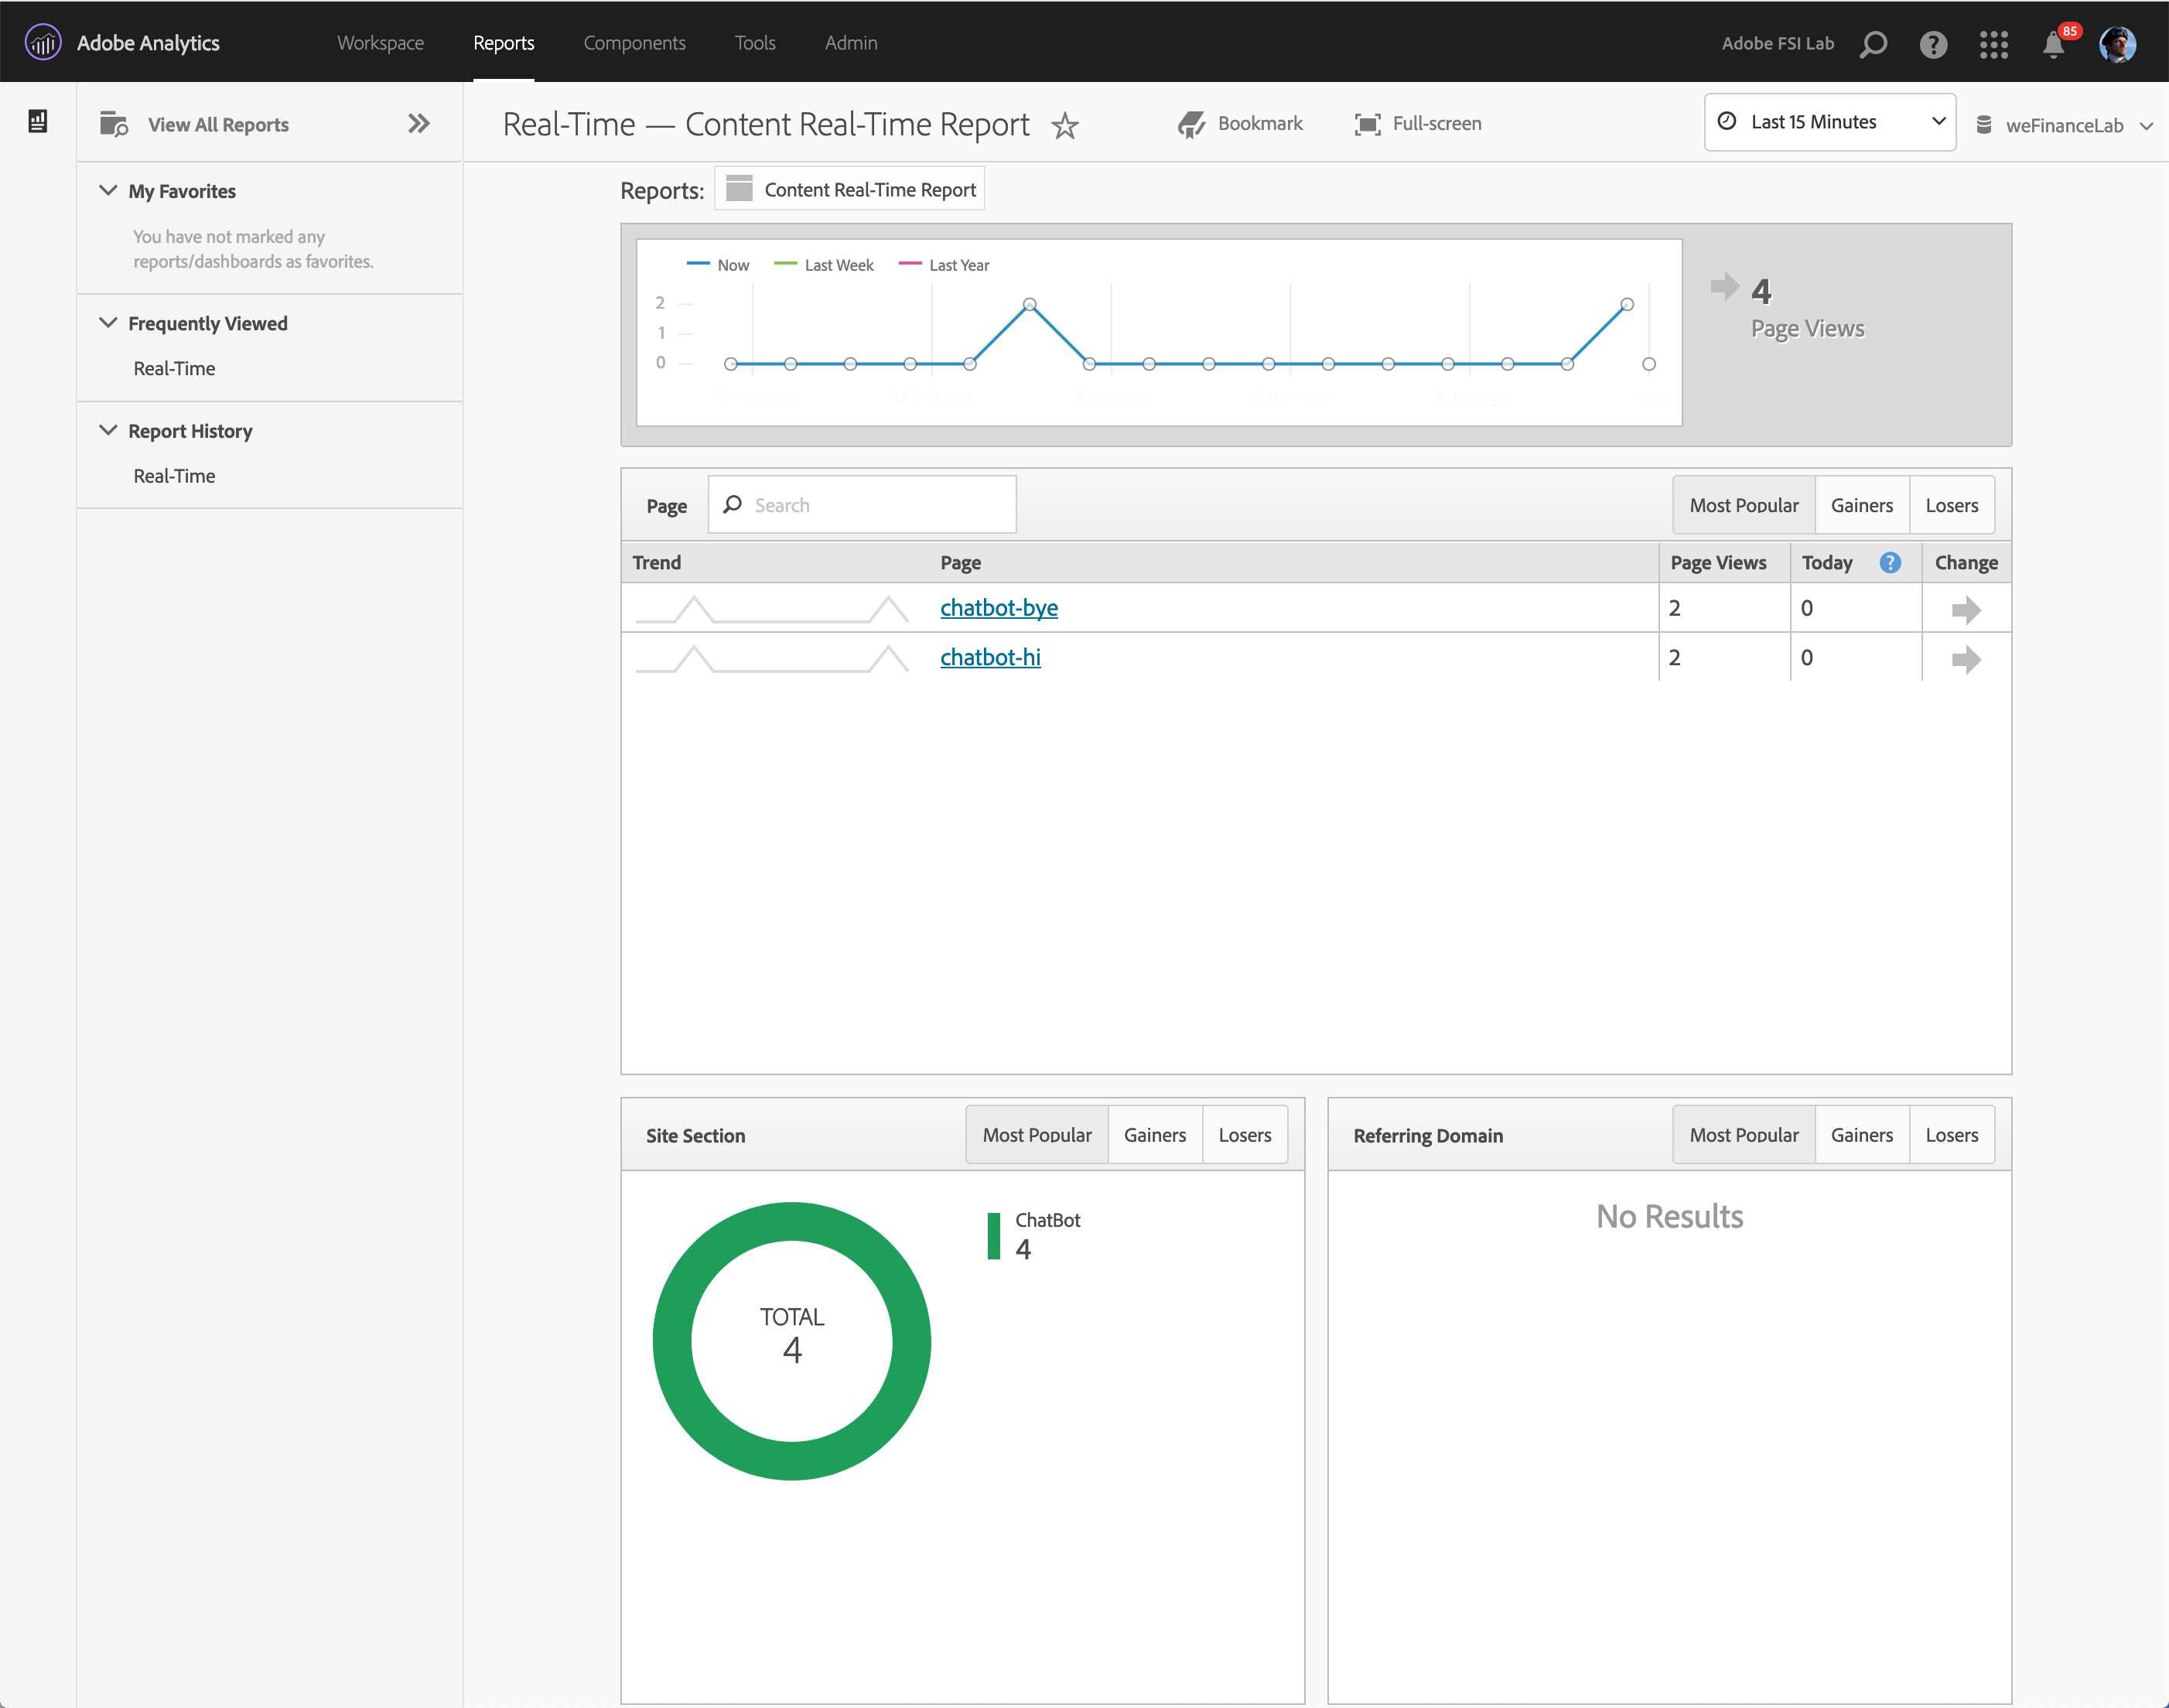 Note: There is a typical lag of around 15 seconds between action and report. Feel free to change the values of your intent and test the results.
This is not an exhaustive overview of how to correctly track a chatbot. For more detailed information on this topic check out this resource Adobe Analytics Help
In Lesson 1 we manually entered the chatbot response directly into the code. While this is easy to manage for simple bots like the one in this lab, over time it can be painful. We can use AEM Fluid Experiences feature to allow content authors to manage the chatbot content without dramatically altering the way we manage the bot logic.
Log into AEM
Navigate to Content Fragments
Open existing fragment
This fragment will be used as our Bot greeting. In a moment we will wire up our bot to consume the content from this fragment
Create new fragment + publish
Click the Create button and select Content Fragment
Select Simple Fragment (we'll look at the others soon)
Enter the title as "Announcement"
Click "Create" then open.
Click the main body of text and enter "We are pleased to announce a drop in interest rates."
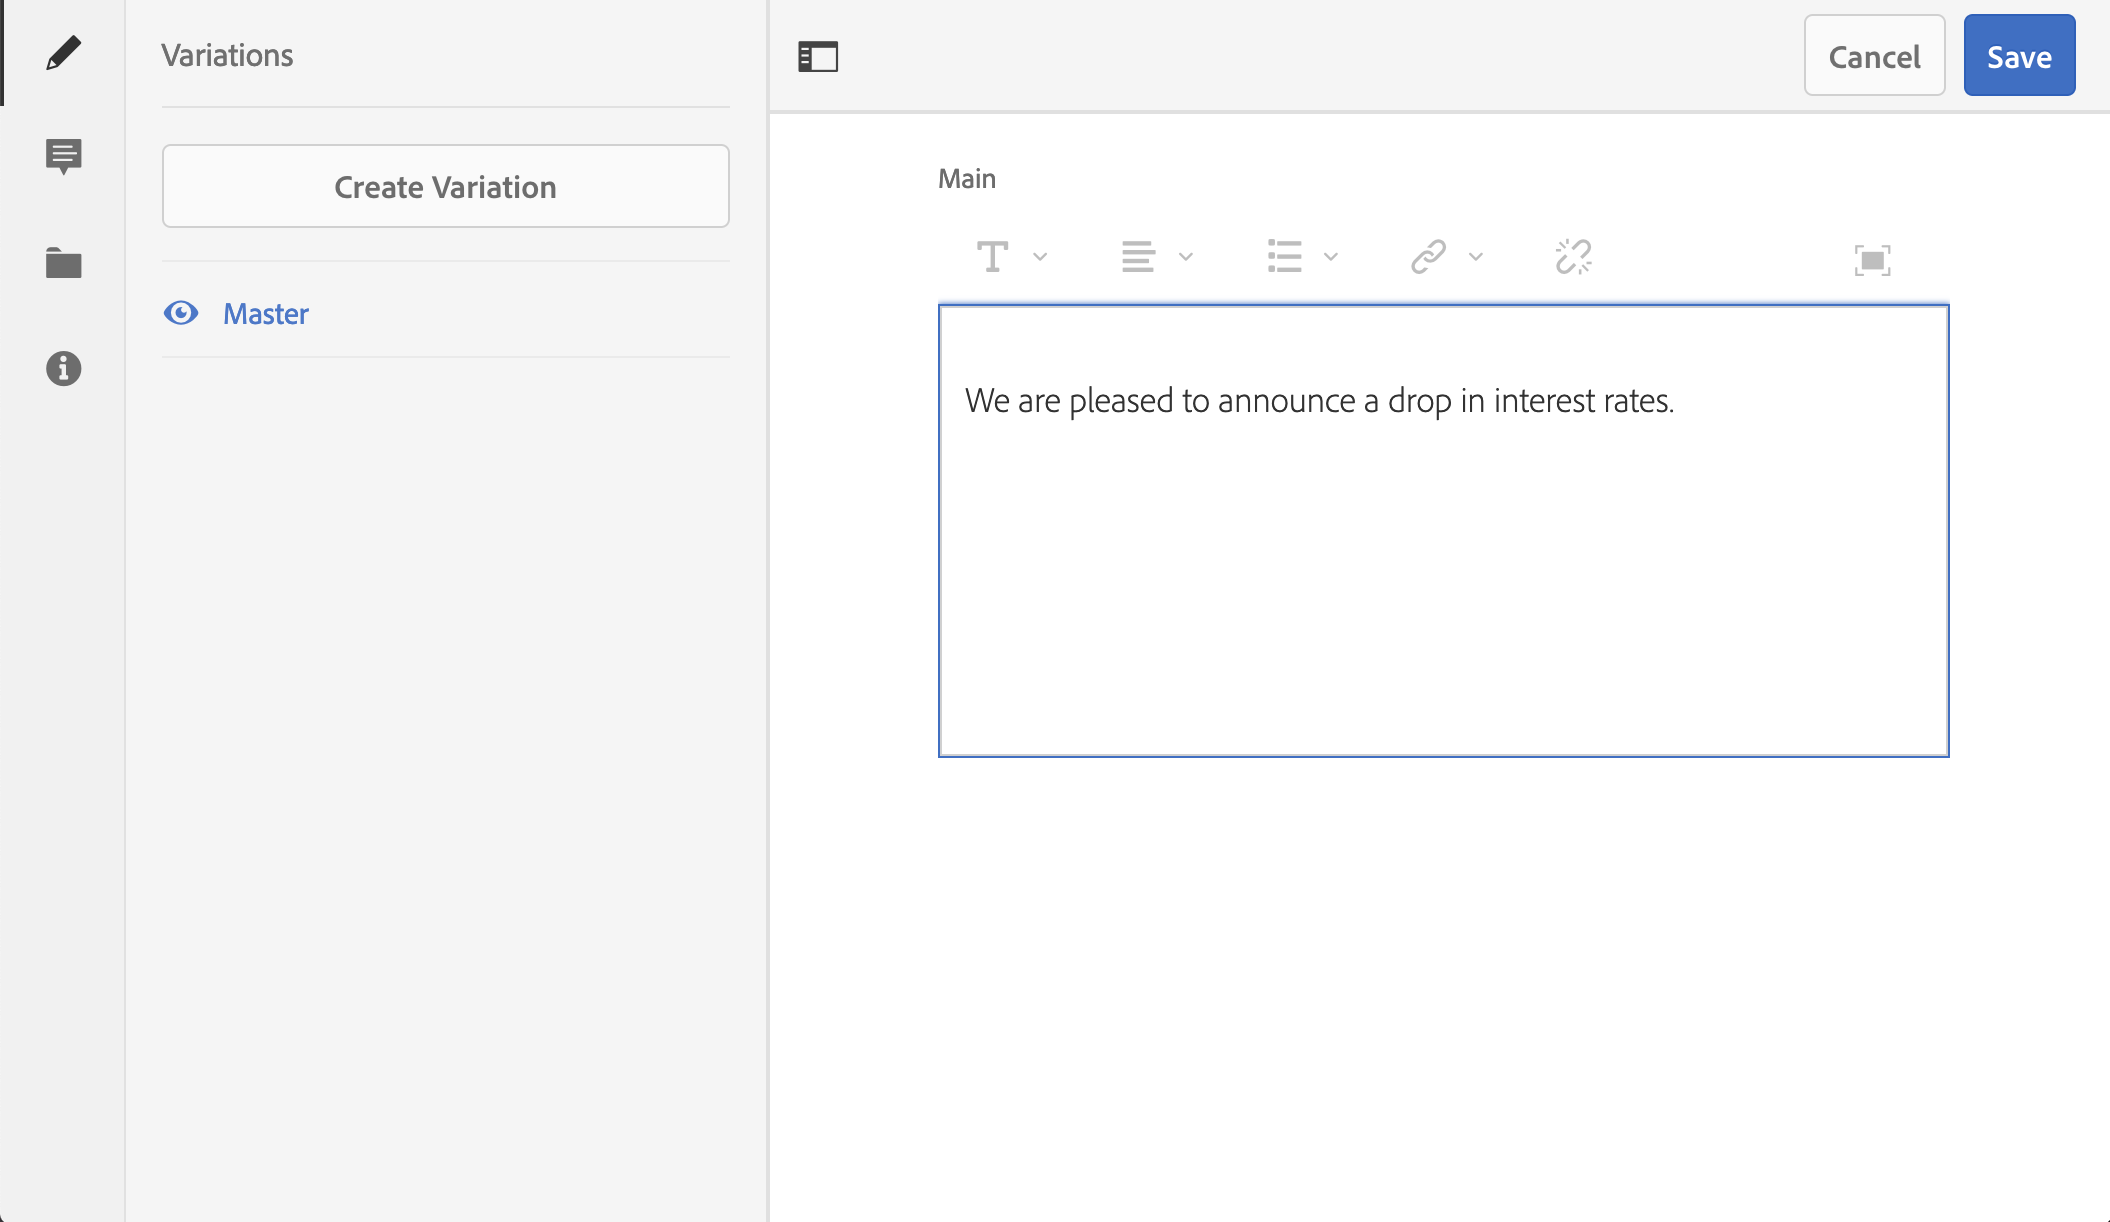
Click Save.
Select both fragments (Hello & Announcement) and click "Quick Publish"
Now that we have some content, lets see how we can access it from outside of AEM
Open Postman (a recommended tool to help explore APIs.)
Call the CF API
Note the contents within the JSON related to our fragment
Now we can write some simple code to consume the JSON
Open or switch back to Visual Studio Code
Paste in the following code (from snippets/ex2.3.1.js) below your existing intent
Run the Bot (if it's already running, type Control-C to quit)
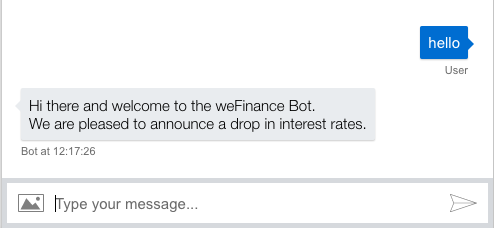
Open Bot Emulator and type "hello".
You should see the following result
Open the AEM CF helper file to see how its simply passing the JSON that we looked at in Postman
Use this technique for any part of the Chat experience that you want to hand off the content to a content author to manage. Note that for the lab the results are fetched live each time the user types "hello". In a production environment this detail could be cached and/or checked at intervals.
You may also be wondering why you wouldn't just update the dialog content within one Content Fragment.. above is a simple example but there are times where you might want to split the content across multiple dialogs or into a richer experience. We'll cover this next.
So far we've used simple content fragments to manage bot responses, but they've fairly basic. In this lesson we'll take advantage of both Structured Content Fragments & Experience Fragments to enhance our bot.
Navigate to Tools -> Assets -> Content Fragment Models -> weFinance APAC or open http://localhost:4502/libs/dam/cfm/models/console/content/models.html/conf/wefinance-apac
Click on "Credit Card" model and select Edit. 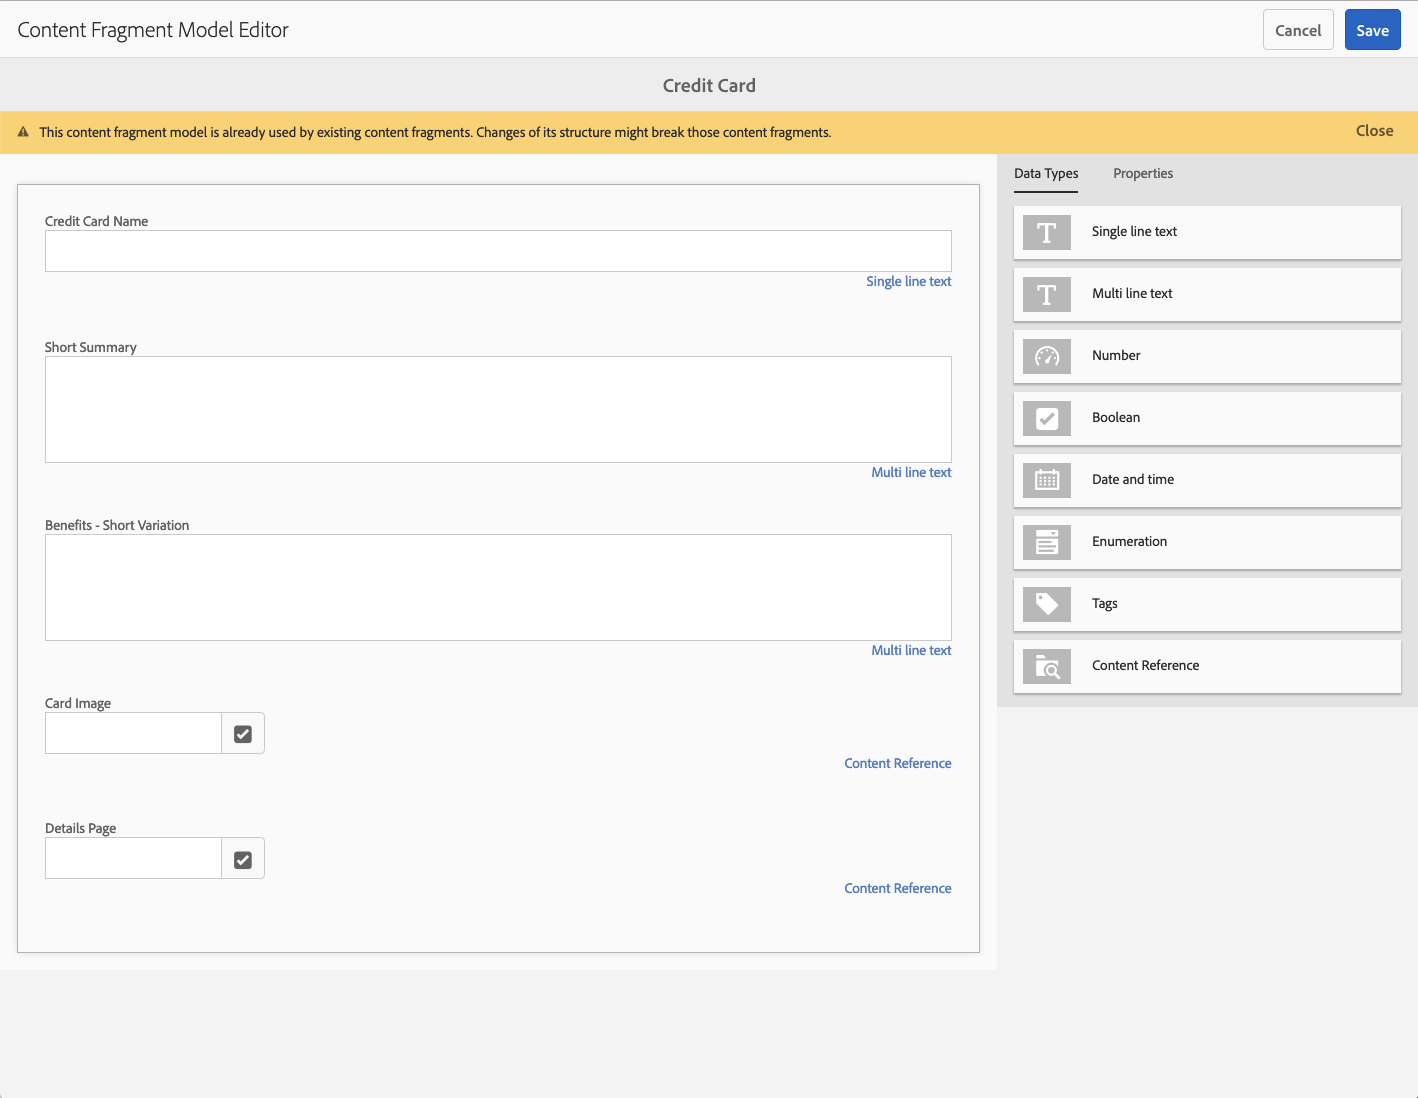
You can use these models to define the structure of content so Content Authors can easily create & edit content, and developers can consume it with predictable format.
Each field will have a Property Name. AEM will use this as the element name in the JSON output for each fragment.

The JSON output is great, but what if you want to process the data in advance and/or change the generated schema? Lets take a look at one possible option.
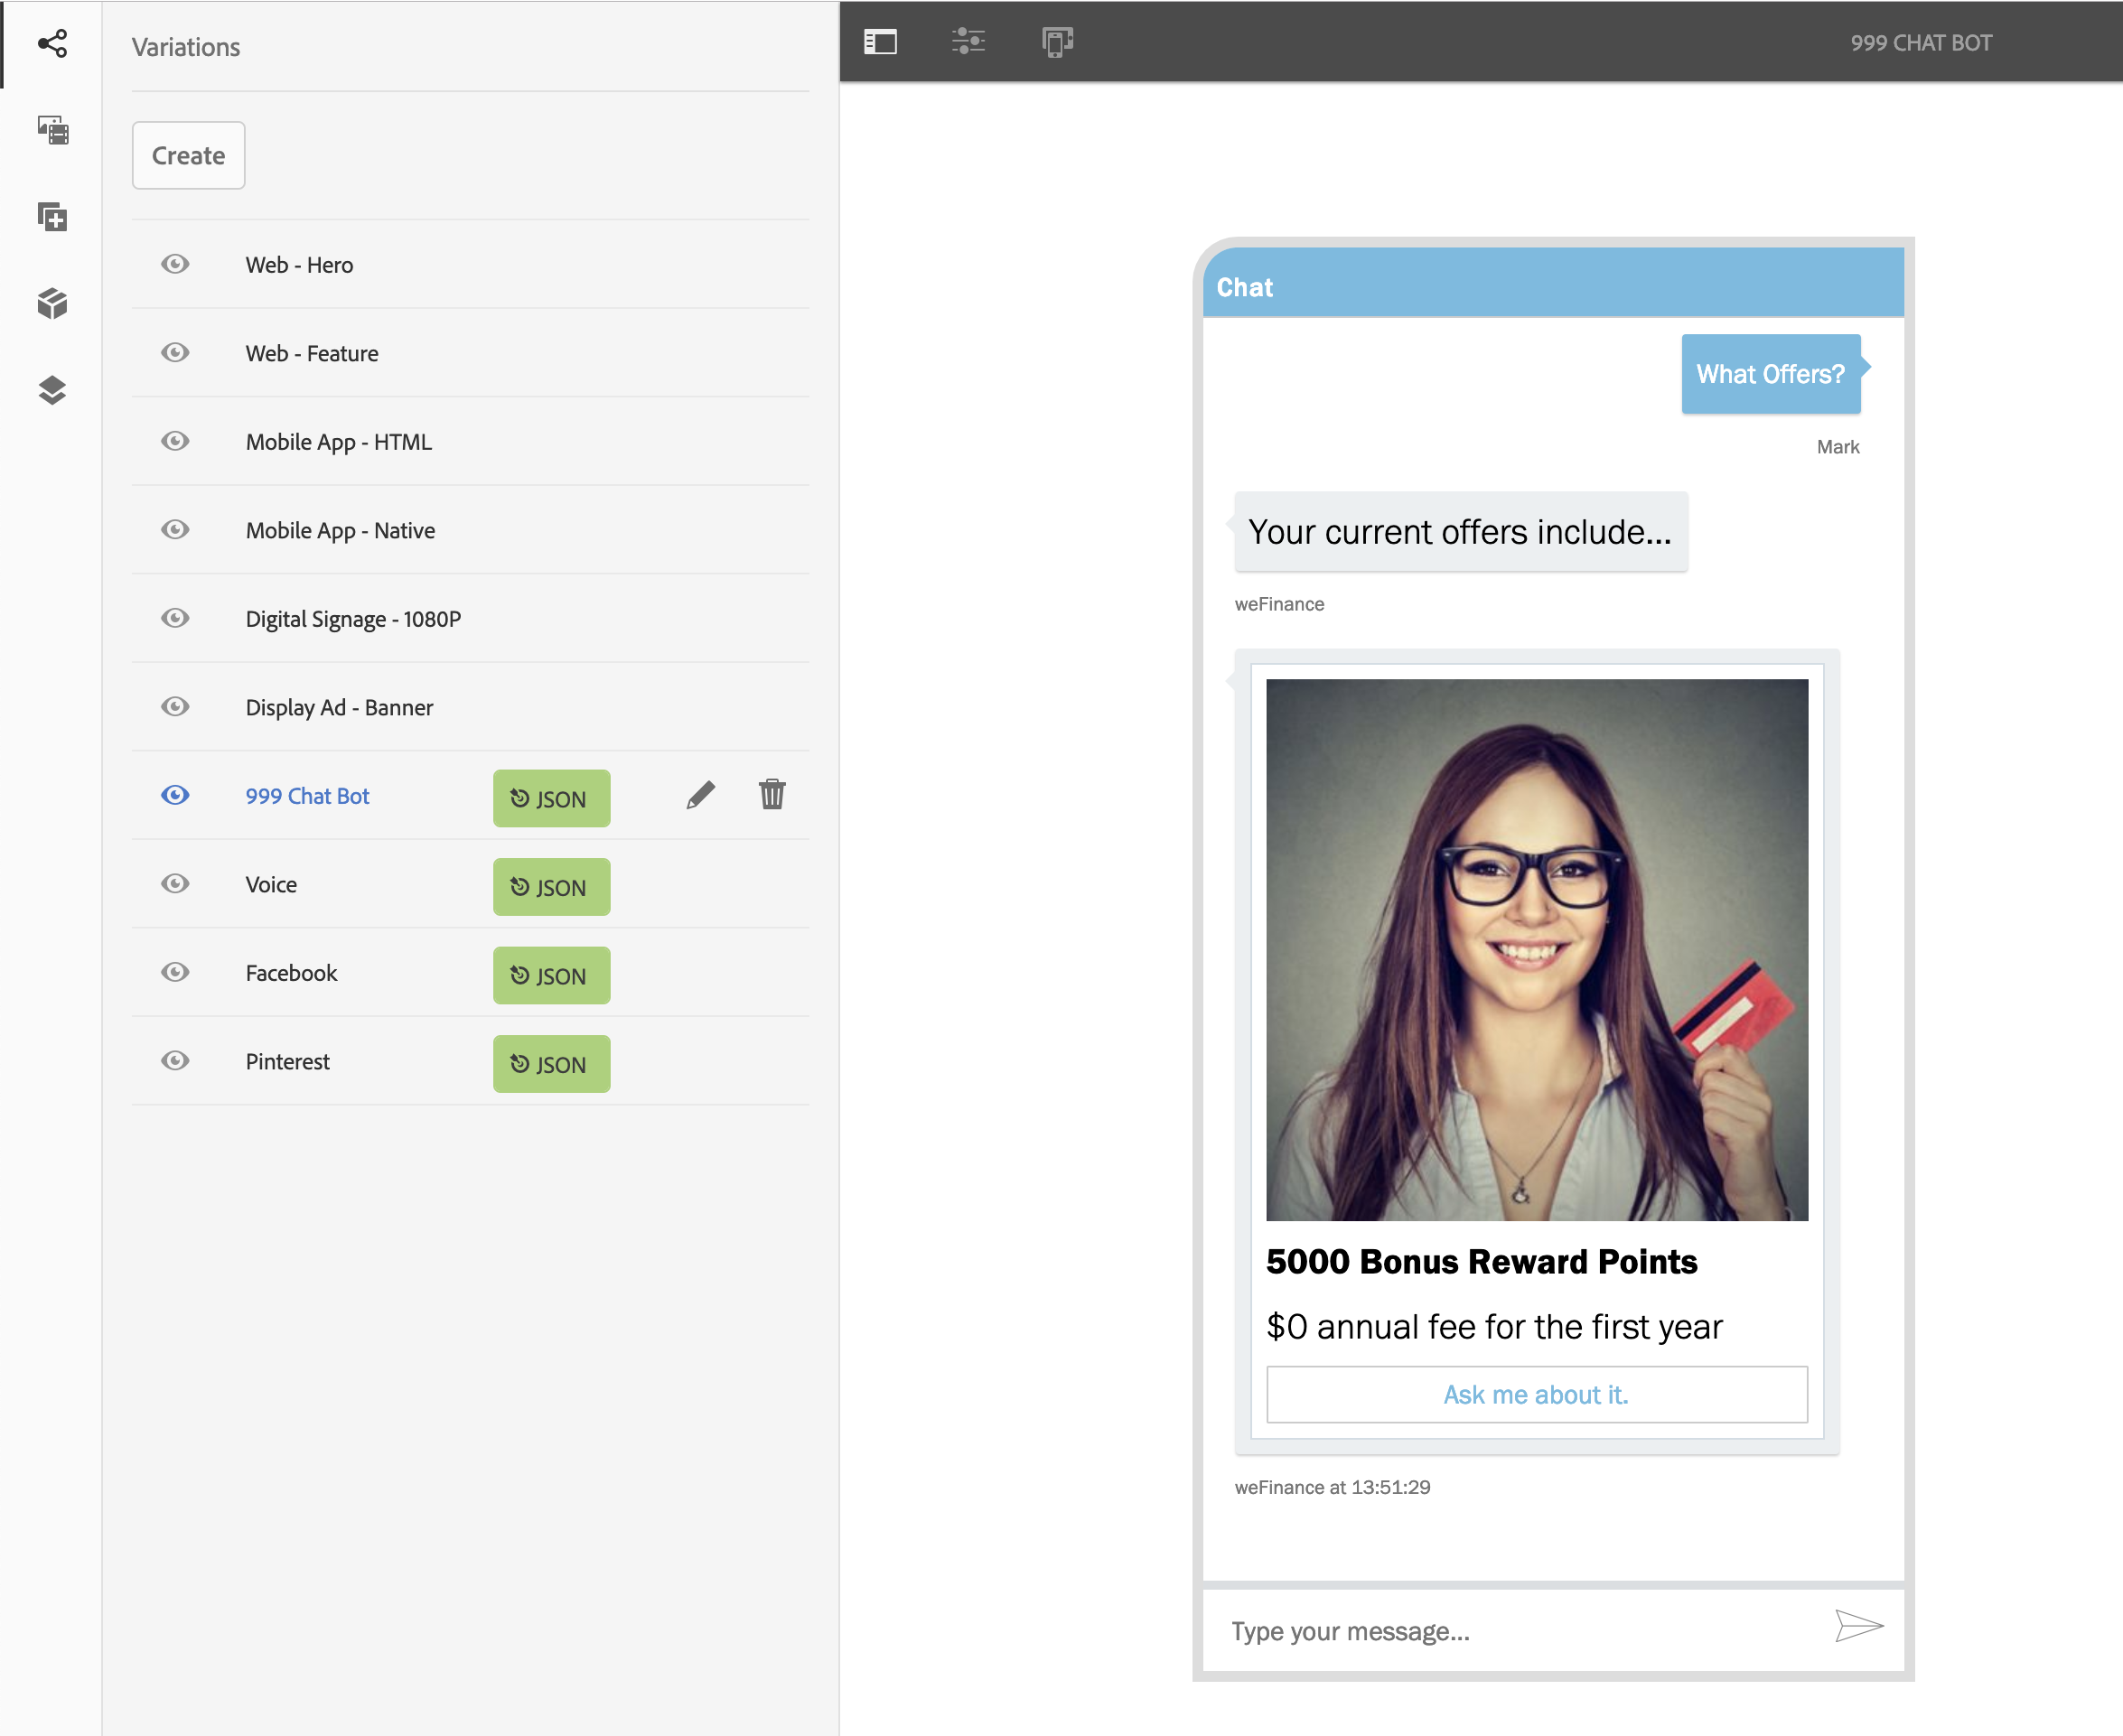
Open Experience Fragment for Offer 999
Navigate to Experience Fragments -> weFinance -> Offers -> English -> 999 - Bonus Rewards -> Web-Hero or click http://localhost:4502/editor.html/content/experience-fragments/wefinance/offers/en/999/master.html
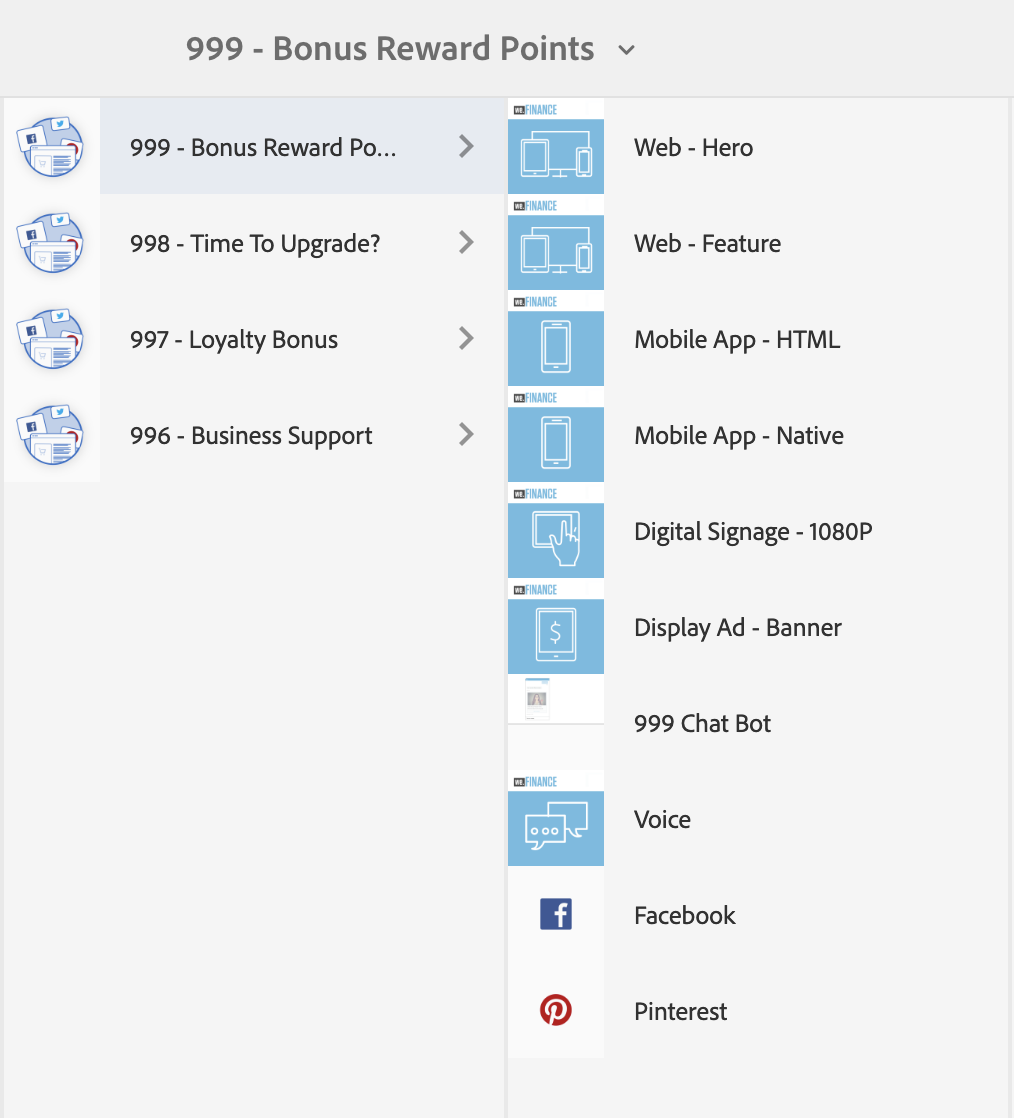
Look at the different variations
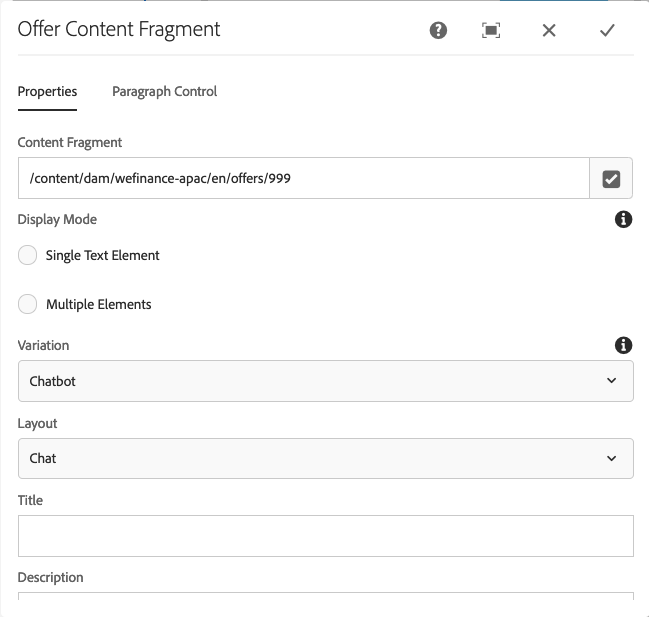
Note the Smart Crops coming from Dynamic Media (we'll look at that in more detail in a moment, but notice that the image crop is different for chat than other fragment variations)
Open Postman
Run the "AEM: Get Experience Fragment" example
Postman will show the output of the content at http://localhost:4503/content/experience-fragments/wefinance/offers/en/999/chat.model.json
Note that the JSON output is different to the previous Content Fragment examples 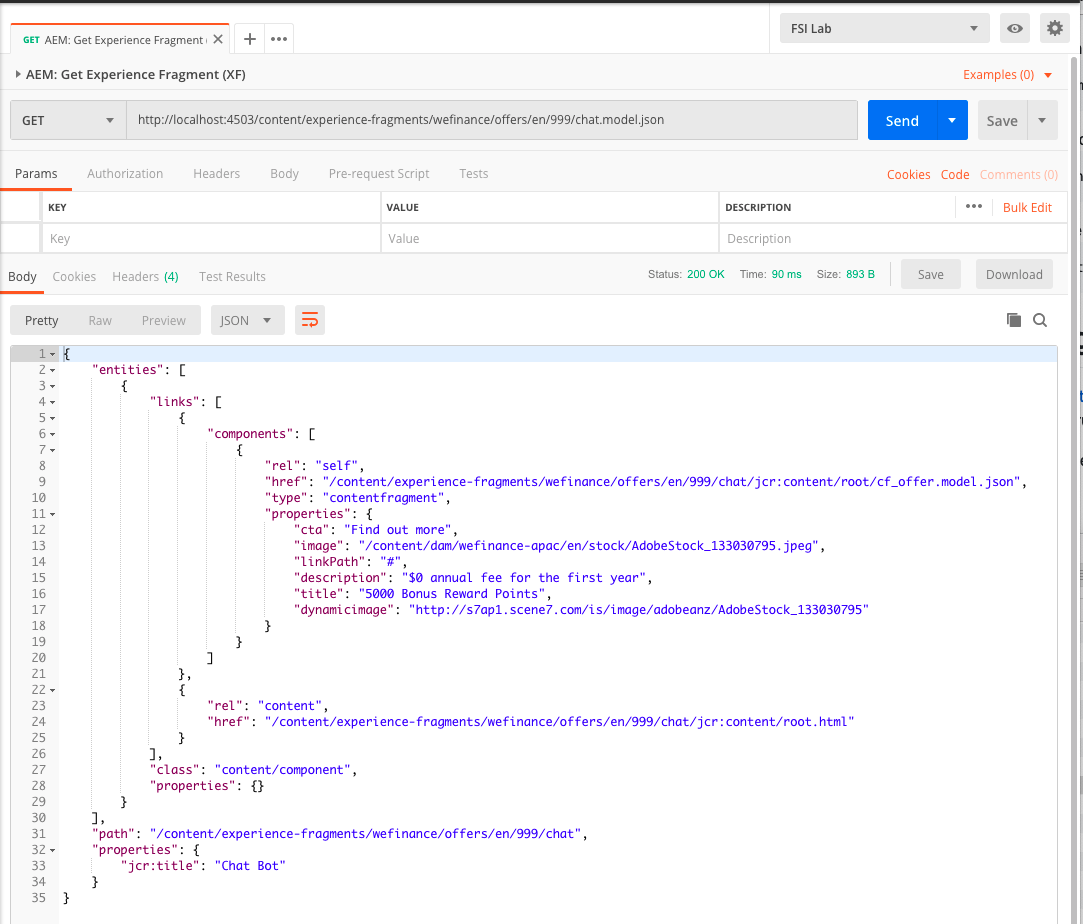
Experience Fragments & Content Services together provide a lot of options for producing content in different ways. In this case we are using Sling Model Exporter to change the output. You can use this method to shape the output from AEM conform to the desired output.
For more information look here: https://helpx.adobe.com/experience-manager/kt/platform-repository/using/sling-model-exporter-tutorial-develop.html
For an example showing how this demo was built, see snippets -> otherexamplecode -> ExperienceFragmentModel.java
Notice the Dynamic Media property within the JSON
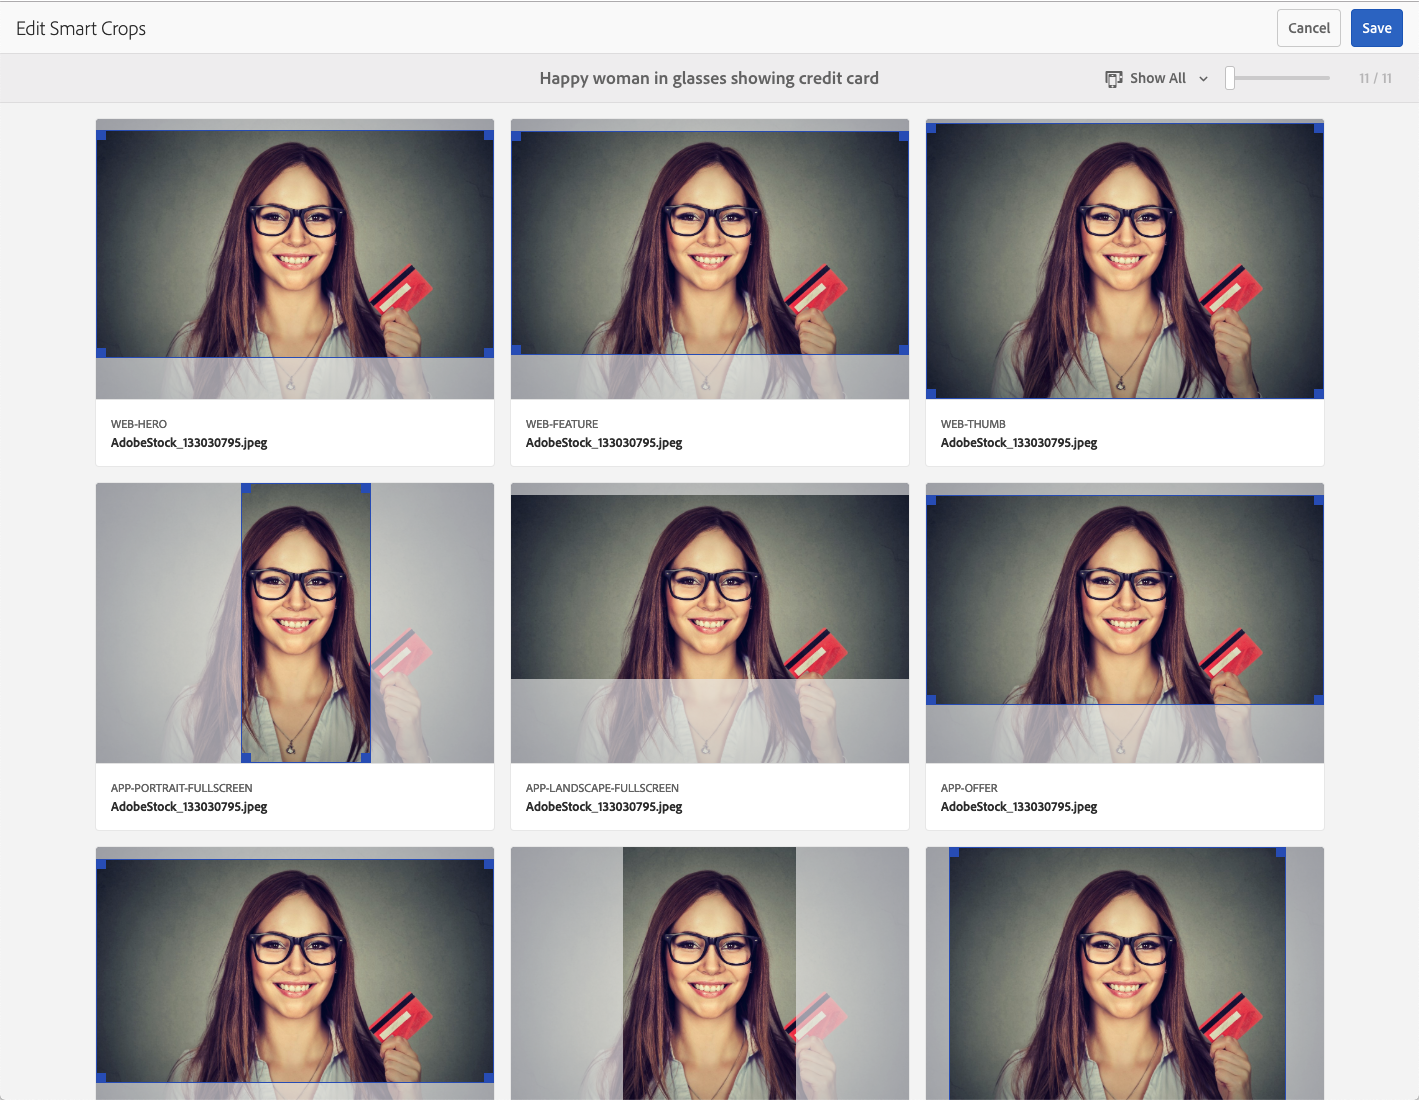
Open http://s7ap1.scene7.com/is/image/adobeanz/AdobeStock_133030795 in your browser
This is the default image served by AEM Dynamic Media

The Smart Crop feature allows you to define crop points that can be called as needed.

You can see how this defined here: http://localhost:4502/libs/dam/gui/content/s7dam/smartcrop/smartcropedit.html/content/dam/wefinance-apac/en/stock/AdobeStock_133030795.jpeg
Our Sling Model Exporter from Exercise 3.2 automatically looks for the image asset linked in the content fragment, and if its dynamic, adds the dynamic media value to the JSON output.
Open or switch back to Visual Studio Code
Paste in the following code (from snippets/ex3.4.2.js) below your existing intent
// OFFER INTENT
if(turnContext.activity.text === 'offer') {
    console.log('##Intent: Offers');
    adobeanalytics.track(ECID, 'offer');

    //Call AEM and request Offer 999, and get the Chat variant.
    let offer = await aemxfmanager.getAEMXFOffer("999","Chat");
    let title = await aemxfmanager.formatOffer(offer);

    await turnContext.sendActivity(title);
};
Run the Bot (if it's already running, type Control-C to quit)
Open the emulator
Type in "offer"
You should see a single line response displaying our offer.
It works, but hardly a compelling experience, so lets switch it out with a Rich Card.
Switch back to Visual Studio Code.
Paste in the following code (from snippets/ex3.4.8.js) below your existing intent
// CARD OFFER INTENT
if(turnContext.activity.text === 'card') {
    console.log('##Intent: Card Offer');
    adobeanalytics.track(ECID, 'cardoffer');

    //Call AEM and request Offer 999, and get the Chat variant.
    let offer = await aemxfmanager.getAEMXFOffer("999","Chat");
    let card = await aemxfmanager.createHeroXFCard(offer);
    await turnContext.sendActivity({ attachments: [card] });
};
Run the Bot (if it's already running, type Control-C to quit)
Open the emulator & type in "card"

We now have a way to bring the same content used across other channels directly into our chatbot, and leveraging Smart Crop to ensure the images are sized accordingly!
Have new content and can't wait for a code release? In this lesson we'll use a technique to use Content Fragments to not only manage content, but also utterances (the keywords that trigger the bot) as well as conversation flow.
It's worth noting that the following is using custom code within the bot, but no customization of AEM is required beyond building / importing some Content Fragment models.
Open or switch back to Visual Studio Code
Paste in the code from (snippets/ex4.1.2.js) just before the last '}' at the bottom of bot.js
This code is calling an AEM Dialog Helper, calling Content Fragments like before, however these Content Fragments have a different structure than the last section, which we can use to build a dynamic bot experience.
Paste in the code from (snippets/ex4.1.3.js) just after the line "class MyBot {" towards the top of bot.js
This code is nothing really to do with AEM, but was left out to simplify the code in previous steps. It is setting up the bot to understand the state of both the conversation, and properties of the user.
Paste in the intent code from (snippets/ex4.1.4.js) just below the last Card Offer Intent code from Exercise 3.4
This code takes the Content Fragment output and converts it into a series of Bot Framework dialogs.
Finally, paste in the code from (snippets/ex4.1.5.js) just below the line that reads var ECID = "labuser"; which should be close to line 23.
This code takes the Content Fragment output and converts it into a series of Bot Framework dialogs.
Run the Bot (if it's already running, type Control-C to quit)
Open the emulator
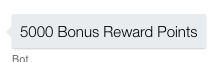
Type in "hey"
You should be greated with the response "Hi there. I'd like to get to know you. What's your first name?"
Enter your name
You will be asked "Business or Personal"
Enter Business or Personal
Note that for simplicity we are expecting the user to type in the response. In a real bot you might consider using a Choice Prompt that the user can just select.
You will be asked what type of service you are interested in.
Enter a value - eg "Loans".
You will be given a summary of the interaction.
Type "offer"
Note that the existing bot functionality still works.
Type "info"
You will be given a summary of what you have already shared.
Log into AEM
Navigate to Assets -> weFinance -> English -> Chatbot -> Dialogs or http://localhost:4502/assets.html/content/dam/wefinance-apac/en/chatbot/dialogs
Open up "Welcome" Content Fragment
Here you can see a number of "utterances" - phrases you can utter, to invoke a function. When we typed "hey" in Exercise 4.2.2 above, our bot knew how to response based on this.
Below the utterances is a series of Steps that should be executed when a user invokes this Dialog.
Close the Content Fragment and open up the "Welcome Name" fragment.
Here you can see various properties that define the user experience. Dialog Kind is the type of prompt, Message is fairly obvious, and "name" is where the Bot will store the response. You can get more detail by clicking on the 'i' on each field.
Open "Welcome - Result" Content Fragment
Here you can see how a user property (name & accountype are examples here) can can be inserted into the message using the {{property}} format.
At this stage we have a great dynamic bot that content authors can manage without relying on development cycles, and provide rich responses via Experience Fragments. In this final section we'll use Adobe Target to personalise the content delivered depending on parameters specified or collected during the dialog.
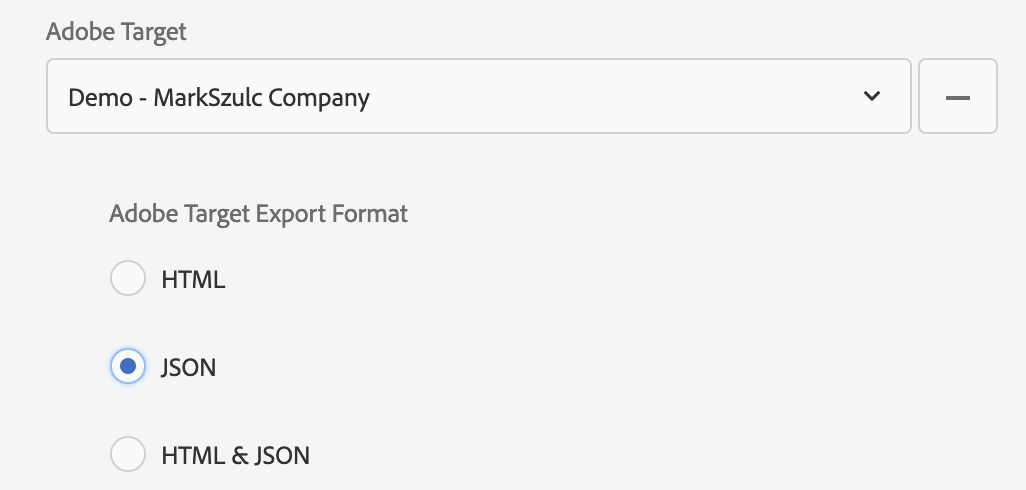
AEM 6.5 extends the Experience Fragment / Target integration by offering support for JSON in addition to HTML.
You may have noticed the green JSON status previously when editing the fragments
This is a new enhancement in AEM 6.5 and is configured in the properties of the parent Experience Fragment as follows;
Due to the lab restrictions, we wont be using this live, but you watch this video of AEM -> Target to get more detail.
Open Postman
Run the "Target: Basic Mbox call" example
This example shows you the output of the direct call from Target. Note the Experience Fragment JSON output. This is the default response from the Target activity.
Log into Adobe Target
Go to https://fsilab.experiencecloud.adobe.com/content/mac/fsilab/target/activities.html
Username: mszulc+lab05@adobetest.com
Password: summit
Click on the "Chatbot Example" activity.
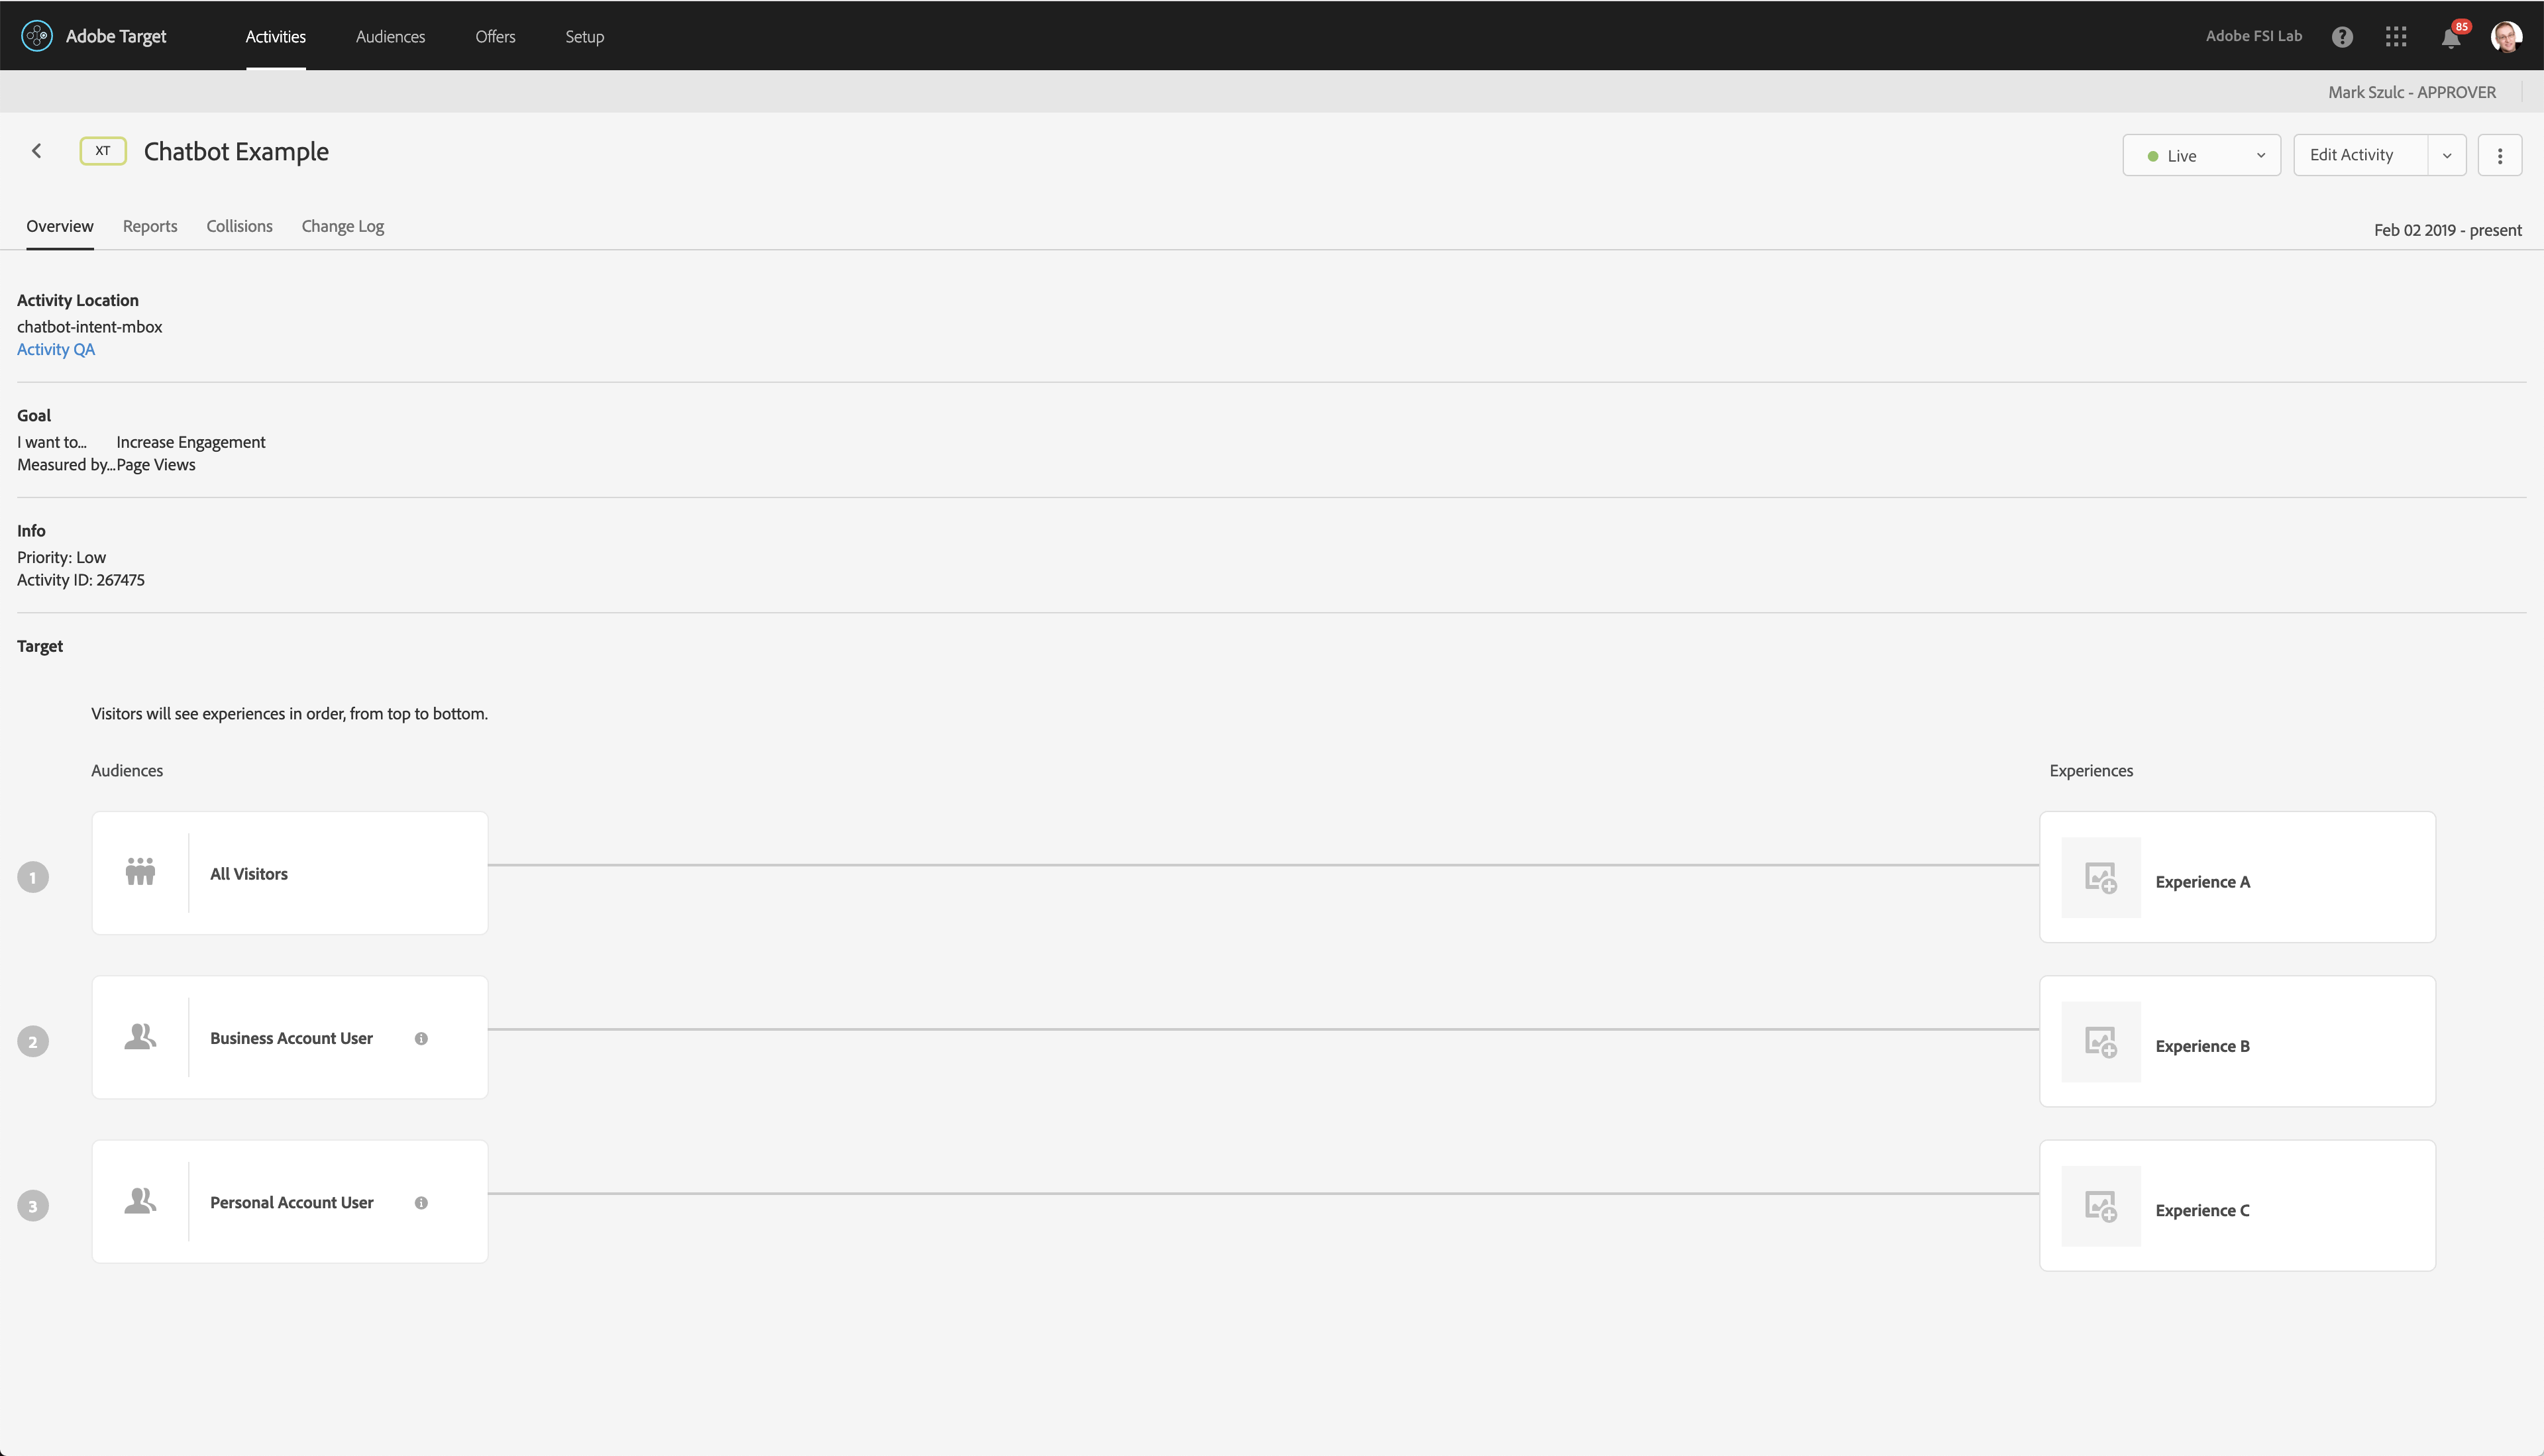
NOTE: Please do not change this.. the whole lab is using the same setup.
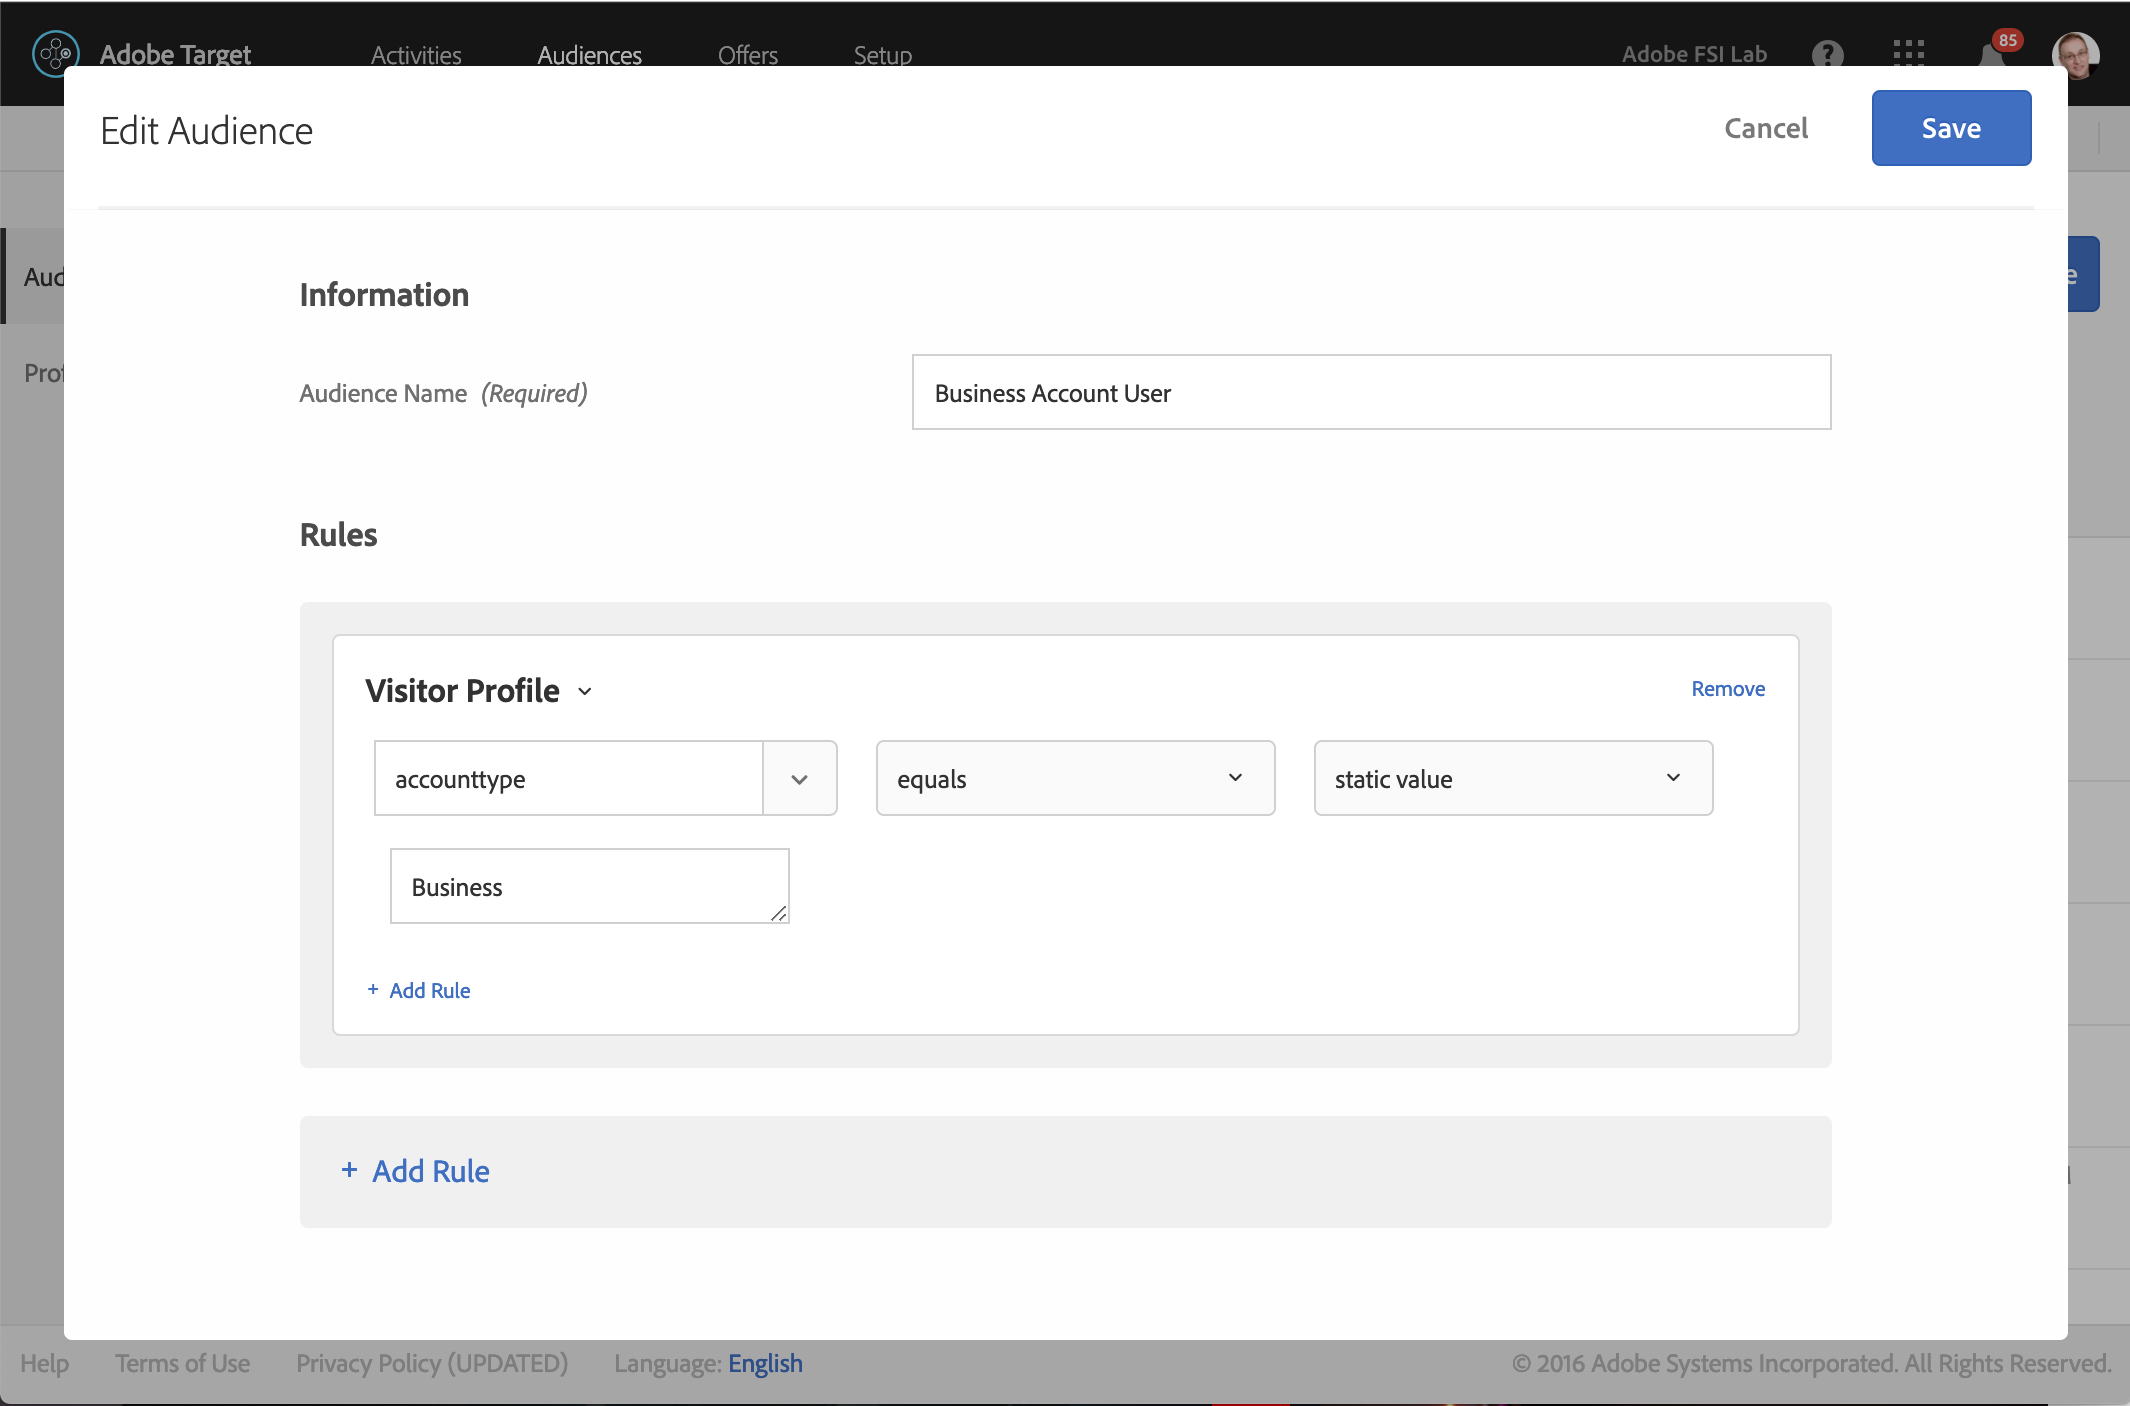
Note the link to Business Account User audience
Open or switch back to Visual Studio Code
Paste in the code from (snippets/ex5.2.2.js) just below the first couple of Intents in your code.
// TARGET INTENT
if(turnContext.activity.text === 'target') {
    console.log('##Intent: Target');
    adobeanalytics.track(ECID, 'target');

    let profileParameters = {};

    const user = await this.userInfoAccessor.get(turnContext, {});

    if (user.hasOwnProperty('userInfo')){
        console.log('Calling Target with AccountType: ' + user.userInfo.accounttype);
        profileParameters = {"accounttype" : user.userInfo.accounttype};
    }

    await turnContext.sendActivity('Calling Target..');
    let offer = await targetmanager.getOffer("chatbot-intent-mbox",profileParameters);
    let card = await aemxfmanager.createHeroXFCard(offer);
    await turnContext.sendActivity({ attachments: [card] });
};
Run the Bot (if it's already running, type Control-C to quit)
Switch to the Bot Emulator
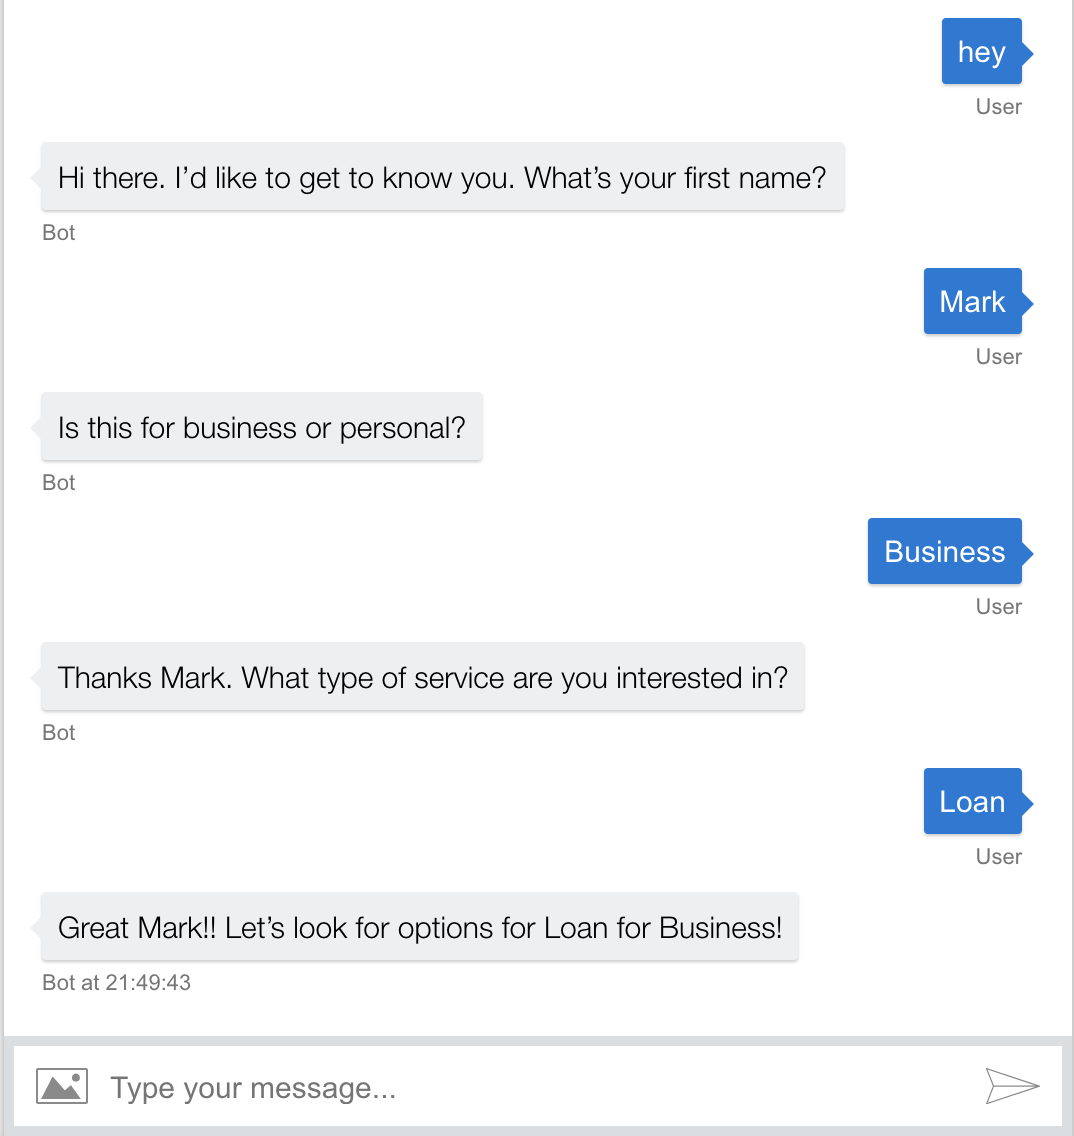
Type "target". You should see a Rich Card with content from the AEM Experience Fragment. While it looks identical, the content is coming from Target instead of AEM.

Its time to put everything together...
Type in "hey" and follow the prompts.
Enter your name, and on the next prompt select "Business"
Enter the last value with any value you want (its not used in this example
type "target"
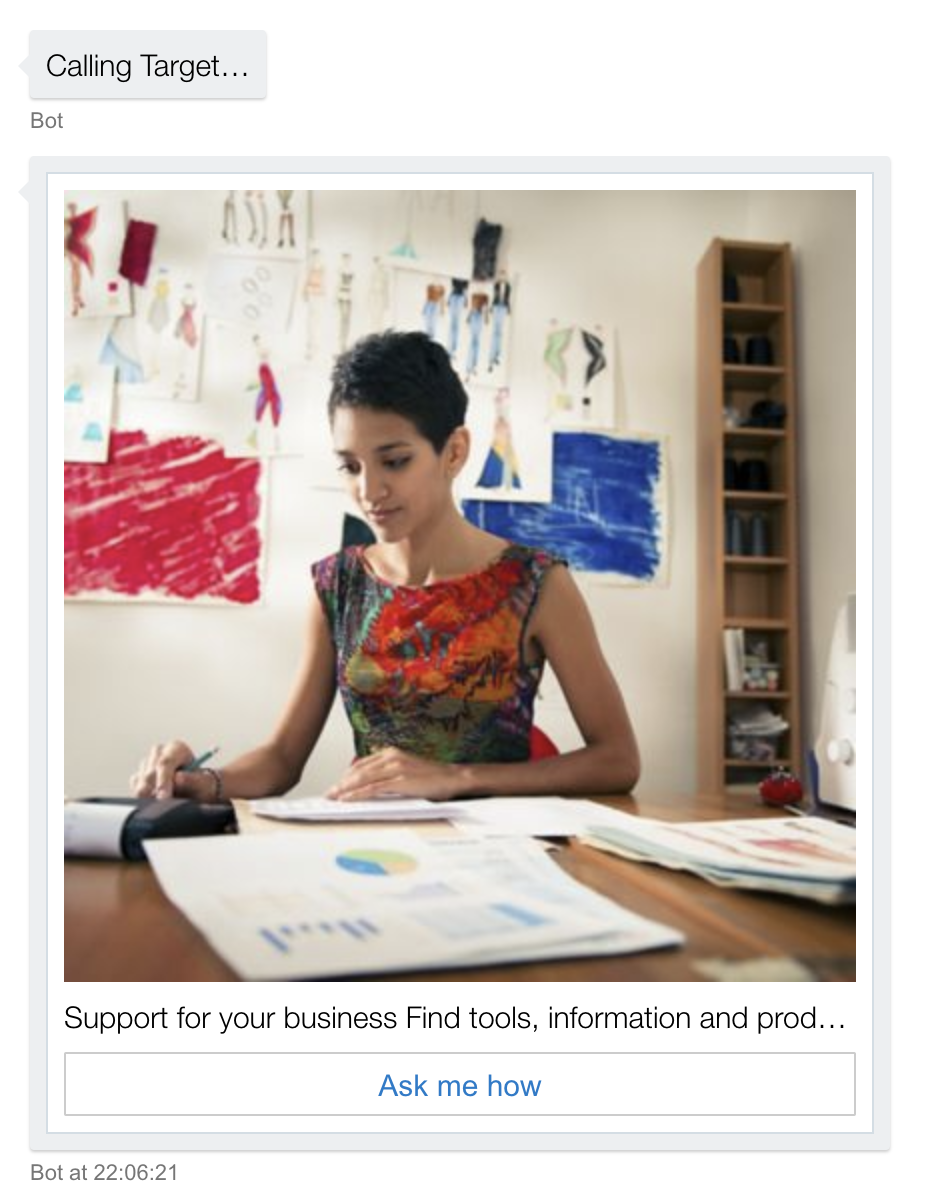
Adobe Target is sent the profileParameter "accounttype" which is currently set to "Business" based on our input. Target makes a decision and sends back the "Business" offer.. in this case Fragment 996.
Congrats! You got through the content!
Sad? Have no fear.. there is more content available on this topic at the following links
Check out my blog. I'll add additional links / content here when time permits http://www.markszulc.com/adobe-summit-2019-lab-729/
Microsoft Bot Framework - https://dev.botframework.com/
Experience Manager docs - https://helpx.adobe.com/support/experience-manager/6-5.html
Target API docs - http://developers.adobetarget.com/