Table of Contents
Interactive Communications centralizes and manages the creation, assembly, and delivery of secure, personalized, and interactive correspondences such as business correspondence, documents, statements, marketing mails, bills, and welcome kits. Interactive Communications can be delivered using two channels: Print and Web. The Print channel is used to create PDFs and paper communications, while the Web channel is used to deliver online experiences.
Use Case
The wealth management companies constantly need to share brochures with their customers covering the fund details that are relevant to them. The companies can use the Interactive Communication capabilities to:
- Create a document that can be single-sourced to create multiple copies.
- Populate the fund details dynamically so that the fund details relevant to the customer are visible in the Interactive Communication.
Lab Overview
In this lab, we are sharing an example of wealth management Interactive Communication. We have deliberately left one section of the Interactive Communication incomplete. We will work with you to complete the Interactive Communication to make it ready to share with the customers.
Key Takeaways
- Understand building blocks required to create an Interactive Communication
- Understand the steps to create and update the building blocks
- Learn to compose the Print channel for an Interactive Communication.
- Autogenerate Web channel from the Print Channel.
Prerequisites
There are no prerequisites for this lab. Your machine already comprises all key components that are required to create a working Interactive Communication.
Lesson 1 - Building blocks of an Interactive communication
Objective
- Understand the building blocks required to create an Interactive Communication.
- View the usage of those building blocks in an Interactive Communication.
Lesson Context
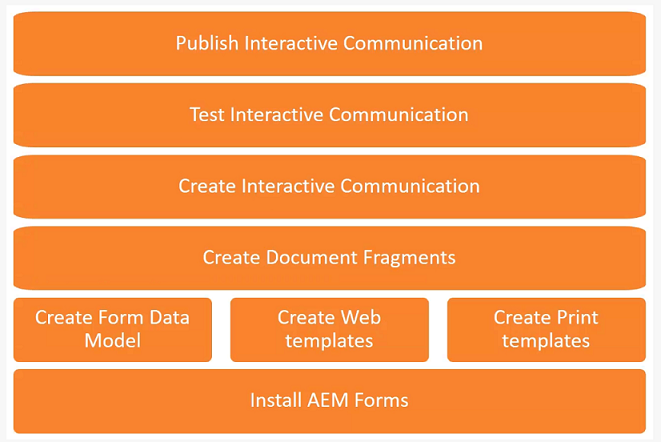
Based on our use case, we will use the following building blocks for creating the Interactive Communication:
- Document fragments (covered in lesson 2): Document fragments are reusable components of a correspondence that are used to compose an Interactive Communication. Document fragment includes fields with static text and data received from form data model.
- Charts (covered in lesson 3): While creating an Interactive Communication, you can add charts to visually represent two-dimensional data from the Interactive Communication's form data model.
- Form data model (covered in lesson 4): A form data model allows you to connect an Interactive Communication to disparate data sources. A form data model is a unified data representation schema of business entities and services available in connected data sources. You can use the form data model with an Interactive Communication to retrieve data from connected data sources.
- Tables or layout fragments (covered in lesson 5): Add dynamic tables in Interactive Communication using layout fragments. Dynamic tables refer to populating data in the table using form data model properties.
The following image lists all steps required to create an Interactive Communication (Bottom to Top):
Exercise 1.1
Refer to the following image: 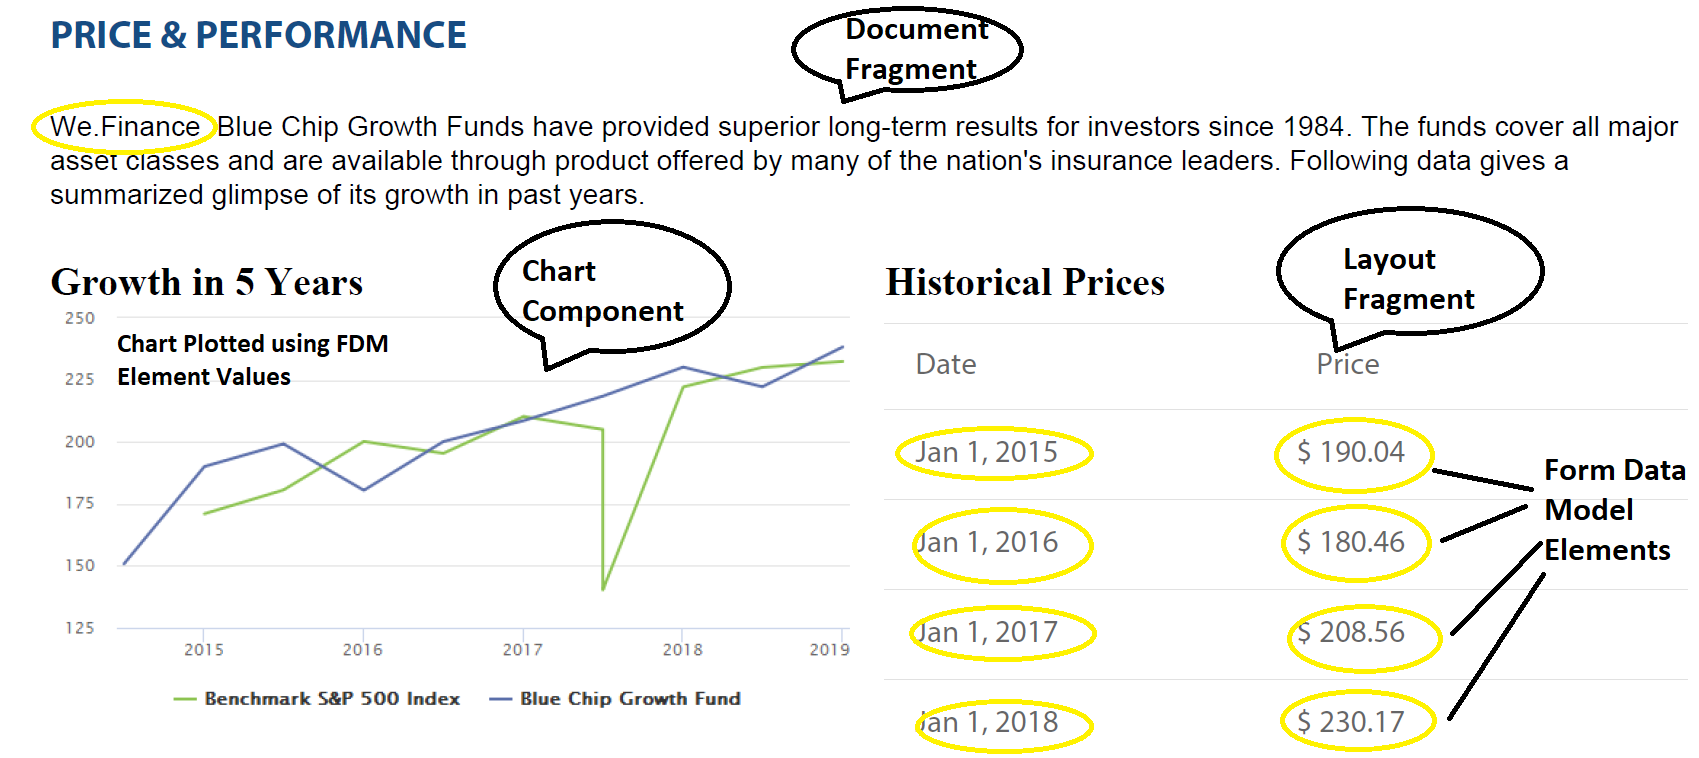
In the subsequent exercises, we will work together to create the Price & Performance section of the wealth management Interactive Communication. The section comprises:
- A document fragment (below the Price & Performance heading). Data source serves as the input for the We.Finance text (highlighted in Yellow) used in the document fragment. The value in this field can vary based on the branding requirements.
- Two-column layout comprising Chart component on the left and Layout Fragment (table) on the right.
- Data source serves as the input for the values in the Date and Price columns of the table (highlighted in Yellow).
The image displays the building blocks that are used in the Interactive Communication. The next four lessons enable you to create and use these building blocks in the Interactive Communication.
Lesson 2 - Creating and adding Document Fragments to Interactive Communication
Objective
Create and use a document fragment in an Interactive Communication.
Lesson Context
Document fragments are reusable components of a correspondence that are used to compose an Interactive Communication. Document fragment includes fields with static text and data received from form data model. In this section, you will create a new Document Fragment and use it in the Interactive Communication.
Exercise 2.1
- In order to create a document fragment, go to Document Fragments listing UI
- Click "Create" and select "Text".
- Create a new Document Fragment with the title "Price & Performance Section" and use Form Data Model "Fund Management" present inside summit-lab folder.
- Copy the text present inside resources/Price&Performance-DocumentFragment.txt to the Document Fragment.
- On the text "PRICE & PERFORMANCE", apply styles "Header 2" and font "Times New Roman"
- On the rest of the text, apply styles font "Times New Roman" and font size "12".
- Drag and Drop "organization_name" (or type the same starting @) element in front of the "Blue Chip Growth Fund". This ensures that the organization name present in the data source is fetched and displayed within the text when the Interactive Communication is rendered.
- Save the document fragment.
Exercise 2.2
- Open the Wealth Management Interactive Communication in edit mode
- In the Interactive Communications editor, go to the Assets tab
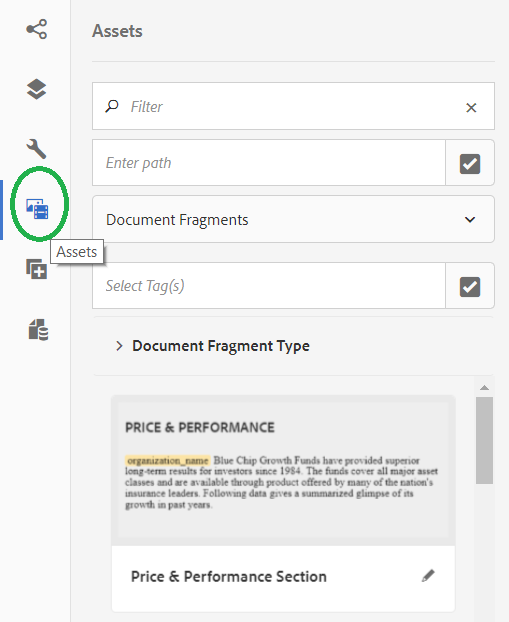
- Filter assets by Document Fragments and search for "Price & Performance Section" Document fragment. Drag and drop this document fragment inside the "priceAndPerformanceSection" target area that you see on the Interactive communication editor on the right-hand side.
Lesson 3 - Adding and configuring Charts
Objective
Add and configure a chart in the Interactive Communication.
Lesson Context
This lesson explains how to add a chart component to an Interactive Communication and the steps to configure the same such that the chart gets plotted using the data available in the back-end data source.
Exercise 3.1
- Go to the components tab and select "Chart component".
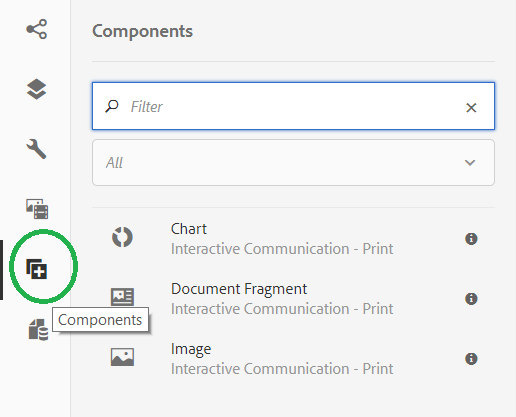
- Drag and Drop the chart component to the "leftGrowthChartSection" target area.
- Select the chart and click the wrench icon to open the properties sheet of the chart component.
- In the property sheet, add chart title, select chart type as "Line".
- Under Series, select "Multiple Series".
- Specify "Series Name Data Model Object" as "/organization/funds/fund_name".
- Now specify the X axis Data Model Object as "/organization/funds/dailyValue/date" and Y axis Data Model Object as "/organization/funds/dailyValue/nav".
- Set the height of the chart as 300 and width as 400.
- Select "show legends" and the position of the legends as "Bottom".
- Save the property sheet and click preview.
Objective
- Adding new data source entities to the Form Data Model.
- Add associations between data model objects
Lesson Context
AEM Forms Data Integration allows you to configure and connect to disparate data sources. The following are supported out-of-the-box. However, with little customization, you can integrate other data sources as well.
- Relational databases - MySQL, Microsoft SQL Server, IBM DB2, and Oracle RDBMS
- AEM user profile
- RESTful web services
- SOAP-based web services
- OData services
It provides an intuitive user interface to create a unified data representation schema of business entities and services across connected data sources. The unified representation is known as a form data model, which is an extension of JSON schema. The entities in a form data model are referred to as data model objects. A form data model allows you to:
Access data model objects, metadata, and services from connected data sources. Build associations between data model objects within and across data sources. Invoke data model object services to query or write data to and from data sources.
Once you have created a form data model, you can use it in an Interactive Communication to:
- Populate dynamic data in Text fragments
- Populate charts
- Populate tables
Exercise 4.1
- Open the "Fund Management" Form Data Model in edit mode
- In the Form Data Model editor, go to the Data Sources tab.
- Search for historical_price table from the SCHEMA:lab
- Add it to the Form Data Model.
- Now select "Fund" entity and click "Add association".
- Provide association name as "historical_prices"
- Select association type as "One to Many"
- Association is to be established with Model Object "historical_price"
- Select service, which is used to retrieve the association from backend, as "get".
- Edit the argument, select argument name as "fund_name", its binding to "fund" model object with binding value being "fund_name". This effectively means that the get service that will read the historical_value will get its argument from the fund entity that has already been read.
- Click Done and add association. Save the Form Data Model.
Lesson 5 - Adding and configuring Tables
Objective
Add and configure tables in the interactive communication.
Lesson Context
Table can be static as well as dynamic. Static tables have fixed number of rows and columns whereas dynamic tables have number of rows dependent on the amount of data available in the data source.
Exercise 5.1
- Open the "Wealth Management" Interactive Communication in edit mode.
- Go to assets tab and select "Layout Fragments", in that search for "Historical Prices table" layout fragment.
- Now drag and drop this layout fragment to "historicalPriceTable" target area in the editor. You will see that the page refreshes and a table appear in that target area. This is dynamic table which means the table will grow depending on the underlying data from data source.
- Bind "Date" to FDM element "/organization/blueChip/historicalPrices/date". Click tick (save).
- Bind "Price" to FDM element "/organization/blueChip/historicalPrices/nav". Click tick (save).
- Now preview the IC.
Lesson 6 - Autogenerate Web Channel from Print Channel
Objective
Auto-generate Web channel from the Print channel
The layout and content of the Web channel is identical to the Print channel. After generating the Web channel, you can make both layout and content changes in the Web channel.
Lesson Context
In Interactive communication, there is a concept of Synchronization using which the content in the secondary channel is kept in sync with the master channel. Interactive Communications currently supports Print channel as master and Web channel as secondary channel. During the first auto-generation, all the content is auto-generated from master channel to secondary channel. Later, when any incremental changes are done in master, then can be synchronized in a single click to Web channel.
There is an additional capability in Interactive communication wherein the layout of Web channel is auto-generated to be same as Print. This capability is also available when Print is chosen as master.
Exercise 6.1
- Navigate to Summit Lab Folder and Select "Wealth Management" Interactive communication, and select "view properties"
- On the view properties page, select "Web" channel.
- In "Interactive Communication Web Template", browse and select "Interactive Communication > Summit Lab" template.
- Select "Theme used in web template - summit-lab-theme"
- Select "Use Print as Master for Web Channel" and "Auto generate content".
- Click "Save & Close".
- In the Interactive communication editor, simply click "web channel" in channels tab and that auto-generates the Web channel from Print.
Lesson 7 - Update layout of web channel
Objective
Update the layout of web channel after a default version is auto-generated for you.
The goal of this exercise is to organize the three sections "Investment Objective", "Price & Performance" and "Portfolio" as horizontal tabs.
Lesson Context
The concept of master and secondary channel allows you to update the layout of the secondary channel keeping the inheritance relationship as it is. So the web channel components will remain in sync (maintain inheritance) and you can re-position or reorganize them without impacting the relationship.
Exercise 7.1
- Go to content tab in the web channel for "Wealth Management" Interactive communication.
- In the tree, select "InvestmentPage_autogenerated_id" section. On the right-hand side, scroll to that section, click on it to see the toolbar menu. Click, "Group Objects in Panel". This will create a new Panel and wrap the existing selected panel in the new panel.
- Enter the name of the new panel as "Tabbed layout Panel" and update layout for the panel to be "Tabs on Top". click Done.
- Again, select the "InvestementPage_autogenerated_id" Panel in the content tree and click Settings. Update its title to "Investment Page".
- Select "pricePage_autogenerated_id" Panel in the content tree and click Settings. Update its title to "Price & Performance".
- In the content tree, select the same Panel again and drag it under "Tabbed layout Panel"
- Select "portfolio_autogenerated_id" Panel in the content tree and click Settings. Update its title to "Portfolio".
- In the content tree, select the Panel again and drag it under "Tabbed layout Panel". You will see that all three Panels "Investment Objective", "Price & Performance" and "Portfolio" now appear as horizontal tabs.
Next Steps
Once you create an Interactive Communication, you can:
- Initiate a workflow to send the Interactive Communication to the customer using an e-mail with PDF (Print version) as the attachment or a link to the Web version.
- Use the Agent UI to make changes to the Interactive Communication before sending it to the customer. Any recipient-specific changes are incorporated in the Interactive Communication using the Agent UI. Initiating workflows and modifying an Interactive Communication using the Agent UI are beyond the scope of this lab.
Additional Resources
For more such tutorials, refer to:
Create your first Interactive Communication
Appendix
Interactive Communication documentation links:
