As more and more consumers move to mobile apps, it’s important to provide a well-optimized and personalized experience. But optimizing for mobile doesn’t have to start with a complex implementation. In fact, you’ll be surprised to learn about basic mobile optimization strategies that can get you well on your way to winning in mobile engagement.
For this lab, we have prepared two versions of the same app: One with the Experience Cloud pre-implemented and one without. The first two lessons focus on the marketer-oriented tasks associated with mobile app personalization such as creating and launching Target activities. The third lesson focuses on developer-oriented tasks such as adding the Adobe SDK and customizing the Target implementation and uses the non-implemented app.
IMPORTANT: At your workstation you should have a paper with your participant number, e.g. “01”. This number will be used for many purposes during the lab, such as for login credentials and to avoid collisions, and so on. Wherever you see “YOUR NUMBER” or “YOUR NAME” in this lab manual, replace it with your participant number or your name.
Adobe Target is the Adobe Experience Cloud solution that provides everything you need to tailor and personalize your customers' experience, so you can maximize revenue on your apps, websites and other digital channels.
The Visual Experience Composer (VEC) for Native Mobile Apps lets you create activities and personalize content on native mobile apps in a do-it-yourself fashion without continuous development dependencies and app-release cycles. In this lesson we will use the Mobile VEC to set up an A/B test activity.
Login to your lab machine with the following credentials:
Before we install the Adobe Mobile SDK, we need to customize the Lesson 1 app so that each users app can be distinguished from each other in the shared Target account.
To open the Lesson 1 app
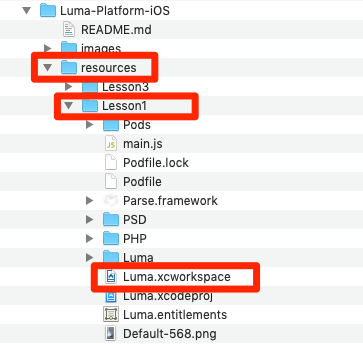
Open the resources/ folder on the Desktop
Open the Lesson1/ folder
Double-click the Luma.xcworkspace file to open the app in XCode
Next we need to customize the app settings to avoid conflicts with other users.
To customize the app settings
Make sure you are in the Project Navigator view (the folder icon)
Double-click Luma in the top left corner to open the Settings pane
Make sure you are on the General settings tab
Update the Display Name field from Luma Your-name to replace Your-name with your name (one word, all lowercase)
Update the Bundle Identifier field from com.adobe.axp.your-name to replace your-name with your name (one word, all lowercase) 
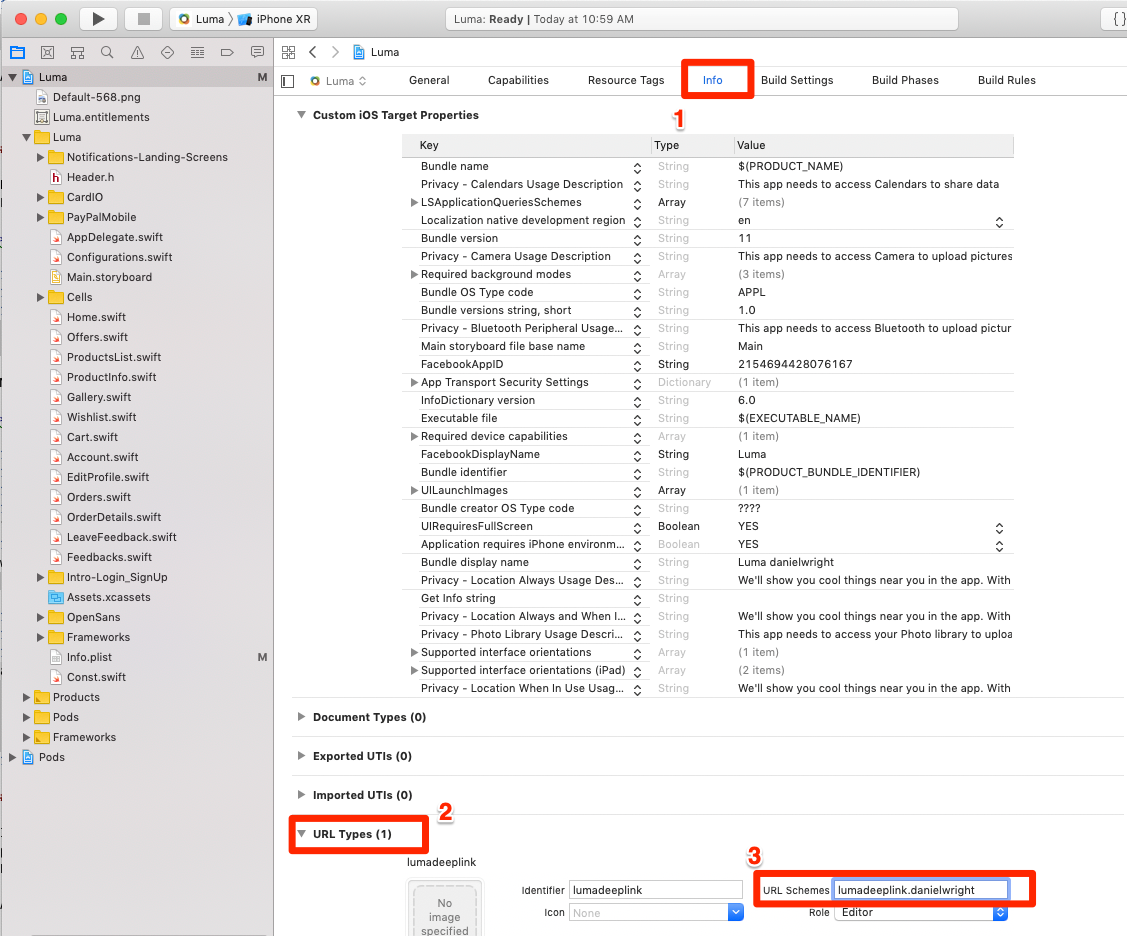
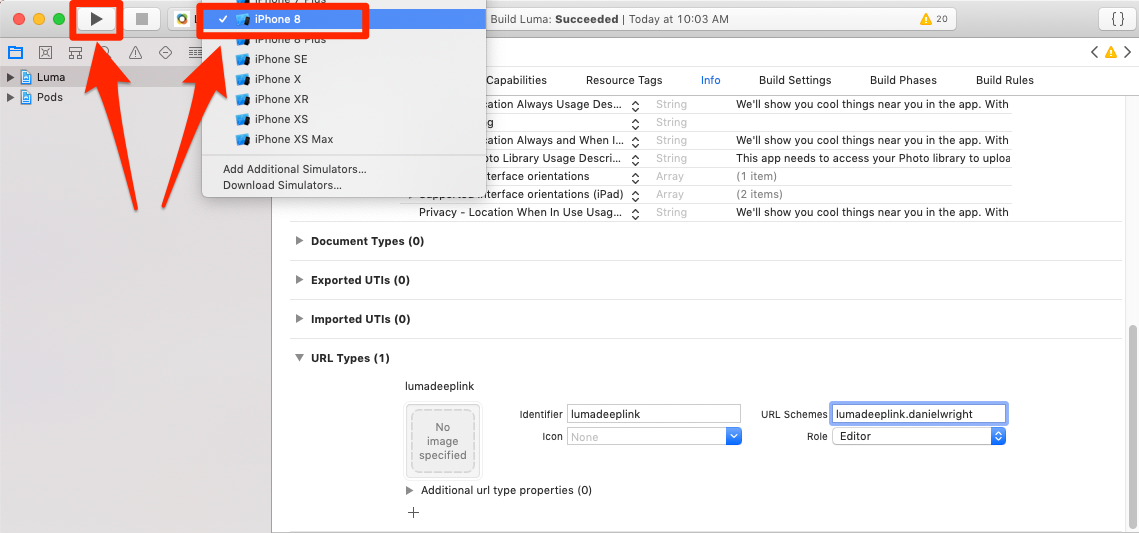
Switch to the Info tab
Expand the URL Types section
Update the URL Schemes field from lumadeeplink.your-name to replace your-name with your name (one word, all lowercase)
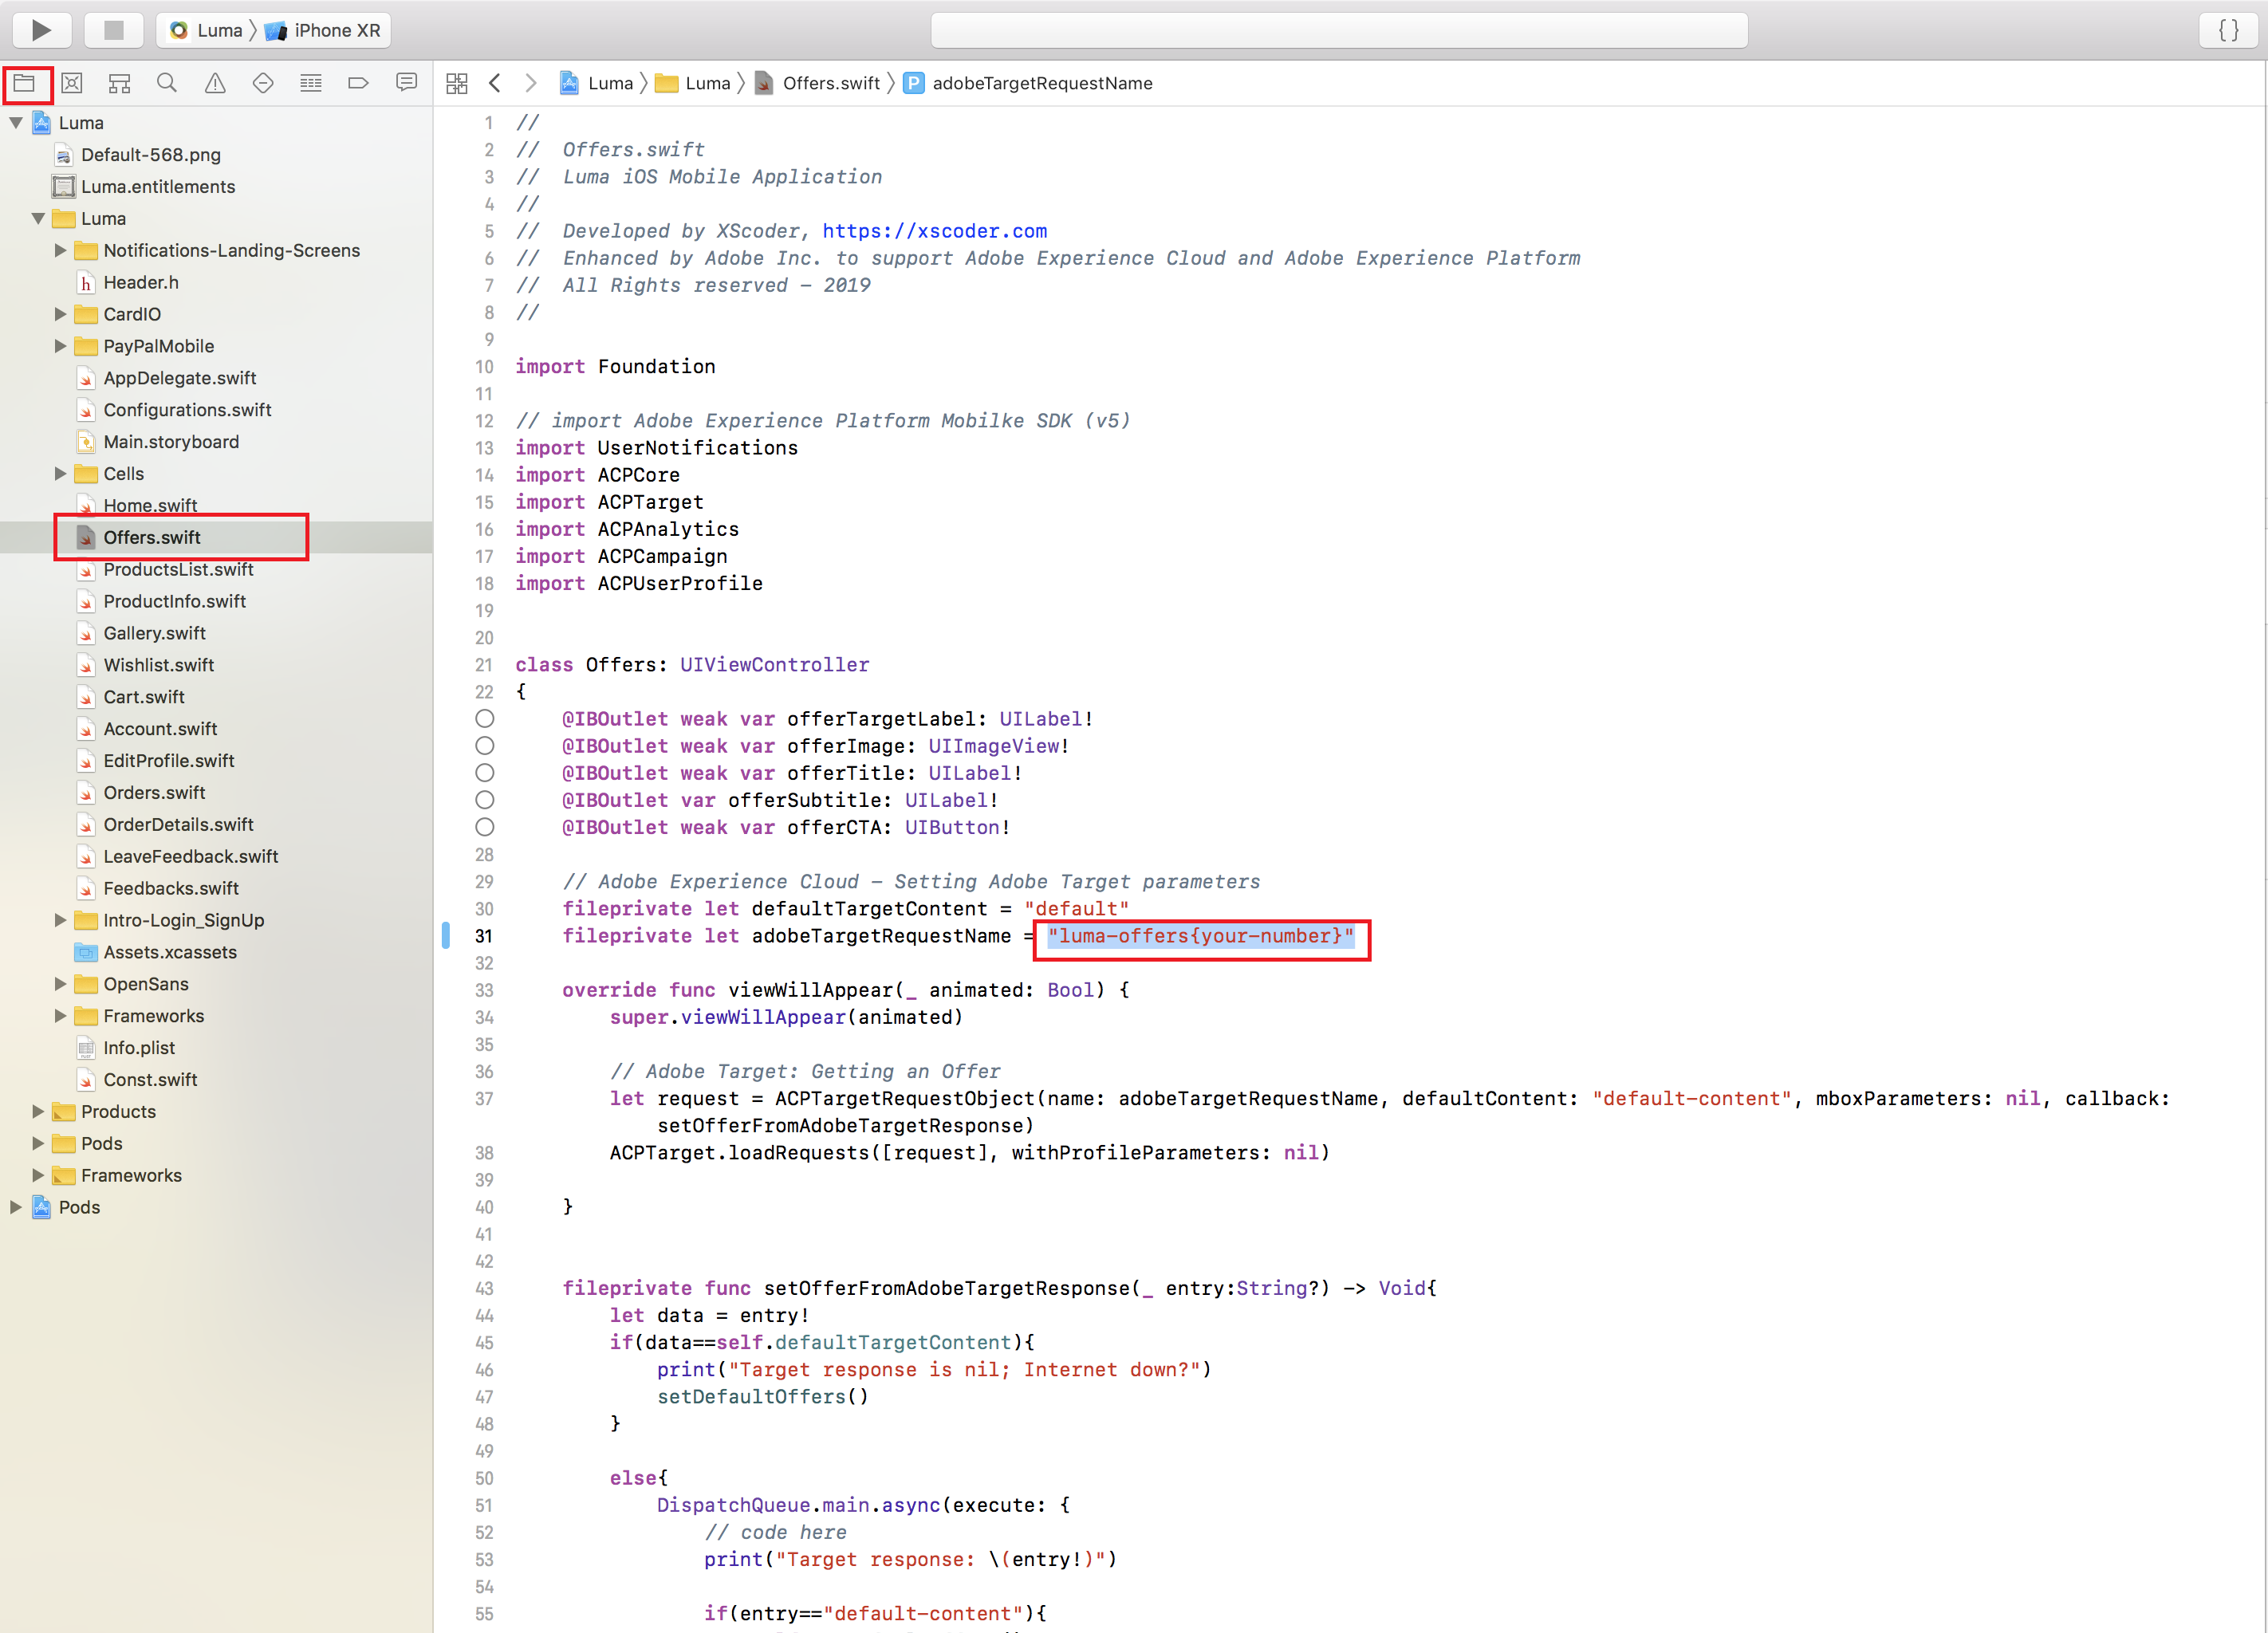
Now open the Offers.swift file.
Change luma-offers{your-number} (Replace your number here, it should look something like luma-offers32)
Save the XCode project by hitting ⌘-S
Run the app and launch it with an iPhone 8 simulator (we find the iPhone 8 simulator easier to use because it still has the "home" button which is easy to click with a mouse).
Wait for the simulator to launch and fully open and get to the home screen. This may take a few minutes. Close any modals about Notifications by clicking either Allow or Don't Allow.
NOTE: If you get any "Build Failed" messages in XCode, please get the attention of a TA immediately

Click on the star icon to open the Offers screen 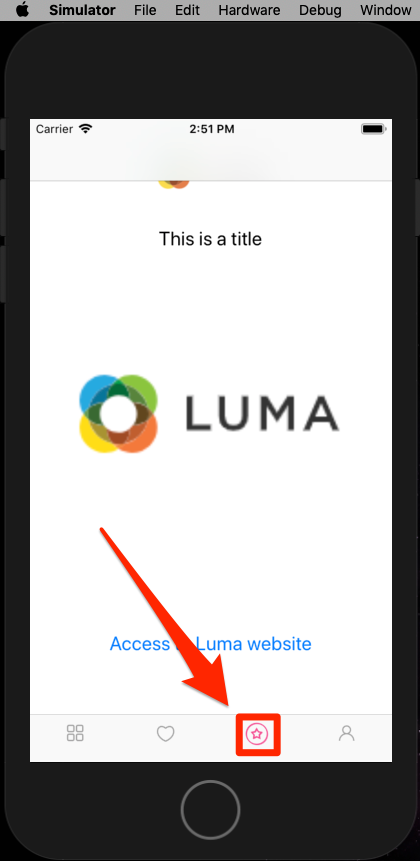
Log into the Adobe Experience Cloud
Skip any screen related to adding a mobile phone number
Skip any "Welcome to the Experience Cloud" intro screen
You should see that you are in the Adobe AGS008 Org
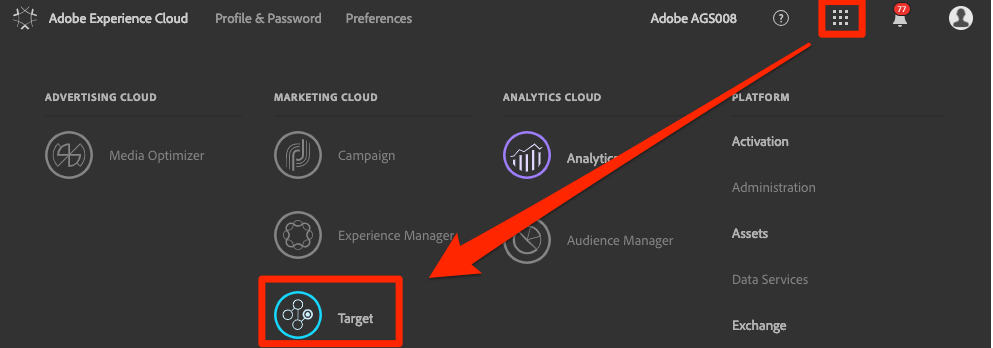
Click the  icon to open the solution switcher
Select Target
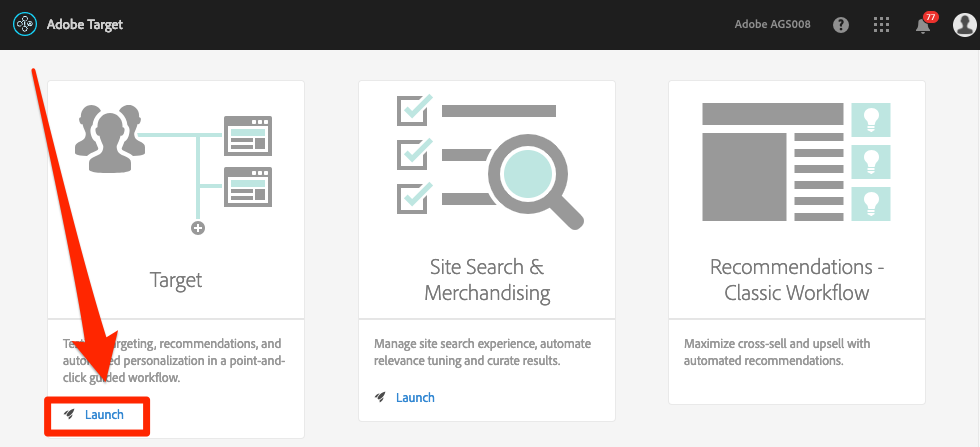
Launch Target
A/B tests are a powerful way to learn what experiences work best in your app or website. Combined with segmentation, they can lead to personalization insights. In this exercise, you will create an A/B test with Target's Mobile VEC.
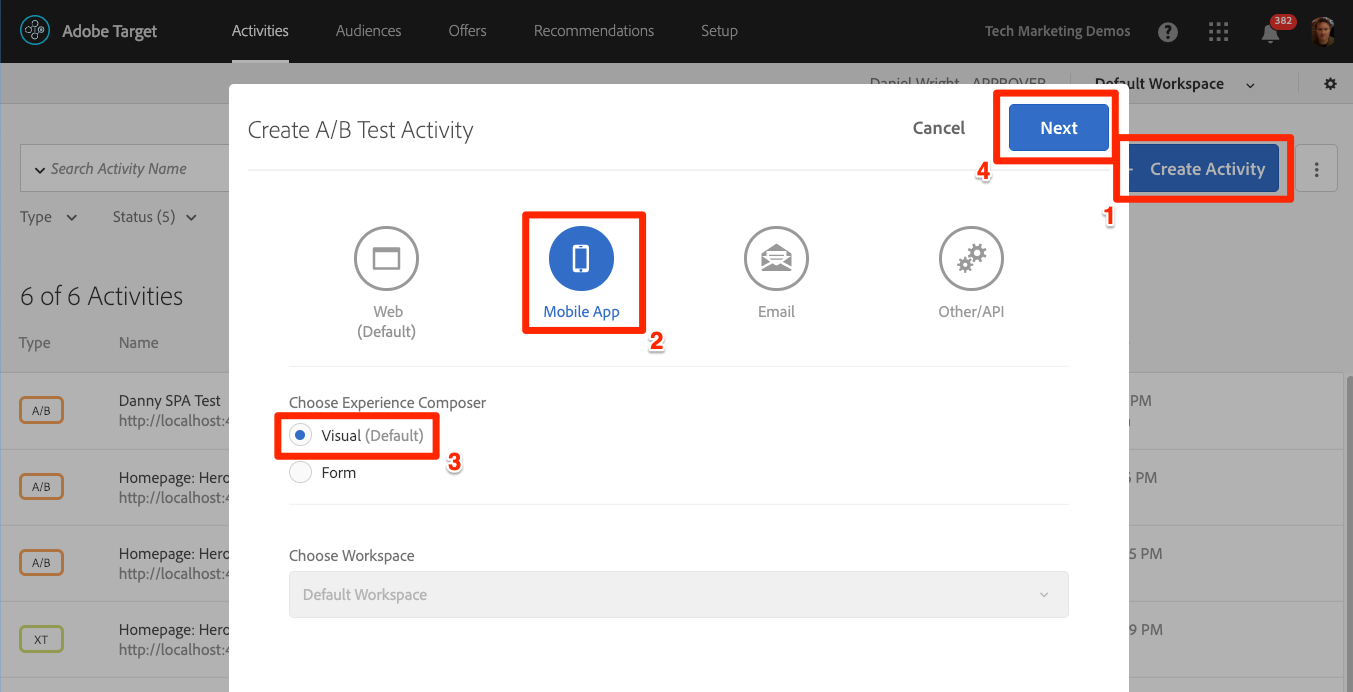
To create the A/B test
Click the Create Activity button and select A/B Test
Select Mobile App
Make sure Visual is selected under Choose Experience Composer
Click the Next button
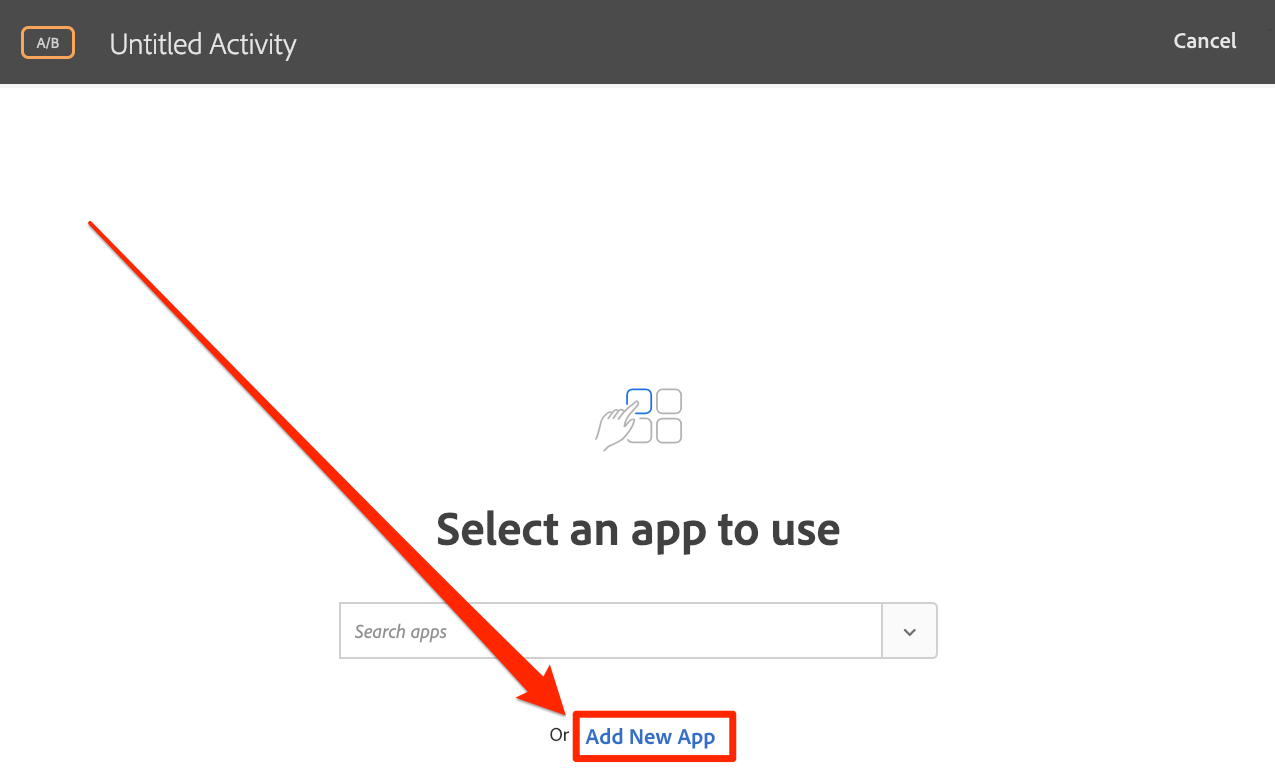
At this point you will be prompted to choose which app to load in the VEC. You just created your own unique app when you updated the app settings and saved them. Now you need to complete the one-time pairing process.
To pair your app
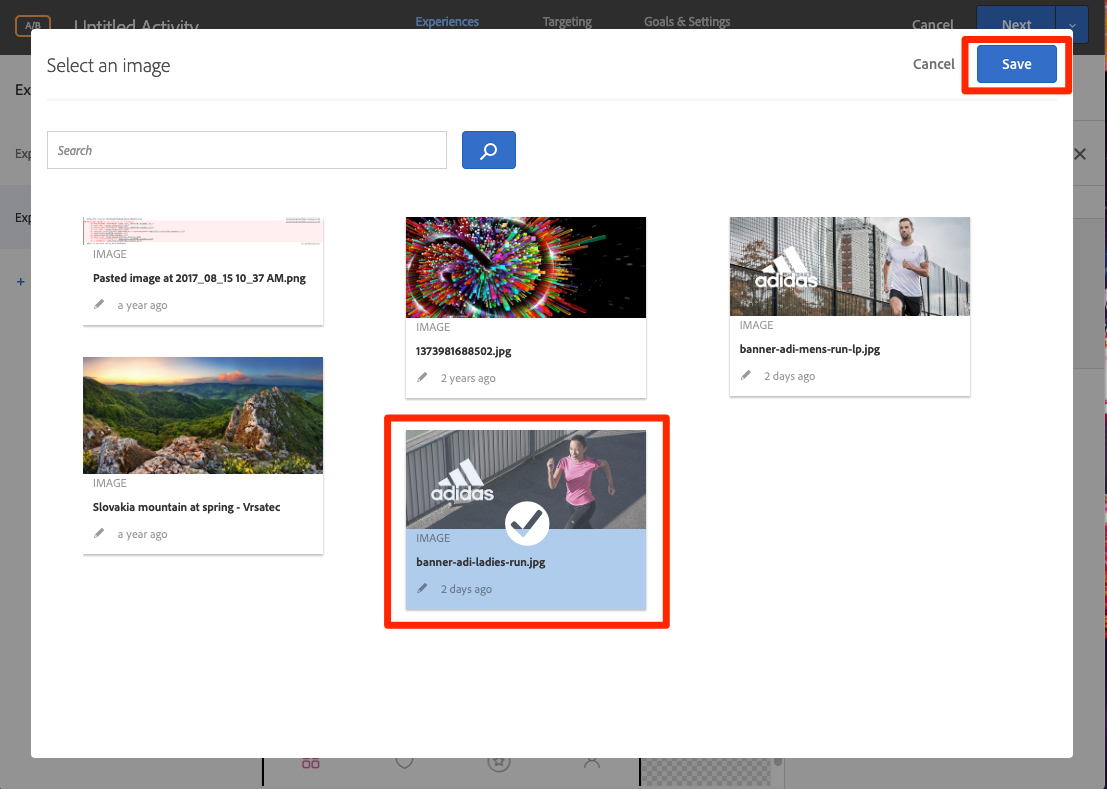
On the Select an app to use screen, click Add New App
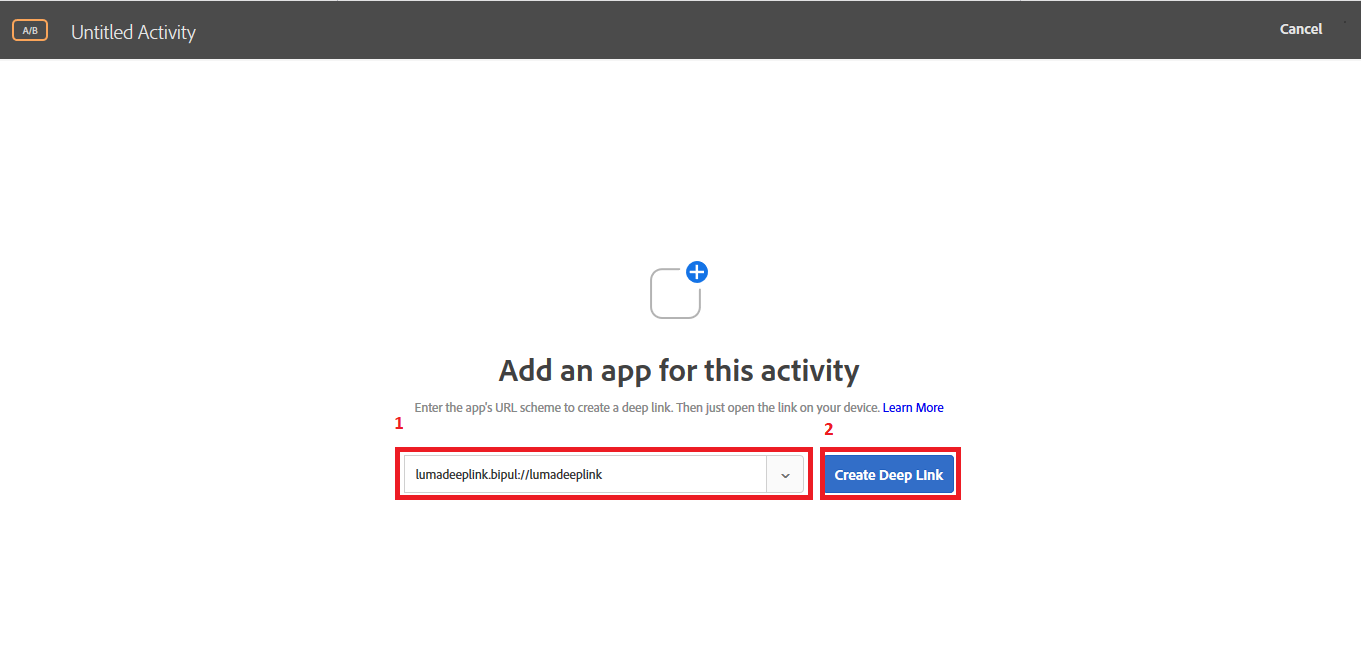
Enter the url scheme you just defined in the Enter URL scheme field, e.g. lumadeeplink.<your-name>://lumadeeplink
Click Create Deep Link
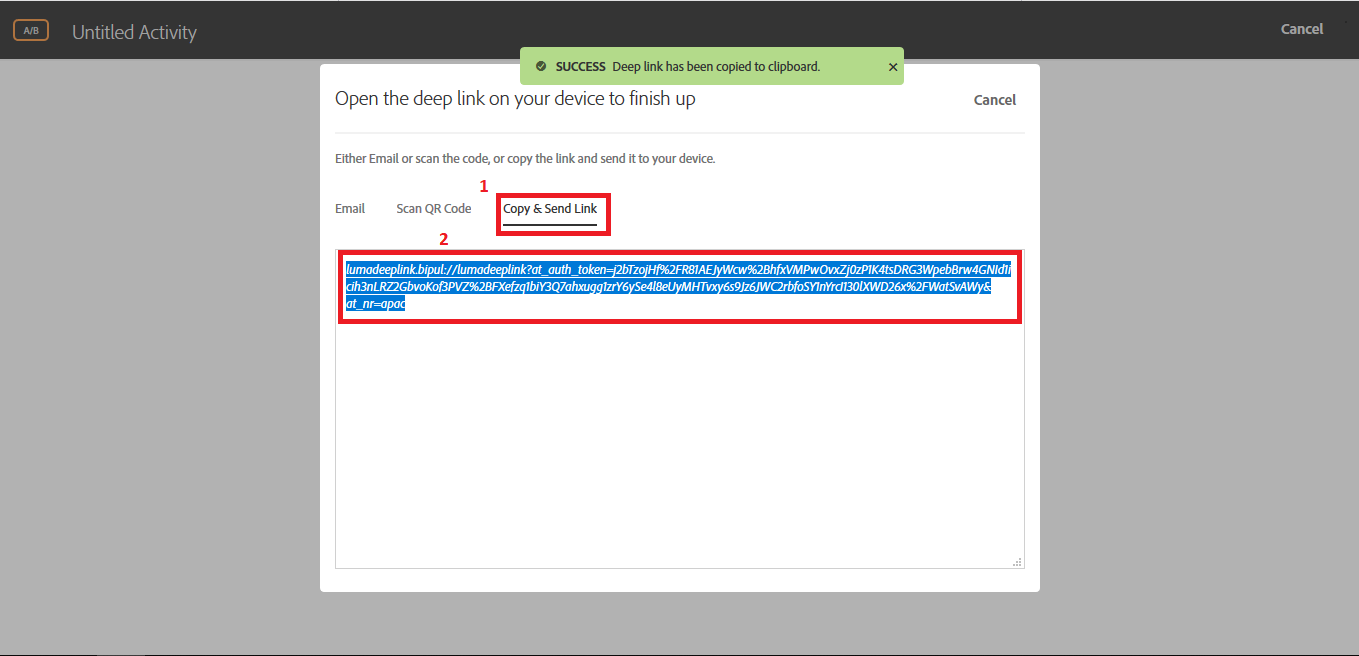
NOTE: You have a few options to send the deep link to the app. You can:
- Email the deep link to a valid email address and then open the link with an email application on the device
- Take a photo of the QR code if you have an iOS device linked to XCode
- Copy the deep link from the Target interface and send it to the device however you would like
Click on the Copy & Send Link tab.
Click on the link itself and notice how it is automatically copied to your clipboard
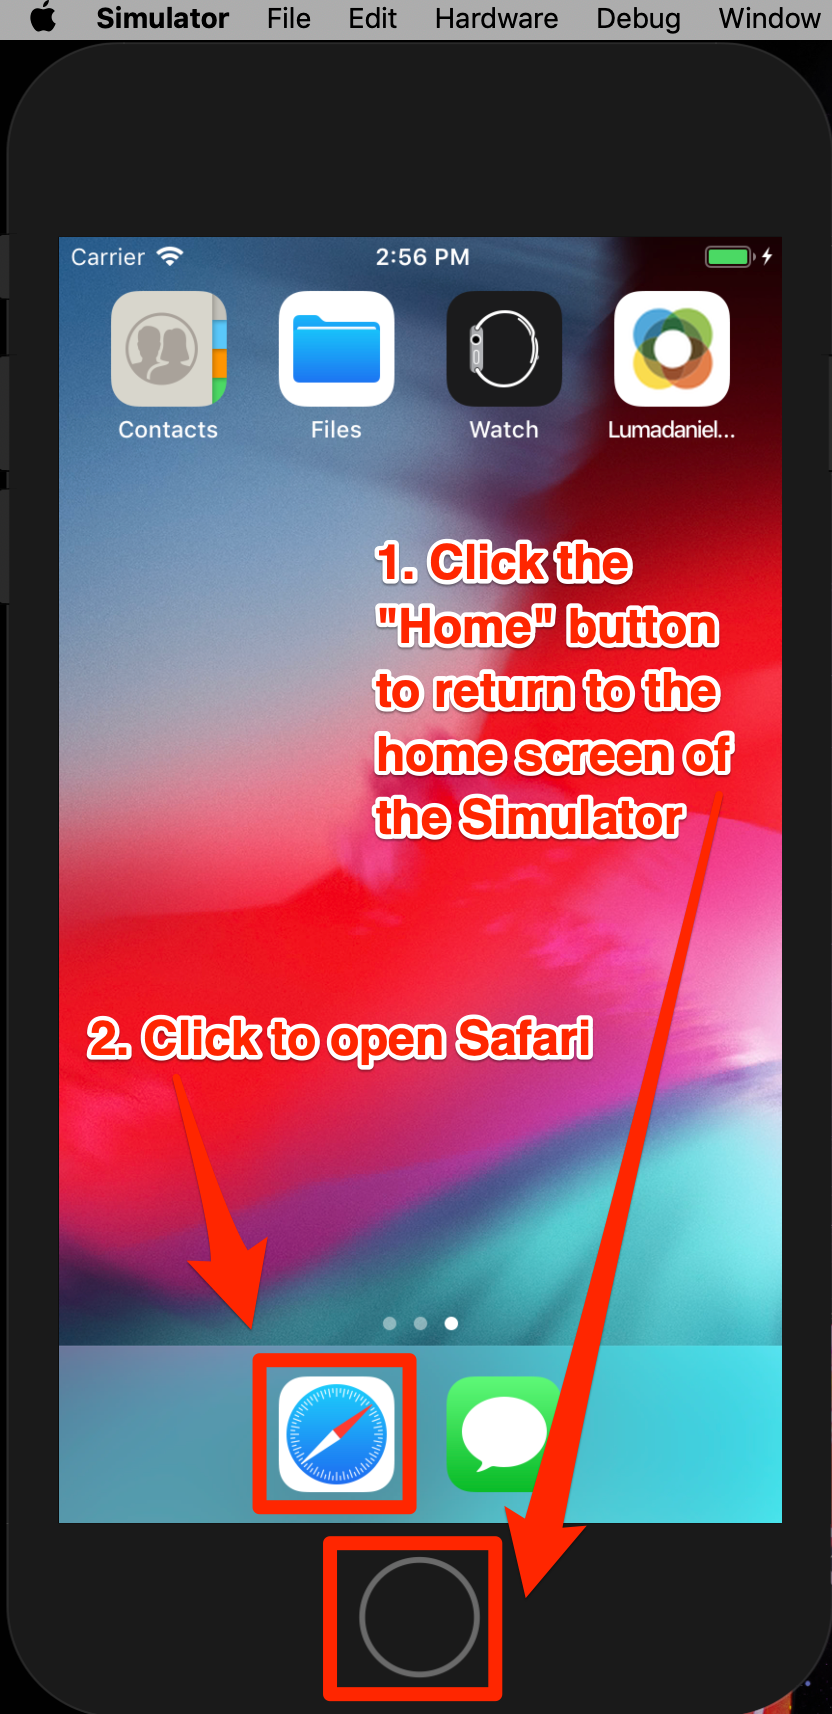
Switch back to the Simulator
Click the Home button to return to the Simulator's home screen
Click the Safari icon to open the Safari browser
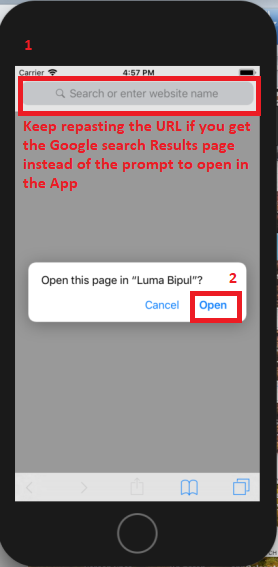
Paste the deep link URL into Safari's address bar and hit Enter on your keyboard.
The first time you load the deep link, you will probably get a Google search results page. Paste the URL in the address bar a second time and hit Enter on your keyboard again.
What we are expecting to happen is to be prompted to open the page in the "Luma <yourname>" app as pictured below.
Click to open the app
TIP: If you are unsuccessful when copy-and-pasting the URL from your Desktop to the Simulator try one of the following tricks:
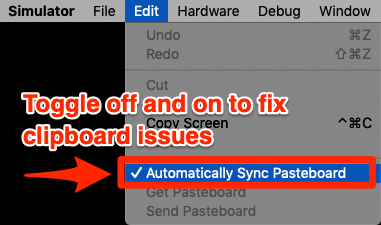
The URL copied from the Target interface doesn't paste into the Simulator This happens when the Desktop and Simulator clipboards are not synced. If this happens, try toggling off and on the
Automatically Sync Pasteboardsetting in the Simulator and copy/pasting again:
Pasting the URL lands on the Google Search results page Try repasting the deep link URL into the address bar and hitting
Enter. You might need to repeat this a few times.If these fixes don't work for you, please raise your hand so a TA can assist you
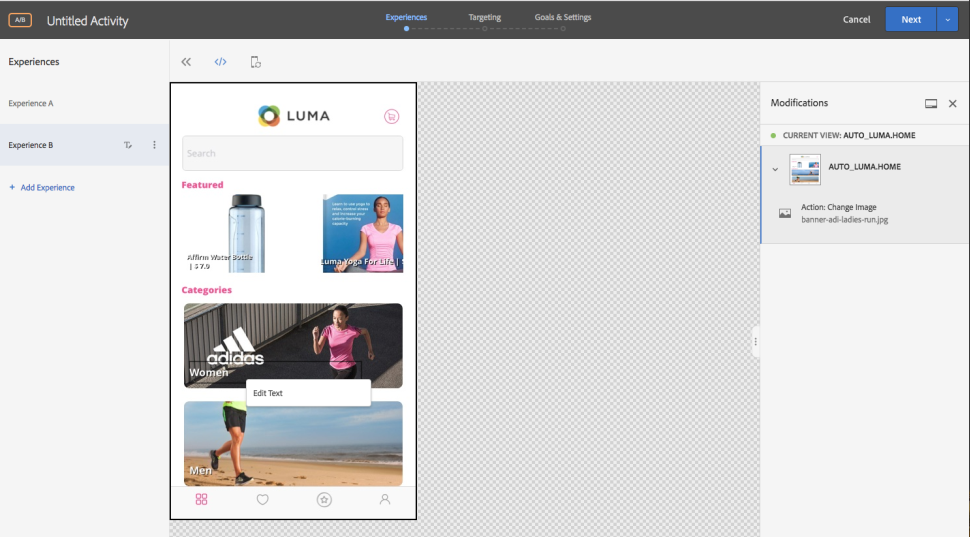
After the App has loaded, switch back to your browser tab where you have Target opened. You should see your app loaded in the VEC.
Navigate to a different screen in the app and notice how the VEC updates with the Simulator!
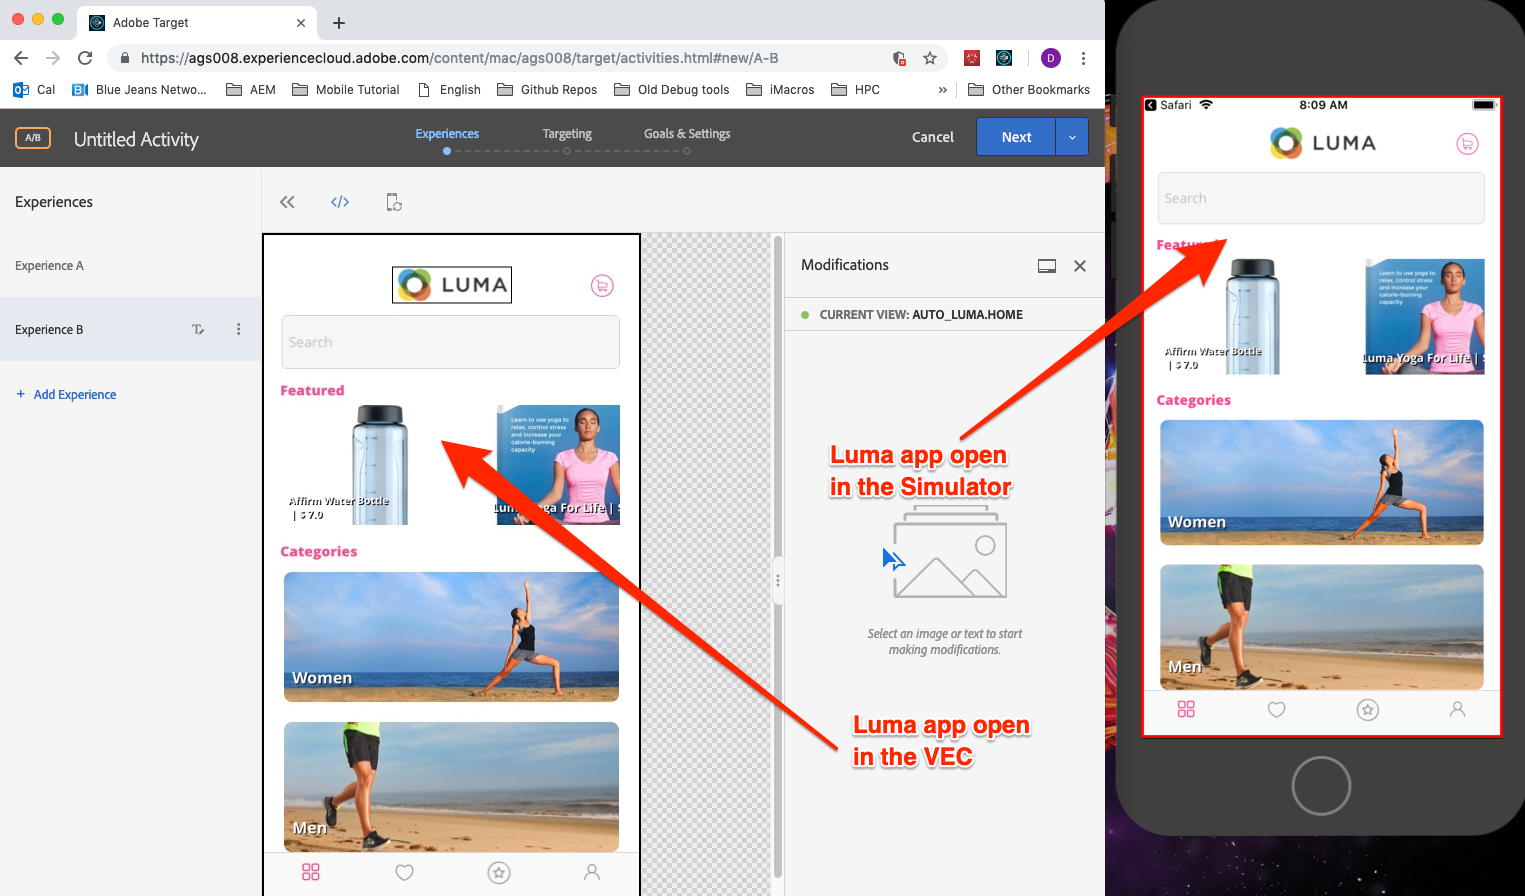
Great! You have paired your app with the VEC. Now, it's time to make some modifications to your app using the VEC.
To make changes with the VEC
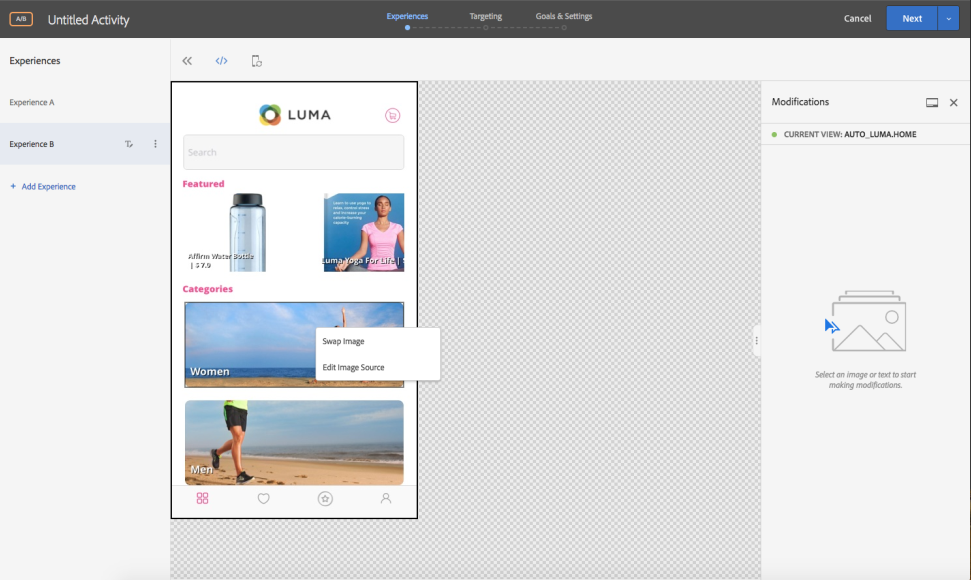
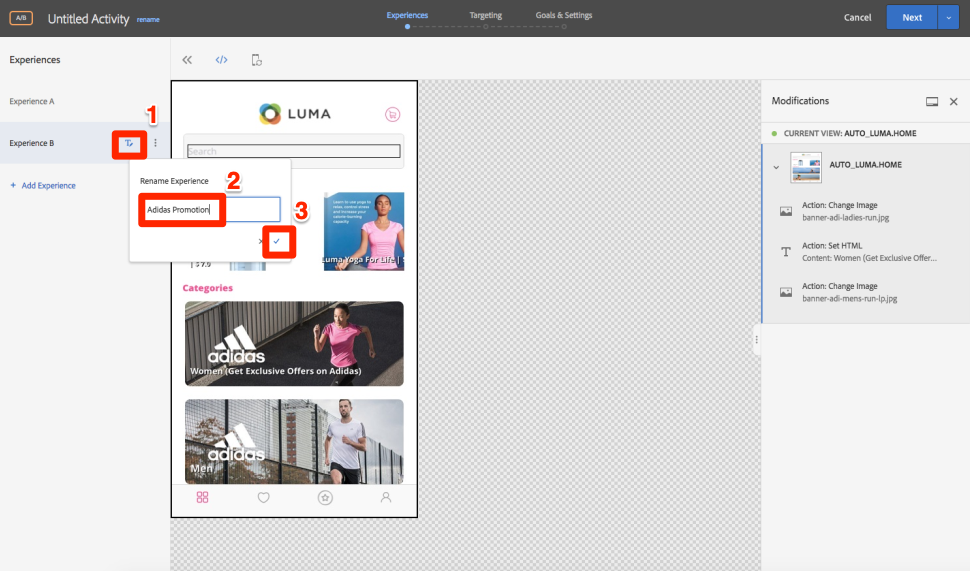

VEC <yourname>) and then click Save & Close 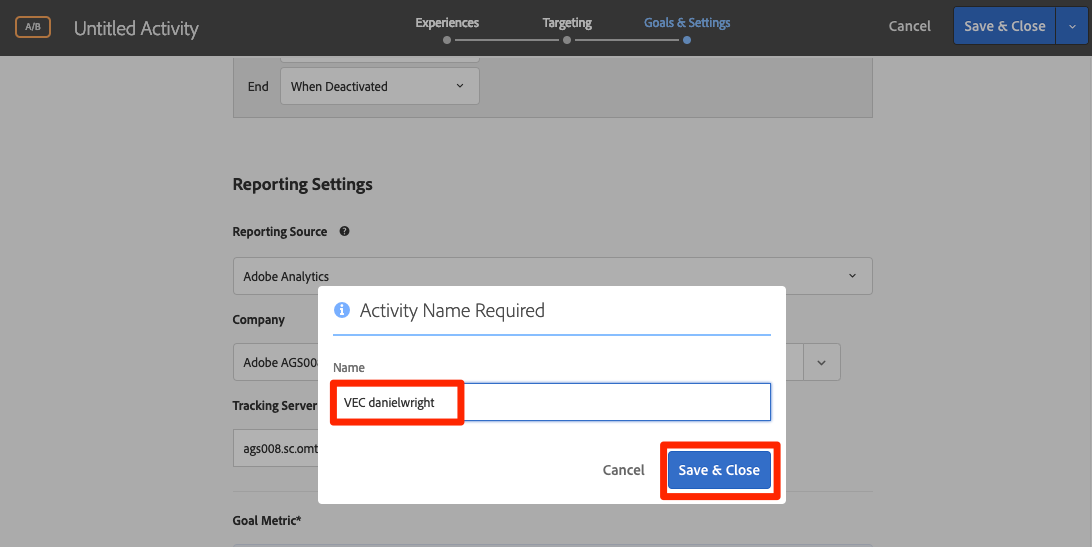
NOTE: You can also make updates to multiple views in your app, in a single activity! You can also visually add click-tracking metrics!
In this lesson, you will use the Form Based Composer to create a more sophisticated activity in the app. As you learned in the previous lesson, the VEC is limited to changing images and text. Next we will create an activity using the Form Composer that will also change link behavior so we can feature different content on the Offers screen. The form composer can be used for limitless types of changes in mobile apps such as content, functionality, flow, etc.
We will use a type of activity called Experience Targeting. Experience Targeting is a type of activity that allows you to deliver targeted messages to specific audiences. In order to do this we will construct an audience that is based on one of the unique features of mobile app personalization—Lifecycle metrics.
At the end of this lesson, you will be able to:
Lifecycle metrics built-in metrics about the visitor's usage of your app that are automatically included in calls made by the Adobe Mobile SDK. You can easily build audiences in Target based on these metrics.
To create an audience
In the Target interface, click Audiences in the top navigation
Click the Create Audience button
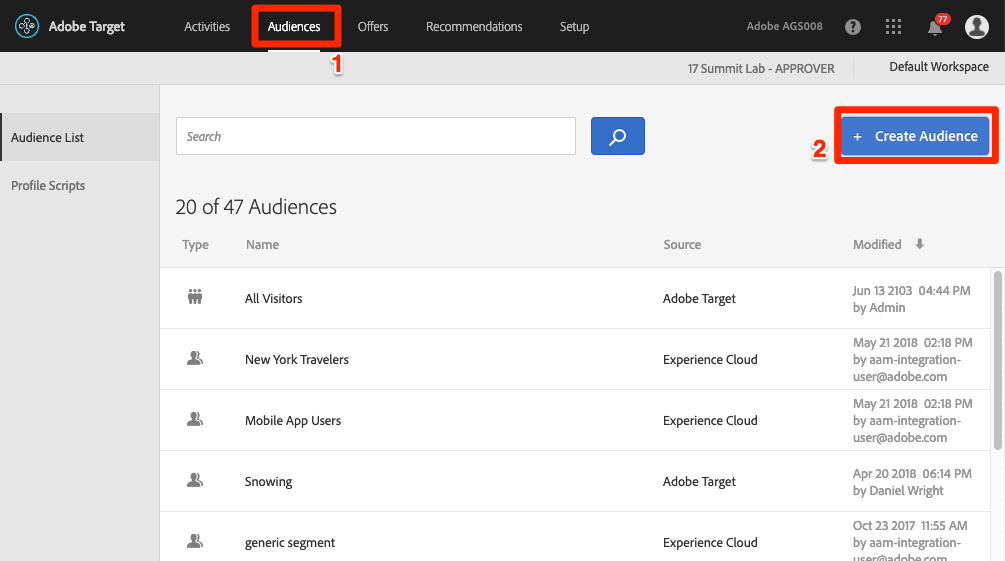
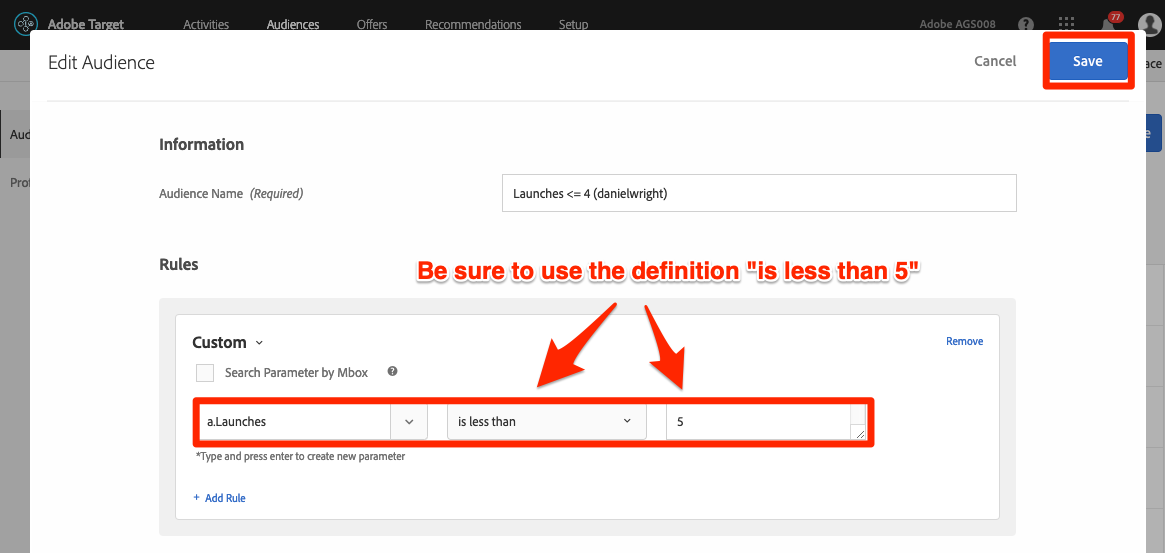
Name the Audience Launches <= 4 (yourname)
Click Add Rule > Custom
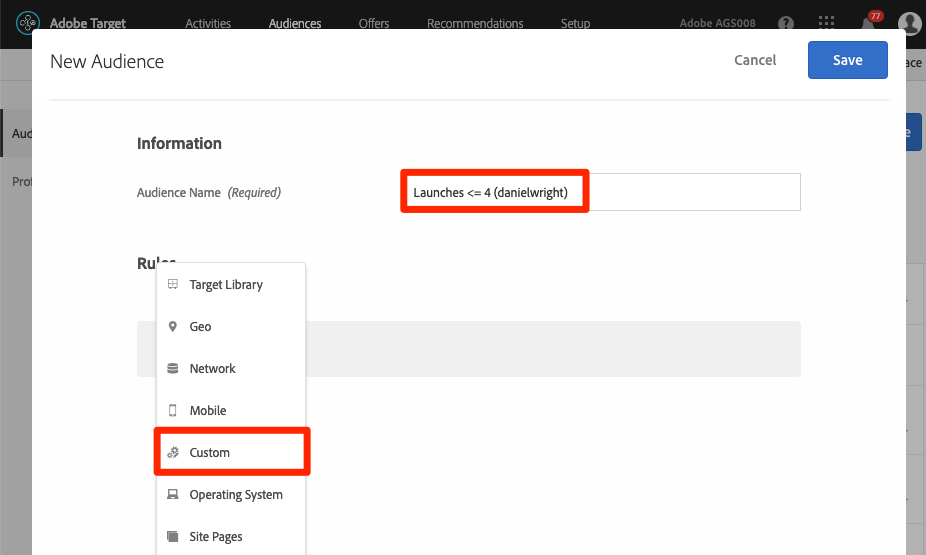
In the first dropdown, select the a.Launches parameter. All of the Lifecycle metric parameters begin with the "a." prefix. We will Target content based on the number of app Launches the user has, which is an excellent way to target first time users of your app with an instructional, first-time-user-experience (FTUE).
In the next dropdown, select is less than
In the third dropdown, enter 5
Click Save
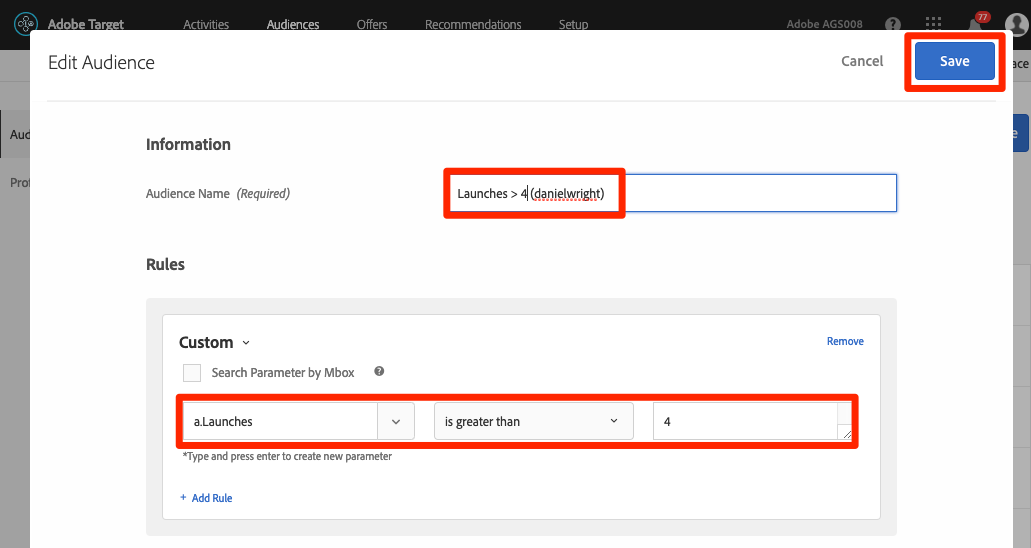
Now build another audience called Launches > 4 (yourname) defined as a.Launches is greater than 4
Note that there are a huge variety of out-of-the-box audience building options in Target. Additionally, you can send up custom data in the Target request for audience-building (which we will look at in Lesson 3), use audiences shared from other Experience Cloud solutions such as Audience Manager and Analytics, and CRM data shared to Target using the Customer Attributes feature of the People Core Service.
Now that we have our audiences, let's build an Experience Targeting activity that will serve content to each one.
To build an XT activity
Click Activities in the top navigation to return to the Activities list
Click the Create Activity button to open the dropdown
Click Experience Targeting 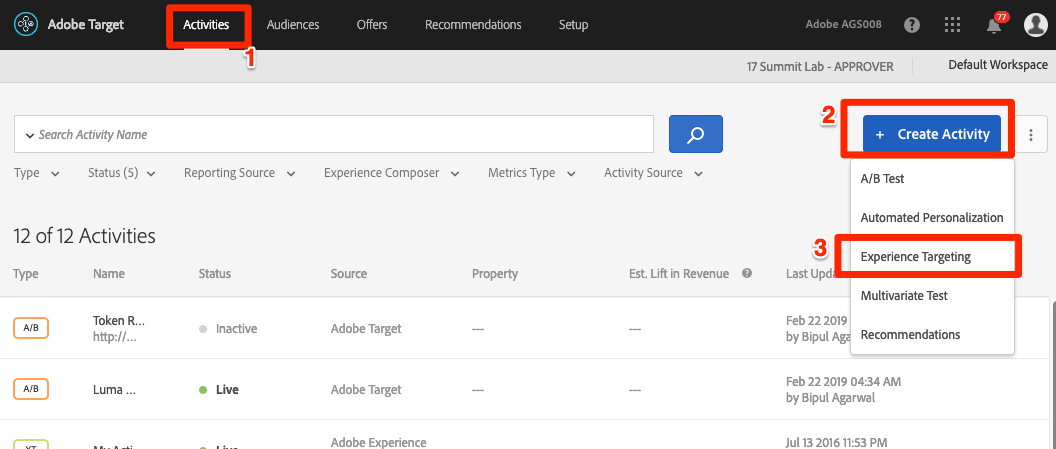
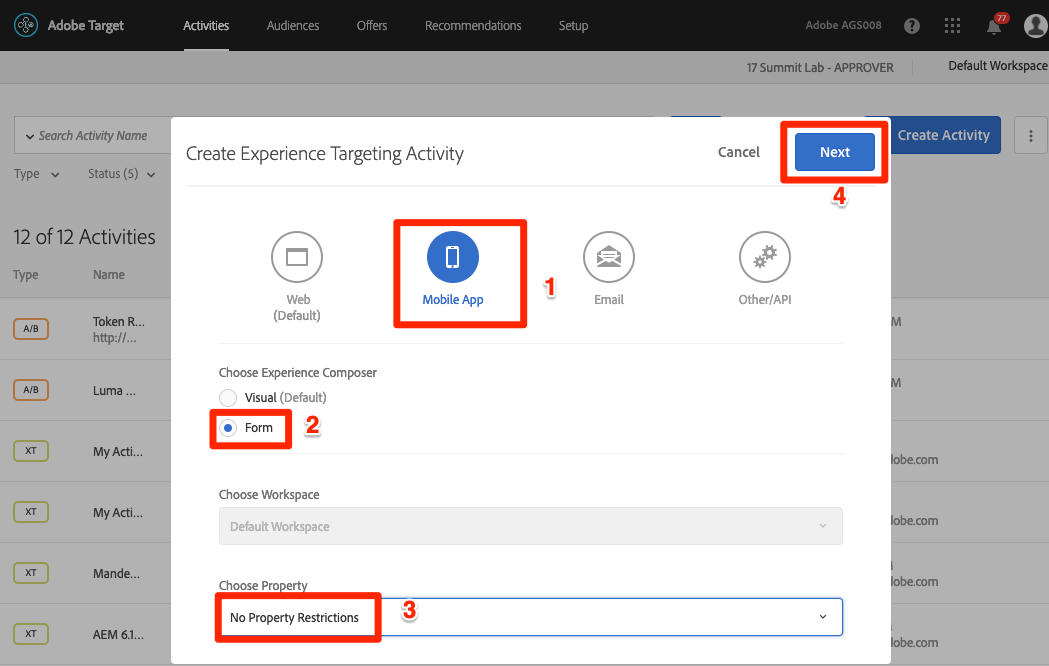
Select Mobile App
Select the Form Composer (note that the VEC can be used with XT activities, too)
In the Choose Property dropdown, select No Property Restrictions
Click the Next button
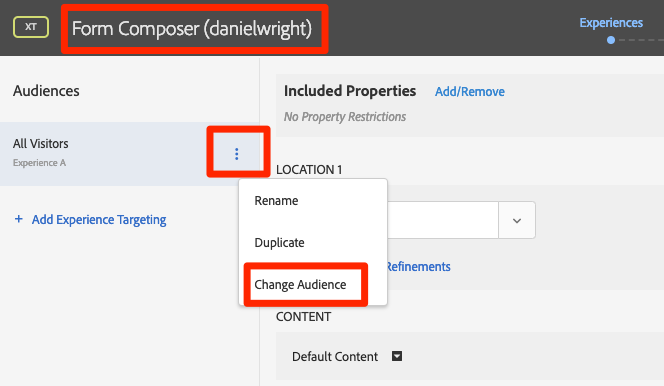
Change the name of the activity to Form Composer (yourname) (click on the current name to change it)
Click the three dots icon to open the dropdown and then select Change Audience
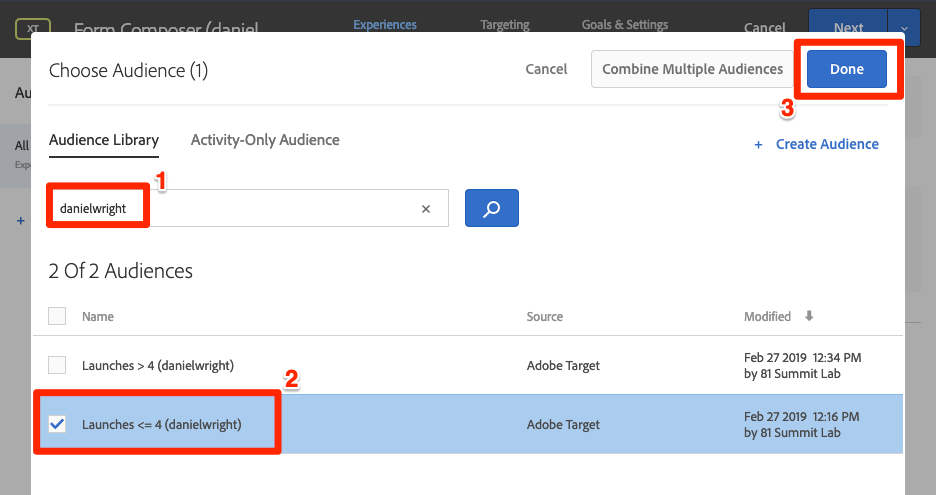
Filter the audience list by yourname to locate the audiences you just created
Click on the Launches <= 4 (yourname) audience so that it is highlighted blue and then click Done
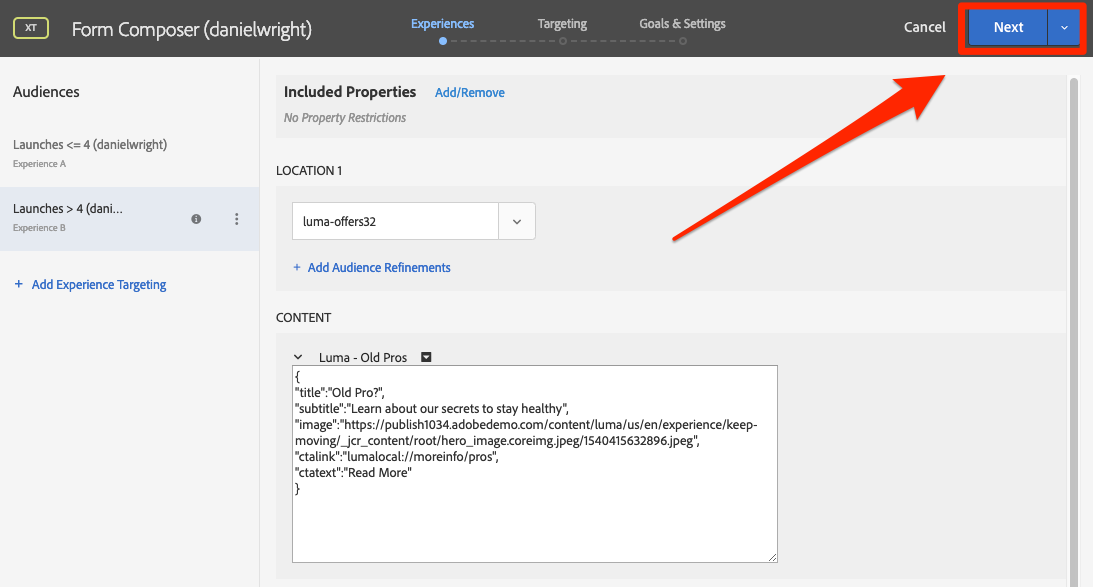
For Location 1 open the dropdown and add the location as luma-offers{your-number} (Replace your number here, it should look something like luma-offers32)
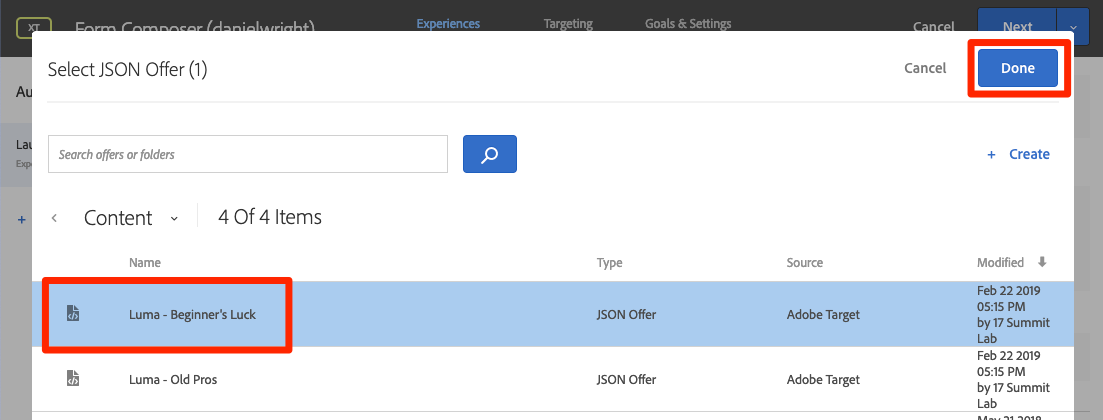
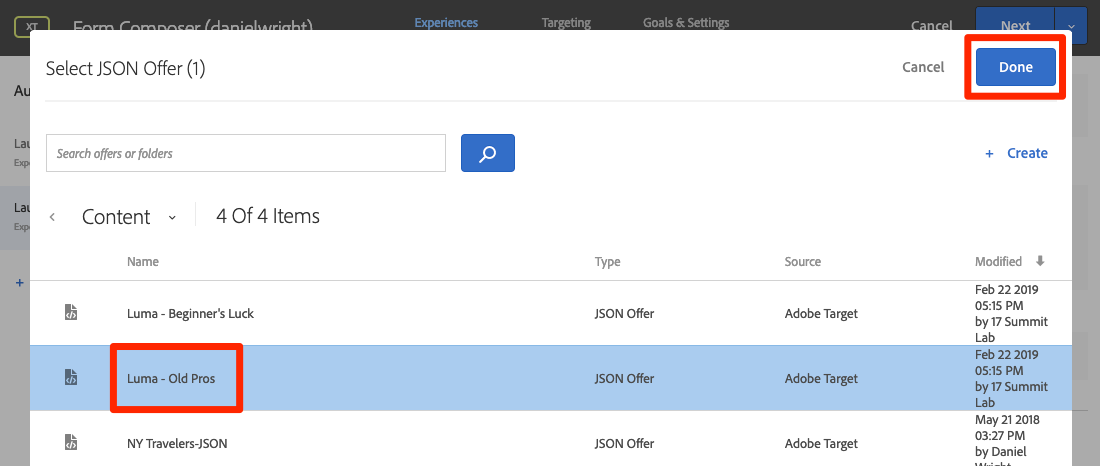
For Content select Change JSON Offer
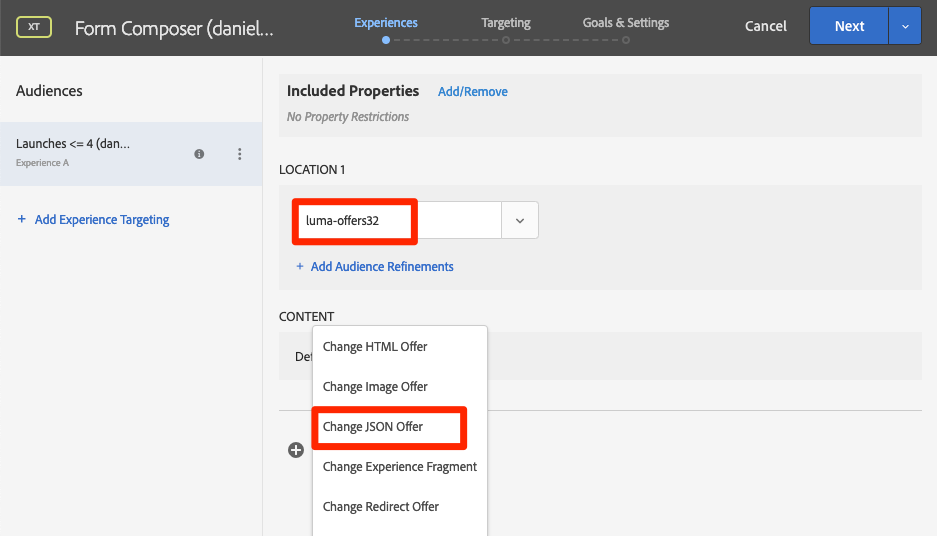
We have created the offers for you to use, so in the content folder, just click Beginner's Luck so that it is highlighted in blue and then click Done
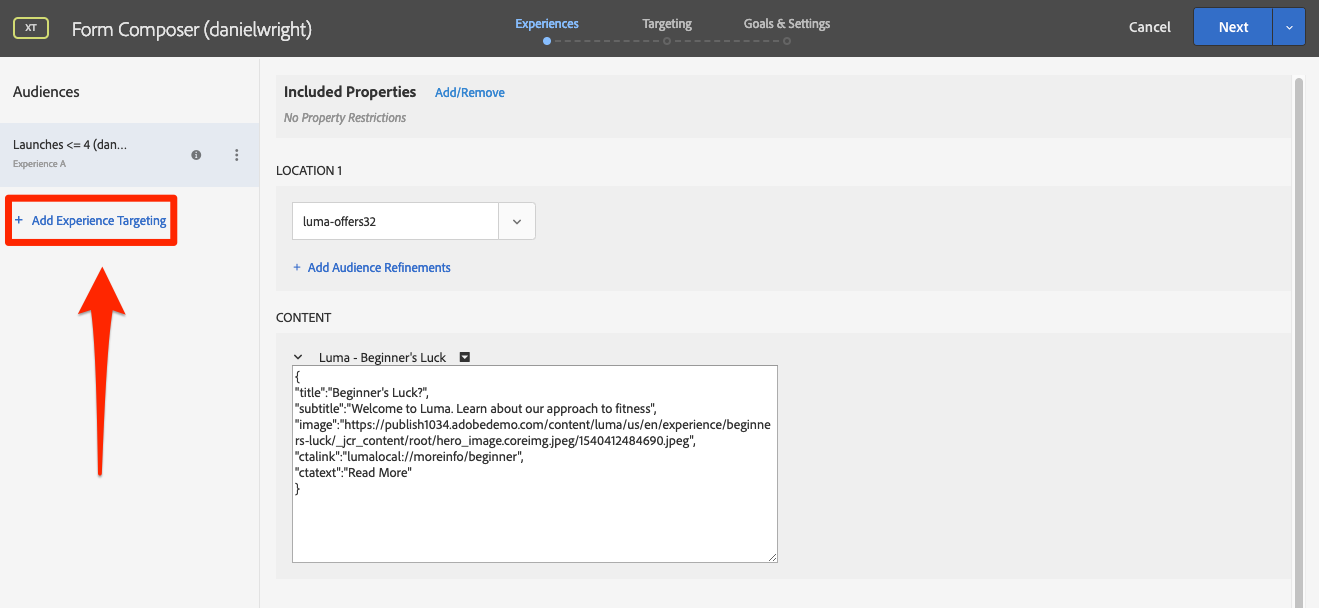
Notice that the JSON offer has properties for each of the elements that we want to change. The app has been provisioned to look for these properties in the Target response and update the app using these values. We will take a look at this in Lesson 3. You can use whatever JSON format and properties you want and provision your app to do whatever you want based on the offer.
Click Add Experience Targeting
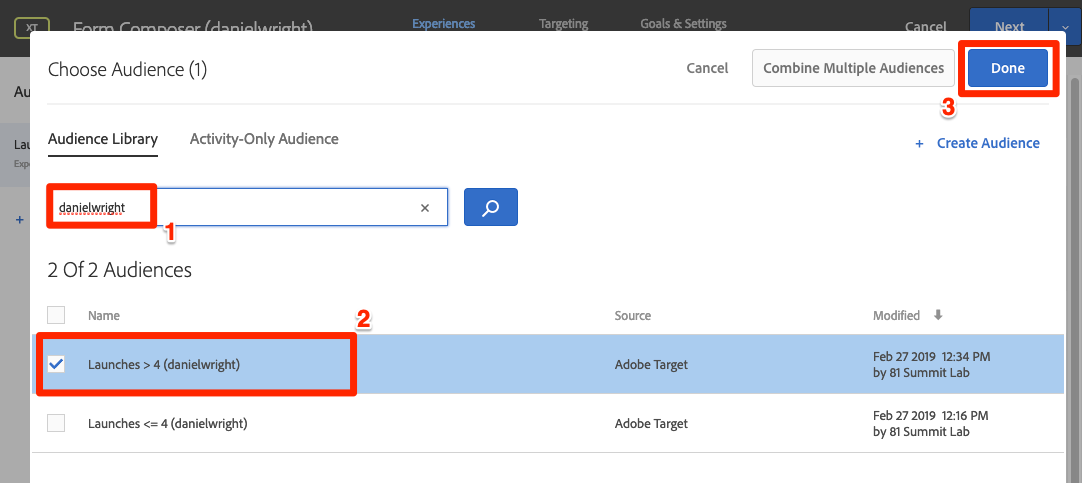
Filter the audience list by yourname to locate the audiences you just created
Click on the Launches > 4 (yourname) audience so that it is highlighted blue and then click Done
For Content select Change JSON Offer
In the Content modal, click Old Pros so that it is highlighted in blue and then click Done
Click Next to proceed to the Targeting screen
The Targeting screen shows a diagram of how the Audiences will be mapped to the experiences. Click Next to proceed to the Goals & Settings screen

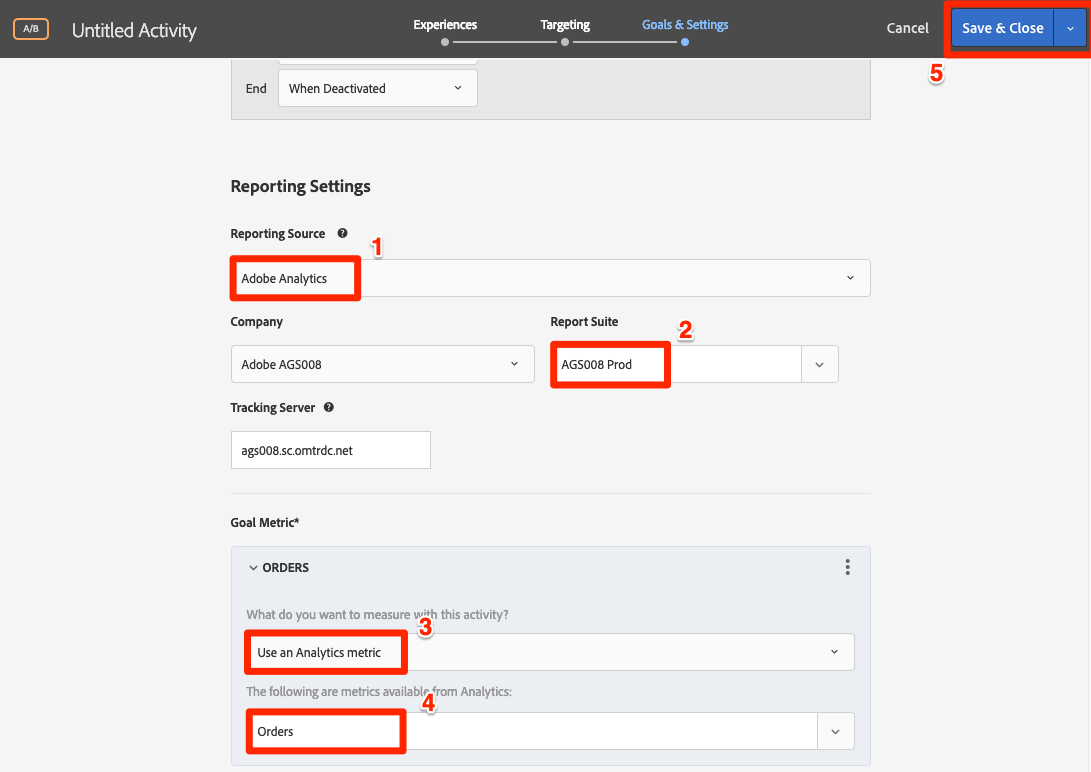
Leave Target as the reporting source, select Revenue as the goal metric and enter orderConfirmPage as the conversion as the mbox
Click the Save & Close button

Congratulations! You have set up your first Mobile XT activity!
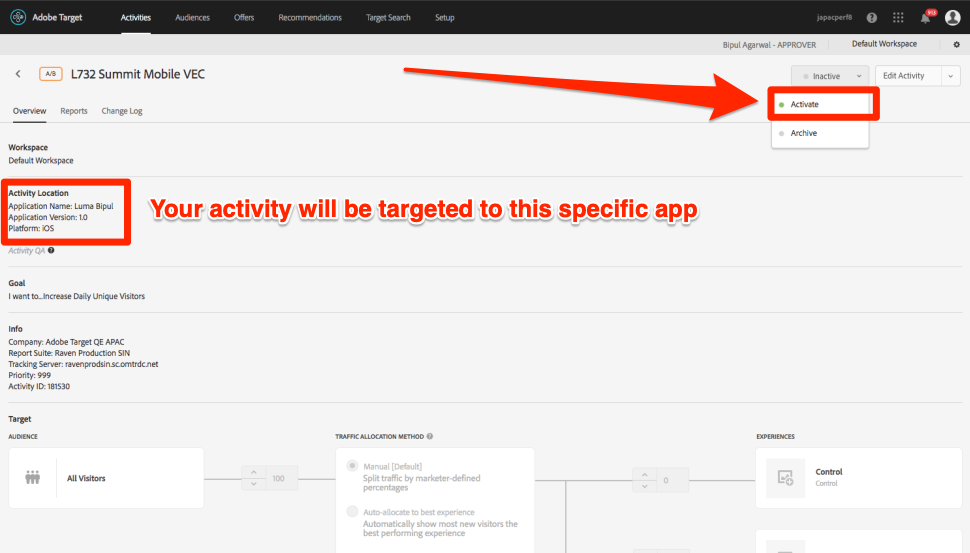
Once the activity is synced successfully, activate the activity by opening the dropdown and selecting Activate. 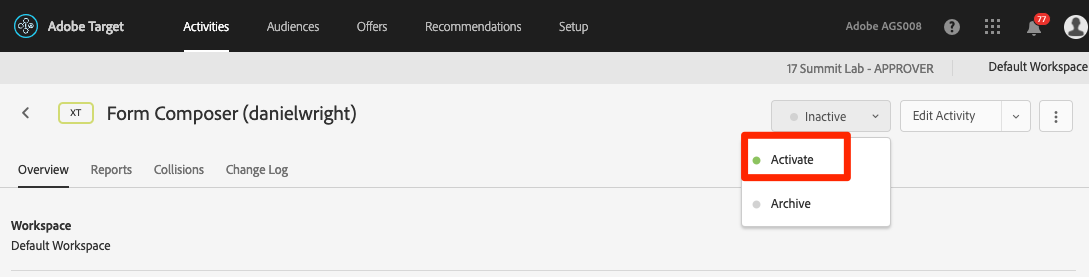
Note that the activity is targeted based on the name of the request (luma-offers<your-number>), to the Workspace (Default Workspace), and to the audiences.
Now go back to XCode
Rebuild the app by clicking the Play icon 
Wait for the Luma app to open again
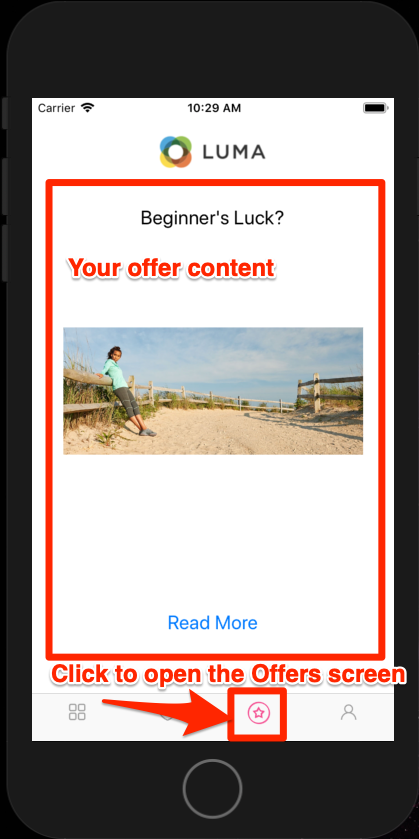
Click on the star icon to open the deals screen
You should see the activity, with either the "Beginner's Luck" or "Old Pros" experience, depending on how many times you have Launched the app during this lab. You can delete and re-install the app to reset the number of Launches. Or rebuild it to increment the number of Launches.
In this lesson, we will look at the implementation fundamentals required to get the Target VEC and Form Composer activities working in your mobile application. We will guide you through each step, so don't feel like you need to be an expert mobile app developer to complete this lesson
At the end of this lesson, you will be able to:
The new Adobe Mobile SDK is configured in Launch and then implemented in your application.
In this lesson, you will create a mobile Launch property with all of the configurations necessary to deploy Adobe Target in a mobile application and then deploy the Adobe SDK into a mobile app.
Log into the Adobe Experience Cloud
Skip any screen related to adding a phone number
Skip any "Welcome to the Experience Cloud" intro screen
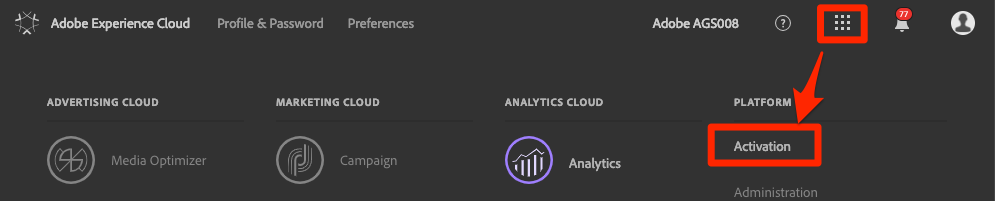
Click the icon to open the solution switcher
Select Activation from the menu
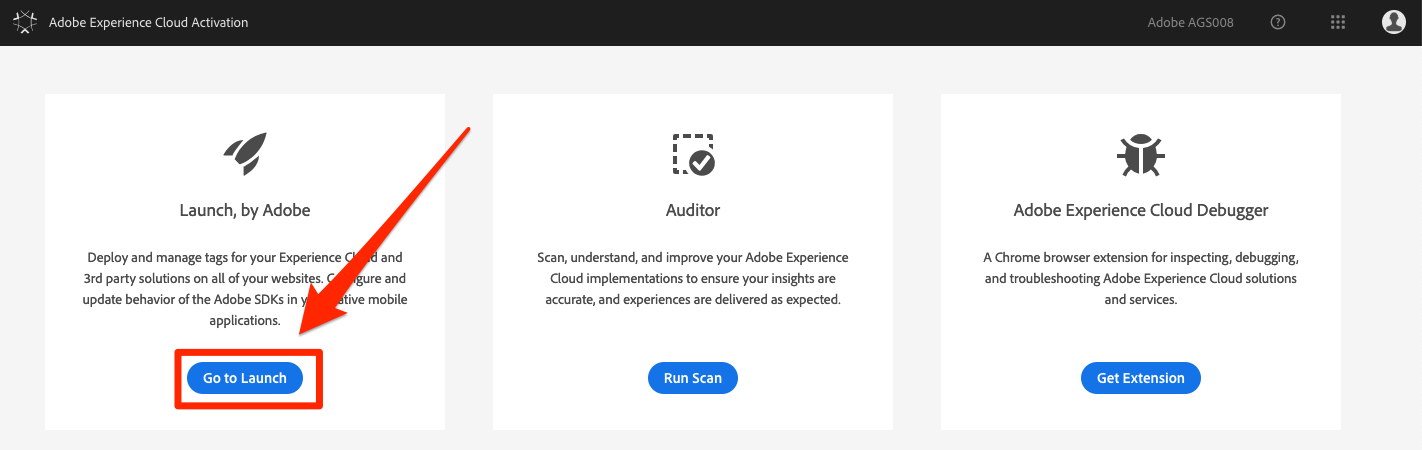
Under Launch, by Adobe, click the Go to Launch button
If you get a "Terms of Use" screen, accept the terms and continue
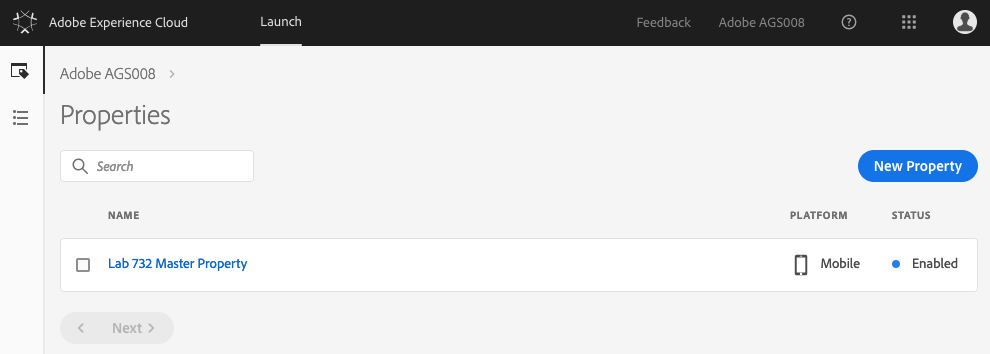
You should now see the Properties screen:
If you use Launch frequently, you can also bookmark the following URL and log in directly https://launch.adobe.com
A property is basically a container that you fill with extensions, rules, data elements, and libraries as you deploy tags to your app. A property can be shared across multiple apps if you track them similarly. For example, suppose that you have apps for iOS and Android that have identical functionality. You can apply one property to both of them.
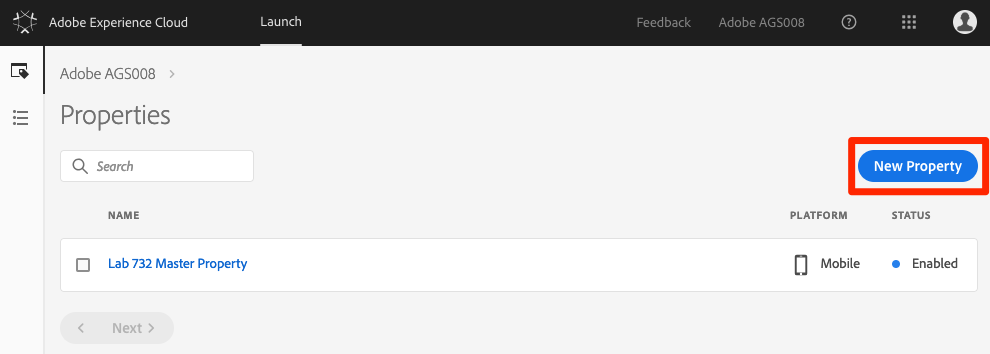
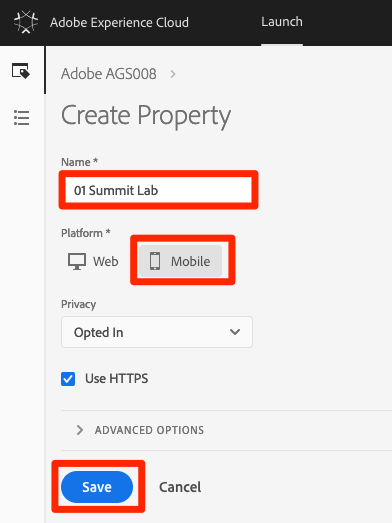
To Create a Property
Click the New Property button:
Name your property (e.g. "[YOUR_NUMBER] Summit Lab")
As the platform, click Mobile
Click the Save button
Your new property should display on Properties page. Note that if you check the box next to the property name, options to Configure or Delete the property appear above the property list. Click on the name of your property (e.g. YOUR_NUMBER Summit Lab) to open the Overview screen. 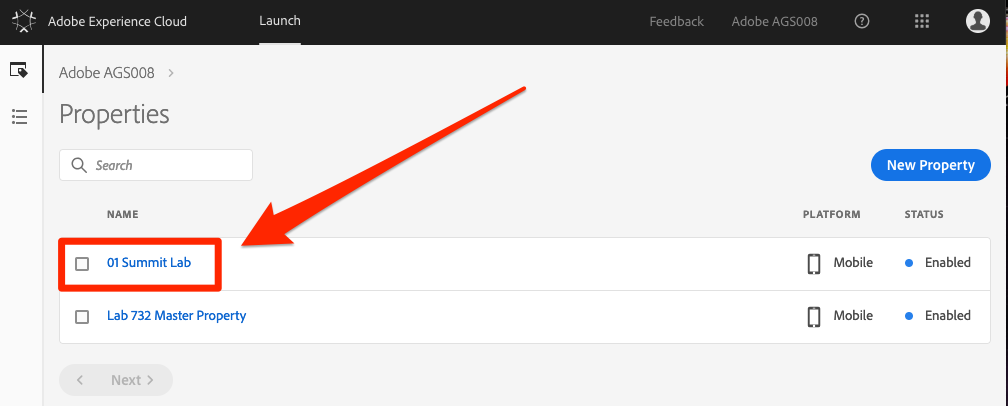
An extension is a packaged set of code that extends the Launch interface and the library functionality. Extensions give you the ability to choose only the parts of the Adobe Experience Platform SDK that you need for your specific app. Since you will be implementing Adobe Target with the VEC capabilities, you will add the necessary extensions required to support it.
IMPORTANT: Adding and removing Extensions in mobile Launch properties requires you to update the embed codes in your app. This is different from web Launch properties, in which you can add or remove extensions at any time, without having to update your website.
Adobe Target has two official extensions, the Adobe Target extension and the Adobe Target VEC extension. The Adobe Target extension supports all of the API familiar to users of our earlier mobile SDKs. The Adobe Target VEC extension requires the Adobe Target extension and adds support for Target's Visual Experience Composer, which allows marketers to build simple activities that change image and text elements on the page in a What-You-See-Is-What-You-Get (WYSIWYG) interface.
Click the Extensions tab to go to the extensions page
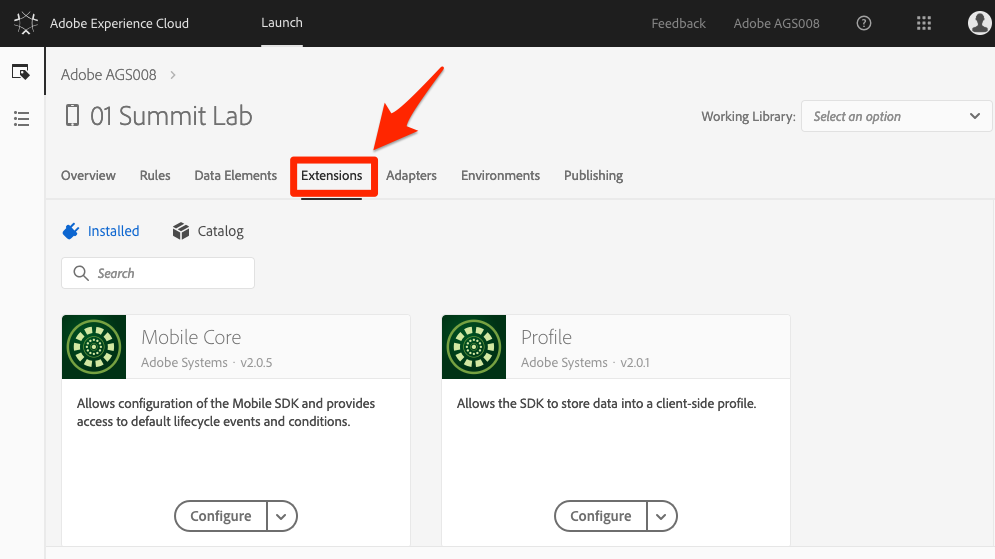
Note that the Mobile Core and Profile are pre-installed in every mobile property.
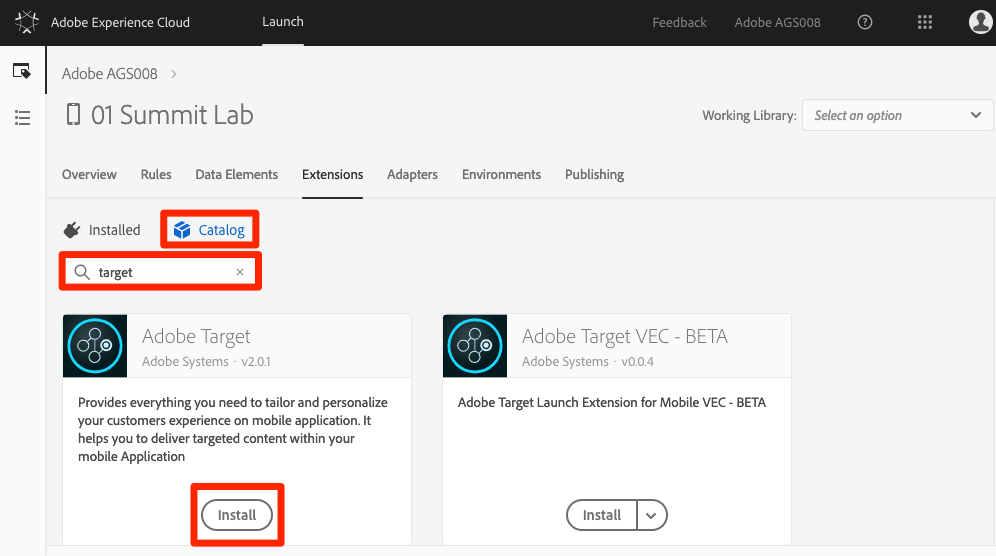
Mobile Core extension represents the core Adobe Experience Platform SDK required for any app implementation. The core contains common set of functionality and frameworks such as a Experience Cloud Identity services, data event hub, rules engine, reusable networking, disk access routines, etc., which is required by all Adobe and third-party extensions.Click on the Catalog tab to see the uninstalled extensions
Search for the word "target" to locate the target extensions
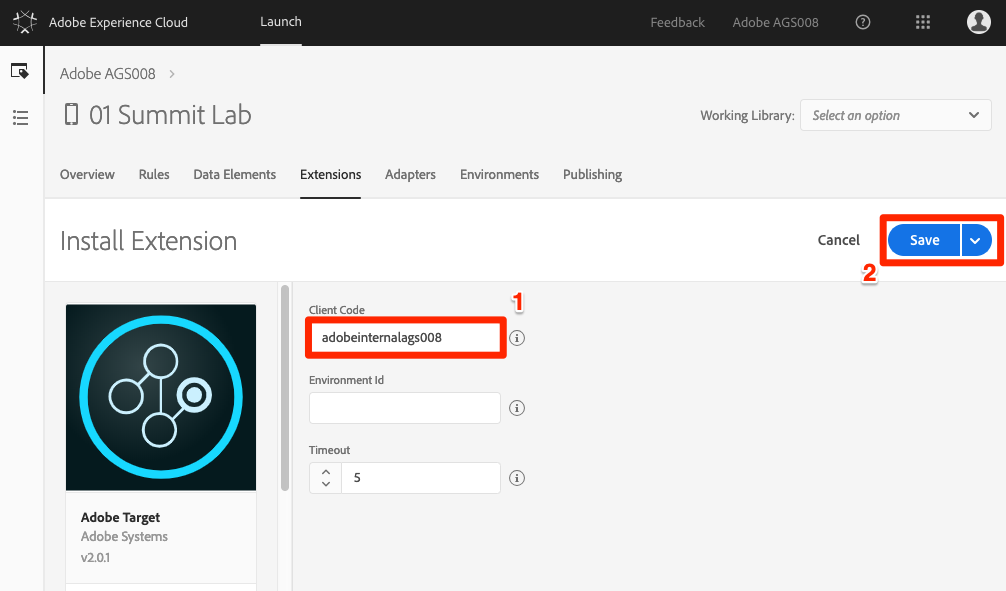
Find the Adobe Target extension and click Install
Enter adobeinternalags008 your Client Code (this is the unique identifier of the Target account we are using)
Leave the Environment Id empty (this creates a new host in Target for the app, for customers who use the host groups feature)
Leave the Timeout set to 5 seconds (this is the maximum amount of time the app will wait for the Target response before showing default content)
Click the Save button
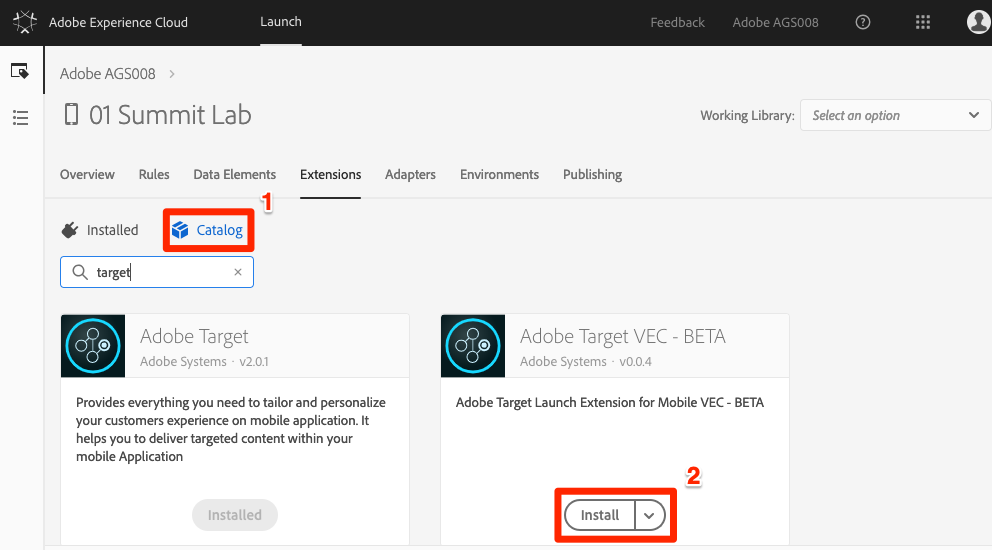
Now that the Target extension has been added, you can add the Target VEC extension.
Click on the Catalog tab to see the uninstalled extensions
Search for the word "target" to locate the target extensions
Find the Adobe Target VEC extension and click Install
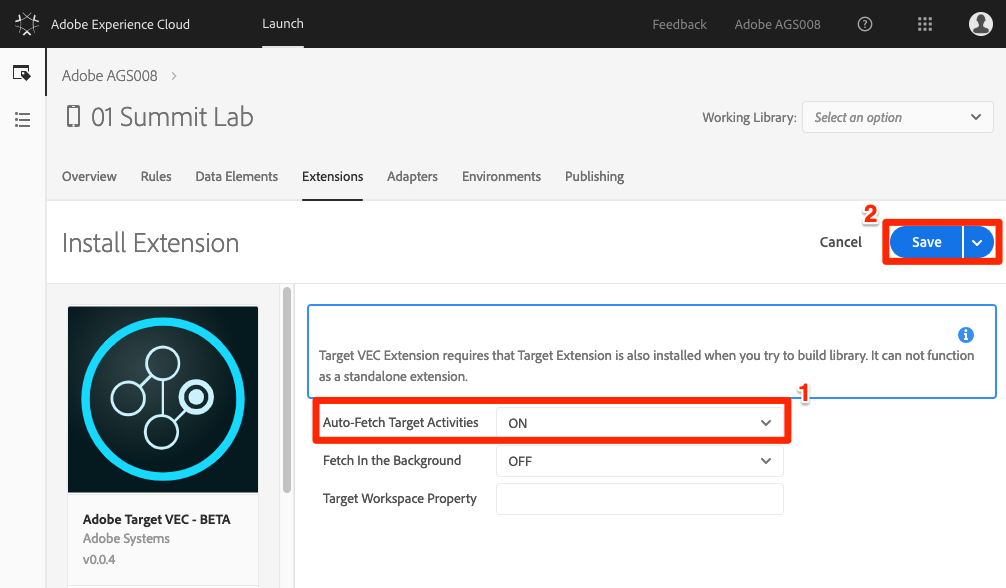
Turn on Auto-Fetch Target Activities. This will pre-fetch all of the Target activities when the app first loads, reducing the number of requests that need to be made.
Leave the Fetch In Background option off. This setting only appears when Auto-Fetch Target Activities is used. Leaving this setting off will allow you to run VEC activities on the home screen of the app, but will also add a slight delay to the app start up to ensure that the Target request has completed or timed out before the home screen displays. We recommend that you leave this setting off when you are running activities on the home screen and toggle it on when you are not. This setting can be changed at any time in the Launch interface without updating your app.
Leave the Target Workspace Property blank. This is a Target Premium feature that allows enterprise customers to control which users can launch activities in different apps or websites.
Click the Save button
That's it! Now that you have added the extensions to your property, you can add them to a library.
After configuring your extensions, you need to package them into a library that you can deploy in your app so you can leverage your marketing solutions.
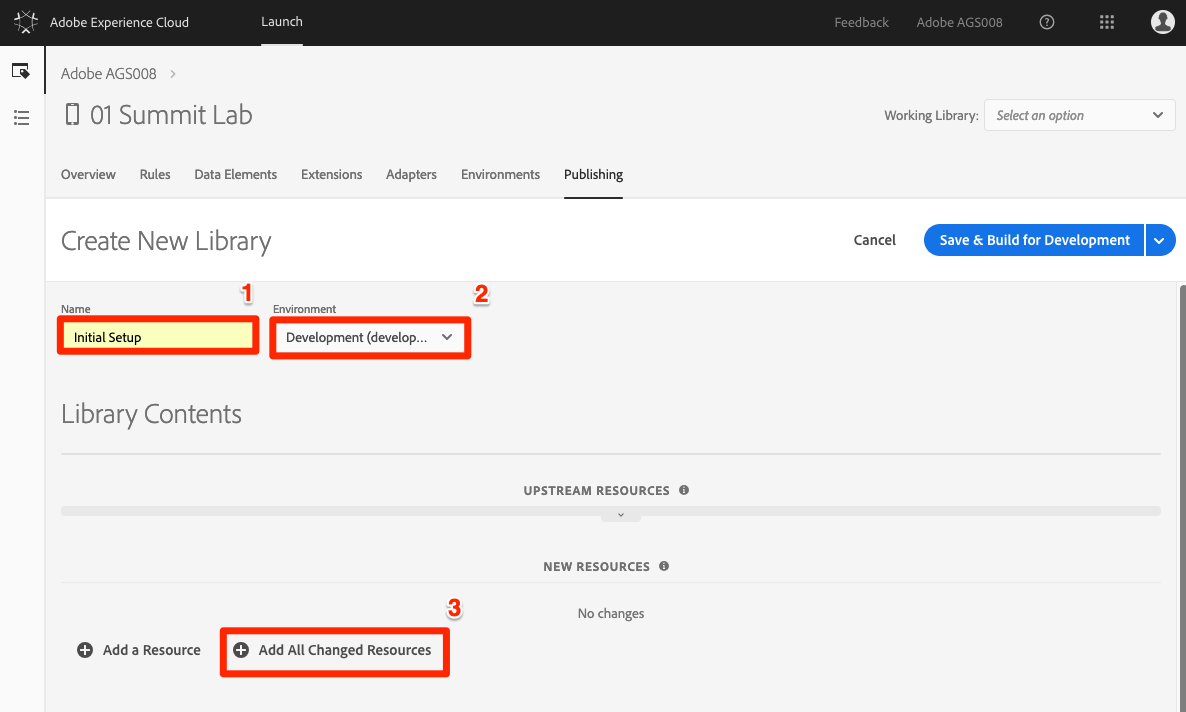
Go to the Publishing tab
Click Add New Library
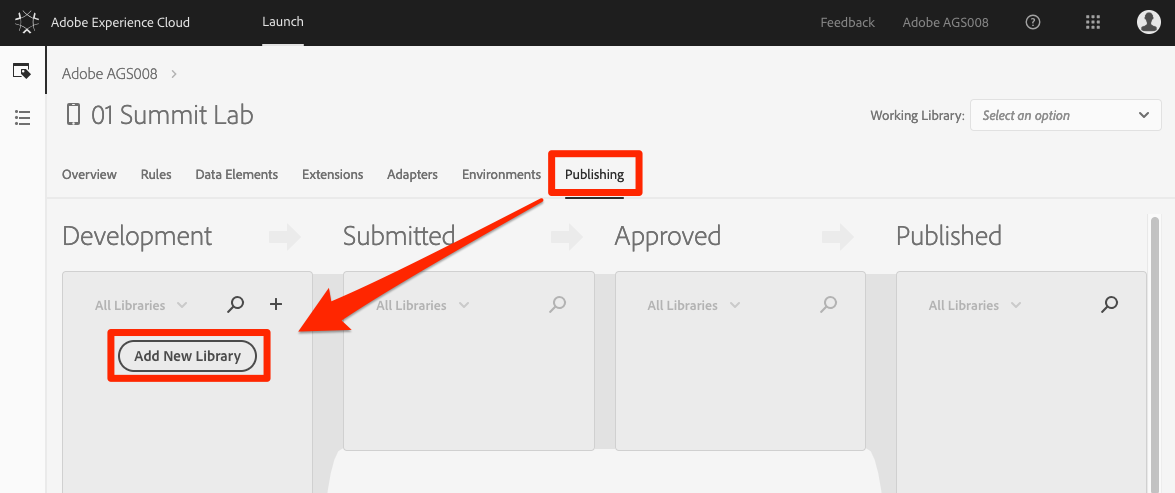
Name the Library Initial Setup
Select Environment > Development
Click Add All Changed Resources
Note that all of the extensions that the default and Target extensions are now listed as "New Resources" in the library.
Click Save & Build for Development
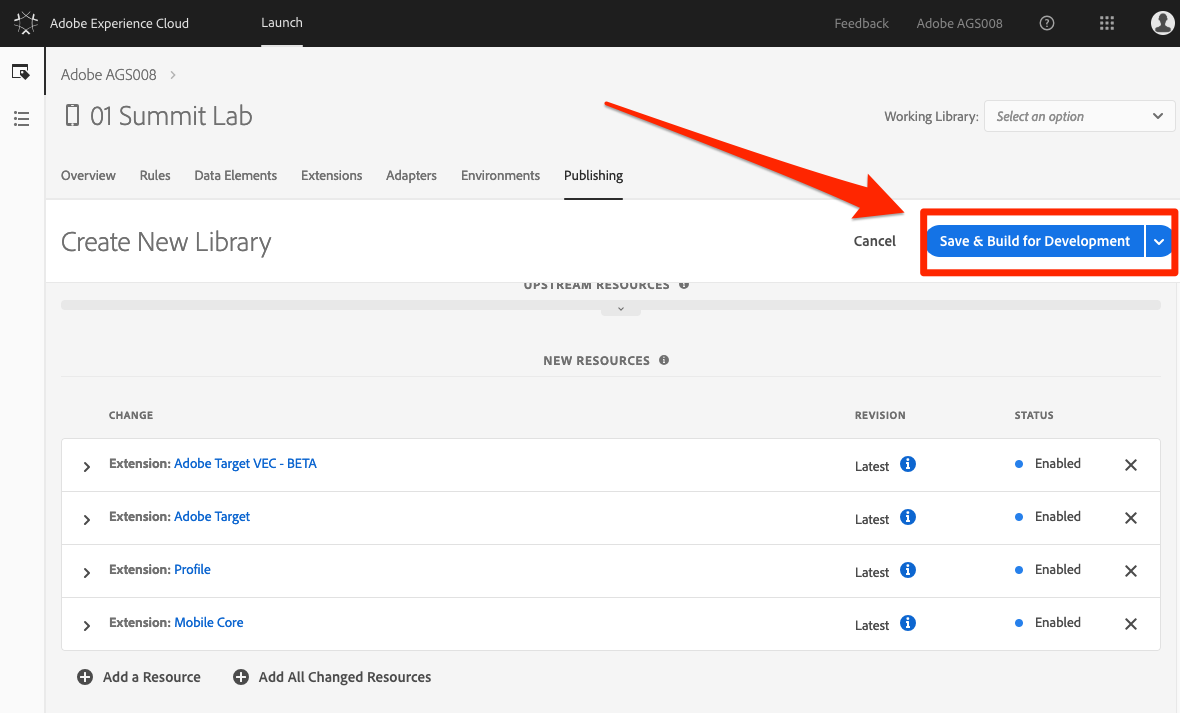
After a few moments, the status dot will turn green indicating the library successfully built.
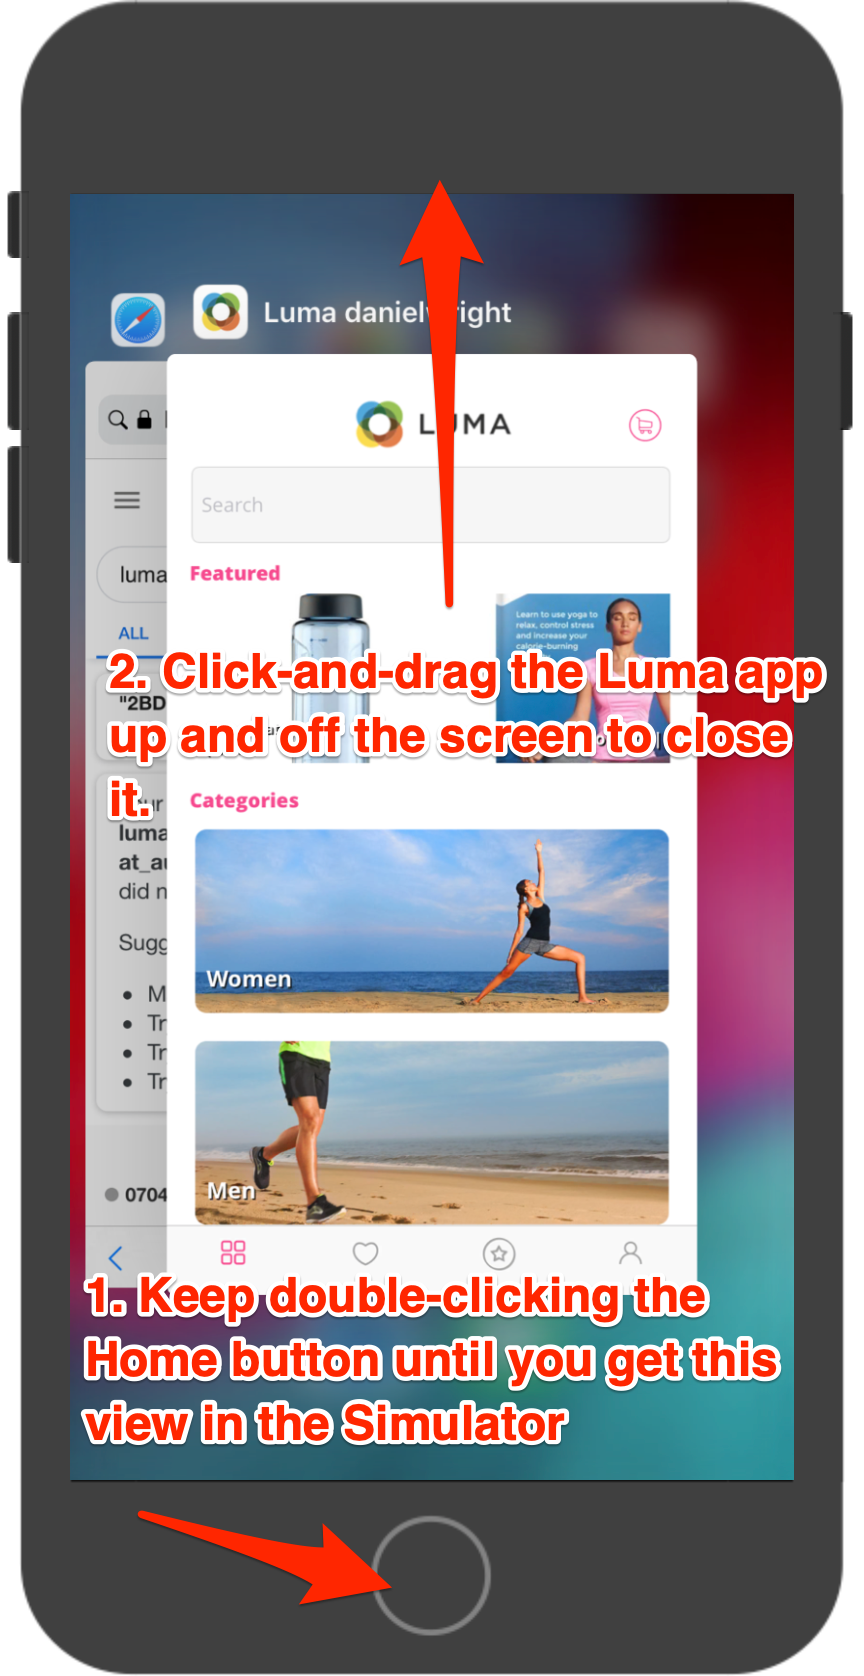
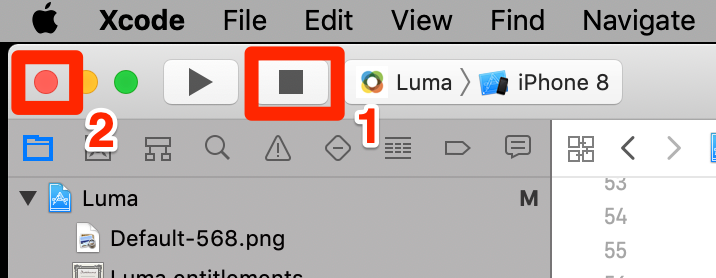
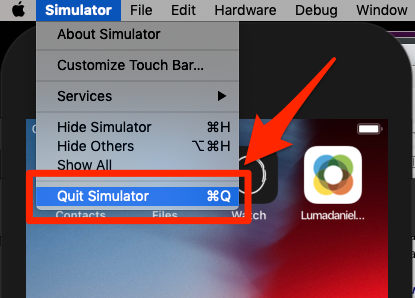
Before we install the Adobe Mobile SDK, we need to close the Lesson 1 app and customize the Lesson 3 app in the same manner that we did to the Lesson 1 app in Exercise 1.1. First, let's close the Lesson 1 app.
To close the Lesson 1 app
In XCode, Click the stop icon
Once the processes have stopped, click the red circle to close the window
In the Simulator, open the Simulator dropdown and click Quit Simulator
Now we can open the Lesson 3 version of the Luma app
To open the Lesson 3 app
Open Finder and navigate to the resources/ folder
Open the Lesson3/ folder
Double-click the Luma.xcworkspace file to open the app in XCode

Next we need to customize the app settings to avoid conflicts with other users.
To customize the app settings
Make sure you are in the Project Navigator view (the folder icon)
Double-click Luma in the top left corner to open the Settings pane
Make sure you are on the General settings tab
Update the Display Name field from Luma Your-name to replace Your-name with your name (one word, all lowercase)
Update the Bundle Identifier field from com.adobe.axp.your-name to replace your-name with your name (one word, all lowercase)
Switch to the Info tab
Expand the URL Types section
Update the URL Schemes field from lumadeeplink.your-name to replace your-name with your name (one word, all lowercase)
Now open the Offers.swift file.
Change luma-offers{your-number} (Replace your number here, it should look something like luma-offers32)
In this exercise, you will implement the Mobile SDK with the extensions and settings corresponding to your Launch property's Development environment. Along the way, you will learn about two main concepts of Launch—Environments and Embed Codes.
At the end of this exercise, you will be able to:
The Installation Instructions for mobile Launch properties is a collection of code snippets that you either run in your Terminal or add to specific locations in your mobile app.
In Launch, click on the Environments tab in the top navigation to go to the environments page. Note that Development, Staging, and Production environments have been pre-created for you.
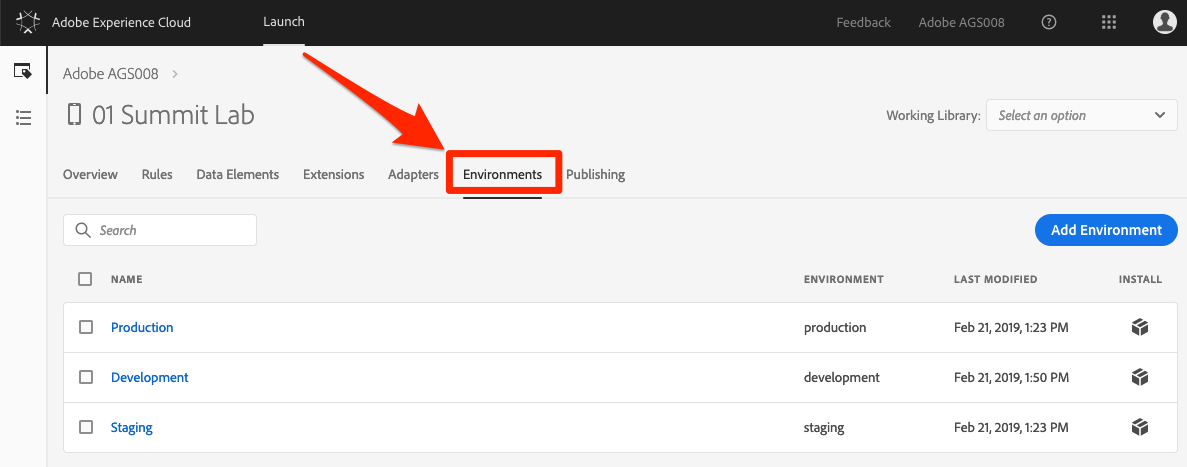
Development, Staging, and Production environments correspond to the typical environments in the code development and release process. Code is first written by a developer in a Development environment. When they have completed their work, they send it to a Staging environment for QA and other teams to review. Once the QA and other teams are satisfied, the code is then published to the Production environment, which is the public-facing environment which your visitors experience when they download your app.
Launch permits additional Development environments, which are useful in large organizations in which multiple developers are working on different projects at the same time.
The Development environment is the only environment we will use in the lab.
Now let's copy the embed code:
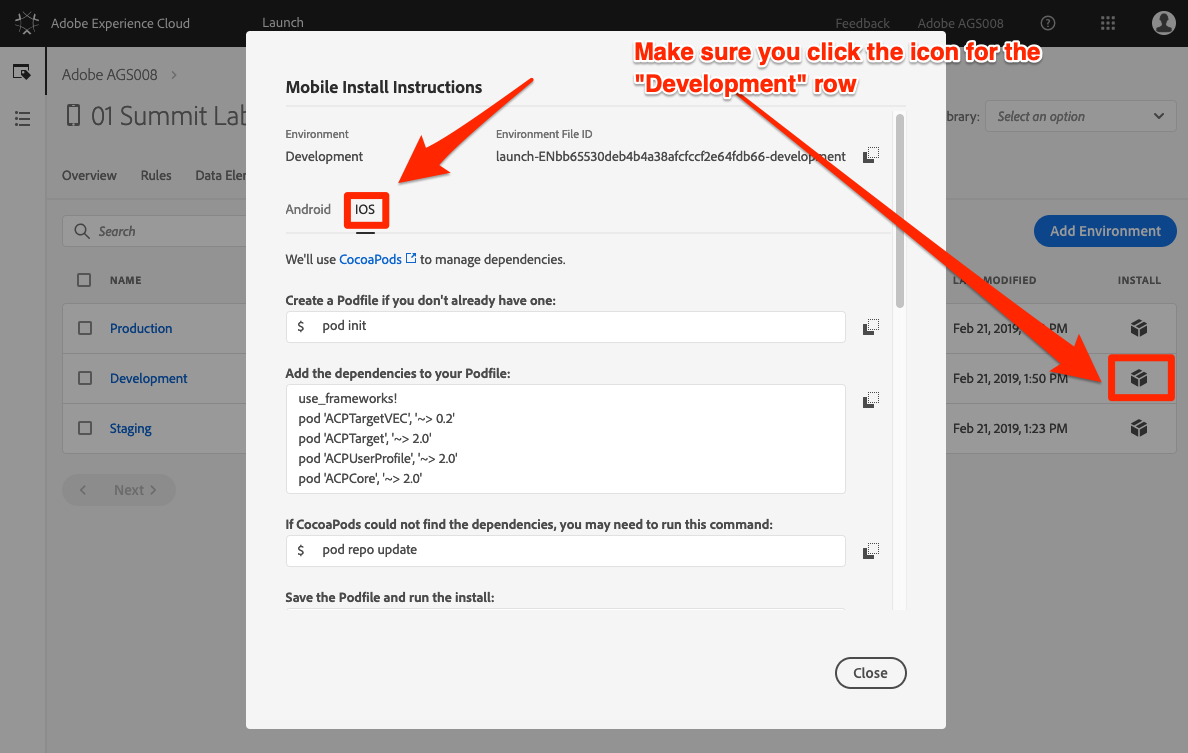
In the Development row, click the Install icon  to open the modal.
If you have previously used Launch in websites, one of the first things you will notice is that there is a lot more information in this modal than for web Launch properties.
Now, beneath the Environment, change the operating system to iOS
Let's go through the instructions to update the App.
The Adobe Mobile SDK for iOS uses the CocoaPods to manage dependencies between its various components to make it easier to keep your app updated with compatible libraries. The first four steps in the installation instructions are related to creating a podfile, adding Adobe dependencies to the podfile, and then installing them in your app.
NOTE: For the sake of time in this lab, we have preinstalled the Pods into the Lesson 3 app and we will skip the first four installation instructions related to the podifles.
Now it's time to import the SDK into the App
To import the SDK
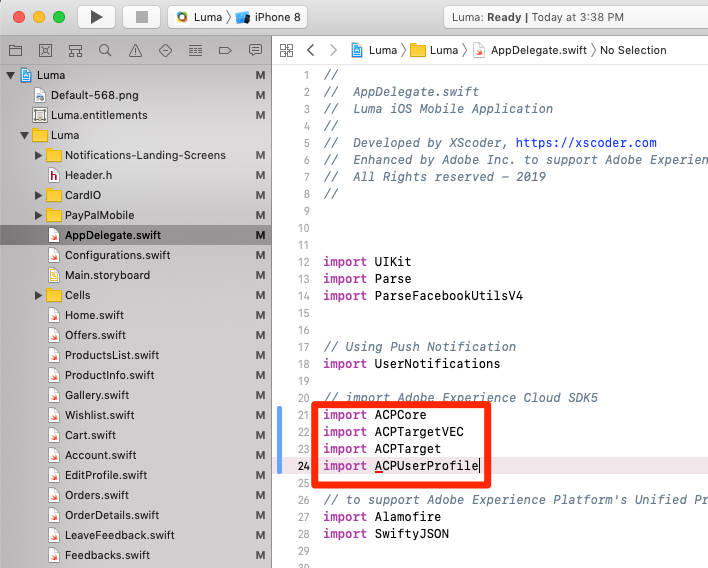
Open the Luma > Luma > AppDelegate.swift file
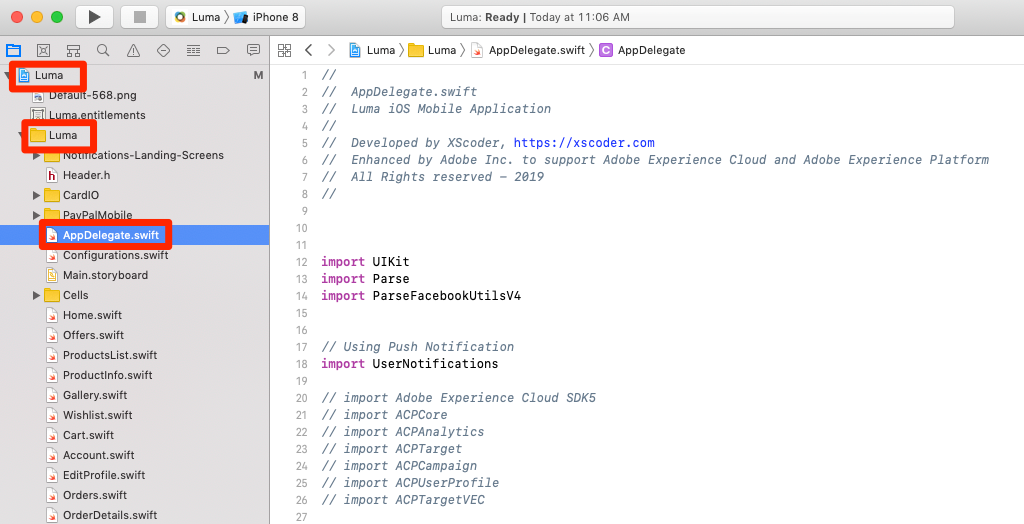
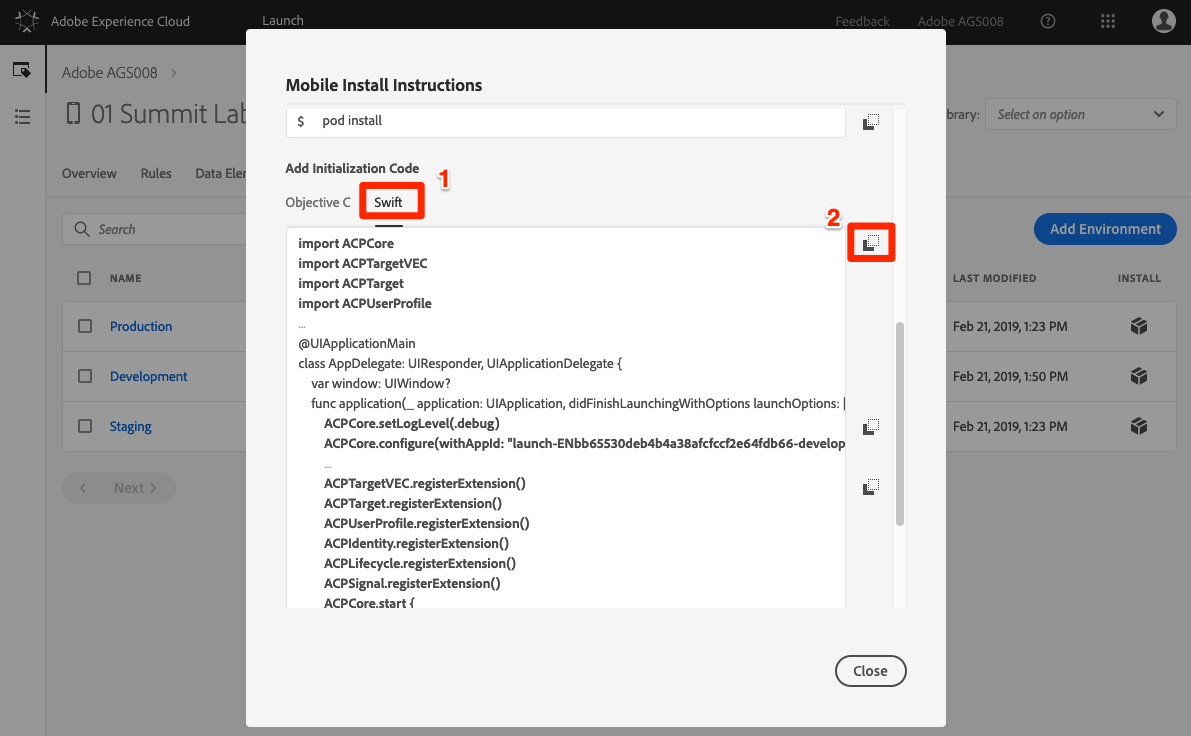
In the Launch interface, scroll to the Add Initialization Code section and click the Swift tab
Copy the import statements, by clicking the first  icon in the Add Initialization Code section:
In XCode, paste these import statements into the AppDelegate file after the line with // import Adobe Experience Cloud SDK5 (or you can just uncomment the import statements already in the AppDelegate.swift file)
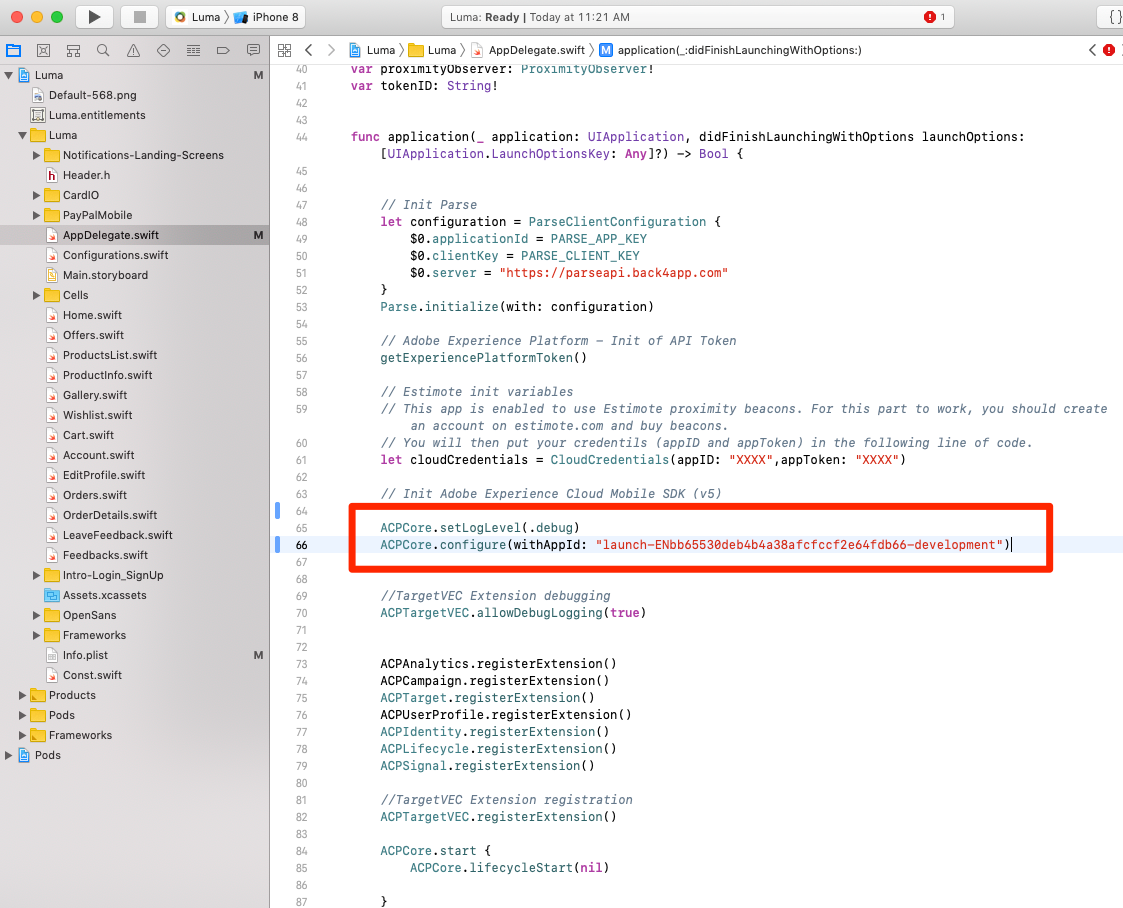
Scroll down the AppDelegate.swift file to the section with the comment: // Init Adobe Experience Cloud Mobile SDK (v5) Remove the comments (the /* and */) that are surrounding the section so that it looks like this
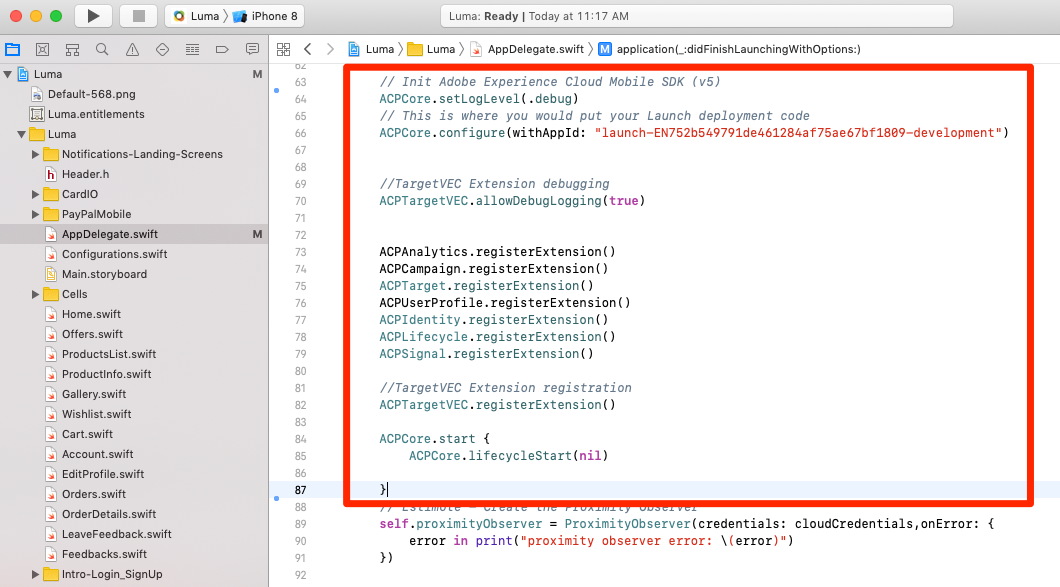
In the Launch interface, copy the two lines related to the ACPCore, by clicking the second icon in the Add Initialization Code section. The first line turns on console logging statements (available options are "debug", "verbose", "warning", and "error"). The second line points to the unique identifier of your Launch environment and will be different from our screenshot.
In XCode, paste these Core statements into the AppDelegate file, just after the line with // Init Adobe Experience Cloud Mobile SDK (v5), replacing the two similar lines already there to customize the app to read your new Launch property:
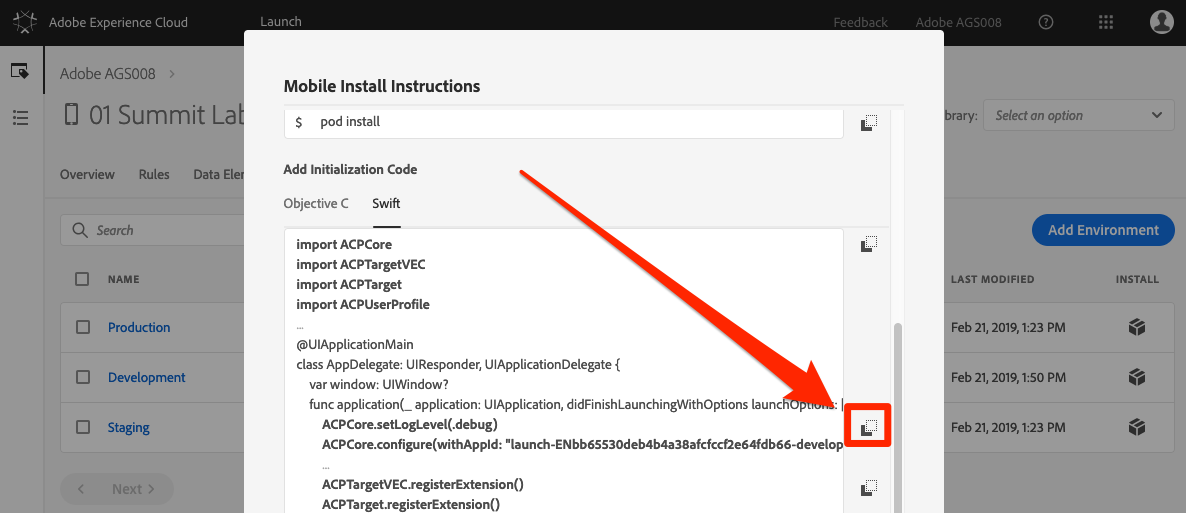
The next section turns on special debugging statements for the Target VEC. Note that this code is not part of the Launch installation instructions, although it is in the Target Mobile VEC documentation.

In the Launch interface, copy the extension statements, by clicking the third icon in the Add Initialization Code section: 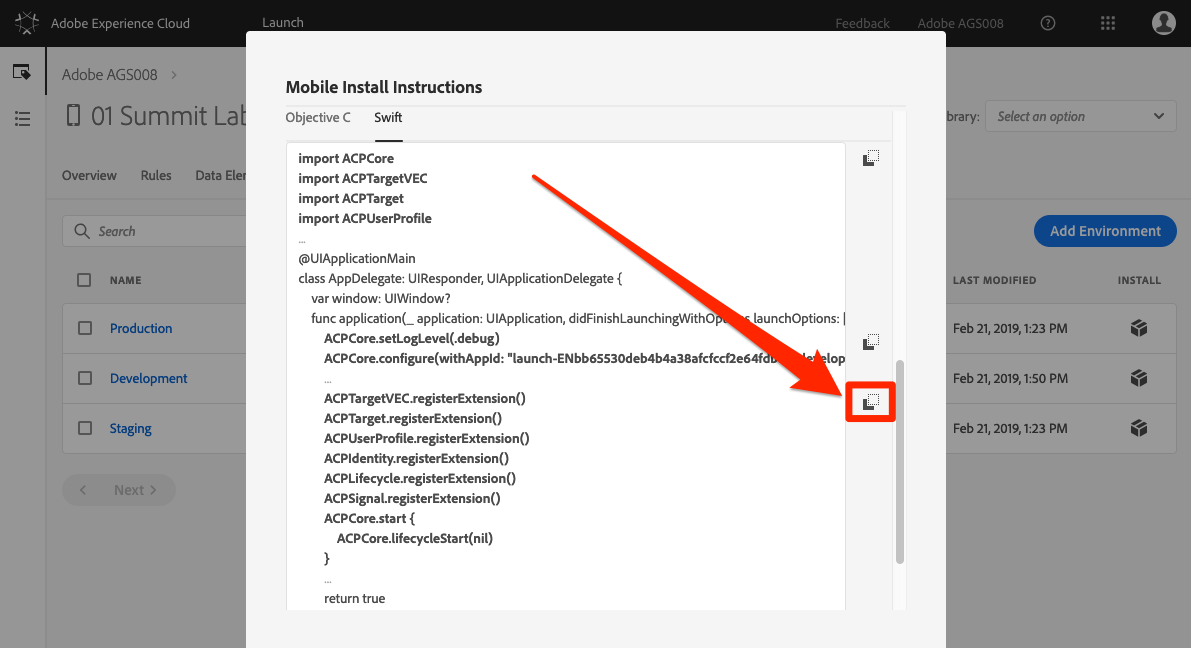
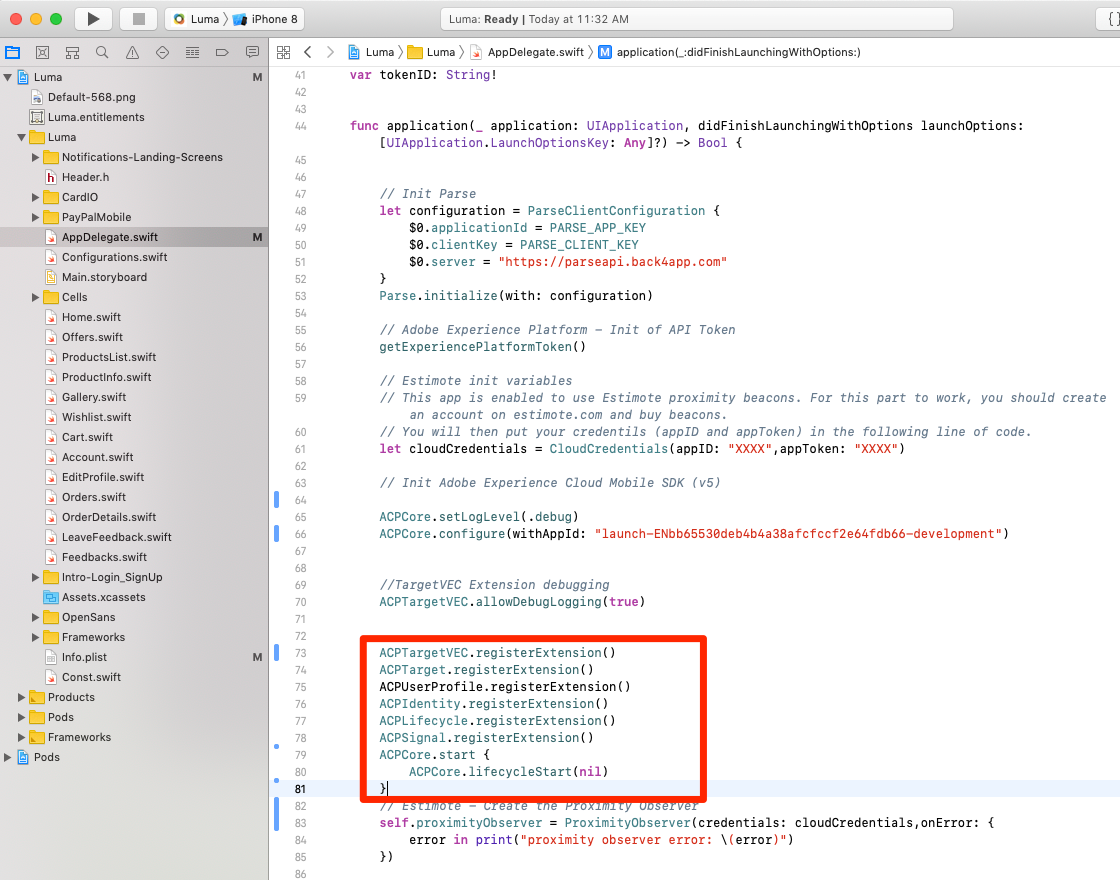
In XCode, paste these extension statements, replacing the existing, similar code. (There shouldn't be any references to Analytics or Campaign when you are done):
Now, lets make sure that everything is working so far.
To verify the implementation
Use ⌘-S to save your XCode project
Run the app and launch it with an iPhone 8 simulator (we find the iPhone 8 simulator easier to use because it still has the "home" button which is easy to click with a mouse).
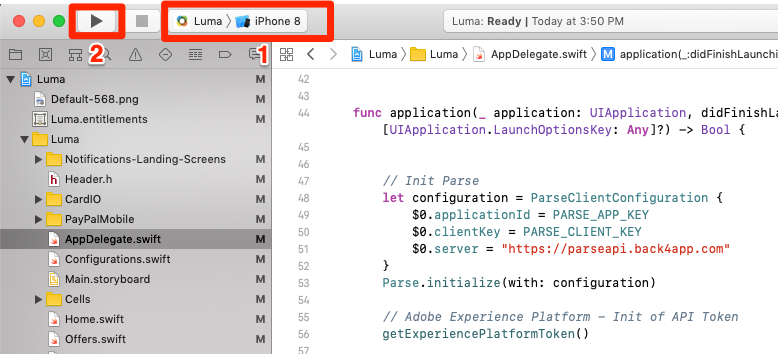
Wait for the simulator to launch and fully open and get to the home screen. This may take a few minutes.
NOTE If you get any "Build Failed" messages in XCode, please get the attention of a TA immediately
Confirm that calls are being made to the Adobe servers in the XCode Debug Console. If the Debug Console doesn't automatically open, open it via the View > Debug Area > Activate Console menu option

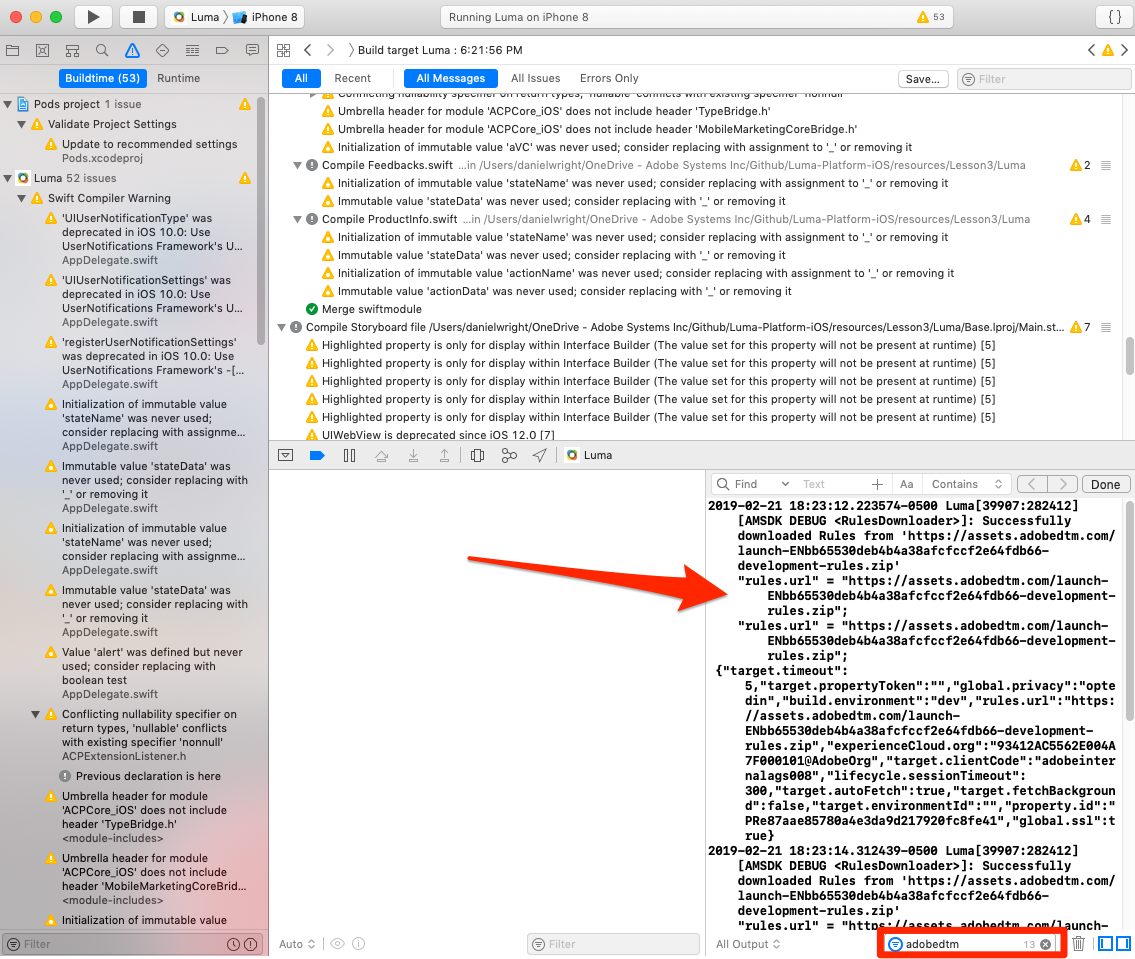
Here are examples of some specific calls you can look for:
Calls to retrieve the Launch configuration (filter your console to adobedtm.com). Note the extension configurations which you entered in the earlier lesson. While adding the extension requires an update to the app, these settings can be managed externally in Launch and changed at any time:
[2019-01-15 12:11:44.518220-0500 Luma[52399:5056293] [AMSDK DEBUG <RulesDownloader>]: Successfully downloaded Rules from 'https://assets.adobedtm.com/launch-EN360aefc739b04410816f751a95861744-development-rules.zip'
{"target.propertyToken":"","target.timeout":5,"global.privacy":"optedin","analytics.backdatePreviousSessionInfo":true,"analytics.offlineEnabled":true,"build.environment":"dev","rules.url":"https://assets.adobedtm.com/launch-EN360aefc739b04410816f751a95861744-development-rules.zip","target.clientCode":"techmarketingdemos","experienceCloud.org":"7ABB3E6A5A7491460A495D61@AdobeOrg","target.autoFetch":true,"target.fetchBackground":true,"lifecycle.sessionTimeout":300,"target.environmentId":"busbookingapp","analytics.server":"tmd.sc.omtrdc.net","analytics.rsids":"tmd-mobile-dev1","analytics.batchLimit":0,"property.id":"PRb4881271498b4f2cbaf67d38a8f3891a","global.ssl":true,"analytics.aamForwardingEnabled":true}](2019-02-21 18:23:12.223574-0500 Luma[39907:282412] [AMSDK DEBUG <RulesDownloader>]: Successfully downloaded Rules from 'https://assets.adobedtm.com/launch-ENbb65530deb4b4a38afcfccf2e64fdb66-development-rules.zip'
    "rules.url" = "https://assets.adobedtm.com/launch-ENbb65530deb4b4a38afcfccf2e64fdb66-development-rules.zip";
    "rules.url" = "https://assets.adobedtm.com/launch-ENbb65530deb4b4a38afcfccf2e64fdb66-development-rules.zip";
 {"target.timeout":5,"target.propertyToken":"","global.privacy":"optedin","build.environment":"dev","rules.url":"https://assets.adobedtm.com/launch-ENbb65530deb4b4a38afcfccf2e64fdb66-development-rules.zip","experienceCloud.org":"93412AC5562E004A7F000101@AdobeOrg","target.clientCode":"adobeinternalags008","lifecycle.sessionTimeout":300,"target.autoFetch":true,"target.fetchBackground":false,"target.environmentId":"","property.id":"PRe87aae85780a4e3da9d217920fc8fe41","global.ssl":true})
Request to the ID Service (filter your console to demdex.net)
[ 2019-01-15 12:11:45.164590-0500 Luma[52399:5056322] [AMSDK DEBUG <com.adobe.module.identity>]: Sending request (https://dpm.demdex.net/id?d_rtbd=json&d_ver=2&d_orgid=7ABB3E6A5A7491460A495D61@AdobeOrg&d_mid=17179986463578698626041670574784107777&d_blob=j8Odv6LonN4r3an7LhD3WZrU1bUpAkFkkiY1ncBR96t2PTI&dcs_region=9)](2019-02-21 18:23:14.149510-0500 Luma[39907:282436] [AMSDK DEBUG <com.adobe.module.identity>]: Sending request (https://dpm.demdex.net/id?d_rtbd=json&d_ver=2&d_orgid=93412AC5562E004A7F000101@AdobeOrg&d_mid=17615499922891563414881652725772701640&d_blob=j8Odv6LonN4r3an7LhD3WZrU1bUpAkFkkiY1ncBR96t2PTI&dcs_region=9))
Our AppDelegate file also had a line ACPTargetVEC.allowDebugLogging(true) in it. This is a special debugging command, which is not part of the Launch installation instructions. It exposes details related to the Target request used for VEC activities.
To locate the Target VEC request
Click in the console
Use ⌘-F to open the Find box
Search for targetvec in the Find box
Hit Enter to jump to the Target request and Post body (Note that the Lifecycle parameters are automatically included):
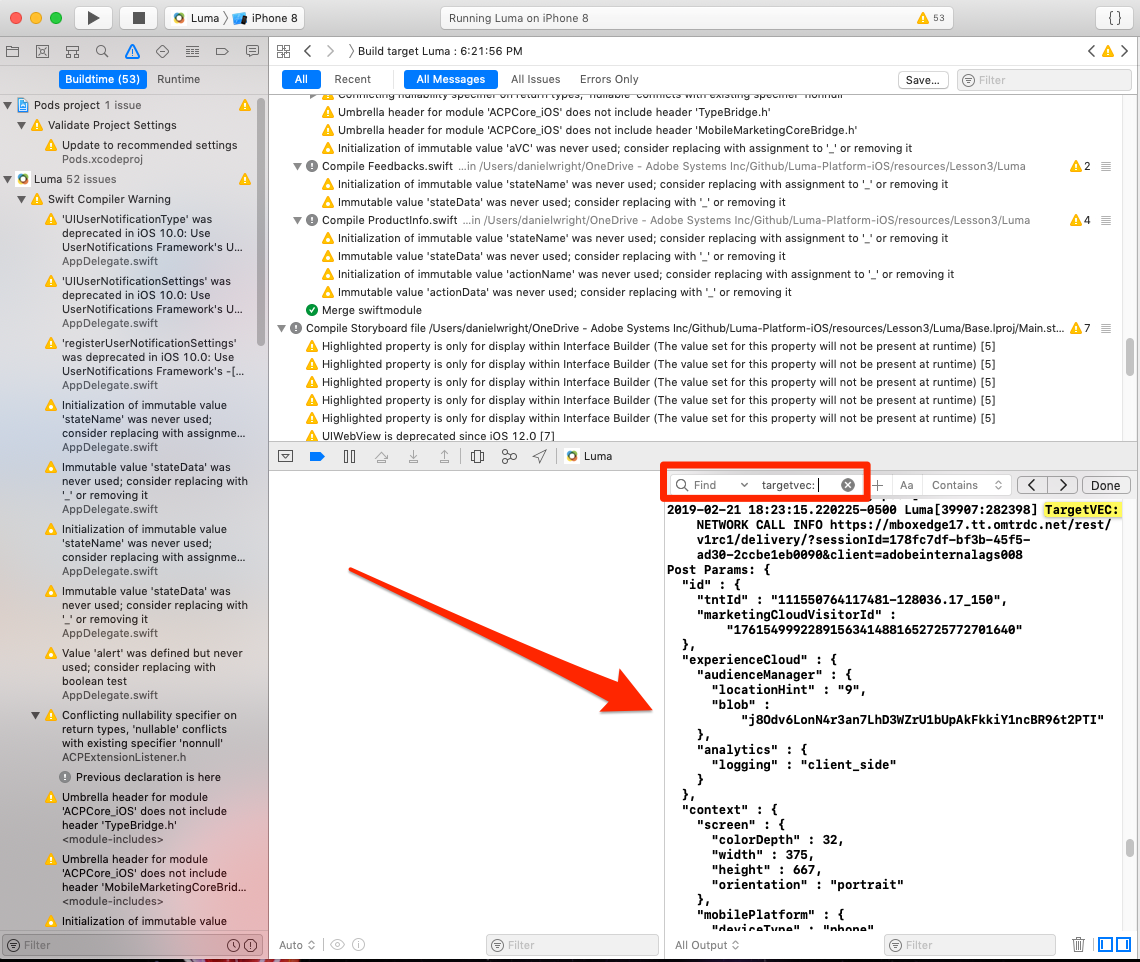
Note that the Target VEC request is made automatically since we used the "Auto-Fetch Target Activities" option in the Launch extension configuration. Other than importing the extension into your app and adding the line for the deeplink support, there's nothing else you need to do to get started with the Target VEC in your own app!
Congratulations, you've added the SDK to a mobile app!
In this exercise, we will enhance our VEC request by adding some parameters to the call.
Adding parameters to the request will allow you to enhance your personalization capabilities by sending new options for audience creation and machine-learning modeling to Adobe Target. They also play an important role in delivering Recommendations content and registering order metrics.
To add custom parameters
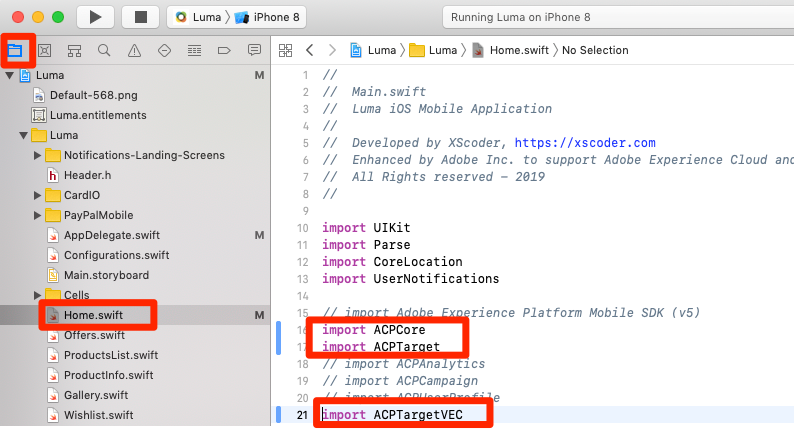
In XCode, open the Home.swift file
Uncomment the imports for ACPCore, ACPTarget, and ACPTargetVEC
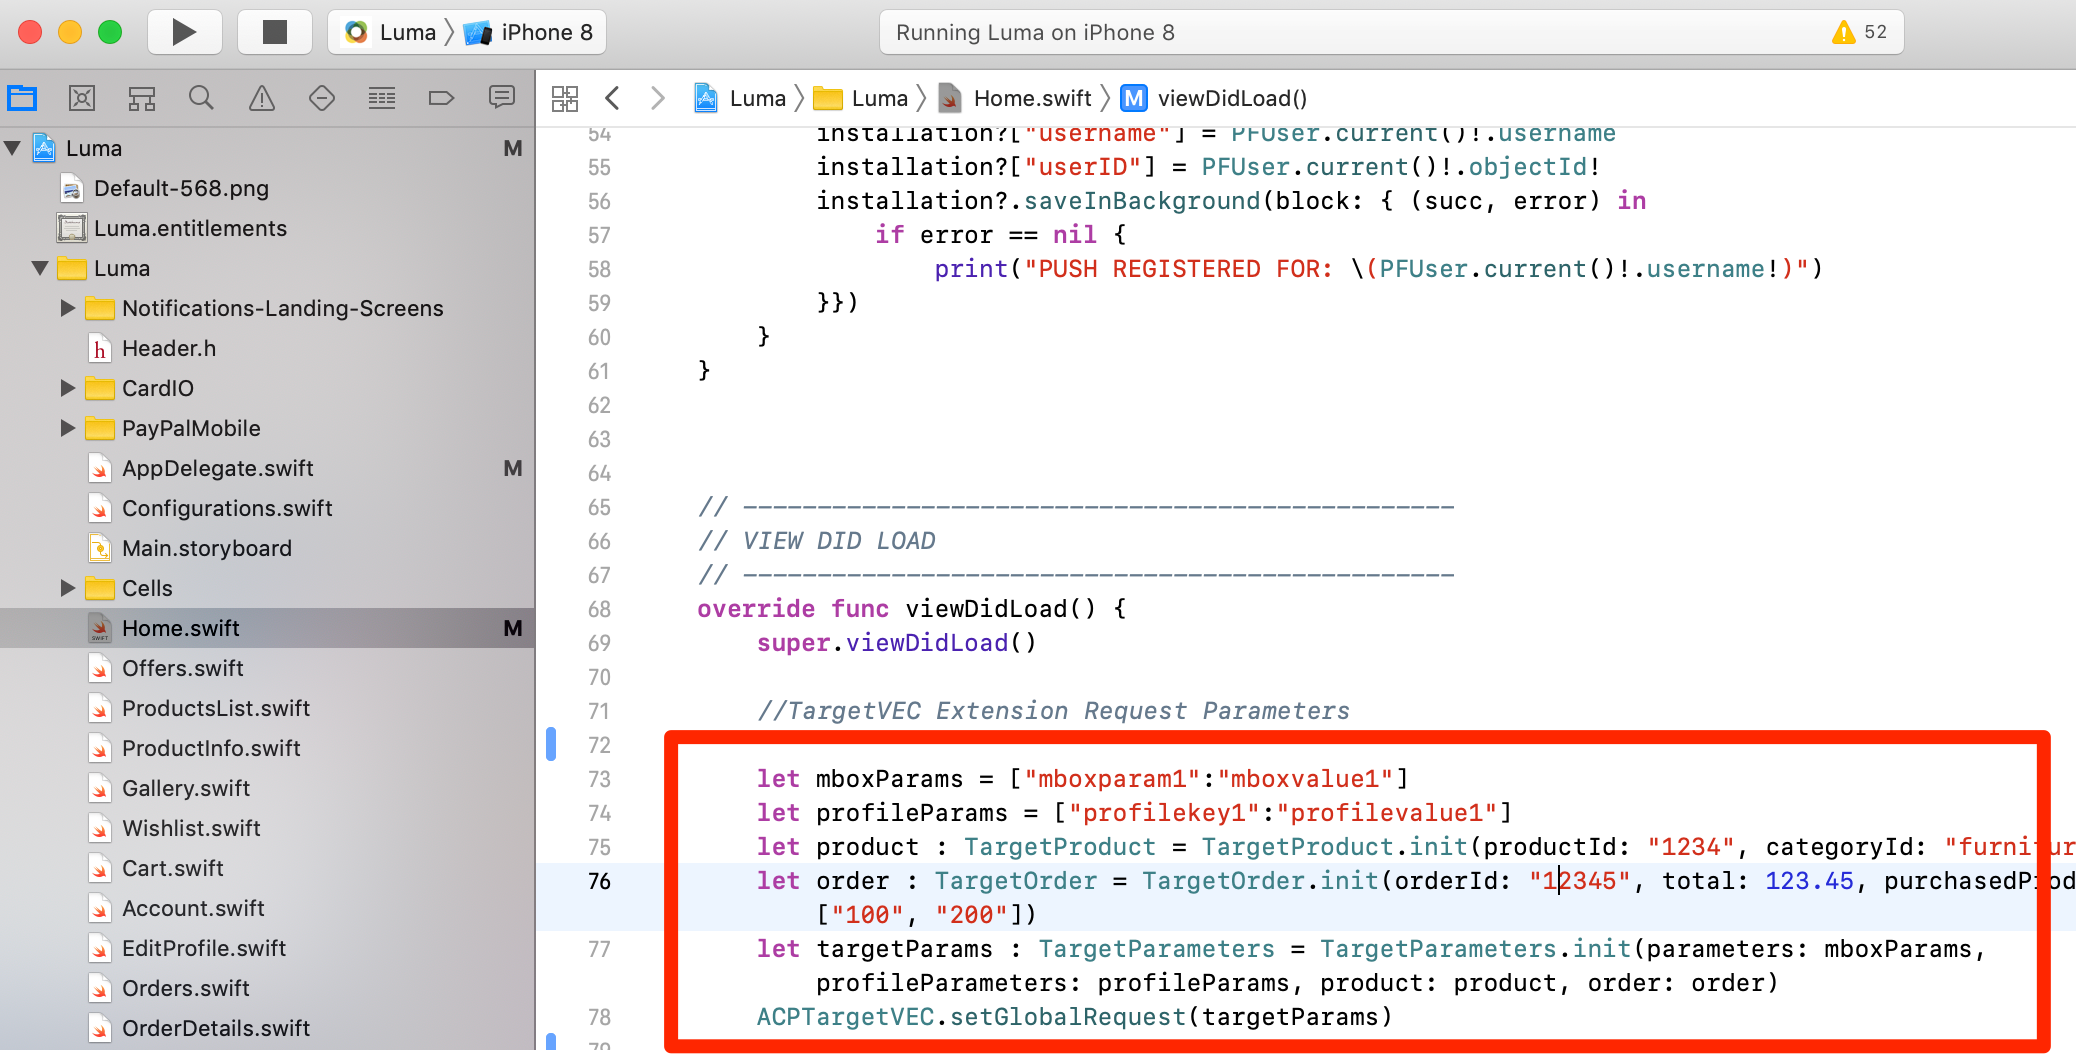
In the viewDidLoad() function, after the //TargetVEC Extension Request Parameters comment, uncomment the parameter code by removing the /* and */. This example code shows how request parameters, profile parameters, product (or entity) parameters, and order parameters can be added to the TargetVEC request. This example uses static values, while in your actual app you would want to use dynamic values from a Dictionary to populate the values:
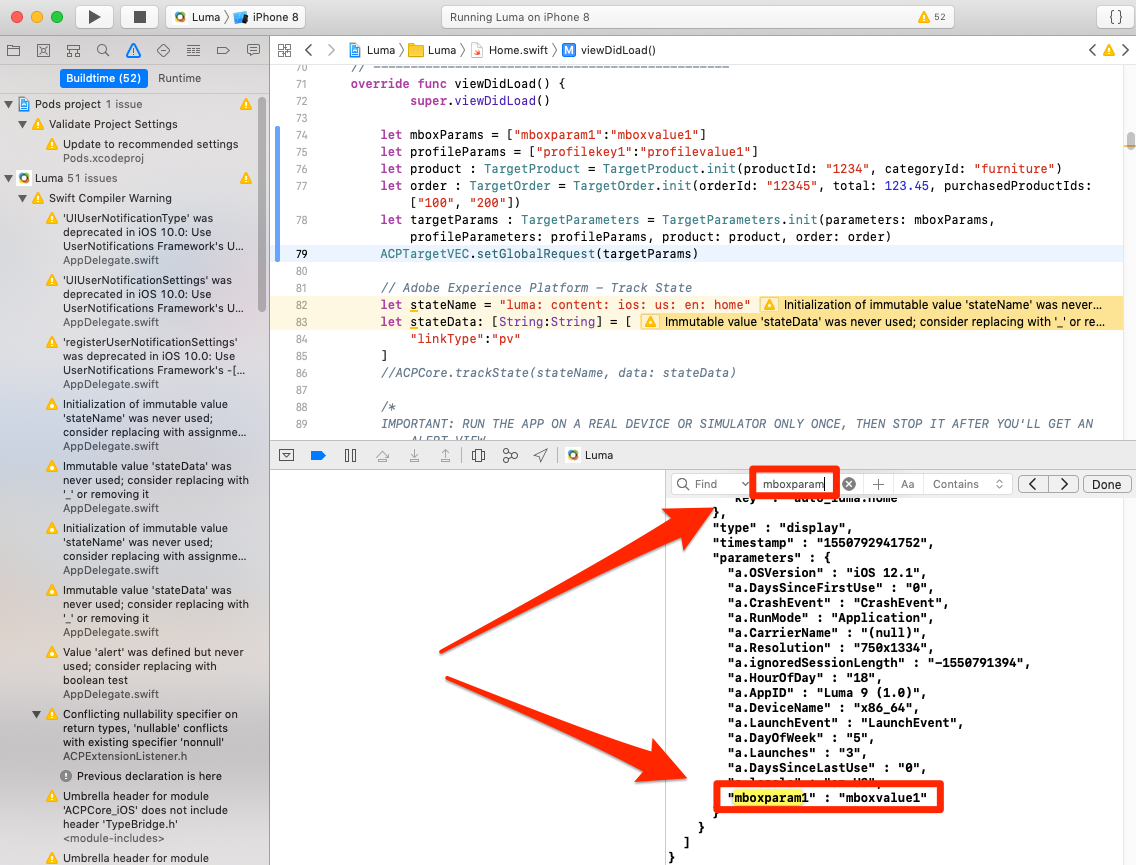
Now that you've added parameters to the app, it's time to confirm they are being passed in the request.
To verify the parameters
Use ⌘-S to save the XCode project
Rebuild the app, by clicking the play icon in Xcode
When the app has opened successfully click in the Console pane of XCode
Use ⌘-F to open the Find box
Search for mboxparam in the Find box
Hit Enter to jump to the Target request and Post body
You should see all of the parameters above now passed in the Target VEC request (after locating mboxparam1, scroll up to see the rest of them)
Supporting activities with more functionality, such as our Form Composer activity, require slightly more implementation. A custom Target request and response handling must be embedded in the app and released with an update to the app store. Successful optimization programs will determine reusable locations in their apps to position this code so that after the initial implementation, marketers can continually update the content via the Target interface without additional updates needed in the app code itself (e.g. by creating new JSON offers).
To add custom request
In XCode, open the Offers.swift file
Uncomment the import for ACPCore and ACPTarget
Uncomment the code in the // Adobe Target: Getting an Offer section by removing the /* and */
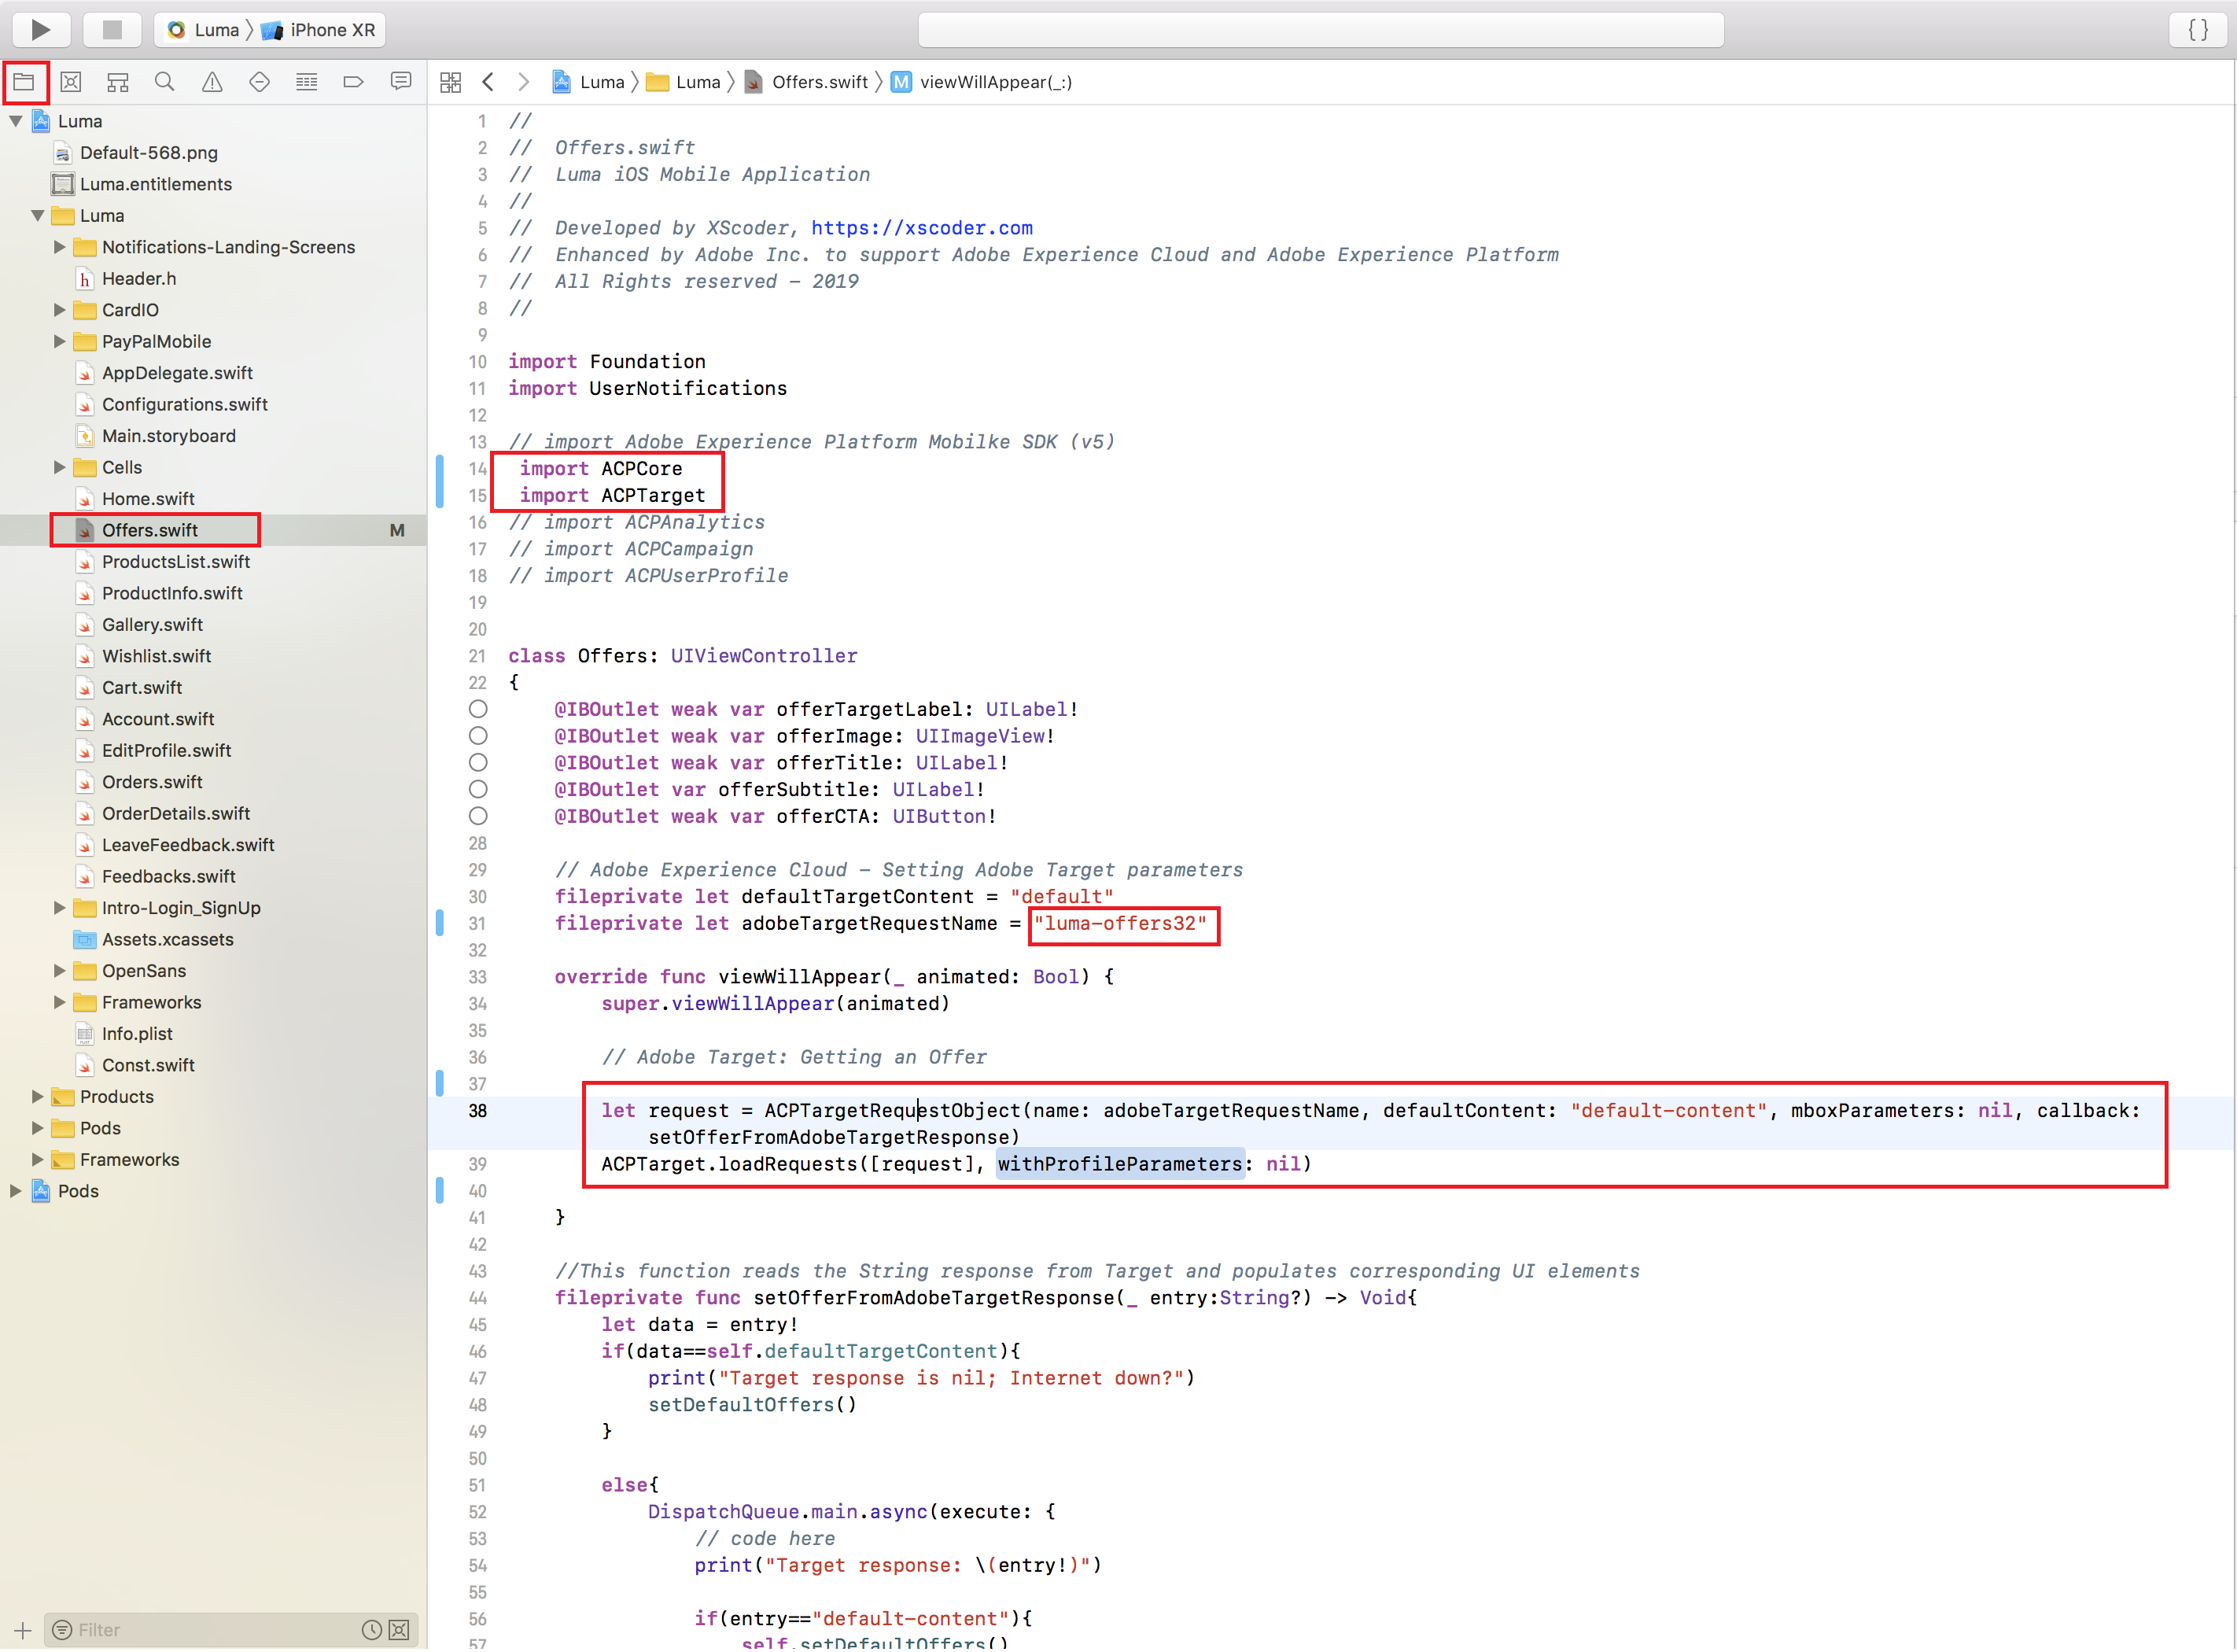
The code that you just uncommented will make a request with the name "luma-offers{yournumber}" whenever a visitor opens the Offers screen in the app. If the request is part of an experience set to show "default" content, or if their request times out, they will execute the "default-content" code, which if you look further down in the Offers.swift file you will see is defined in the setDefaultOffers() function.
If the visitor qualifies for a personalized experience, they will execute the setOfferFromAdobeTargetResponse function, which will extract the JSON from the Target offer and use it in the setOffer() function also defined later in the Offers.swift file.
So, you see that the the app needs to be provisioned to make the request (custom parameters can be added) as well as handle the response that comes back. There needs to be coordination between the app developers and the marketers about what Target needs to do and the format of the Target offer.
To verify the request
Use ⌘-S to save the XCode project
Click the play icon in XCode to rebuild the app
When the app has opened successfully click on the star icon to open the Offers screen
In XCode, click in the Console pane
Use ⌘-F to open the Find box
Search for luma-offers in the Find box
Hit Enter to jump to the new Target request and Post body
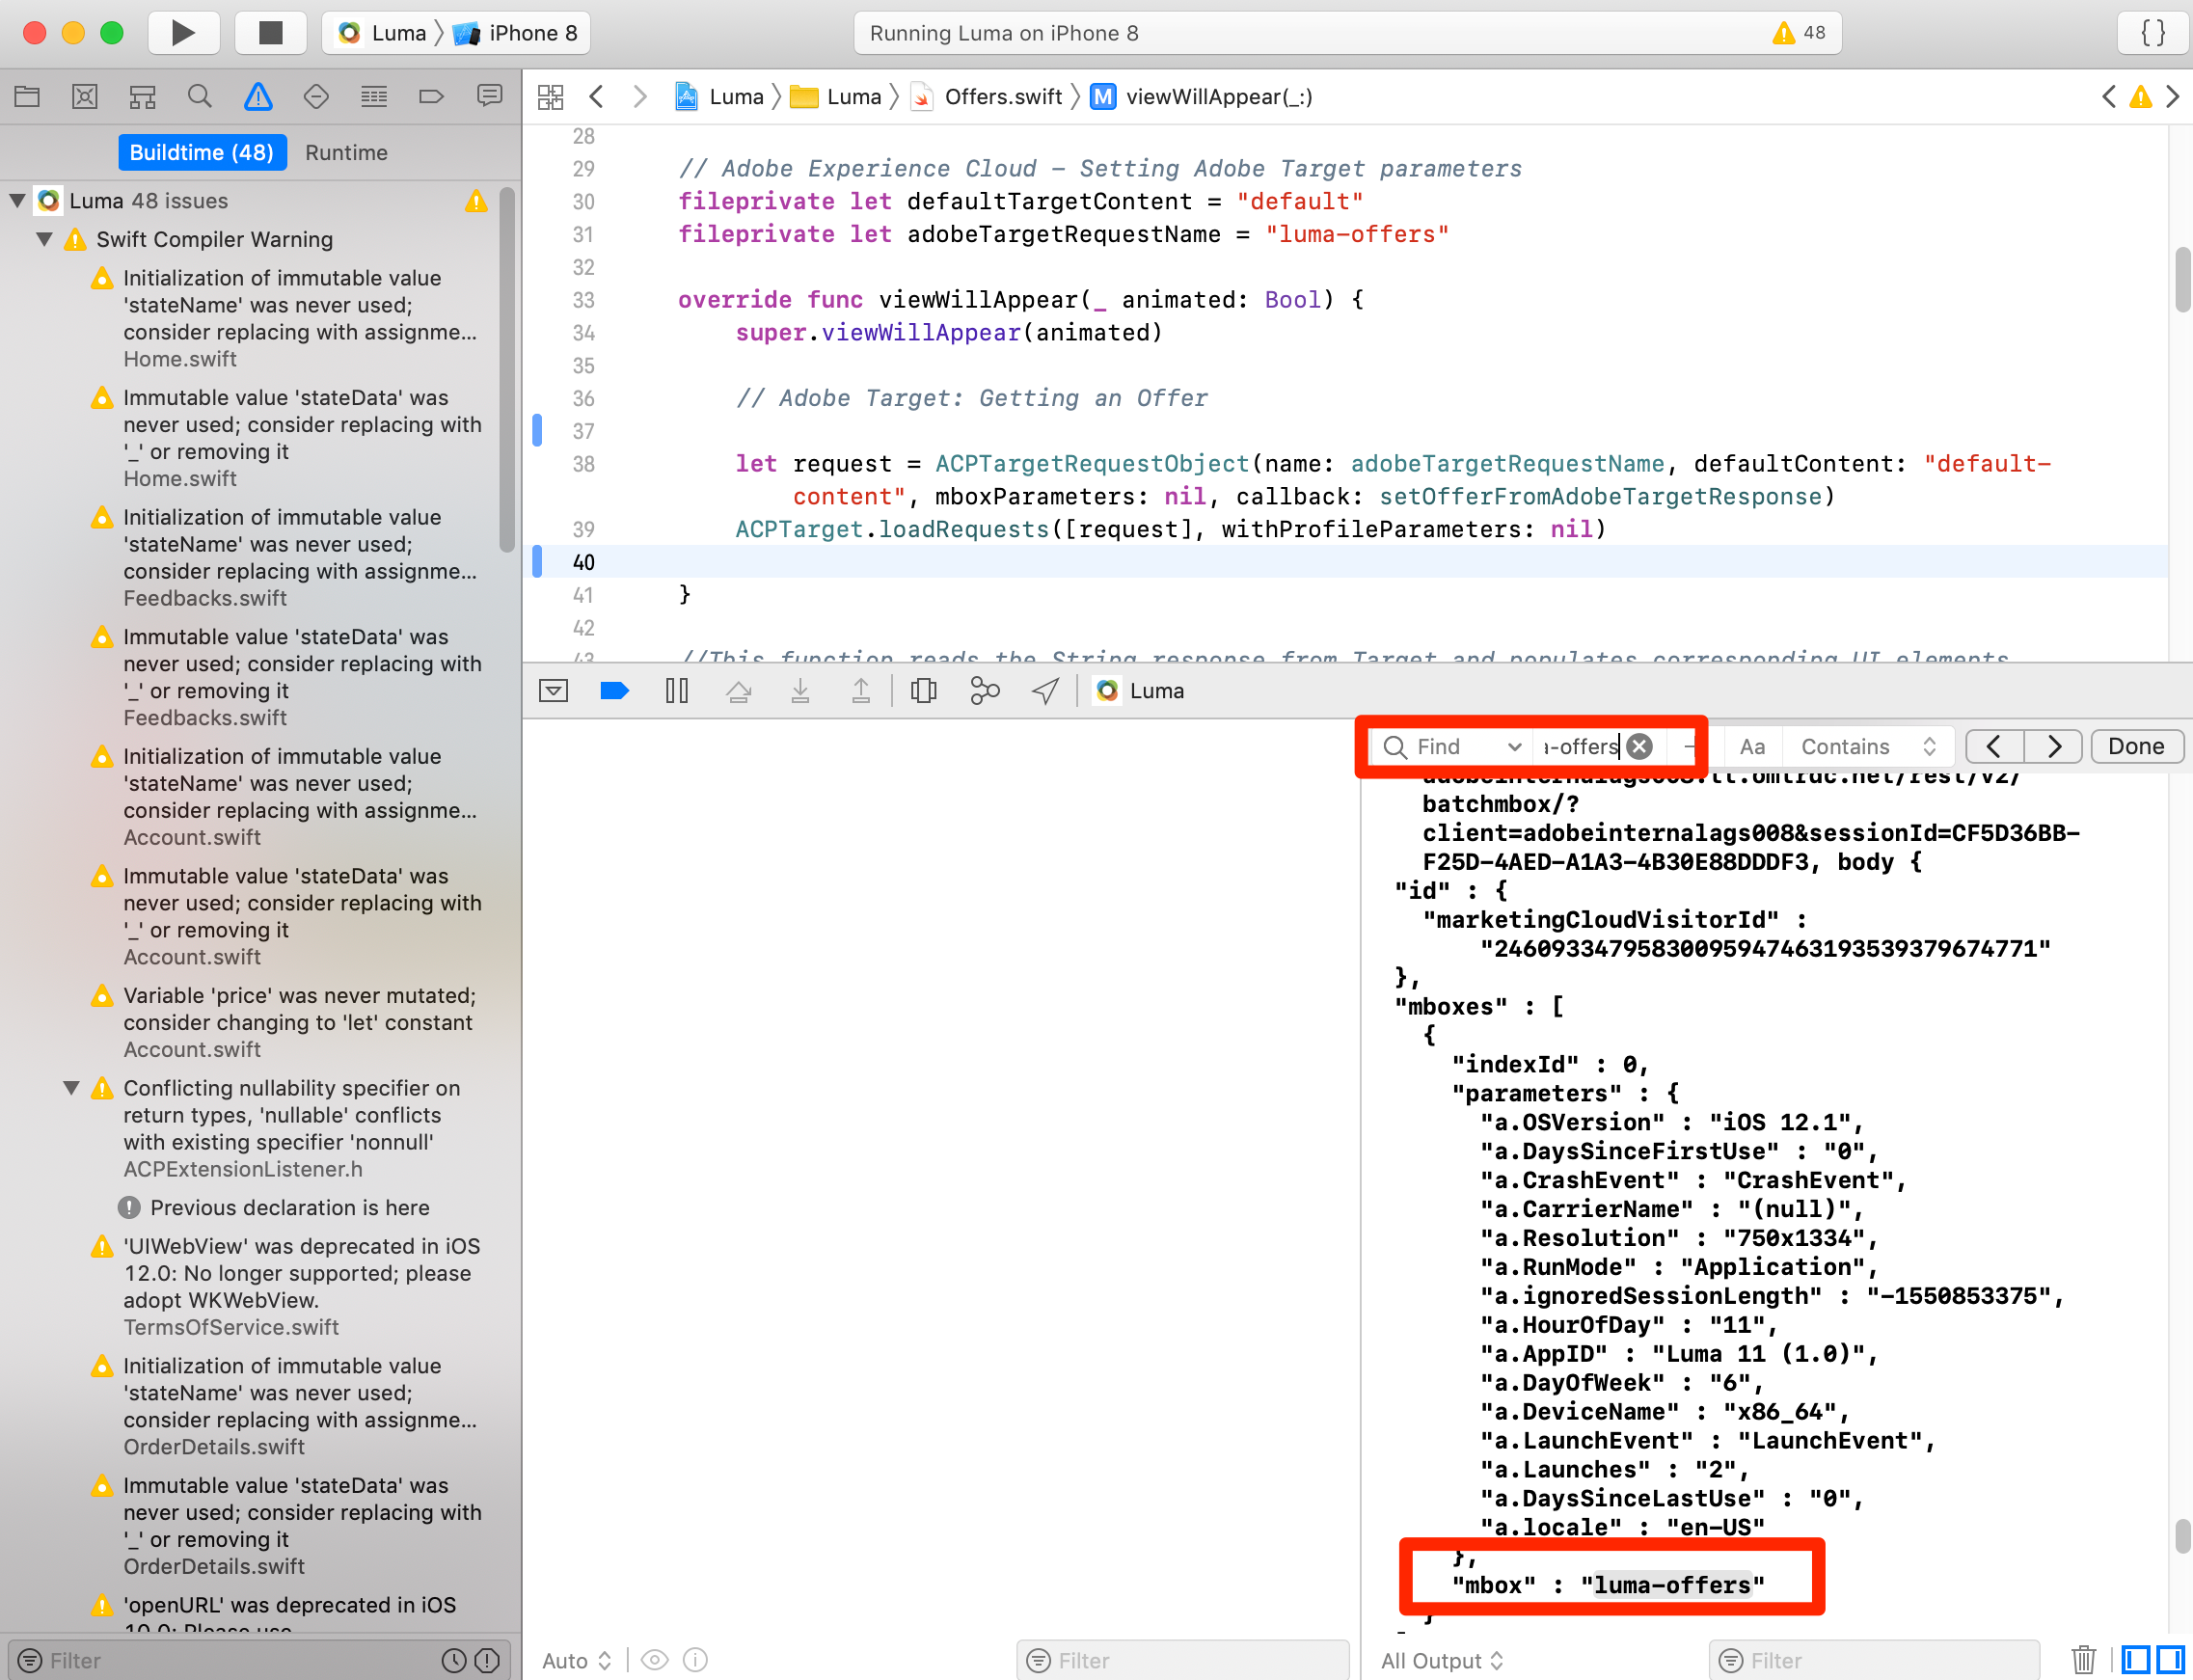
Was your Experience Targeting activity delivered in the response?