Implementing the Experience Cloud in Websites with Launch is the perfect starting point for front-end developers or technical marketers who want to learn how to implement the Adobe Experience Cloud solutions on their website.
Each exercise contains how-to exercises and foundational information to help you implement the Experience Cloud and understand its value. Callouts are provided to highlight information which might be useful to customers migrating from our older tag manager—Dynamic Tag Management. Demo sites are provided for you to complete the tutorial, so you can learn the underlying techniques in a safe environment. After completing this tutorial, you should be ready to start implementing all of your marketing solutions through Launch on your own website.
After completing this you will be able to:
Launch, by Adobe is the next generation of website tag and mobile SDK management capabilities from Adobe. Launch gives customers a simple way to deploy and manage all of the analytics, marketing, and advertising solutions necessary to power relevant customer experiences. There is no additional charge for Launch. It is available for any Adobe Experience Cloud customer.
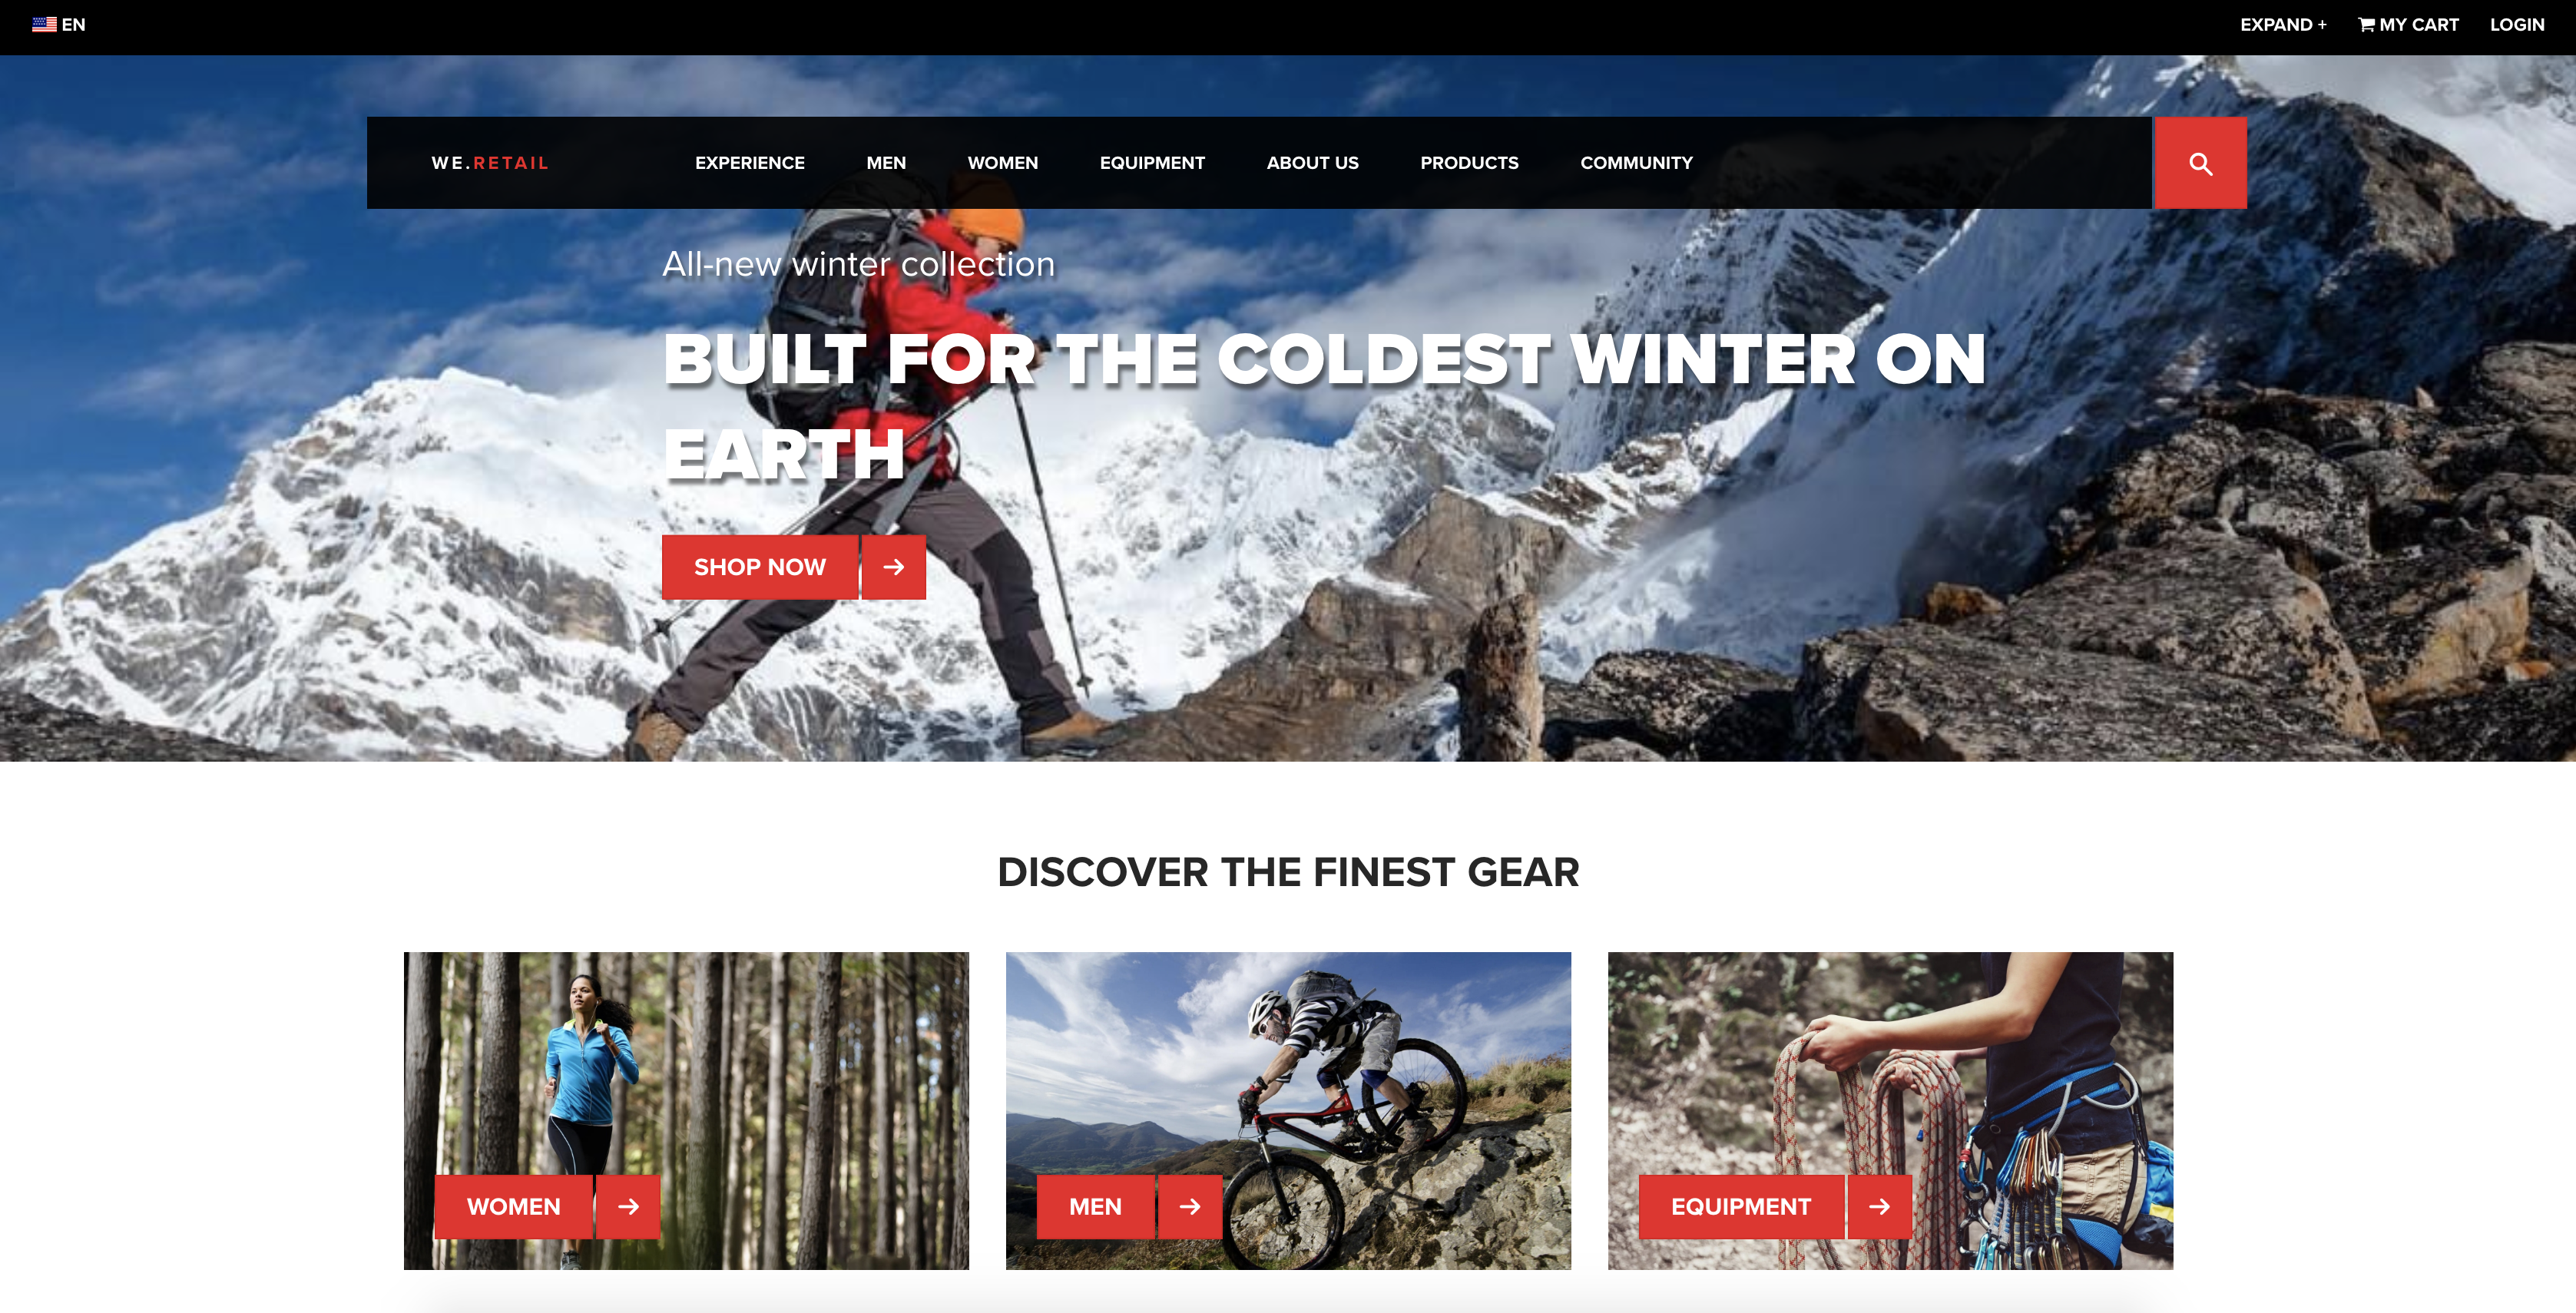
In this lab, you will implement the Adobe Experience Cloud into a fake retail website called We.Retail. The We.Retail site has a rich data layer and functionality that will allow you to build a realistic implementation. You will build your own Launch property, in your own Experience Cloud organization, and map it to our hosted We.Retail site using the Experience Cloud Debugger.

Because you will be using some browser-specific extensions, we recommend completing the tutorial using the Chrome Web Browser
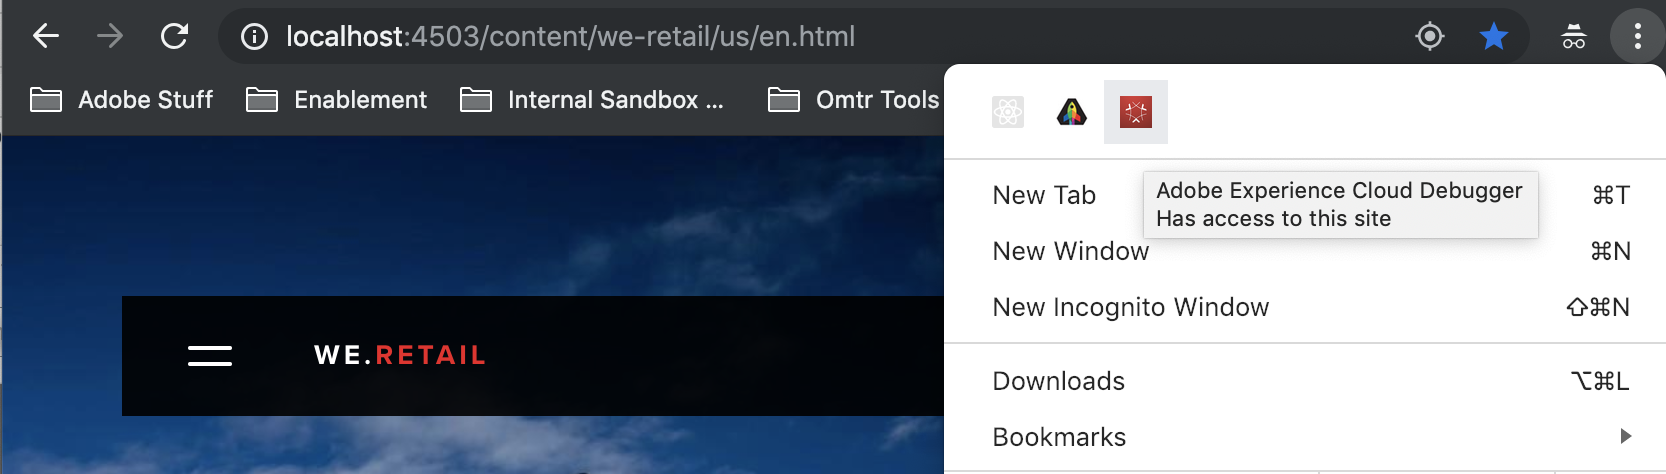
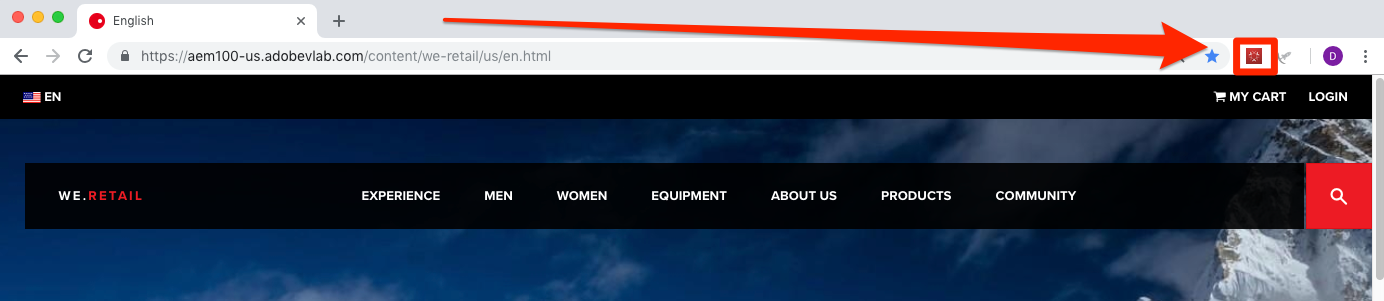
Add the Adobe Experience Cloud Debugger extension to your Chrome browser
Run AEM Publish instance for We.Retail site
You might find it easier to complete this tutorial with the We.Retail site open in Chrome, while you read this tutorial and complete the Launch interface steps in a different browser.
Let's get started!
In this pre-lab exercise, you will run AEM and access the Adobe Experience Cloud.
At the end of this exercise, you will be able to:
On your desktop, you should have a folder called "AEM 6.5 for Summit Lab L734" with sub-folders "author" and "publish"
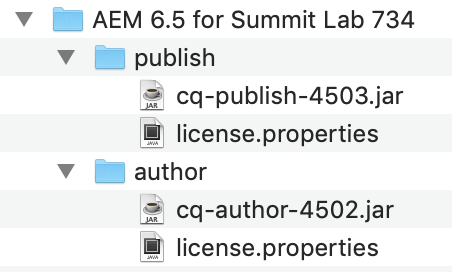
Double-click on the .jar file in your "publish" folder to run AEM
Note: This will take a few minutes initially to build the WeRetail site and run a local instance of AEM. The WeRetail site will automatically open in your browser once this process is complete.
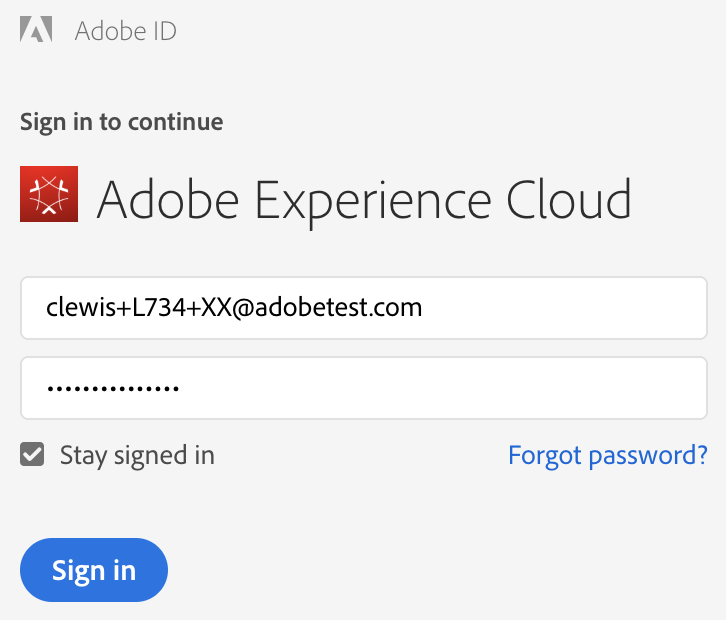
Use your assigned Lab # in place of XX to authenticate with the provided username and password.
Username: clewis+L734+XX@adobetest.com (substitute XX for your assigned number)
Password: @dobeSummit2019
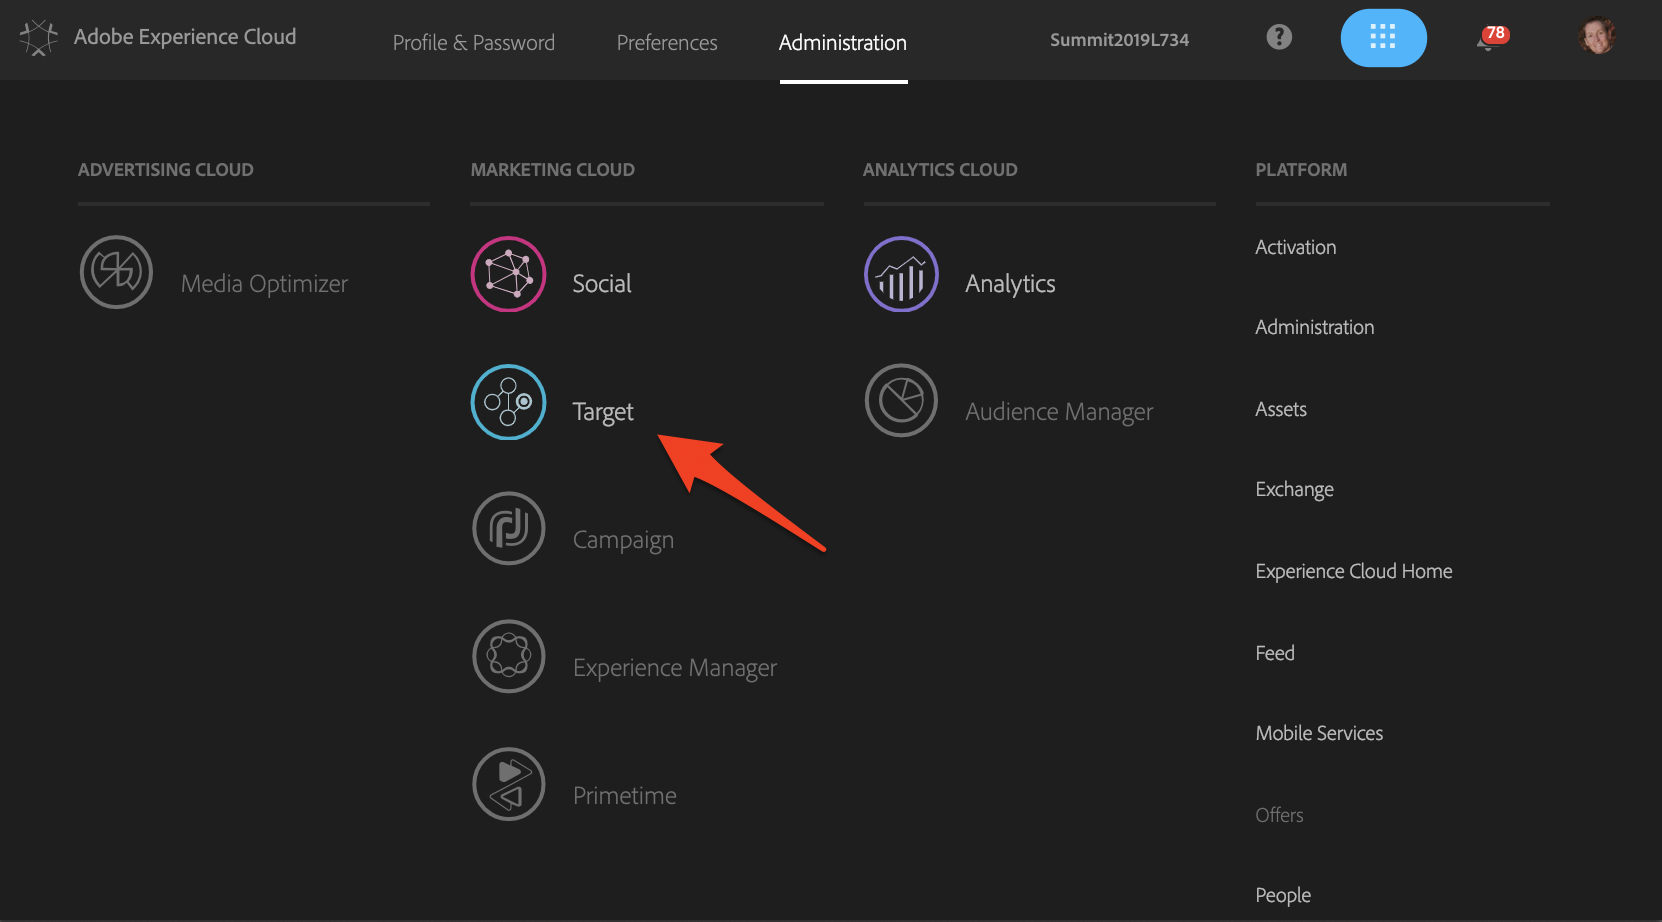
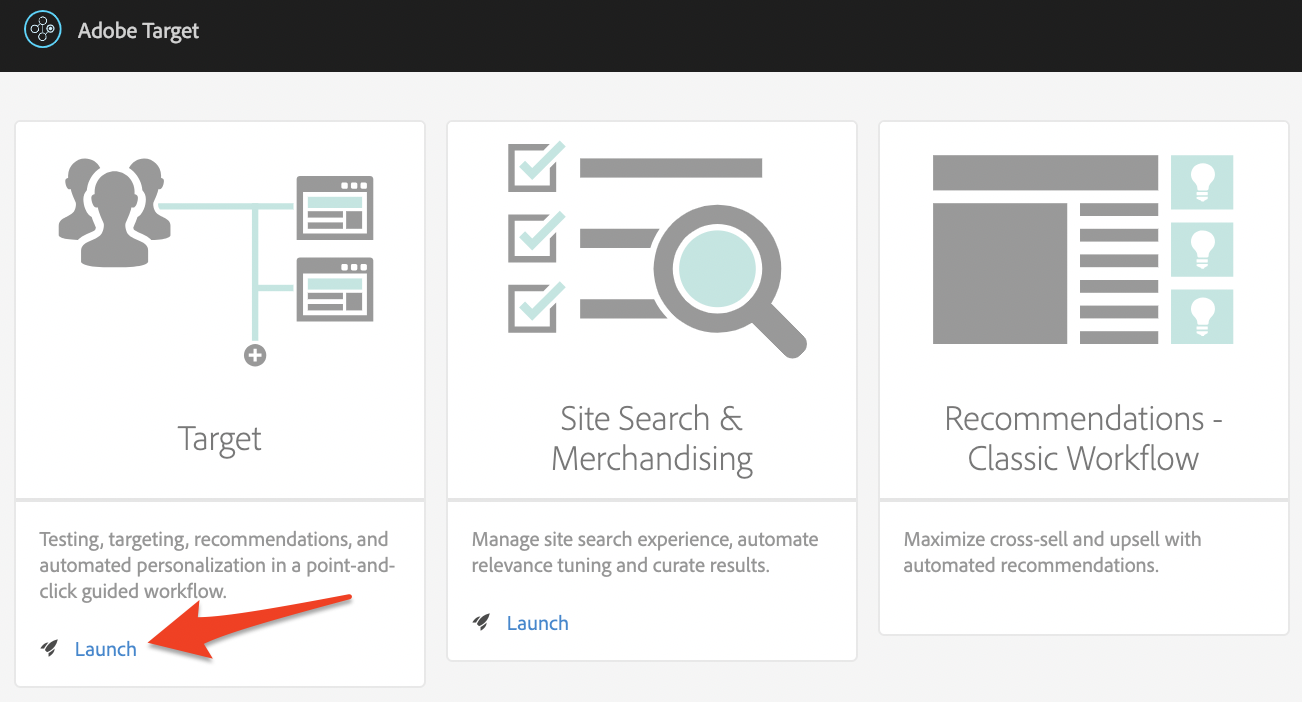
Access Adobe Target by navigating with the Solution Switcher Widget using the  icon
icon
You should have a running instance of WeRetail with AEM and be authenticated on the Experience Cloud with Adobe Target before proceeding.
Please raise your hand to request help from one of the Lab TAs if you are unable to complete the above steps.
In this first exercise, you will add Adobe Target code directly to the WeRetail site.
At the end of this exercise, you will be able to:
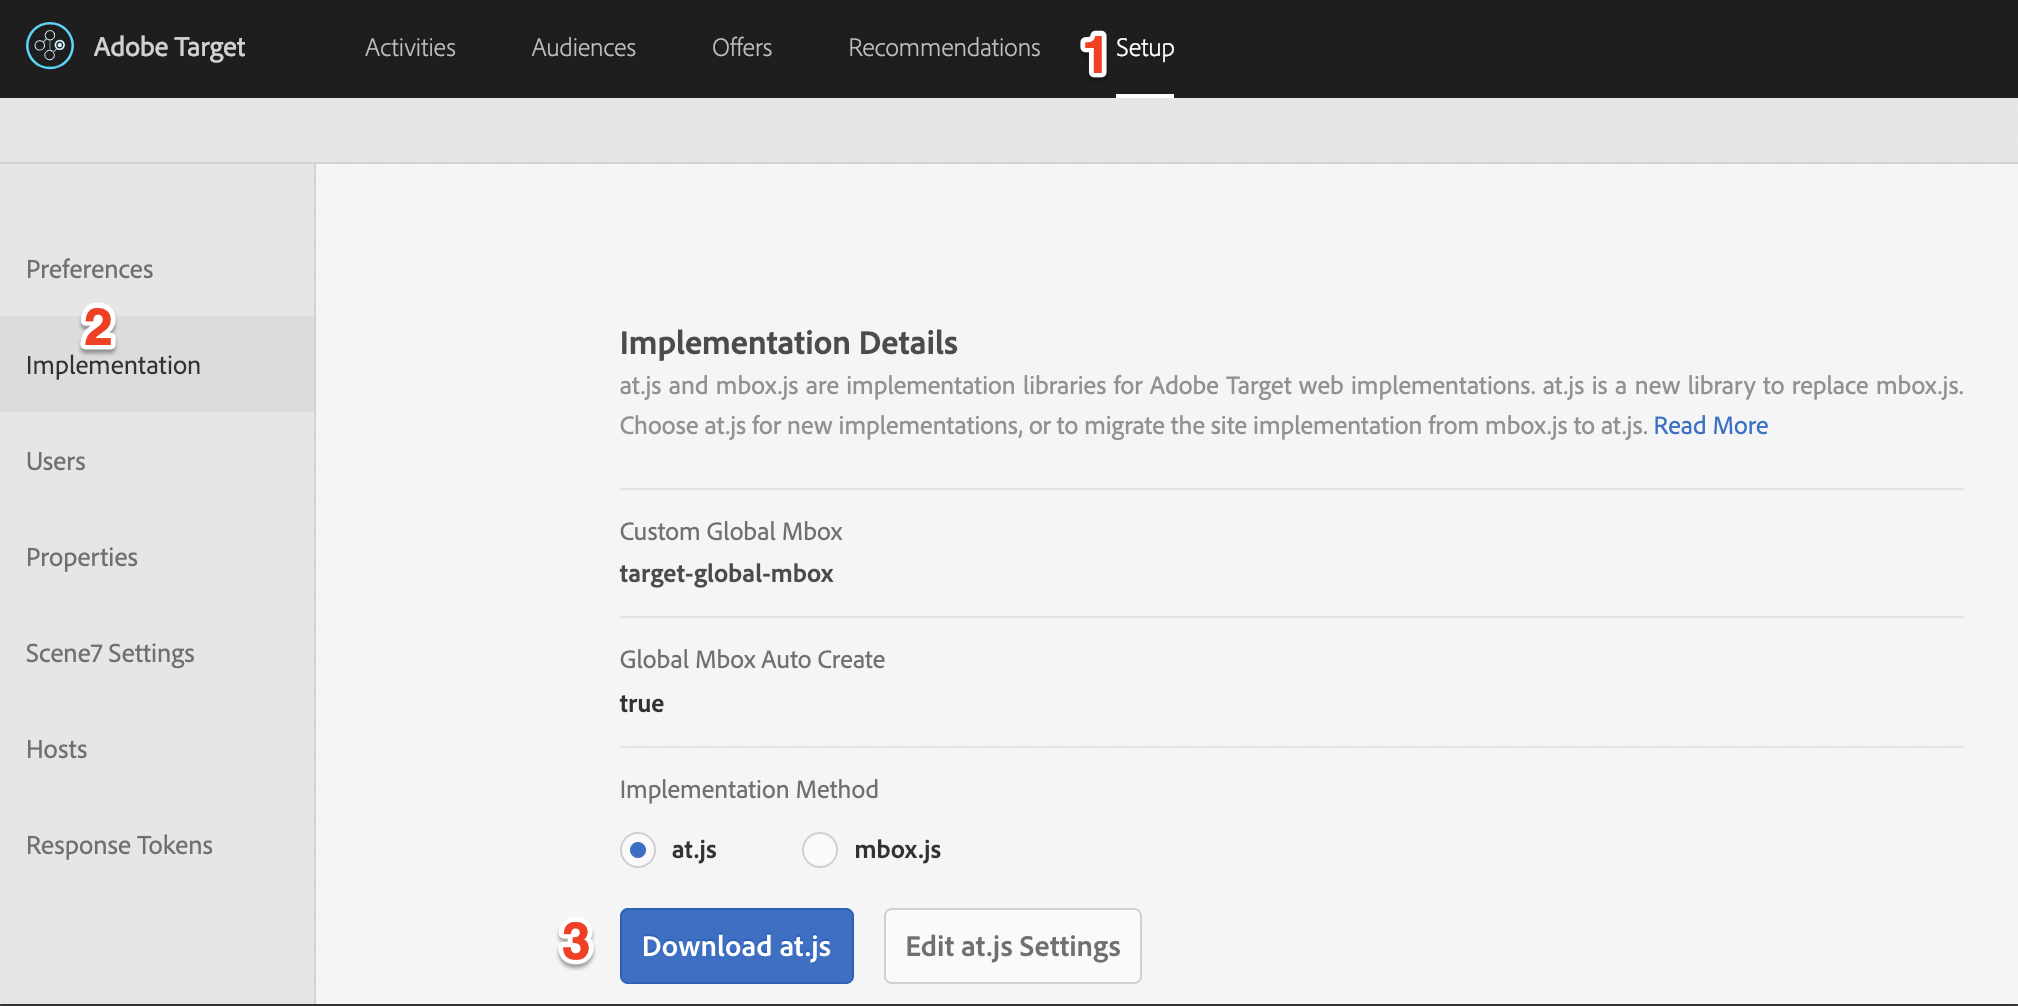
From the top navigation in the Adobe Experience Cloud, click Setup (1) and choose Implementation (2) from the left nav options
Click the blue Download at.js (3) button to retrieve a copy of the javascript library file
(Optional) Open this downloaded file in NotePad++ to view the contents
For this lab, we have already uploaded and hosted a copy of this library file for reference:
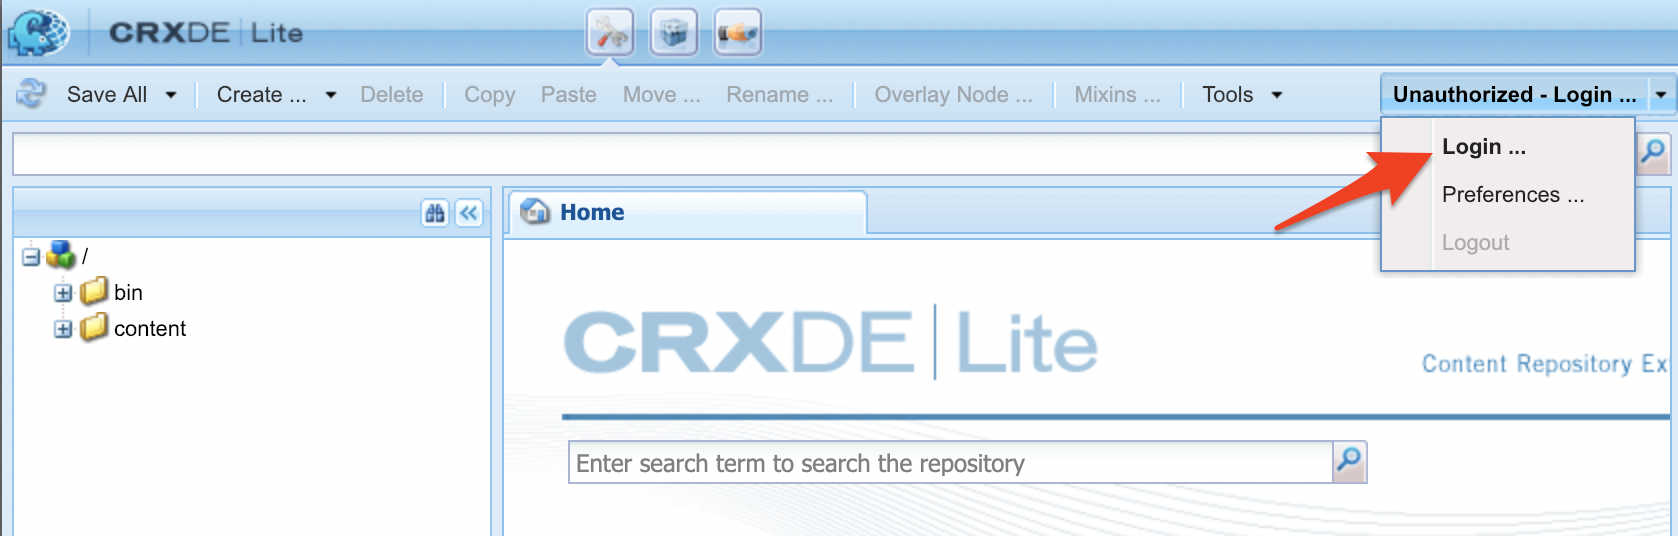
Open CRX DE Lite to edit the page code of the AEM WeRetail site by clicking the link below: http://localhost:4503/crx/de/index.jsp#/apps/weretail/components/structure/page/customheaderlibs.html
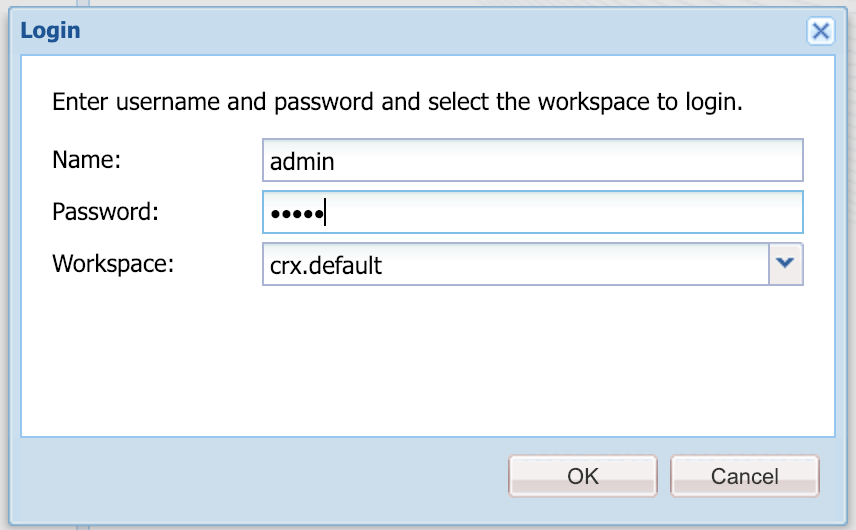
Authenticate as an Administrator with the following credentials:
username: admin
password: admin
Ensure you’re on the customheaderlibs.html file:
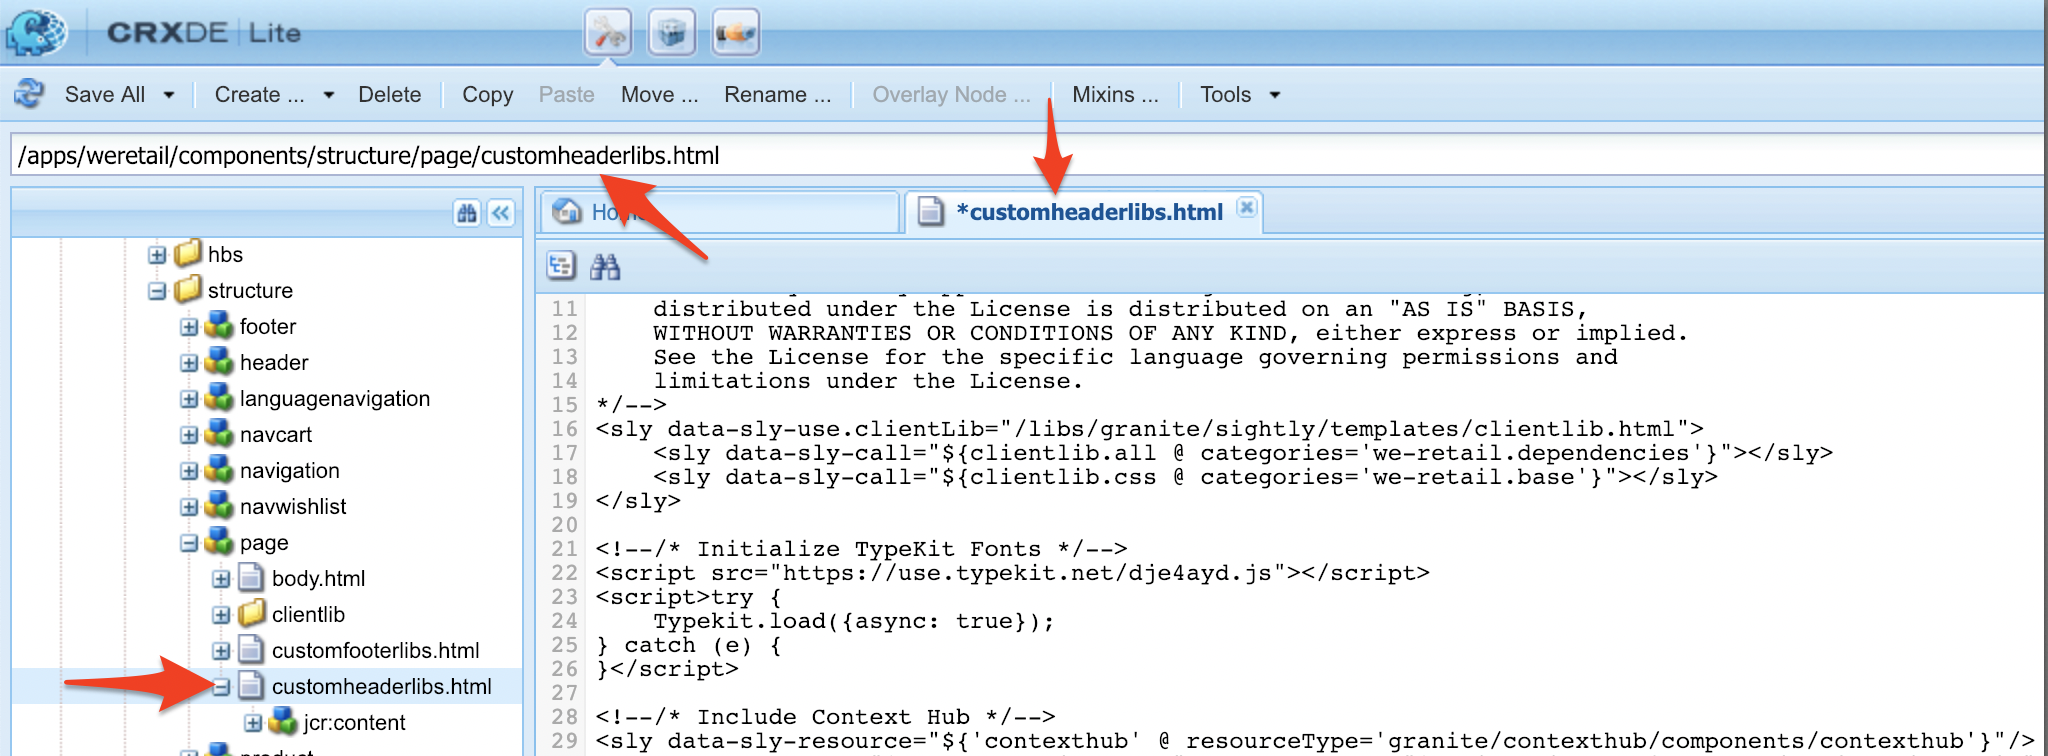
Scroll to the bottom of the customheaderlibs.html file and add the at.js reference provided in Exercise 1.1.
Save this file
Return to the WeRetail page, refresh if needed, and confirm that Adobe Target is now running on the page using the Experience Cloud Debugger
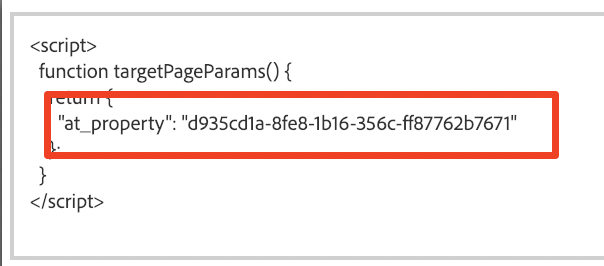
Add the targetPageParams helper function immediately before the at.js reference to capture the AEM ContextHub data layer:
Save this file
Return to the WeRetail page, refresh again, and user the Experience Cloud Debugger to confirm that Adobe Target is now firing with awareness of the DigitalData layer parameters.
Congratulations. You have now implemented Adobe Target with AT.js directly on the page and augmented the mbox server call with targetPageParams to expose the AEM Context Hub DigitalData Layer.
In this exercise, you will create a Launch property.
A property is basically a container that you fill with extensions, rules, data elements, and libraries as you deploy tags to your site. For more information on Launch permissions, see the documentation .
At the end of this exercise, you will be able to:
Log into the Adobe Experience Cloud
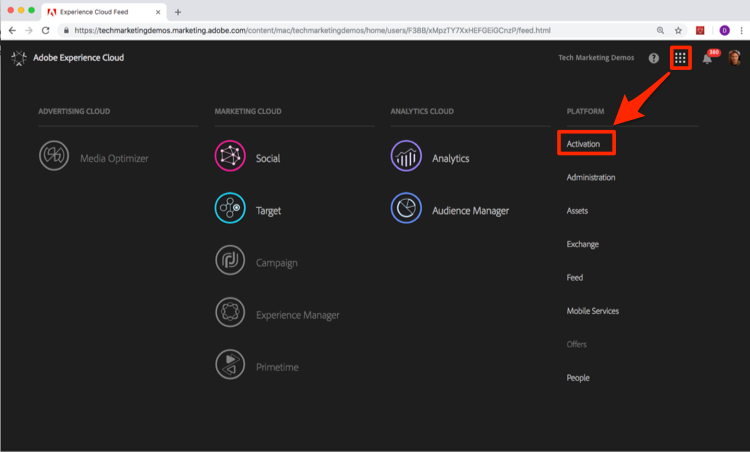
Click the icon to open the solution switcher
Select Activation from the menu
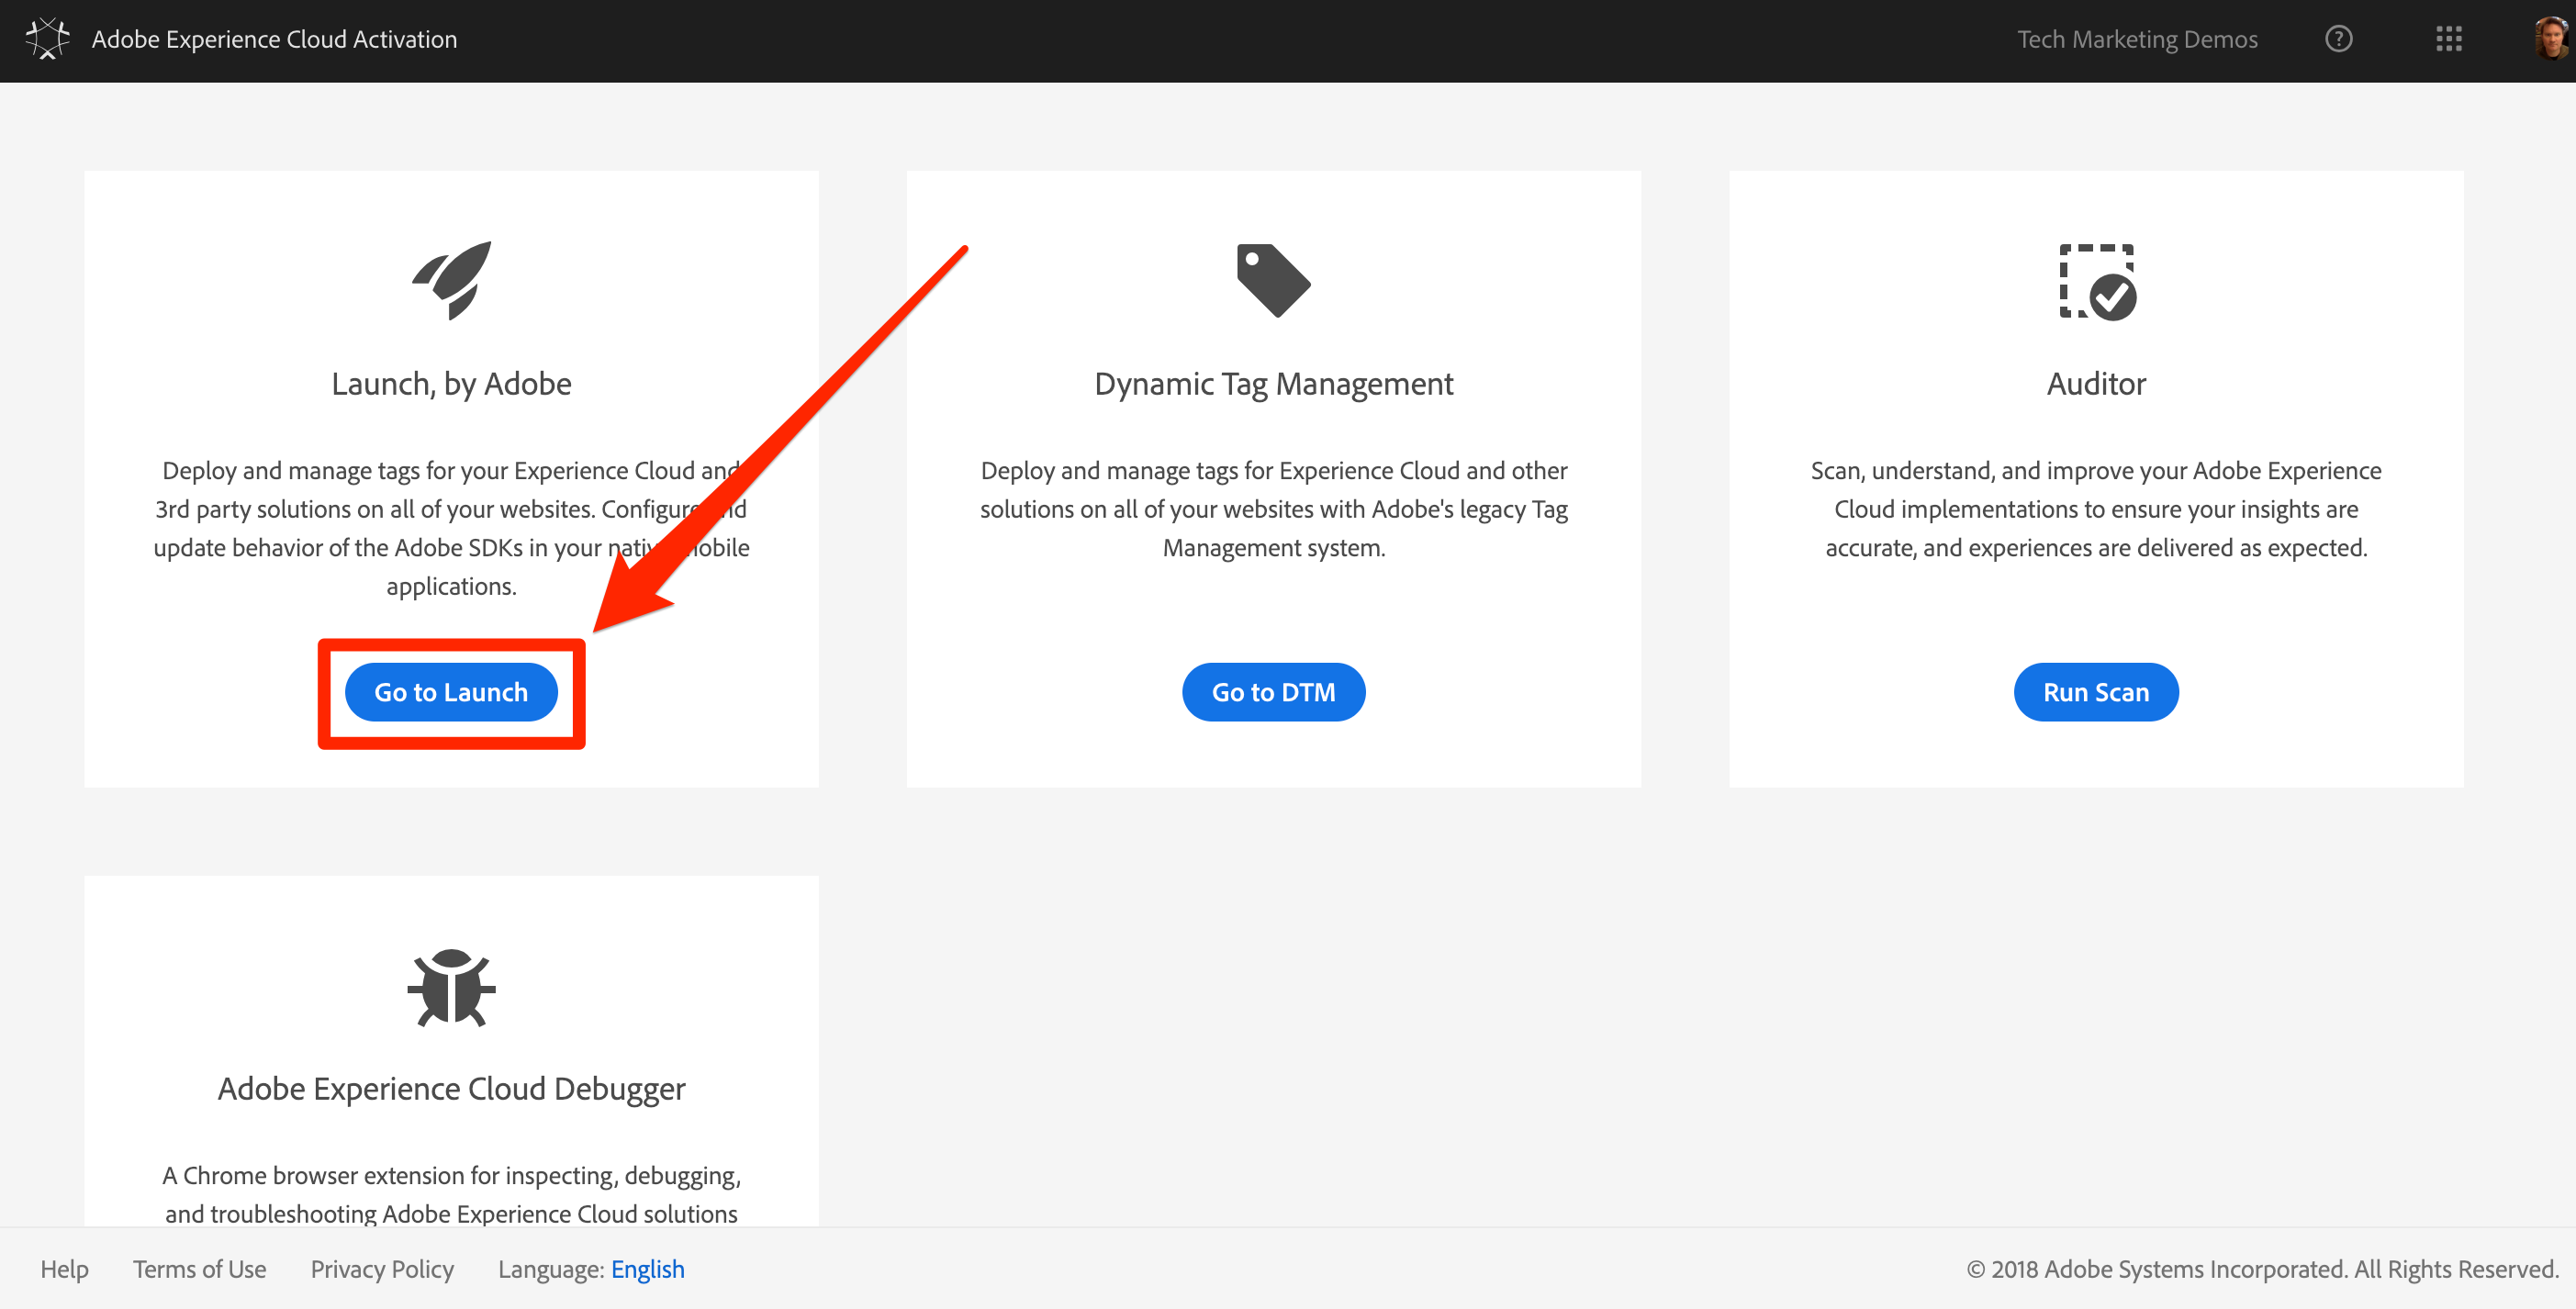
Under Launch, by Adobe, click the Go to Launch button
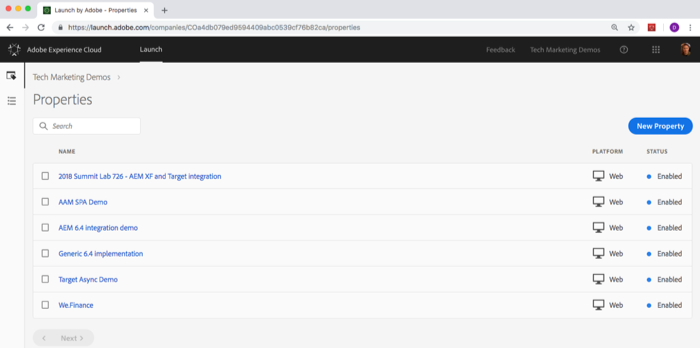
You should now see the Properties screen (if no properties have ever been created in the account, this screen might be empty):
A property is basically a container that you fill with extensions, rules, data elements, and libraries as you deploy tags to your site. A property can be any grouping of one or more domains and subdomains. You can manage and track these assets similarly. For example, suppose that you have multiple websites based on one template, and you want to track the same assets on all of them. You can apply one property to multiple domains. For more information on creating properties, see "Create a Property" in the product documentation.
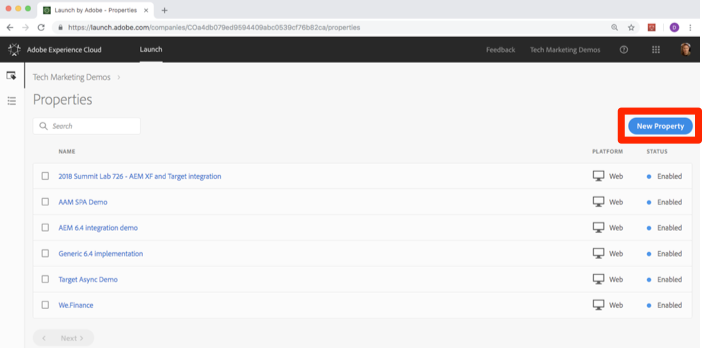
Click the New Property button:
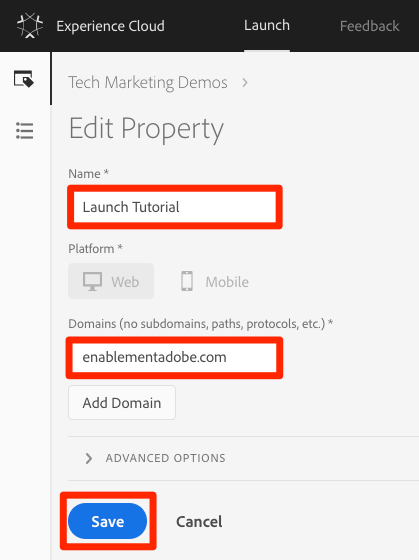
Name your property XX L734 Target Lab (where XX is your assigned number)
As the domain, enter weretail.com since you will be using this property in conjunction with the We.Retail demo site which is hosted on this domain
Click the Save button
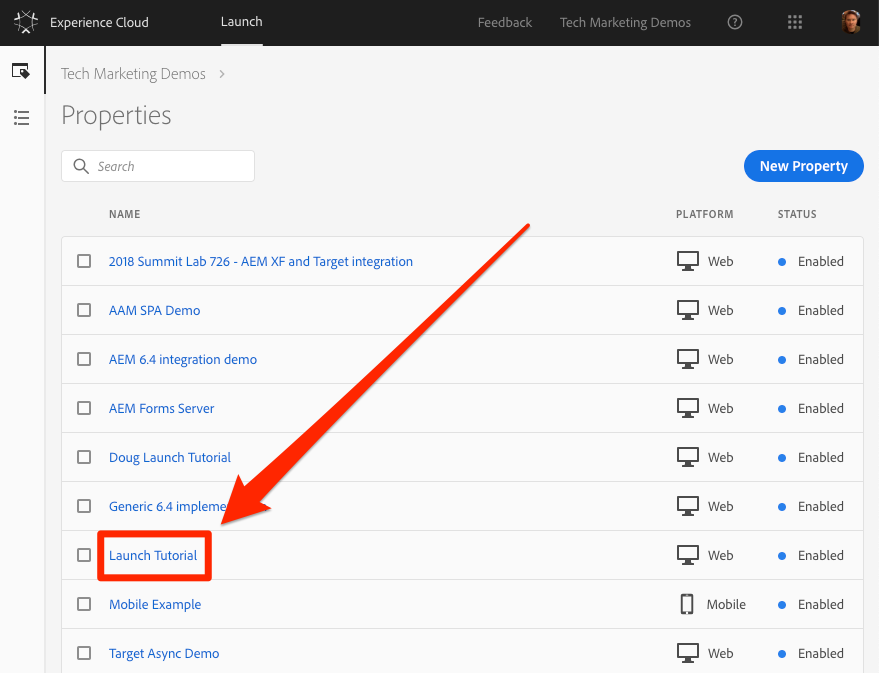
Your new property should display on the Properties page. Note that if you check the box next to the property name, options to Configure or Delete the property appear above the property list.
Click on the name of your property (e.g. Launch Tutorial) to open the Overview screen.
In this exercise, you will implement the asynchronous embed code of your Launch property's Development environment. Along the way, you will learn about two main concepts of Launch—Environments and Embed Codes.
At the end of this exercise, you will be able to:
<head> of an html documentThe embed code is a <script> tag that you put on your webpages to load and execute the logic you build in Launch. If you load the library asynchronously, the browser continues to load the page, retrieves the Launch library, and executes it in parallel. In this case, there is only one embed code, which you put in the <head>. (When Launch is deployed synchronously, there are two embed codes, one which you put in the <head> and another which you put before the </body>).
From the property Overview screen, click on the Environments tab to go to the environments page.
Note: Development, Staging, and Production environments have been pre-created for you.
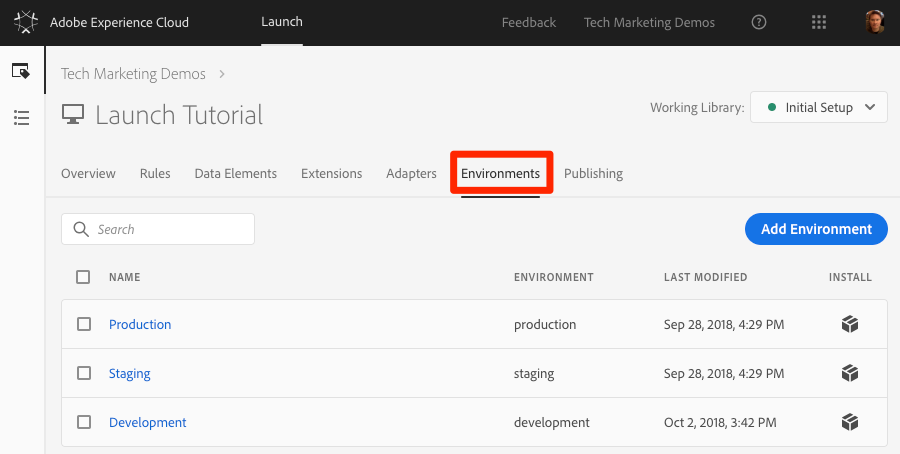
Development, Staging, and Production environments correspond to the typical environments in the code development and release process. Code is first written by a developer in a Development environment. When they have completed their work, they send it to a Staging environment for QA and other teams to review. Once the QA and other teams are satisfied, the code is then published to the Production environment, which is the public-facing environment which your visitors experience when they come to your website.
Launch permits additional Development environments, which is useful in large organizations in which multiple developers are working on different projects at the same time.
These are the only environments we need to complete the tutorial. Environments allow you to have different working versions of your Launch libraries hosted at different URLs, so you can safely add new features and make them available to the right users (e.g. developers, QA engineers, the public, etc.) at the right time.
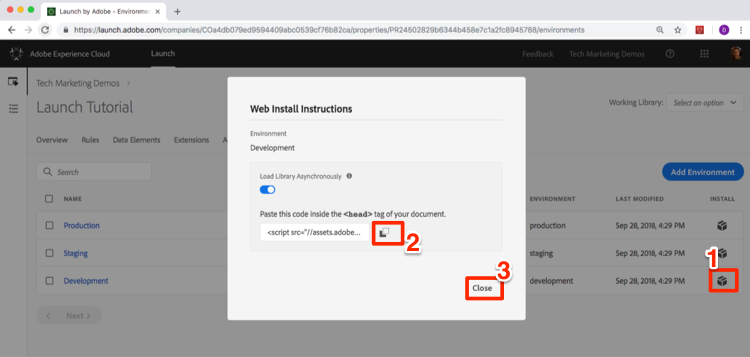
In the Development row, click the Install icon  to open the modal.
Note: Launch will default to the asynchronous embed codes
Click the Copy icon  to copy the embed code to your clipboard.
Click Close to close the modal.
Return to CRXDE Lite
Comment out the at.js reference and targetPageParams code from Exercise 1 by wrapping it with html comment tag <!-- --> (1)
Paste the Launch Embed code from Exercise 3.1 immediately after this section (2)

Save the changes to the customheaderlibs.html file
Return to the WeRetail page, refresh, and confirm that Target is no longer active
Let's take a moment to review some of the Launch implementation best practices which are demonstrated in the WeRetail page:
Data Layer:
<head> of your pages, load it before Launch in order to leverage its syntax in Launch and TargetHere is a summary what these best practices look like in the suggested order. Note that there are some placeholders for account specific details:
<!doctype html>
<html lang="en">
  <head>
    <!--Data Layer to enable rich data collection and targeting-->
    <script>
      var digitalData = {
        "page": {
          "pageInfo" : {
            "pageName": "Home"
          }
        }
      };
    </script>
    <!--/Data Layer-->
    <!--jQuery or other helper libraries-->
    <script src="https://code.jquery.com/jquery-3.3.1.min.js"></script>
    <!--/jQuery-->
    <!--prehiding snippet for Adobe Target with asynchronous Launch deployment-->
    <script>
      (function(g,b,d,f){(function(a,c,d){if(a){var e=b.createElement("style");e.id=c;e.innerHTML=d;a.appendChild(e)}})(b.getElementsByTagName("head")[0],"at-body-style",d);setTimeout(function(){var a=b.getElementsByTagName("head")[0];if(a){var c=b.getElementById("at-body-style");c&&a.removeChild(c)}},f)})(window,document,"body {opacity: 0 !important}",3E3);
    </script>
    <!--/prehiding snippet for Adobe Target with asynchronous Launch deployment-->
    <!--Launch Header Embed Code: REPLACE LINE 39 WITH THE INSTALL CODE FROM YOUR OWN DEVELOPMENT ENVIRONMENT-->
    <script src="//assets.adobedtm.com/launch-EN93497c30fdf0424eb678d5f4ffac66dc.min.js" async></script>
    <!--/Launch Header Embed Code-->
  </head>
  <body>
    <h1>Launch by Adobe: Basic Demo</h1>
    <p>This is a very simple page to demonstrate basic concepts of Launch by Adobe</p>
  </body>
</html>
Now you know how to add the Launch embed code to your site!
In this exercise, you will create your first Data Element, Rule, and Library.
Data Elements and Rules are the basic building blocks of Launch. Data Elements store the attributes you want to send to your marketing and advertising solutions, while Rules fire the requests to those solutions under the right conditions. Libraries are the JavaScript files that load on the page to do all of the work. In this exercise, you will use all three to make our WeRetail page do something.
Data elements are Launch’s version of a data layer. They can store values from your own data layer object, cookies, local storage objects, query string parameters, page elements, meta tags, etc. In this exercise, you will create a data element for Page Name, which you will use later in your Target and Analytics implementations.
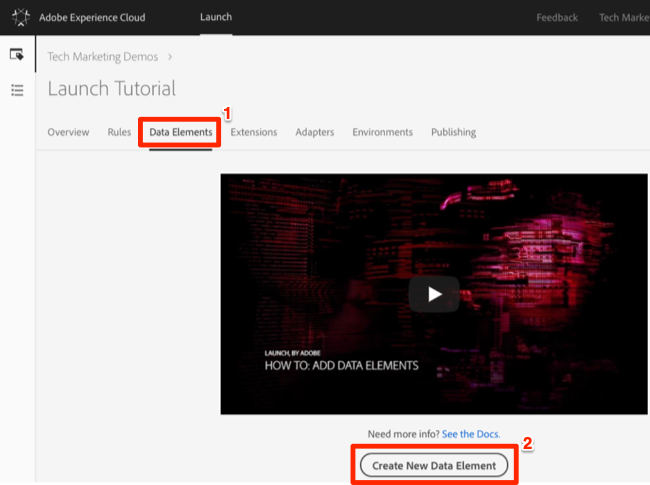
In the top navigation of Launch, click Data Elements
Since you haven't created any data elements yet in this property, a brief video appears with additional information on this topic.
Click the Create New Data Element button:
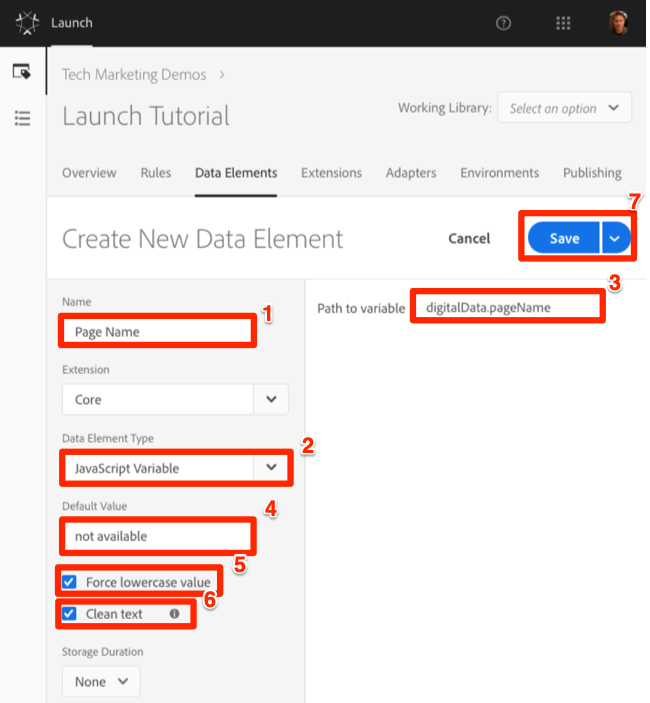
Name the data element, Page Name
Use the JavaScript Variable Data Element type to point to a value in your WeRetail page's data layer: digitalData.page.pageInfo.pageName
Use "not available" as the Default Value. The Default Value tells Launch what value to use for the data element if your JavaScript Variable specified above is not found.
Check the boxes for Force lowercase value and Clean text to standardize the case and remove extraneous spaces
Leave None as the Storage Duration setting since this value will typically be different on every page
Click the Save button to save the data element
DTM Migrators: New data element types have been added to Launch, which did not exist in DTM. Some of the new data element types include Local Storage, Session Storage, Page Info, and Random Number
Data element capabilities can be extended with Extensions. For example, the ContextHub extension allows you to add data elements using features of the extension.
Next you will use this data element in a simple rule. Rules are one of the most powerful features in Launch and allow you to specify what should happen as the visitor interacts with your website. When the criteria outlined in your rules are met, the rule triggers the action you have specified.
You are going to create a rule that outputs the Page Name data element value to the browser console.
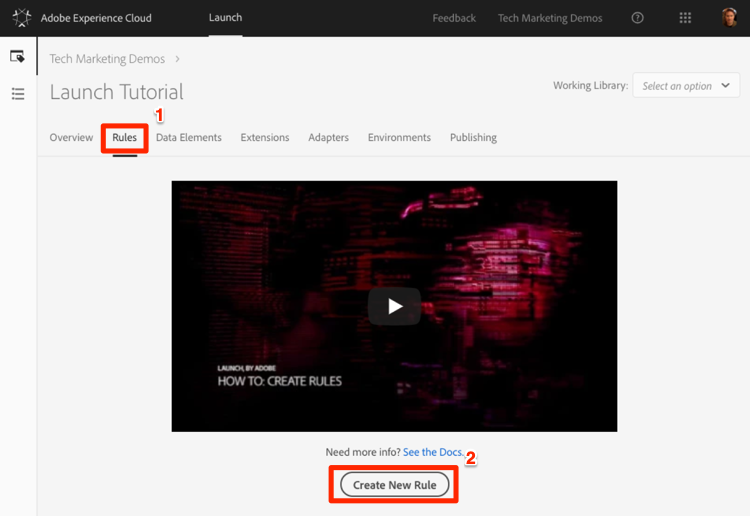
In the top navigation, click Rules
Since you haven't created any rules yet in this property, a brief video appears with additional information on the topic.
Click the Create New Rule button:
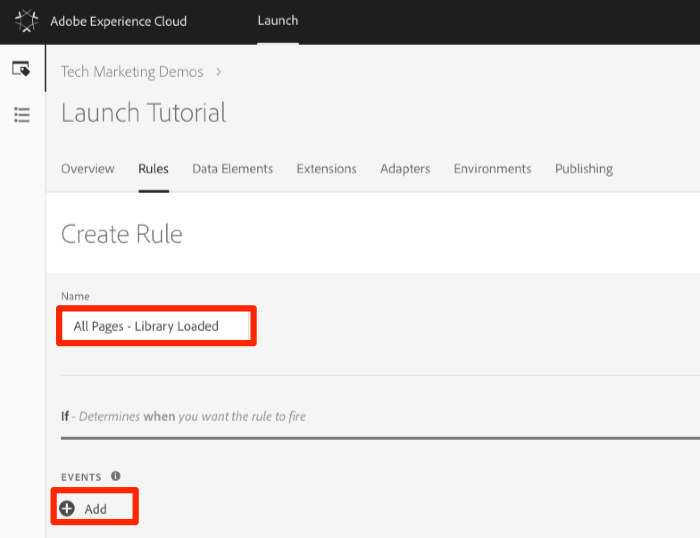
Name the Rule All Pages - Library Loaded. This naming convention indicates where and when the rule will fire, making it easier to identify and re-use as your Launch property matures.
Under Events, click Add. The Event tells Launch when the rule should fire and can be many things, including a page load, a click, a custom JavaScript event, etc.
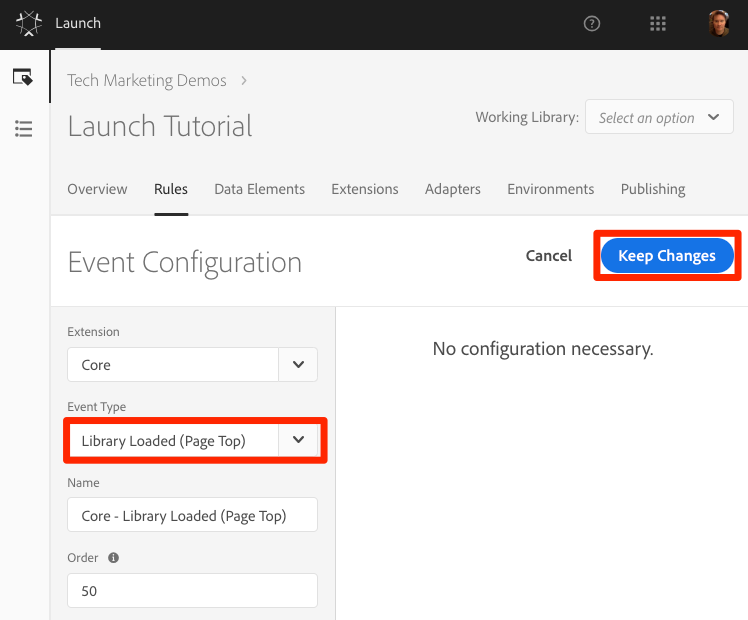
As the Event Type, select Library Loaded (Page Top).
Note that when you select the Event Type, Launch pre-populates a name for the event using your selection. Also note that the default order for the event is 50. Ordering is a powerful feature in Launch which gives you precise control over the sequence of actions when you have multiple rules that are triggered by the same event. You will use this feature later in the tutorial.
Click the Keep Changes button
Since this rule should fire on all pages, leave Conditions blank.
If you open the Conditions modal, you will see that conditions can add both restrictions and exclusions based on a large variety of options, including URLs, data element values, date ranges, and more.
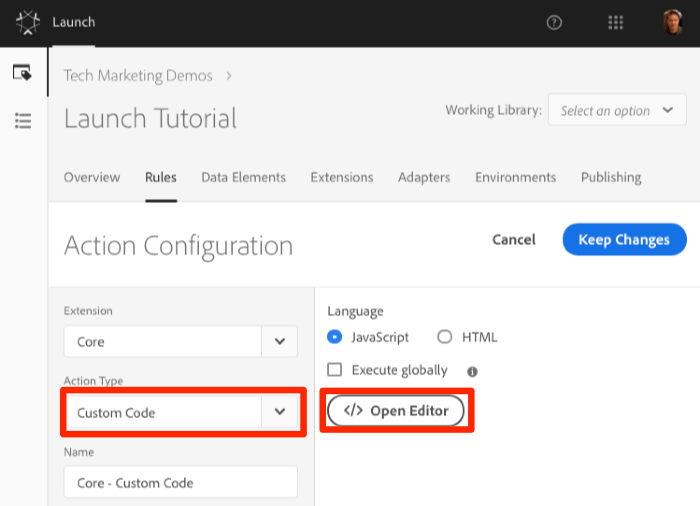
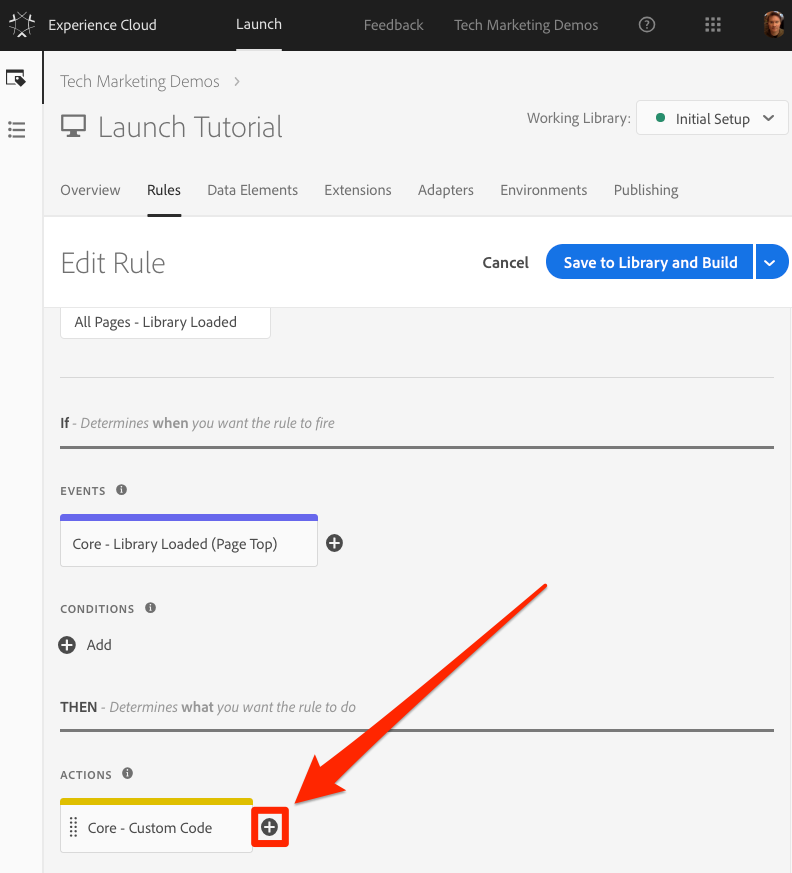
Under Actions, click Add
Select Action Type > Custom Code, which at this point is the only option. Later in the tutorial, as you add extensions, more options will become available.
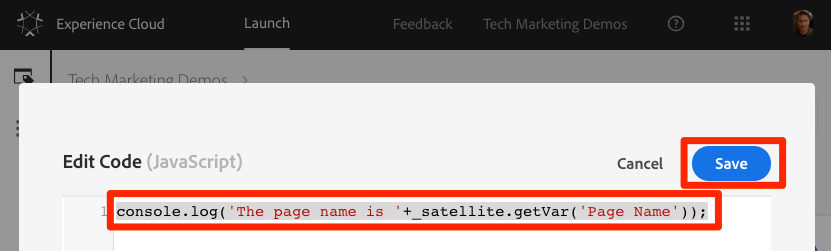
Select </> Open Editor to open the code editor
Add the following to the code editor. This code will output the value of the Page Name data element to the browser console so you can confirm it's working:
Save the code editor
On the Action configuration screen click Keep Changes
Click Save to save the rule
After configuring a collection of extensions, data elements, and rules in the Launch interface, you need to package these capabilities and logic into a set of JavaScript code that you can deploy on your website so that marketing tags will fire when visitors come to the site. A library is the set of JavaScript code that will do this.
In an earlier exercise, you implemented the embed code of your development environment on the WeRetail page. When you loaded the WeRetail page a 404 error was returned for the embed code URL because a Launch library had not been built yet and assigned to the environment. Now you will put your new data element and rule in a library so that your WeRetail page can do something.
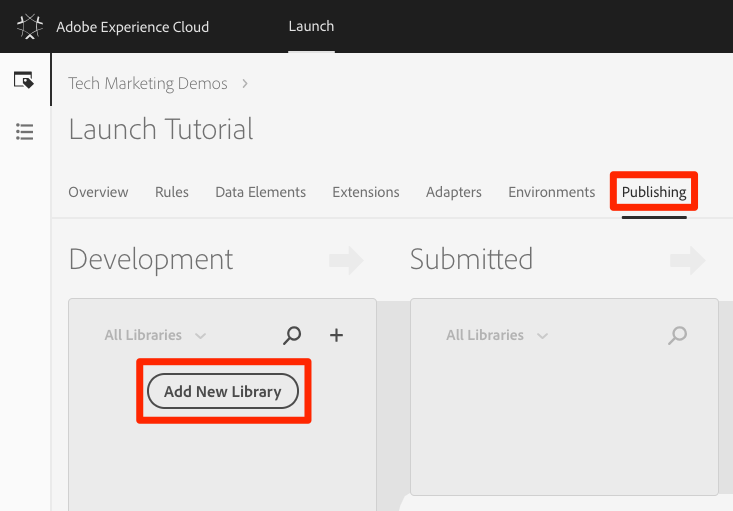
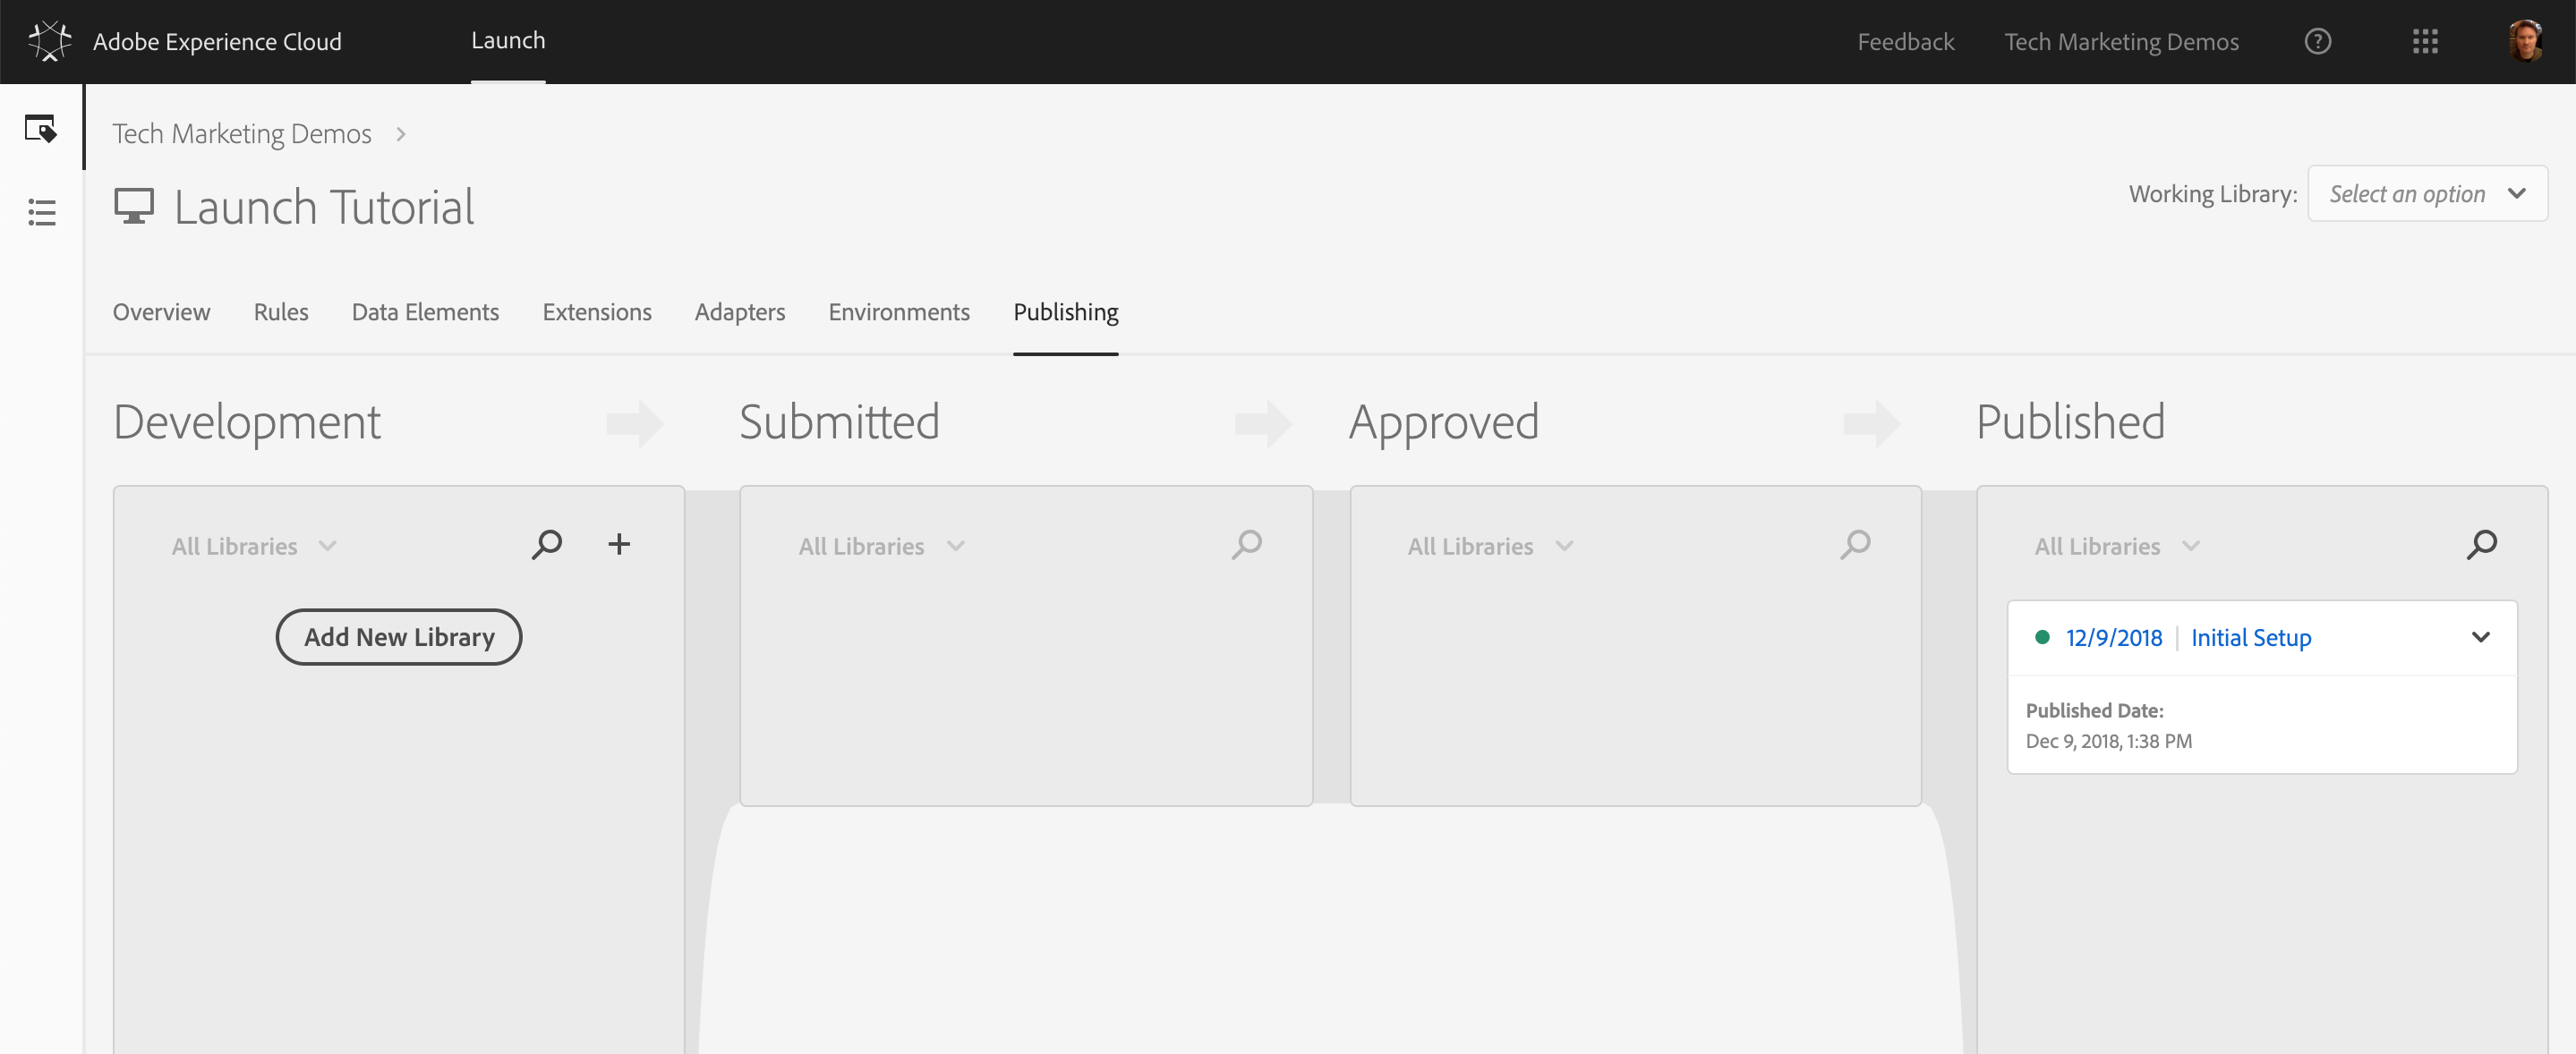
Go to the Publishing tab
Click Add New Library
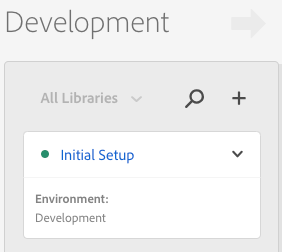
Name the Library "Initial Setup"
Select Environment > Development
Click Add All Changed Resources
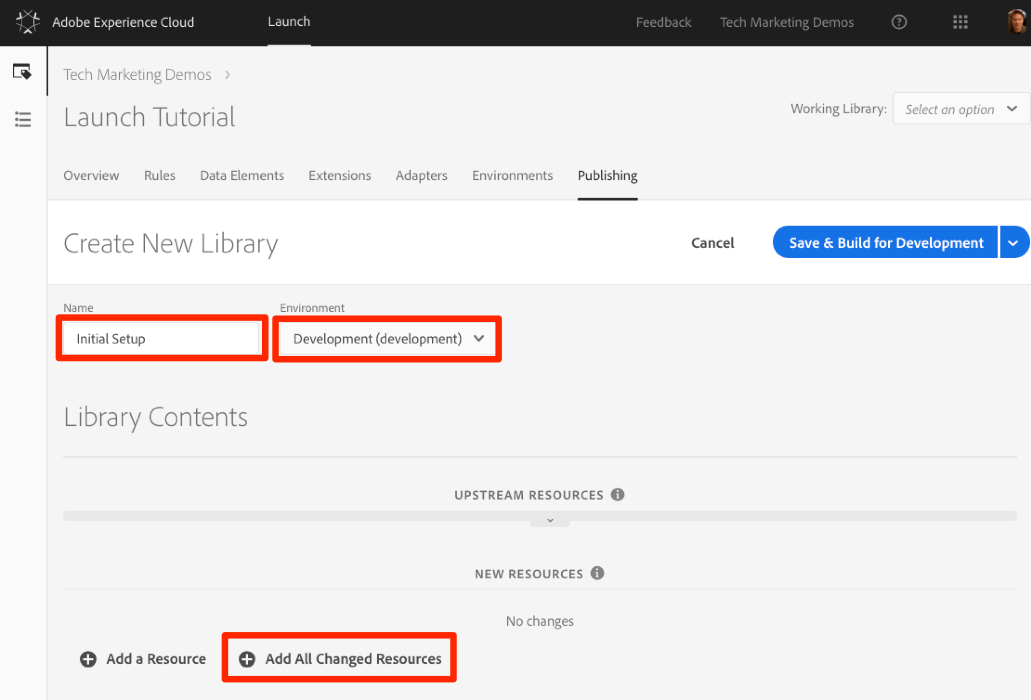
Note that after clicking Add All Changed Resources Launch summarizes the changes you just made.
Click Save & Build for Development
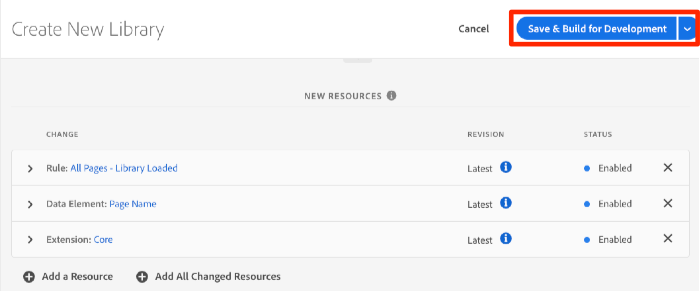
After a few moments, the status dot will turn green indicating the library successfully built.
Now validate that your rule is working as expected.
Reload your WeRetail page. If you look at the Developer Tools -> Network tab, you should now see a 200 response for your Launch Library!
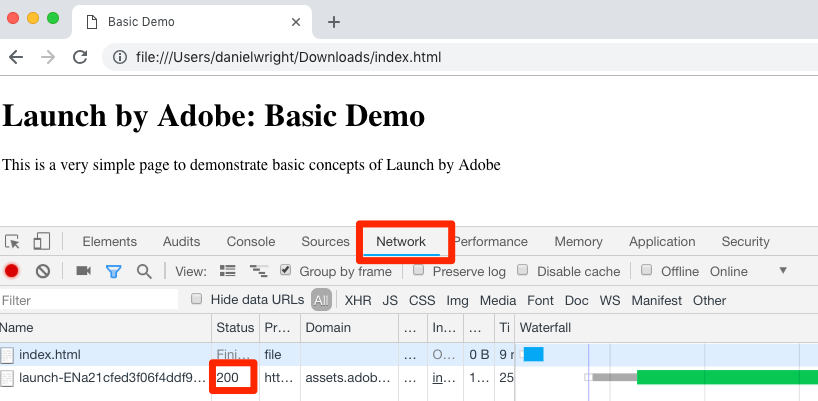
If you look at the Developer Tools -> Console, you should see the text " The page name is content:we-retail🇺🇸en"
Congratulations, you created your first data element and rule and built your first Launch library!
When you are making a lot of changes in Launch, it is inconvenient to have to come to the Publishing tab, add changes, and build the library each time you want to see the result. Now that you have created your "Initial Setup" library, you can use a feature called "Working Library" to rapidly save your changes and rebuild the library in a single step.
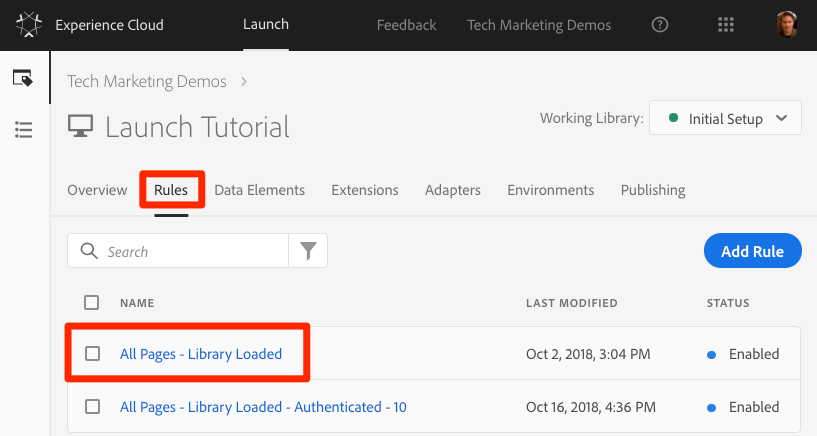
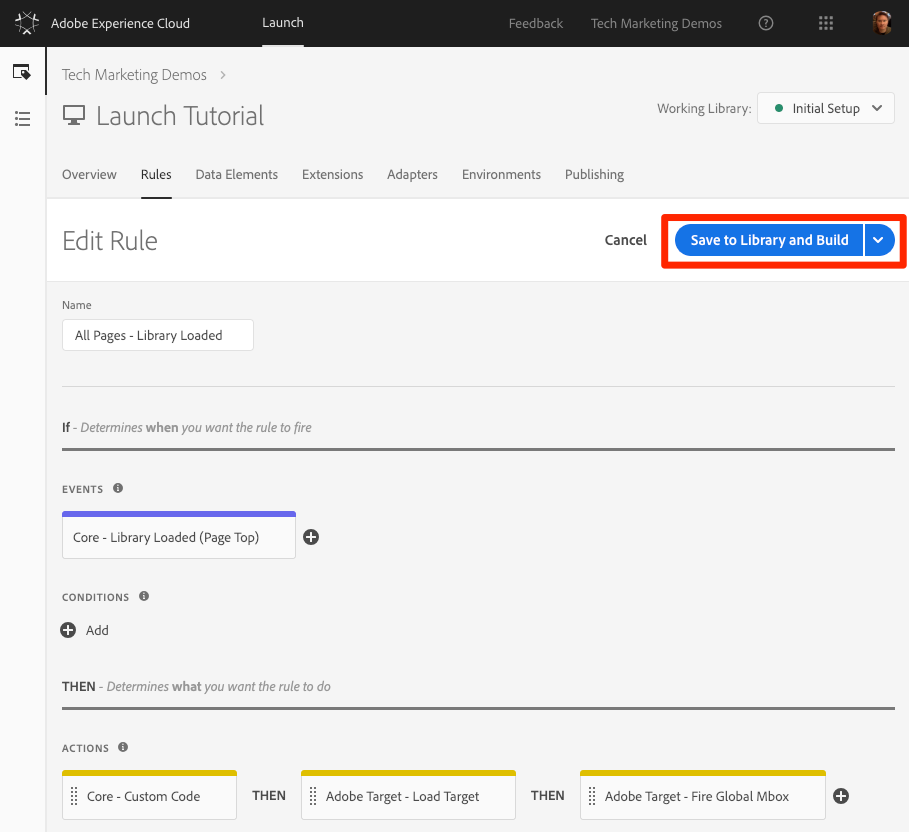
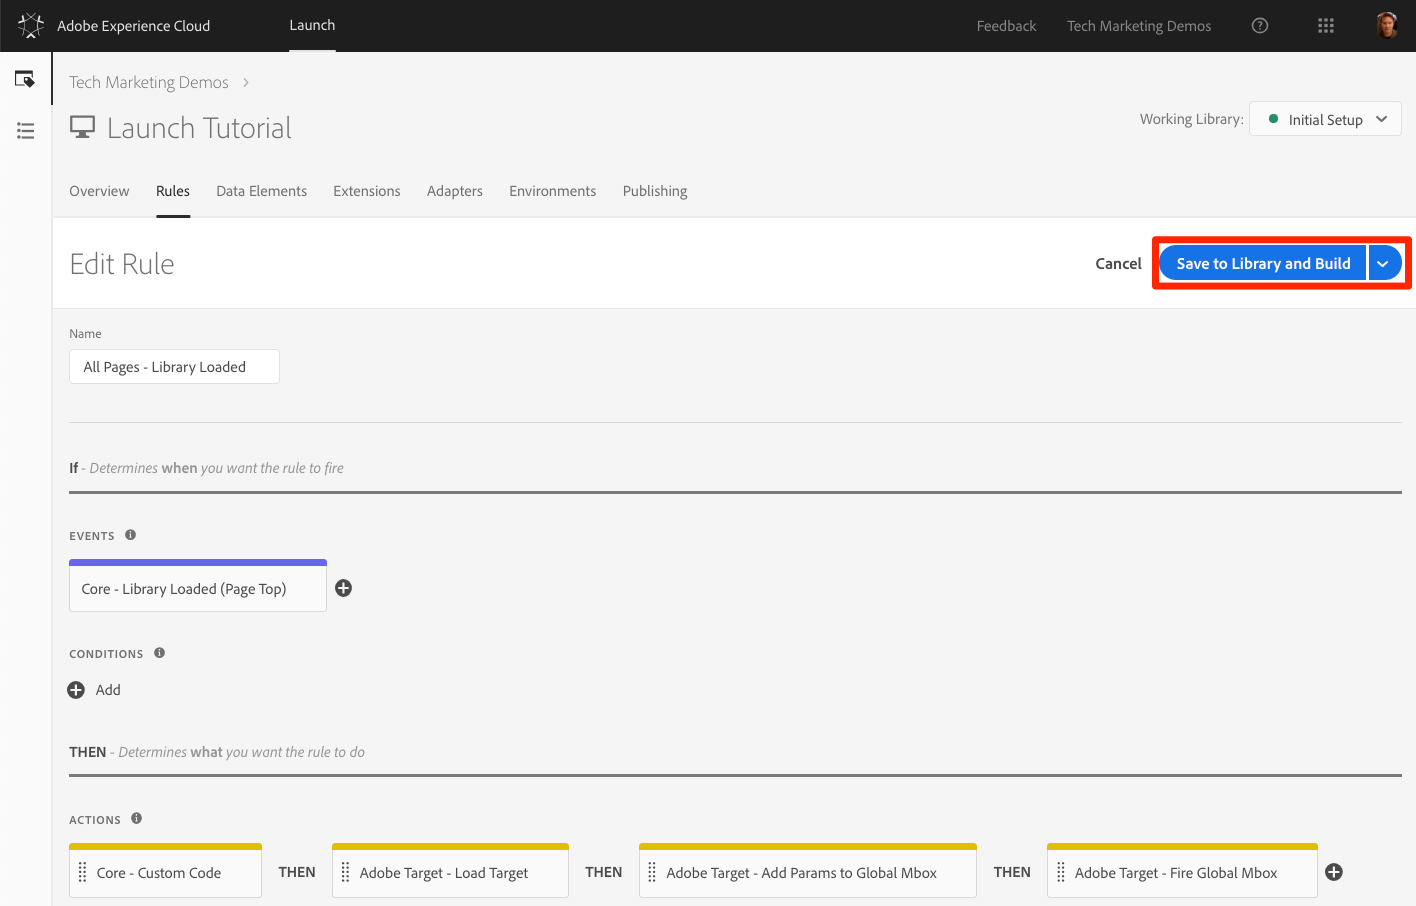
In the top navigation, click Rules and then click on the All Pages - Library Loaded rule to open it up.
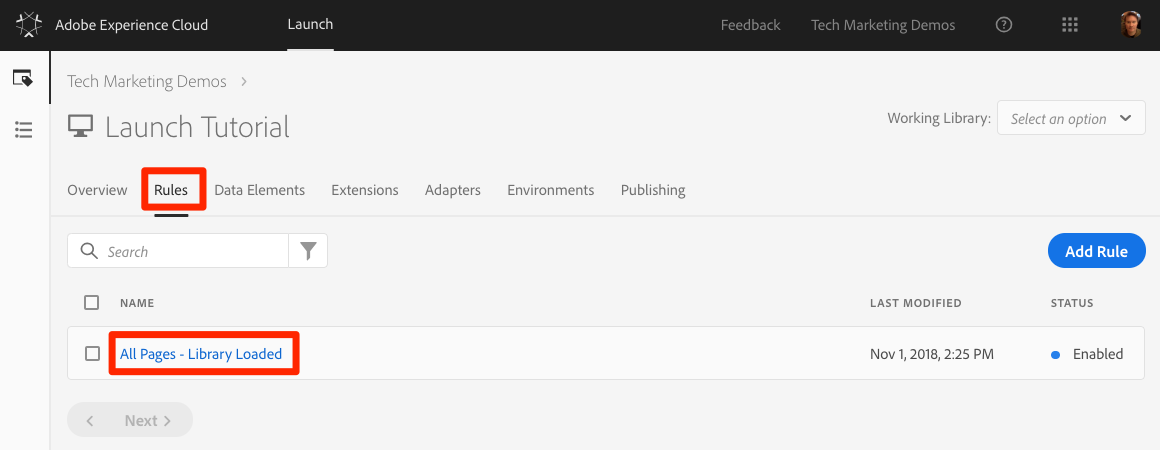
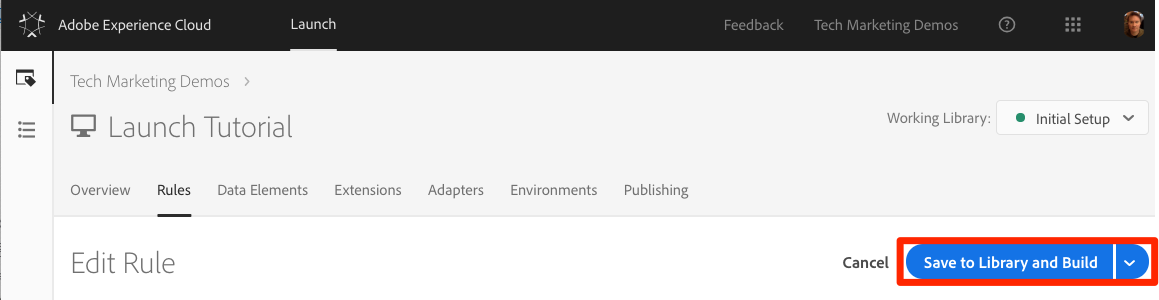
On the Edit Rule page, click the Working Library dropdown and select your Initial Setup library.
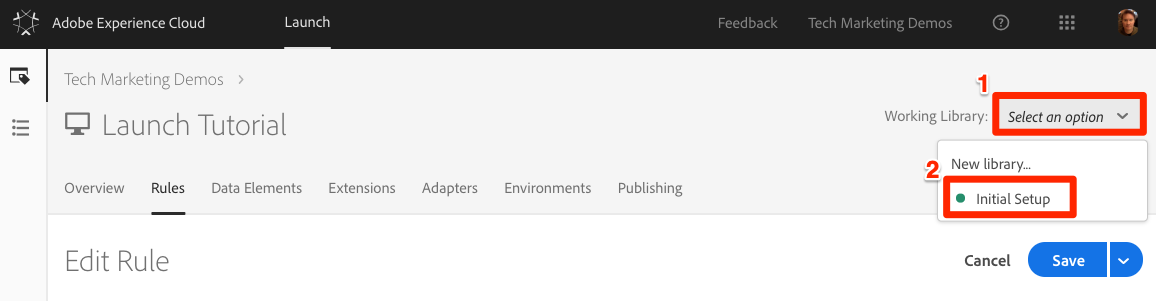
Once you've selected the library, you should see that the Save button now defaults to Save to Library and Build. When you make a change in Launch, you can use this option to automatically add the change directly to your working library and rebuild it.
Open your Custom Code action and just add some additional characters and a colon after the text "The page name is" so the entire code block reads:
Save the code, keep the changes in the action, and now click the Save to Library and Build button.
Wait a moment until the green dot reappears next to the Working Library dropdown. Now, reload your WeRetail page and you should see your change reflected in the console message (you may have to clear your browser cache and reload, in order to see the change to the page):

This is a much faster way of working and you will use this approach for the rest of the tutorial.
In this exercise, we will implement the Adobe Target extension with a global request and custom parameters.
Adobe Target is the Adobe Marketing Cloud solution that provides everything you need to tailor and personalize your customers' experience, so you can maximize revenue on your web and mobile sites, apps, social media, and other digital channels.
The Adobe Target extension supports client-side implementations using Target's JavaScript SDK for the modern web, at.js. Customers still using Target's older library, mbox.js, should upgrade to at.js in order to use Launch.
The Target extension consists of two main parts:
The extension configuration, which manages the core library settings
Rule actions to do the following:
In this first exercise we will add the extension and look at the configurations. In later exercises we will use the actions.
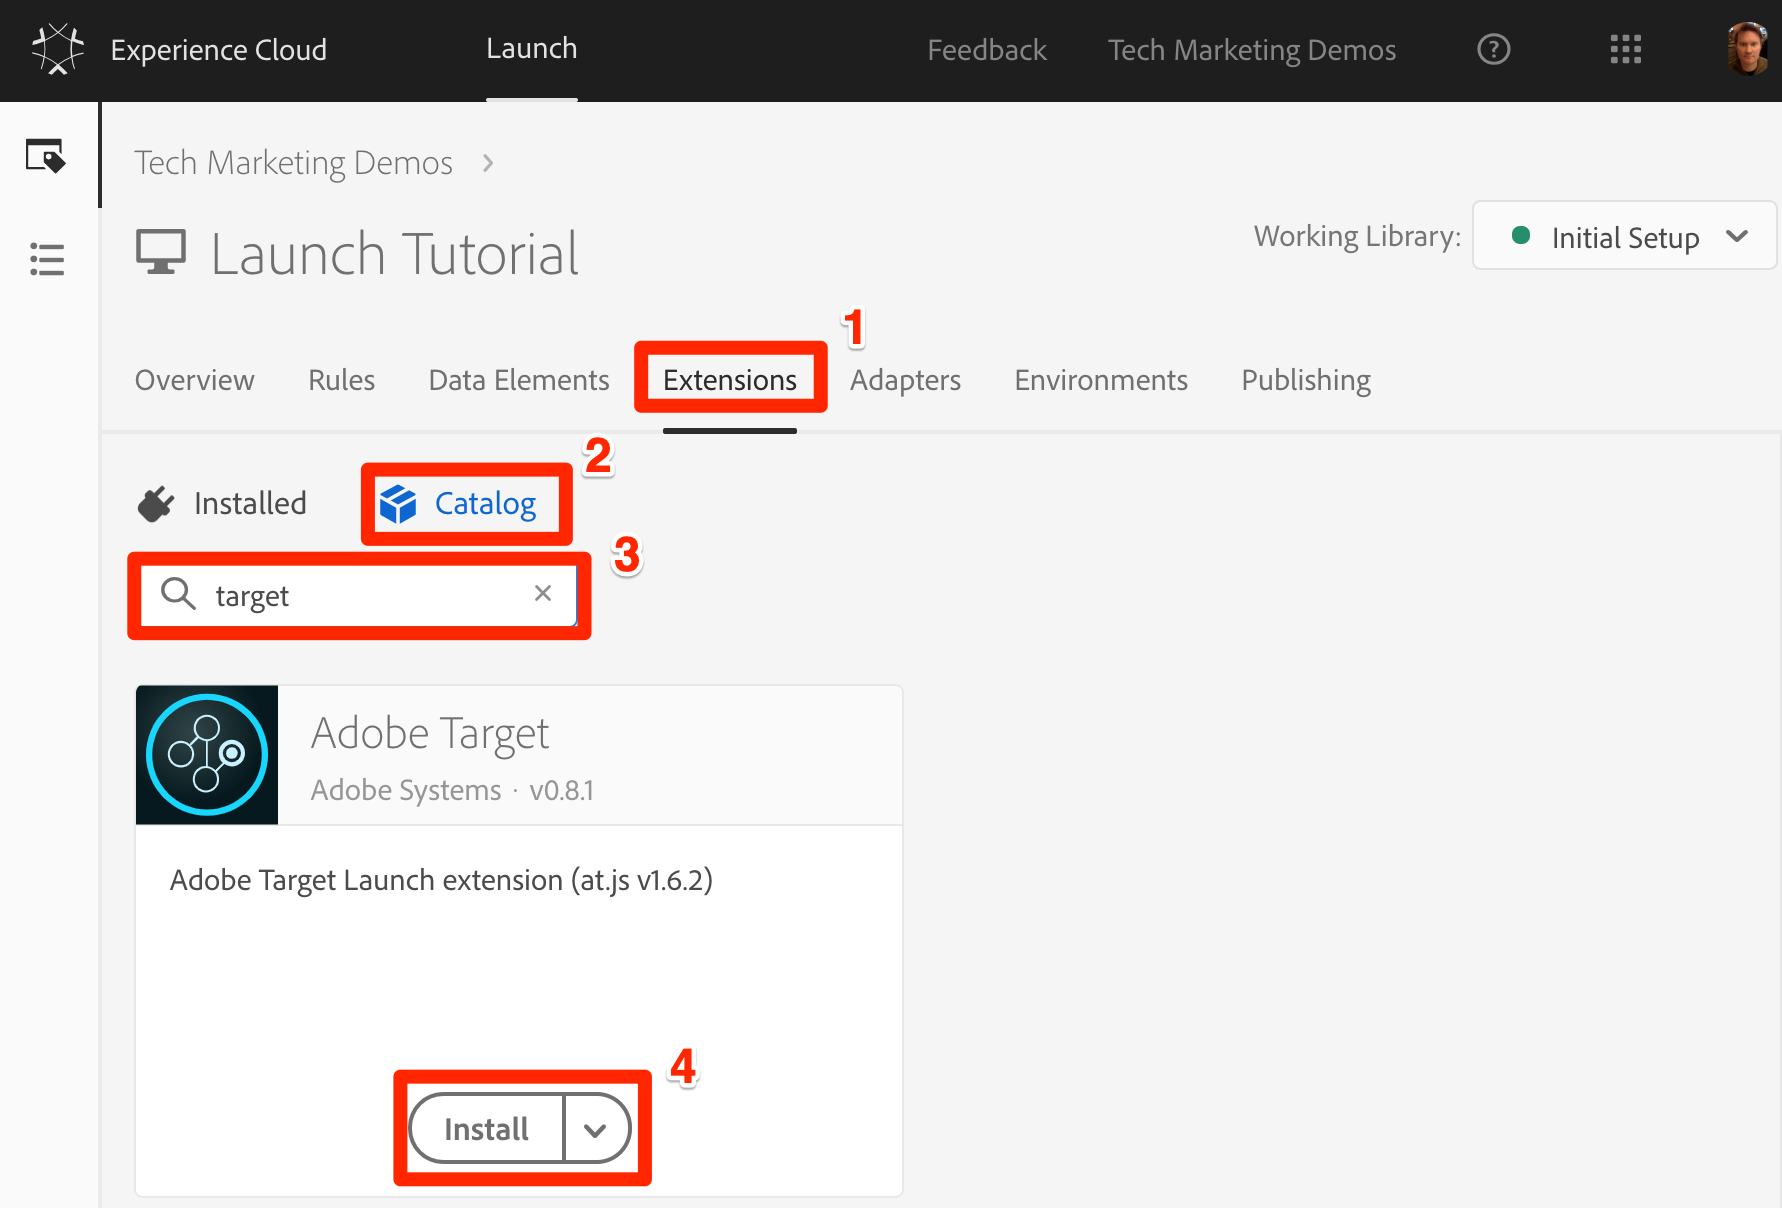
Go to Extensions > Catalog
Type target in the filter to quickly locate the Adobe Target extension
Click Install
When you add the extension, it will import many, but not all of your at.js settings from the Target interface, as pictured below. One setting that will not be imported is the Timeout, which will always be 3000ms after adding the extension. For the tutorial, leave the default settings.
Note that on the left-hand side it will show the at.js version that ships with the current version of the extension.
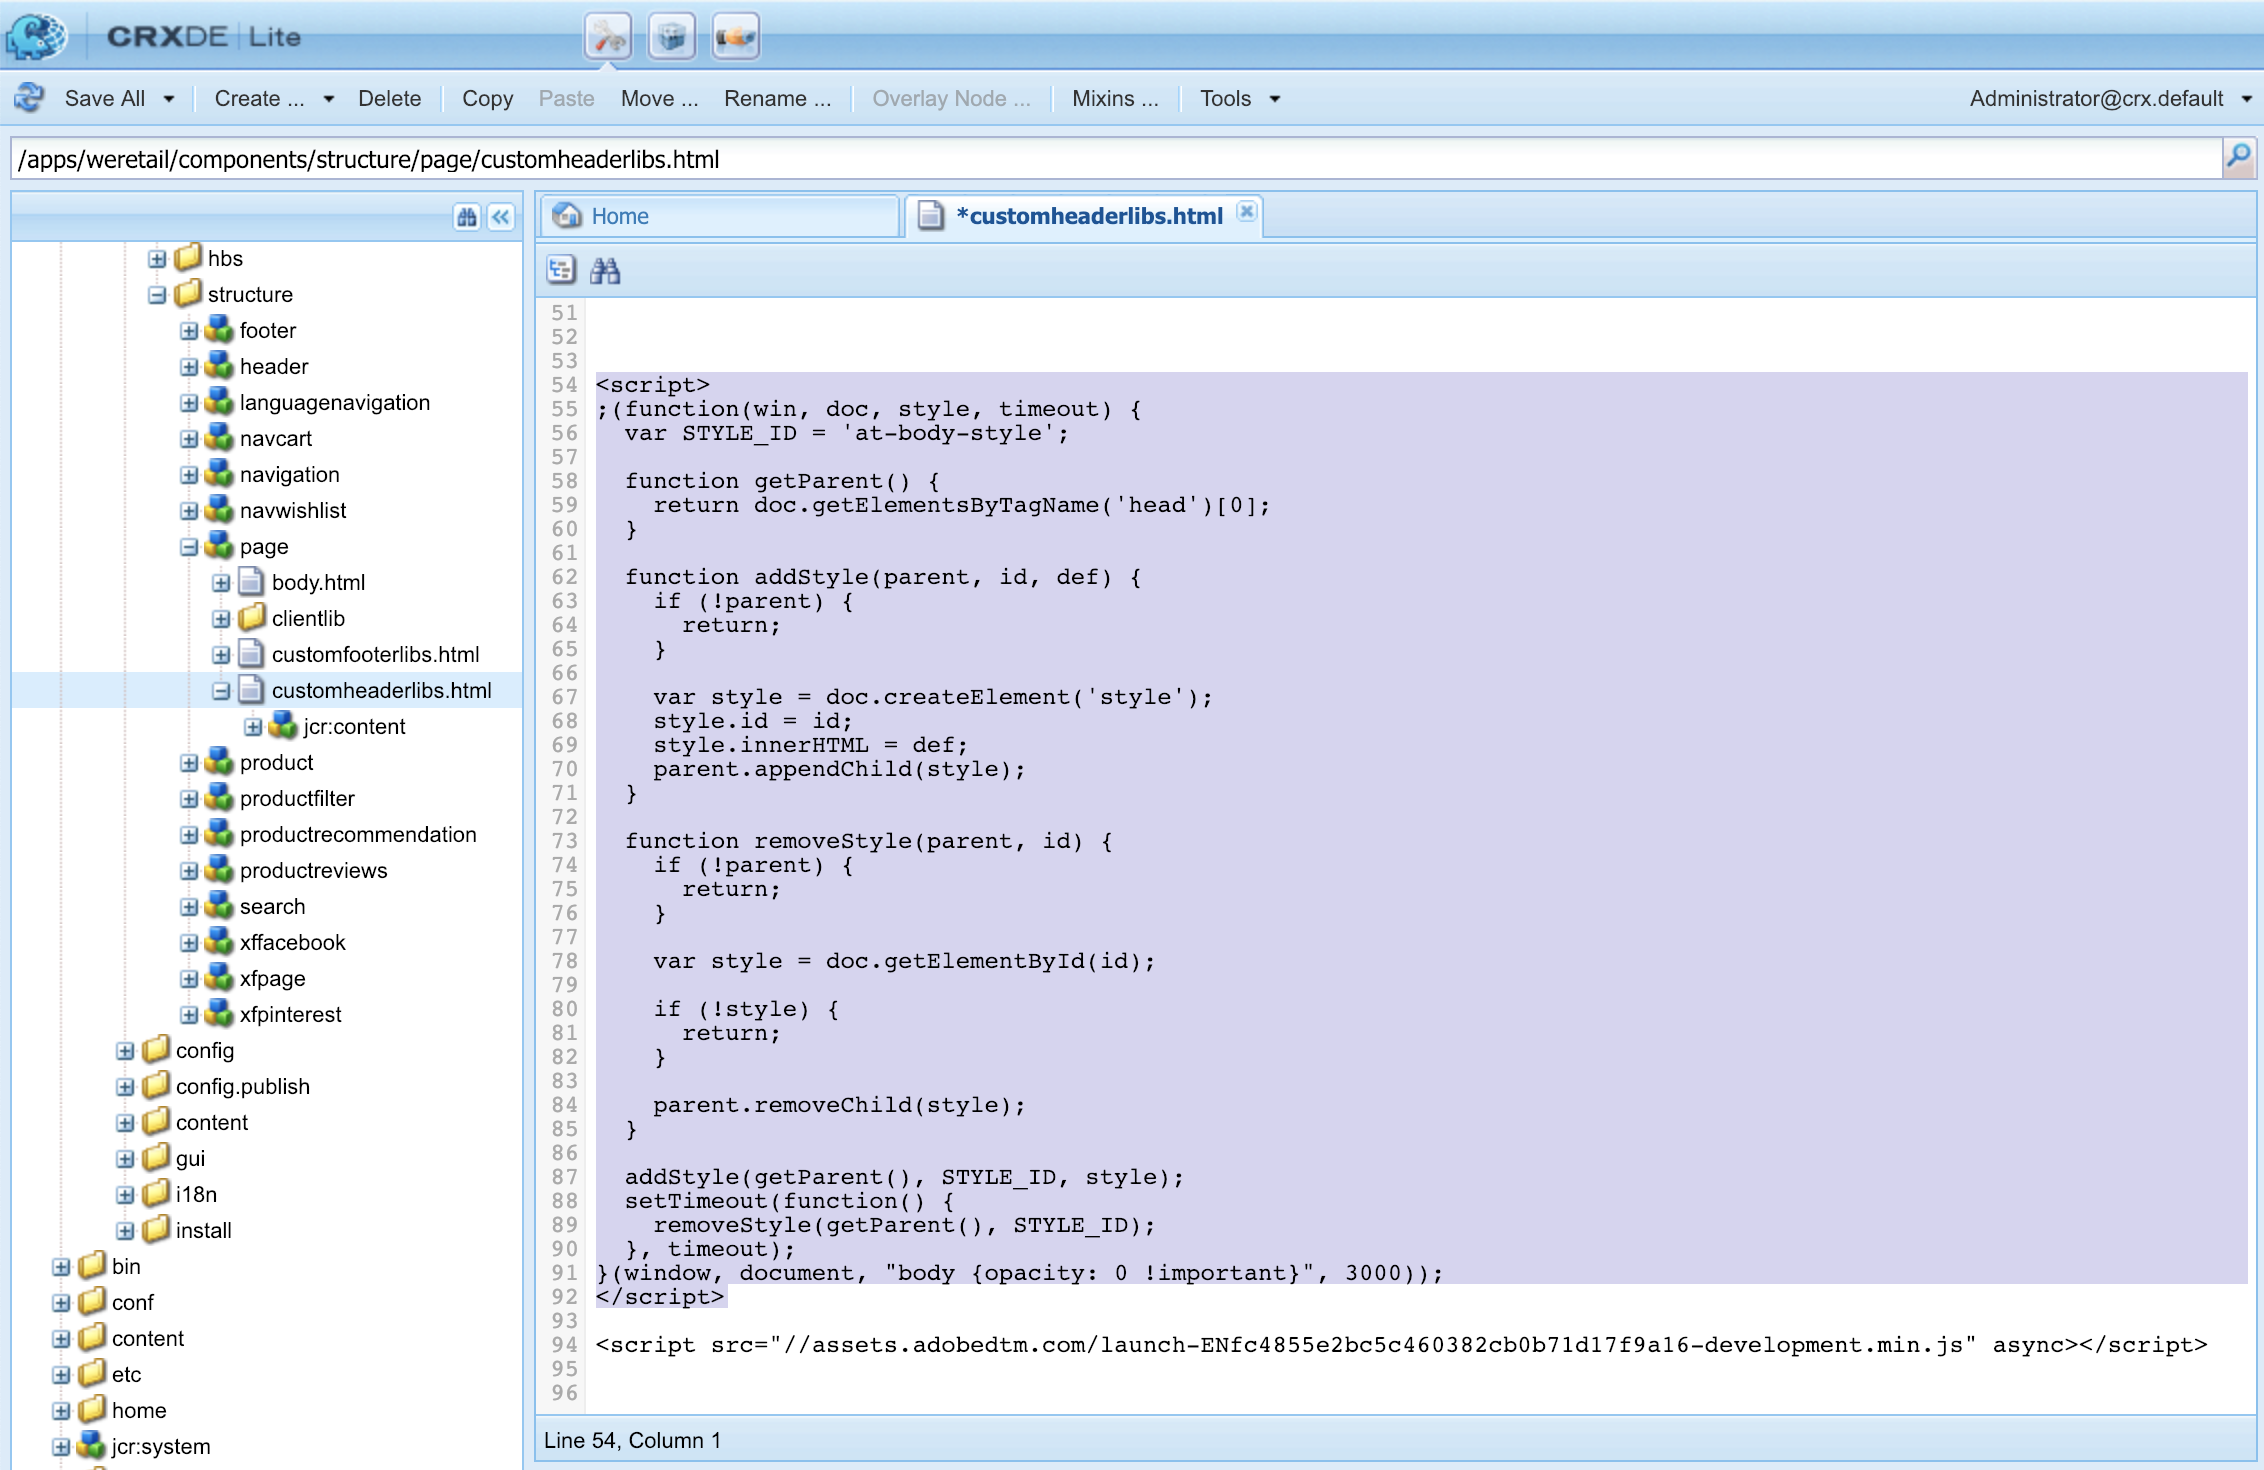
Copy the Pre-Hiding Snippet

Return to CRXDE Lite and insert the pre-hiding snippet before the Launch tag, wrapped in <script>…</script> tags
Click Save to Library and Build
At this point, Target isn't really doing anything, so there is nothing to validate.
Each version of the Target extension comes with a specific version of at.js, which is listed in the extension description. You update the at.js version by updating the Target extension.
Marketers use Target to control the visitor experience on the page when testing and targeting content. Because of this important role in the display of the page, you should load Target as early as possible to minimize the impact on page visibility. In this section, we will load the Target JavaScript library—at.js—as well as fire the global mbox.
You can use the All Pages - Library Loaded rule you created in the exercise "Add Data Elements, Rules and Libraries " to implement Target because it is already triggered on the first event that will fire on a page load—the Library Loaded event.
Go to the Rules in the top navigation and then click on All Pages - Library Loaded to open the rule editor
Under Actions, click the  to add a new action
Select Extension > Adobe Target
Select Action Type > Load Target
Click Keep Changes
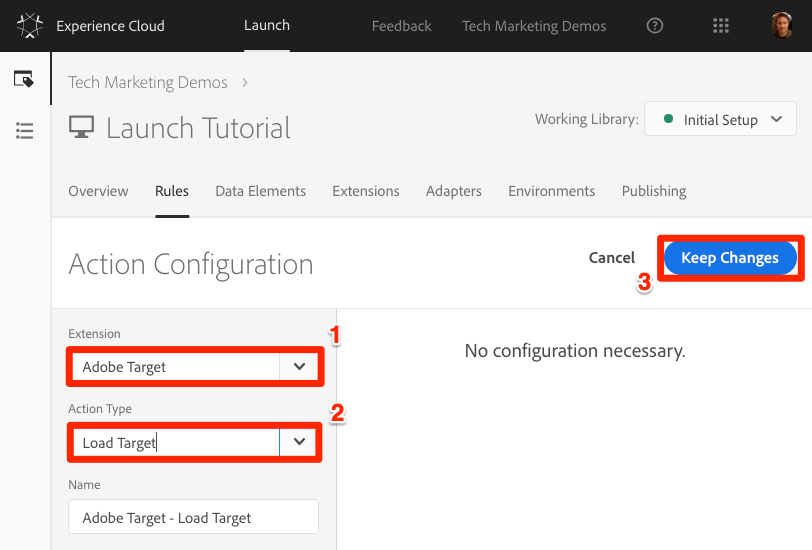
With the Load Target action added, at.js will load on the page. *This is the equivalent to adding the at.js library to the page like we performed in Exercise 1. However, no Target requests will fire until we add the Fire Global Mbox action.
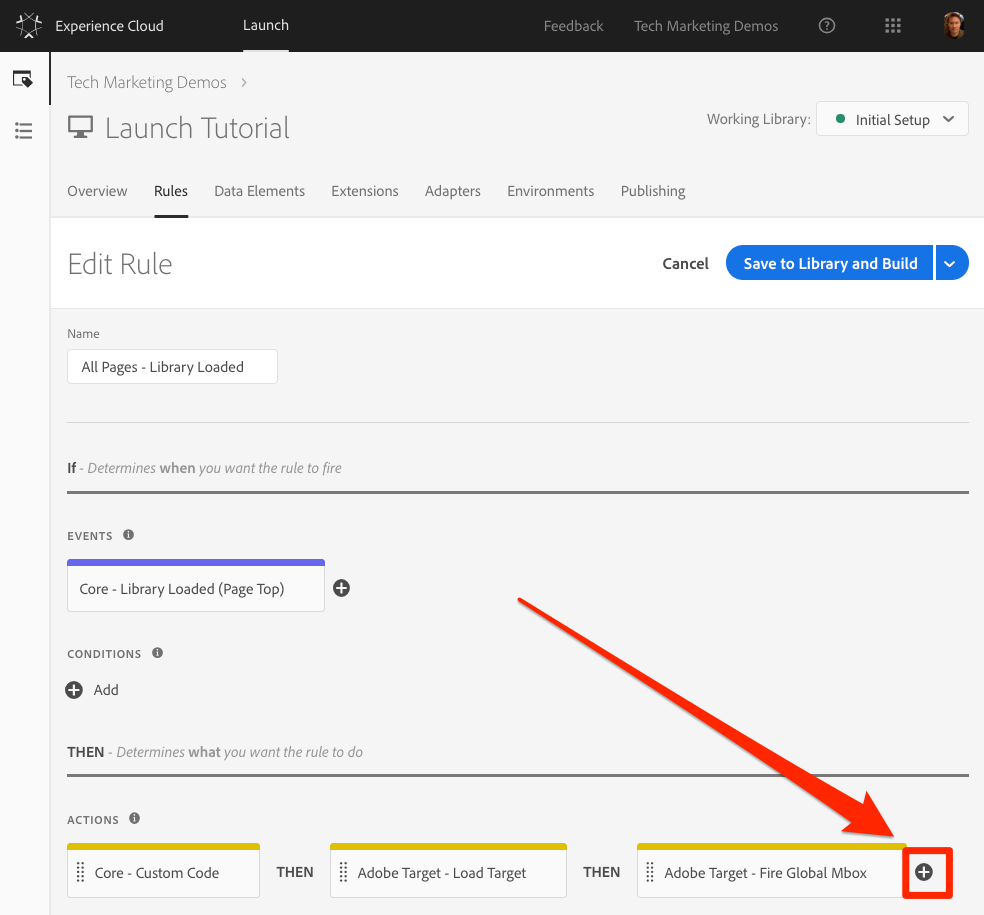
Under Actions, click the again to add another action
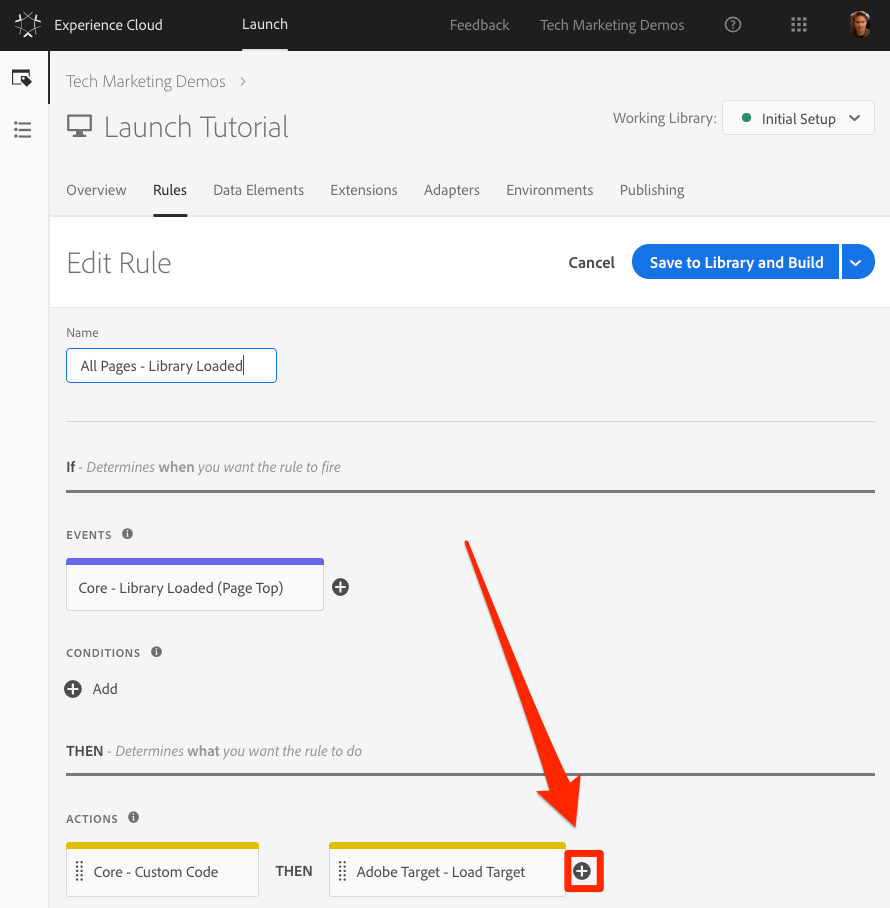
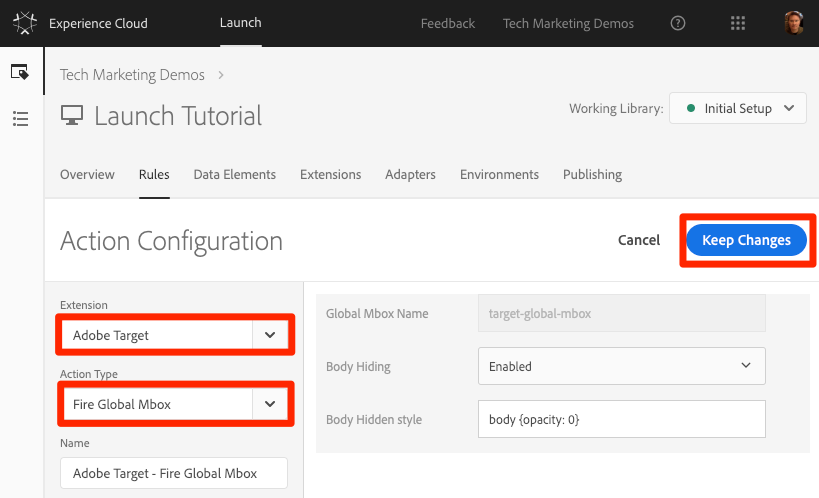
Select Extension > Adobe Target
Select Action Type > Fire Global Mbox
There are some configurations available for the global mbox related to whether or not to hide the page and CSS selector to use for pre-hiding. These settings work in conjunction with the pre-hiding snippet we added to the page. Leave the default settings.
Click Keep Changes
The new action is added in sequence after the Load Target action and the actions will execute in this order. You can drag-and-drop the actions to rearrange the order, but in this scenario, Load Target needs fire before the Fire Global Mbox.
Click Save to Library and Build
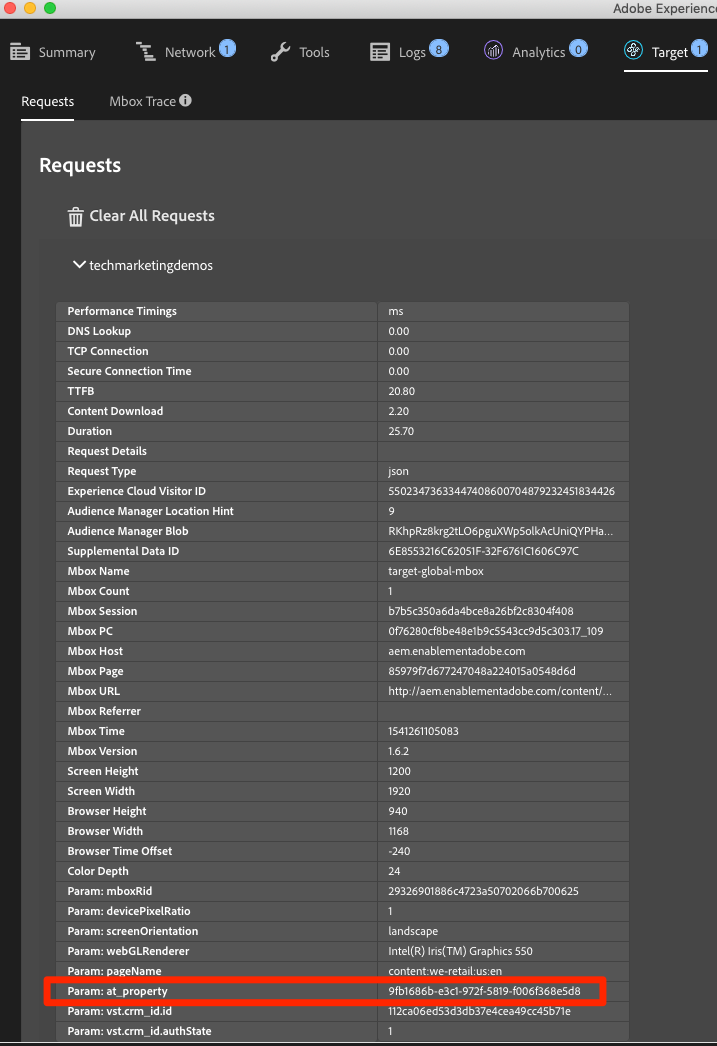
Now that you have added the Target extension and fired the Load Target and Fire Global Mbox actions, there should be a global mbox request made on all pages where your Launch property is used.
Reload your WeRetail page. You should no longer see a delay of three seconds before the page is visible.
Open the We.Retail site
Make sure the Debugger is mapping the Launch property to your Development environment, as described in the earlier exercise
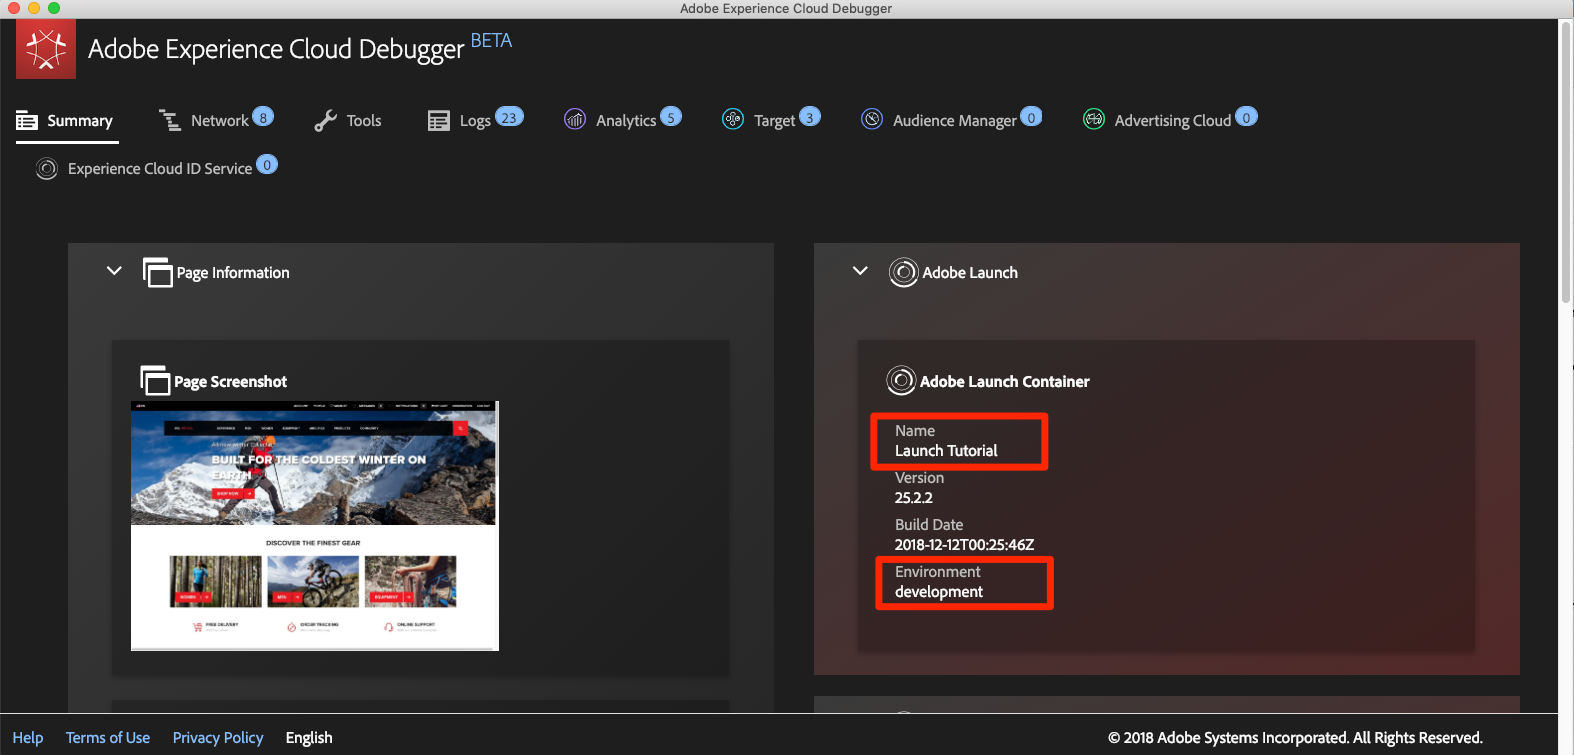
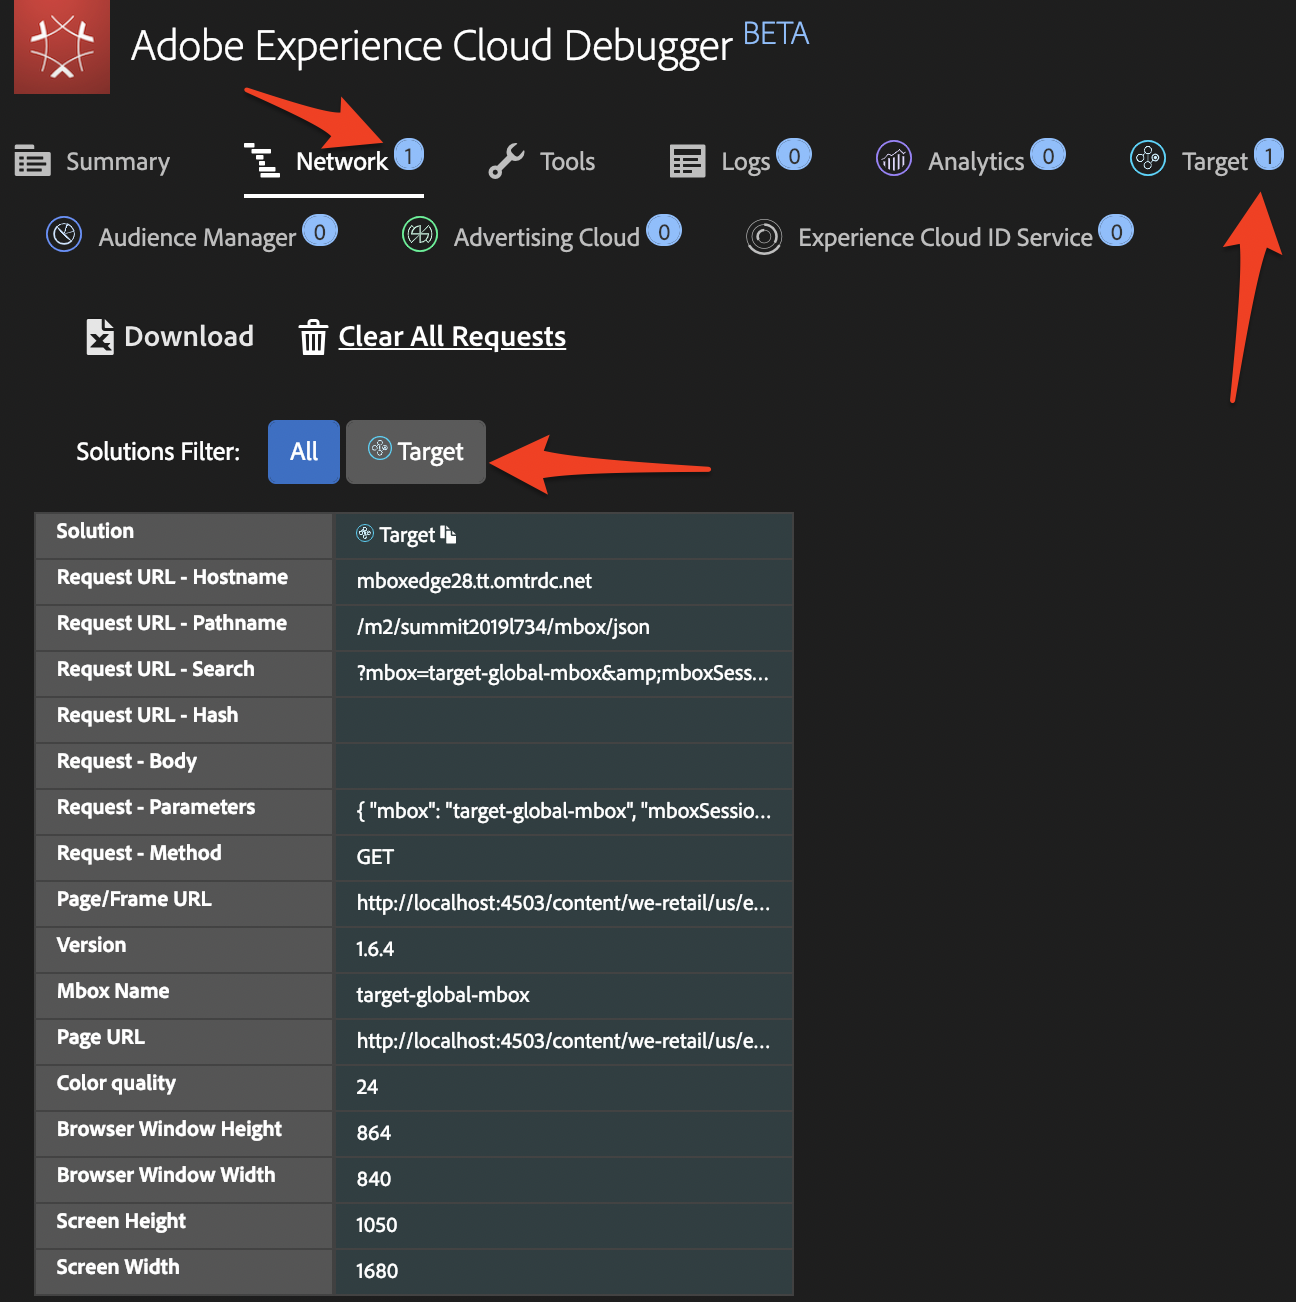
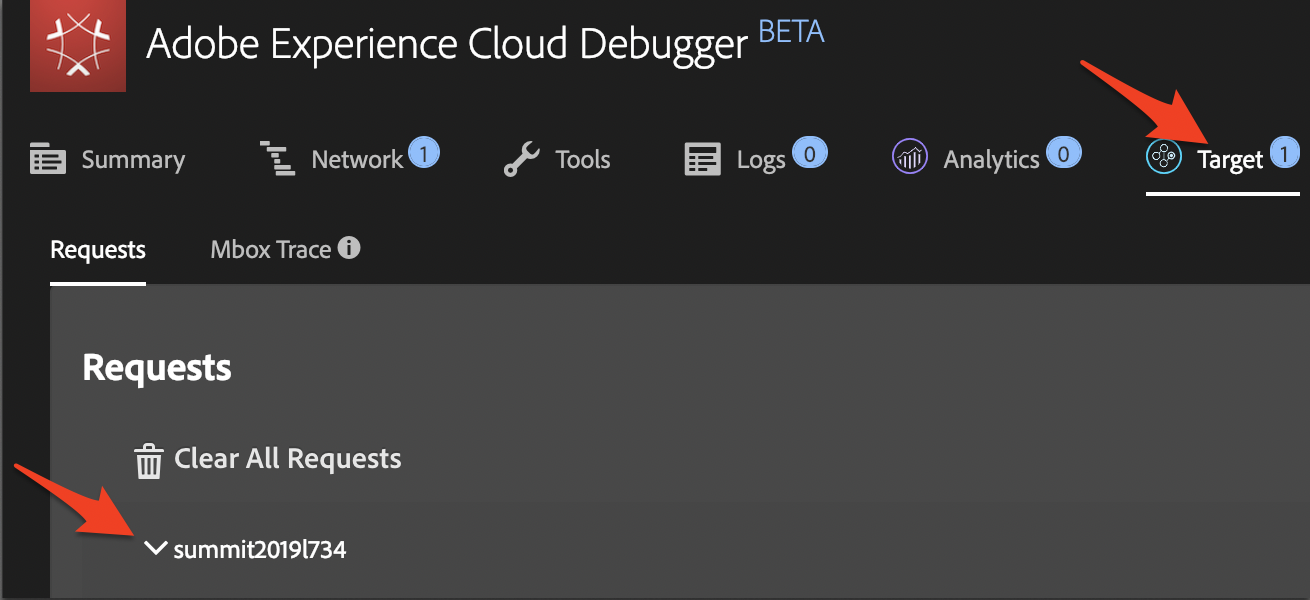
Go to the Summary Tab of the Debugger
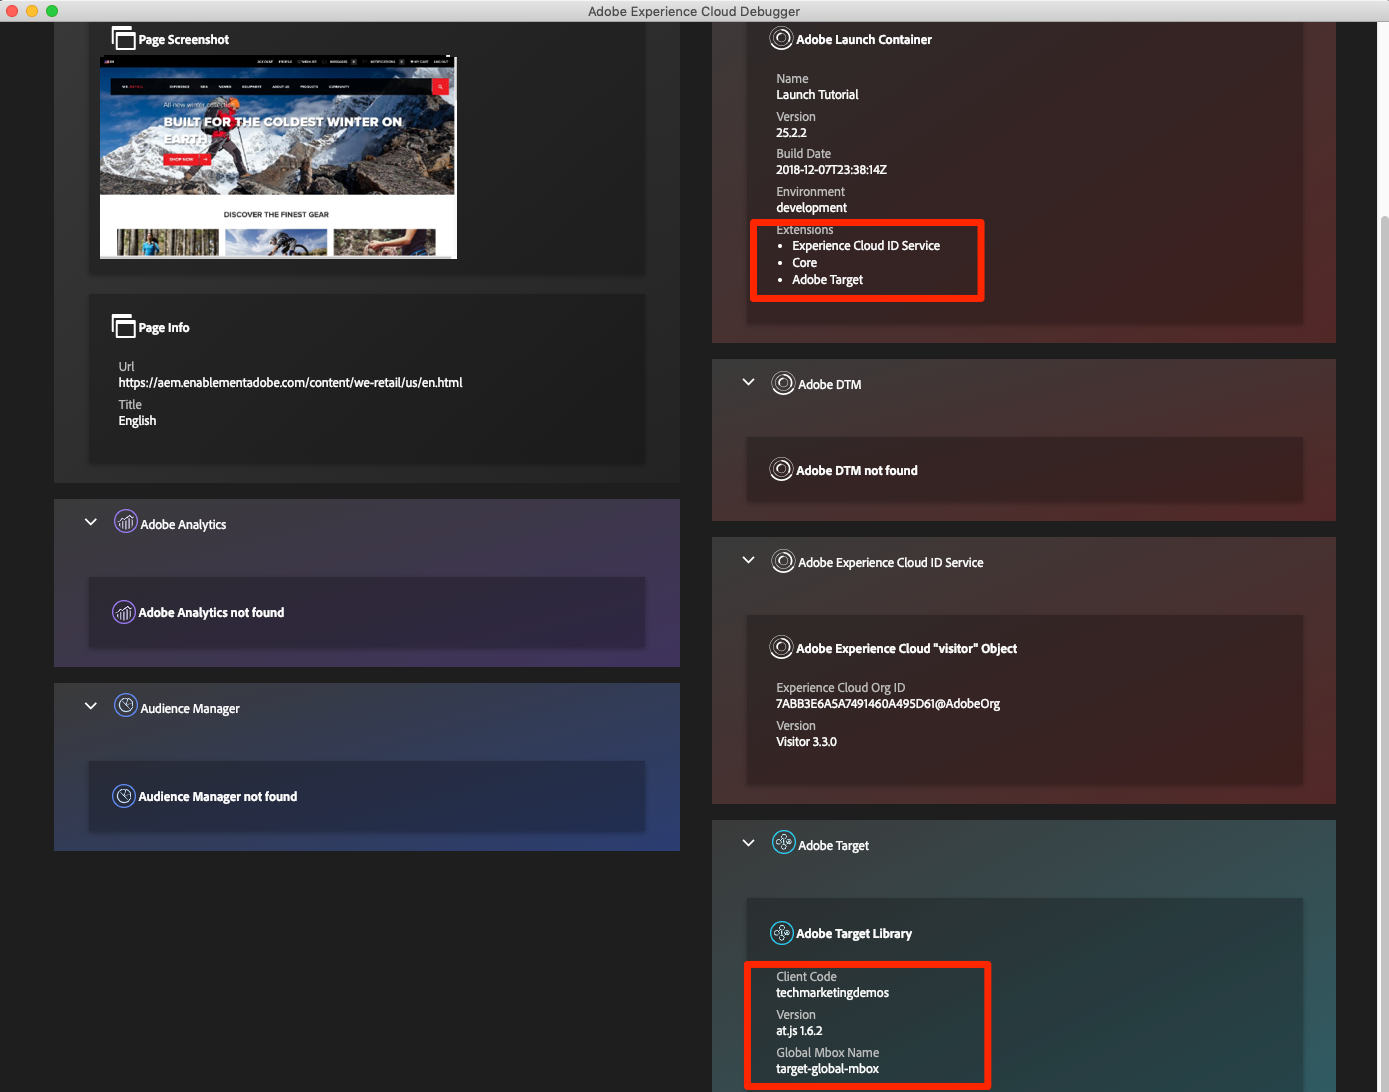
In the Launch section, confirm that Target appears under the Extensions heading
In the Target section, confirm that your client code, at.js library version, and your global mbox name appear
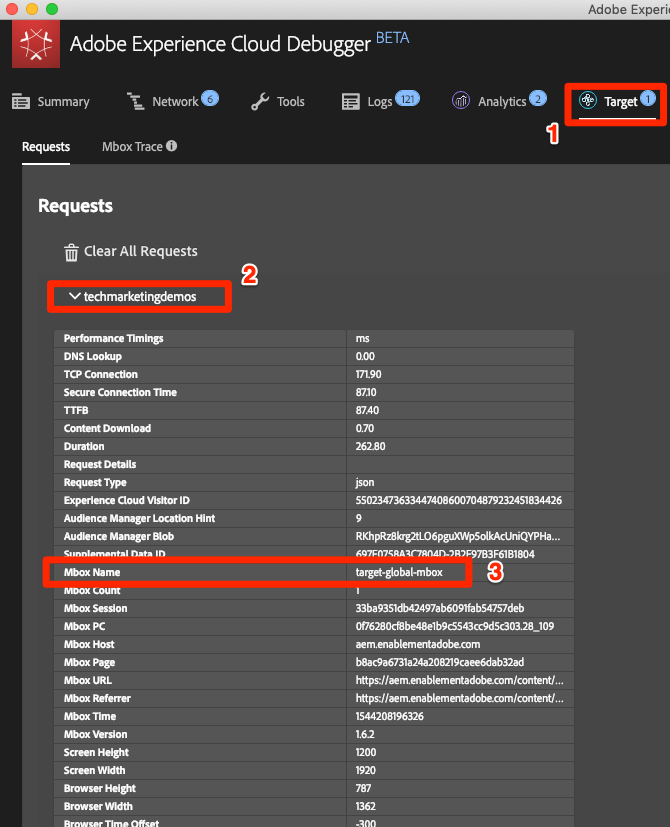
Finally, go to the Target tab, expand your client code, and confirm that the request for your global mbox appears:
Congratulations! You've implemented the global mbox!
Passing parameters in the Target request adds powerful capabilities to your targeting, testing, and personalization activities. The Launch extension provides two actions to pass parameters:
Add Params to Global Mbox, which adds parameters to global mbox requests (equivalent to the targetPageParams() method)
Add Params to All Mboxes, which adds parameters in all mbox requests, e.g. the global mbox plus additional mbox requests made from Custom Code actions or hardcoded on your site (equivalent to the targetPageParamsAll() method)
These actions can be used before the Load Target action and can set different parameters on different pages based on your rule configurations.
Since most implementations use the global mbox for activity delivery, it usually sufficient to just use the Add Params to Global Mbox action.
Mbox parameters are used to pass custom data to Target, enriching your personalization capabilities. They are ideal for attributes that change frequently during a browsing session such as the page name, template, etc. and do not persist.
Let's add the Page Name data element that we created earlier in the Add Data Elements, Rules and Libraries exercise as an mbox parameter.
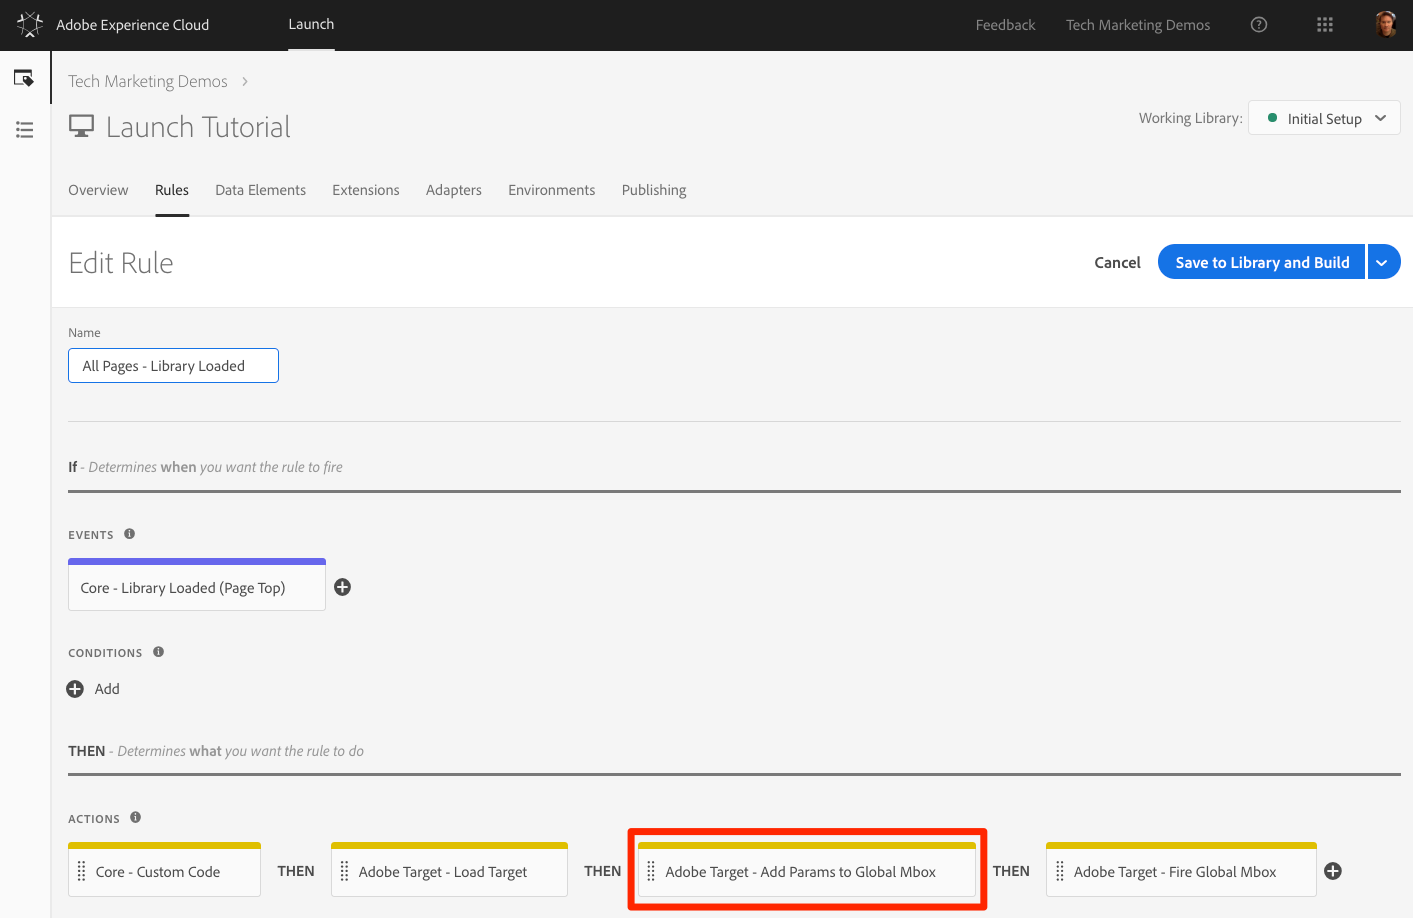
Go to the Rules in the top navigation and then click on All Pages - Library Loaded to open the rule editor.
Under Actions, click the to add a new action
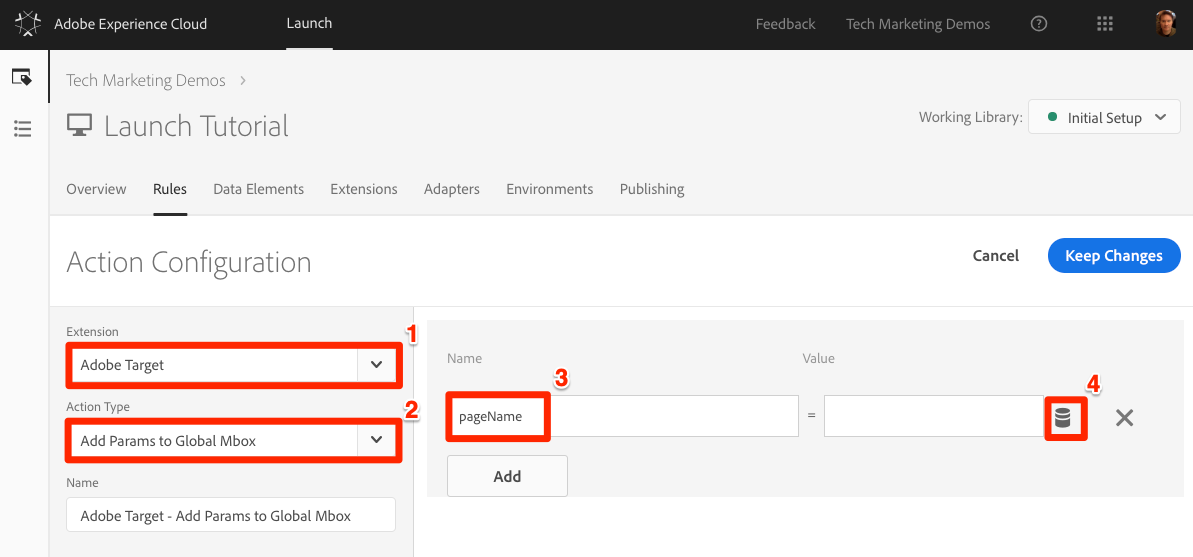
Select Extension > Adobe Target
Select Action Type > Add Params **to Global Mbox
**This is equivalent to the targetPageParams function we added in Exercise 1.
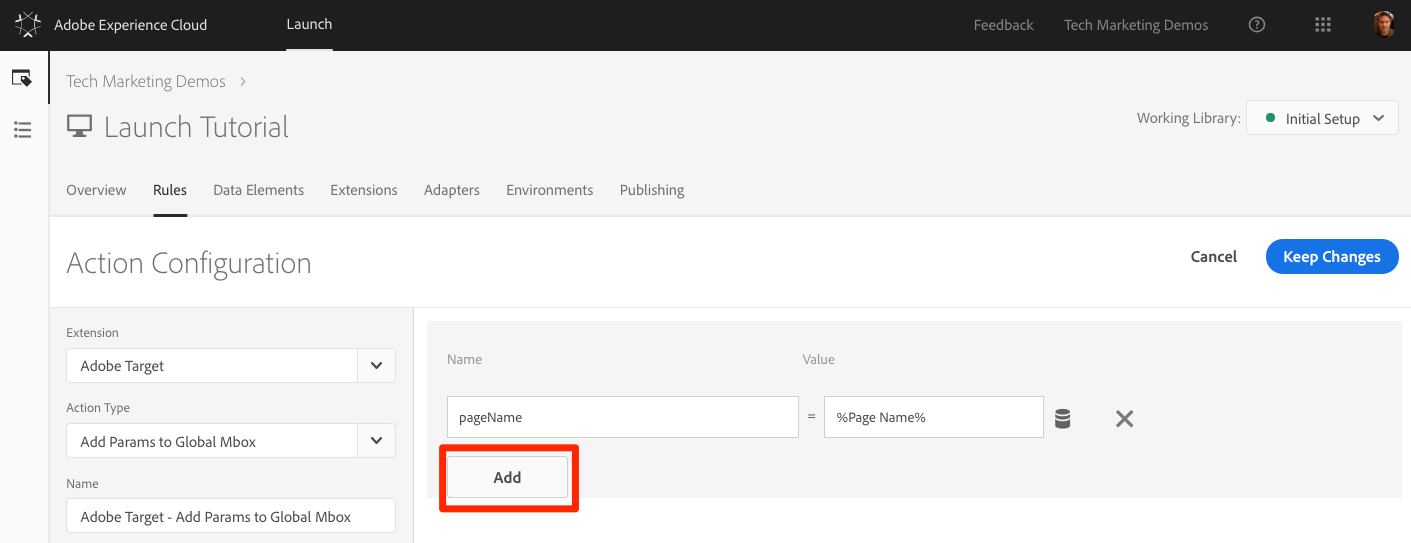
Enter pageName as the Name
Click the  to open the data element modal
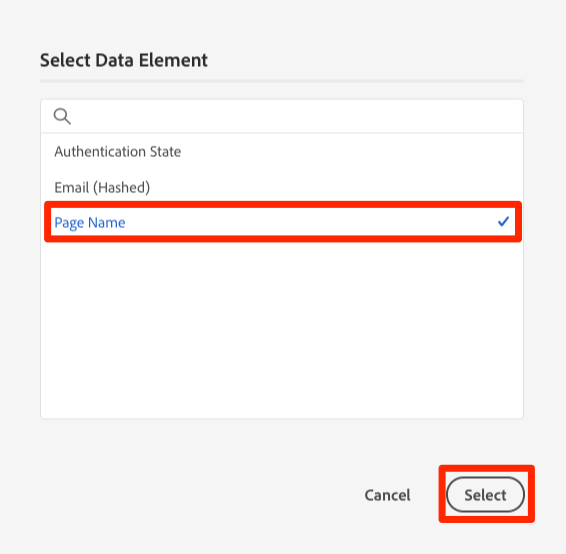
Click the Page Name data element
Click the Select button
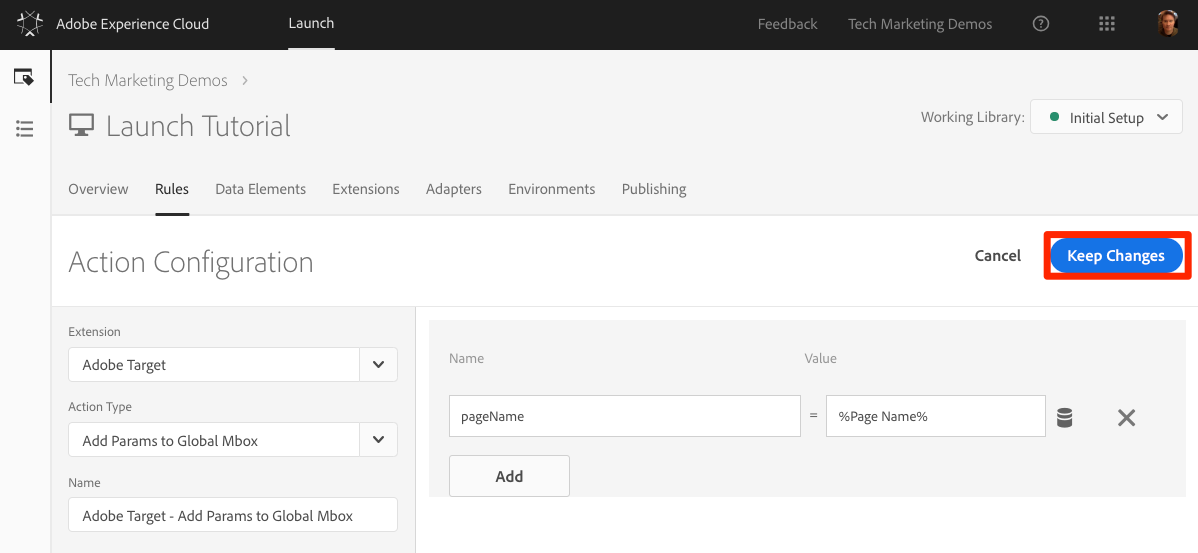
Click Keep Changes
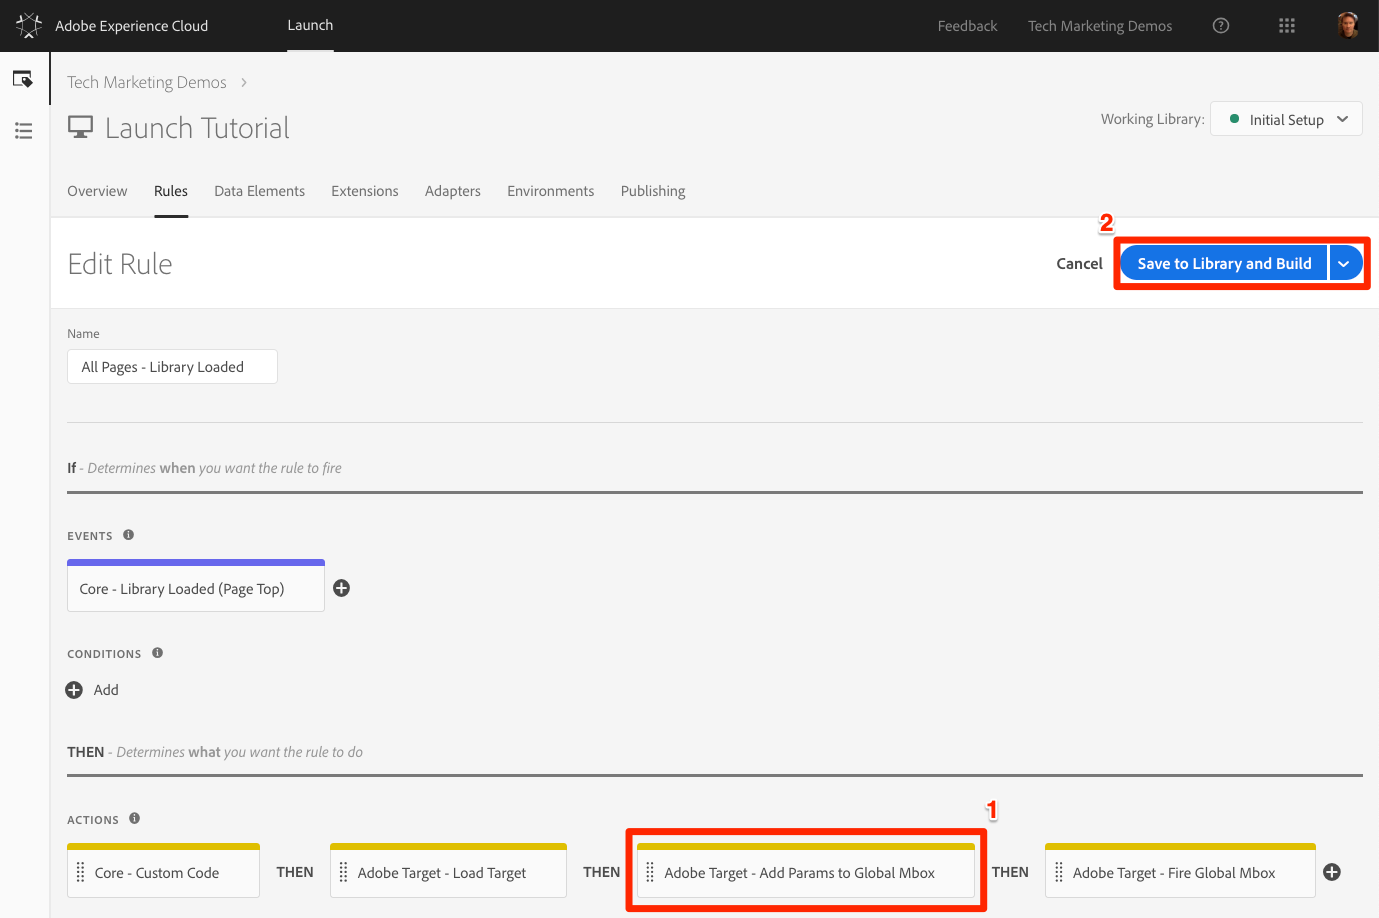
Click-and-drag on the left edge of the Add Params to Global Mbox action to rearrange the actions so that Add Params to Global Mbox is before the Fire Global Mbox action (it can be before or after Load Target)
Click Save to Library and Build
Profile Parameters
Similar to mbox parameters, profile parameters are also passed through the Target request. However, profile parameters get stored in Target's visitor profile database and will persist for the duration of the visitor's profile . You can set them on one page of your site and use them in Target activities on another page.
Here is an example from an automobile website. When a visitor goes to a vehicle page, you could pass a profile parameter "profile.lastViewed=sportscar" to record their interest in that particular vehicle. When the visitor browses to other, non-vehicle pages you can target content based on their last vehicle viewed. Profile parameters are ideal for attributes that rarely change or are only available on certain pages.
This is an optional exercise for Target Premium customers.
The property token is a reserved parameter used with the Target Premium Enterprise User Permissions feature. It is used to define different digital properties so that different members of an Experience Cloud Organization can be assigned different permissions on each property. For example, you might want one group of users to be able to set up Target activities on your web site, but not in your mobile application.
Target properties are analogous to Launch properties and Analytics report suites. An enterprise with multiple brands, websites, and marketing teams might use a different Target property, Launch property and Analytics report suite for each website or mobile app. Launch properties are differentiated by their embed codes, Analytics report suites are differentiated by their report suite id, and Target properties are differentiated by their property token parameter.
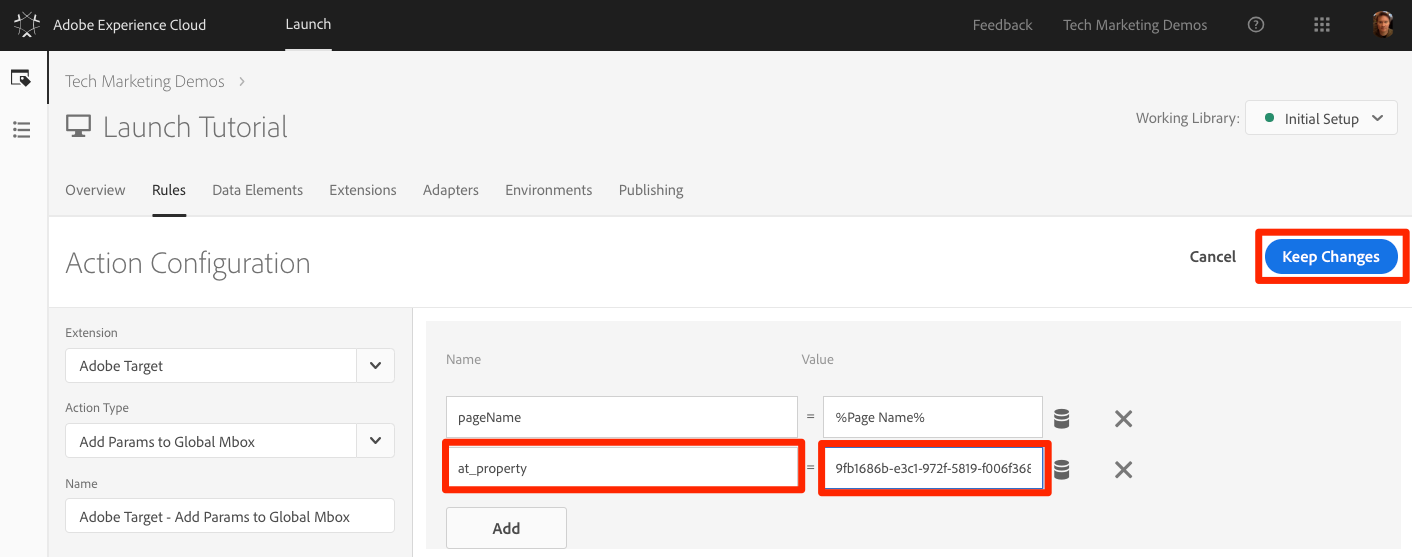
The property token is implemented just like an mbox parameter. Just name the parameter "at_property" and paste in the value provided in the Target interface. If you are implementing multiple sites with a single Launch property, you could manage the at_property value via a data element.
Here is an optional exercise, if you are a Target Premium customer and would like to implement a property token in your Tutorial property:
In a separate tab, open the Target user interface
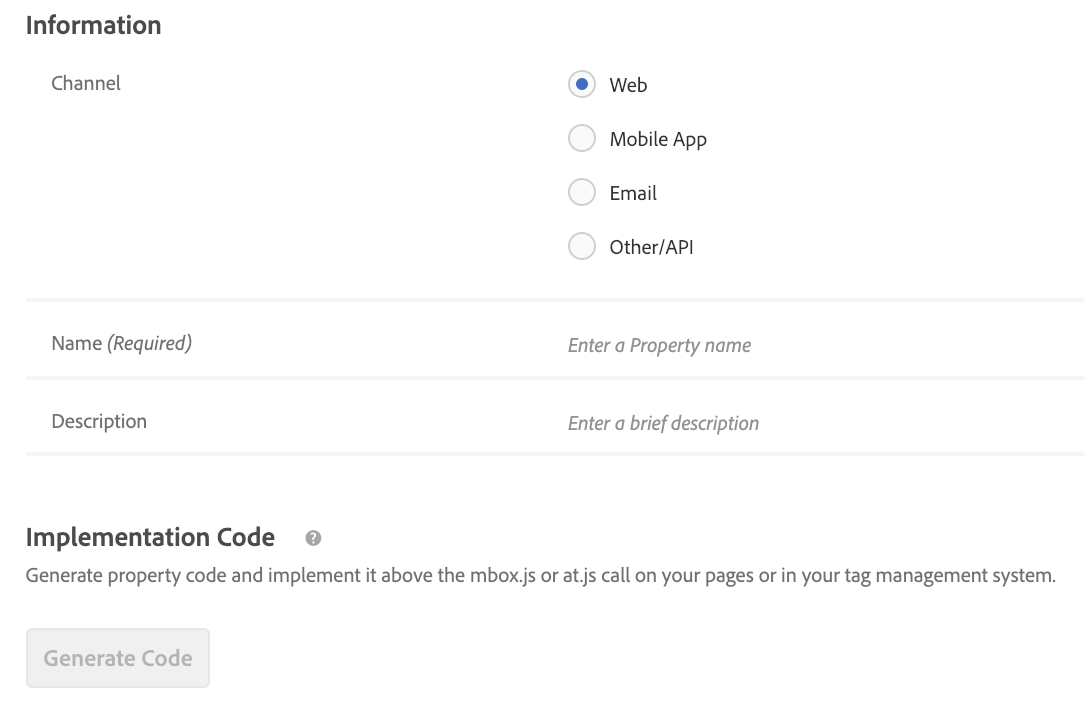
Go to Setup > Properties
Create a new property by clicking the  button
Name the property XX Target Property (substituting your lab user number for XX)
Click  and copy the at_property value to your clipboard
Save your newly created property
In your Launch tab, go to the Rules in the top navigation and then click on All Pages - Library Loaded to open the rule editor.
Under Actions, click the Adobe Target - Add Params to Global Mbox action to open the Action Configuration
Under the pageName parameter, click the Add button
Name the parameter at_property and paste in the value you copied from the Target interface
Click Keep Changes
Click Save to Library and Build
Open the We.Retail site
Make sure the Debugger is mapping the Launch property to your Development environment, as described in the earlier exercise
Open the Debugger
Go to the Target tab
Expand your client code
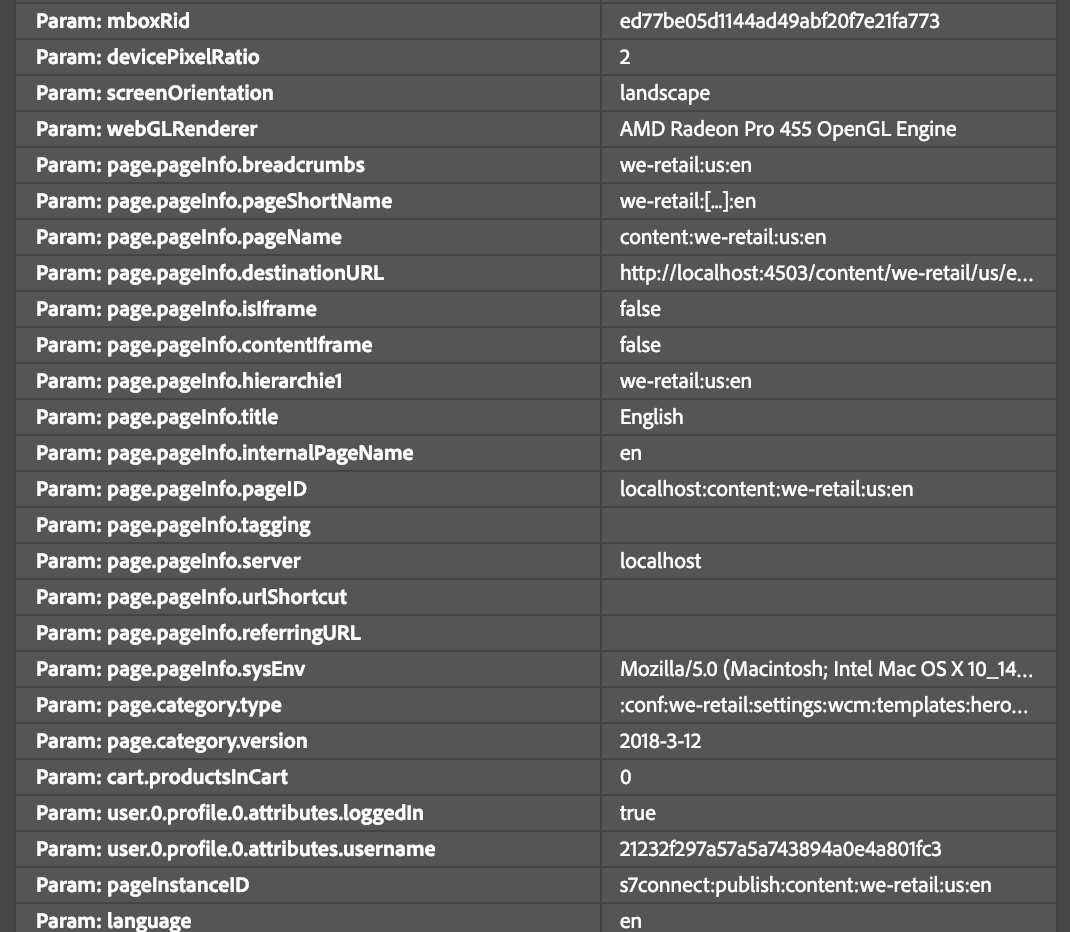
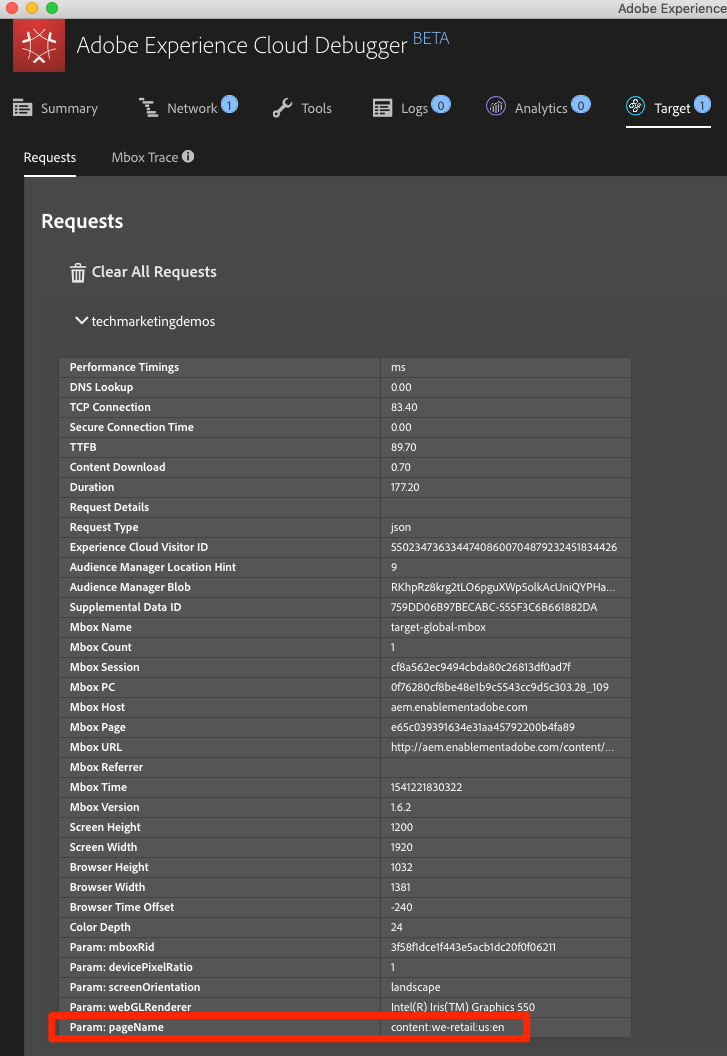
You should see the parameter for "at_property" in every global mbox request as you browse the site:
Add an Order Confirmation mbox
The order confirmation mbox is a special type of mbox used to define order submissions in Target. The inclusion of three specific mbox parameters—orderId, orderTotal, and productPurchasedId—is what turns an mbox into an order mbox. In addition to reporting revenue, the order mbox also does the following:
The best practice is to use and order confirmation mbox in all order funnels, even on non-retail sites. For example, lead generation sites usually have lead funnels with a unique "lead id" generated at the end. These sites should implement an order mbox, using a static value (e.g. "1") for the orderTotal.
Customers using the Analytics for Target (A4T) integration for most of their reporting should also implement the order mbox, since A4T is not yet compatible with activity types like Auto Allocate, Automated Personalization and Auto Target. Additionally, the order mbox is a critical element in Recommendations implementations, powering algorithms based on purchase behavior.
The order confirmation mbox should fire from a rule that is only triggered on your order confirmation page or event. Often, it can be combined with a rule setting the Adobe Analytics purchase event. It must be configured using the Custom Code action of the Core extension, using the appropriate data elements to set the orderId, orderTotal, and productPurchasedId parameters.
Let's add the data elements and rule we need to fire an order confirmation mbox on the We.Retail site. Since you have already created several data elements, these instructions will be abbreviated.
Click Data Elements in the top navigation
Click Add Data Element
Name the data element Order Id
Select Data Element Type > JavaScript Variable
Use digitalData.cart.orderId as the Path to Variable
Check the Clean text option
Click Save to Library and Build
Click Add Data Element
Name the data element Cart Amount
Select Data Element Type > JavaScript Variable
Use digitalData.cart.cartAmount as the Path to Variable
Check the Clean text option
Click Save to Library and Build
Click Add Data Element
Name the data element Cart SKUs (Target)
Select Data Element Type > Custom Code
For Target, the skus must be a comma separated list. This custom code will reformat the data layer array into the proper format. In the custom code editor, paste the following:
Check the Force lowercase value option
Check the Clean text option
Click Save to Library and Build
Now we need to create a rule to fire the global mbox with the order parameters on the order confirmation page.
Click Rules in the top navigation
Click Add Rule
Name the rule Order Confirmation Page - Library Loaded - 60
Click Events > Add
Select Event Type > Library Loaded (Page Top)
Change the Order to 60 so that it will fire after the Load Target action (which is in our All Pages - Library Loaded rule where Order is set to 50)
Click Keep Changes
Click Conditions > Add
Select Condition Type > Path Without Query String
For Path equals enter thank-you.html
Toggle the Regex option to enable it, effectively treating this as a contains
Click Keep Changes
Click Actions > Add
Select Action Type > Custom Code
Click Open Editor
Paste the following code into the Edit Code modal
adobe.target.getOffer({
  "mbox": "orderConfirmPage",
  "params":{
    "orderId": _satellite.getVar('Order Id'),
    "orderTotal": _satellite.getVar('Cart Amount'),
    "productPurchasedId": _satellite.getVar('Cart SKUs (Target)')
  },
  "success": function(offer) {
    adobe.target.applyOffer({
      "mbox": "orderConfirmPage",
      "offer": offer
    });
  },
  "error": function(status, error) {
    console.log('Error', status, error);
  }
});
Click Save to save the custom code
Click Keep Changes to keep the action
Click Save to Library and Build
Open the We.Retail site
Make sure the Debugger is mapping the Launch property to your Development environment, as described in the earlier exercise
Browse the site and add several products to your cart
Continue to checkout
During the checkout process the only required fields are First Name and Last Name
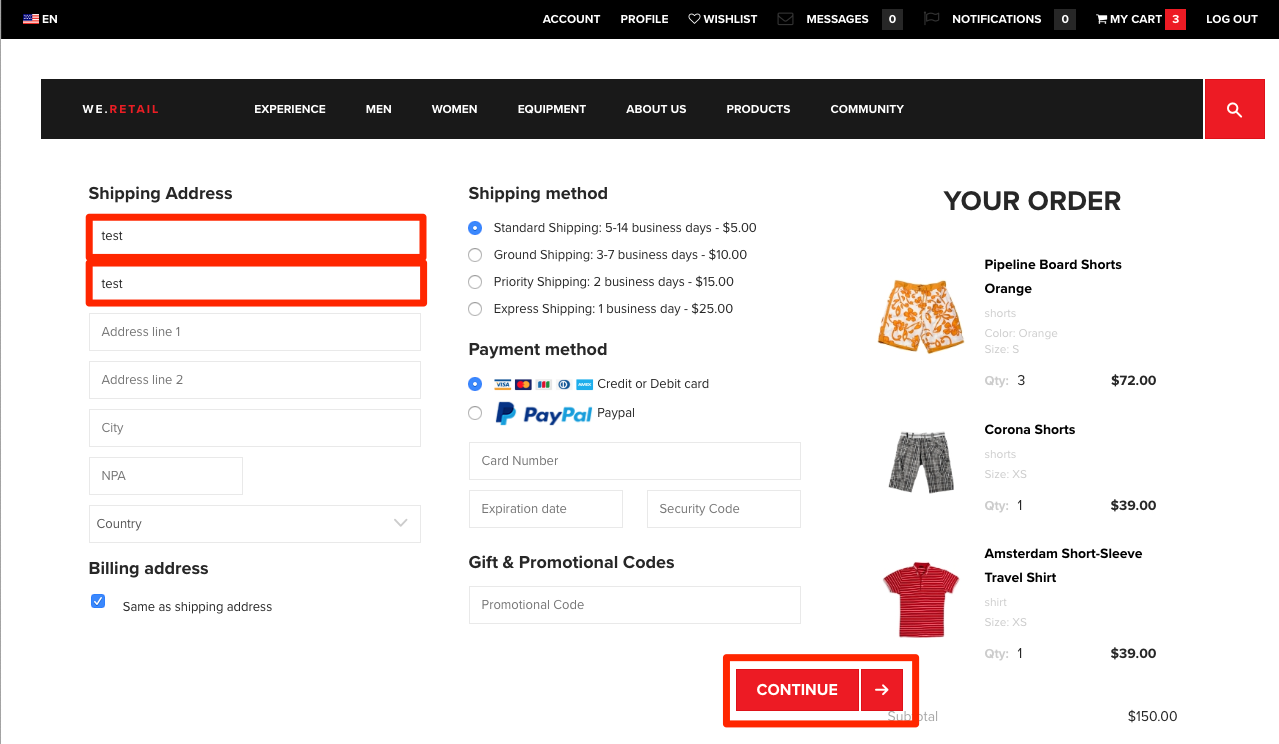
On the Review Order page, be sure to click the Place Order button
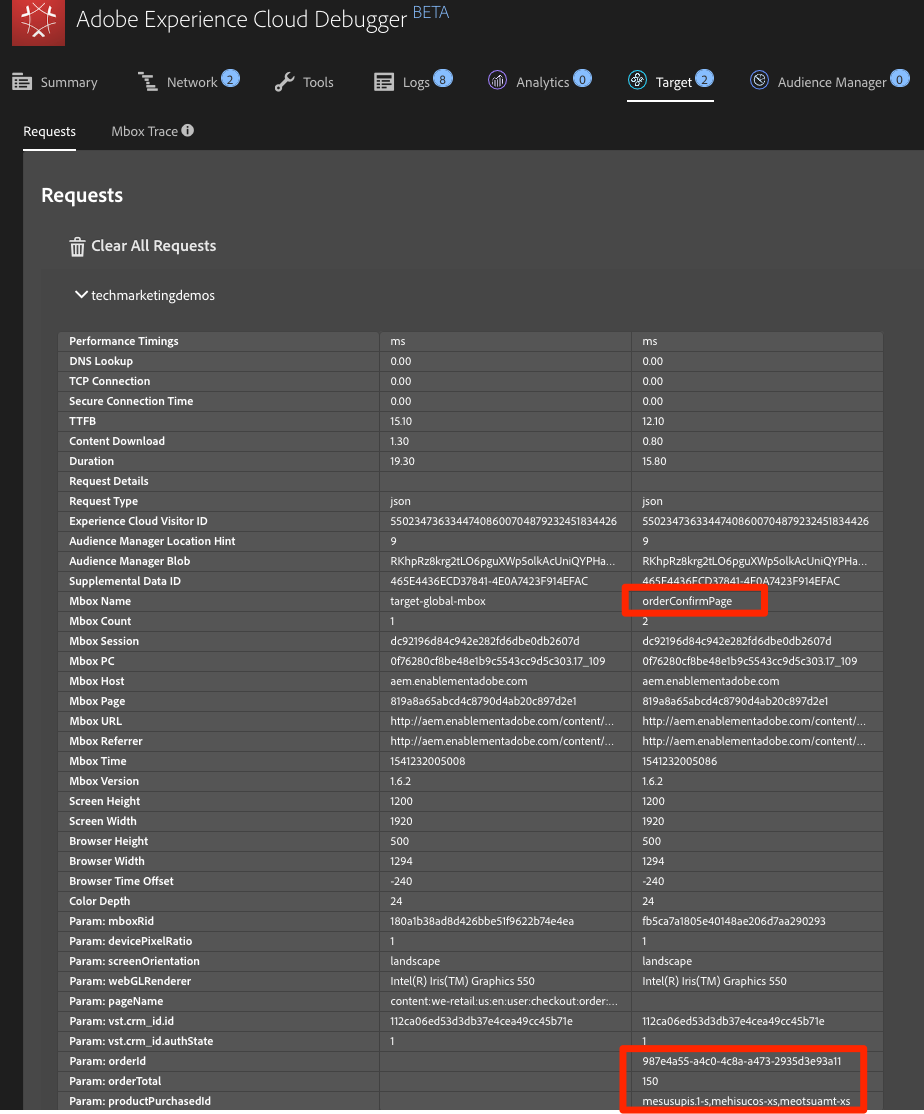
Look in the Debugger
Go to the Target tab
Expand your client code
You should see the orderConfirmPage request as the latest Target request with the orderId, orderTotal, and productPurchasedId parameters populated with the details of your order
There rare instances when you need to make Target requests other than the global and order confirmation mbox. For example, sometimes important data you would like to use for personalization is not defined on the page before the Launch embed codes—it might be hardcoded on the bottom of the page or get returned from an asynchronous API request. This data can still be sent to Target using an additional request, although it will not be optimal to use this request for content delivery since the page will already visible. It can be used to enrich the visitor profile for later use (using profile parameters) or to populate the Recommendations catalog.
In these circumstances, use the Custom Code action in the Core extension to fire an mbox using the getOffer() /applyOffer() and trackEvent()methods. This is very similar to what you just did in the Order Confirmation mbox exercise, but you will just use a different mbox name and will not use the special order parameters. Be sure to use the Load Target action before making mbox calls from custom code.
The Edit at.js screen in the Target user interface has locations in which you can paste custom JavaScript that will execute immediately before or after the at.js file.
The Library Header is sometimes used to override at.js settings via the targetGlobalSettings() function or pass data from third parties using the Data Providers feature
The Library Footer is sometimes used to add at.js library extensions or at.js custom event listeners.
To replicate this capability in Launch, just use the Custom Code action in the Core extension and sequence the action before (Library Header) or after (Library Footer) the Load Target action. This can be done in the same rule as the Load Target action (as pictured below) or in separate rules with events or order settings that will reliably fire before or after the rule containing Load Target:

To learn more about use cases for custom headers and footers see the following resources:
Use dataProviders to integrate third-party data into Adobe Target
Implement dataProviders to integrate third-party data into Adobe Target
Use Response Tokens and at.js Custom Events with Adobe Target
Now that you have implemented some key solutions of the Adobe Experience Cloud in your Development environment, it's time to learn the publishing workflow.
At the end of this exercise, you will be able to:
Now that you have created and validated your library in the Development environment, it is time to publish it to Staging.
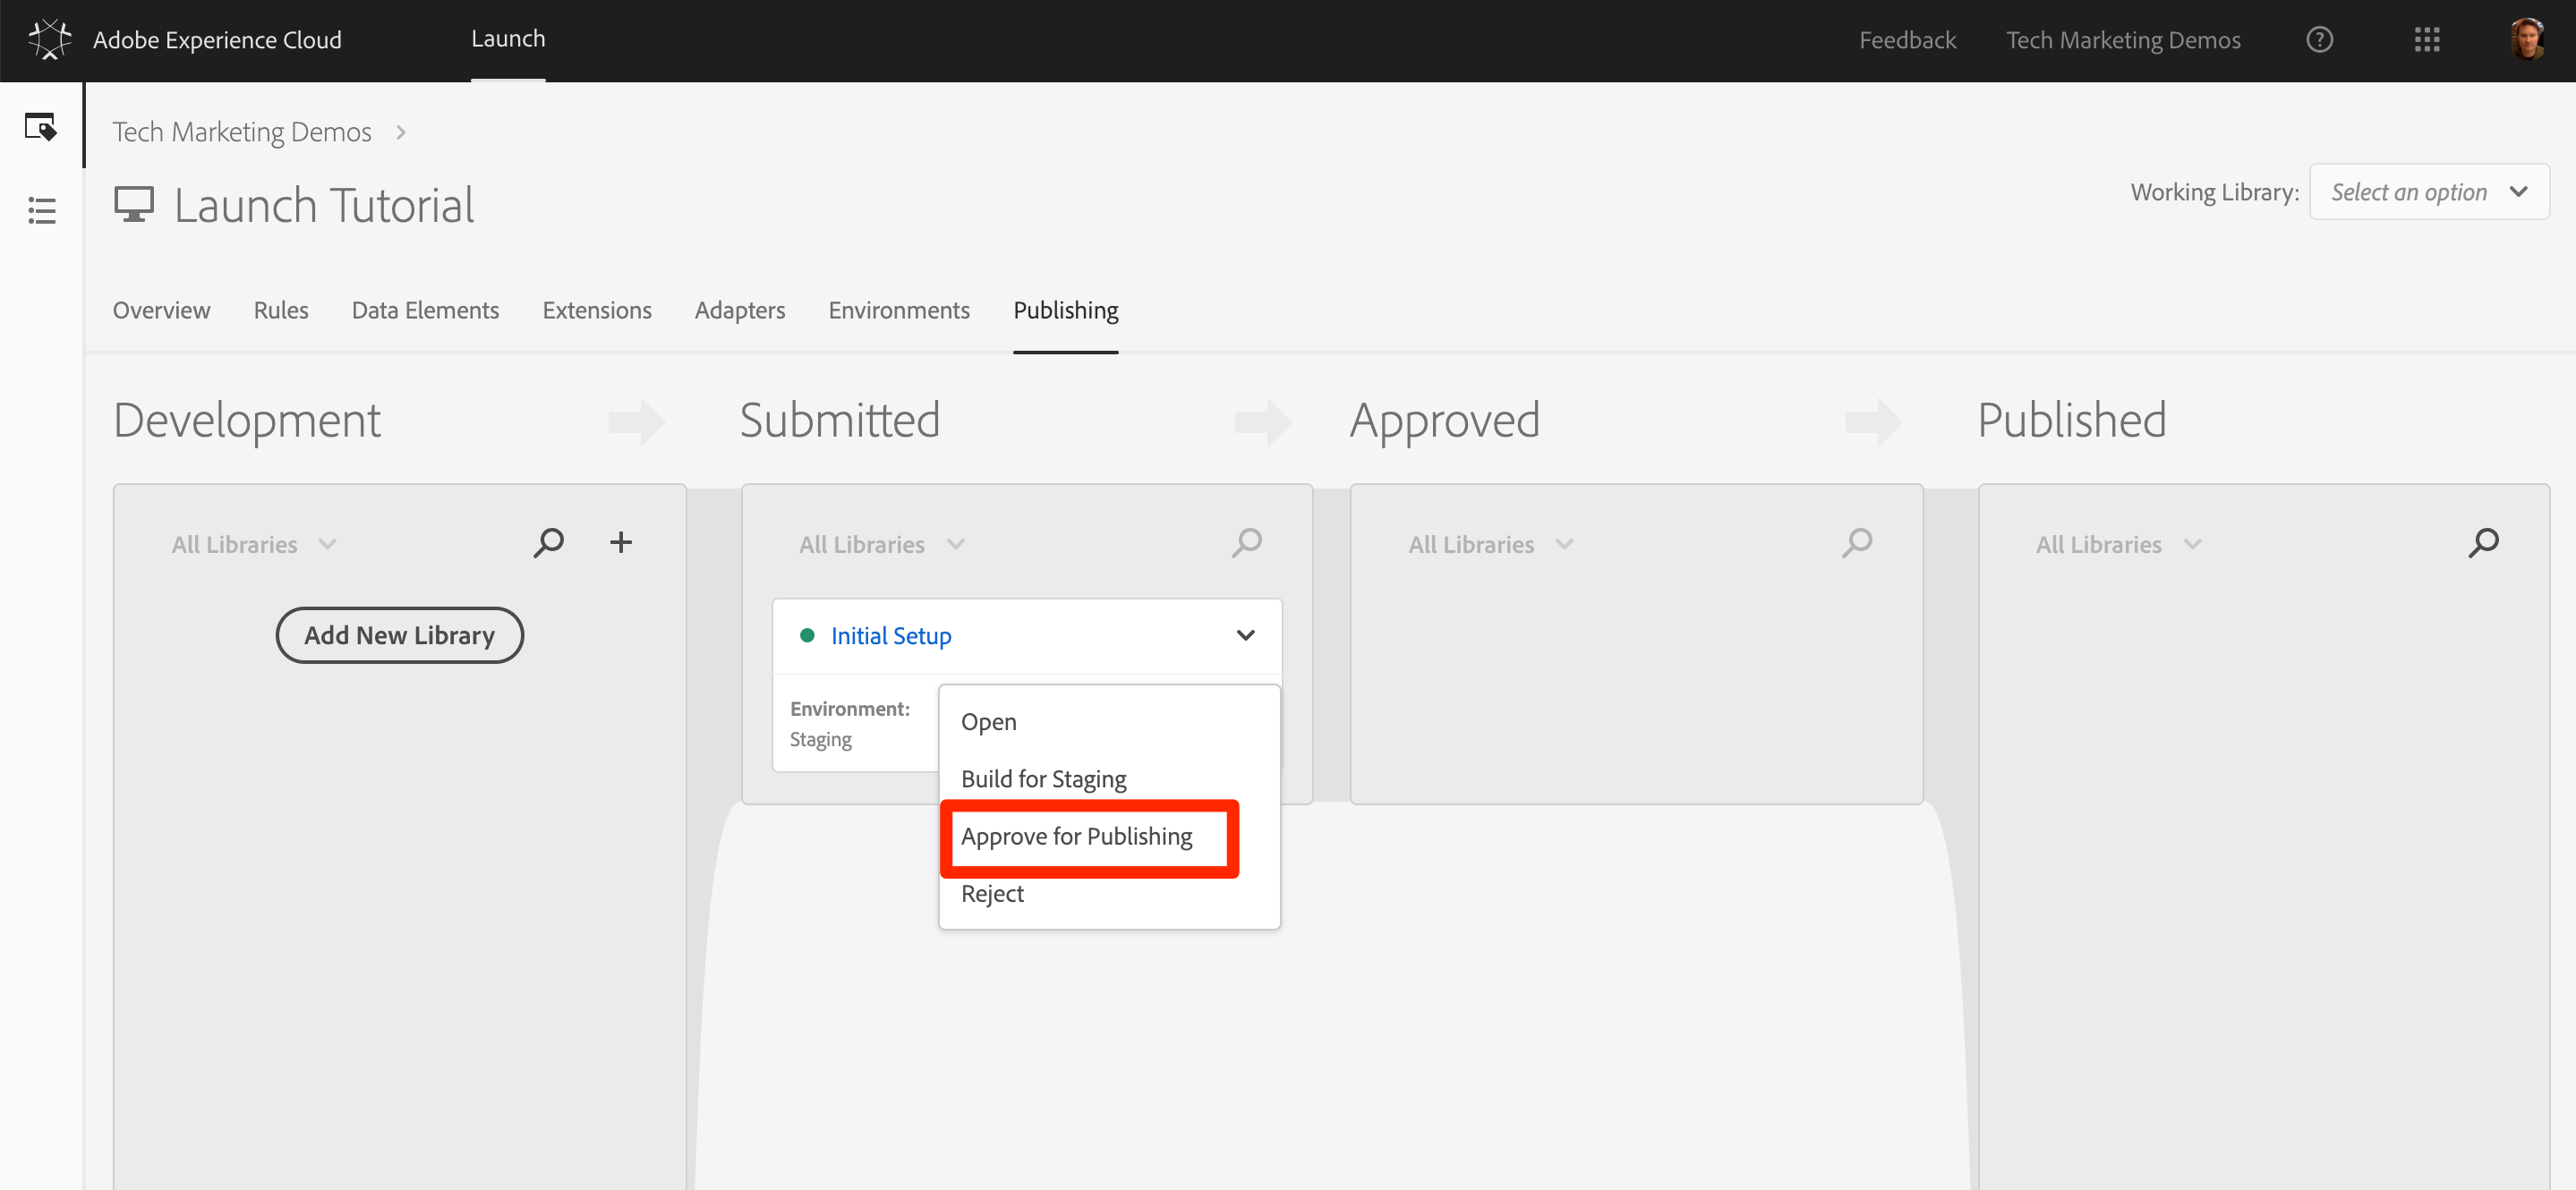
Go to the Publishing page
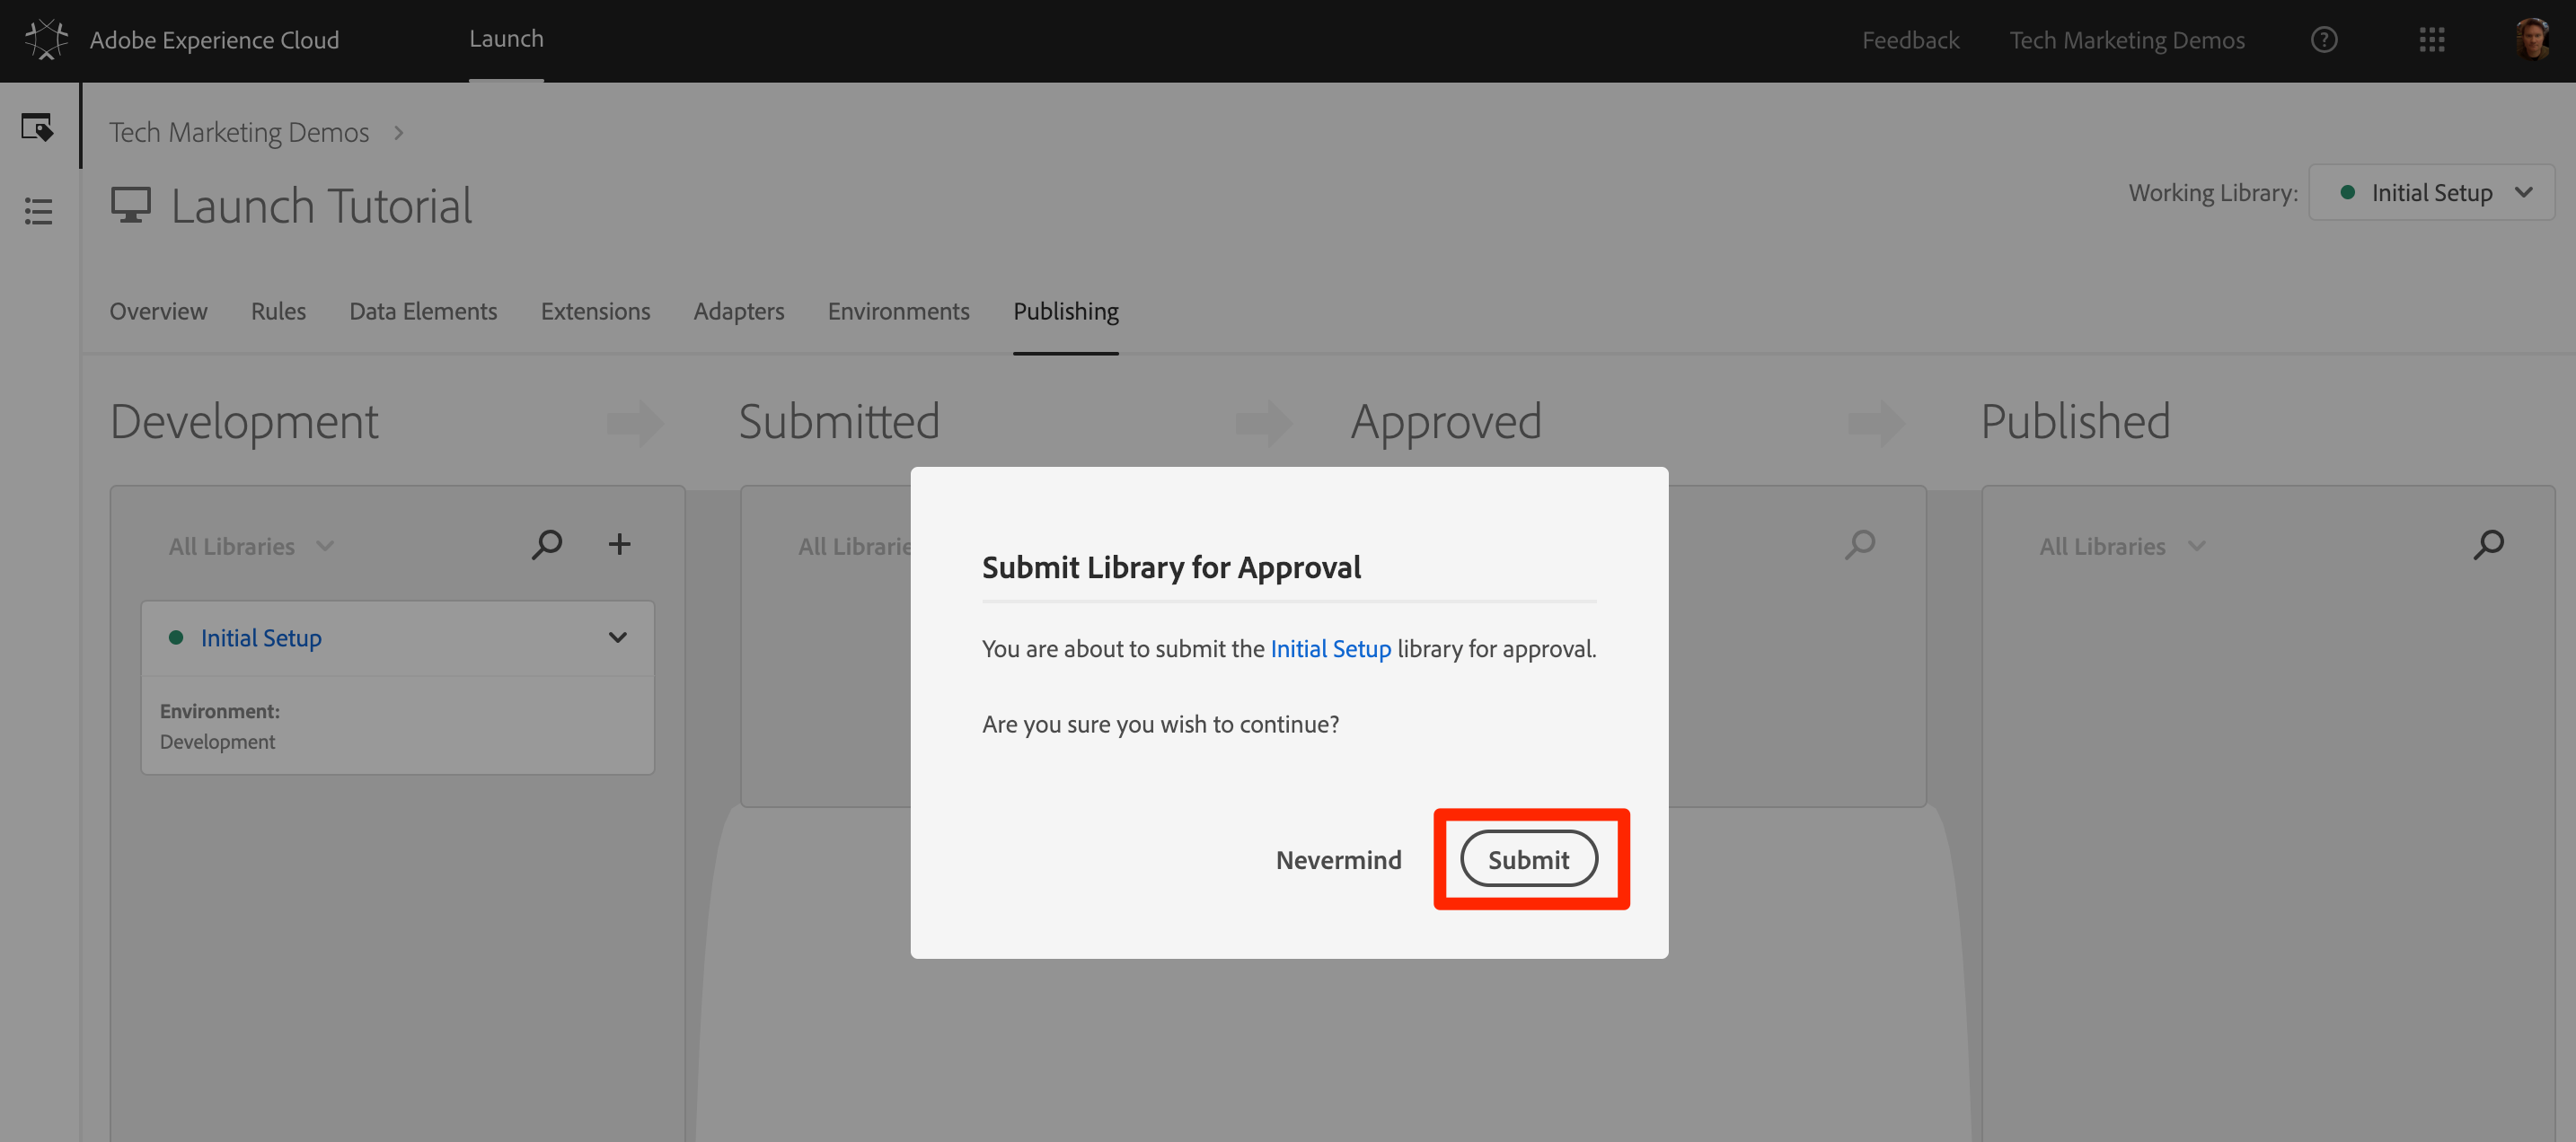
Open the dropdown next to your library and select Submit for Approval

Click the Submit button in the dialog:
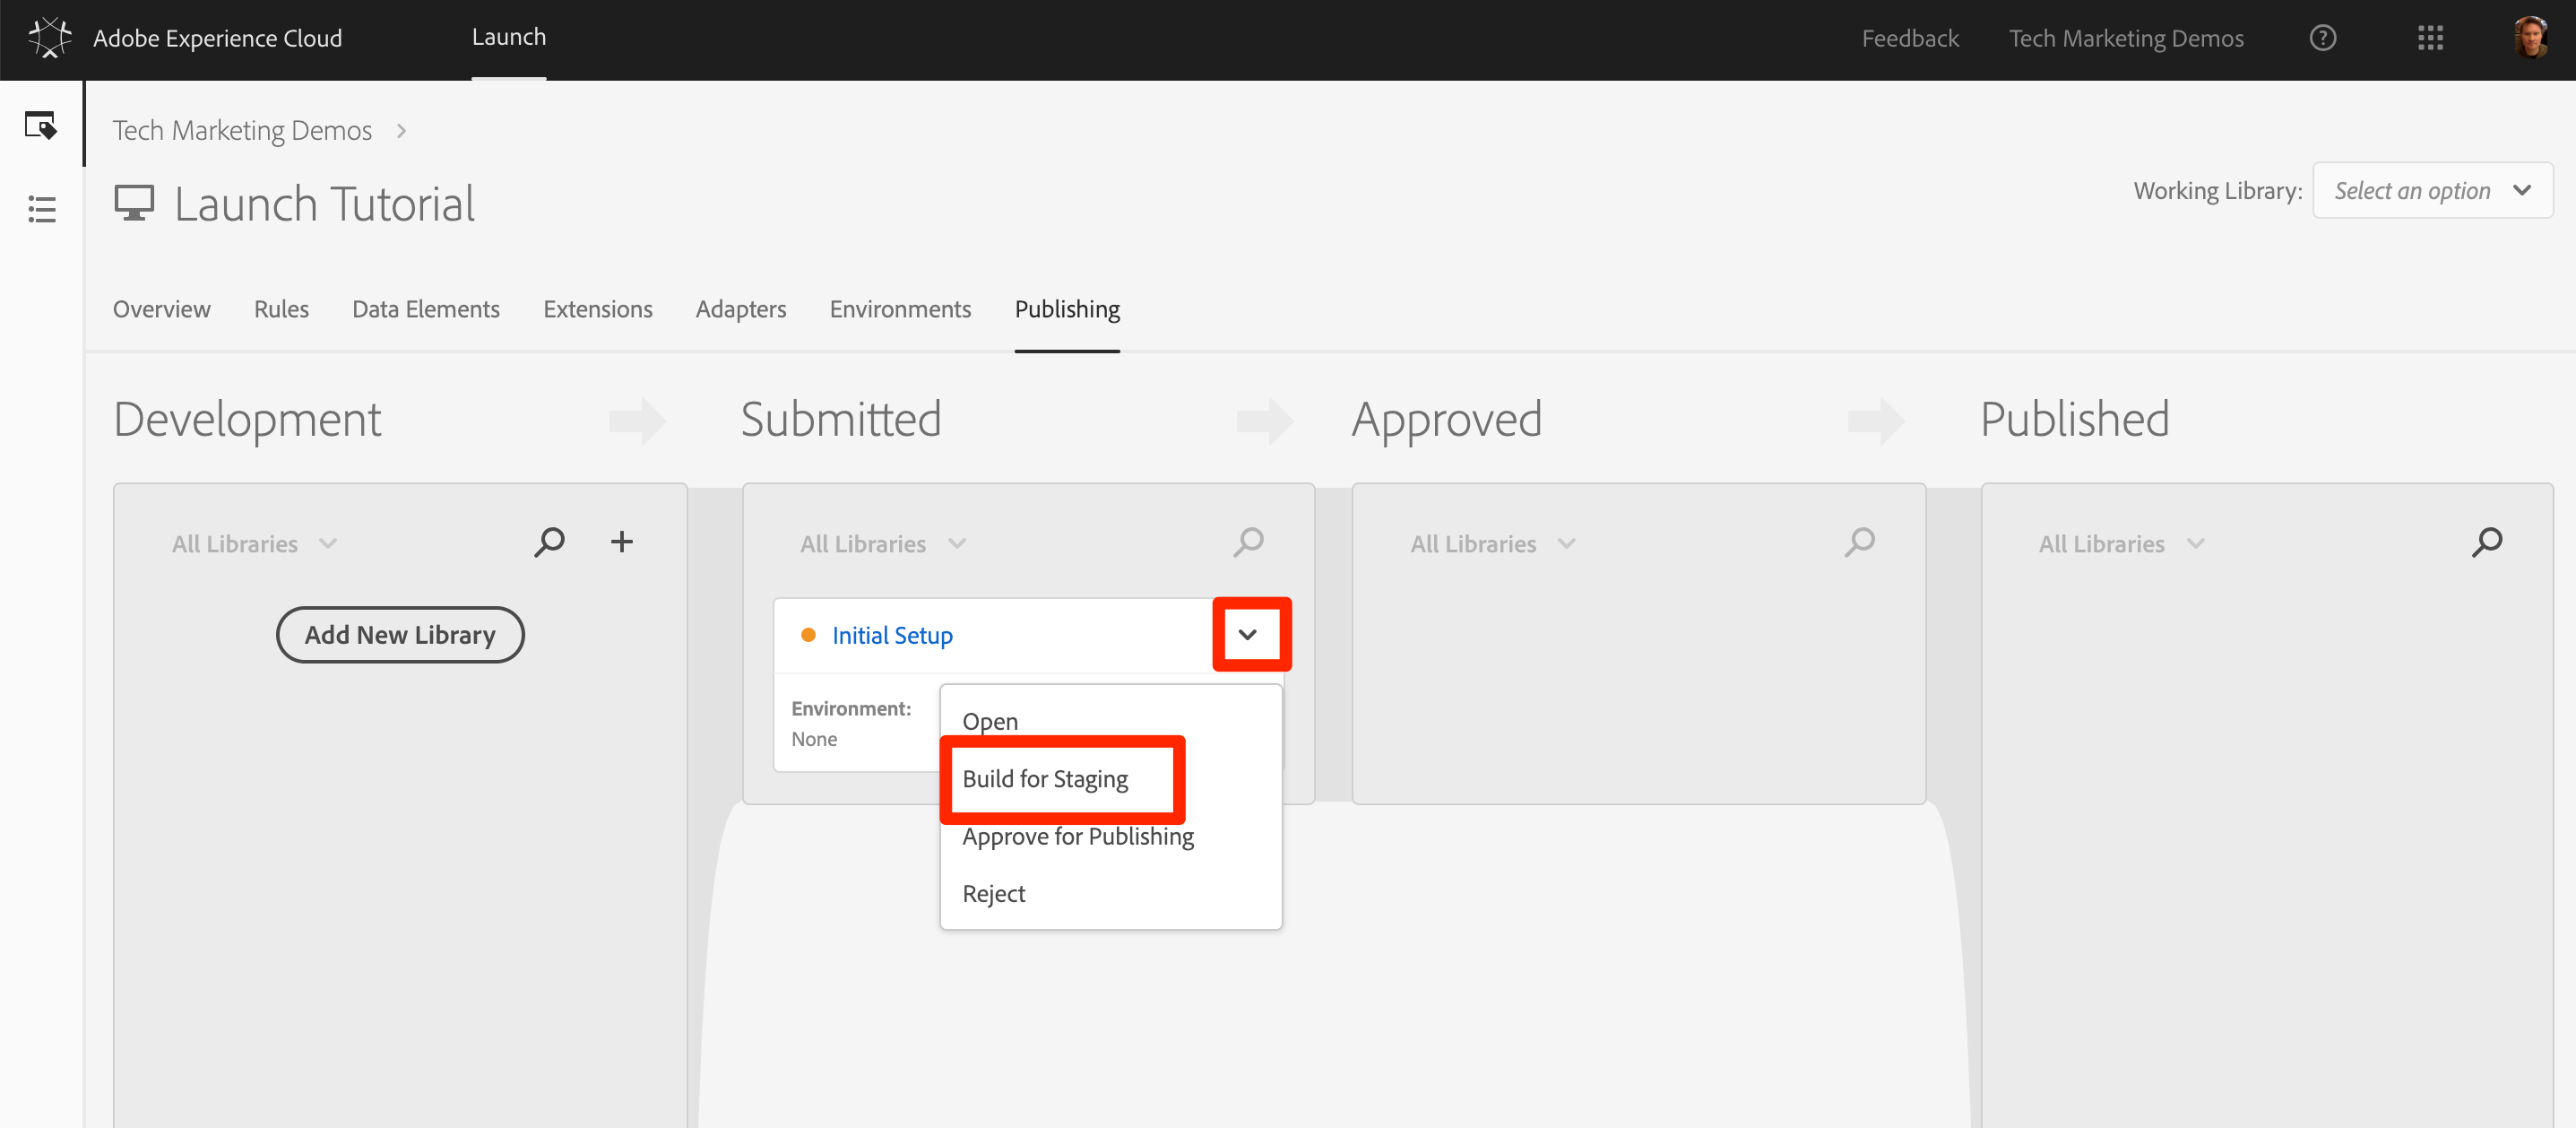
Your library will now appear in the Submitted column in an unbuilt state:
Open the dropdown and select Build for Staging:
Once the green-dot icon appears, the library can be previewed in the Staging environment.
In a real-life scenario, the next step in the process would typically be to have your QA team validate the changes in the Staging library. They can do this using the Debugger.
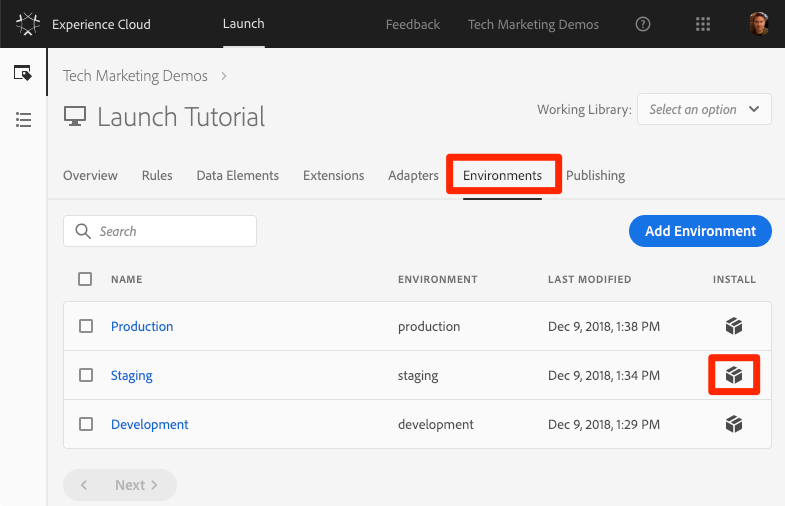
In your Launch property, open the Environments page
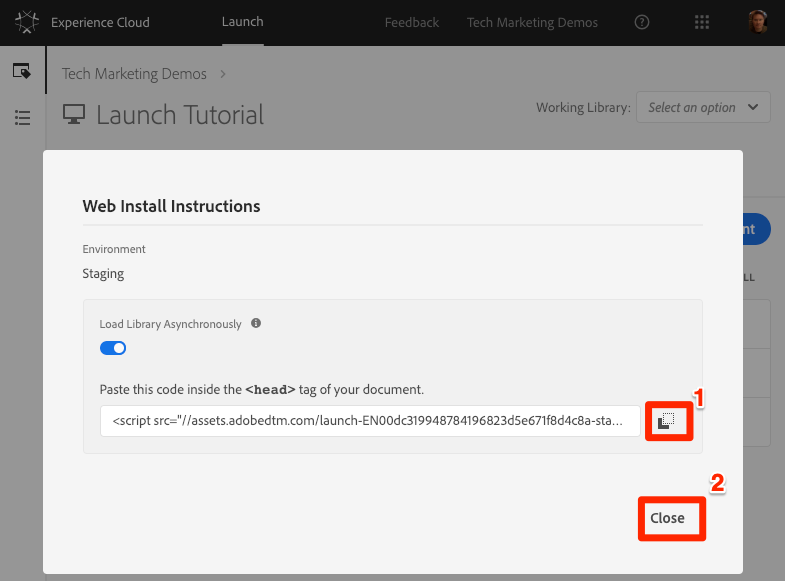
In the Staging row, click the Install icon to open the modal
Click the Copy icon to copy the embed code to your clipboard
Click Close to close the modal
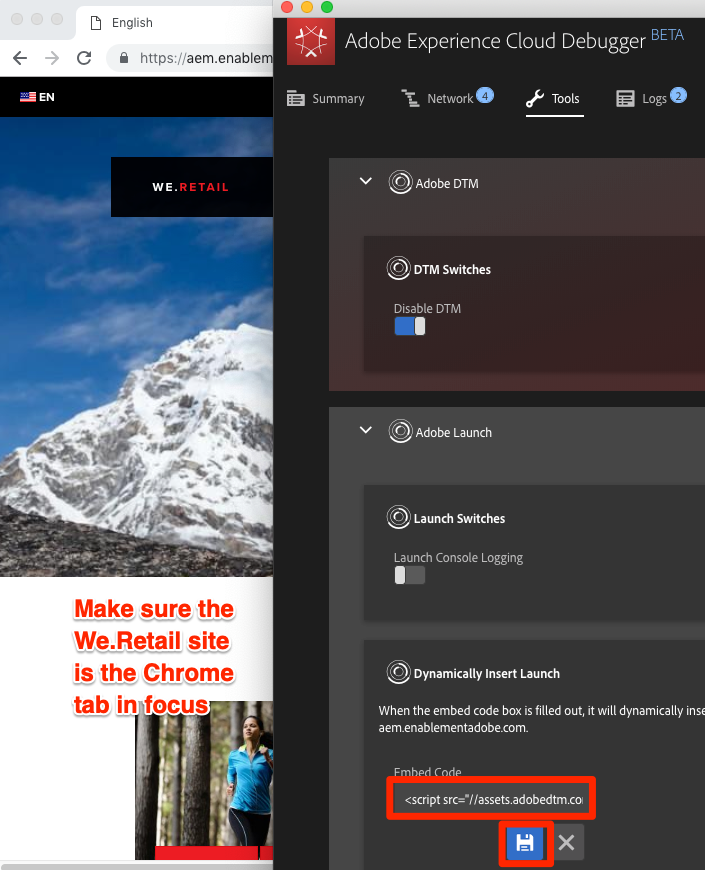
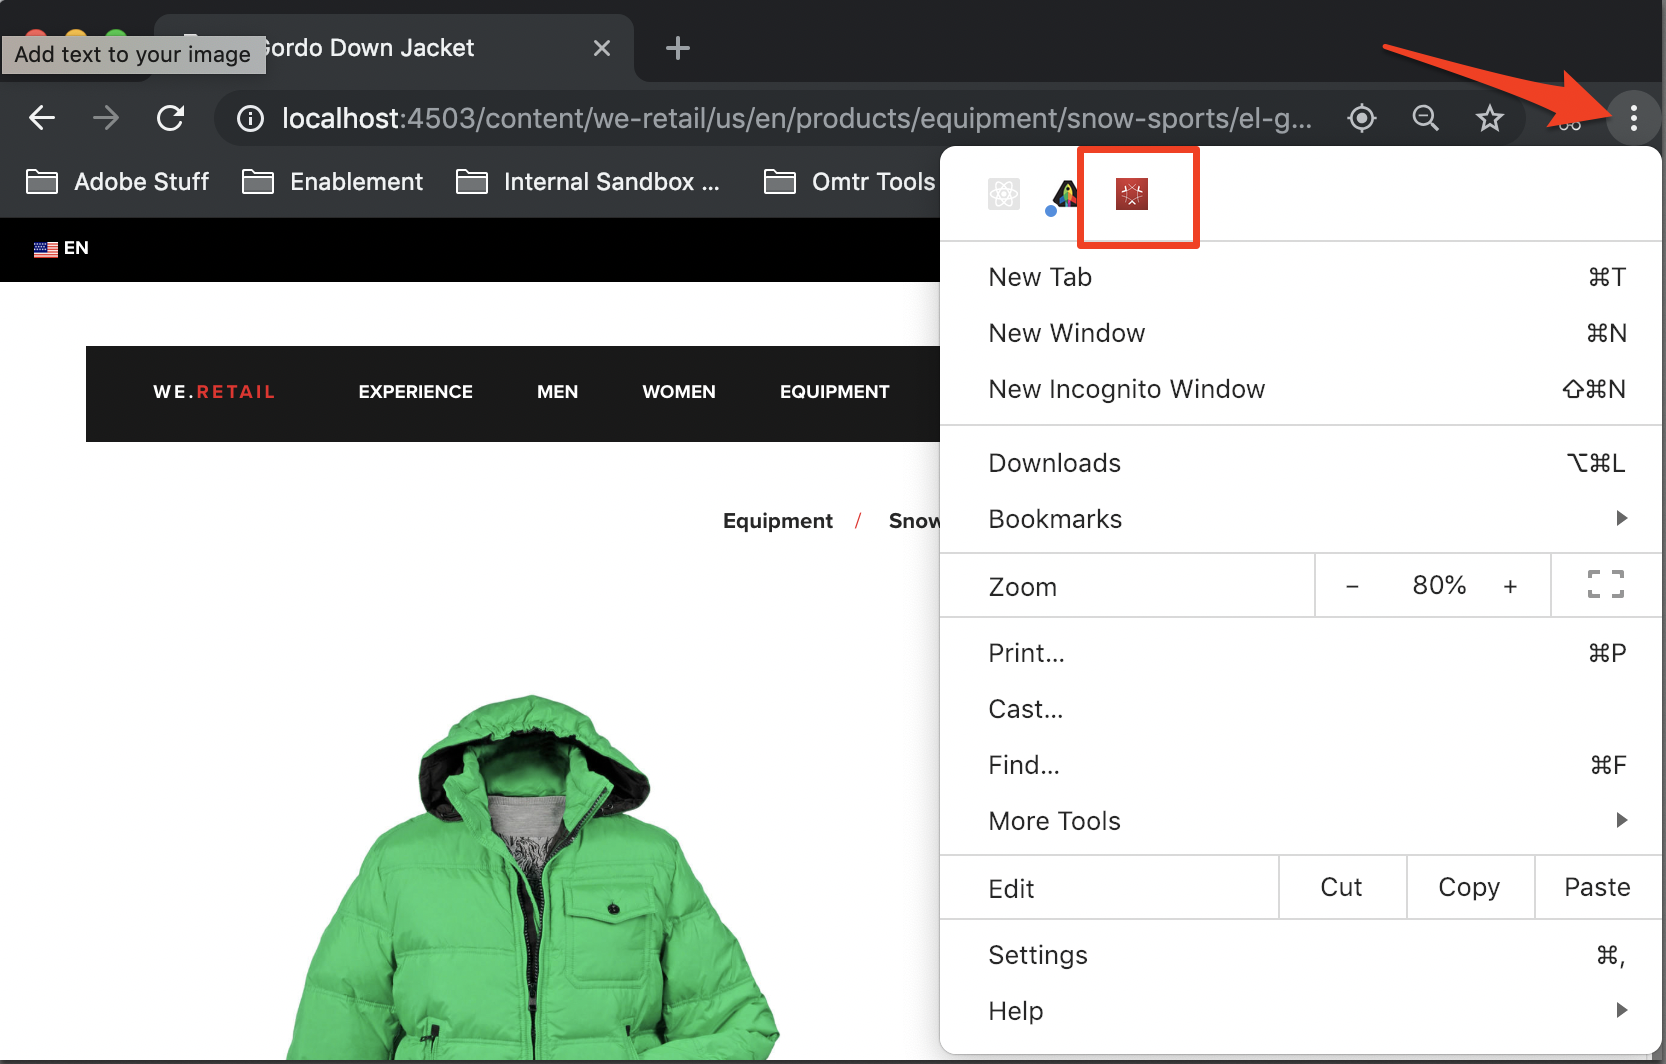
Open the We.Retail demo site in your Chrome browser
Open the Experience Cloud Debugger extension by clicking the  icon
icon
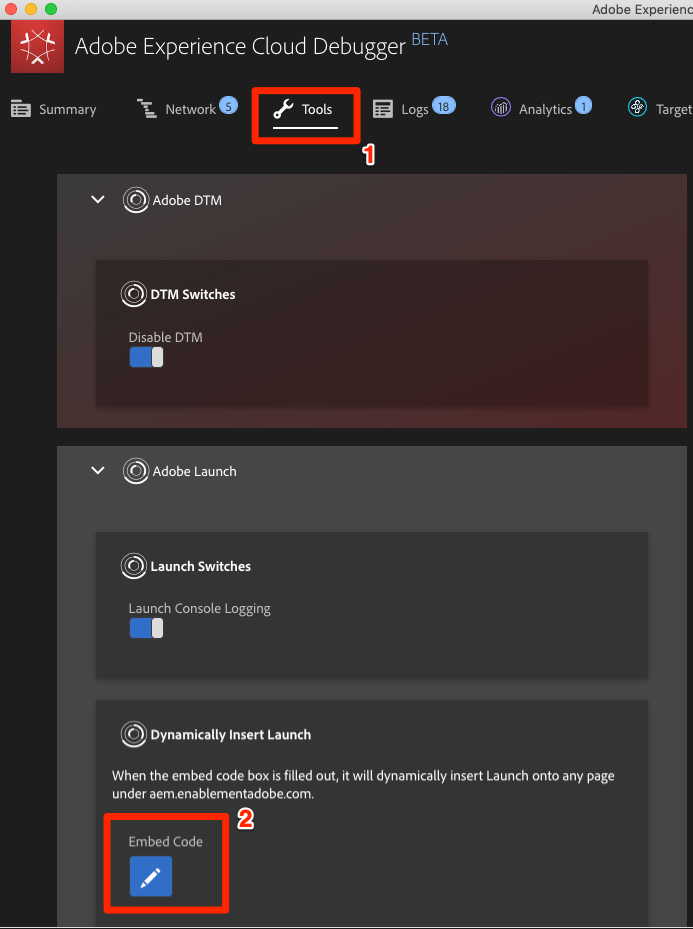
Go to the Tools Tab
Click Adobe Launch > Dynamically Insert Launch > Embed Code button to open the text input field (it might currently have the URL of your Development embed code):
Paste the Staging embed code that is in your clipboard
Click the disk icon to save
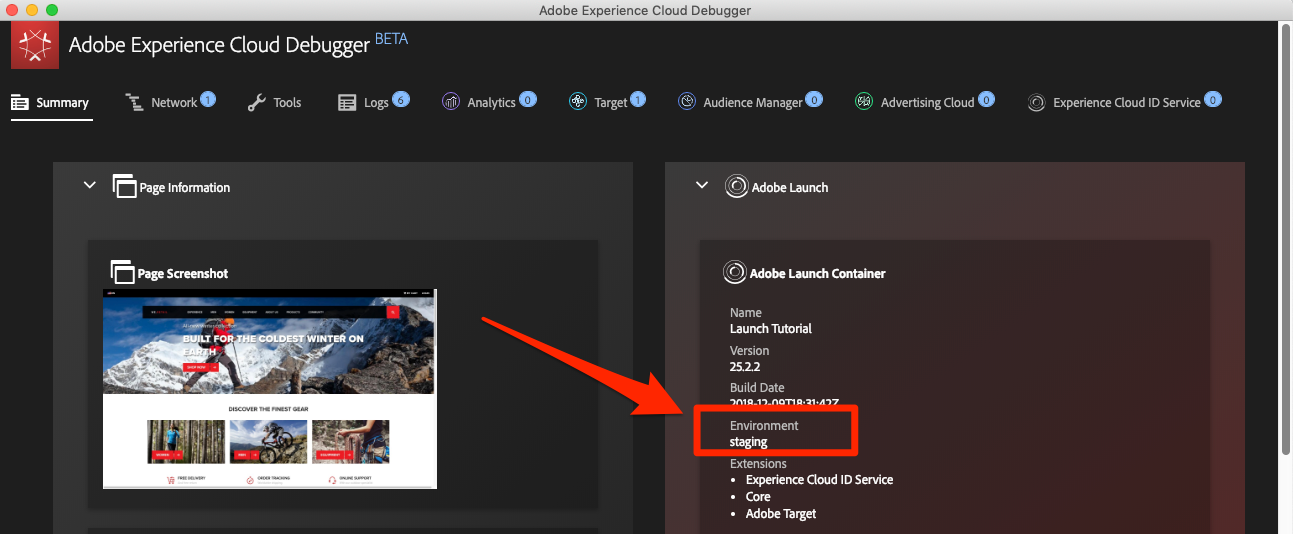
Reload and check the Summary tab of the Debugger. Under the Launch section, you should now see your Staging Property is implemented, showing your property name (I.e. "Launch Tutorial" or whatever you named your property)!
In real-life, once your QA team has signed off by reviewing the changes in the Staging environment it is time to publish to production.
Go to the Publishing page
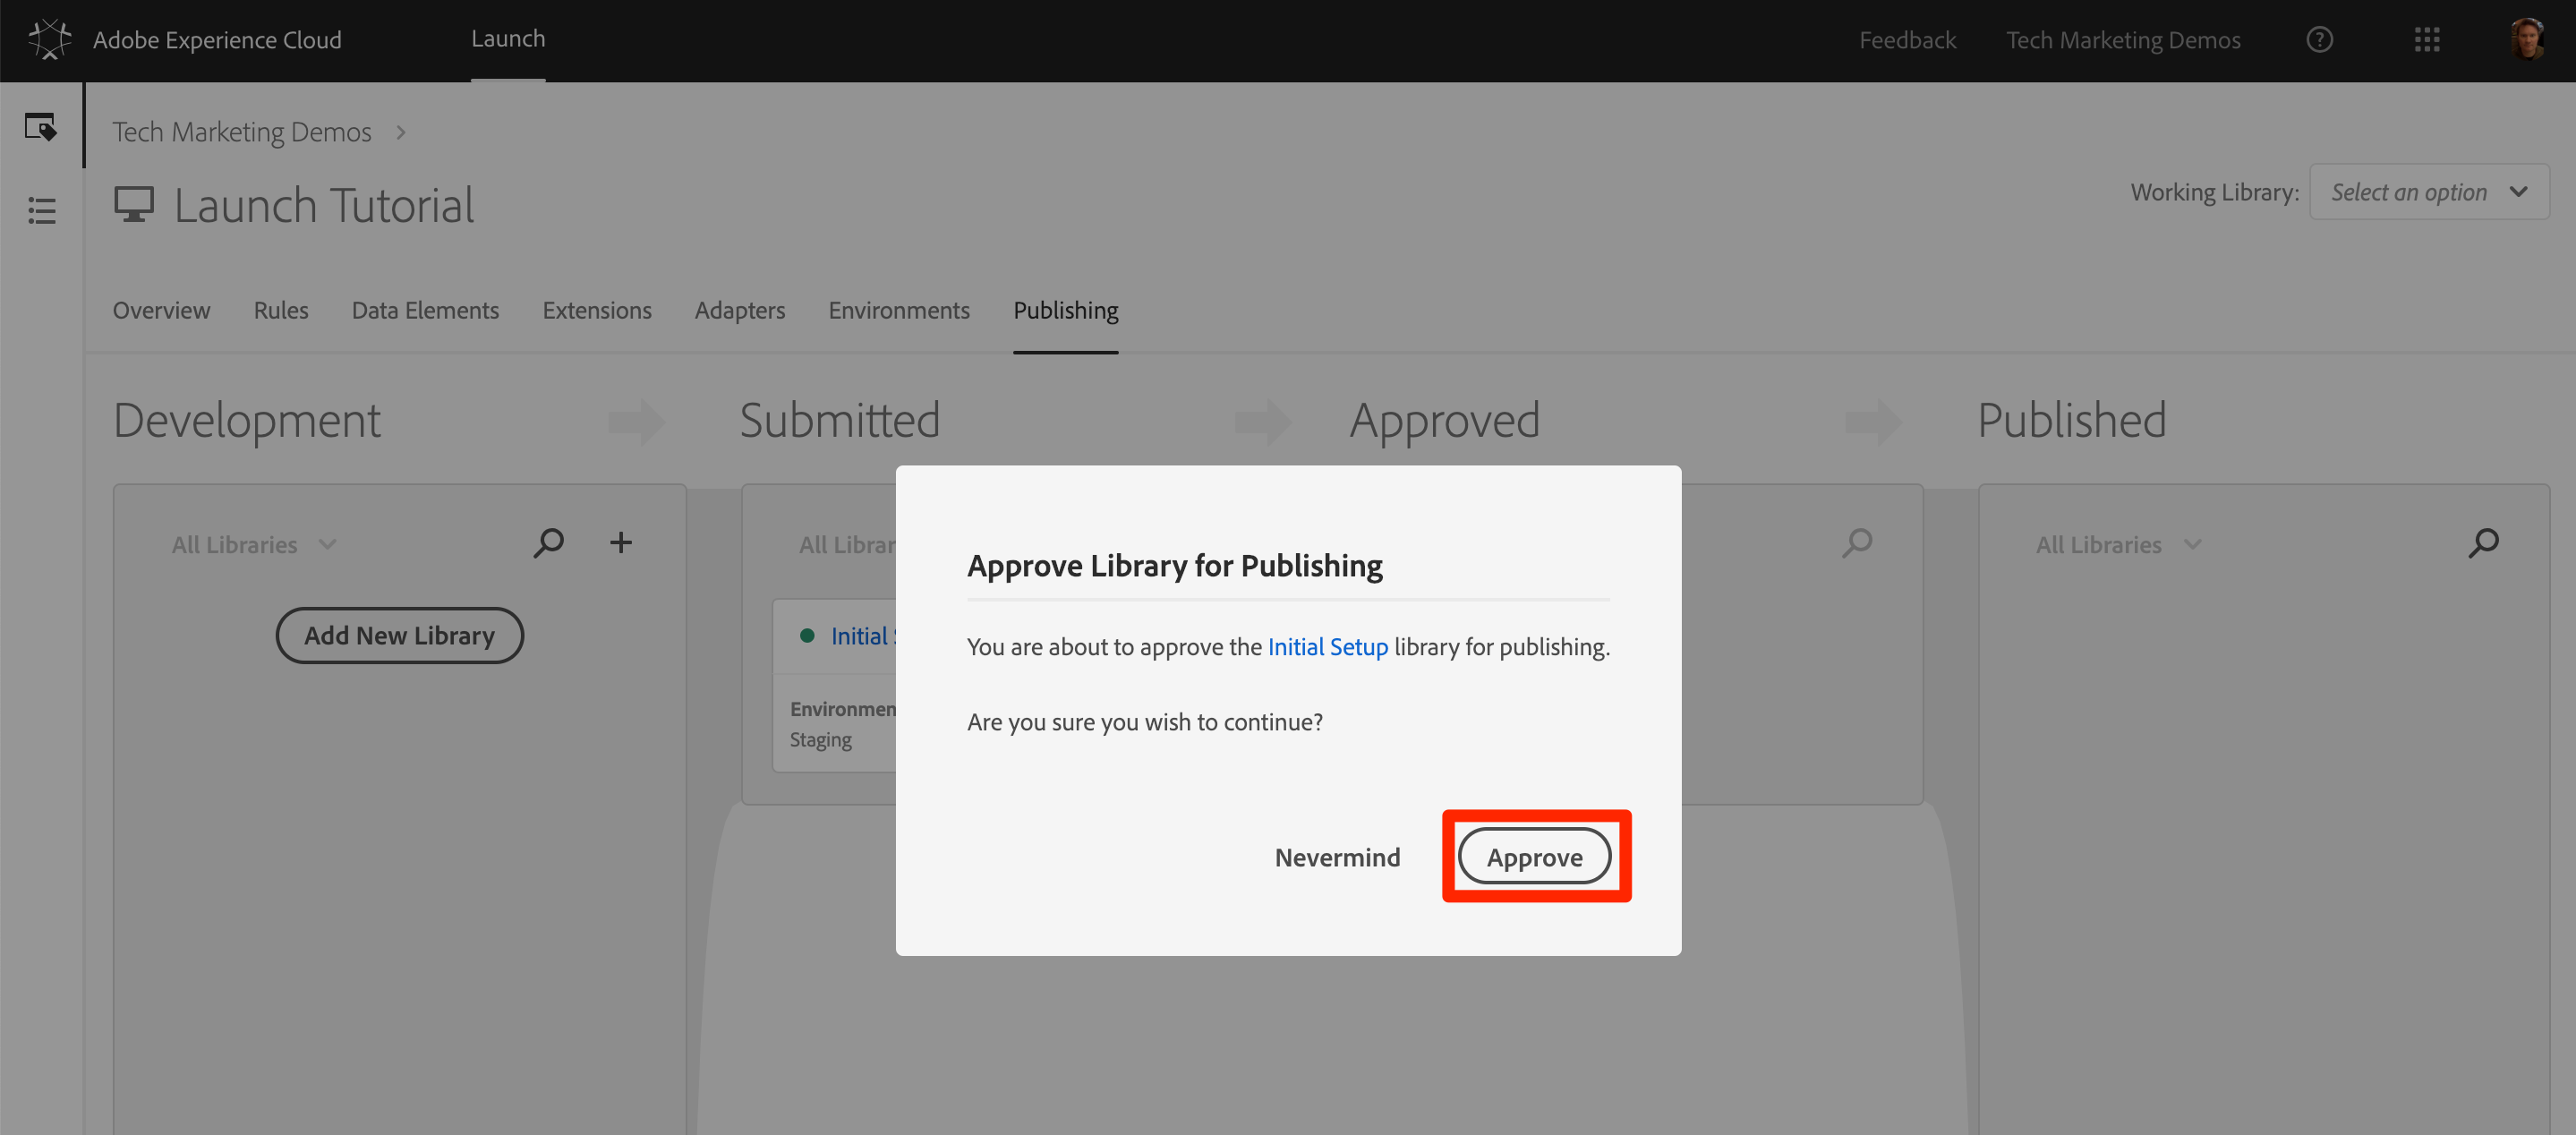
From the dropdown, click Approve for Publishing:
Click the Approve button in the dialog box:
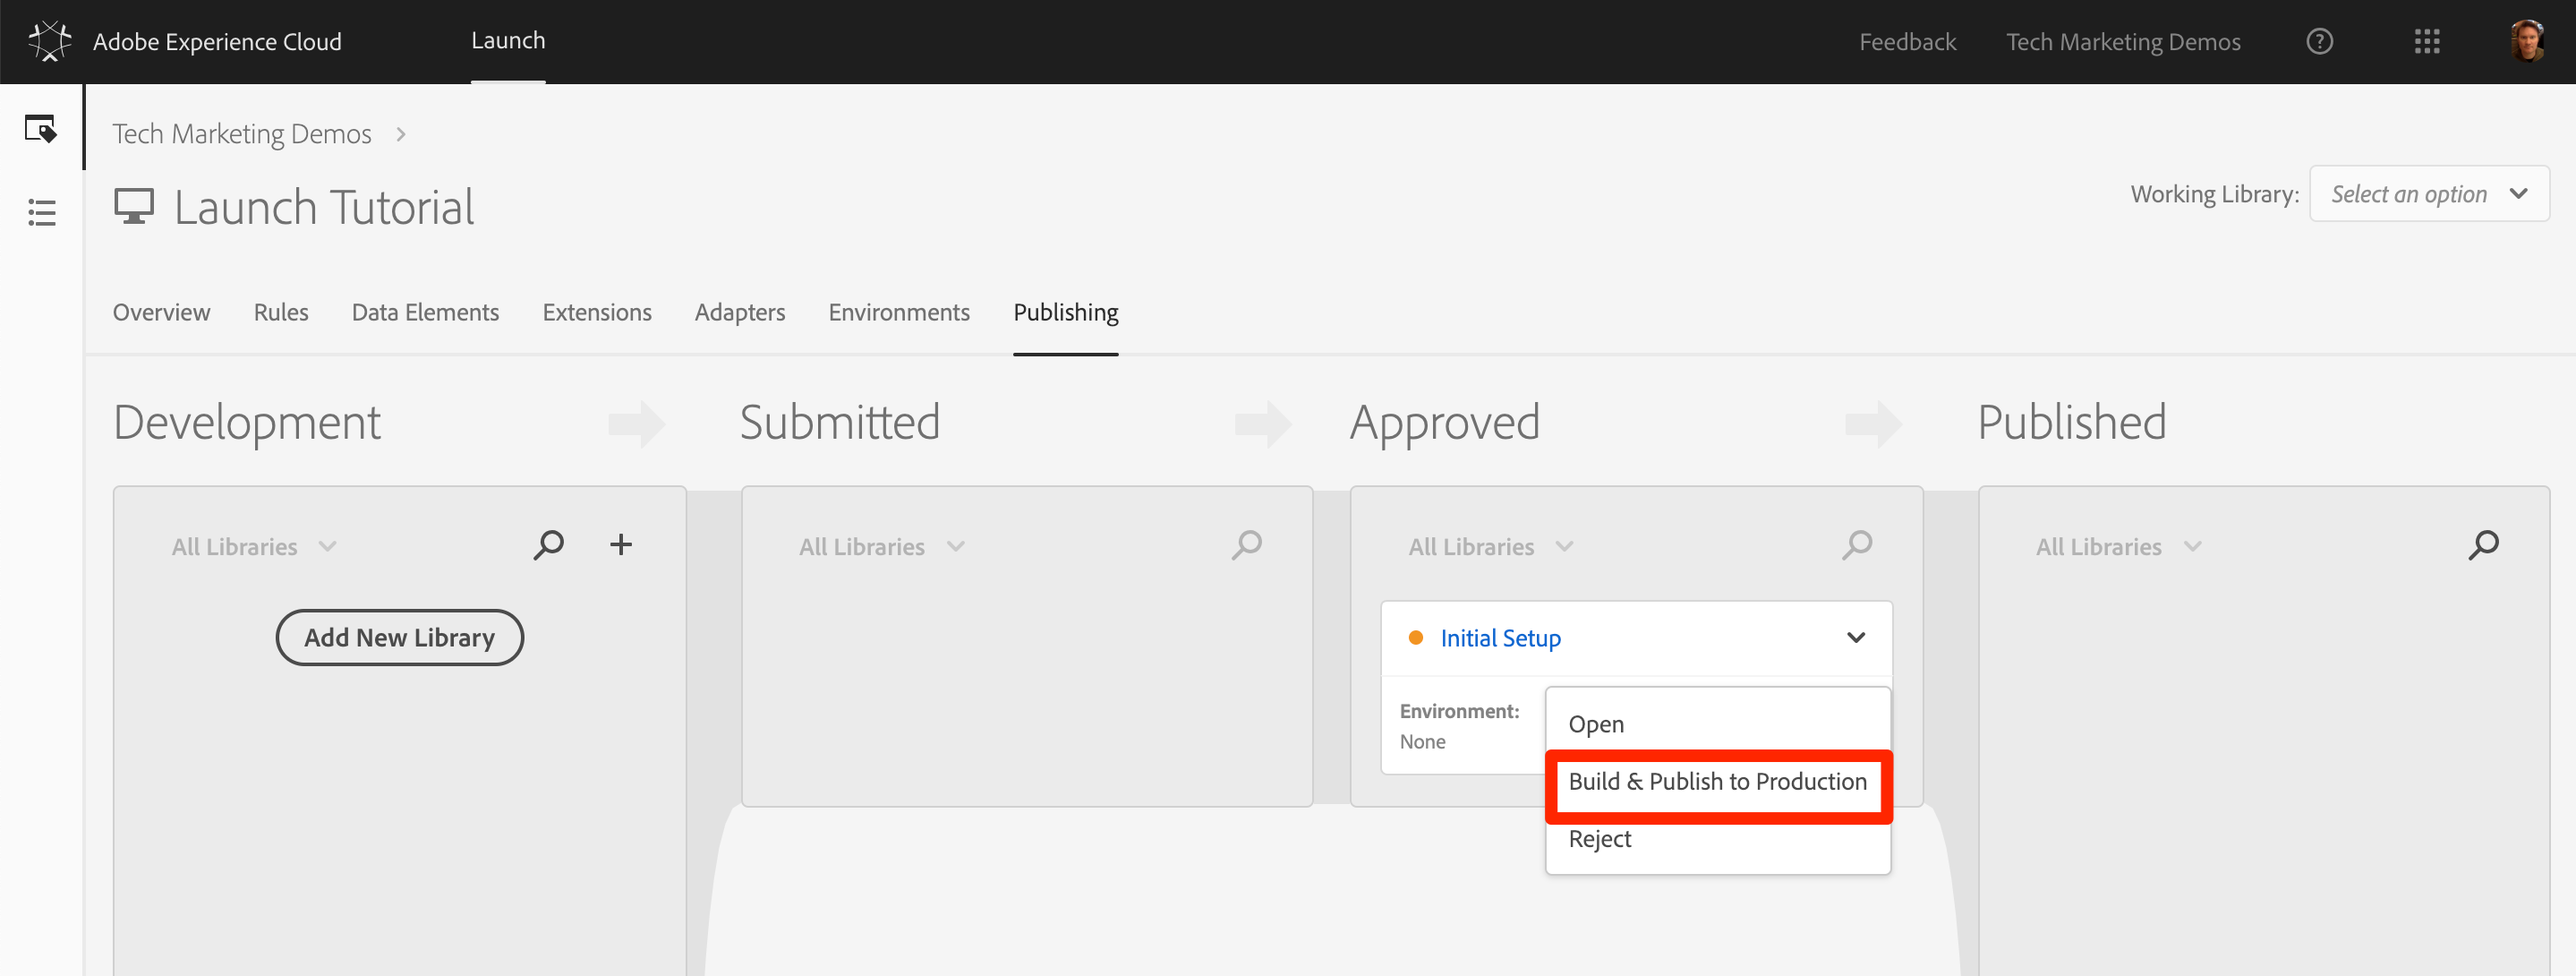
The library will now appear in the Approved column in the unbuilt state (yellow dot):
Open the dropdown and select Build and Publish to Production:
Click the Publish in the dialog box:
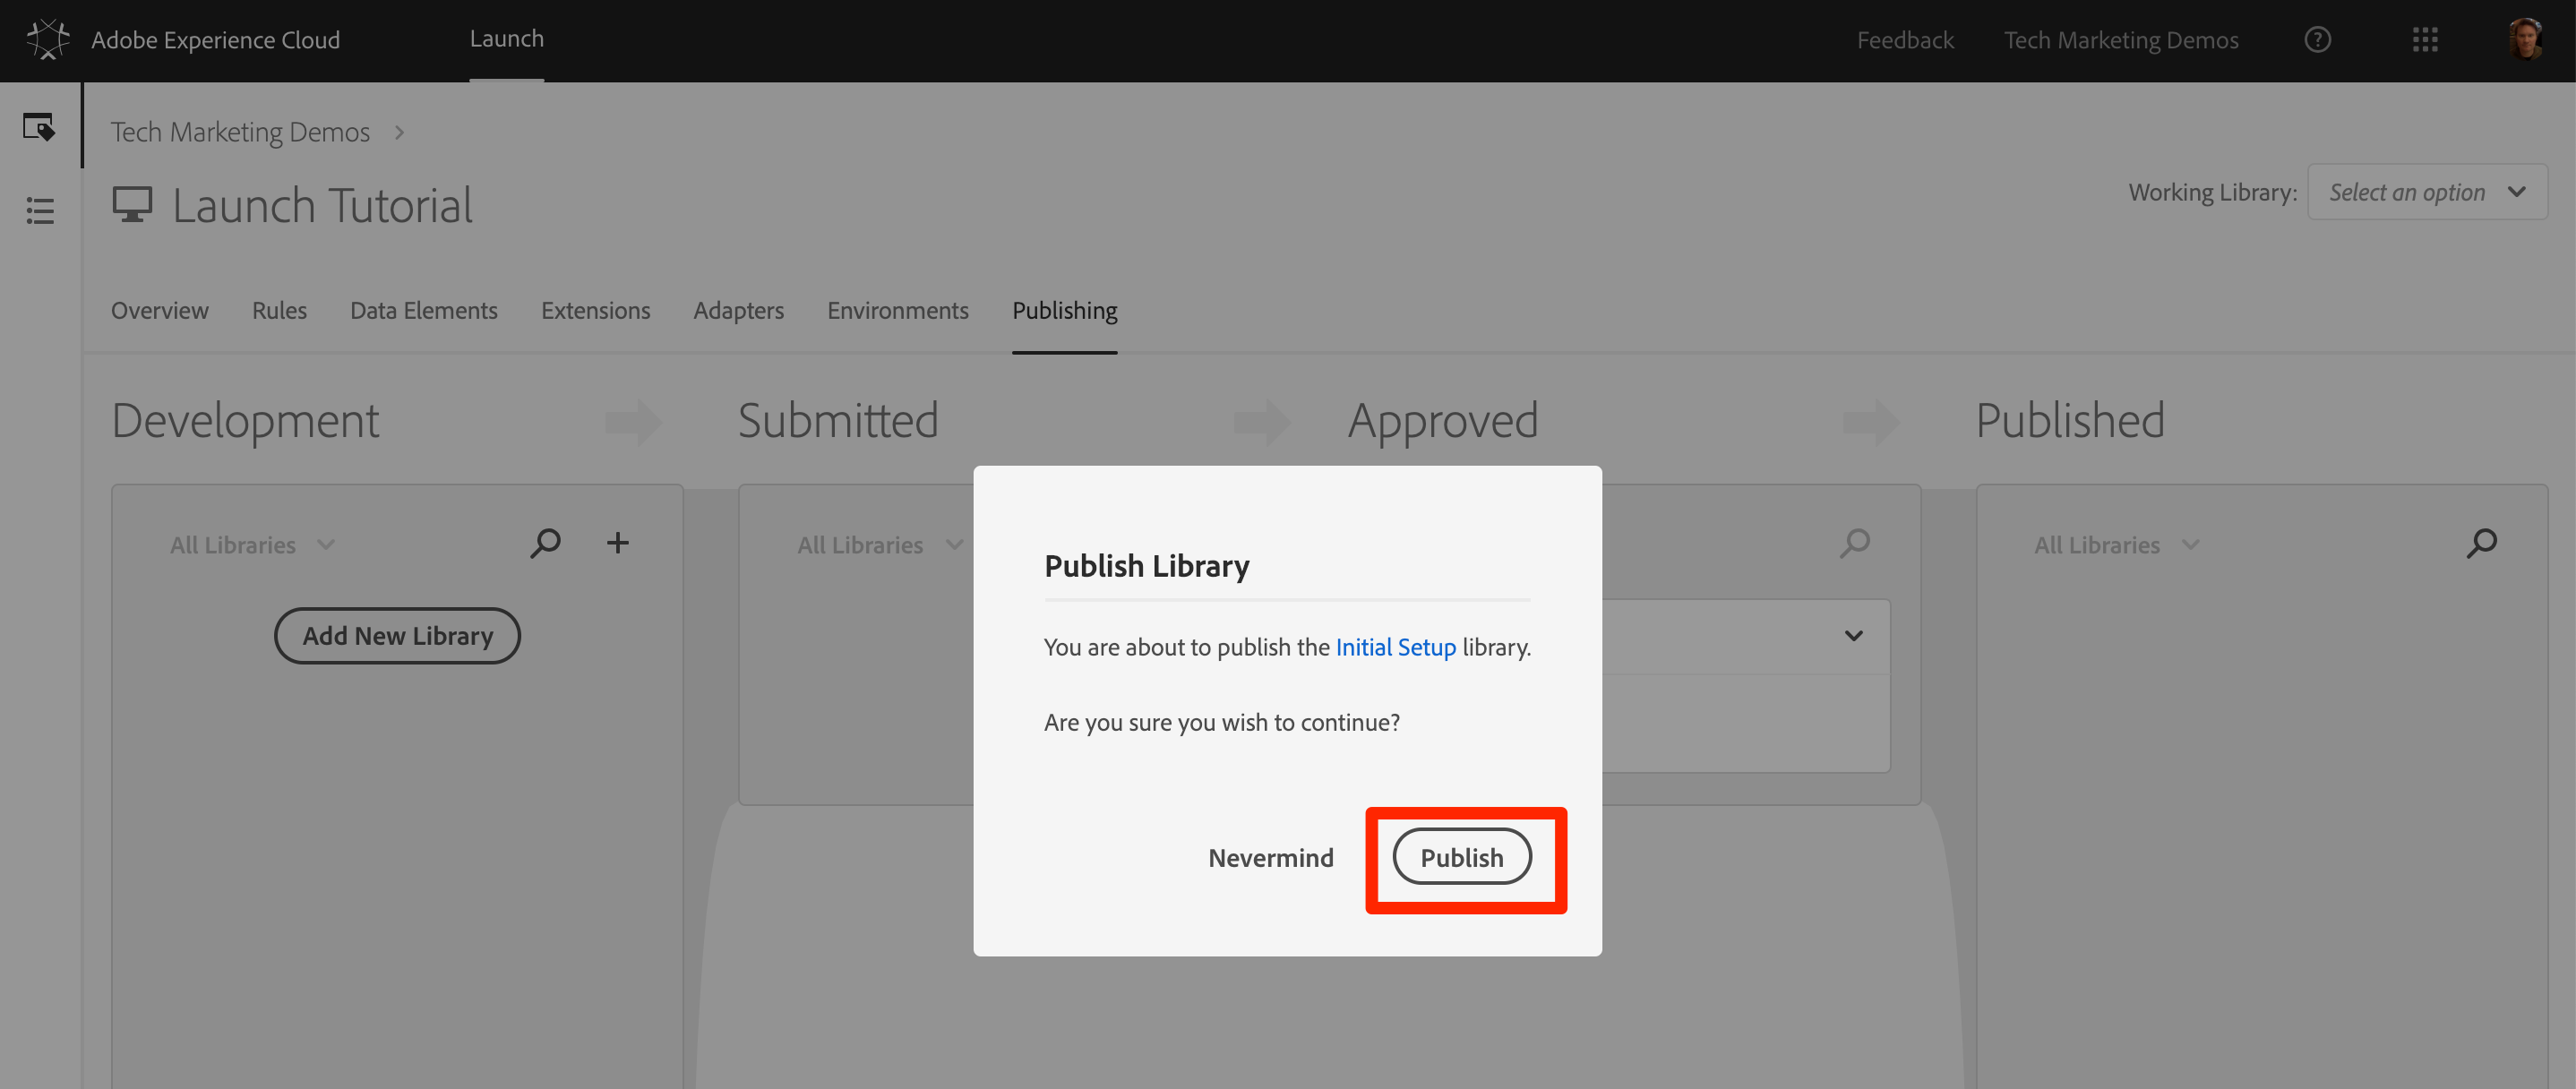
The library will now appear in the Published column:
That’s it! You have published your first property in Launch!
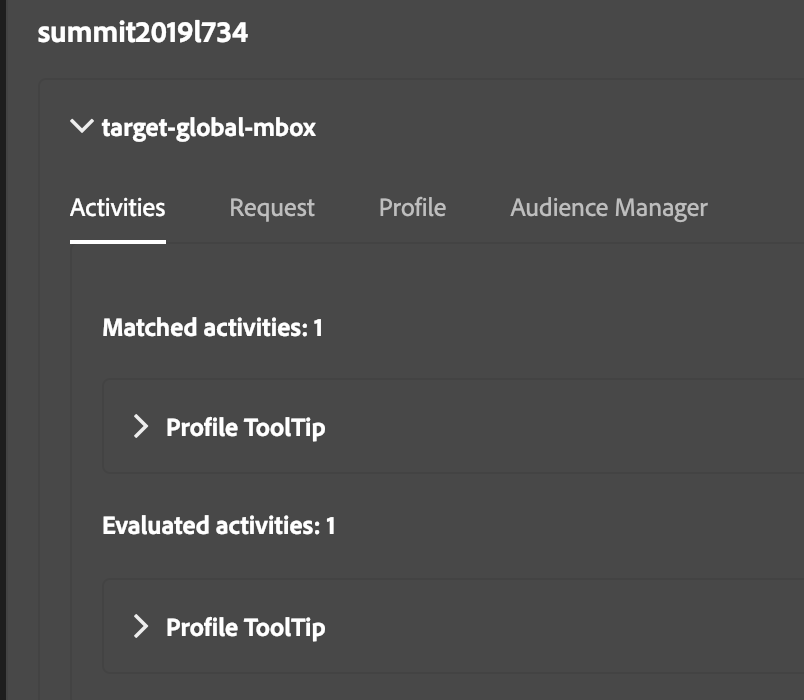
MboxTrace enables you to receive trace information attached to mbox replies. Trace information reflects the outcome of an mbox call (for example, a conversion or an impression) and any additional data that may help in determining why this particular outcome happened, such as a set of available branches among which the selection was made in a campaign. Use this information to debug content delivery.
The output displays very detailed information about your content. mboxTrace shows details about your campaign or activity and profile It also provides a snapshot of the profile before execution, and a snapshot of what changed after execution. It also shows which campaigns or activities were evaluated for each location.
At the end of this exercise, you will be able to:
Because mboxTrace and mboxDebug can expose campaign data and profile data to external parties, an authorization token is required. The authorization token can be retrieved in the Target UI. The token is valid for six hours.
Click Setup > Implementation.
Click Generate Authentication Token.
Copy the value highlighted below
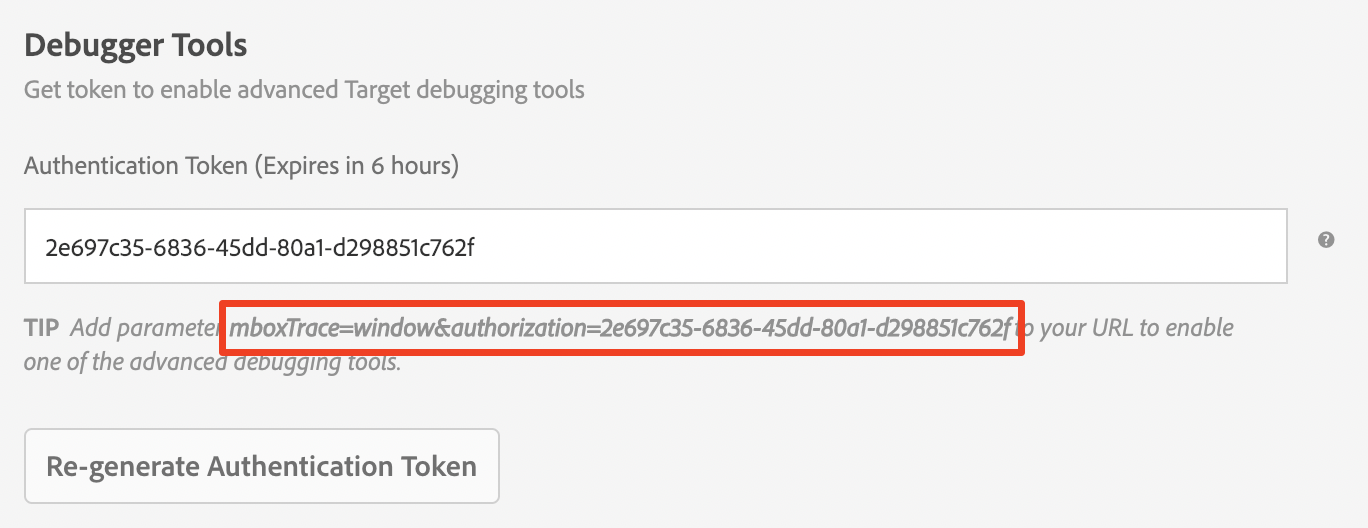
Add the generated token as a parameter to your URL to enable one of the debugging tools. Be sure to include the ? between the URL and your parameter

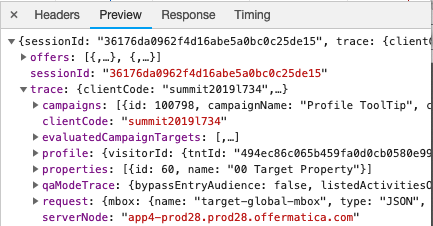
Using the Browser Developer Tools, open the Network tab and filter the results for **mbox

Locate the target-global-mbox result, and select the preview tab
Expand the trace node and explore the details that MboxTrace has exposed to you
With the Adobe Experience Cloud Debugger, troubleshooting Target has never been easier. The extra steps of locating the authentication token, pasting it into your URL, and digging through the browser’s developer tools are not necessary.
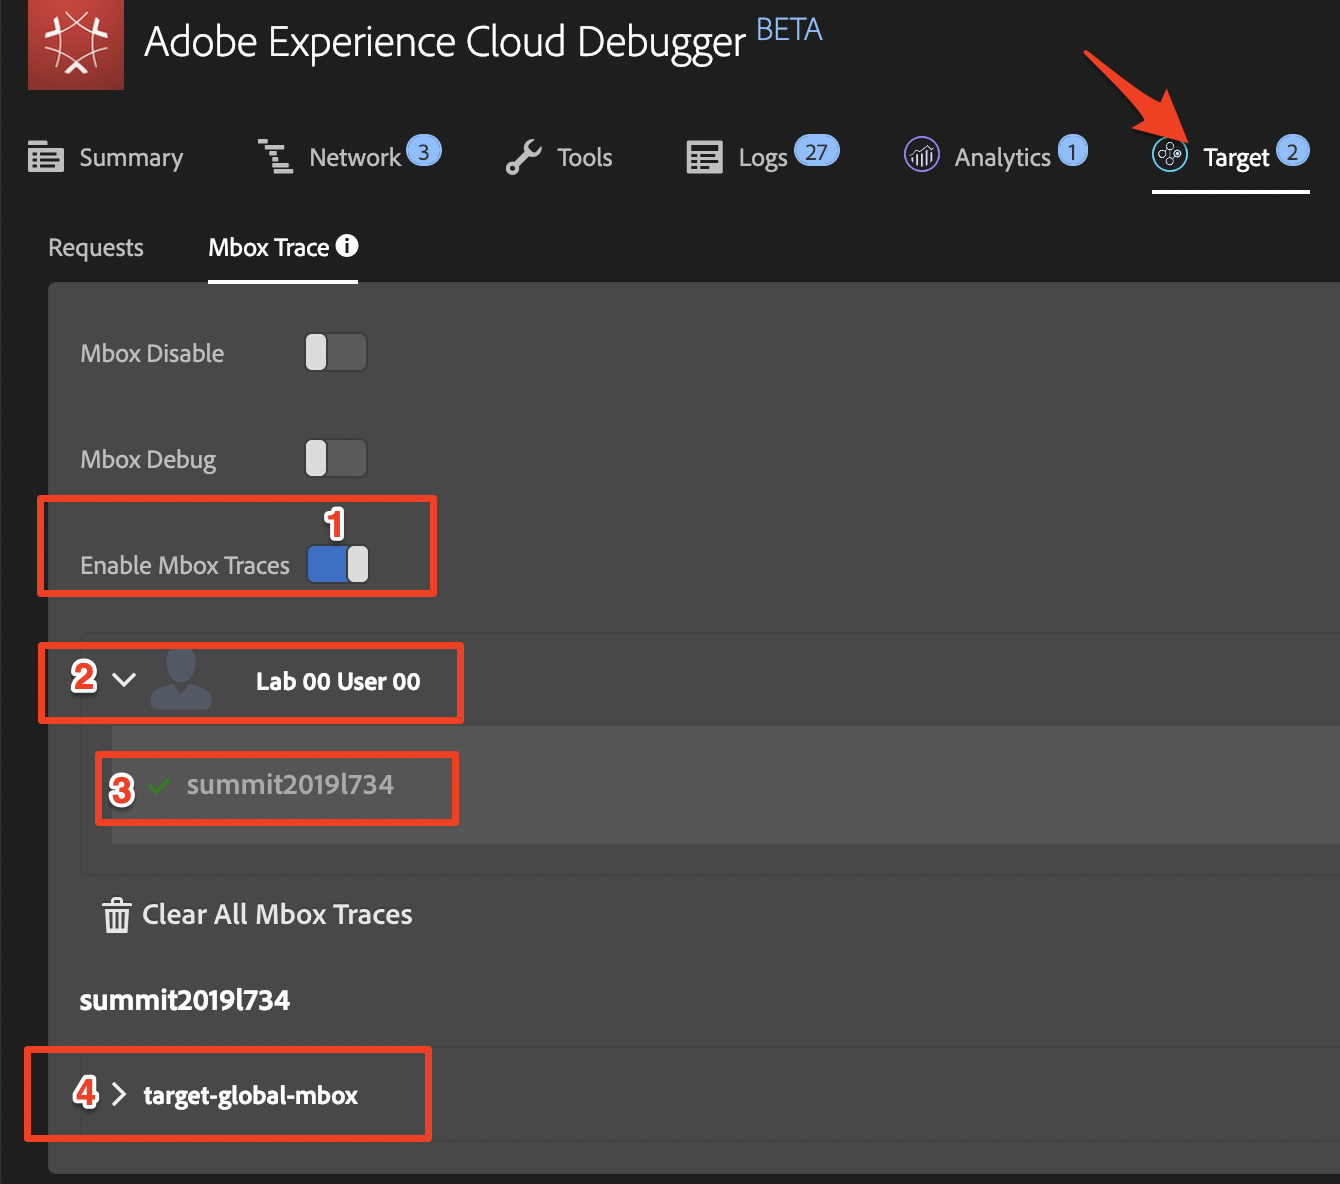
Open your WeRetail page within the same browser that you are currently logged in to the Adobe Experience Cloud
Click the Debugger Icon
Click Target from the top options
Toggle the Enable Mbox Traces option to the on position (1)
Notice that the user account you are currently authenticated in the Experience Cloud is automatically recognized here. Expand that section (2) and choose the Lab’s appropriate company (3).
Finally, expand the target-global-mbox (4) to view the Mbox Trace details.
Mbox Trace provides insights on multiple aspects of the current visitor:
With Target Response Tokens, profile data can be returned with the mbox response for third-party integrations and other uses.
Return to Launch, and once again navigate to Rules and edit the All Pages - Library Loaded rule created earlier.
Under Actions, click the icon
Choose the Action Type of Custom Code
Name this Action ttMeta
Click the </> Open Editor button and add the following custom snippet
document.addEventListener(adobe.target.event.REQUEST_SUCCEEDED, function (e) {
  window.ttMETA= typeof(window.ttMETA)!="undefined" ? window.ttMETA : [];
  var tokens=e.detail.responseTokens;
  if (isEmpty(tokens)) {
    return;
  }
  var uniqueTokens = distinct(tokens);
  uniqueTokens.forEach(function(token) {
    window.ttMETA.push({
      'CampaignName': token["activity.name"],
      'CampaignId' : token["activity.id"],
      'RecipeName': token["experience.name"],
      'RecipeId': token["experience.id"],
      'OfferId': token["option.id"],
      'OfferName': token["option.name"],
      'MboxName': e.detail.mbox});
    console.log(ttMETA);
  });
});
function isEmpty(val) {
  return (val === undefined || val == null || val.length <= 0) ? true : false;
}
function key(obj) {
  return Object.keys(obj).map(function(k) { return k + "" + obj[k]; }).join("");
}
function distinct(arr) {
  var result = arr.reduce(function(acc, e) {
    acc[key(e)] = e;
    return acc;
  }, {});
  return Object.keys(result).map(function(k) { return result[k];
  });
}
Click Keep Changes
And finally, rearrange the ttMeta action to come before the Fire Global Mbox action
Click Save
Return to the Publishing page and create a new development library, adding this update. You can find these steps in Exercise 4.3, if you need a reminder.
Refresh your WeRetail page
Open the Experience Cloud Debugger and find the Adobe Target section of the Summary Page.
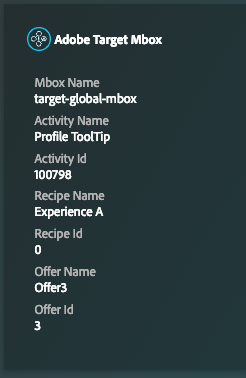
Notice the additional info presented by the ttMeta custom code, exposing Response Tokens for visibility, troubleshooting, or integrations:
Now that you have implemented Adobe Target, published your Launch library, and learned how to troubleshoot, let’s look at another way to validate your hard work using Adobe Auditor.
For more information, please see https://marketing.adobe.com/resources/help/en_US/auditor/
At the end of this exercise, you will be able to:
The first time you use Auditor, you must complete and accept the Auditor agreement. Auditor has been developed as a cooperative effort between Adobe and ObservePoint. Auditor users may use limited ObservePoint functionality for no additional cost. To use Auditor, you must opt-in to communications from ObservePoint.
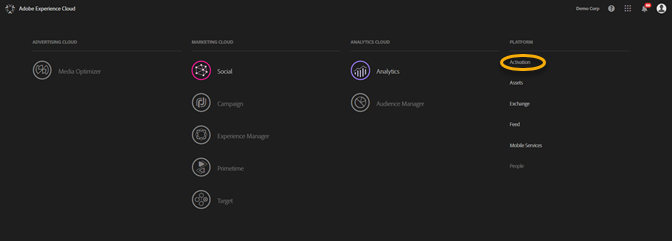
Click on the Solution Switcher Widget icon in the top right corner of the Adobe Experience Cloud navigation bar and click Activation.
Select Auditor and accept the Terms of Use.
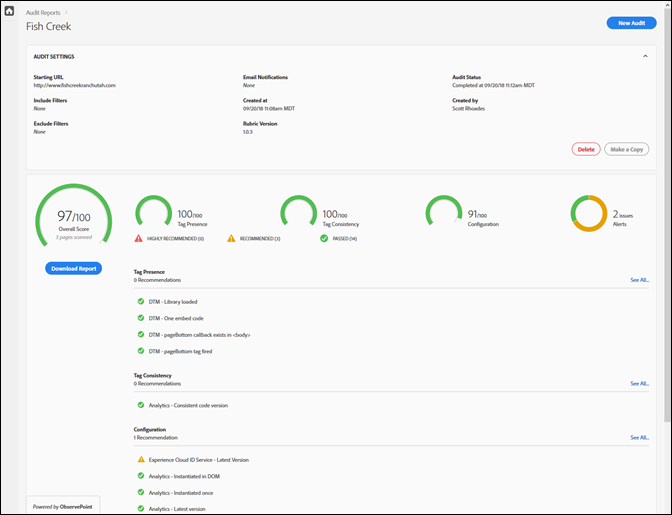
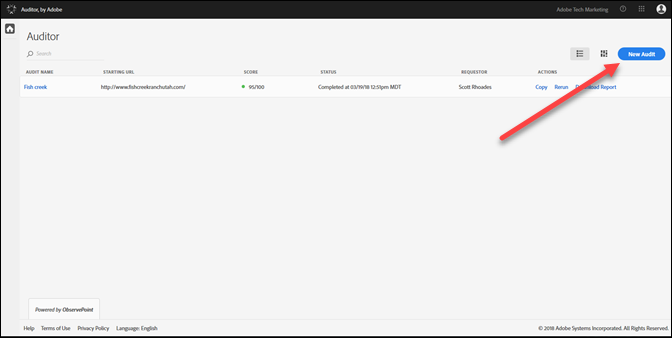
The Auditor page gives you a dashboard of previous scans, along with the option of running a new scan.
To run a new scan, click New Audit in the top right-hand corner of the screen.
Name the audit and provide a starting URL.
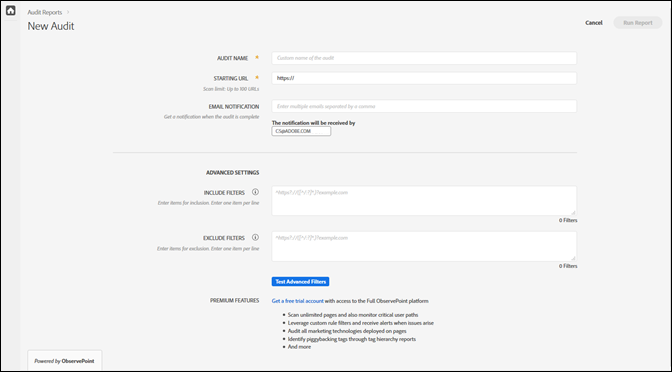
Because we are running this lab using a local instance of AEM, the audits will not work for your custom environments.
For a description of all the configuration options, see Create a new audit.
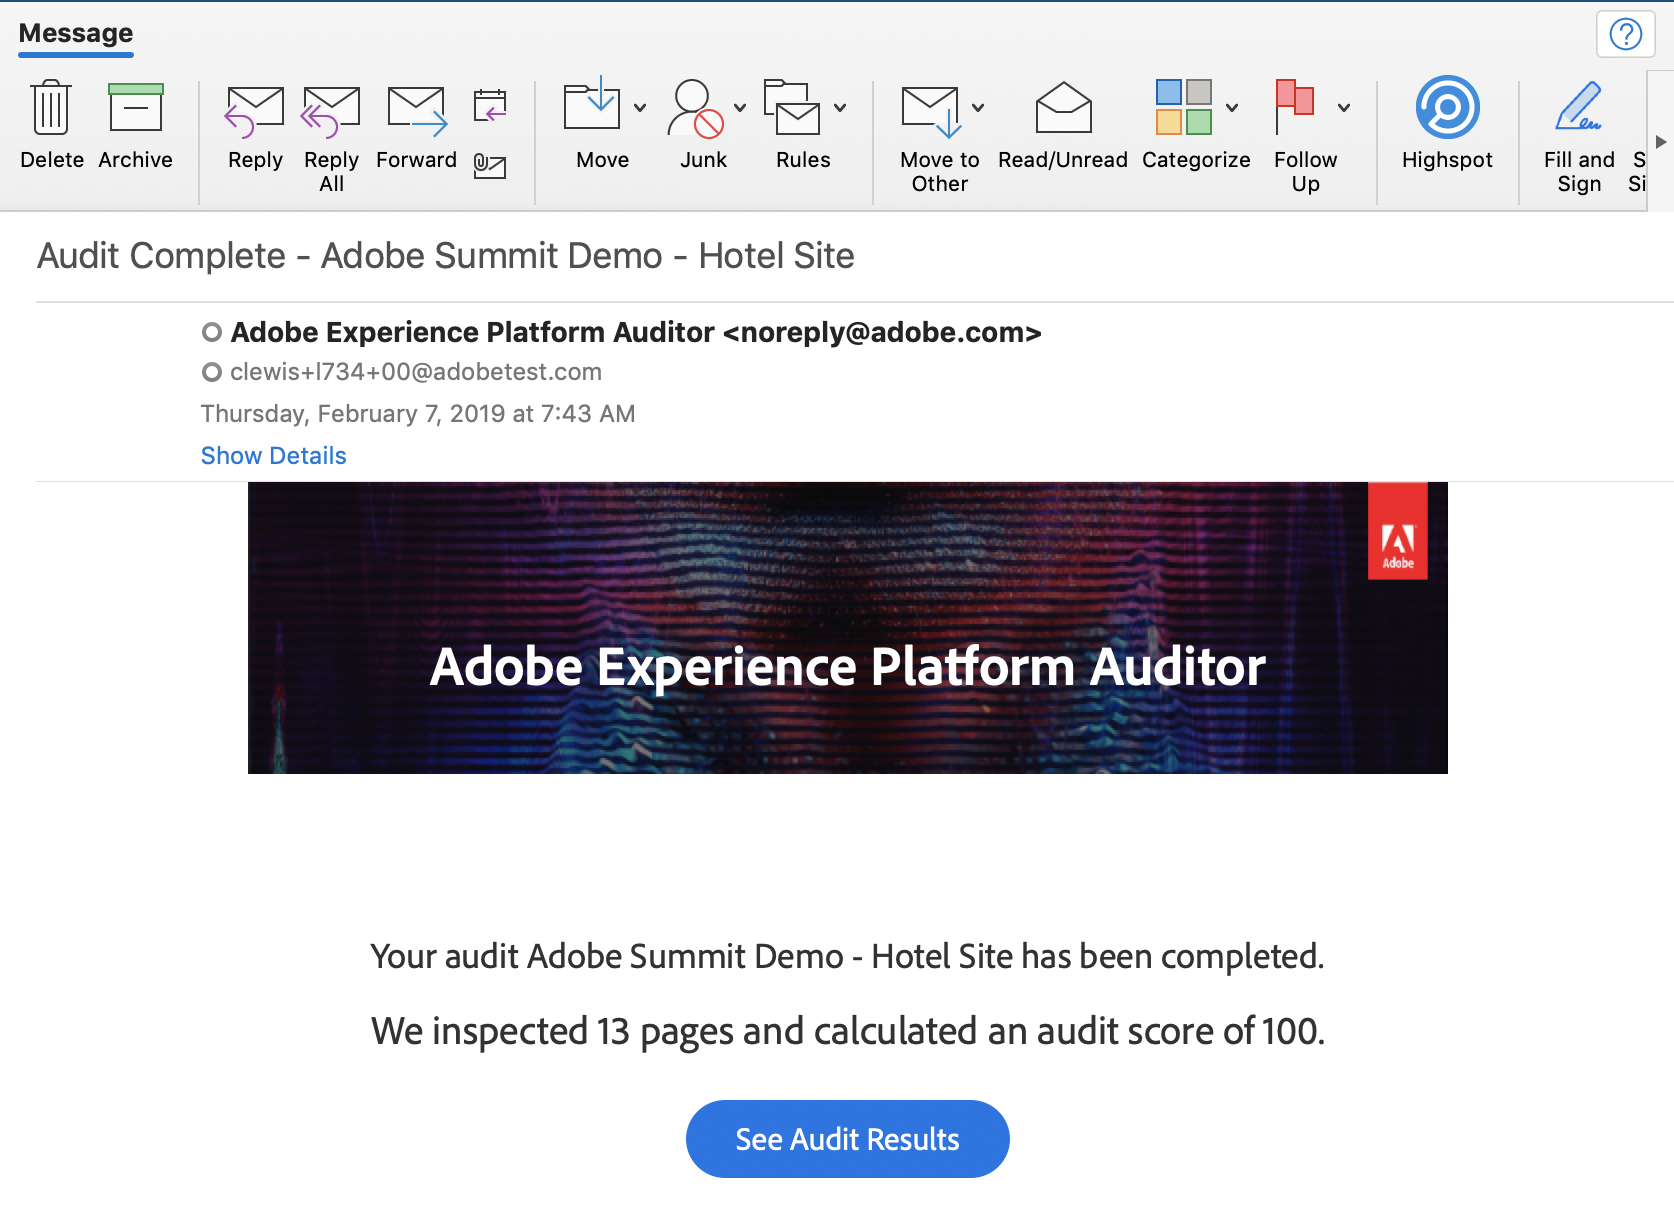
When you receive the email letting you know the scan is complete, click on the link to view your report and start understanding opportunities to improve your implementation and gain more value from your Adobe solutions.
You can also click the name of the audit in the Auditor page to see the status of the audit and to view the report after the audit is complete.
For this lab, we have already configured and run several Audit reports for these sites: http://ats-sb.adobe.com/target/target_training/L734/
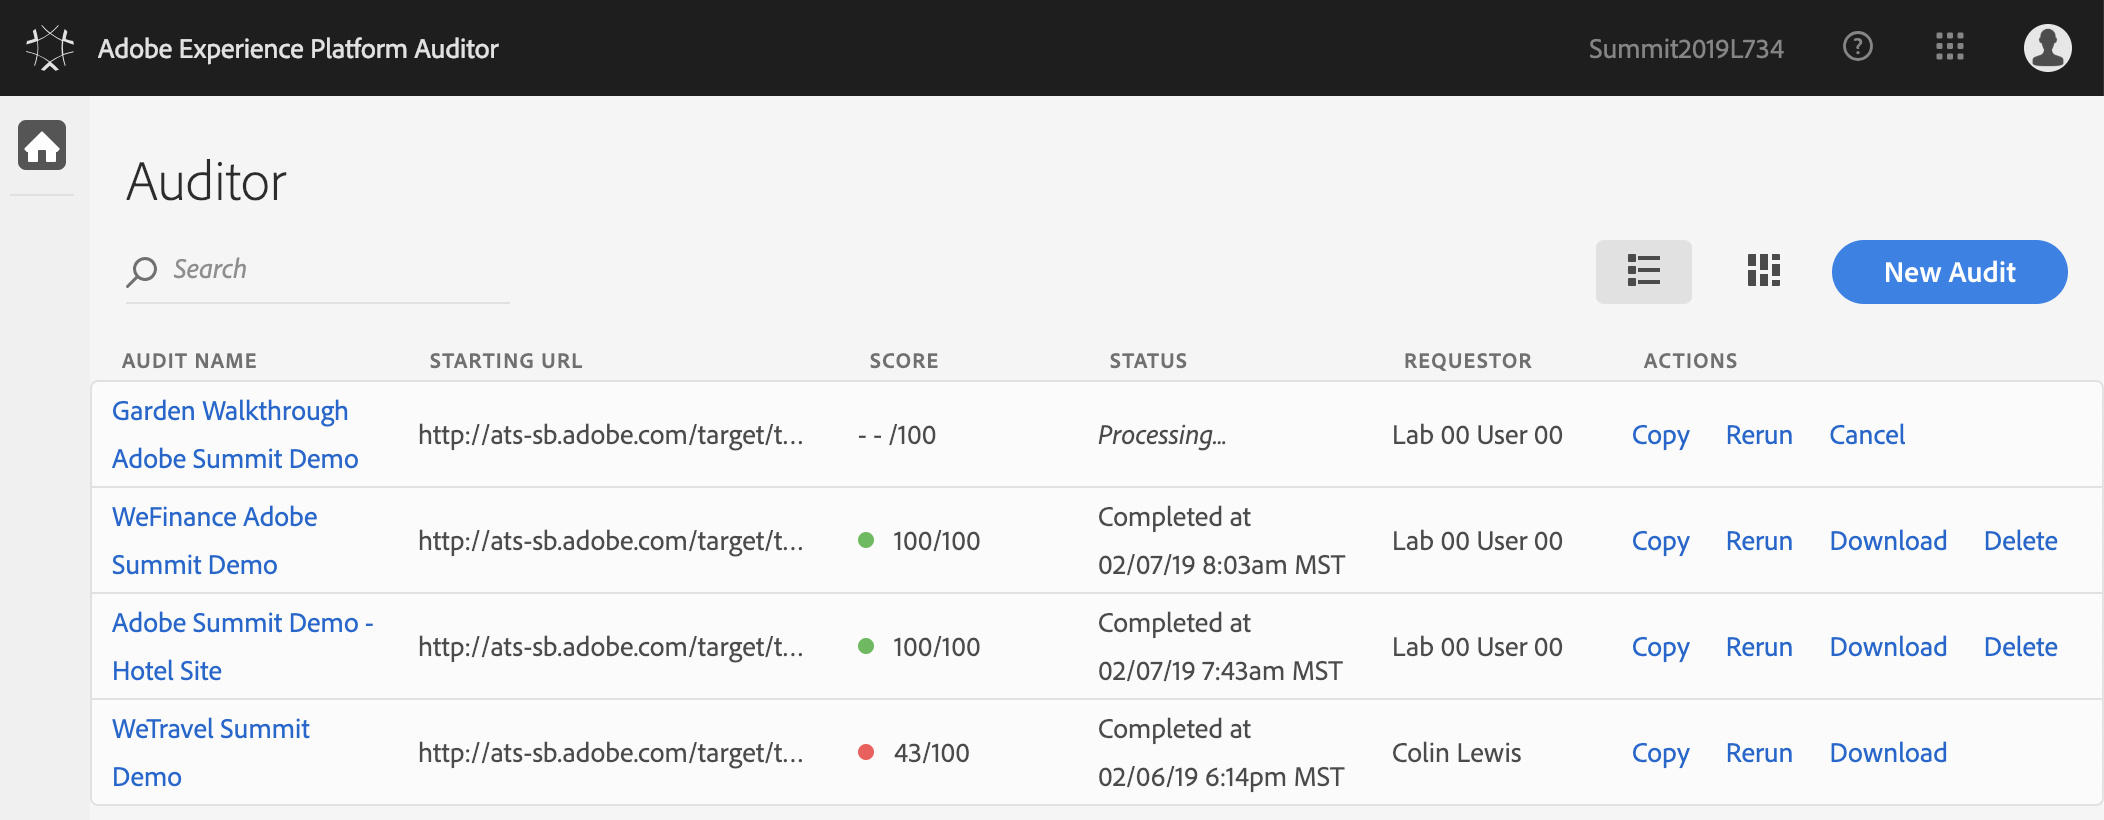
Open one or more of the Audit reports and review the details.