
In this training you will learn about the Adobe Sensei capabilities within Adobe Target. Adobe Sensei uses artificial intelligence (AI) and machine learning to help you discover hidden opportunities, make tedious processes fast, and offer relevant experiences to every customer.
You will learn how to setup an Automated Personalization (AP) activity. AP provides advanced machine learning algorithms to drive personalized experiences and improved conversion rates for digital experiences. We will also briefly review Audience creation and rules-based targeting prior to the AP review.
We will also be taking a closer look at newer additions to Target’s Sensei features including the Auto-Target option in AB Test activities and the new Insights reporting capabilities.
The Adobe Experience Cloud brings Adobe's marketing solutions together into one central hub. The Cloud is where your teams can:
The Adobe Experience Cloud has social sharing features to allow you and your team to collaborate on your marketing activities. It is the hub for all your activities within your Adobe Solutions.
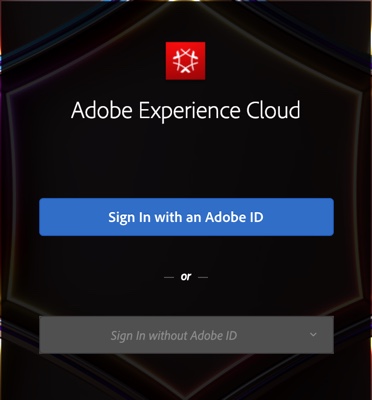
Click “Sign In with an Adobe ID”
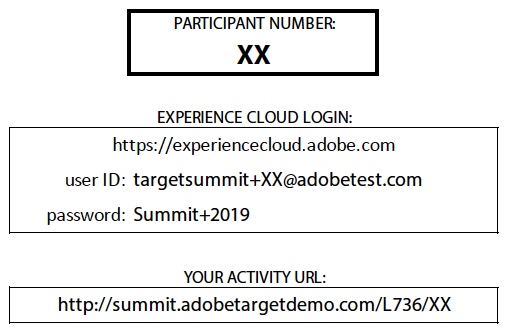
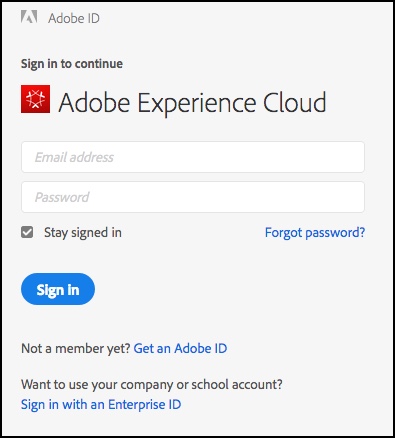
Log in using the credentials on your desk:
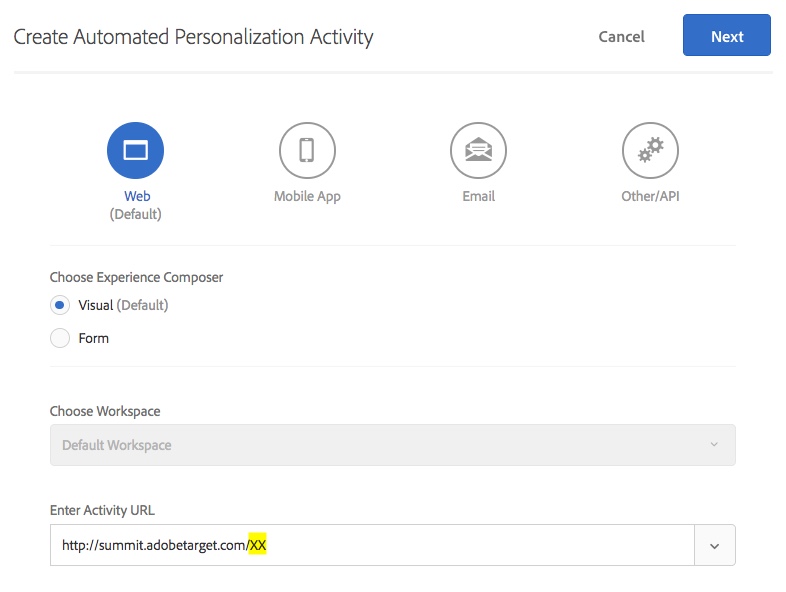
(Don’t forget to replace the XX with your participant number)
Adobe Target, accessed through the Adobe Experience Cloud, helps you visually create and manage A/B tests, rules-based targeting activities, and MVT tests. It also offers more advanced personalization features where, based on anonymous visitor data, you can change content across digital channels and properties to create a more engaging and consistent experience.
The interface offers a streamlined implementation strategy with your digital properties— just a single line of code on each page (or using our APIs!) manages all communication required between your site and Adobe Target. Industry best practices are built in to Adobe Target, designed for both new and experienced users. You can share data and results to collaborate easily with other team members.
Learn how to access the Adobe Target interface from the Experience Cloud
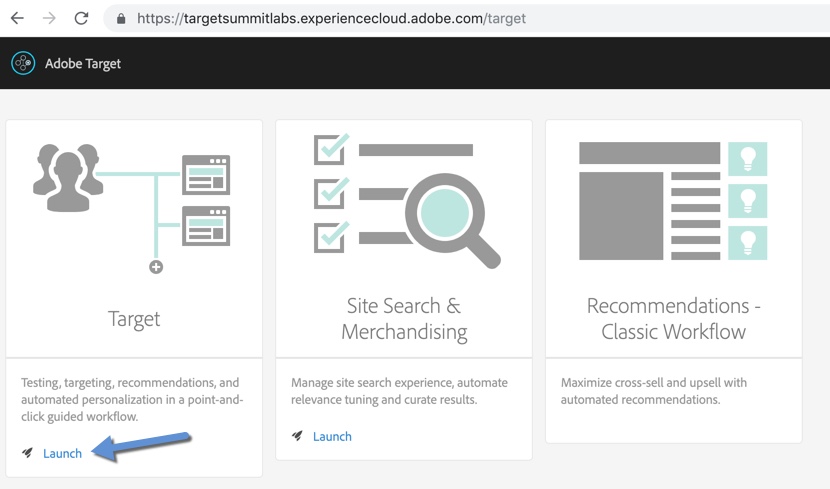
From the top right corner of the page, click the hamburger menu Target. The Target Menu will load.

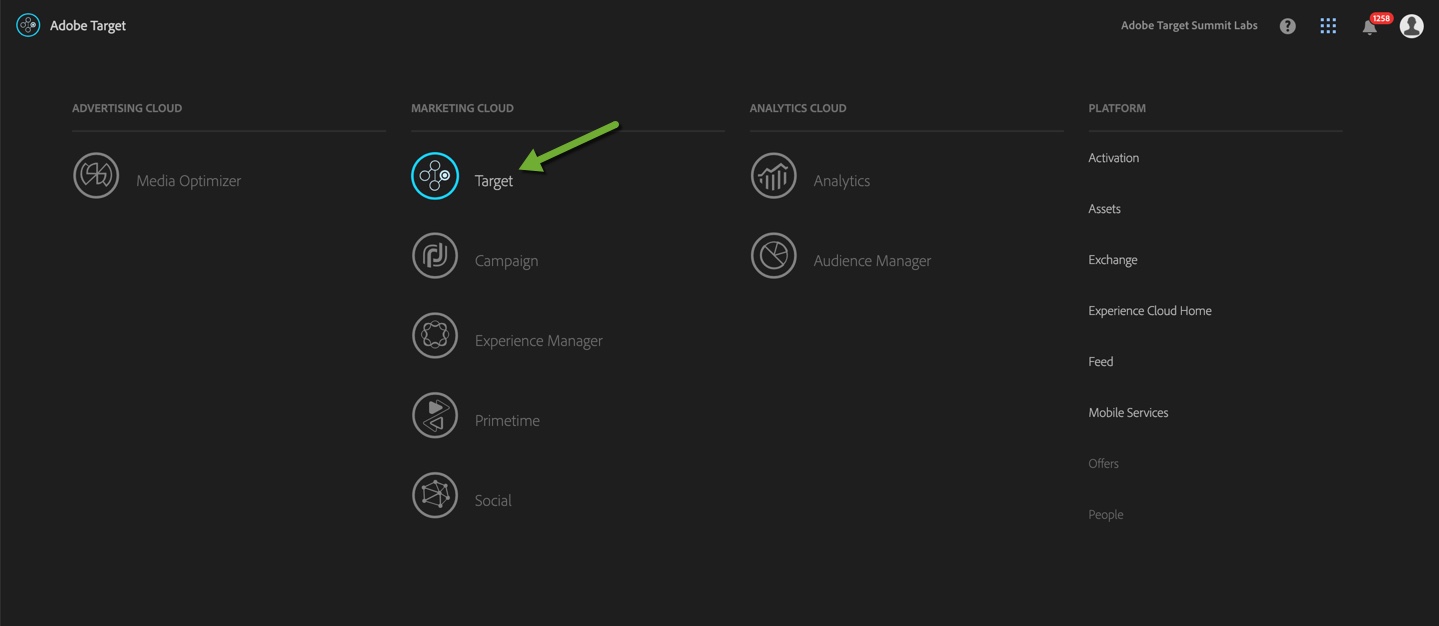
The Target solution page contains cards for all of the products in the Adobe Target solution. Products accessible through the Experience Cloud will have a blue “Launch” link.
Tip: If your Experience Cloud account is linked to the product, the “Launch” link will take you directly to the product. If you don’t have access or have not linked your account, you will get either a marketing message or login screen.
Click “Launch” in the Target card to open Target.
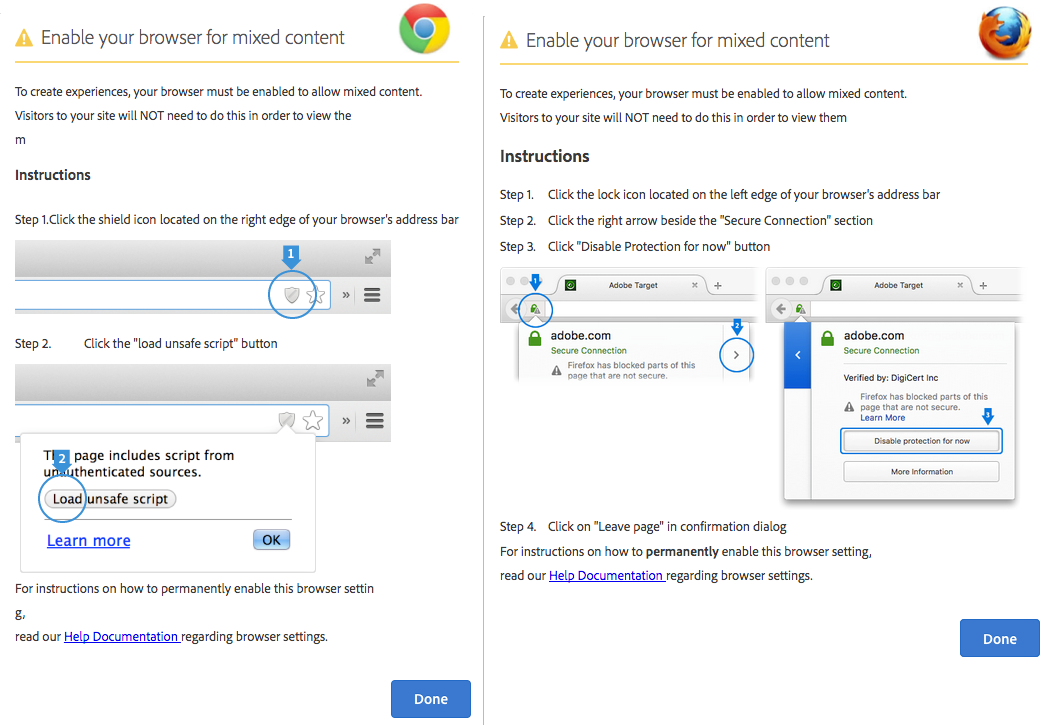
Enable Mixed Content – If you are not receiving an error, you can skip this part.
After launching Target, you will land directly on the Activity listing page. We will need to first enable mixed content in the browser in order to set up our first Activity. Follow the instructions for your specific browser according to the screenshot below. In a future release of Adobe Target, this step will no longer be necessary.
Learn how to build an Audience based on the Target profile attributes.
When a visitor lands on a page where you have set up an activity, Target determines whether the visitor qualifies as a member of an Audience that has been identified for the activity. If the visitor cannot be identified as a member of a target audience, that visitor is shown default content and is not included in the reports for the activity. Audiences can be used to restrict entry into any Target Activity, used in explicit rules-based Experience Targeting activities, or used to filter native Target Activity reports.
You can create Audience targeting rules for each of the following categories:
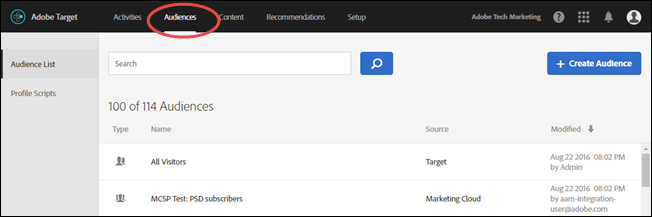
From the Target Premium Activities list, click the Audiences tab to access the Audiences list, click Audiences in the top menu bar. Review the Audiences list, noting that the ‘Source’ column includes segments built in Adobe Analytics and Adobe Audience Manager (indicated as ‘Marketing Cloud’ for source). Next, click on the blue ‘Create Audience’ button upper right:
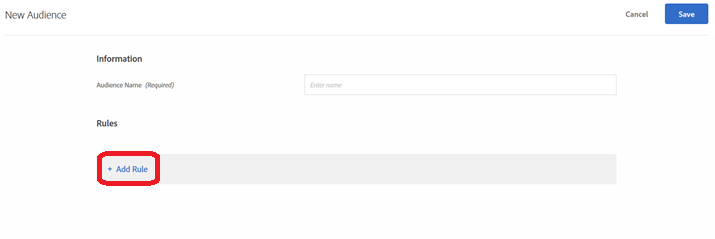
Next we will create a customized New Audience and save them to the Target library for use in your activities. Please build an Audience using the available Rules by clicking ‘Add Rule’.
Try building an Audience with multiple rule definitions. When you combine rules or parameters with AND, any potential audience member must meet all of the defined conditions to be included as an entrant. For example, if you define an OS rule AND a browser rule, only visitors using both the defined OS and the defined browser are included in the activity.
When you combine rules or parameters with OR, any potential audience member need only meet any single defined condition to be included as an entrant. For example, if you define multiple mobile rules connected by OR, visitors meeting any of the defined criteria are included in the activity.
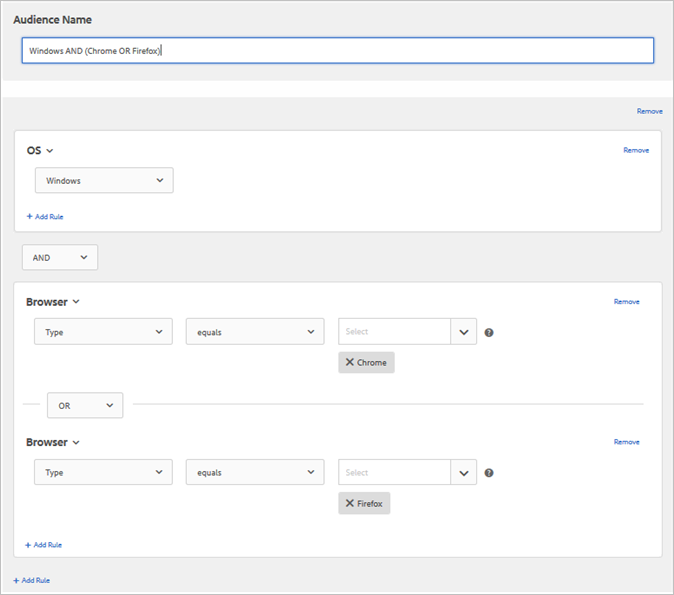
Give your Audience a unique name (e.g. start name with your initials so you can easily find it later) and click the blue ‘Save’ button. Once you return to the Audiences list, search for your initials to ensure that your Audience was saved properly and is available to be used in an Activity.
Understand how to add additional data (e.g. CRM data) to the Target visitor profile. In this Lab, we will briefly review the Customer Attributes method of augmenting the visitor’s Target profile with additional non-PII data you may have collected for known visitors.
Tip: There are a variety of methods to bring into Target additional data you may have collected on your visitors. If you are interested in reviewing these options, please visit: https://marketing.adobe.com/resources/help/en_US/target/ov2/c_methods-to-get-data-into-target.html
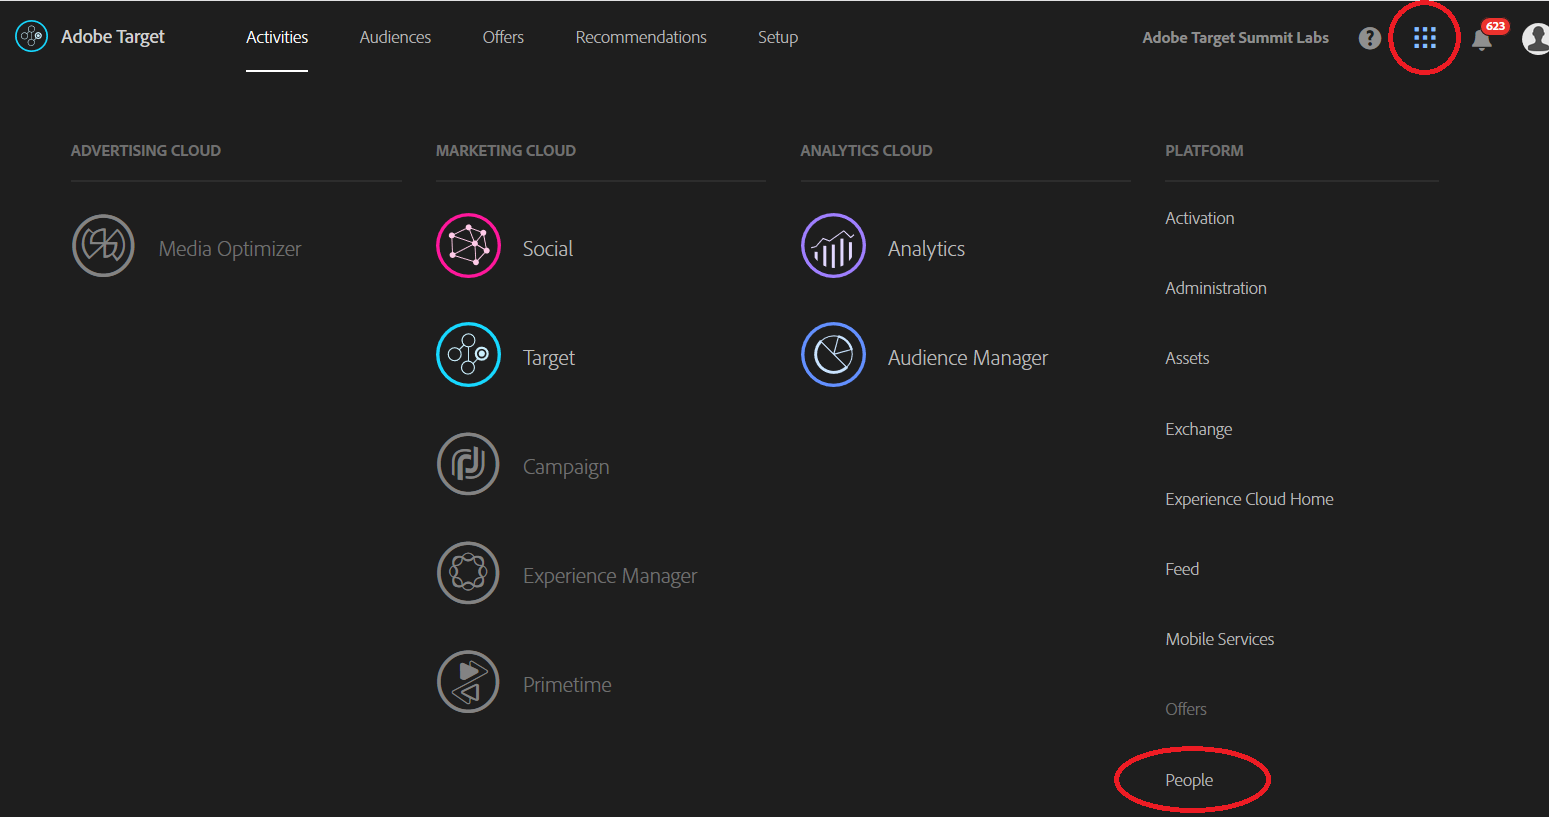
Select the hamburger icon in the upper right of your Experience Cloud UI, and then select the ‘People’ core service option (lower right).
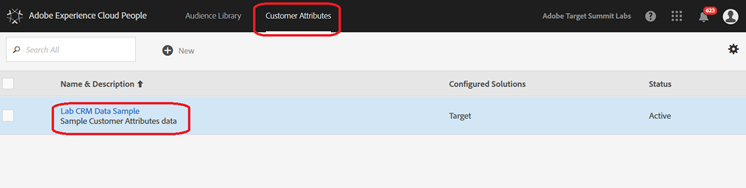
On the next screen, select the ‘Customer Attributes’ tab, and then select the pre-configured ‘Lab CRM Data Sample’ option.
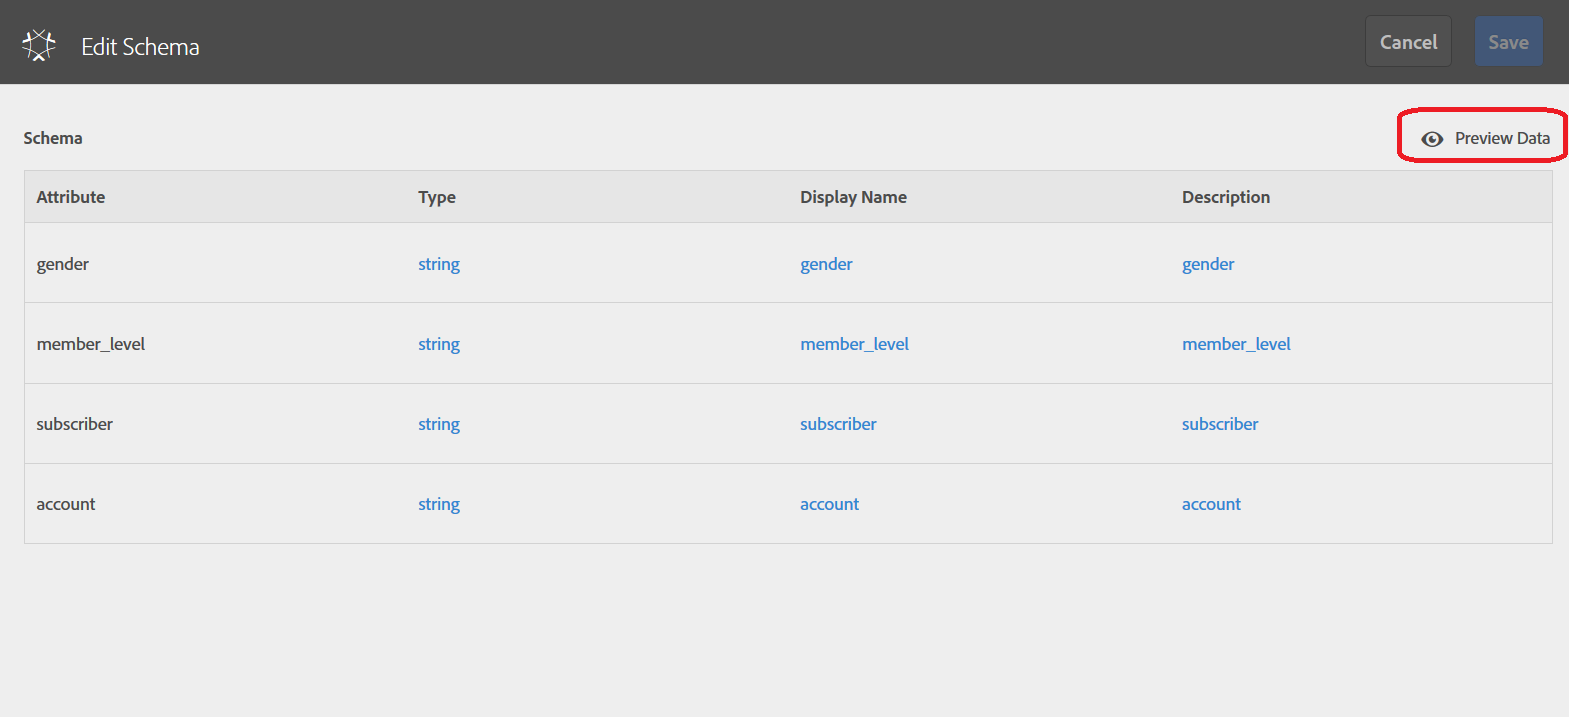
On the next screen, we will walk you through the Customer Attributes set-up steps. In this example, scroll to the ‘File Upload’ section, click the gear icon under ‘Actions’ and select View/Edit Schema
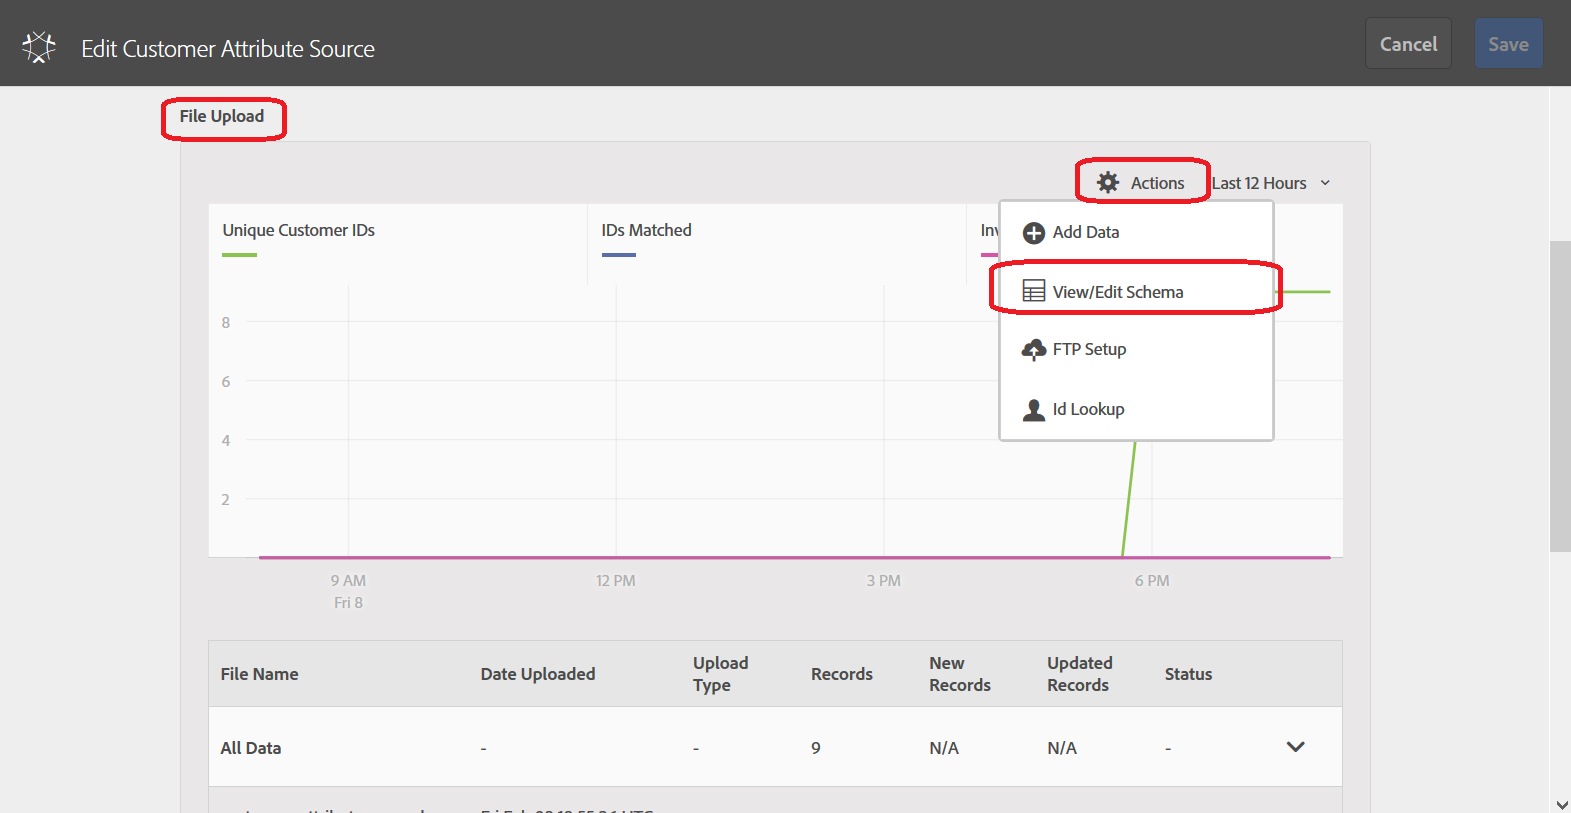
In this Customer Attributes example, you can see that we have uploaded some new Attributes: gender, member_level, subscriber and account. Select ‘Preview Data’ to see some of the data.
Note: the CSV file uploaded for this example is at: http://summit.adobetargetdemo.com/L736/customer_attributes_sample.csv
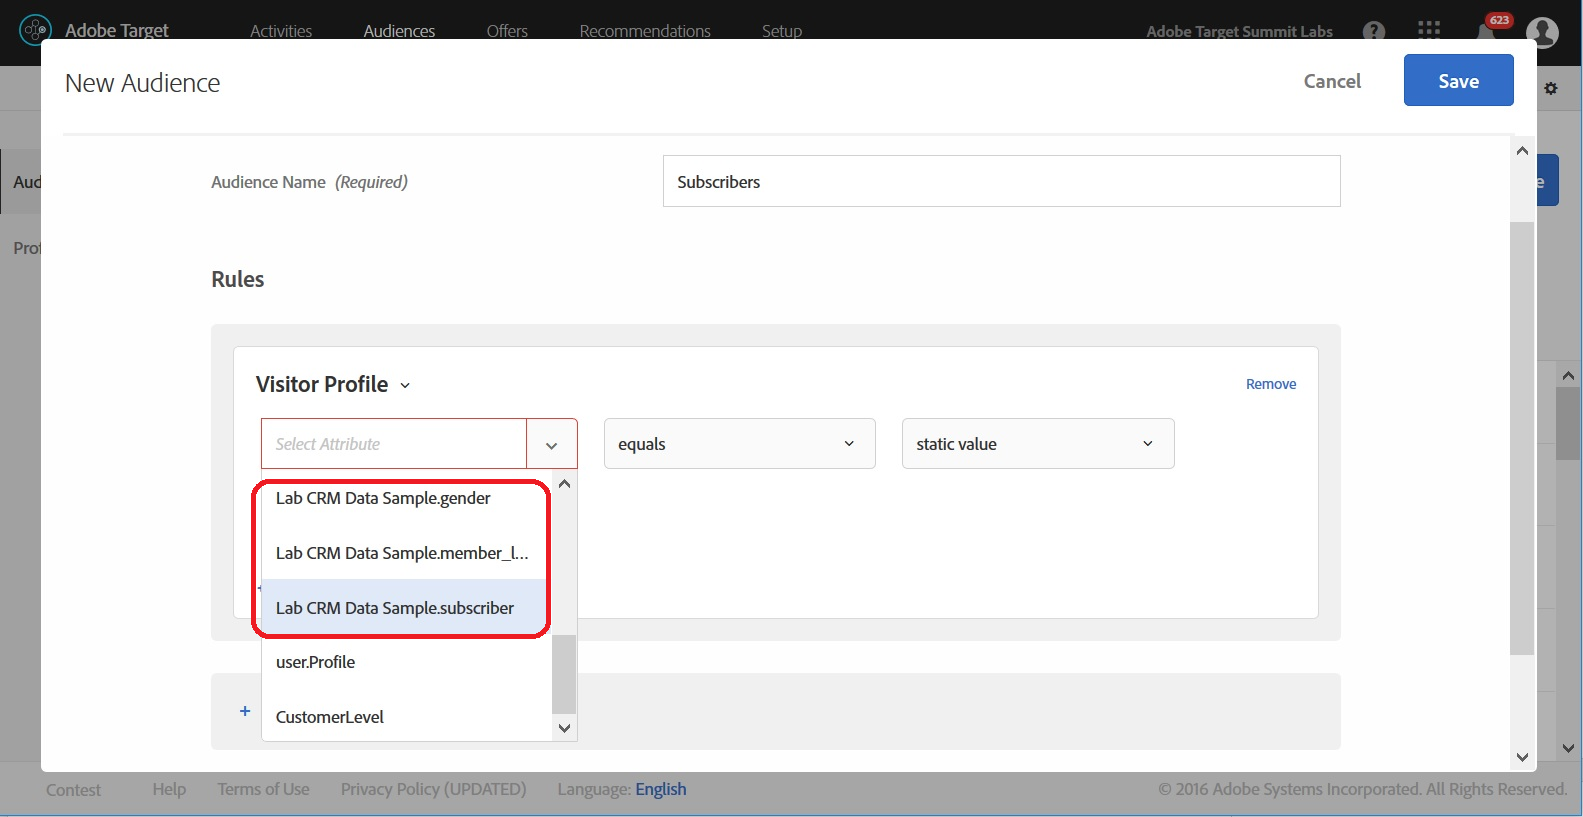
Navigate back to the Target > Audiences menu (covered in Exercise 2.2). Build another new Audience and note, under the Visitor Profile rules, your new CRM Customer Attributes are available.
Before diving into automated AI-driven personalization, let’s first quickly review manual rules-based targeting via the Experience Targeting Activity type.
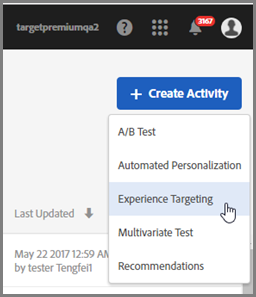
Return to the Activities menu within Target Premium and select an Experience Targeting from the blue ‘Create Activity’ button, upper right.
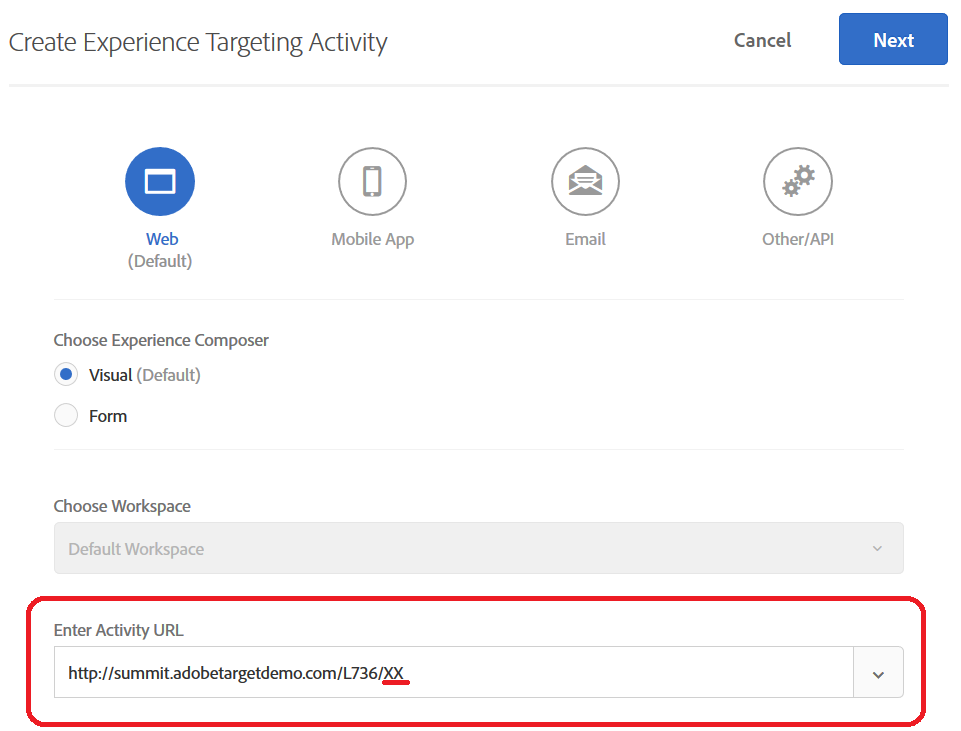
Modify the default Activity URL by replacing the ‘XX’ at the end of the default URL string with your Lab participant number (e.g. if you were participant number ‘105 it would be http://summit.adobetargetdemo.com/L736/105), then click the blue ‘Next’ button.
You should enter the 3-step workflow to create an XT (Experience Targeting) Activity. On the Experiences step (step 1), please give your Activity a unique name (e.g. using your initials as a prefix) in the upper left, and select ‘Add Experience Targeting’ in the left rail.

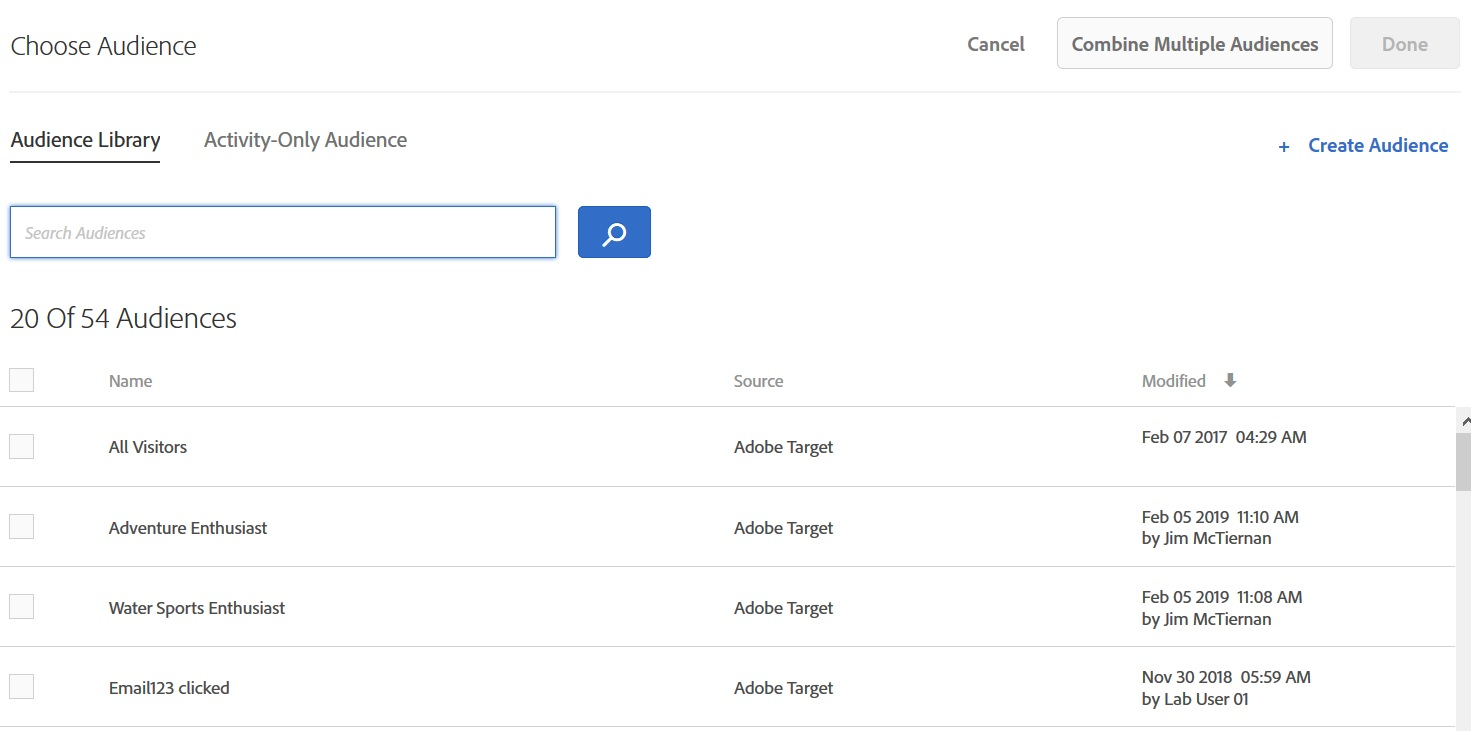
Please search for the Audience your created in the ‘Choose Audience’ step and then click the blue ‘Done’ button, upper right.
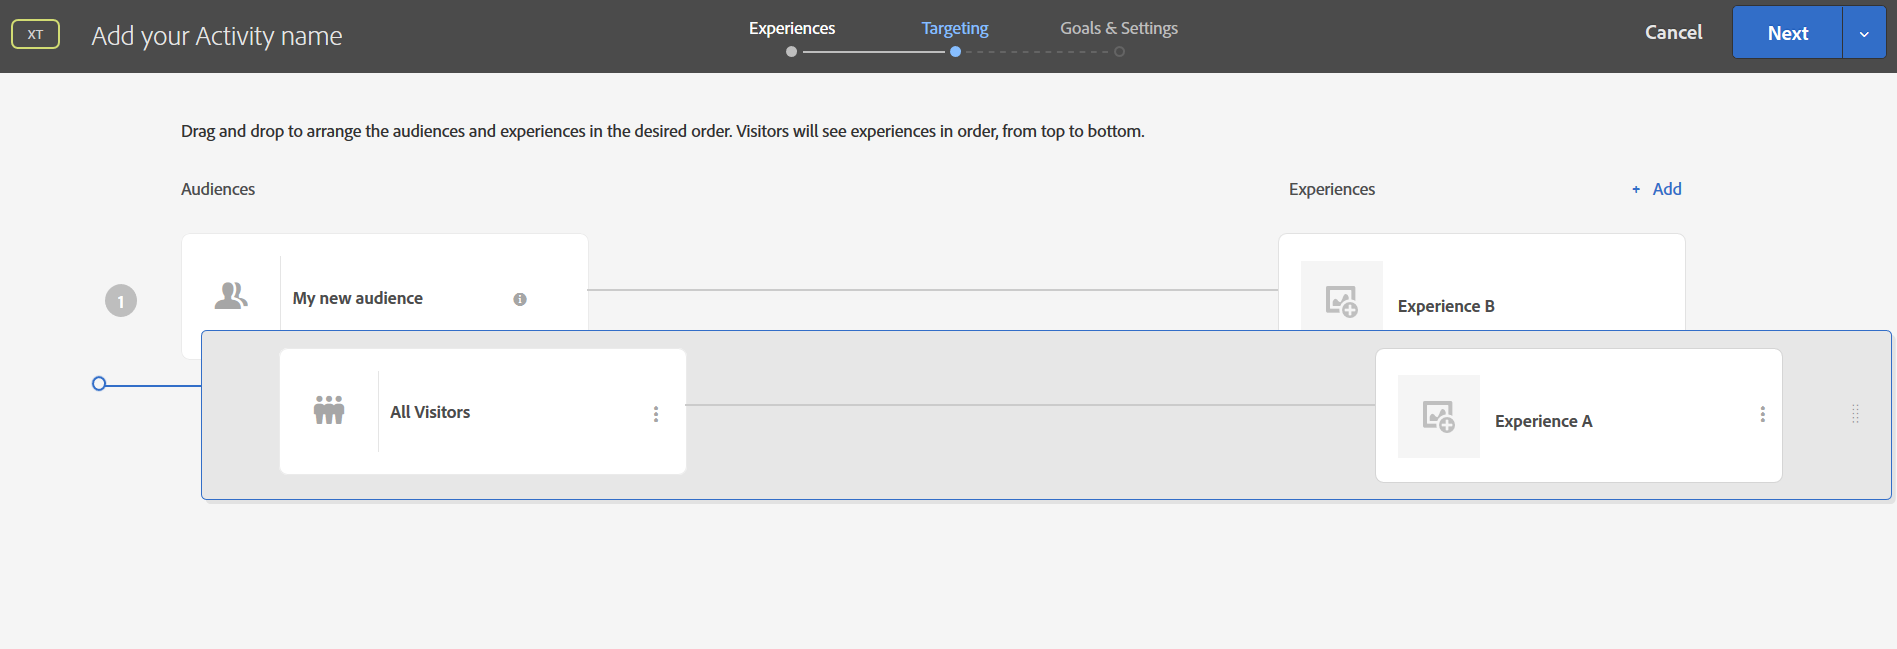
Proceed to step-2 ‘Targeting’ step by selecting the blue ‘Next’ button, upper right. On this step, it is important to note that the Audiences must be arranged in the desired order as visitors will see Experiences from top to bottom. So, if ‘All Visitors’ is the first Audience listed, no one will ever get to more granular Audiences defines. Drag and drop ‘All Visitors’ to bottom of list.
Click the blue ‘Next button, and proceed to step-3 ‘Goals & Settings’ and plug-in some goal metrics. This Lab assumes familiarity with these Activity set-up settings, and so we won’t do a deep-dive into each option on step-3.
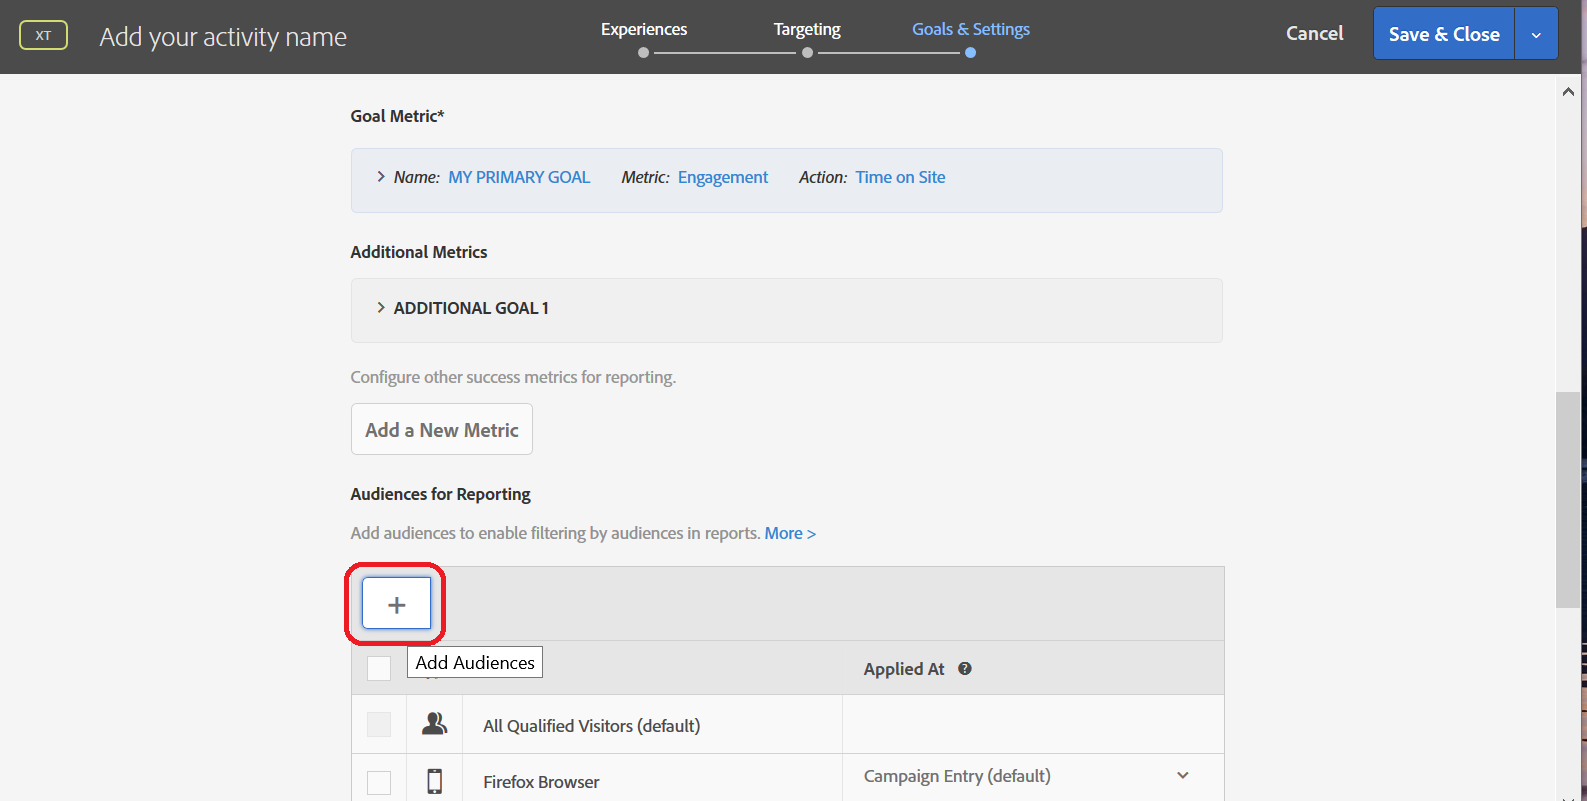
Note that after you define your goal metrics, you can add ‘Audiences for Reporting’. This allows you to filter your Activity report by any defined Audience. Select the + button here and add the Audience you created in Lesson 2.1.
That completes Lesson 2, which was designed as a quick review of rules-based targeting prior to the primary Lab focus on AI-driven targeting.
Automated Personalization (AP) provides advanced machine learning algorithms to drive personalized experiences and improved conversion rates for digital experiences.
Marketers implement one file on their site. That enables them to point and click on any content and visually create and select additional content options for that area. Then, the modeling system automatically determines which piece of content to deliver to each individual based on all the behavioral data the system has about the visitor.
Offline data, such as CRM information or customer churn propensity scores, can be incredibly valuable when building personalization models. Additionally, any data available in the visitor profile or segments shared from Experience Cloud audience can provide valuable insights for Sensei’s automated decisioning and model building.
There are several ways to input data in Automated Personalization (AP) and Auto-Target personalization algorithms.
Please refer to the table on the following page for a full list and details of the possible data sources that Sensei uses in its model building.
| Data Type | Description | Example Variables |
|---|---|---|
| Shared Audiences | Audiences created through Adobe Audience Manager or Adobe Analytics and shared with Target. |
|
| URL Parameters | Target inspects the URL to extract the URL parameters. |
|
| Customer Attributes | Offline data imported into the Experience Cloud via the Customer Attributes import and data subscription process. |
|
| User Profile Parameters | Any information you've decided to include in Target's user profile. This information could come from profile scripts, Profile Update API, or in-mbox profile parameters prefixed with "profile." |
|
| Environmental and Session data | Information about how and when the user is accessing the activity. |
|
| Geography | Information on where the visitor is located. |
|
| Device and Mobile Data | Device and mobile-specific information. |
|
In this exercise you will be using the Visual Experience Composer (VEC) to add your offers to the Activity.
The setup of an AP Activity is very similar to that of an A/B test with one key difference. Rather than having a Menu for your different experiences, you make all your changes on a single “experience”. You have the option of testing multiple versions of each area of the page that you change. The key here is that this works similarly to a Multivariate test, as each possible combination of changes will be tested. Therefore, AP is usually best run on pages with significant traffic.
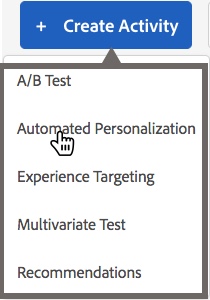
From the Target Premium Activities list, click: Create Activity Automated Personalization.
In the field labeled “Enter Activity URL”, replace the “XX” with your lab number then click Next. Your demo site will load within the VEC.
Click anywhere within the page to begin setting up the Activity’s experiences.
First we will be adding some alternate hero banners to the Activity. Click on the hero banner (the main banner image going across the page) and select “Change Image”, the image offer library will open.
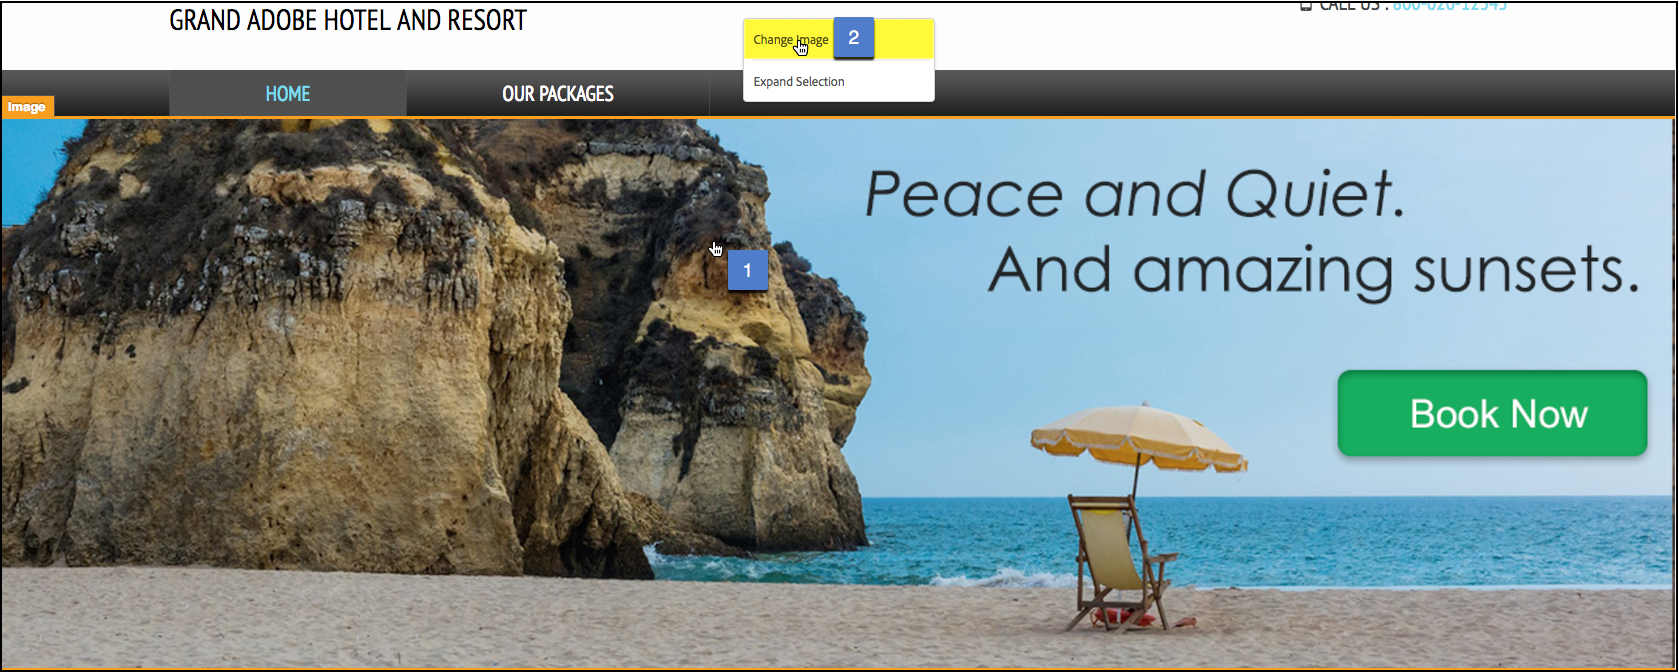
Select the alternate versions of the hero banner by clicking on the images that you would like to include in your activity.
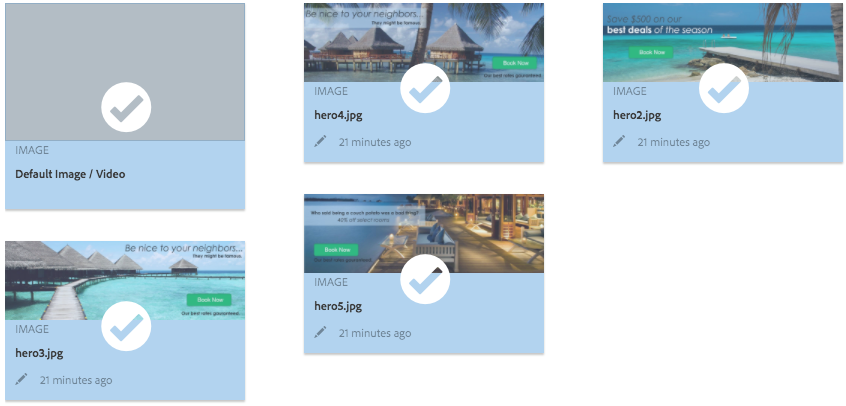
Tip: Target gives you option here to include your site’s default content as part of the Activity. In this scenario, the default content will be served from your Activity as if it was any other offer. AP will try to optimize the default content by showing it to visitors who may be more likely to convert on the default content. If you wish to include the default hero banner as part of the Activity, then leave that selected as well. If the default hero banner should be excluded, then clicking on it will unselect it and it will be removed from the Activity.
After you have selected the alternate hero banners, Click the “Save” button to return to the VEC.
Scroll down on the page and click on the text blurb located directly under the hero banner. Select the “Change Text/HTML” option.

Modify the text from the WYSIWYG editor.
Click “Add Text/HTML offer” to add more variants/offers to this location of the Activity.
After creating several options of altered text, click the “Save Button”.
Offer level targeting can be applied to each individual offer so that the content only displays for a particular Audience. An example of a use case where a marketer would apply offer level targeting, let’s say you have multiple levels of customer loyalty (Gold, Platinum), and you have content within this AP Activity that should only be shown to visitors when they belong to a particular Audience. Offer level targeting allows you to do just that.
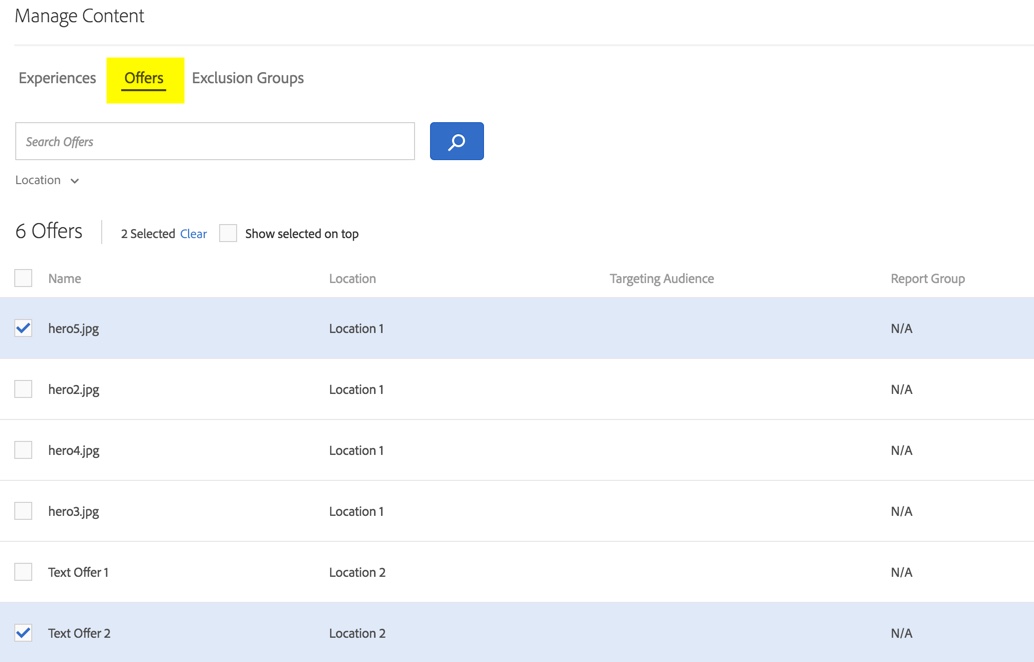
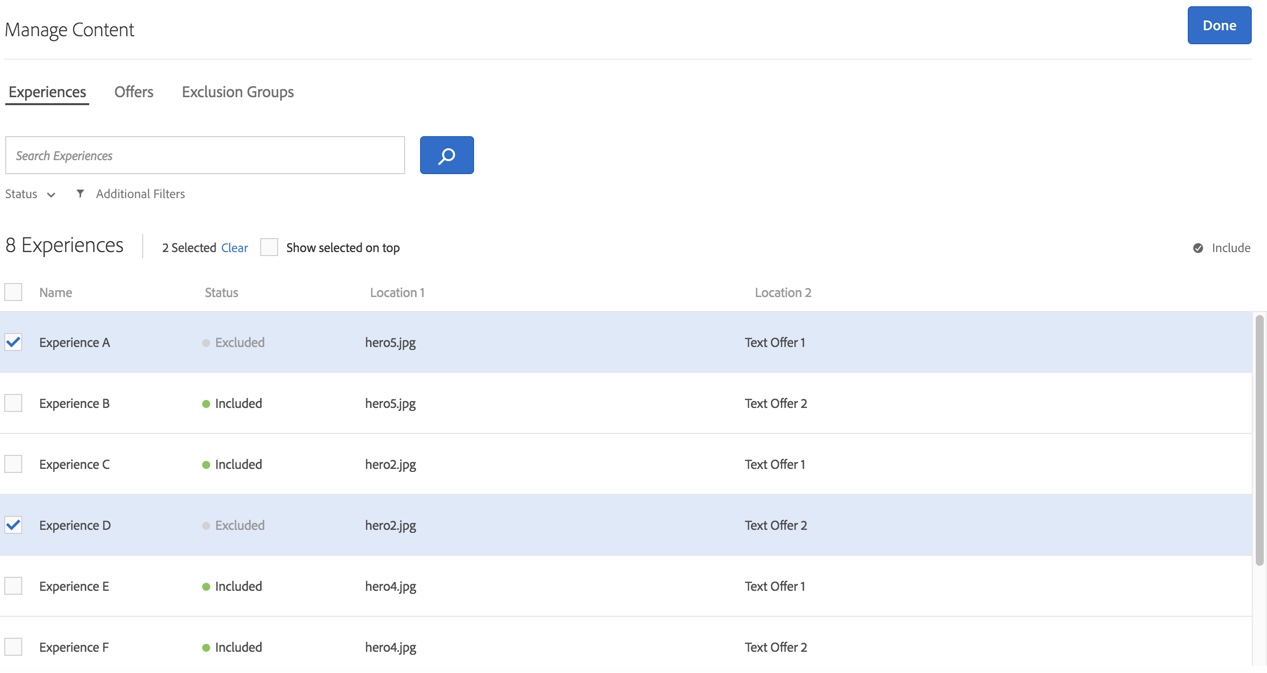
Click the “Manage Content” option to pull up the “Manage Content” window.
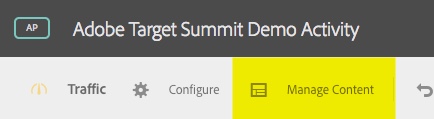
Click on the ‘Offers’ tab (as shown highlighted below). Select the offers that you would like to apply the targeting rules to.
In this example, we are selecting two of the offers to be served only when visitors are Gold Status members. However, there are many different Targeting options that can be applied to meet your specific use cases.
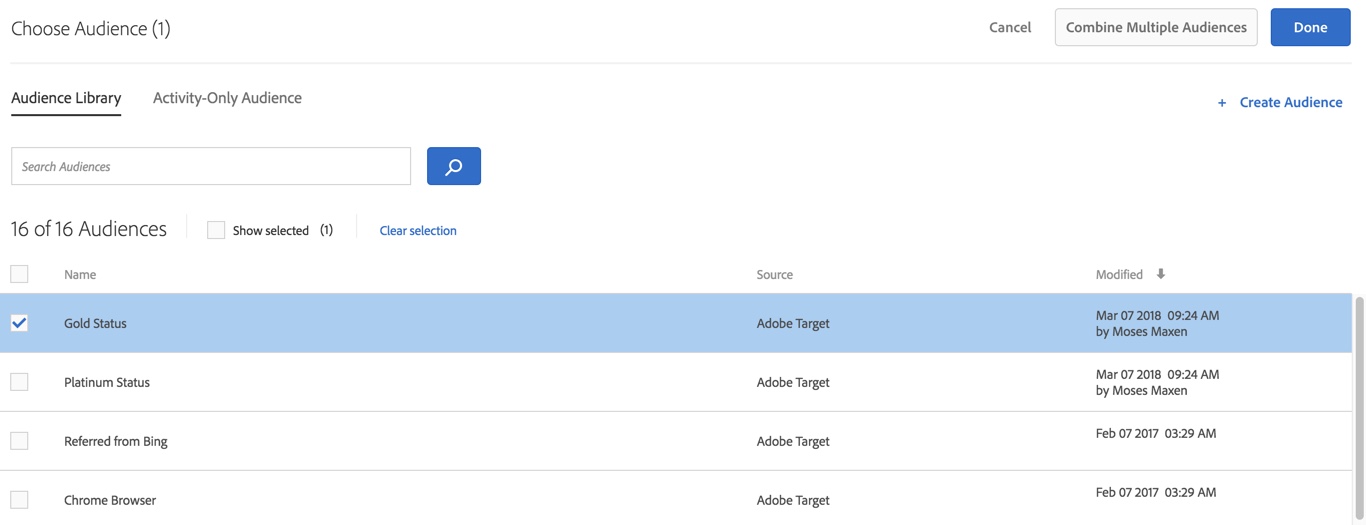
Click the “Targeting” option.

Select an Audience from the list.
For example, we have selected “Gold Status” from the below list. Only visitors who have a customer level status of Gold will see the offers that have this targeting applied. Feel free to create your own audience here as well using the “+ Create Audience” option.
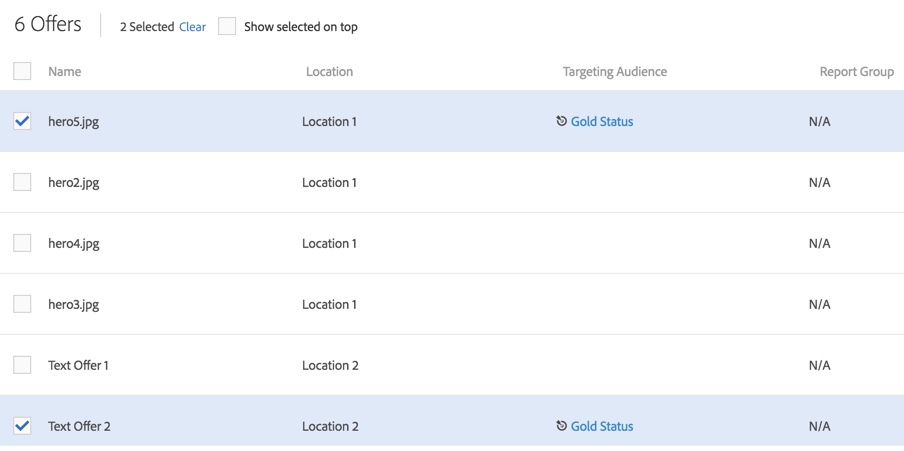
Click “Done” to apply the targeting. Your content list should now look similar to the shown screenshot.
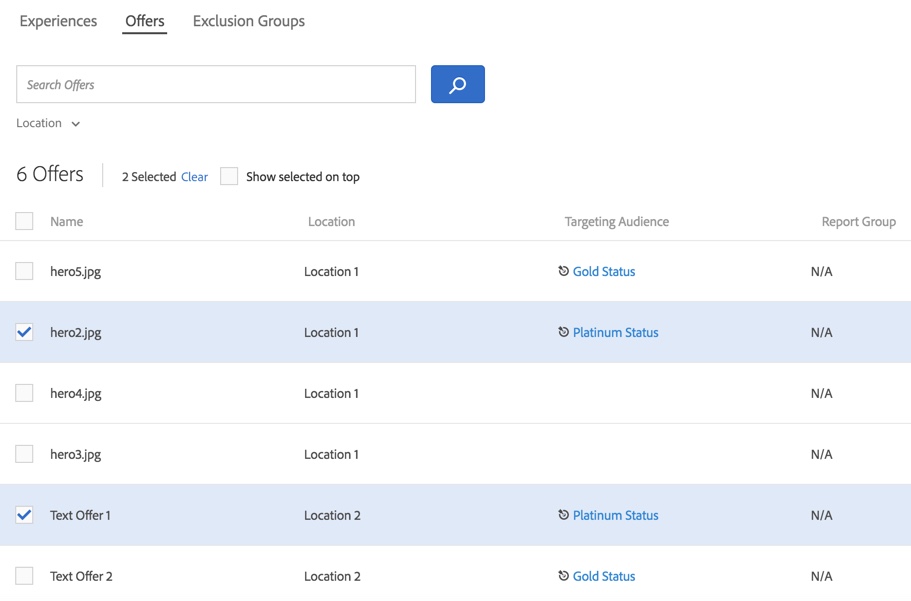
We can also target offers to customers who have a customer level status of Platinum. Select a couple of offers, click the “Targeting” option again, and select “Platinum Status” from the list. Then, click “Save”. Now only customers who have a customer level of Platinum will see these offers.
Now click “Done” to return to the VEC main page.

Advanced tip: If there are any combinations of offers that should never be displayed together to a visitor in a single experience, you can use exclusions to choose any combinations that you want to exclude from the activity.
Once you are ready, click the “Next” button to move on to the next step.
It’s time to configure the Activity targeting that will be used for this AP Activity.
First we will be adding an Audience to the Activity. In the previous step, we selected an Audience at the individual offer level. In this step, we will be adding an Audience at the Activity level. At this level of targeting, we are deciding who should be allowed into the campaign. Whereas with the offer level targeting from the previous step, we were deciding what pieces of content should be displayed to particular Audiences once those Audiences were entered in the Activity.
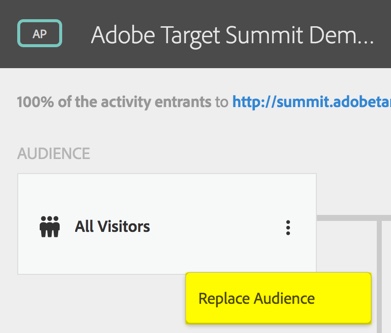
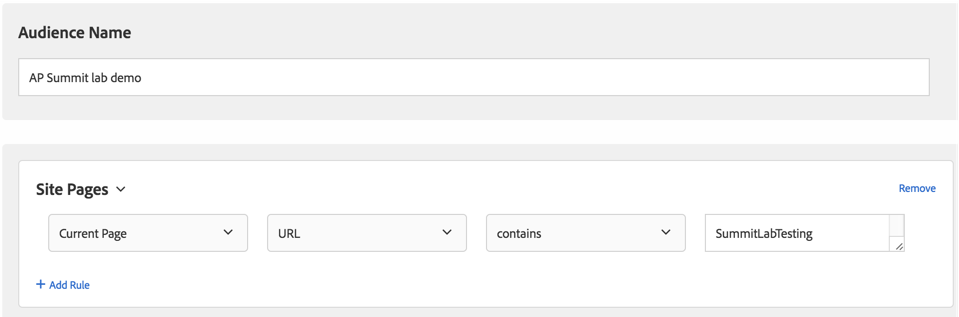
Click the down arrow icon next to the “All Visitors” text and select “Replace Audience” to open the Audience library.
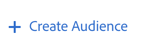
From the Audience list, click “+ Create Audience” to create a new Audience.
Specify a name of your choosing for your new Audience.

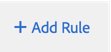
Click the “Add Rule” option to begin configuring your new Audience.
There are many targeting options to choose from. For the sake of this demo we recommend going with “Site Pages”.
For example, below we have set the Audience to only be allowed into the Activity when the current page URL contains “SummitLabTesting”.
For reference, here is the current list of the various targeting options:
Once you have finished configuring your new Audience, click the “Save” button to save it. This will take you back to the Audience list.
From the Audience list, select your new Audience, and click the “Done” button which will apply this Audience to your Activity.
Automated Personalization uses a Random Forest algorithm, a leading data science ensemble method, as its main personalization algorithm to determine the best experience to show a visitor. Automated Personalization can be valuable in the discovery phase of testing. It is also useful to allow machine learning to determine the most effective content when targeting diverse visitors. Over time, the algorithm learns to predict the most effective content and displays the content most likely to achieve your goals.
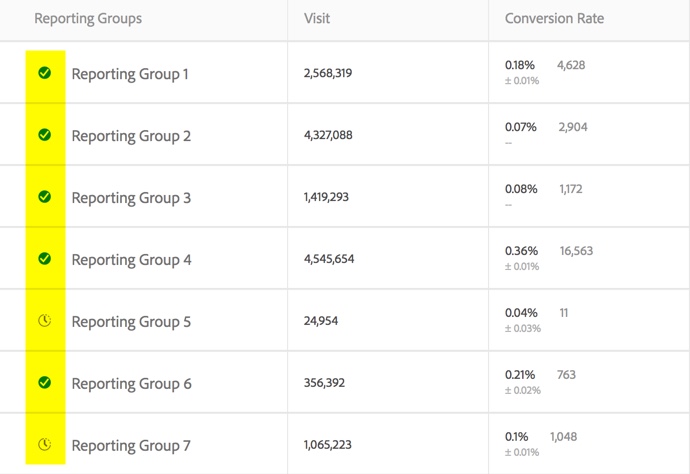
Tip: It takes time for the machine learning to build a model for each offer/reporting group. During this time, the system learns from the behavior of the control group, where offers are served at random to a percentage of the total population. The time it takes for the models to be built is dependent on the level of traffic and the number of conversions. In the AP Offer level report, you can see if a model has been built yet. Highlighted below you will see either a clock icon or a checkmark. The clock icon denotes more time is needed, whereas the checkmark means the model has been built for that particular offer/reporting group.
The last step is selecting your Primary Goal metric. This is particularly important for AP Activities, as the algorithm optimizes to this type of conversion. You can still add additional metrics as well, but the algorithm will adjust traffic based on each variation’s performance against this primary metric. Therefore, it is important to choose carefully and select the metric that is most suitable for the campaign. If you are unsure about which primary metric is right for the activity, optimizing towards click through rate is a good place to start.
Scroll down the page until you see the section for Reporting Settings. It should look something like the below screenshot:

Advanced tip: There are two types of optimizing goals, Conversion and Revenue.
Conversion – With this metric there are three options. You can track clicks, but you can also track if a particular page was viewed or if a particular mbox request is made.
Revenue – With this metric you can optimize against Revenue per Visitor (RPV). A use case for optimizing towards revenue would be if your conversion rates are on the lower side.
Please note that for optimizing towards revenue, there is additional implementation that requires the passing in of Order information into Target. The following parameters should be passed through any mbox at the time of conversion.
| Parameter | Description |
|---|---|
| orderId | Unique value to identify an order for conversion counting. The orderId must be unique. Duplicate orders are ignored in reports. |
| orderTotal | Monetary value of the purchase. Do not pass the currency symbol. Use a decimal point (not a comma) to indicate decimal values. |
| productPurchasedId | Comma-separated list of product IDs purchased in the order. These product IDs display in the audit report to support additional reporting analysis. |
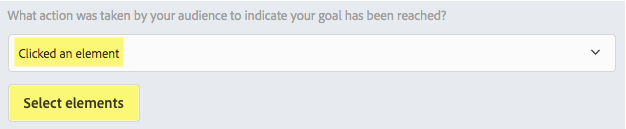
For this exercise, choose Conversion as your primary metric.

Next we will define the conversion event. Select “Clicked an element” and then click on the “Select elements” button. This will take you back into the VEC to define your click event(s).
Click on the hero banner to select it. After clicking on it, you should see the banner will have a blue border around it.


Once you have selected the hero banner, click on the checkmark seen on the very top right corner of the page. This will take you back to the Goals and Setting page.
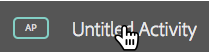
Lastly, let’s give this Activity a name. Found in the very top left of the page, click on the “Untitled Activity” text and specify a name. Please use your lab participant number in the name of your Activity. For example: Automated Personalization Lab – participant 105
Now we are ready to save the Activity. Click the “Save” button located in the top right corner of the page.
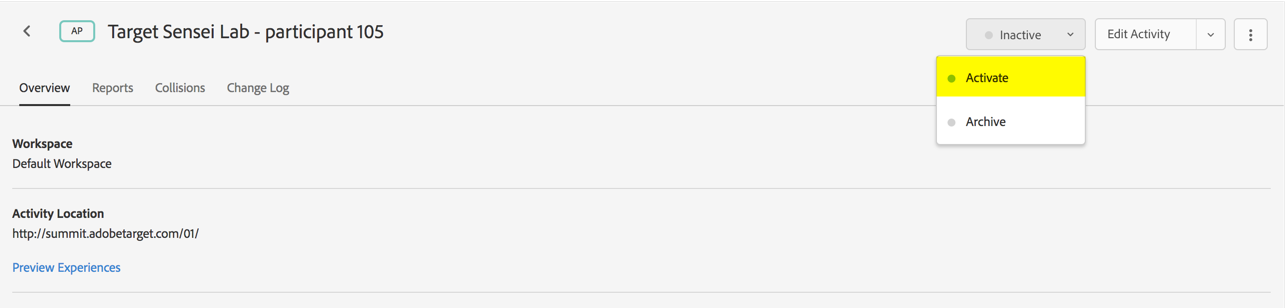
On the top left of the Overview page, you will see a spinning “synching” notice on the top right of the screen for a few moments. At this point, the test is synching with the Target delivery network.

Once an activity is synched it will be inactive and the “Activate” button will appear on the top right.
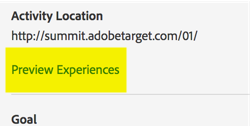
Before launching your test, you might wish to have your QA team review your test experiences.
Click the “Preview Experiences” link to open the Experience URLs overlay.
To generate the preview links, click the blue “Generate all” text link
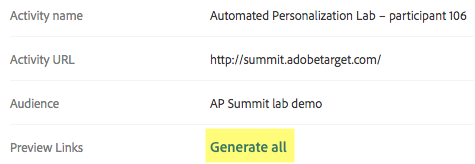
These URLs will allow you to jump directly to a test experience:
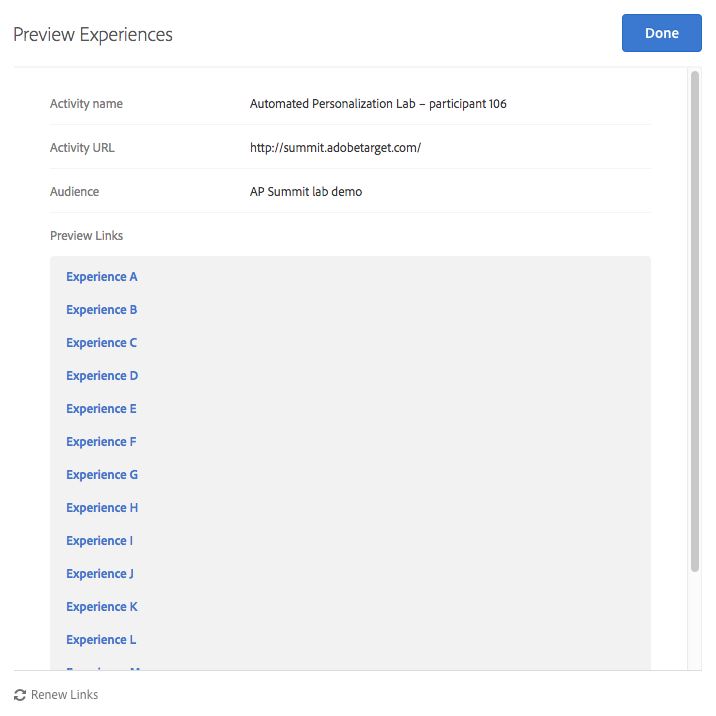
Tip: to share or socialize these links, you can copy and paste the links into an email or document.
After your test experiences have passed review, you are ready to Activate your test. Simply click the “Activate” button.

Click “Activities” from the main menu to go back to the Activities list and confirm that your activity is Live.

Congratulations! You just launched your first Automated Personalization Activity with Adobe Target!

Auto-Target uses advanced machine learning to select from multiple high-performing marketer-defined experiences, and serves the most tailored experience to each visitor based on his or her individual customer profile and the behavior of previous visitors with similar profiles, in order to personalize content and drive conversions.
Because of the successes our clients have seen using Automated Personalization, we have added automated personalization capabilities inside of the AB testing Activity workflow. Now with the click of a radio button, you can turn your AB Activities into an auto-personalizing Auto-Target Activity.
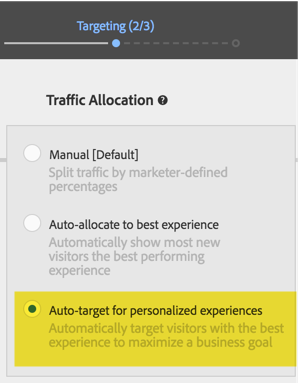
On step 2 (Targeting) of the AB testing workflow, you have the option of changing your traffic allocation to Auto-target for personalized experiences. Selecting this option enables the systems to leverage Sensei machine learning to personalize a visitor’s experience based on their current Target visitor profile.
There are several scenarios where you might prefer to use Auto-Target over Automated Personalization:
If you want to define the entire experience rather than individual offers that will be automatically combined to form an experience.
If you want to leverage the full set of Visual Experience Composer (VEC) features not supported by Auto Personalization: the custom code editor, multiple experience audiences, and more.
If you want to make structural changes to your page in different experiences. For example, if you wanted to rearrange the order of elements on your home page, Auto-Target would be more appropriate to use than Automated Personalization.
There have been several recent enhancements made to the reporting of these activity types to help marketers gain valuable insights from their personalization efforts. In this step, we will explain how to evaluate the effectiveness of your AP/AT Activities.
Two specialized reports are available to users of Automated Personalization (AP) and Auto-Target (AT) activities: the Automated Segments and Important Attributes reports. We will go into further details of these reports in the following two Lessons. First let’s take a look at the standard reporting that AP has to offer.
From the main Target Activities list (Click Activities from the main menu), click on an Automated Personalization activity from the list, then click the Reports tab.
(Optional) Click the Download icon to download the summary view (for example, comparing Control and Targeted traffic) as broken down by all available success metrics.
Automated Personalization provides the following reports:
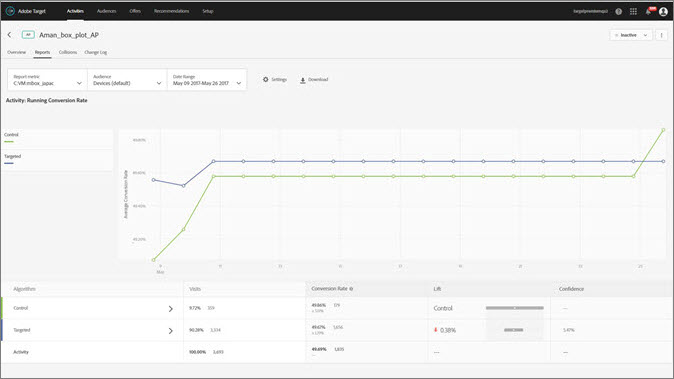
Activity Level Report: The Activity Level report compares the aggregate performance of using an Automated Personalization algorithm to randomly served content (control).
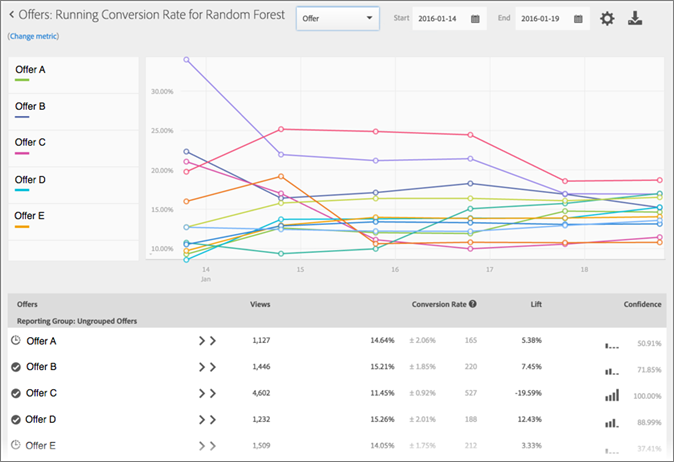
Offer Level Report: The Offer Level report for the Random Forest experience compares the performance of each algorithm-applied offer to the same randomly served offer (Control). Thus, offers should not be compared against each other in this view. In the example below, it can be stated that Offer D exhibits a 12.43% lift when served according to the algorithm logic (Random Forest) as opposed to randomly (Control).
Click the experience algorithm (Random Forest or control) to view the Offer Level report.
Offers can be shown within report groups, and these report groups can be collapsed and expanded. Select Reporting Group in the drop-down list to view rolled-up information by reporting groups, rather than by offers.
Note: The clock icon indicates that the algorithm model is still building. The checkmark icon indicates that the base algorithm has been established.
The Automated Segments report is one of the two specialized reports available to users of Automated Personalization (AP) and Auto-Target (AT) activities.
Different visitors respond differently to the offers/experiences in your AP/AT activity. This report shows how different automated segments defined by Target's personalization models responded to the offers/experiences in the activity.
Click Activities, then click the desired AP or AT activity from the list.
Click Reports.
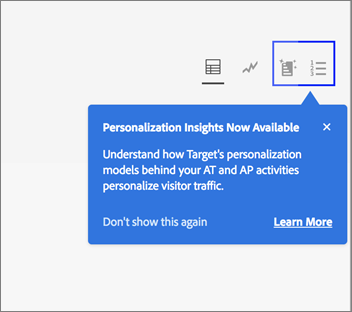
The Summary report displays, which provides information about the performance of your activities, represented by the first screen icon. The two additional icons represent the two Personalization Insights reports: Automated Segments and Important Attributes. Note that Auto-Target has an additional graph icon for the graphical view of the Summary report.

Important: The Automated Segments report won't be available until at least 15 days after you've activated your activity. During this initial period, you won't be able to access this report or click the Automated Segments icon. After 15 days have passed, assuming there is sufficient personalized traffic in your activity, the Automated Segments report will be available.
After 15 days from activating the activity, you can click the Automated Segments icon.
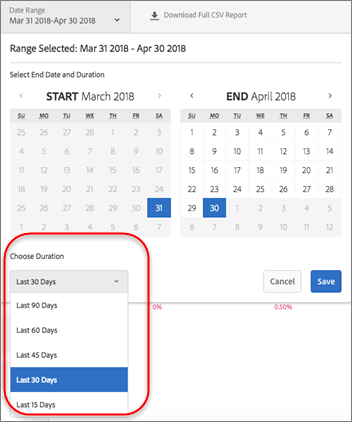
Select the desired date range.
Unlike the Summary report (performance reporting), Personalization Insights, including Automated Segments, is available only for fixed date ranges: 15 days, 30 days, 45 days, 60 days, and 90 days. These fixed date ranges allow Personalization Insights to use a large enough range of data to reduce the likelihood that you derive insights from a short-lived pattern in your activity. The two decisions you can make for your date range is the "End Date" and the "Duration." You'll notice that the "Start" is greyed out. The start date automatically changes based on your selections for the end date and duration. Select the desired date range.
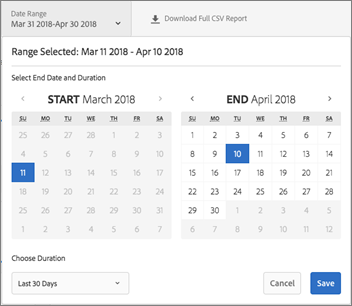
You can access the available fixed date ranges from the Choose Duration drop-down list.
Review the Automated Segments report data.

The following table explains how to interpret the report and describes its elements:
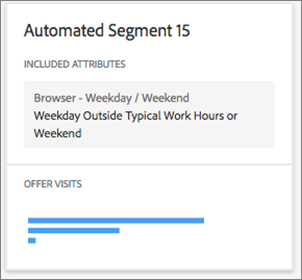
This automated segment is defined based on only one attribute. Visitors included in this automated segment saw this AP activity on a weekday outside of typical working hours or on a weekend.
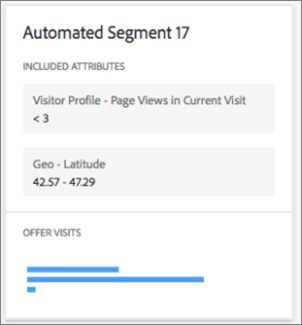
This automated segment is defined based on two attributes. Visitors included in this automated segment who saw this AP activity had fewer than three page views in their current visit and were geographically based within the Latitude 42.57 and 47.29 (approximately between New Hampshire/Oregon and Washington/Maine for a US-based company).
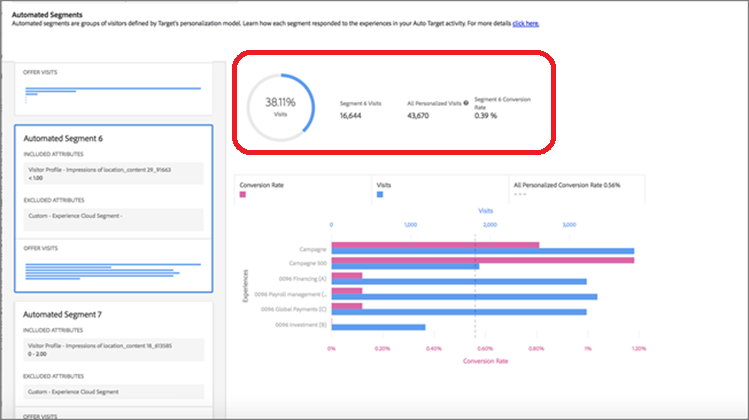
The center graph displays how your activity's content performed for the highlighted automated segment. As you click different segments on the left-hand panel, the center graphs update.
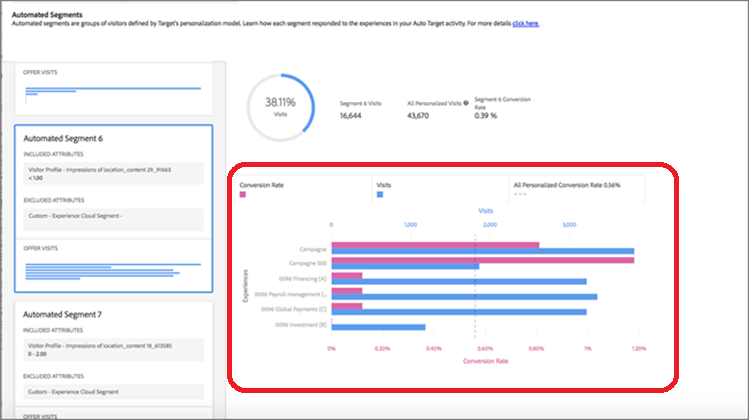
The pie charts at the top of the center panel show the size of the automated segment, as well as the total number of personalized visits in the activity (for example, traffic to this activity that was served by the personalization model. It does not include control traffic or traffic served by the overall winner model). Note that the size of the segment is based only on personalized visits.
(Optional) Download the report in CSV format for analysis in Excel and other tools.
Note: The Personalization Insights UI report contains select information. The CSV download for the Automated Segments report contains additional details. The Automated Segments report download includes additional Automated Segments beyond the top segments included in the UI, along with how those segments performed against your offers or experiences.
The Important Attributes report is another specialized report available to users of Automated Personalization (AP) and Auto-Target (AT) activities.
In different activities, different attributes are more, or less, important to how the model decides to personalize. This report shows the top attributes that influenced the model and their relative importance.
Click Activities, then click the desired AP or AT activity from the list.
If you have many activities, you can filter the list by selecting options from the Type, Status, Reporting Source, Experience Composer, Metrics Type, and Activity Source drop-down lists.
Click Reports
The Summary report displays, which provides information about the performance of your activities, represented by the first screen icon. The two additional icons represent the two Personalization Insights reports: Automated Segments and Important Attributes. Note that Auto-Target has an additional graph icon for the graphical view of the Summary report.
Important: The Important Attributes report won't be available until at least 15 days after you've activated your activity. During this initial period, you won't be able to access this report or click the Important Attributes icon. After 15 days have passed, assuming there is sufficient personalized traffic in your activity, the Important Attributes report will be available.
After 15 days from activating the activity, you can click the Important Attributes icon.
Select the desired date range.
Unlike the Summary report (performance reporting), Personalization Insights, including Important Attributes, is available only for fixed date ranges: 15 days, 30 days, 45 days, 60 days, and 90 days. These fixed date ranges allow Personalization Insights to use a large enough range of data to reduce the likelihood that you derive insights from a short-lived pattern in your activity. The two decisions you can make for your date range is the "End Date" and the "Duration." You'll notice that the "Start" is greyed out. The start date automatically changes based on your selections for the end date and duration.
Review the Important Attributes report data.

Important Attributes Bar Graph
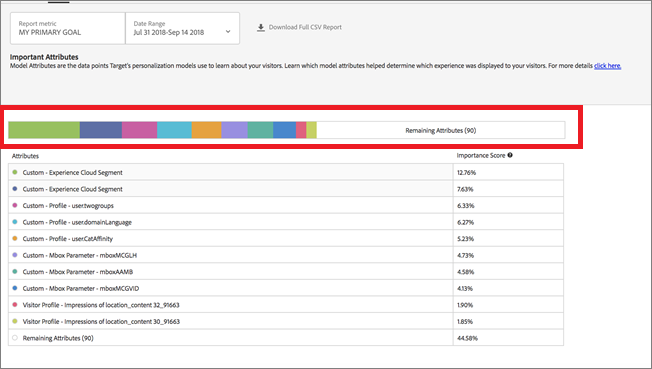
The multi-colored bar graph at the top of the screen allows you to visualize these relative importance scores and maps to the dot's color beside each respective attribute in the table. You can also hover over a specific color in the bar chart to see the attribute it represents. The importance scores across the top 100 attributes add to 100%.
Important Attributes Ranking Chart
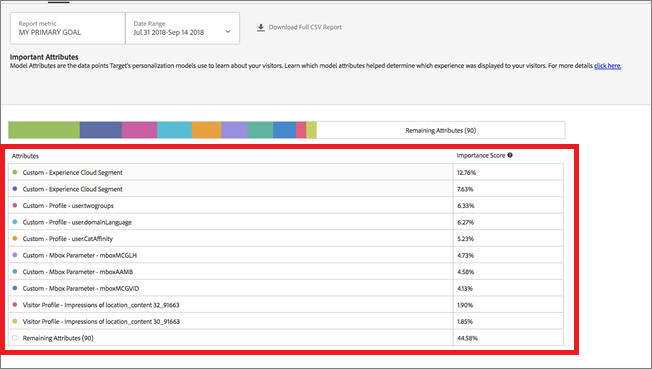
The Model Attribute Ranking includes the top 10 attributes that were most important to how Target's personalization model decided what content to show each visitor. The importance score shows, relative to the top 100 attributes, how important a specific attribute was to Target's personalization models in this activity.