
Recommendations are everywhere—and they aren't just for products anymore. With Adobe Target Recommendations, you can deliver personalized products, articles, videos, downloads, songs, content, and more with sophisticated algorithms and complete marketer control.
In this hands-on lab, you’ll learn how to:
This lab assumes you have some experience with the use of Adobe Target.
This workbook assumes that you have access to the following software:
NOTE: At your workstation, you should have a paper with your participant number, e.g. “001”. This number is used for many purposes during this lab: e.g. login credentials, demo site URL, etc. Whenever you see “YOURNUMBER” in this lab manual, replace it with your participant number.
Customers expect recommendations.
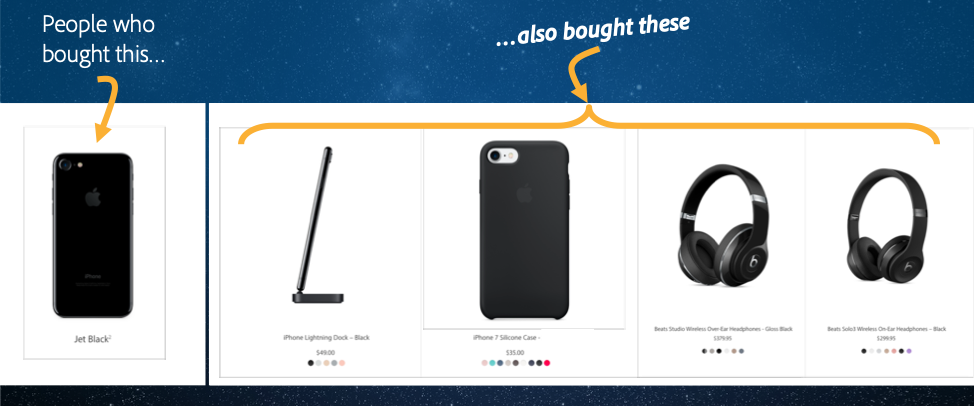
Most of us are familiar with recommendations in retail. Increasingly, customers expect recommendations and use them as a jumping off point to explore the available options.
And if you think about your own shopping behavior, these kinds of recommendations work!
Nearly everyone among us has bought a product we saw first in a recommendation somewhere.
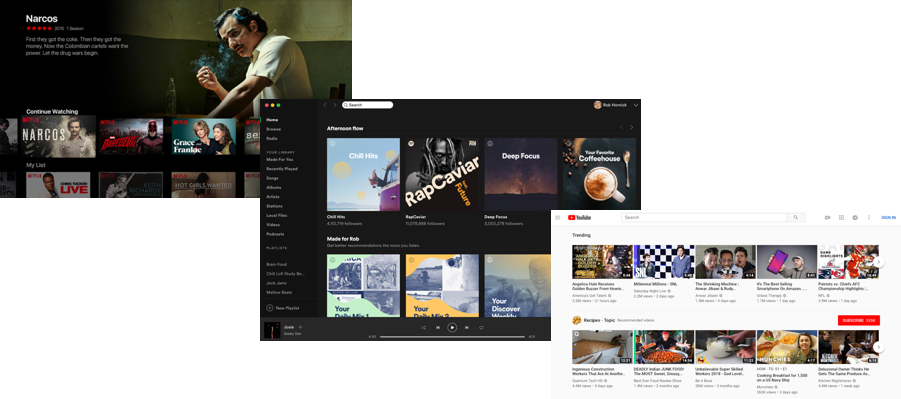
Increasingly, the way we consume media and content is driven by personalized recommendations.
Think about the first thing you see when you open up Netflix, Spotify or YouTube.
In a world where more alternatives are available than ever, it’s critical that you can identify the most relevant content for your customer at the point of interaction.
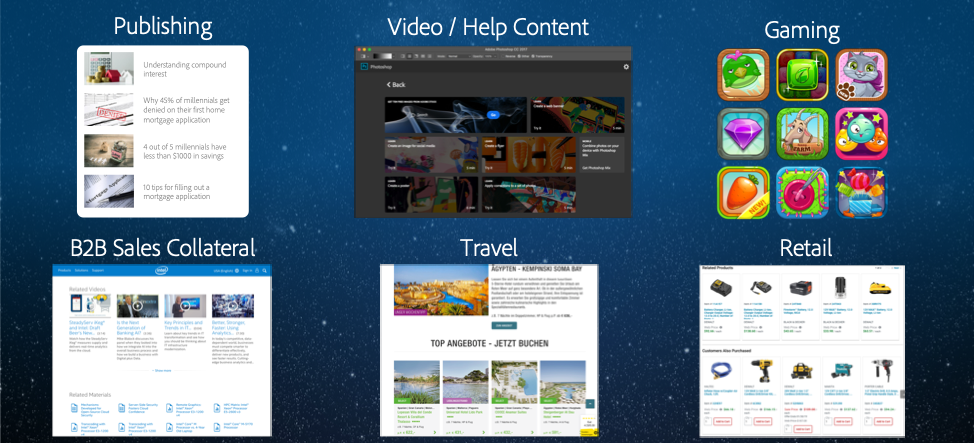
Marketers use Adobe Target to drive personalized experiences across a wide variety of industries, customer types and channels:
Great recommendations should be relevant and personalized. This means you need these three things:
Marketer controls to help drive relevance of the items that are recommended. As a marketer you bring valuable context to the table and you know what attributes of your products or content are relevant for a recommendations model to consider. If you’re running a video site, you know that users might be interested in seeing movies from the same director, but probably don’t care about seeing movies that were produced by the same studio. Adobe Target empowers you with controls that allow you to enhance your algorithms with this domain knowledge.
Sophisticated models to make sense of millions of items in your catalog and interaction events. Adobe Target has sophisticated machine learning capabilities built over a decade of experience and we handle billions of recommendations per year.
User context to ensure that recommendations are timely and relevant to your users. You don’t want to recommend the video that someone just watched or the shirt that someone just added to their cart. Adobe Target’s rich user profile can be used in recommendations to ensure personalization.
First, think about what you want to recommend – this could be products, videos, content.
Next, think about where you want to make recommendations. Broadly what channels – web, mobile, in-store, other? What parts of the customer journey? What pages on your site?
Then, suppose that you have an experience without recommendations and an experience with recommendations, or you have two different types of recommendations. How would you determine which experience was a better experience for your customers? Some metrics may be more difficult than others to measure. For example, the impact of recommendations on Customer Lifetime Value is often difficult to directly get to. So it is often easier to get to a less abstract metric and one that is more concrete – for example, revenue per visit, average order value, or number of clicks. In some cases you may be looking to minimize a metric – for example, the number of support calls.
| Recommendation Type | Location | Purpose |
|---|---|---|
Similar Items (e.g. ‘people who viewed this viewed that’; ‘last product you viewed/purchased’) |
Product page | Related; similar; publisher; helpful articles |
Alternative Items (e.g. ‘people who viewed this bought that’) |
Product page; email | Alternatives; substitution; similar; selection/decision |
Complementary Items (e.g. ‘people who bought this bought that’) |
Shopping cart; checkout (funnel); email |
Cross-sell |
High Affinity Items (e.g. ‘may we suggest’; ‘suggested products) |
Product page; checkout | Conversion-focused; expert |
Searched Items (e.g. ‘people who searched for this bought that’) |
Search results page | Cross-sell; related; complementary |
Most Popular Items (e.g. ‘’best-selling products’; ‘top viewed’) |
Homepage; product page; email | Engagement; cross-sell |
In this section, we will cover the basics of creating and managing your product or content catalog for Adobe Target Recommendations. You will learn:
Open Chrome and navigate to http://summit2019l737.experiencecloud.adobe.com
Click “Sign in with an Adobe ID”.
Log in using the following credentials:
Username: hornick+YOURNUMBER@adobetest.com
Password: Summit19
Upon logging into the Experience Cloud, you will see the Experience Cloud homepage which suggests helpful Getting Started Content. To open Adobe Target, click the Solution Switcher, represented by a grid icon ( ) in the upper right corner of the screen, then click Target from the dropdown menu that appears:

An intro page will appear the first time you log in – click Skip Intro in the upper right hand corner.

Click  underneath the Target card that appears to open the application.
A release announcement will appear the first time you log in – click the checkbox next to “Do not show again until next Adobe Target release”, then click the X in the upper right corner to dismiss the announcement.
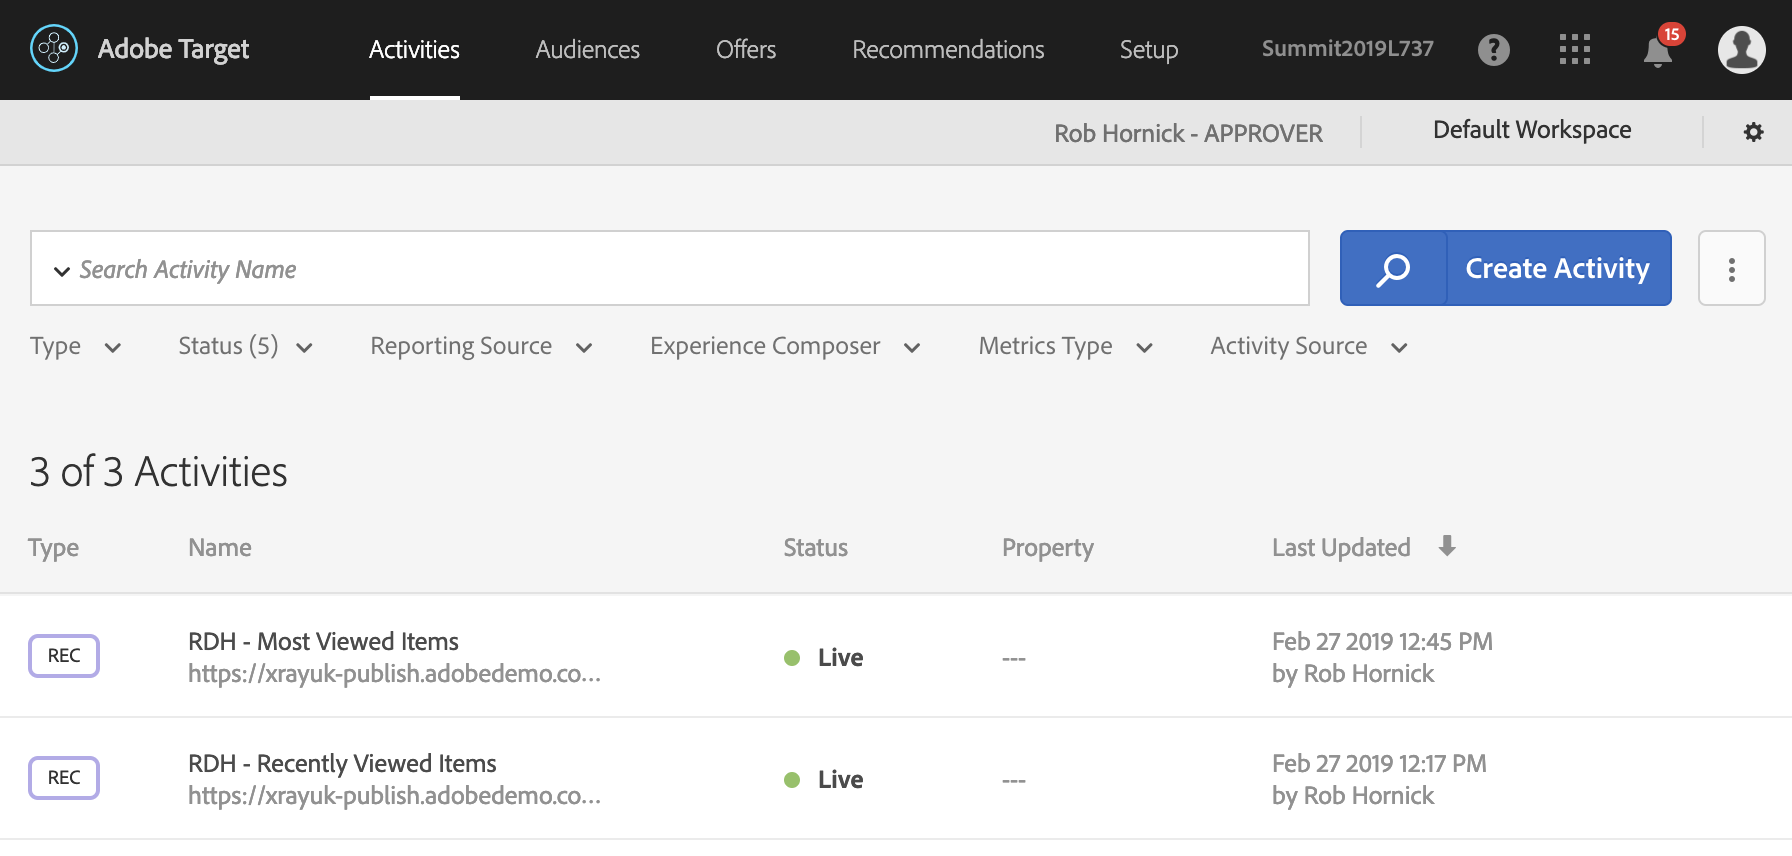
Here you will find the Activities page. Activities are how you set up an A/B Test, Experience Targeting rules, Automated Personalization model, or Recommendations experience.
We’ll return to this page later to create Recommendations on our site.
For now, we’re going to navigate to the Recommendations tab, where we can do some of the initial configuration of Recommendations. Click on Recommendations in the top navigation bar.

You will now find yourself at a blank search page.
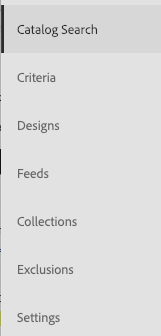
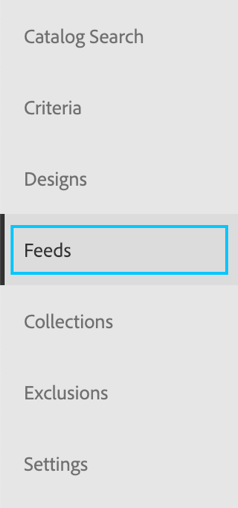
On the left-hand navigation bar, you can see the various elements of Target Recommendations that you can configure:
We’re going to start by using Catalog Search, the current page you are viewing.
Catalog Search allows you to inspect the contents of your Target Recommendations catalog. Your catalog contains all of the items (for example, products, articles, or videos) that you might want to recommend, along with relevant data points that describe each of these items.
These attributes might include:
Sample Product Catalog Attributes
Sample Video Catalog Attributes
In Target Recommendations, we call these items “entities” and these descriptive data points “attributes”.
Let’s look through the items we currently have in our catalog for our retail store.
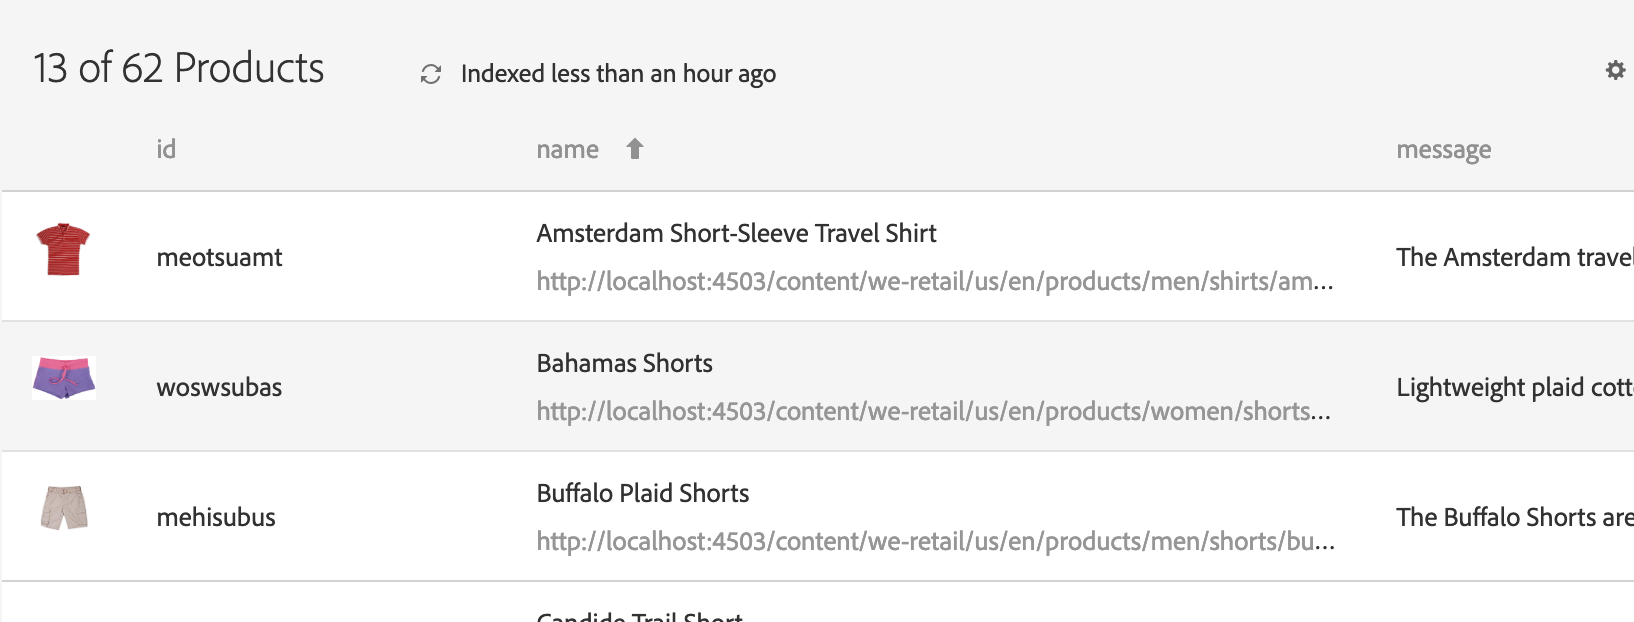
First, in the search box, type shorts and press Return/Enter or click the magnifying glass icon.

You’ll see that 13 items containing “shorts” are present in the catalog. Note that some are actually pairs of shorts -- while others are “short-sleeved shirt”, “shorty” surfboard, etc.
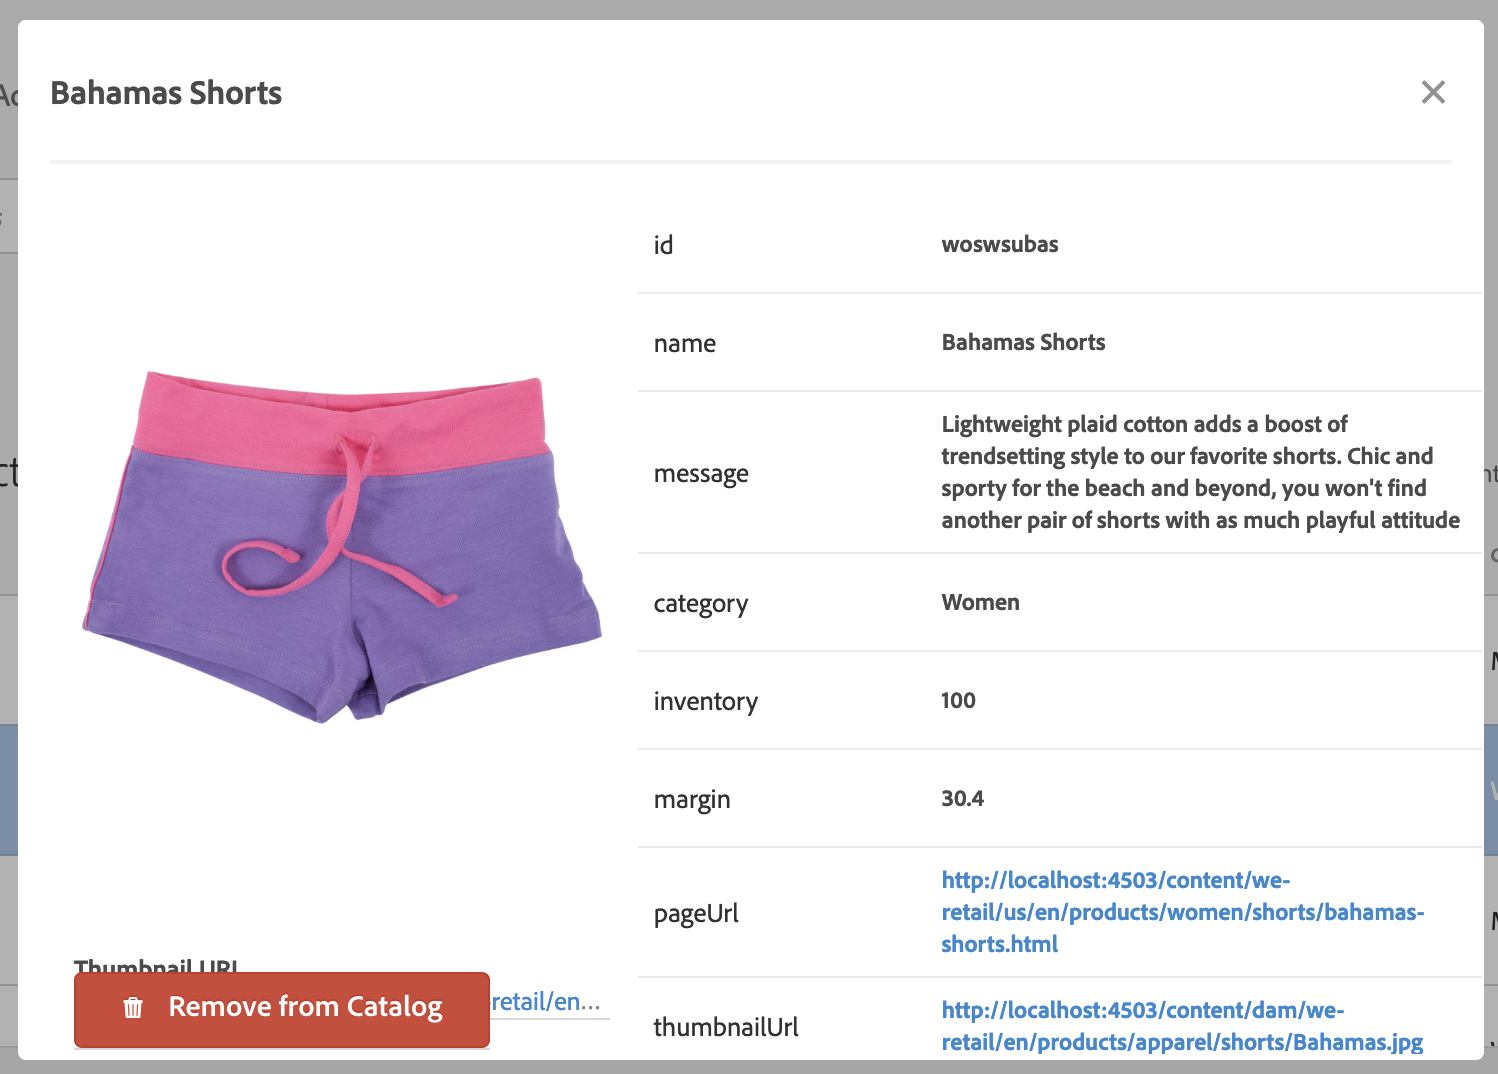
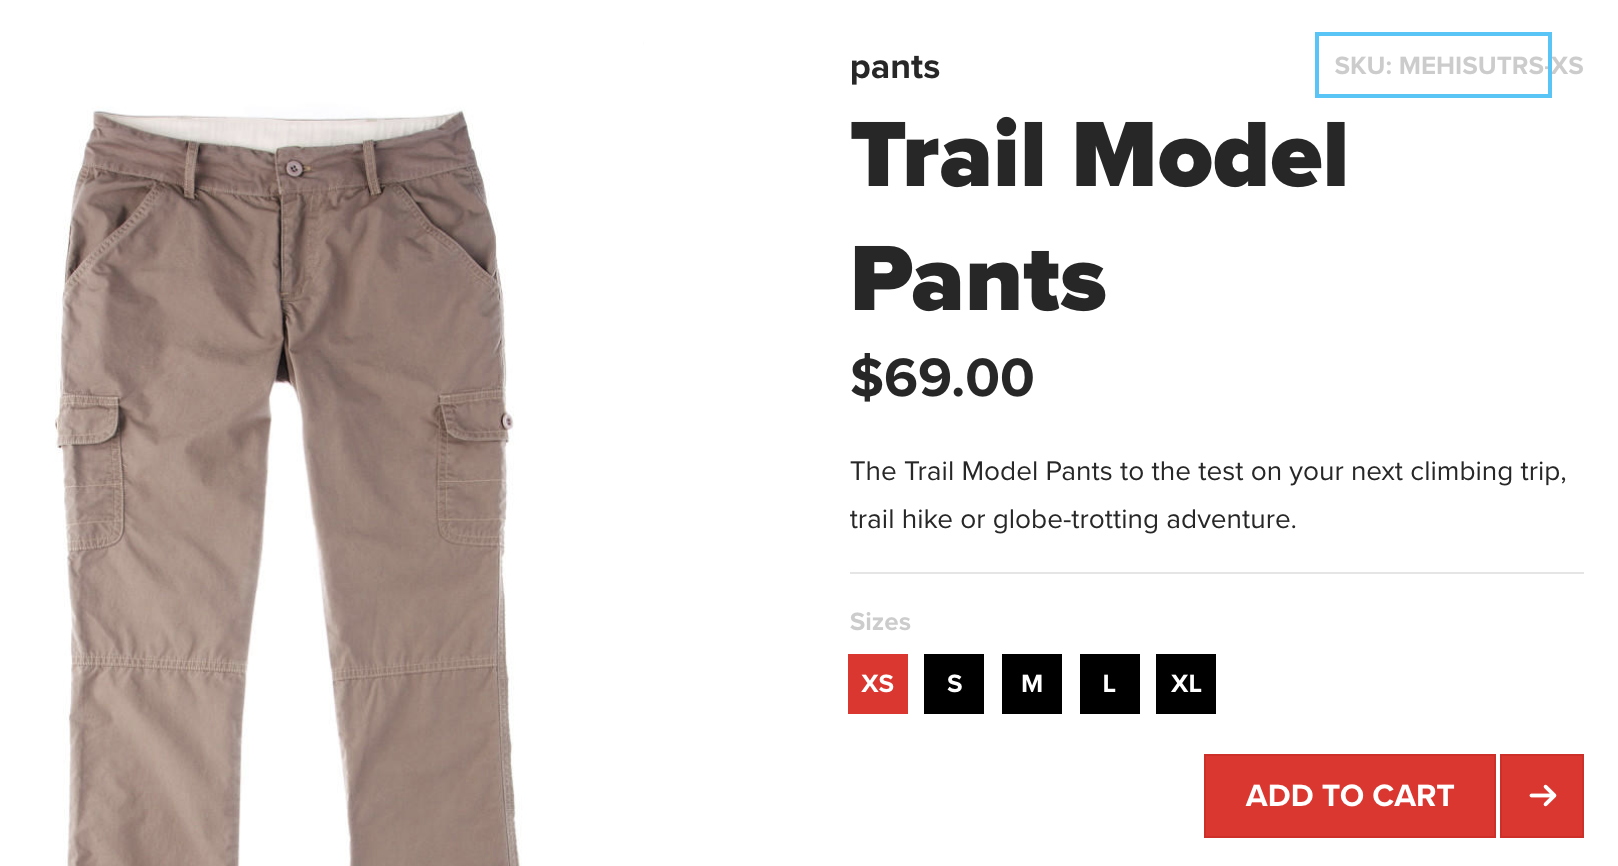
To view an item’s details, click the item name in the list below.
You’ll see the full details for the item, including description, inventory, page URL, thumbnail image URL, etc.
Tip: Note that items can be deleted from the catalog from this page. (Don’t remove any items during this lab!)
Close the detail view to return to your search results.
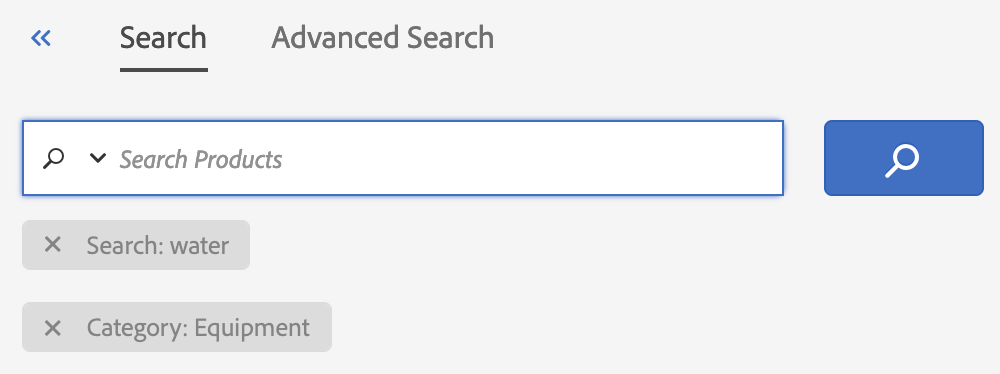
You can apply additional filters to the results from the list at left. Let's try a new search. Type water into the search box. Then, expand the Category filter and select Equipment.
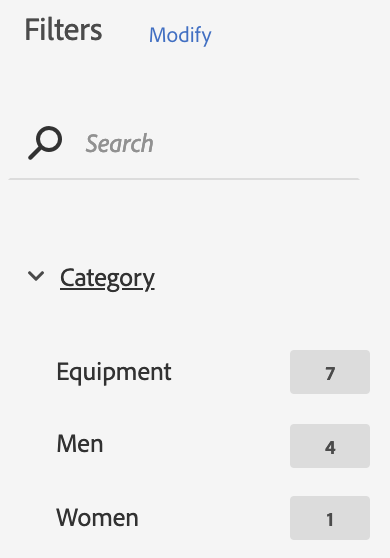
You will see the results with the Category: Equipment filter applied. Go the tags listed below the search box and remove the Search: water tag to see all products in the Equipment category.
You should send Target three kinds of metadata about your catalog items:
Data that you want to display to the user receiving the recommendation – for example, the name of the product and a thumbnail image URL.
Data that is useful for applying marketing and merchandising controls – for example, the category of the product., the price of the product, and the stock level of the product.
Data that is useful for determining the similarity of items to other pieces of items – for example, the brand of the product.
Target Recommendations offers multiple ways to send in your catalog data:
Feeds: You can send a CSV file or Google Product Feed (XML file) on a daily, weekly or biweekly basis to Adobe Target. This is the easiest method to ensure your entire product catalog is imported and is good for making sure all of your attributes are present in the catalog. Feeds can be fetched from an HTTP or HTTPS URL, or on an FTP or FTPS server. If you use Adobe Analytics, you can also send Adobe Analytics Product Classifications as a feed.
Entities API: You can use Target Recommendations’ RESTful Entities API to create or update items in the catalog whenever an item is updated in your Product Information Management (PIM) system or Content Management System (CMS). For more information, refer to the Target Recommendations API documentation on the Adobe Target Developers portal.
Target Javascript (aka mbox): You can send catalog updates via Adobe Target’s Javascript functions. Generally, this is done on your product detail page or equivalent (e.g. video view page, article view page, etc.) This is useful when paired with feeds to pass certain frequently-updated attributes that are crucial to update in a timely fashion: for example, inventory levels or price.
For most use cases, it’s best to start with a periodic feed file (daily or weekly) and fill in with either the Entities API or Target Javascript for updates that are necessary to make in between feed files.
Tip: Whichever method you choose, be sure to send a record of your product at least on a monthly basis. Target Recommendations removes products from the catalog if they are not refreshed within a 60-day period.
Navigate to the Feeds section using the left-hand bar to see the configured feeds.
Click the + Create Feed button in the upper right-hand corner to configure a new feed.
Type the name for your feed: YOURNUMBER – Test Feed
Select the feed Source Type: CSV.
Open the URL http://summit-demo.com/feeds/weretail_product_catalog.csv in a spreadsheet program to examine a sample CSV feed.
Note that you can add additional columns to the right to add additional data attributes.
Return to Target Recommendations.
Select URL as the Source Location and enter the above URL.
Click Next and select Never as the upload frequency. (We will use this option to avoid having several feeds running in the classroom.)
Leave the default Mapping settings and click Save in the upper right-hand corner.
Your feed is now created and you will return to the list of feeds.
Mouse over the feed in the list to see the available options on the right: Edit, Copy, Delete and Activate. Move on to the next section without activating your feed.

Collections allow you to create separated sets of items to be used in different types of recommendations across your site. This is useful when you have multiple types of items that are recommended in different contexts and do not want these items to appear together. For example, on a retail site, you might separately recommend Products and Articles. Or, on a news site, you might separately recommend Articles and Videos.
Navigate to the Collections tab using the left-hand navigation bar. Note that the All Collections collection is listed; this contains all items across your site and is the default option.
Click the Edit pencil icon ( ) on the Equipment collection to view the definition of this collection and the items contained within it:

Scroll down further to see the products matching the search criteria; then click Cancel to leave the Collection without editing it.
Tip: Collections are best used to separate broad types of items, as in the examples above. Finer-grained filtering is best done in the Criteria, as we shall see later.
Tip: Collections are best used with product attributes that do not frequently change (e.g.: category or gender), not frequently-changed attributes (e.g. price or inventory level). This is because collection rules are applied only when a Recommendations algorithm executes, every 12-24 hours. Frequently-changed attributes can be used for filtering in Exclusions or Criteria filtering rules, which run in real time whenever a customer visits your site.
Exclusions allow you to prevent sets items from ever being recommended on your site. This is useful when there are certain types of items you don’t ever want to recommend: for example, on a retail site, you may never want to recommend clearance items; or on a movie site, you may never want to recommend NC-17 rated films.
Navigate to the Exclusions tab using the left-hand navigation bar.
Click the Edit pencil icon () on the Low Margin Items collection to view the definition of this exclusion and the items contained within it:

Scroll down further to see the products matching the search criteria; then click Cancel to leave the Exclusion without editing it.
Tip: An item captured in an Exclusion will never be recommended in any location on your site. Keep this in mind in subsequent exercises – you won’t see these items recommended even if they otherwise would be, based on your browsing behavior.
Tip: Even if an item is excluded from recommendations (i.e. part of an Exclusion), it is still possible to produce recommendations for that item and display them on the product detail of that item – as long as all related products aren’t similarly excluded.
One common Recommendations implementation option uses both feeds and page parameters.
This method is often preferred by retailers, who tend to have relatively consistent product catalogs, but with frequent changes to a few product attributes (such as price and inventory) due to sales, seasonal promotions, or seasonal inventory changes.
Whether using a CSV file or Google product file, use a feed to provide all product attributes that stay fairly consistent over time.
Required:
Other static parameters:
Attributes that are not consistent may be provided via feed, but often should also be provided on a more frequent basis via page parameters or API:
Priority is given to whichever set of data is received most recently. If you pass the feed first and then update the page parameters, changes that are made in the page parameters will be shown, replacing item information passed in the feed.
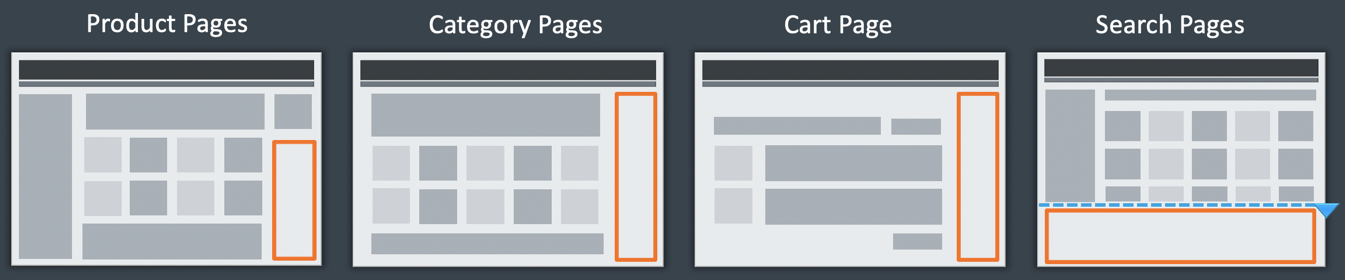
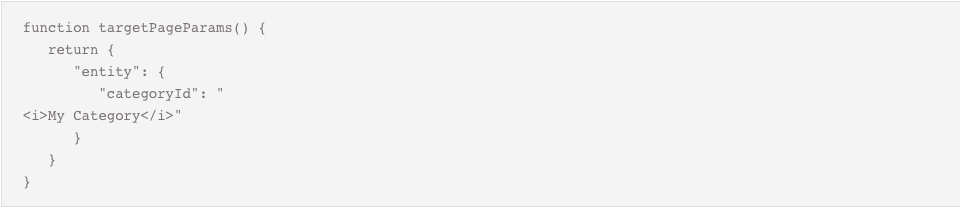
Page type will influence your Recommendations implementation. For example, the kinds of recommendations you want to present will differ between a product page, a category page, or your home page. For each page type, you should be sure to pass the appropriate key values for the right kind of recommendations.
The targetPageParams functions shown below is especially helpful if you are using a tag management solution to implement your pages. Adobe Launch or Adobe Dynamic Tag Manager (DTM) places the at.js/mbox.js reference and the targetPageParams function on your page and allows you to configure the values. You should either place that function before your at.js/mbox.js call, or put it in the Extra JavaScript section of your at.js/mbox.js.
On a product page, you will want to recommend items that are related to the current item and/or the current item’s category. You also want to send any frequently changing attributes (such as value and inventory), in addition to the identifying key for the item.
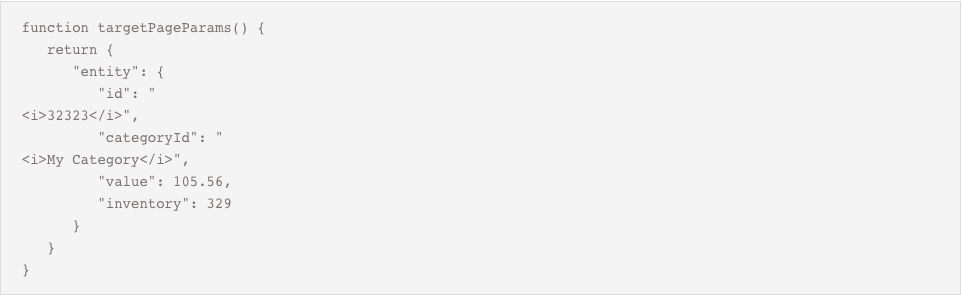
On a category page, you probably want to restrict your recommendations to products or content within that category. To achieve this, be sure to pass the category ID of the page:
On a cart page, you likely want to exclude some items from your recommendations, such as the items that are already in the cart.

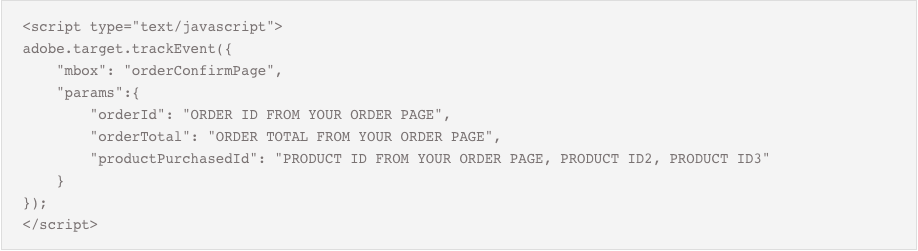
On an order confirmation page, you might want to show the order total, and the order ID, and show the products that were purchased, without recommending additional items. You can implement a second mbox to capture the order information.
Once your pages are properly tagged, you should review the Target server call to confirm if your implementation is working properly. By using native browser developer tools, we can inspect and evaluate components of the Target server request.
Navigate to a product detail page (e.g. http://localhost:4503/content/we-retail/us/en/products/men/coats/el-gordo-down-jacket.html#meskwielt)
In your Chrome browser window, open Developer Tools.
Select the Network tab and refresh the current page.
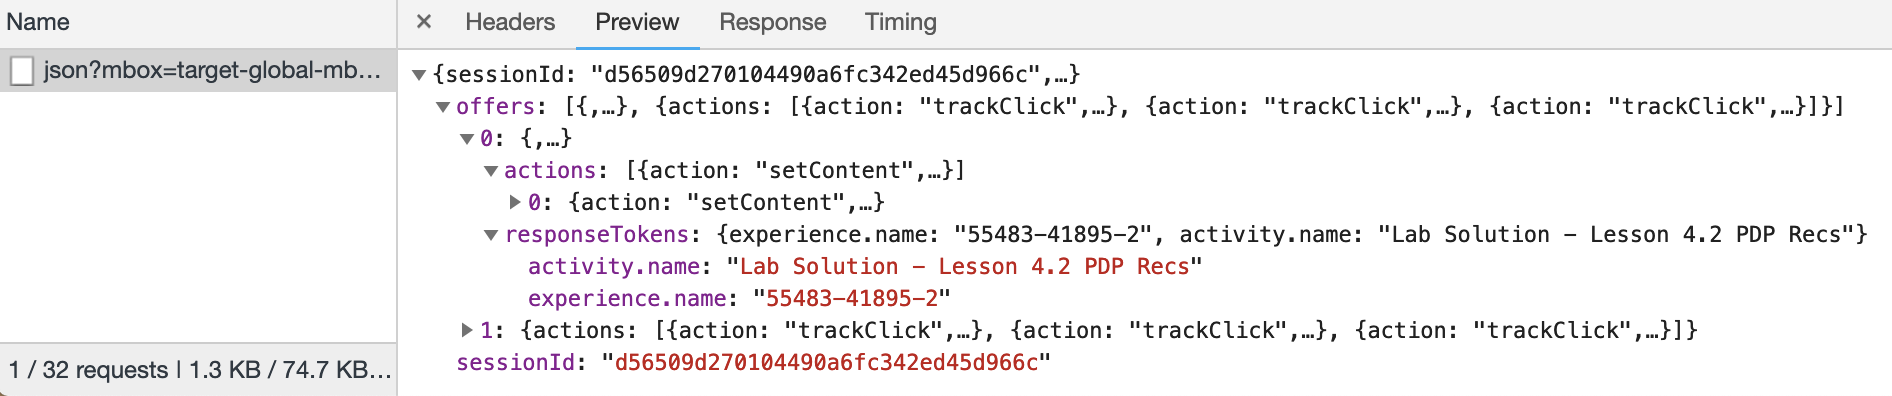
Type “mbox” in the search filter and select the request that appears.
After selecting the query at left, the Headers tab shows the information sent to Target, allowing you to confirm that the call is working as expected. Confirm that the entity.id and entity.categoryId are being sent to Target.

The Preview tab shows the actions returned from Target.
We’ll cover more advanced troubleshooting methods later which allow you to perform a deeper inspection of the Target Recommendations configuration.
In this section, we will cover the basics of creating personalized recommendations using Adobe Target Recommendations. You will learn:
Our goal for this lesson is to recommend items that users have recently viewed on our site’s homepage. This will allow shoppers to quickly return to items they have previously considered purchasing.
We’re going to start by creating your first Recommendations Activity. A Recommendations Activity is a way of linking together answers to the following questions:
Get started by following these steps:
Click the Activities tab on the top navigation bar to see a list of existing Activities.
Click + Create Activity, then choose Recommendations from the drop-down menu that appears, to create a new Recommendations Activity.
Here you have the choice of selecting a channel for the activity (Web, Mobile, Email or API), a choice of using the Visual Experience Composer or Form-Based Experience Composer, a choice of Workspace and can enter the Activity URL. Leave the default selections of Web and Visual Experience Composer. Enter the following URL for your Activity:
Click Next to create the activity.
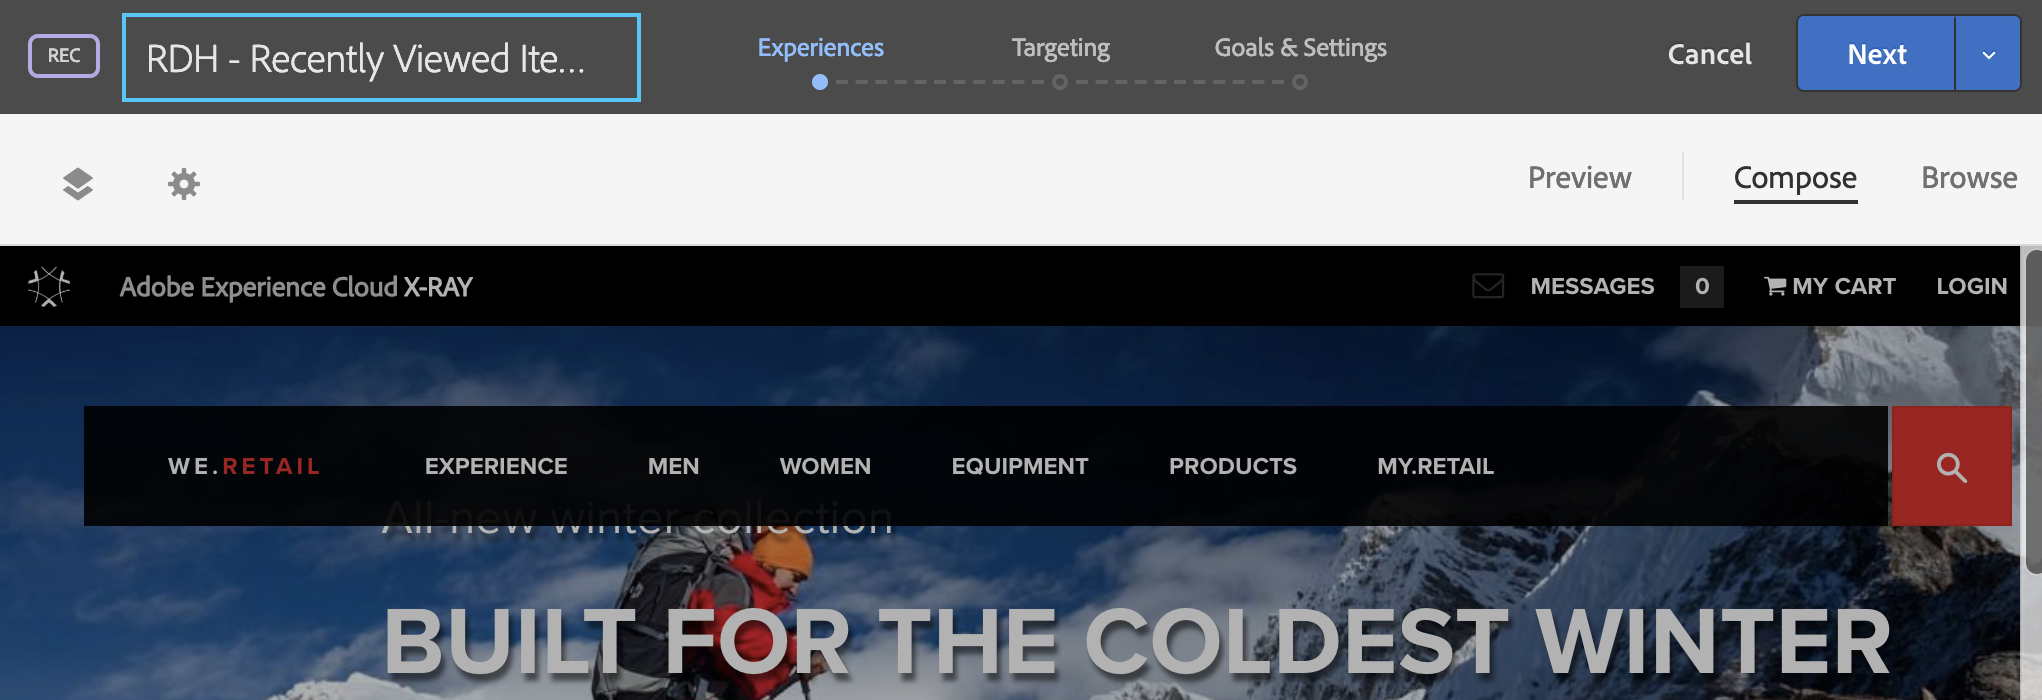
You will now see the homepage of our site. The Visual Experience Composer (VEC) allows you to quickly select the areas of our site that we want to modify, then change the content that appears in those areas.
By default, you enter the VEC in the Compose mode. In this mode, clicking page content allows you to select an area to insert recommendations into the page. If you need to use the page’s navigation to expose the area of the page where recommendation should be inserted, you’ll want to switch to the Browse mode, which allows you to interact with page elements, before switching back to Compose. Additional information about the VEC is available in the Target help documentation at: https://marketing.adobe.com/resources/help/en_US/target/target/c_visual-experience-composer.html
We want to replace static content on our homepage with our Recently Viewed Items, so we need to use the VEC to identify the area of our site where we want recommendations to display.
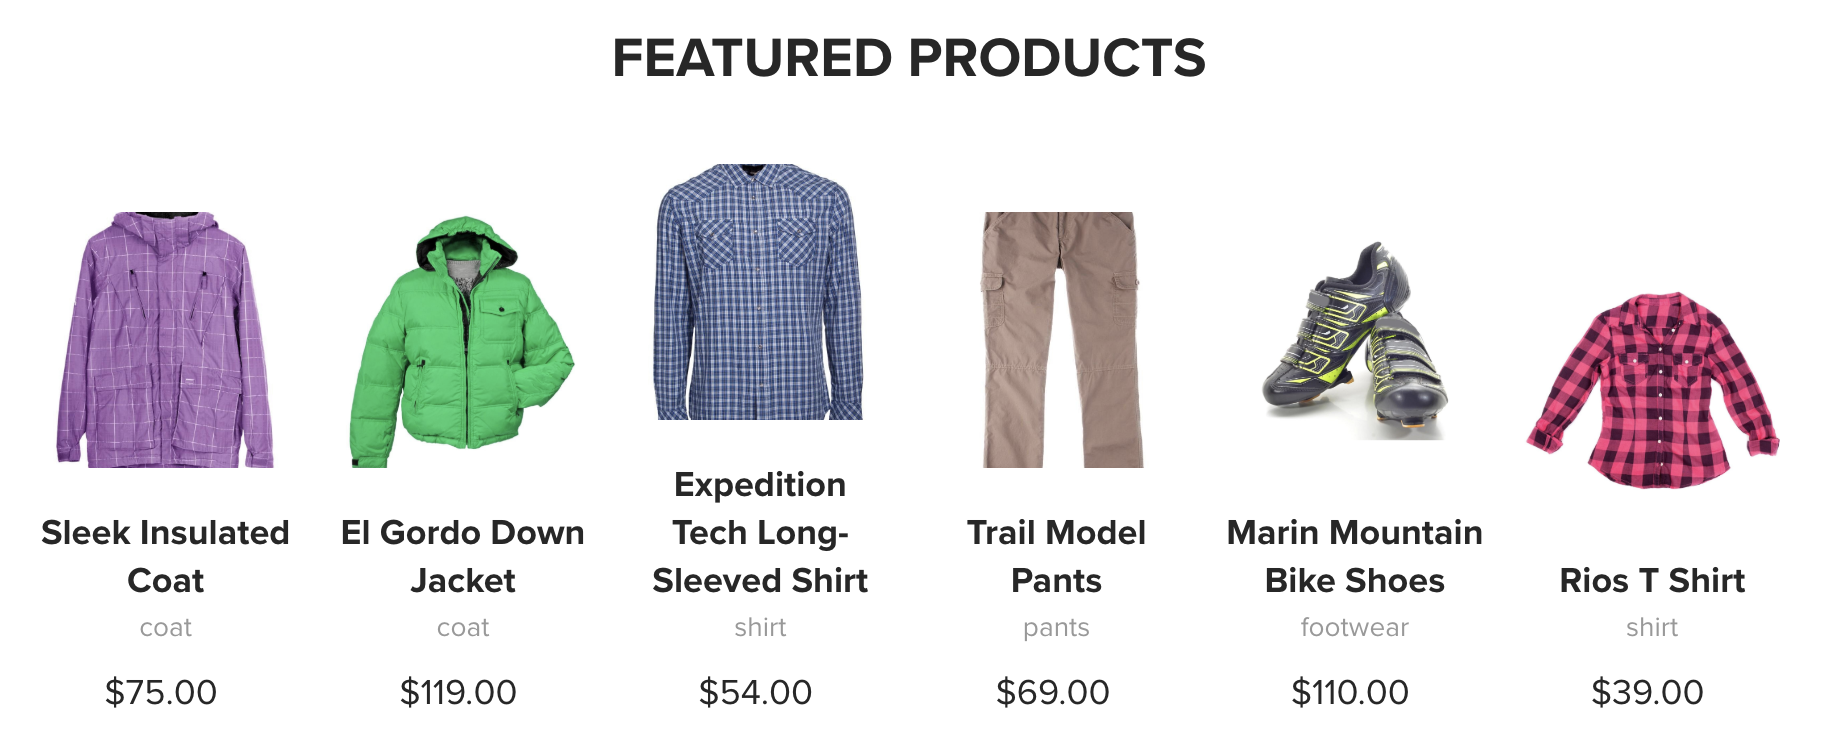
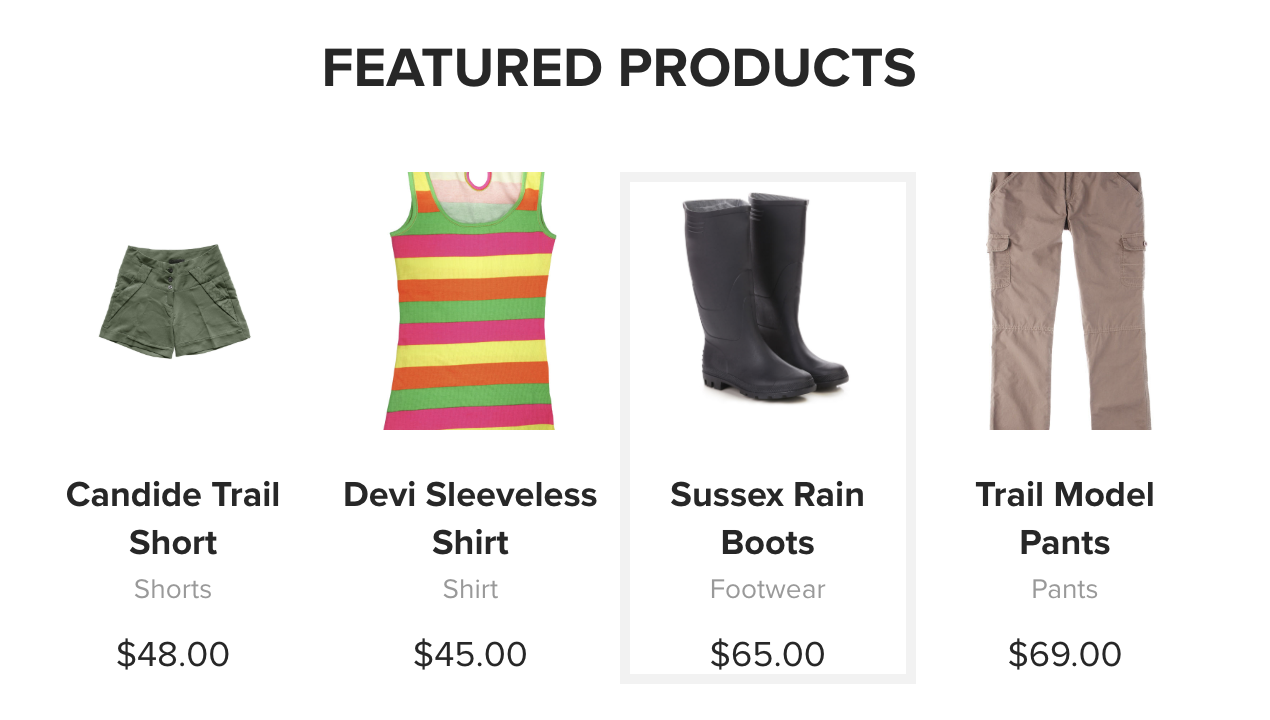
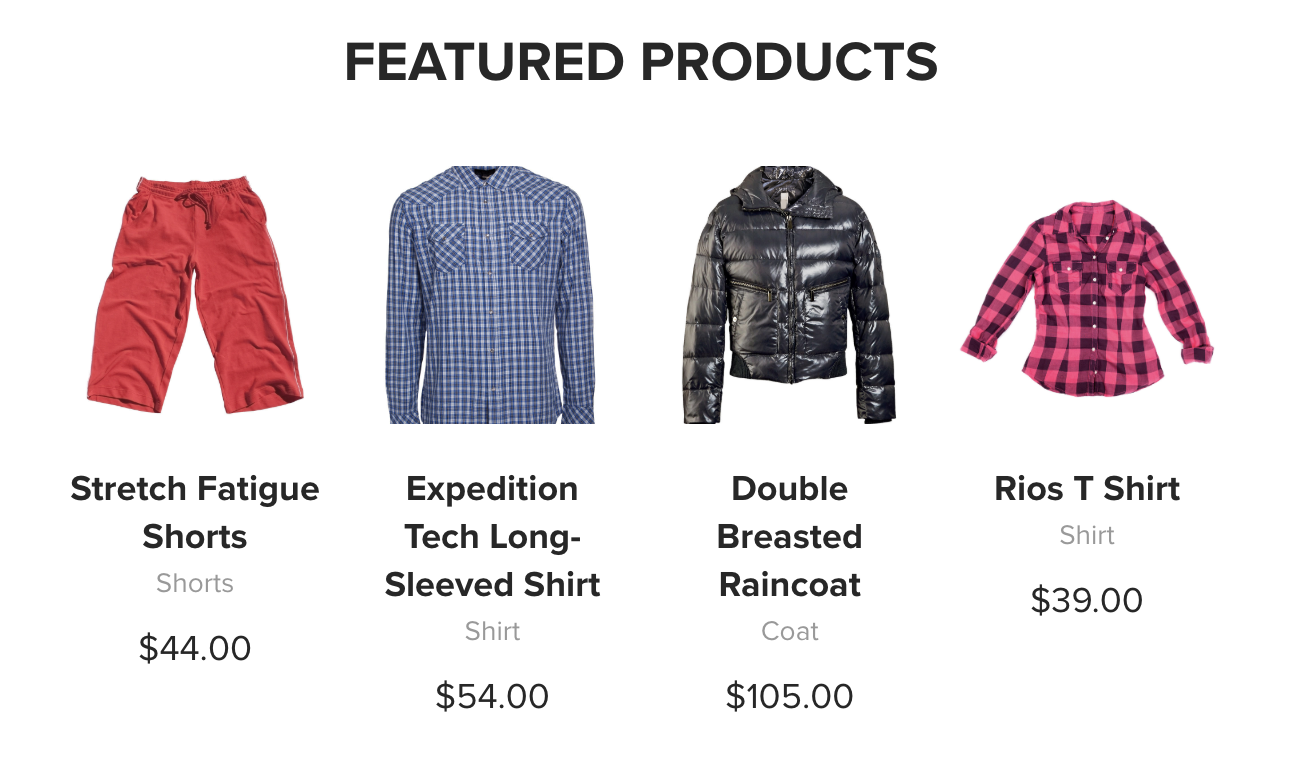
Scroll the homepage so that you see the Featured Products section:
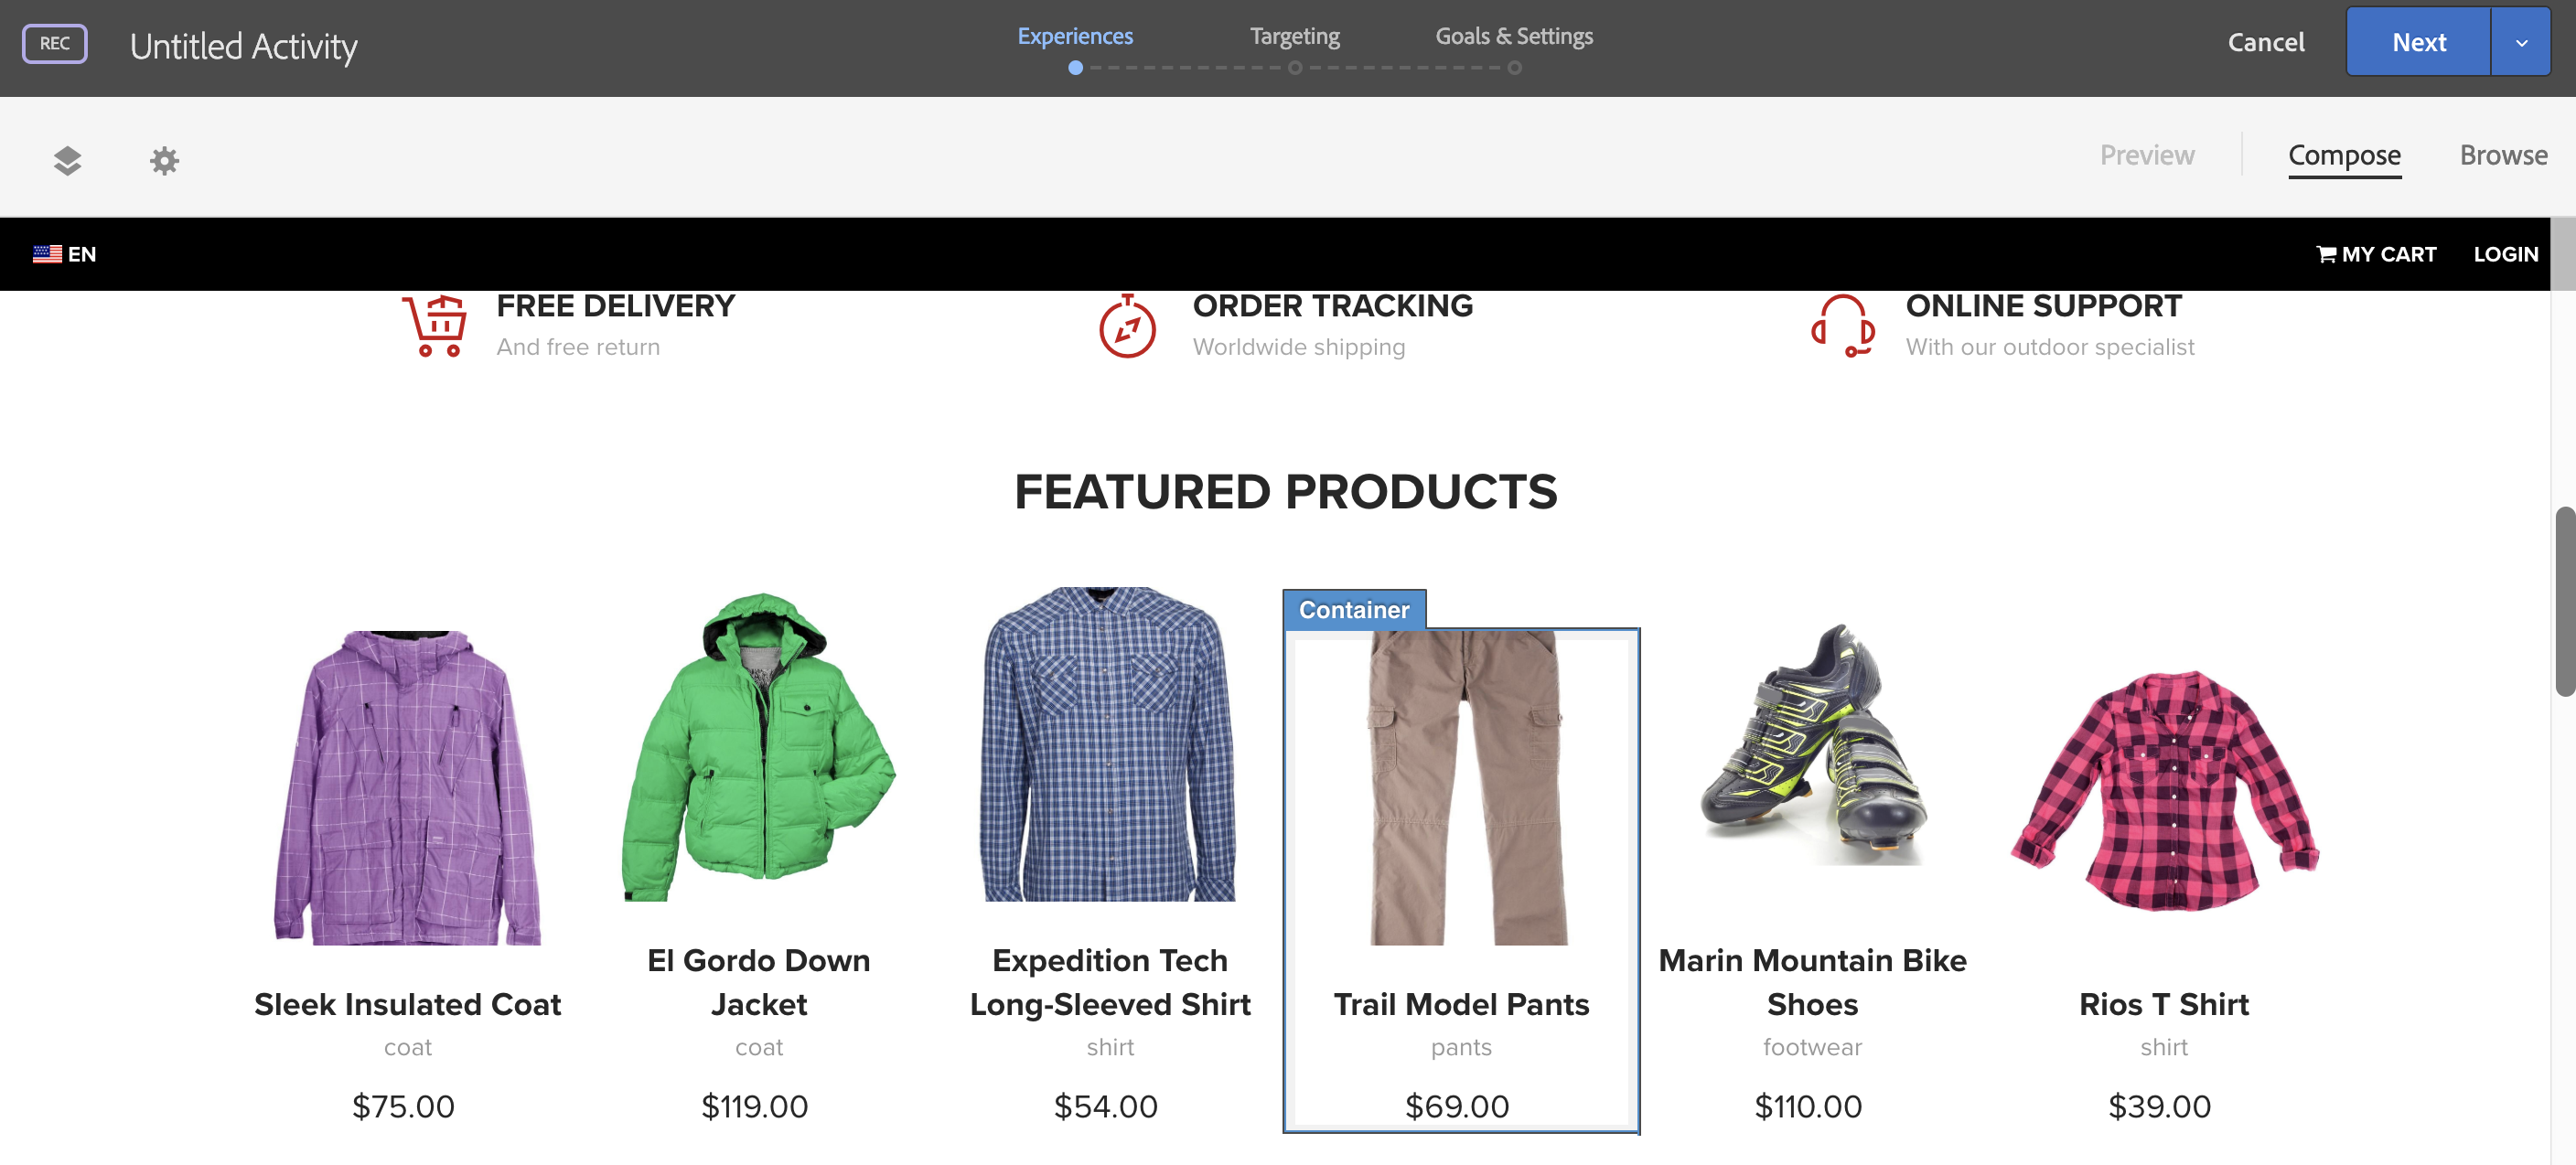
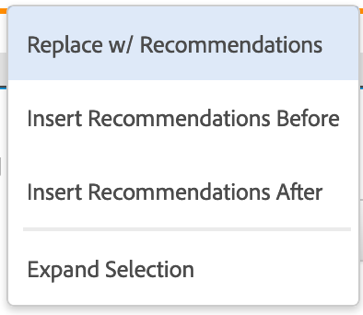
Mouseover a single product image and note that the HTML container containing that item is highlighted. Then, click the item. Note that you have the following options:
Click Expand Selection and observe that the container element size is increased to include all of the items.
Experiment with clicking containers and then Expand Selection until you have selected a container which contains only the horizontal items and no other page content. Then, click Replace w/Recommendations.
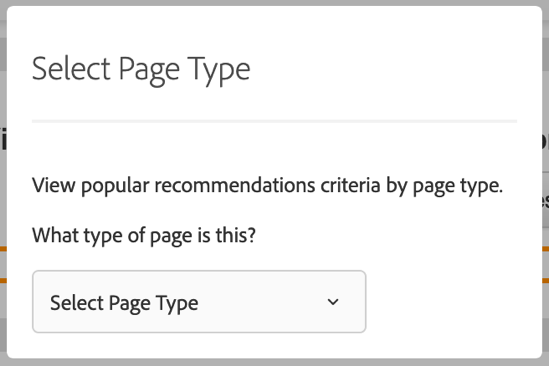
In order to narrow down the list of available recommendations, you will be asked to identify the type of page this is. Select Home Page from the dropdown list that appears:
After selecting a Page Type, you are taken to select a Criteria.
Criteria are sets of rules that tell Target Recommendations how to choose the items to be recommended from the items in your catalog. Let’s start by choosing a built-in Criteria to see how it works; later, we’ll return to see how to create our own Criteria.
Type recently viewed in the Search box, find the Criteria labeled Recently Viewed Items and select the criteria by clicking anywhere in the card.
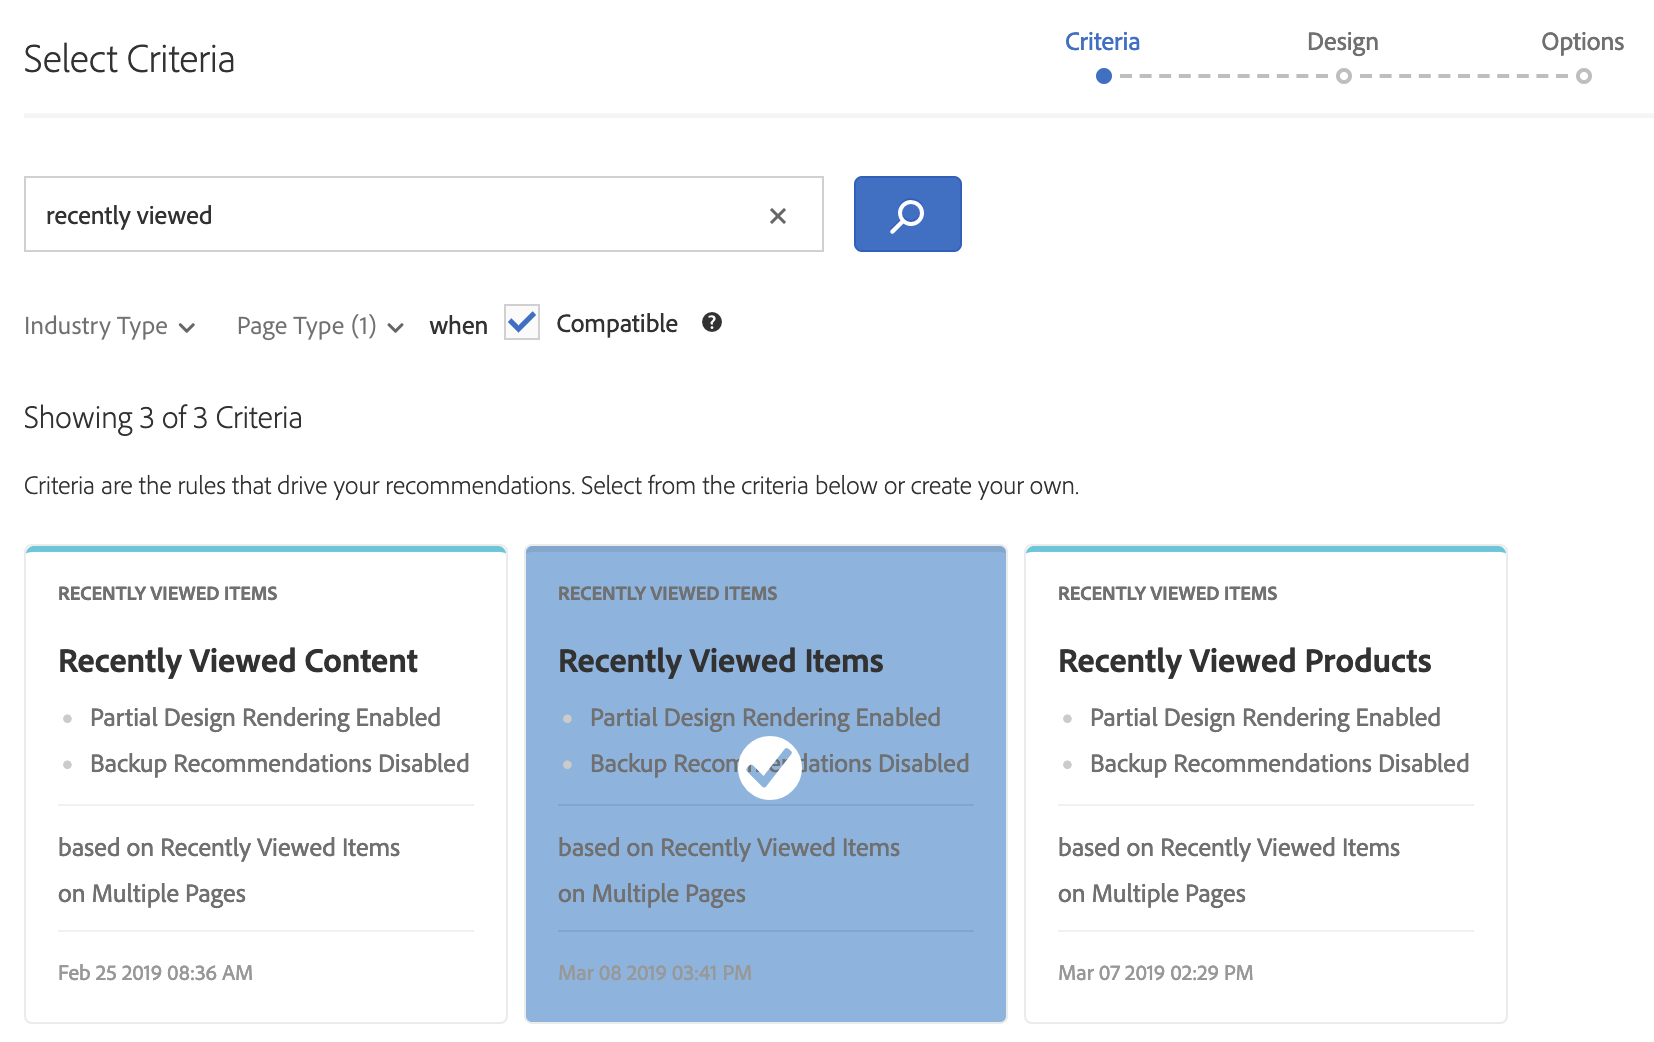
You can click the Info icon to view more information about the Criteria or click the Edit (pencil) icon to modify the criteria. We will practice customizing Criteria in Section 4. For now, just click the Next button in the upper right-hand corner.
After selecting a Criteria, you are taken to choose a Design.
A Design is an HTML or JSON template that tells Target Recommendations how to format its response containing recommended products.
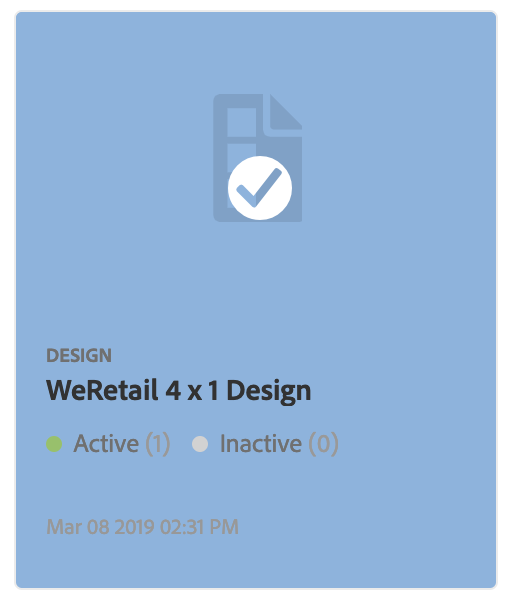
Select the WeRetail 4 x 1 Design criteria by clicking anywhere on the card.
We will explore customizing Designs in Section 5. For now, just click the Next button in the upper right-hand corner.
You now have the option to choose a Collection – recall that we examined the available Collections earlier. Leave the default “All Collections” option selected.
You can also set up Front Promotions and Back Promotions here. Front Promotions allow you to set up a list of items you want to promote in front of any algorithmic results; Back Promotions allow you to set up a list of items you want to promote behind any algorithmic results. Toggle the Front Promotions slider to see the available options. Note that you can control the number of slots allocated to promotions, time-bound promotions, and promote either a list of IDs, a collection, or results of a filtering rule. After exploring the options, turn Front Promotions off again, then click Save in the upper right-hand corner.
Tip: Promotions are useful for time-limited marketing campaigns: for example, when you want to promote a certain category or brand of items even when it is not algorithmically “best” for a customer, or during new product releases, where algorithms based on historical data will not recommend a brand new product until traffic related to that product is present.
Note now that you have selected a Criteria and Design, the site layout updates to show sample products inserted into your page.
Tip: The products inserted here are randomly selected illustrative examples and are not necessarily representative of the products that will appear on this page on your live site.
Click Next in the upper right-hand corner to continue.
You are now viewing an Activity diagram. You may already be familiar with the Activity diagram concept from creating A/B Test or Experience Targeting activities. For Recommendations activities, the Activity diagram displays your Recommendations activity’s selected Location (i.e., URL), Audience, Collection, Criteria, and Design. It allows you to set up an A/B test between multiple Criteria or Designs and set up a control group receiving no recommendations.
We previously configured the Location, Collection, Criteria and Design.
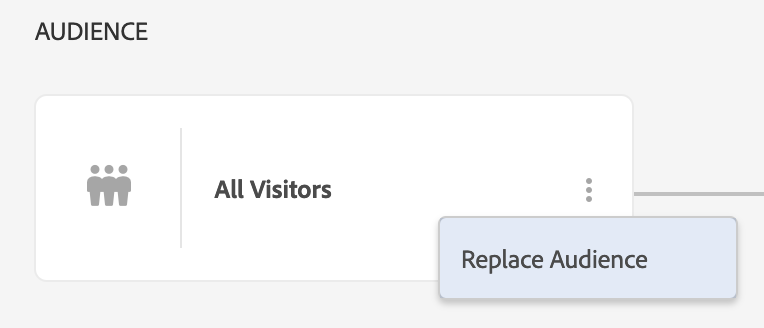
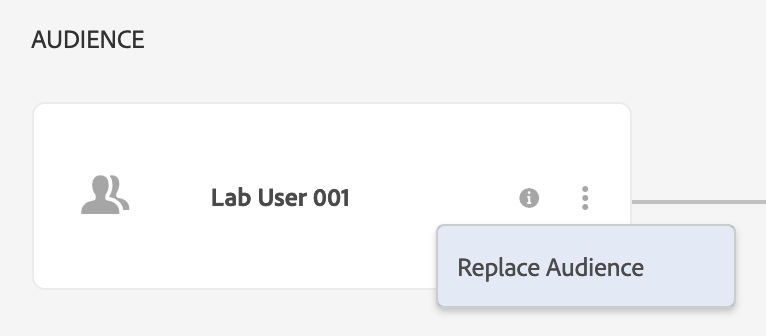
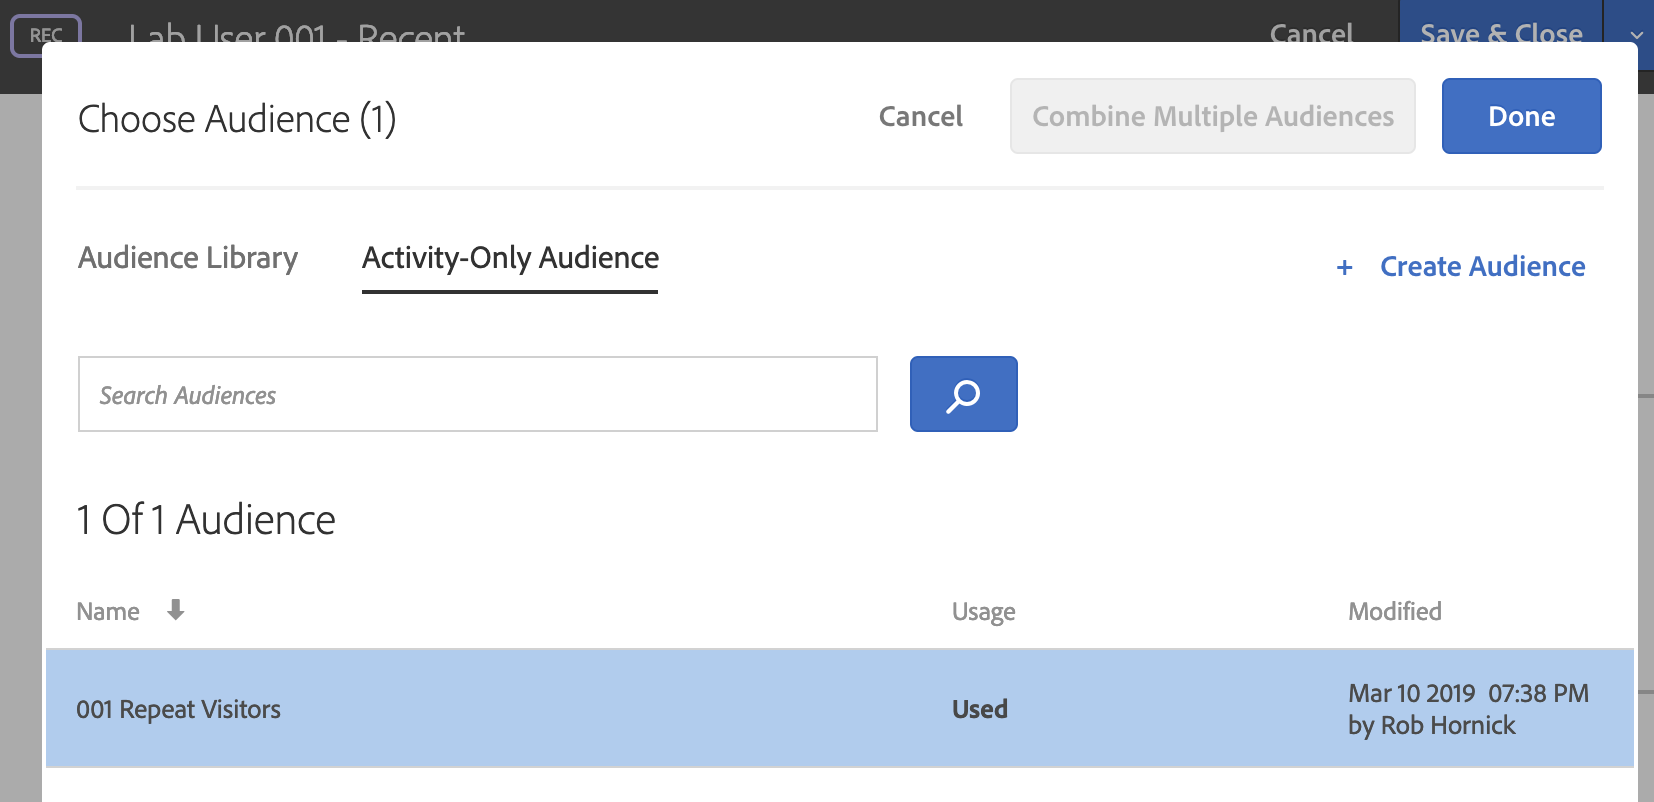
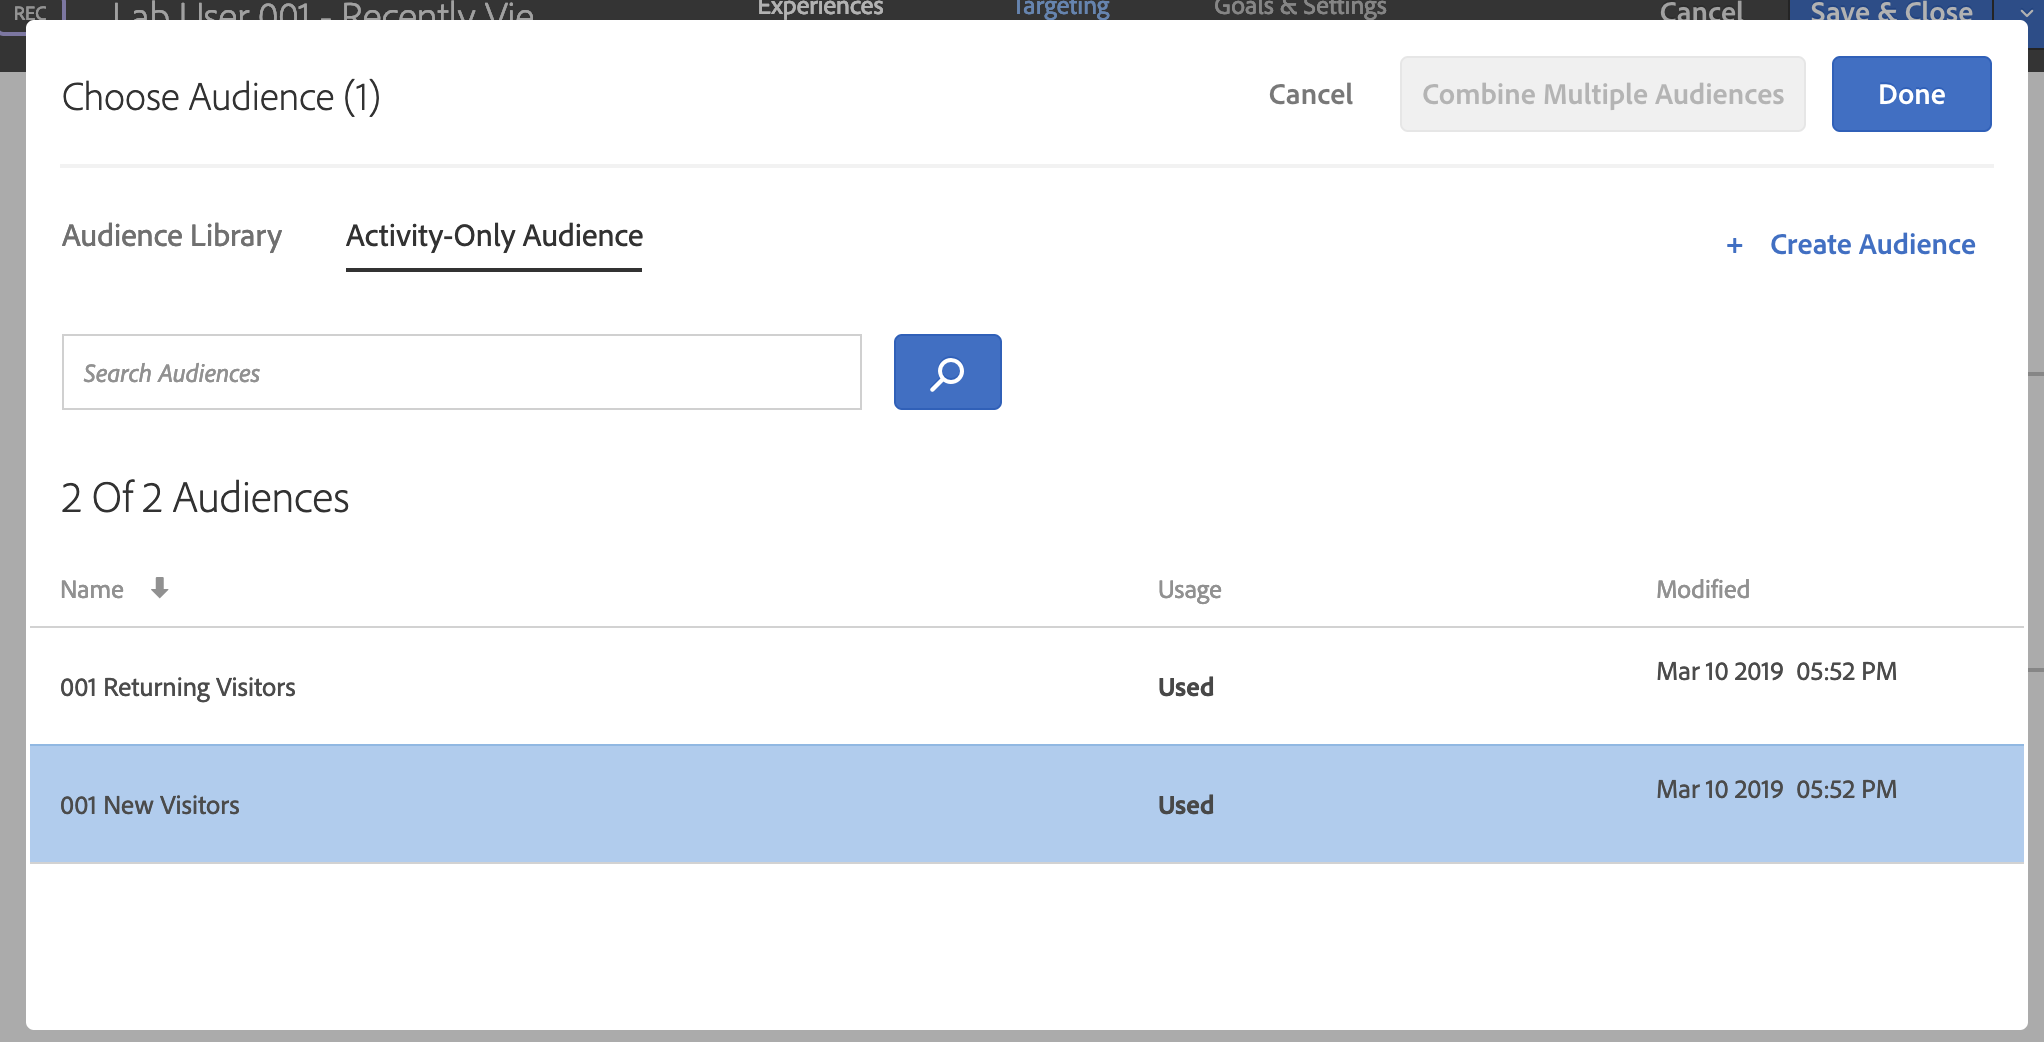
We need to change the Audience so that each lab user sees the only the Recommendations he or she has configured. Click the menu icon on the All Visitors audience, then select Replace Audience.
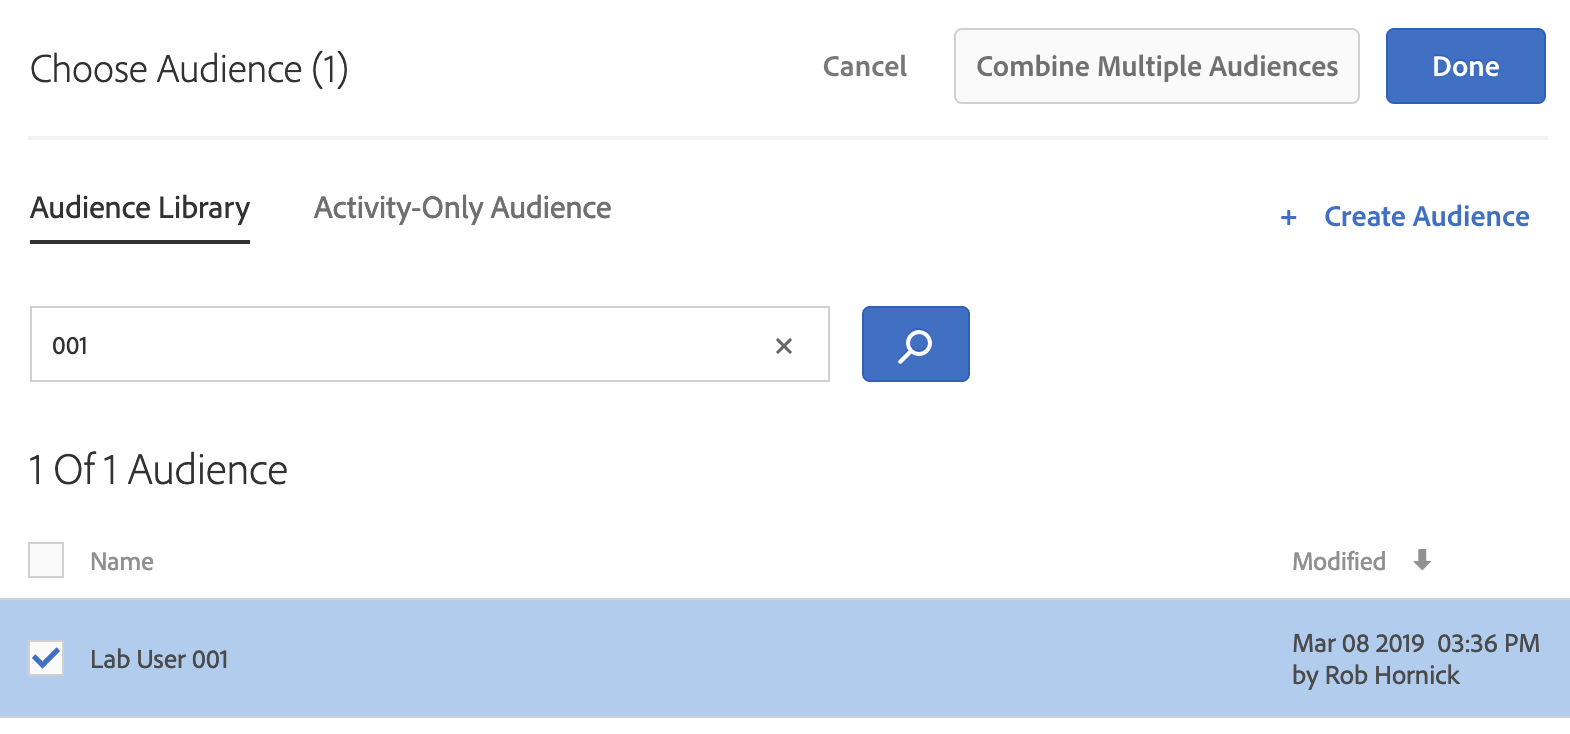
Type YOURNUMBER into the search box, select the “Lab User YOURNUMBER” audience, and click Done.
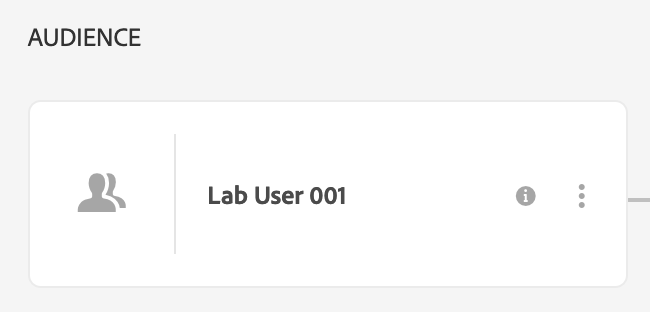
The Audience in the diagram updates to reflect your selection. We’ll further explore using Audiences in Lesson 3.3.
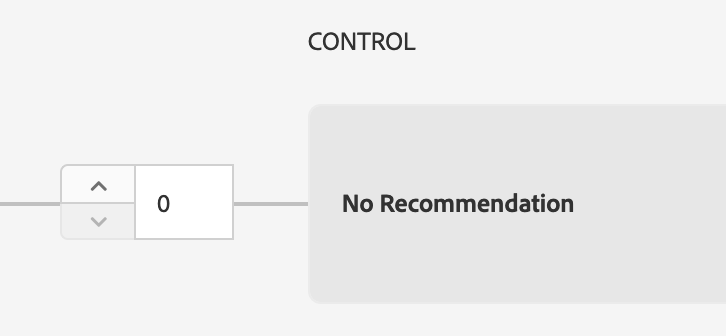
For the purposes of this lab, we want all visitors to see the Recently Viewed Items recommendation, so adjust the Control Group percentage from the default setting of 10 to 0, then click Next in the upper right-hand corner to continue.
If you have previously created an A/B Test or Experience Targeting activity, you should be familiar with the Goals and Settings page. For Recommendations activities, generally the most important settings to be aware of are the Reporting Source and Goal Metric.
Your Reporting Source specifies whether the success of your Recommendations activity should be measured via Adobe Analytics conversion data or Adobe Target conversion data. The default value of Adobe Target is selected and cannot be changed as we have not configured Adobe Analytics for this lab.
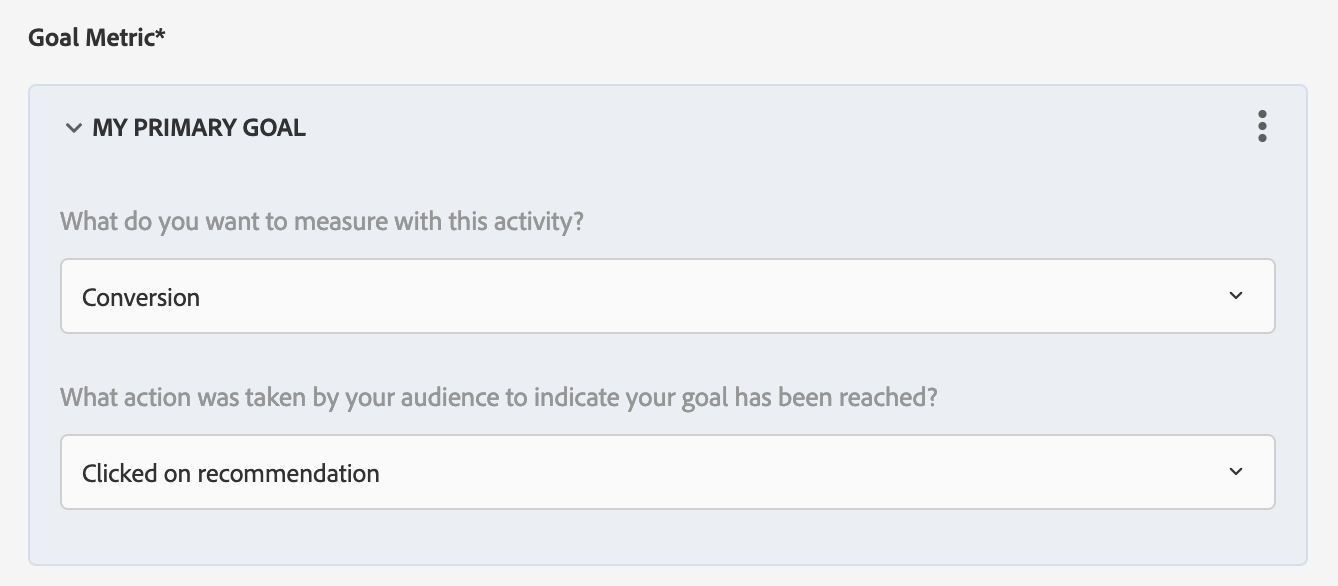
Your Goal Metric specifies how Adobe Target should measure lift (i.e. success) for this Recommendations activity. Note that Conversion, Revenue and Engagement metrics are available. For this lab, select Conversion. Note the actions available as proxy metrics for Conversion. Choose Clicked on recommendation as your Goal Metric, then click Save & Close in the upper right-hand corner.
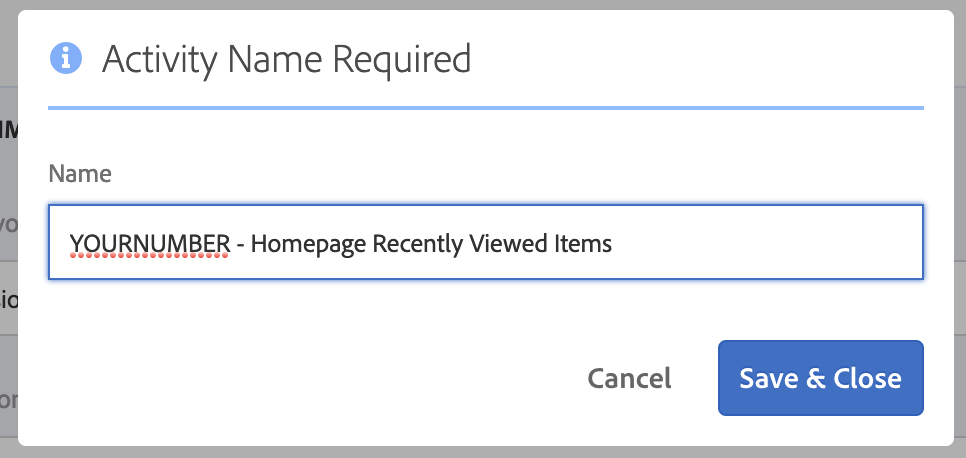
Name your Activity YOURNUMBER - Homepage Recently Viewed Items, then click Save & Close.
Now that you have saved your activity, let’s check to make sure it’s working correctly before it goes live on our site.
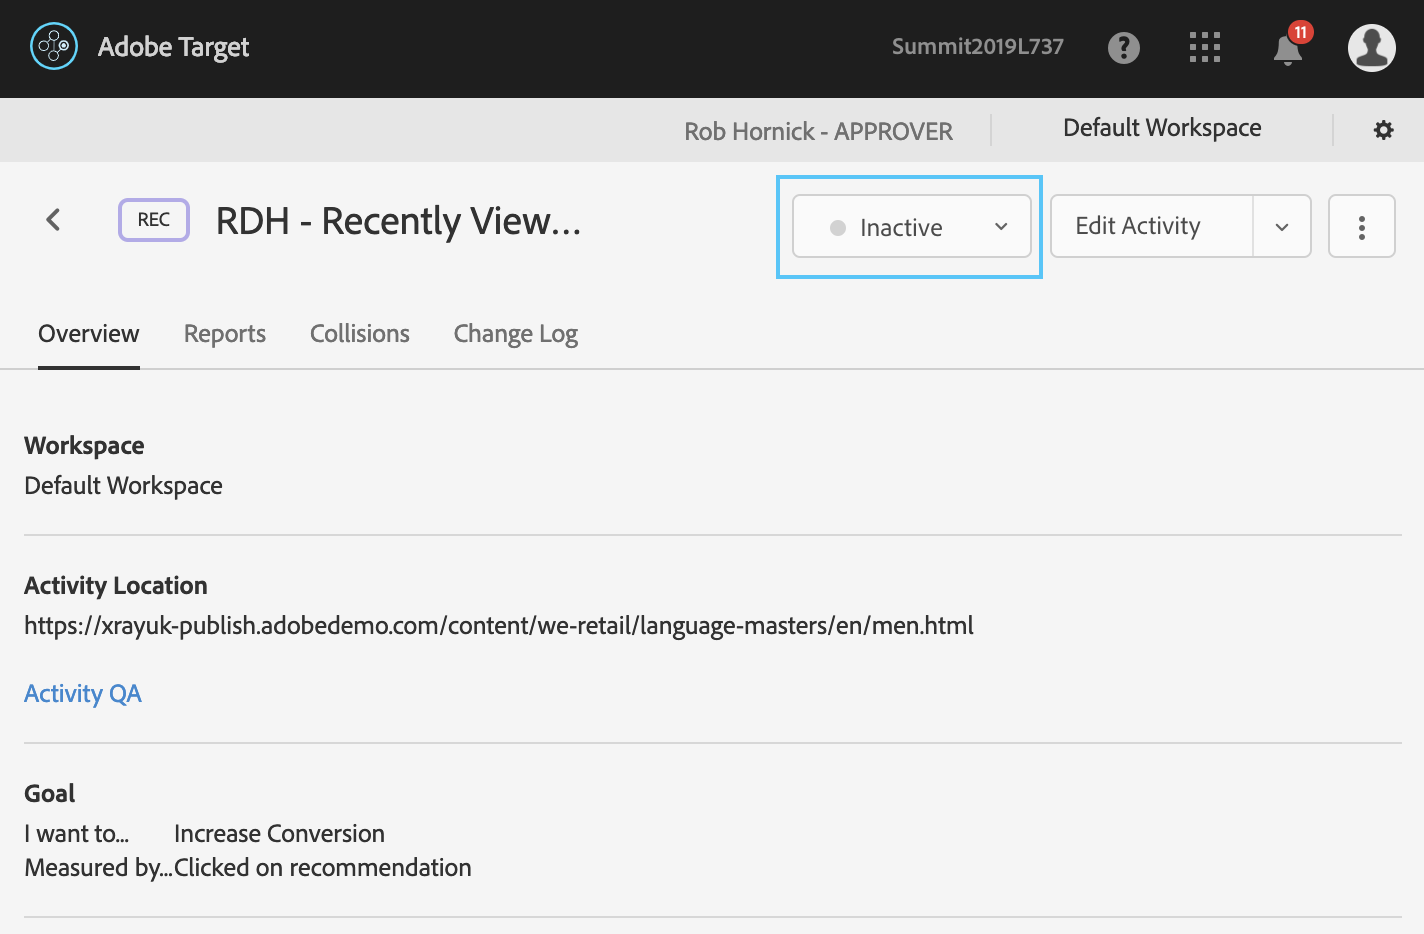
First, observe that in the upper-right hand corner that the activity’s status is listed as Inactive. This means our activity is not yet visible on our site. Before we change the activity’s status to Active, we should make sure that recommendations are available and displayed correctly.
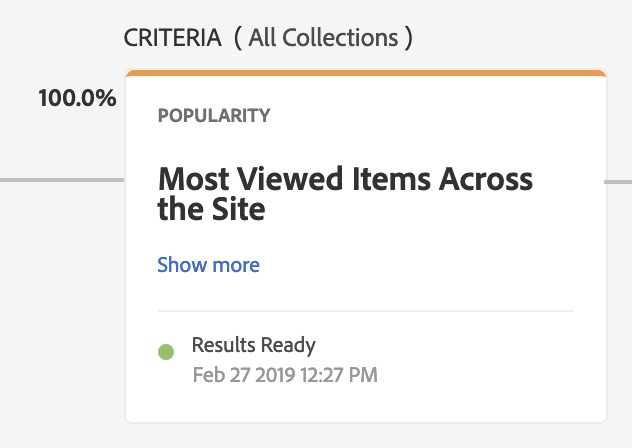
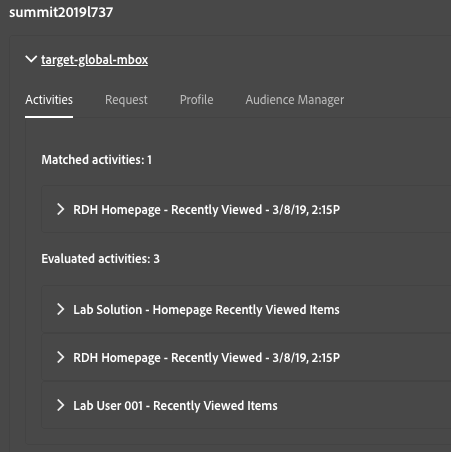
Scroll down to view the Activity Diagram. Observe that underneath the Criteria, the Results Ready status is listed:
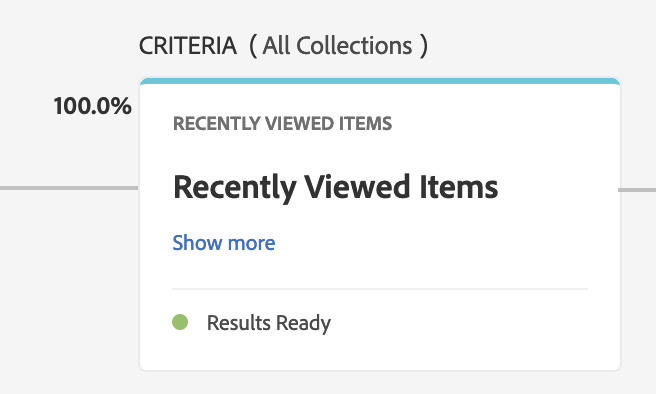
This means that recommendations are available. The Recently Viewed Items criteria will always have results ready since it is simply based on the user’s browsing behavior, but other algorithms, like People Who Viewed This, Viewed That, take some time to get ready as results are computed. For these algorithms, the status will first show as “Results Not Ready”.
Since the Results Ready status is displayed, we can proceed to quality assurance of our activity.
Tip: Getting results ready can take as little as 15 minutes for simple algorithms like Top Sellers and Top Viewed or can take several hours for advanced algorithms if you have a large catalog size, high site traffic (many views/purchases), or have selected a long lookback window (2 days’ data will take less time to process than 60 days’ data.)
Before we start QA, let’s ensure that we have some recently viewed items to test against. Use the top navigation to open the Products page (http://localhost:4503/content/we-retail/us/en/products.html) and click on a few products that interest you:

Return to your Activity Overview in Adobe Target, scroll to the top of the page and find the Activity QA link under the Activity Location.
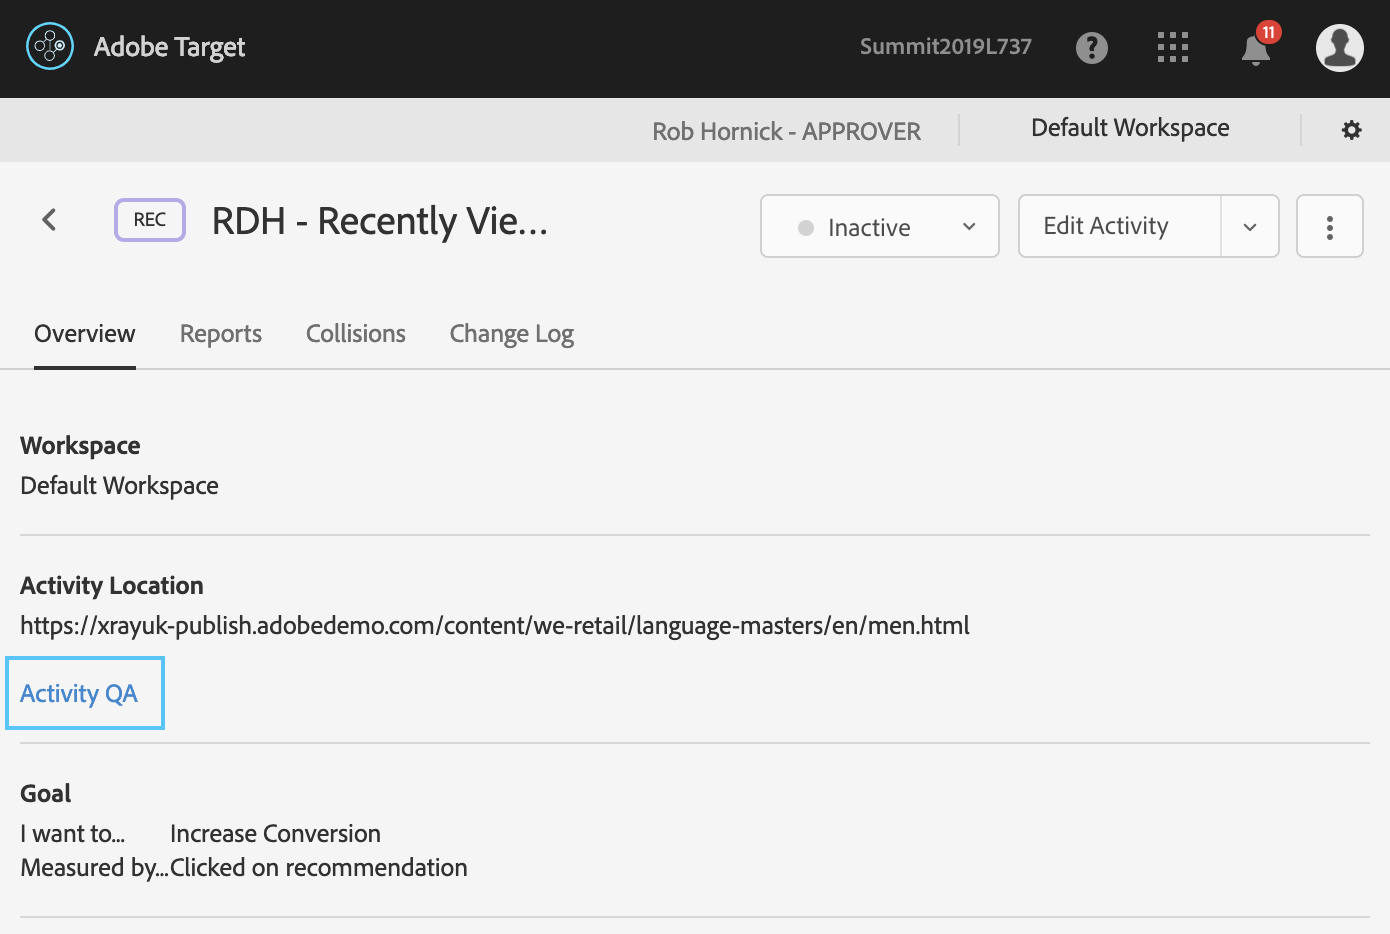
Click the link and scroll to observe that two QA URLs are provided:
A QA link with no recommendations displayed.
A QA link with the selected Design and Criteria displayed.
Tip: By default, Adobe Target will automatically add you to the required audience for the QA link. This setting can be turned off, but will be useful to leave on for this lab.
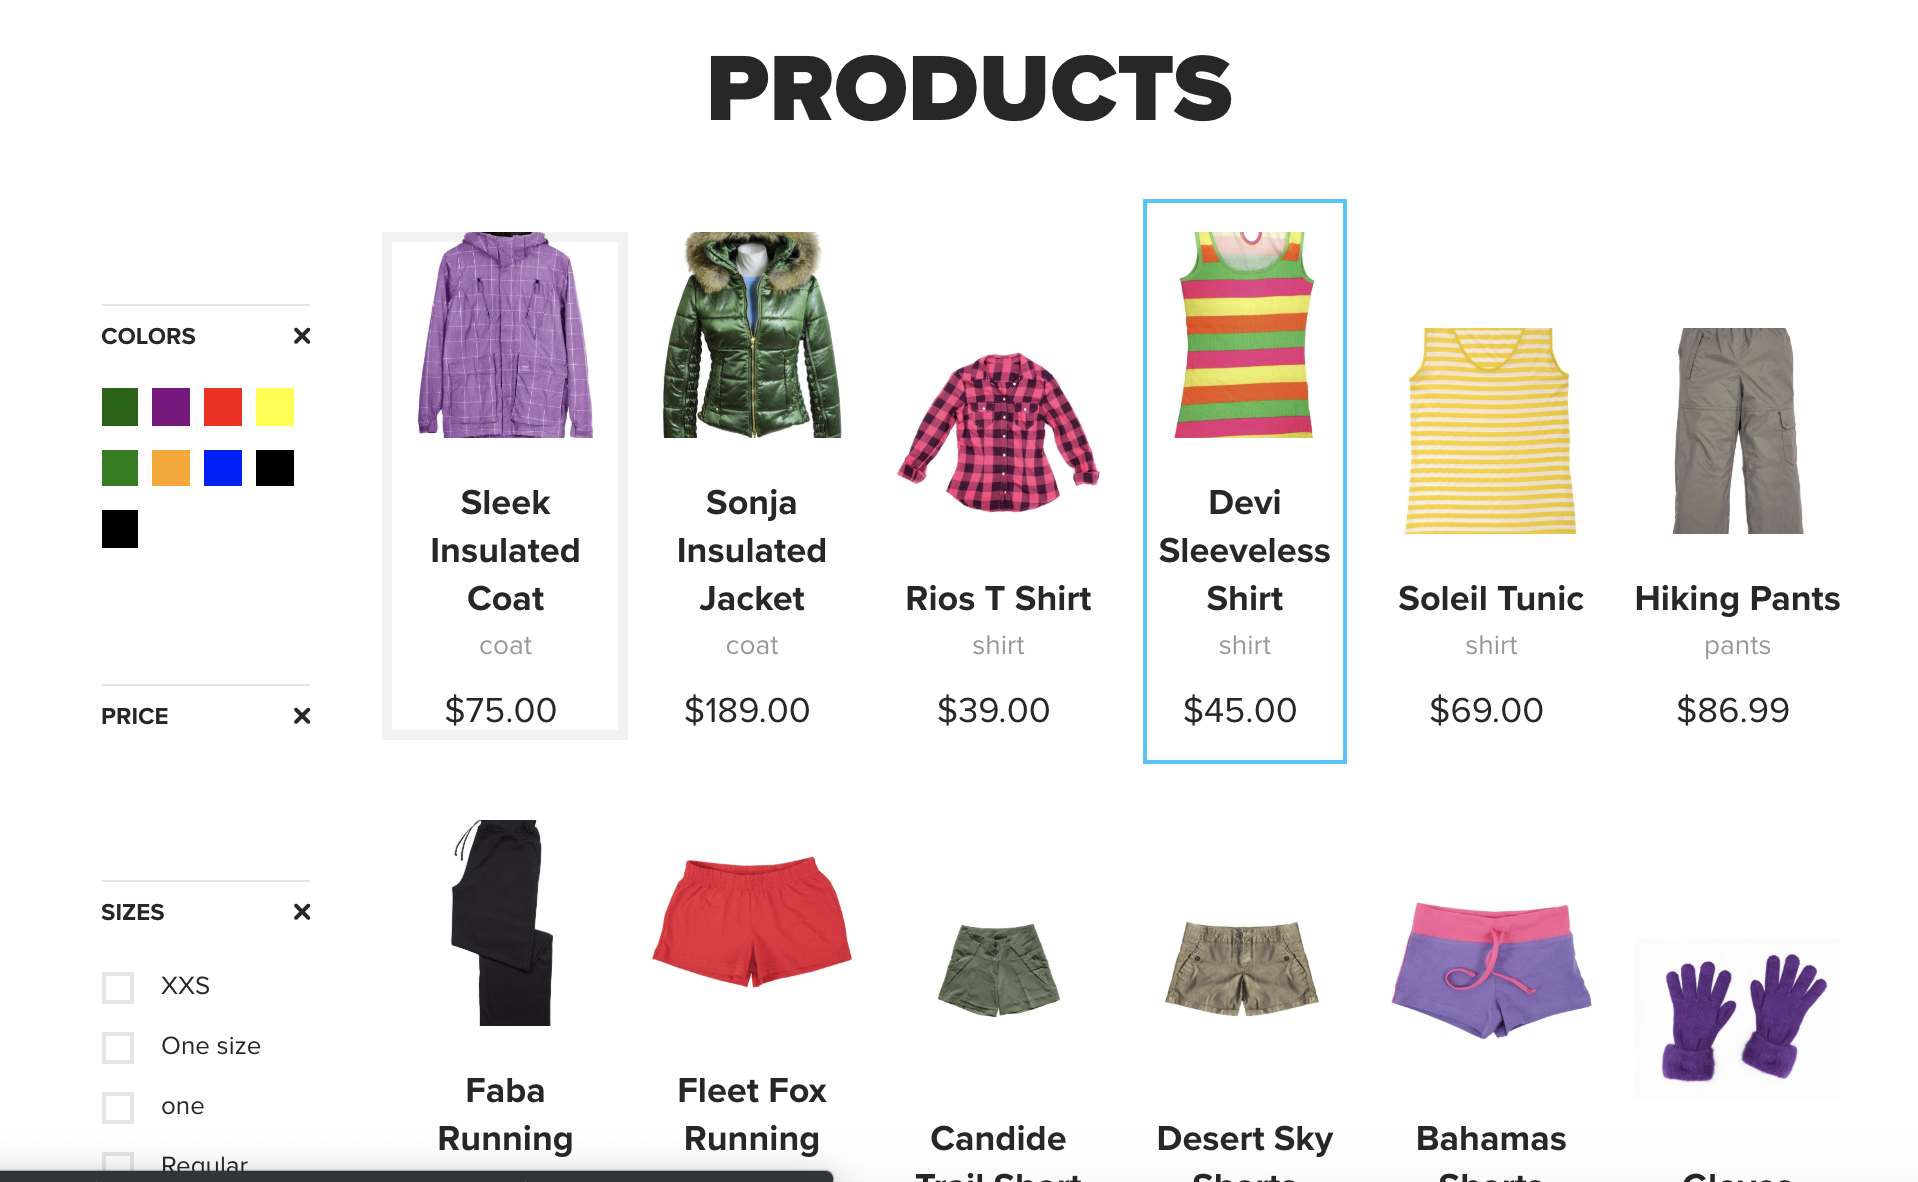
Click the first link, No Recommendation, and observe that the Featured Products section appears as it did initially with a static list of 6 products:
Close the tab and then click the second link, Recently Viewed Items + WeRetail 4 x 1 Design.
Note that up to 4 items you viewed earlier now appear:
Target QA mode is “sticky” and saved in a cookie. Now that you have proven the recommendations are working as expected, you’re ready to exit QA mode. If you miss this step, you’ll keep seeing the QA results throughout the site! To exit QA mode, visit the homepage and pass an empty Target QA cookie parameter: http://localhost:4503/content/we-retail/us/en.html?user=YOURNUMBER&at_preview_token=
Tip: You can add a bookmarklet so you don’t have to manually pass the blank token; see https://marketing.adobe.com/resources/help/en_US/target/target/c_activity-qa-bookmark.html.
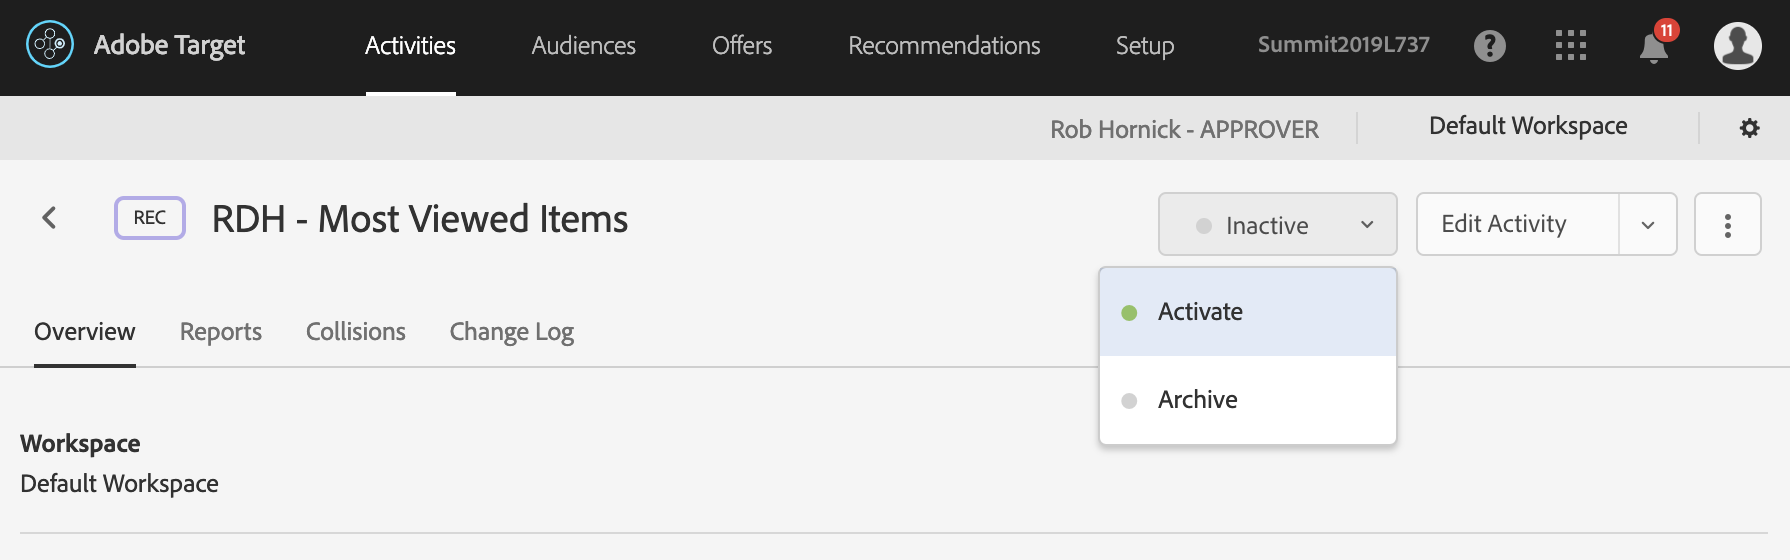
Close the preview tab and return to the Activity page. Click on the dropdown arrow next to the status and choose Activate from the options.
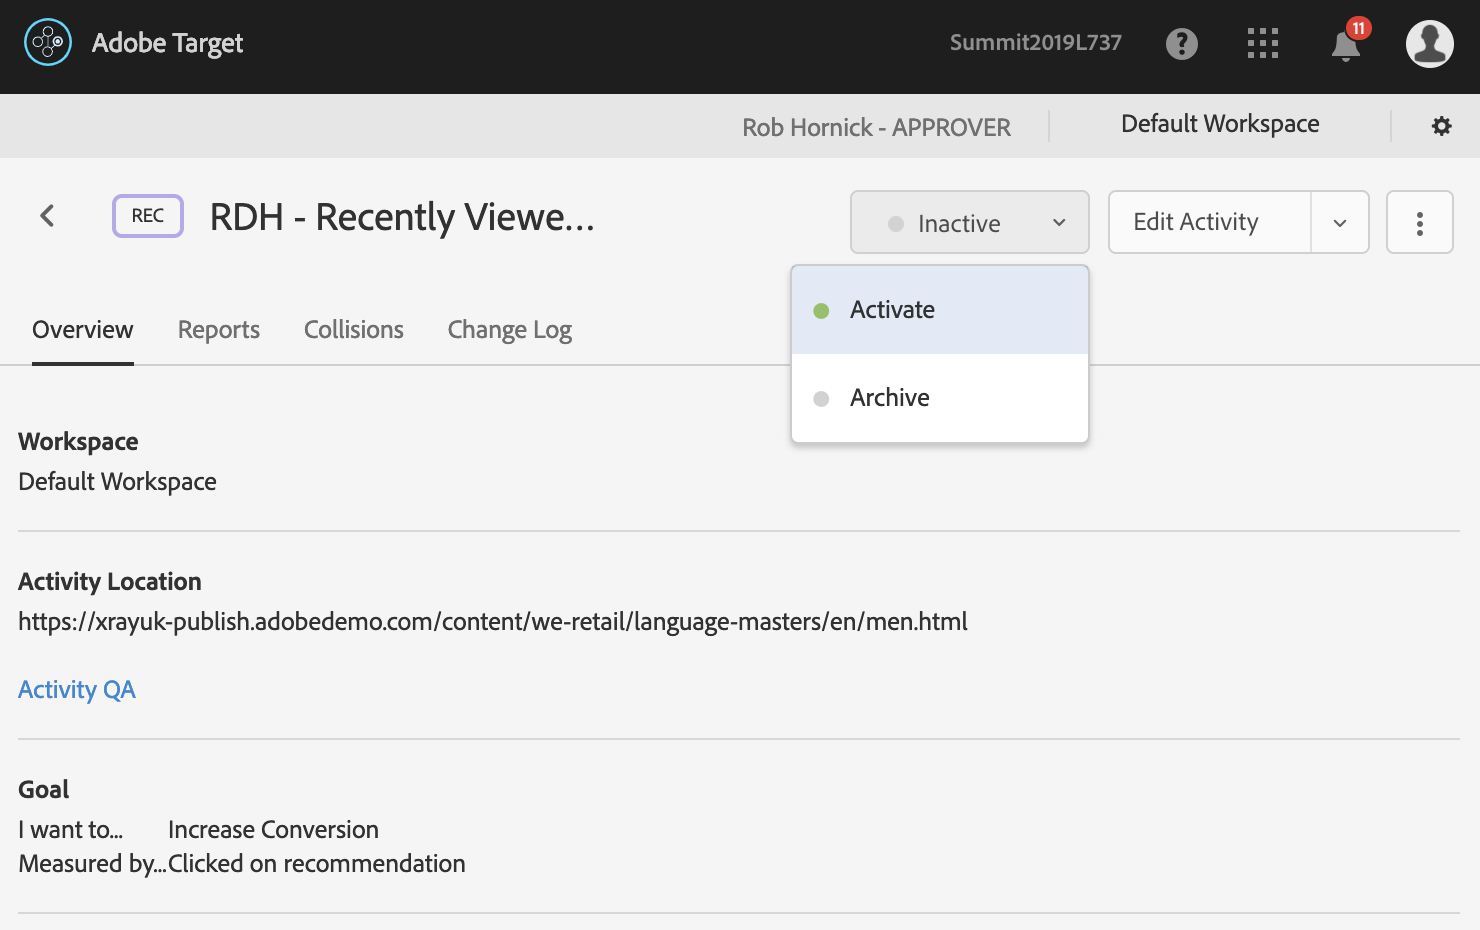
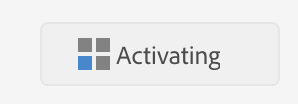
Note that the status becomes Activating:
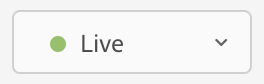
After a few seconds to a couple of minutes, the status switches to Live:
Tip: You can also deactivate or archive the activity using the same dropdown selector.
Open a new tab to http://localhost:4503/content/we-retail/us/en.html?user=YOURNUMBER and observe the Recently Viewed Items recommendations are active. Navigate around, returning to the URL above using the Back button, to see the recommended items change as you view new products.
Note: Remember that you must have the user=YOURNUMBER parameter on the homepage URL to see your recommendations.
Congratulations! You’ve just set up your first Recommendations activity.
In the next lesson, we’ll explore using Audience Targeting to further personalize your recommendations.
In many cases, you will want to show different types of recommendations to different types of site visitors. For example, a hotelier may wish to showcase different properties for individuals identified as Vacationers vs. those identified as Business Travelers.
In these cases, Audience Targeting is a useful way to ensure the right recommendations are shown to the right groups of users.
In our e-commerce store, we know that users who are visiting our store for the first time won’t have any Recently Viewed Items. Let’s suppose that we believe it makes the most sense to show the Most Viewed Items from across our site to visitors on the first pageview of their session, and show Recently Viewed Items to users on subsequent pageviews.
Tip: The Audience Targeting techniques we’ll explore in this lesson are not the only ways to solve the problems described above. For example, a “Most Viewed from Favorite Category” algorithm might solve the hotel use case, and a Criteria Sequence or Backup Recommendations might solve our retail use case. These techniques are explored in in Section 4.
Let’s first restrict our original Recently Viewed Items campaign to show to only on subsequent pageviews.
Click the dropdown arrow next to Edit Activity in the upper-right hand corner and choose Edit Targeting.

Click the menu icon next to the Lab User YOURNUMBER audience and select Replace Audience.
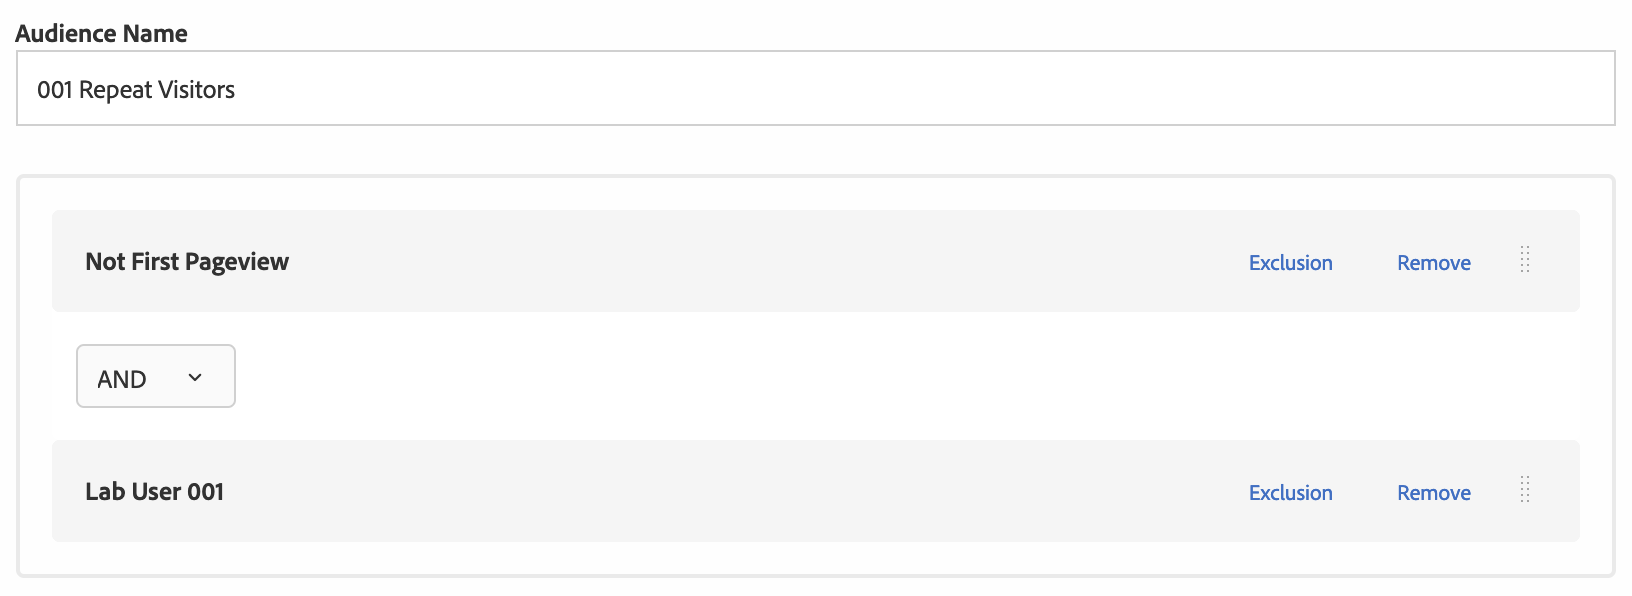
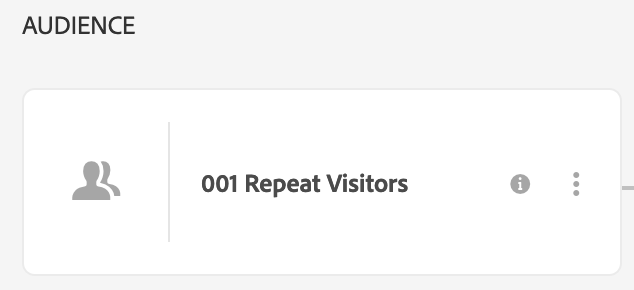
Click Combine Multiple Audiences in the upper right hand corner. In the window that appears, combine the Lab User YOURNUMBER audience with the Not First Pageview audience using an AND rule so that users must be in both audiences to see the content, by selecting the audiences in turn and clicking Add to Rules. Name the custom audience YOURNUMBER Repeat Visitors, then click Save.
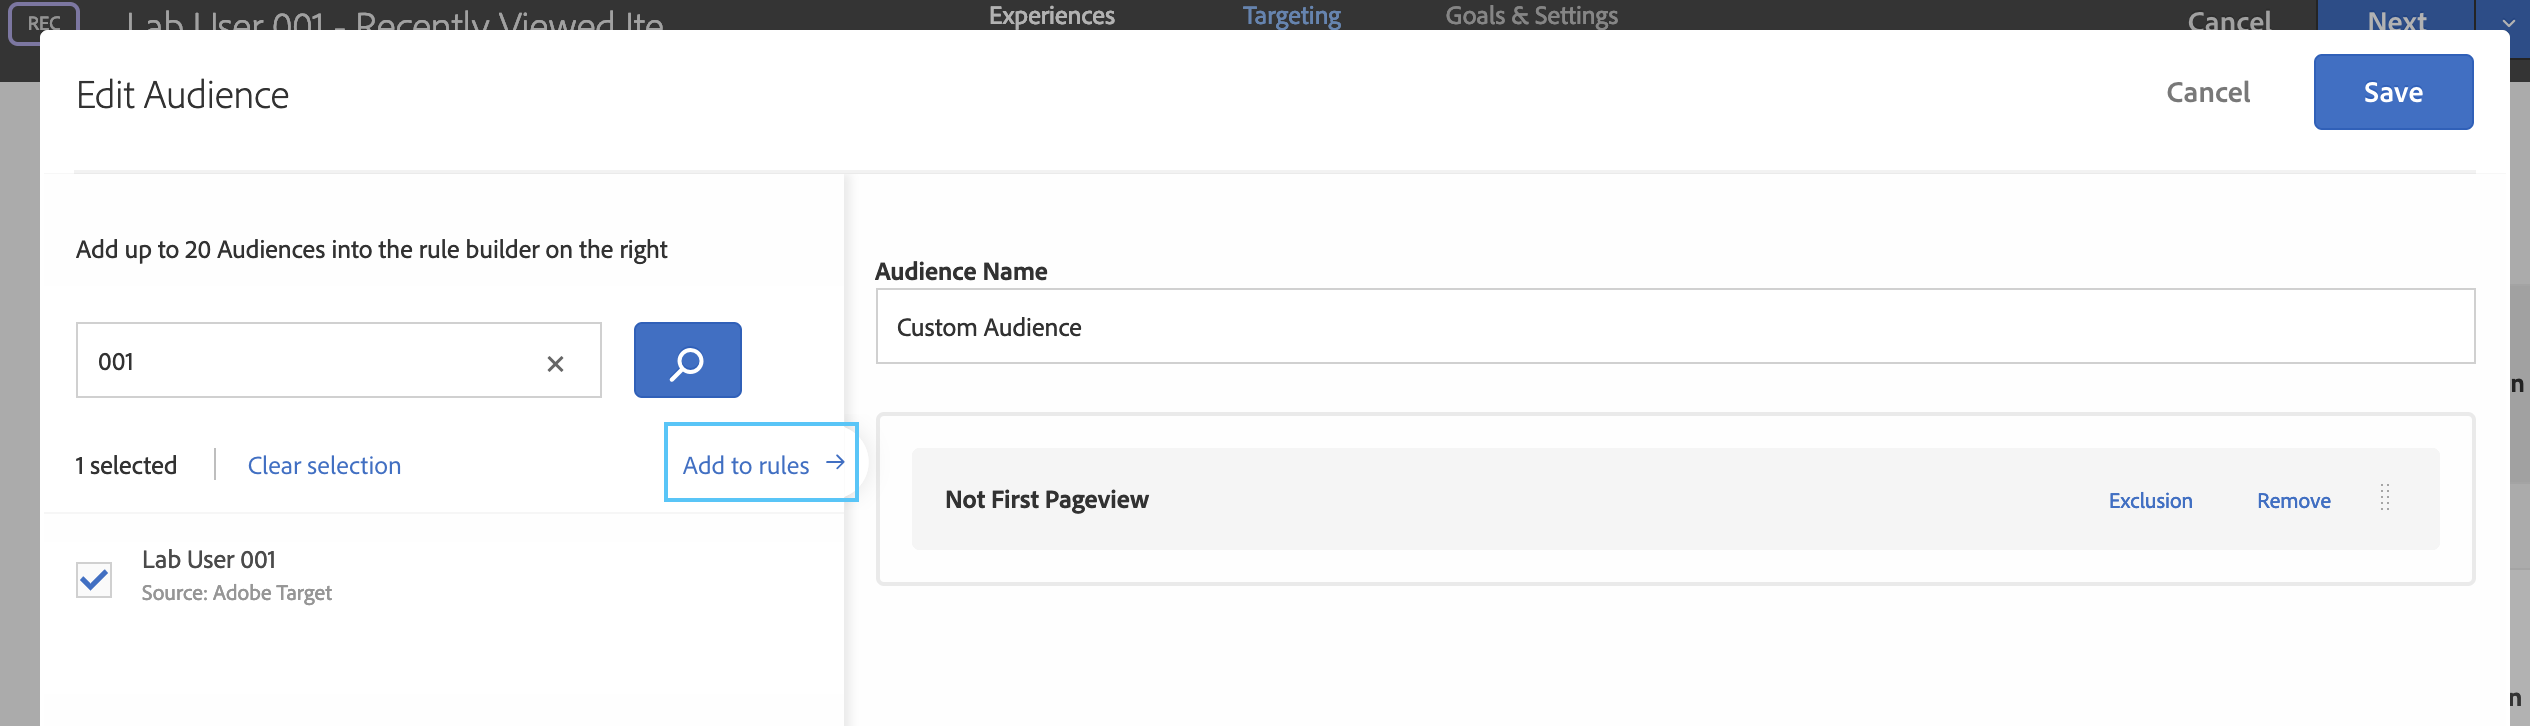
Select the new custom audience and click Done.
Tip: You can also create custom audiences here based on any profile attribute by using the + Create Audience link. More information on audiences is available at https://docs.adobe.com/content/help/en/target/using/audiences/target.html.
Observe that the selected Audience for the activity has been changed to YOURNUMBER Repeat Visitors. Click Save & Close.
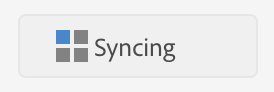
Note that the Activity status changes to Syncing as the changes are published to your site:
Tip: In a real-world scenario, we usually wouldn’t recommend make changes to a live activity on the fly without any testing (to avoid a mistake causing a disruption to your site) – but this is acceptable for the purposes of a lab. If you are willing to have reporting on the activity start from scratch after your changes and want to avoid any period of time without active recommendations, the most foolproof method is to copy the activity (we cover this topic below), edit the copy, QA the copy, deactivate the original activity, and activate the copy. Alternatively, if you need to retain historical reporting information in the activity and are willing to accept a brief period without active recommendations, then deactivate the activity, make the changes, QA the changes, and then re-activate the activity.
Let’s continue to create another activity which shows Most Viewed Items to only First Pageview visitors.
Leave this Activity and return to the Activities list page by clicking the Activities link in the top navigation bar. Find your Activity, mouse over it, and click Copy to create a copy of the activity.
First, let’s change the name of the activity from the default (which simply appends “Copy” to the name of the activity we copied.). Click the name of the activity in the upper left-hand corner, then rename the activity to YOURNUMBER – Most Viewed Items.
Scroll to the area of the page that we replaced with recommendations, click on the sample recommendations and choose Change Criteria from the menu.

De-select Recently Viewed Items by clicking on it, then select Most Viewed Items Across the Site by clicking on it.

Click Add to swap the criteria, then click Next to modify the targeted Audience.
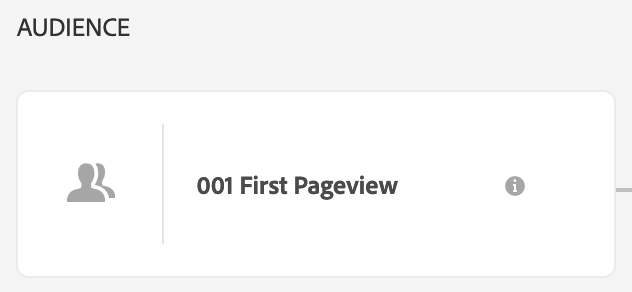
Use the Replace Audience function to swap the YOURNUMBER Repeat Visitors audience out. Create a YOURNUMBER First Pageview audience using the Combine Multiple Audiences feature that we just used.

Check that the targeted audience is updated:
Click Next to reach the Goals & Settings. We can keep the same Goals & Settings as we previously had, so click Save & Close.
Again, we need to check that the activity is ready to go before we put it live on our site.
In some cases, you may wish to audit the specific items that are recommended. This is particularly helpful when using algorithms like People Who Viewed This, Viewed That, where a different set of items are recommended depending on the item the user is currently viewing, and you may have thousands or millions of different items in your catalog.
For Most Viewed Items Across The Site, we’ll only have a single list of recommendations, but let’s check out how we can perform this audit.
First, check that your criteria results are ready by scrolling down and checking the status. If results are not ready, you may see:
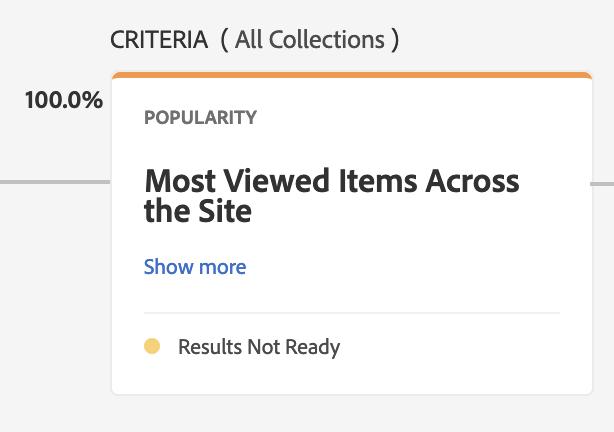
When results are ready, you will instead see:
Then, scroll back up, click the menu icon in the upper-right hand corner, and then choose Download data.
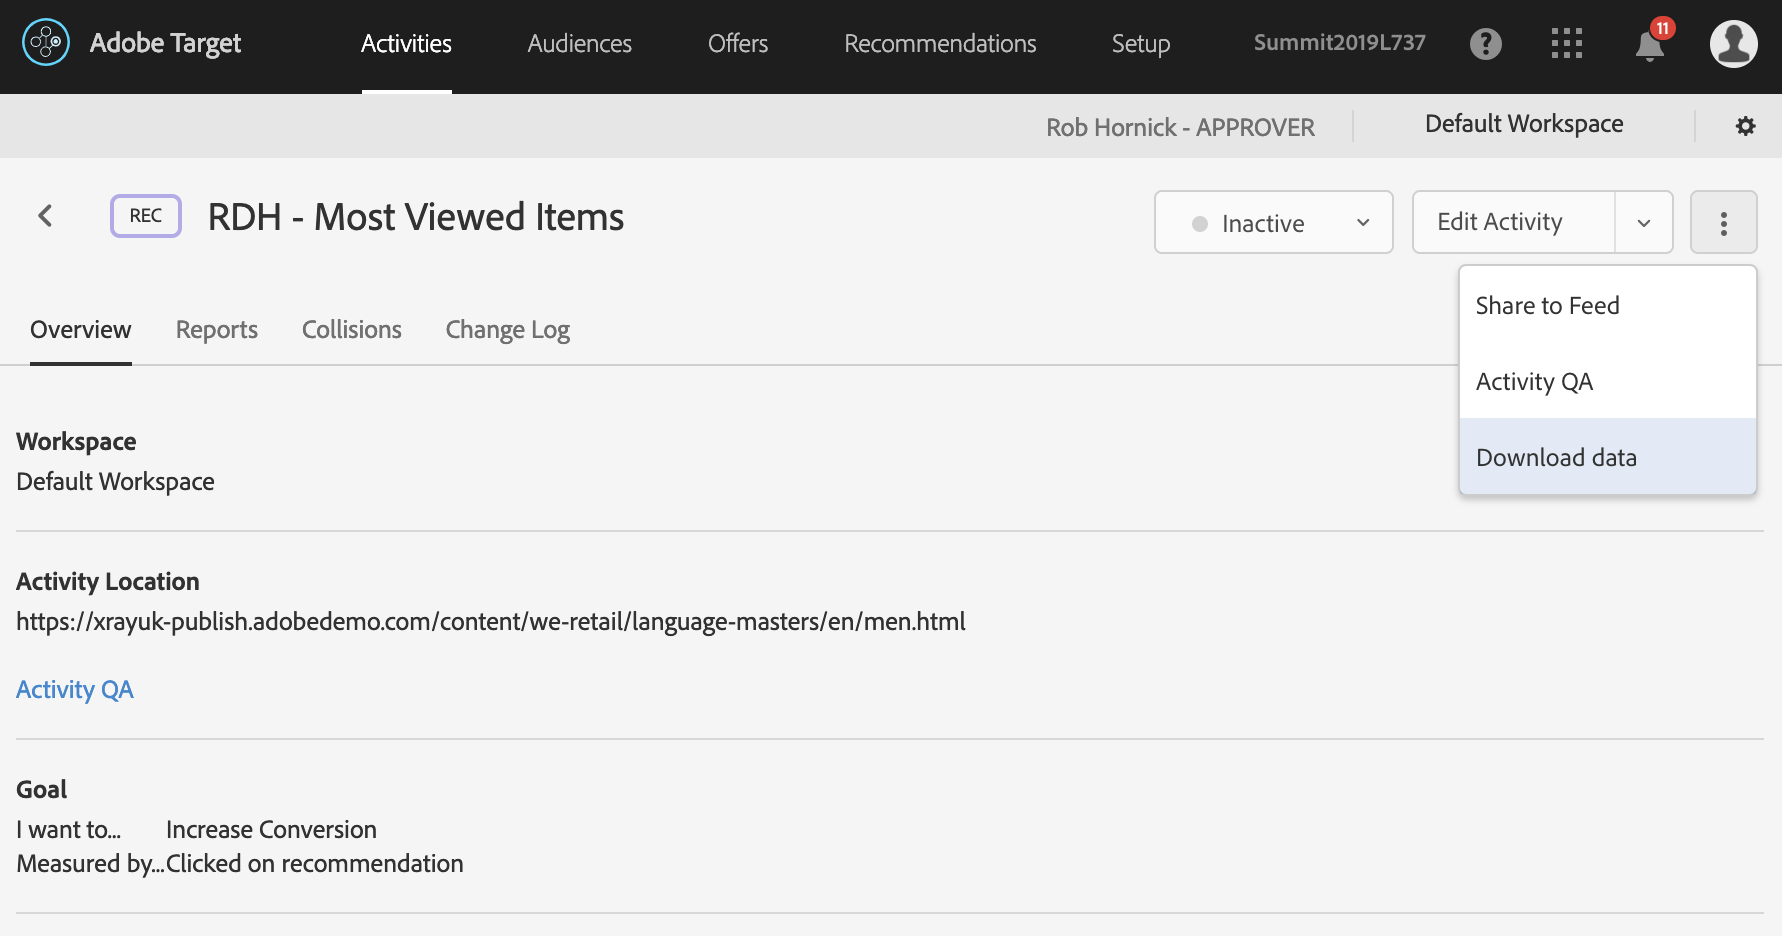
A CSV file will download: open it to see the recommended items:
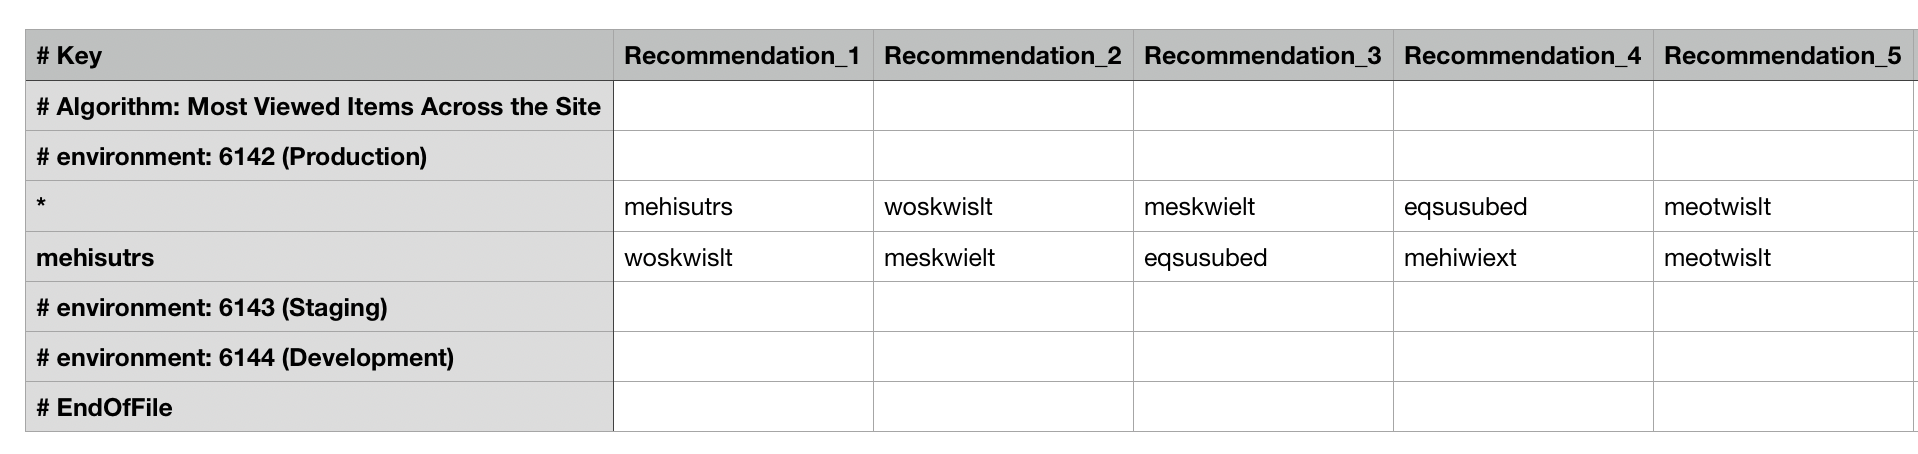
Note that from left to right are a list of recommended items – in this case the most frequently viewed. The recommendations are separated by environment – in this case only the Production environment has recommendations. For this algorithm, we have not applied any restrictions based on key value and so the row labeled with an asterisk (*) contains the complete set of recommendations. For other algorithm types based on a key value, such as “People Who Viewed This, Viewed That”, the key values (i.e. the “This” items) are listed in the left-most column and the recommended items (i.e. the “That” items) are listed left-to-right in the Recommendation_X columns.
Now that you’ve confirmed items are ready, activate the activity.
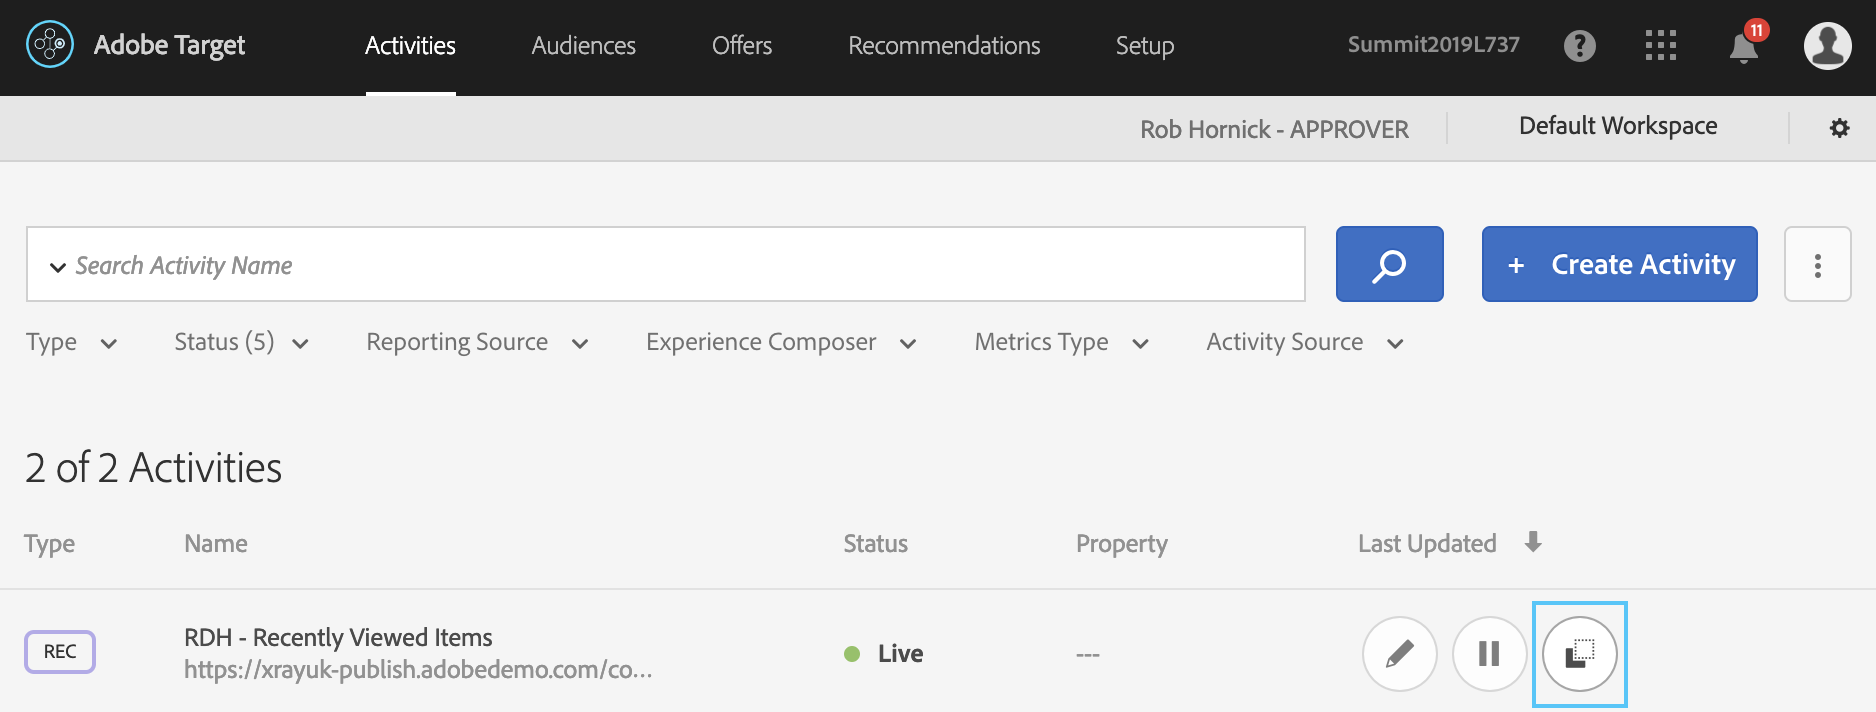
Confirm that both of your activities are Live in the Activity list view:
Open a new tab to the http://localhost:4503/content/we-retail/us/en.html?user=001 page and verify that as a repeat visitor, you still see Recently Viewed Items – browse around the site as needed to confirm this is true, returning to the homepage with the Back button to avoid losing your query parameter.
Then, open an incognito window to the same URL and verify that as a brand new visitor, you now see a different set of recommendations - Most Viewed Items. (Results may differ from the below screenshot based on changing pageviews!)

Extra Credit Exercise: Confirm these items match to the CSV file by opening these items and comparing their SKUs to the SKUs of the items recommended in the CSV.
Extra Credit Exercise: You can also become a “new visitor” by clearing the “mbox” cookie for this page which contains the session identifier. Prove that this resets the recently viewed items and subsequent browsing again reveals the recently viewed items.
Congratulations on completing Section 3! You’ve learned:
In this section, we will cover how you can create advanced algorithms to control recommendations. You will learn:
In Adobe Target Recommendations, Criteria are algorithms and rules that determine which items to recommend. In this lesson, we will build customized recommendations for our product detail page. We want to recommend related items that the customer viewing the PDP might be interested in as alternatives to the current item. (Research and practice indicate that this greatly boosts overall conversion rate.) To accomplish this, we will use a People Who Viewed This, Viewed That algorithm and we will additionally apply a restriction to show only products in the same category.
Navigate to the Criteria library by clicking Recommendations in the top navigation bar, then Criteria in the left navigation bar. The criteria library appears.
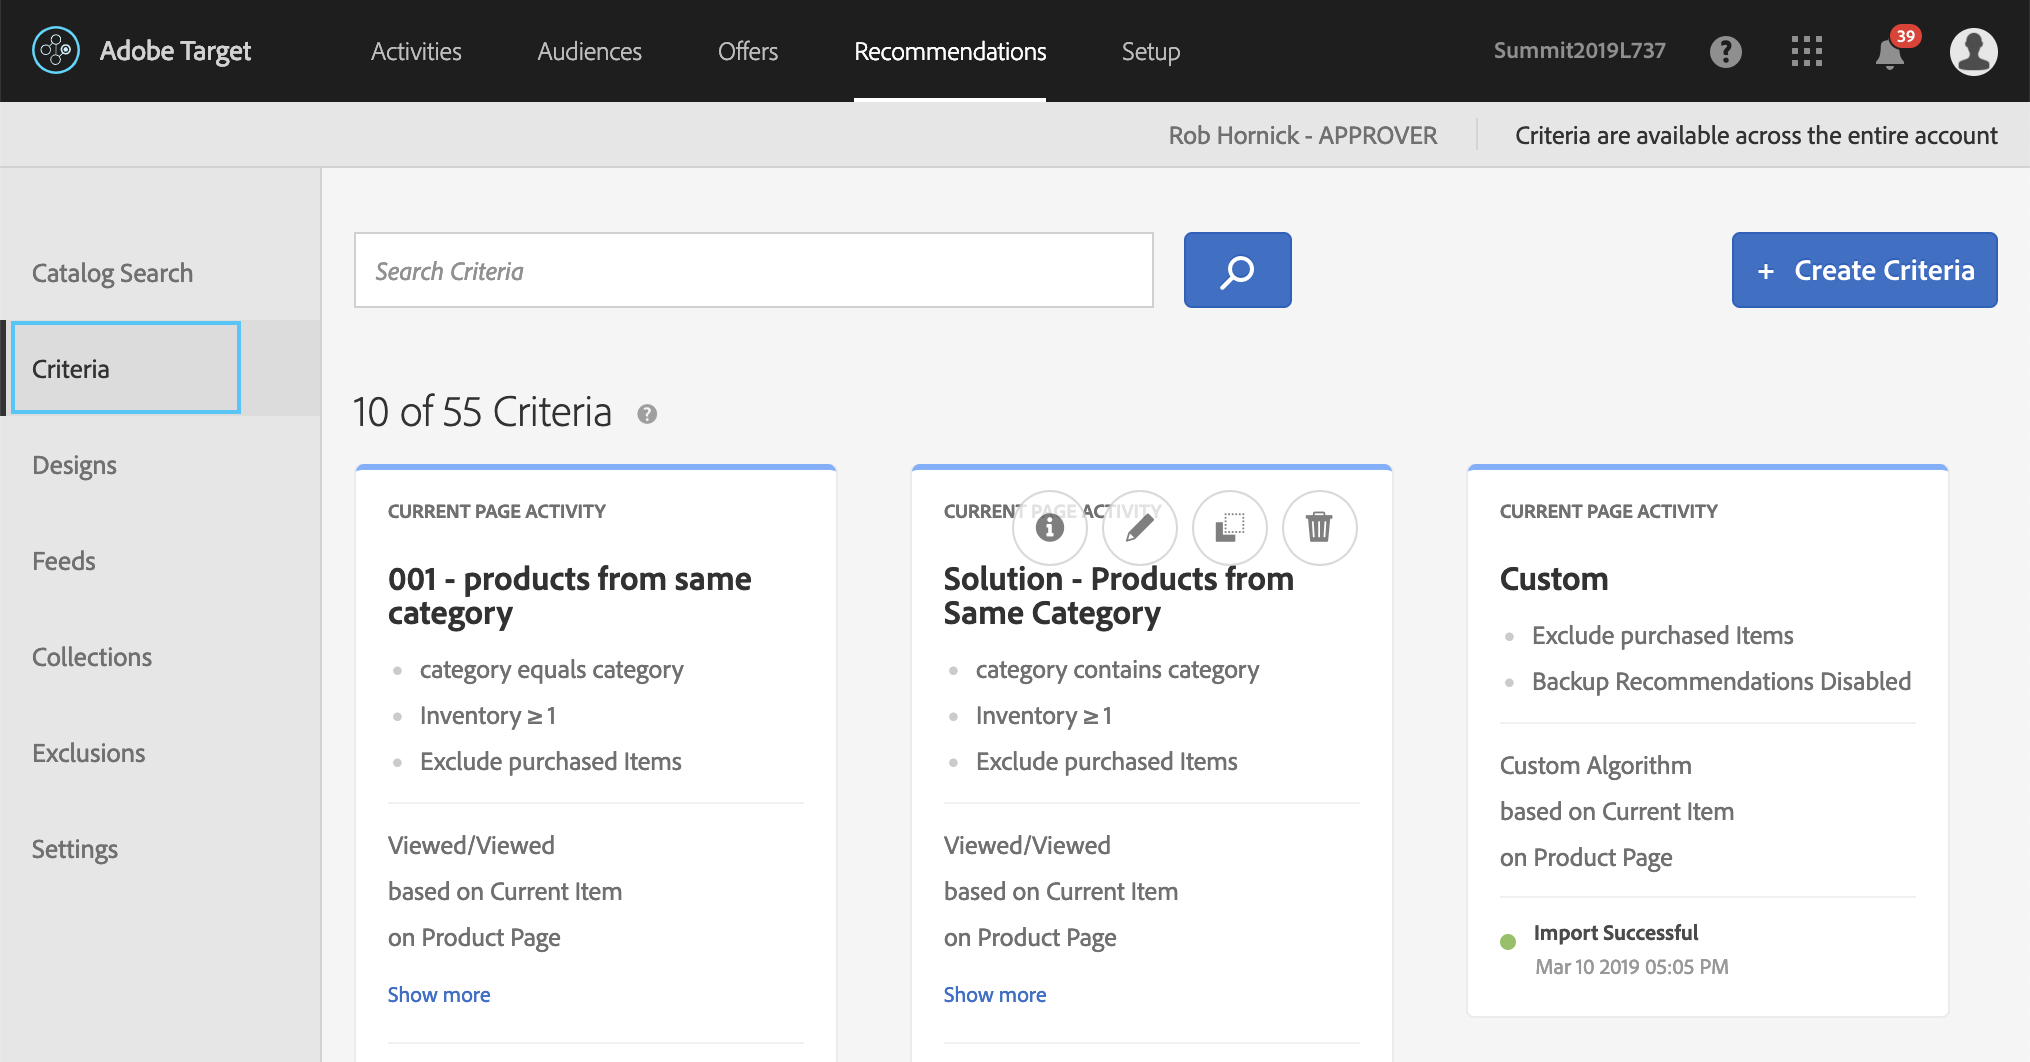
By default, Adobe Target includes several “out-of-the-box” criteria. You can customize these criteria or create your own. Browse these criteria to see what exists already; when you are done, return to begin creating your own criteria.
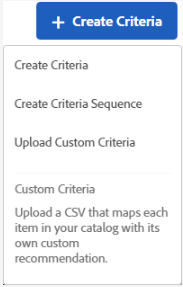
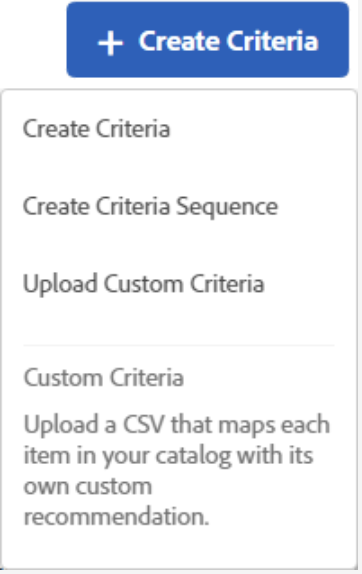
Click the blue + Create Criteria button to start a new criteria and choose Create Criteria from the submenu.
Enter the Basic Information: name, title, & description.
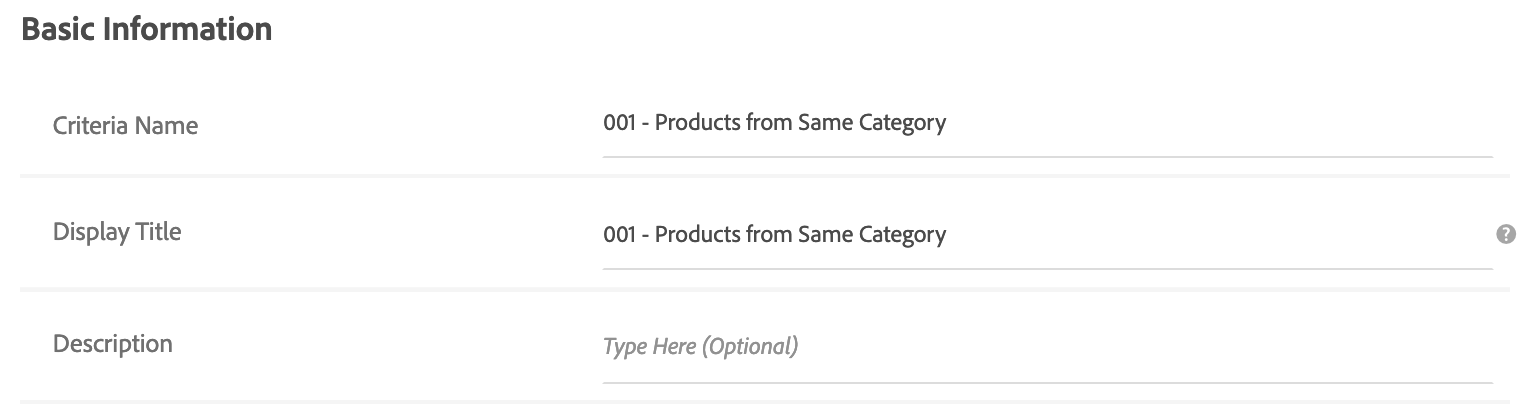
Criteria Name: This identifies the criteria in the Adobe Target application. Enter YOURNUMBER – Products from Same Category.
Display Title: This public-facing display text can be returned in the recommendations template on pages using this criteria and can be used in troubleshooting. (For example, you might use “People Also Viewed These Products” or “Related Items”.) For this lab, enter the same title as above (YOURNUMBER – Products from Same Category).
Description: An optional description detailing the purpose and/or selected settings of the algorithm.
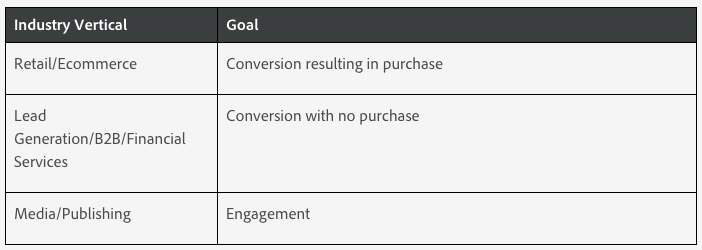
Industry Vertical: This is used in Target to help narrow down the available choices of Criteria in your Activities and the available choices of Recommendation Logic in your Criteria. Generally, this can be set once in your default settings and left alone. Our site is a web retailer, so leave the default option of Retail / Ecommerce selected.
Page Type: Like Industry Vertical, Page Type is used in Target to help narrow down the available choices of Criteria in your Activities and the available choices of Recommendation Logic and Key in your Criteria. By default, new criteria start with Home Page selected. We are creating recommendations for a Product Page so clear the Home Page selection, search for, and select Product Page.

The Recommendation Key acts as the basis for the Recommendation Logic and determines the available logic options. A unique set of recommendations are produced for each unique value of the selected key. The key you select will depend on the type of recommendations you want.
The Recommendation Logic determines how the unique set of recommendations is produced for each value of the selected key.
| Key | Description | Logic Available |
|---|---|---|
| Current Item | The recommendation is determined by the item the visitor is currently viewing. Recommendations display other items that might interest visitors who are interested in the specified item. When this option is selected, the entity.id value must be passed as a parameter in the display mbox. Commonly used on product detail pages, article view pages, etc. |
Items with Similar Attributes People Who Viewed This, Viewed That People Who Viewed This, Bought That People Who Bought This, Bought That Site Affinity |
| Current Category | The recommendation is determined by the product category that the visitor is currently viewing. Recommendations display items in the specified product category. When this option is selected, the entity.categoryId value must be passed as a parameter to the display mbox. Commonly used on category view pages. | Top Sellers Most Viewed |
| Last Purchased Item | The recommendation is determined by the last item that was purchased by each unique visitor. This is captured automatically, so no values need to be passed on the page. Commonly used on home pages or order confirmation pages. Do not use on product detail pages or earlier checkout flow pages. | Items with Similar Attributes People Who Viewed This, Viewed That People Who Viewed This, Bought That People Who Bought This, Bought That Site Affinity |
| Last Viewed Item | The recommendation is determined by the last item that was viewed by each unique visitor. This is captured automatically, so no values need to be passed on the page. Commonly used on home pages, “my account” page, etc. Do not use on product detail pages or checkout flow pages. | Items with Similar Attributes People Who Viewed This, Viewed That People Who Viewed This, Bought That People Who Bought This, Bought That Site Affinity |
| Most Viewed Item | The recommendation is determined by the item that has been viewed most often, using a weighting formula. Useful when users may view items more than once (e.g. media/content use cases.) | Items with Similar Attributes People Who Viewed This, Viewed That People Who Viewed This, Bought That People Who Bought This, Bought That Site Affinity |
| Favorite Category | The recommendation is determined by the category that has been viewed most often, using a weighting formula. Useful when category is predictive of subsequent behavior. |
Top Sellers Most Viewed |
| Popularity | The recommendation is determined by the popularity of items on your site. Popularity includes top sellers and top viewed by mbox data and, if you use Adobe Analytics, all of the metrics available in the product report. Items are ranked based on the Recommendation Logic you select. | Top Sellers Most Viewed Product report metrics (if using Adobe Analytics) |
| Recently Viewed Items | Uses the visitor's history (spanning sessions) to present the last x items the visitor has viewed, based on the number of slots in the design. | None |
| Custom Key | Recommendation is determined by an custom key that is stored in a visitor's profile. | People Who Viewed This, Viewed That People Who Viewed This, Bought That People Who Bought This, Bought That Site Affinity Most Viewed Top Sellers |
| Logic | Description |
|---|---|
| Items/Media with Similar Attributes | Recommends items or media similar to items or media based on current page activity or past visitor behavior. Note: If you select Items/Media with Similar Attributes, you will have the option to set content similarity rules. |
| People Who Viewed This, Viewed That | Recommends items that are most often viewed in the same session that the specified item is viewed. |
| People Who Viewed This, Bought That | Recommends items that are most often purchased in the same session that the specified item is viewed. This criteria returns other products people purchased after viewing this one, the specified product is not included in the results set. |
| People Who Bought This, Bought That | Recommends items that are most often purchased by customers at the same time as the specified item. |
| Site Affinity | Recommends items based on the certainty of a relationship between items. You can configure this criteria to determine how much data is required before a recommendation is presented using the Inclusion Rules slider. For example, if you select very strong, the products with the strongest certainty of a match are recommended. For example, if you set a very strong affinity and your design includes five items, three of which meet the strength of connection threshold, the two items that do not meet the minimum strength requirements are not displayed in your recommendations and are replaced by your defined backup items. The items with the strongest affinity display first. Some customers with diverse product collections and diverse site behaviors might get the best results if they set a weak site affinity. |
| Top Sellers | The items that are included in the most completed orders. Multiple units of the same item in a single order are counted as one order. |
| Most Viewed | The items or media that are viewed most often. |
| Recently Viewed Items/Media | Items that have been viewed recently by the visitor. When using this criteria, you should update the Target design to handle cases where blank recommendations would show when there are not enough previously viewed items to display. |
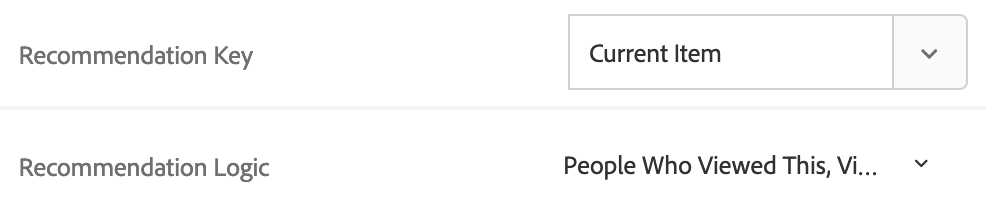
Select Current Item as the Recommendation Key and People Who Viewed This, Viewed That as the Recommendation Logic..
Set the Data Range to determine the time range of available historical user behavior data to use when determining which recommendations to show. If your site has a lot of traffic and behaviors change frequently, choose a shorter data window. A shorter window enables Recommendations to be more responsive to changes in the market and in your business. For example, a shorter window means that Recommendations will detect changes in visitor behavior as your visitors begin seasonal shopping, such as back-to-school shopping or Christmas, and will recommend items appropriate to those shopping seasons.
If you don't have a lot of data, or visitor behavior does not change frequently, you might select a longer window. However, for many sites, a shorter window results in better recommendations.
The available data ranges are:
Our demo site has little traffic, so select 1 month as the Data Range.

Behavioral Data Source: Target Recommendations can use page events (i.e. views and purchases) from Adobe Analytics to determine the popularity of items or use page events from Adobe Target (i.e., mboxes). Leave the default selection of mboxes selected.

Tip: If you choose Adobe Analytics, you must choose the appropriate report suite to use for behavioral data.
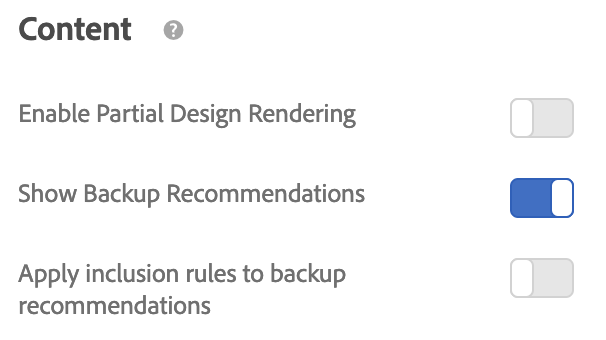
Content Rules: Content rules determine what happens if the number of recommended items does not fill your design. For example, if your design has space for five items, but your criteria causes only three items to be recommended, you can leave the remaining space empty, or you can use backup recommendations to fill the extra space.
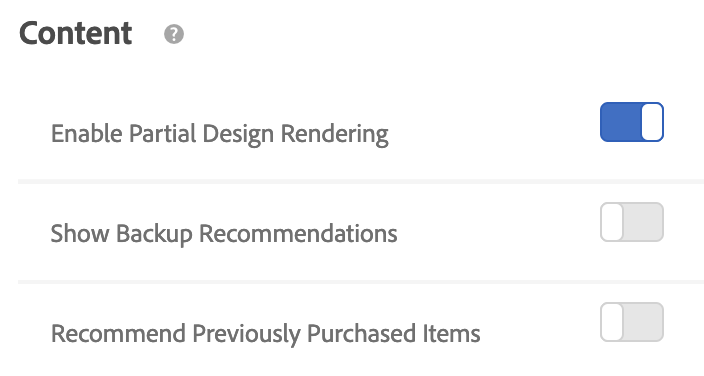
Enable Partial Design Rendering determines whether Target Recommendations is allowed to display a design that is only partially filled. Turn this setting On. If this setting is turned Off and Target does not have enough recommendations to completely fill the template, default content will be displayed.
Show Backup Recommendations determines whether Target Recommendations will return backup recommendations from the site’s top viewed items if not enough items are available to fill the template.. Backup recommendations are randomly chosen from the top 500 most-viewed products across the entire site. For more information, view https://marketing.adobe.com/resources/help/en_US/target/recs/c_backup_recs.html. Leave this setting Off.
Recommend Previously Purchased Items determines whether Target Recommendations will filter out previously purchased items from the recommendations. This setting is useful if you mostly sell items that people don’t repurchase frequently (e.g.: home appliances like dishwashers refrigerators.) If you sell items that people come back to purchase again, such as shampoo or other personal items, you should disable this option. Leave this setting Off.
Inclusion Rules allow you to filter items out of your computed recommendations. Inclusion rule filtering is performed in real-time when a visitor views the page, so it always reflects the latest price/inventory updates. The options available depend on the selected industry vertical. For Retail / Ecommerce, price rules and inventory will display:
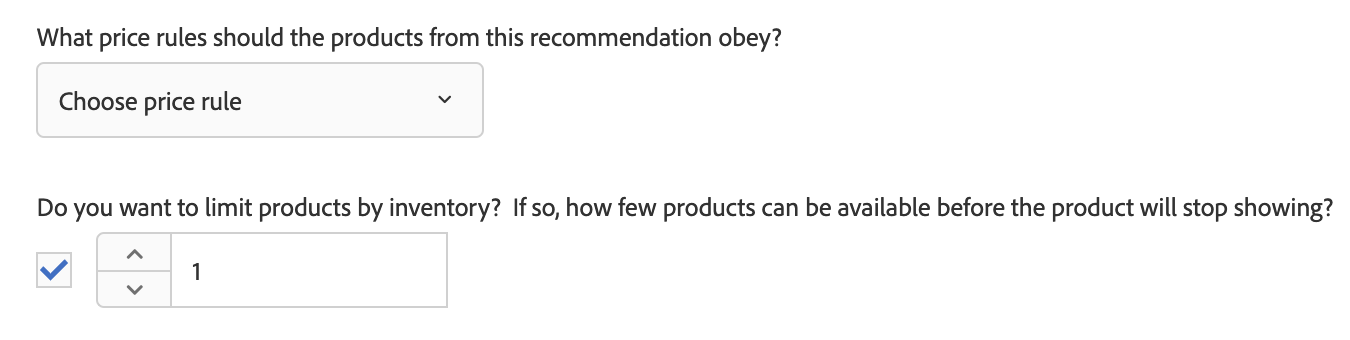
Leave these default values selected.
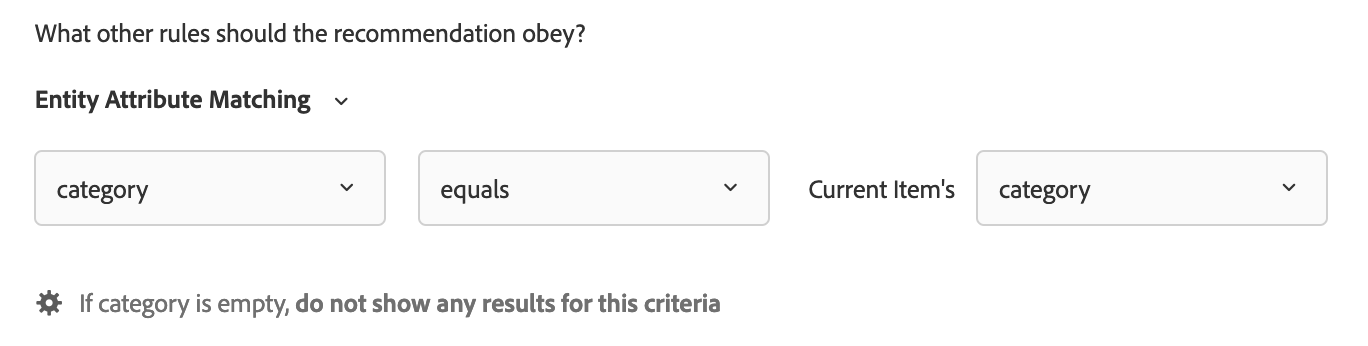
Filtering Rules allow you to create custom filters to dynamically exclude items based on the user’s behavior or profile. Four options are available:
Entity Attribute Matching: Filter dynamically by comparing a pool of potential recommendations items to a specific item that the users has interacted with. (For example, only recommend items that match the current item’s brand.)
Profile Attribute Matching: Filter dynamically by comparing items (entities) against a value in the user's profile. (For example, only recommend items that match the visitor’s favorite category.)
Parameter Matching: Filter dynamically by comparing items (entities) against a value in the request (API or mbox). (For example, only recommend content that matches the "industry" page parameter.)
Static Filter: Manually enter one or more static values to filter. (For example, only recommend content with an MPAA rating of "G" or "PG.")
Add an entity matching rule to recommend only items that match the current item’s category:
Attribute Weighting: You can add multiple rules to "nudge" the algorithm based on important description or metadata about the content catalog. For example, you can apply a higher weighting to on-sale items so they appear more often in recommendations. For this exercise, Attribute Weighting is not required.
When finished, click Save.
We now need to put this Criteria into action on your product detail page! In order to make the most of our limited time in this lab, we’ve pre-created an Activity for you which contains an identical criteria to the one you just created. Find the activity titled Lab Solution - Lesson 4.2 PDP Recs and open the Activity Overview.
Note the activity location includes any URL that matches the string “http://localhost:4503/content/we-retail/us/en/products/” which means the recommendations will be displayed on all Product Detail Pages:

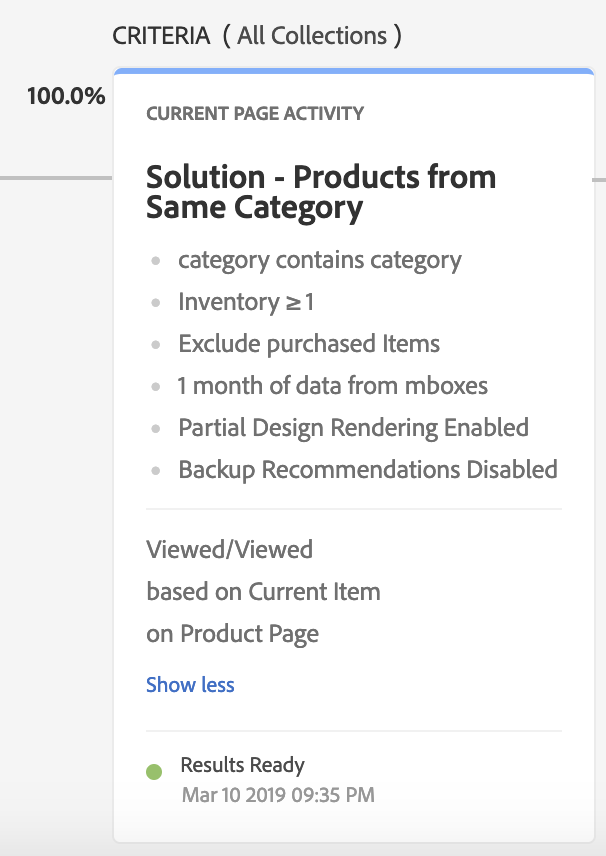
Note that the Criteria is selected and has results ready:
Use the Download data option and note that different recommendations have been produced per product SKU:

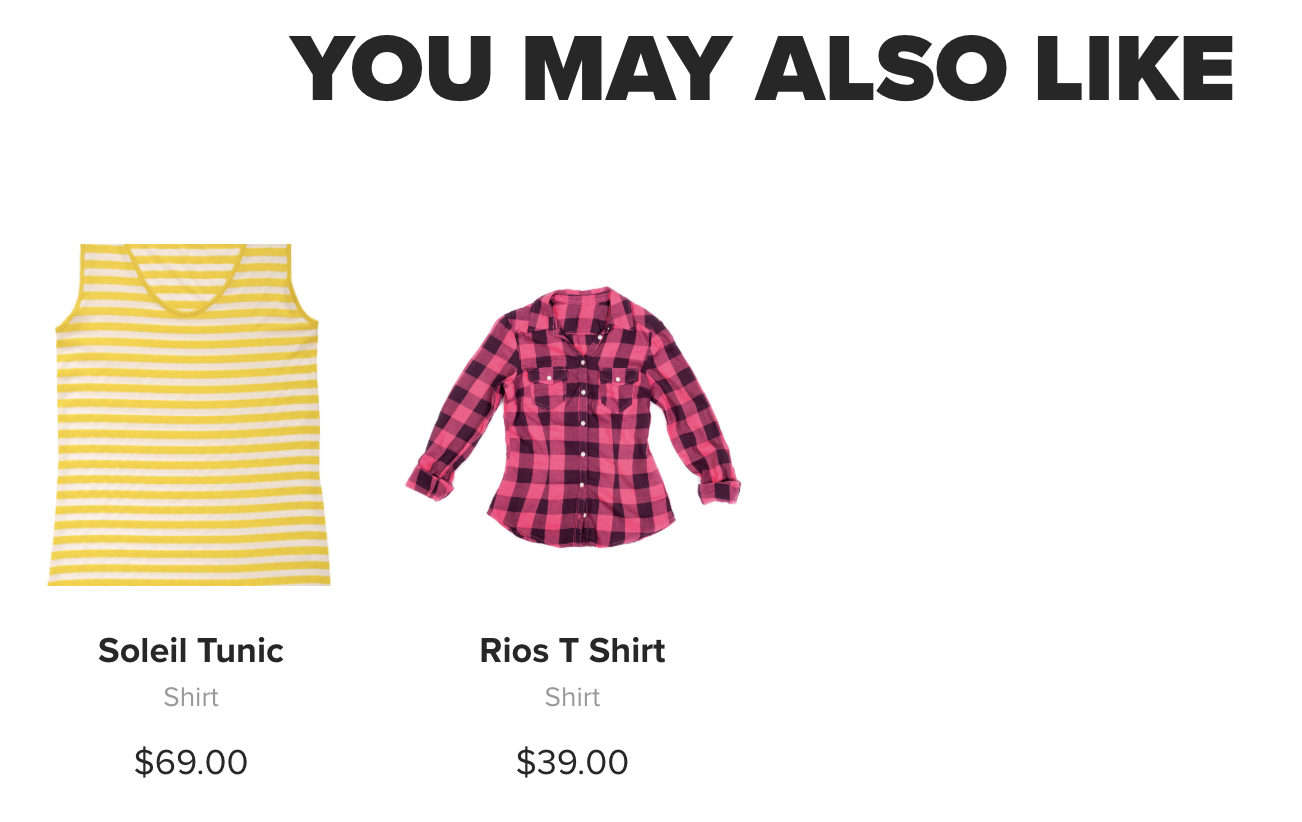
Once the activity has been activated, you will see recommendations that differ on each product detail page:
Note the following:
Items 3 & 4 are true because we did not enable backup recommendations and because we used a restrictive filtering rule (category equals current item’s category) to narrow down the recommended items. In the next exercise, we will see how we can use multiple sets of recommendations to fill in the rest of the slots.
Criteria Sequences allow you to use up to five criteria to exercise greater control of the items that appear in your Recommendations activities. By using a criteria sequence, you can provide additional targeted recommendations, instead of using more generic backup recommendations, when a criteria doesn't return enough results to fill your design. Typically, a criteria sequence will proceed from more specific targeting, which may return fewer results, to more general targeting, which usually returns more results.
For example, a product page criteria sequence might follow this order:
A home page criteria sequence might follow this order:
We will create a sequence for our product detail page that displays in order of descending preference:
Return to the Recommendations > Criteria library screen.
Click Create Criteria and select Create Criteria Sequence.
The first several steps are identical to those we did in Lesson 4.1 to create a Criteria.
Criteria Name: This identifies the criteria in the Adobe Target application. Enter YOURNUMBER – PDP Criteria Sequence.
Display Title: This public-facing display text can be returned in the recommendations template on pages using this criteria and can be used in troubleshooting. For this lab, enter the same title as above (YOURNUMBER – PDP Criteria Sequence).
Description: An optional description detailing the purpose and/or selected settings of the algorithm.
Industry Vertical: Our site is a web retailer, so leave the default option of Retail / Ecommerce selected.
Page Type: We are creating recommendations for a Product Page so clear the Home Page selection, search for, and select Product Page.

Adjust the Content settings. When you create a criteria sequence, backup recommendation and partial design rendering settings are ignored for the individual criteria the make up the sequence. To use backup recommendations and partial design rendering you must enable them for the sequence. If you choose to allow backup recommendations, you can also choose whether to apply inclusion rules to the backups. Select the appropriate toggles to ensure we have a full tray of recommendations for every product in our catalog.
Add the criteria to the sequence under Sequence Order:
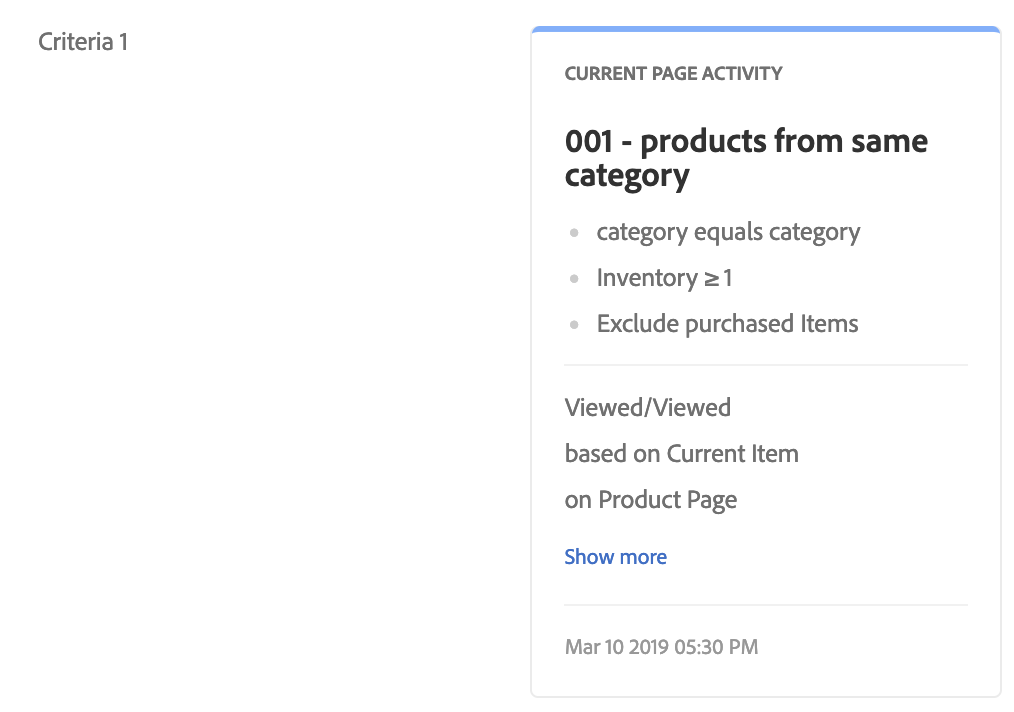
Start by adding the YOURNUMBER – Products from Same Category criteria.
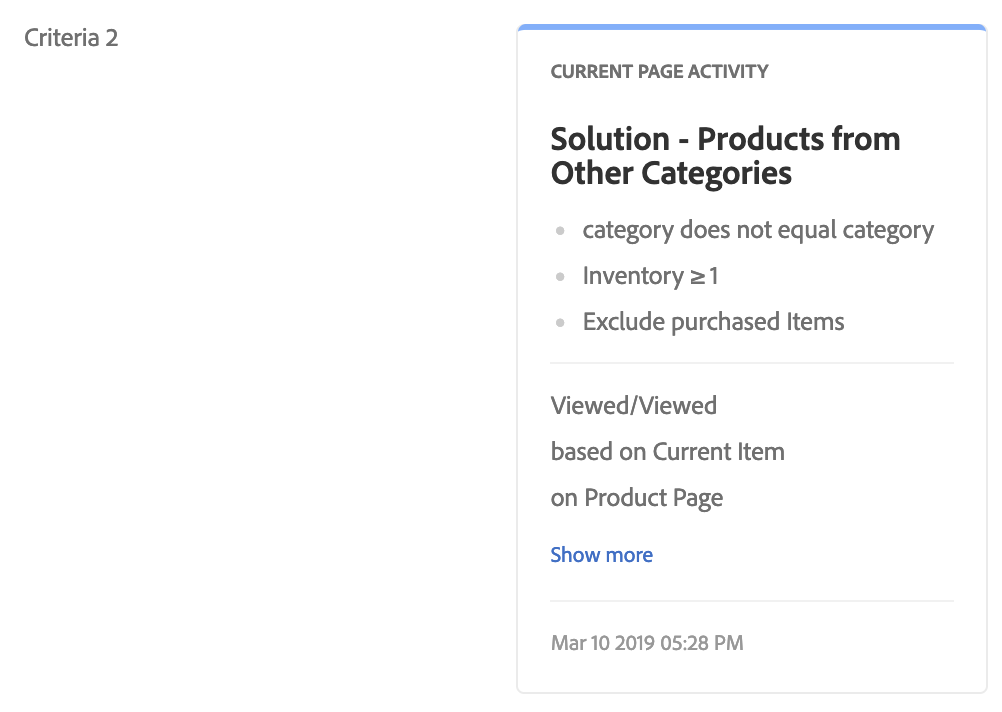
Then add the Solution - Products from Other Categories criteria.
Save and Close the Criteria Sequence.
We now need to put this Criteria Sequence into action on your product detail page. In order to make the most of our limited time in this lab, we’ve pre-created an Activity for you which contains an identical criteria sequence to the one you just created. Find the activity titled Lab Solution - Lesson 4.3 PDP Criteria Sequence and open the Activity Overview.
As you did in Lesson 4.2, explore the configuration of this activity and examine the data download. Once the activity has been activated, you will see recommendations that differ on each product detail page. Note these similarities and differences from Lesson 4.2:
mboxTrace enables you to receive trace information attached to mbox replies. Trace information reflects the outcome of an mbox call (for example, a conversion or an impression) and any additional data that may help in determining why this particular outcome happened, such as a set of available branches among which the selection was made in a campaign. Use this information to debug content delivery.
Because mboxTrace can expose campaign data and profile data to external parties, an authorization token is required. The authorization token can be retrieved in the Target UI. The token is valid for six hours.
To use the authorization token:
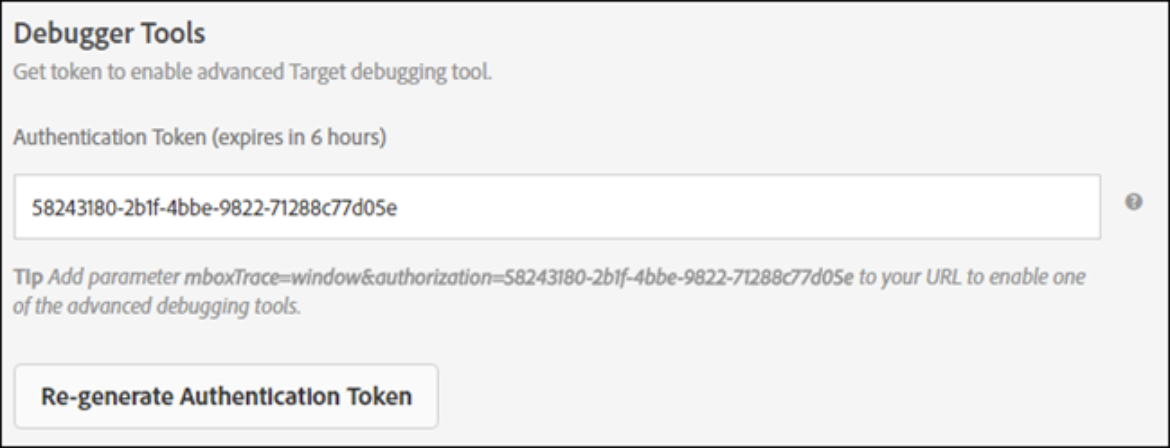
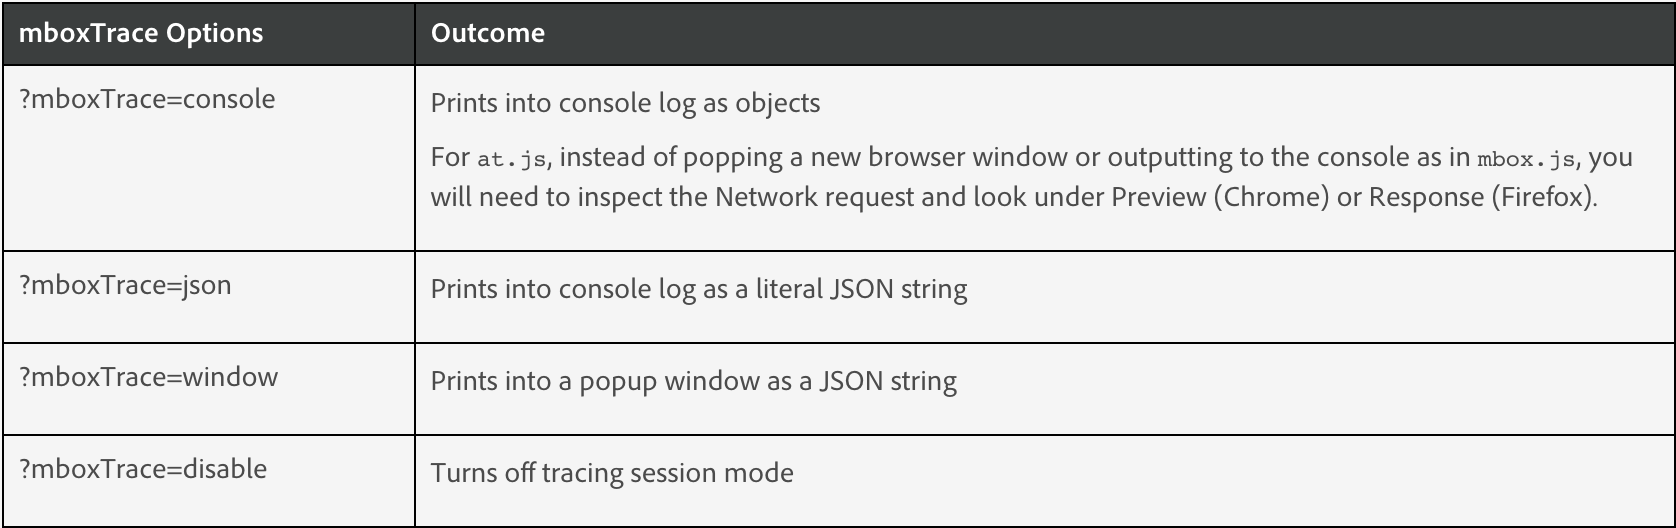
The following parameters are available:
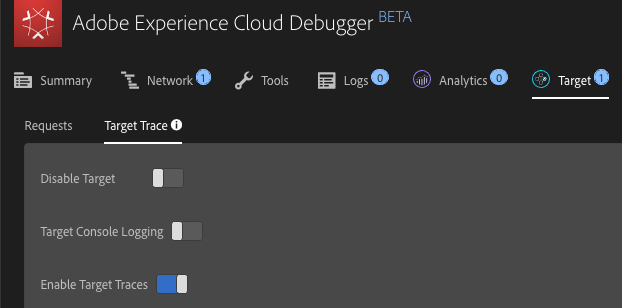
When applying mboxTrace, the Recommendations area will contain “embedded” code that can be extracted to a text editor for further evaluation:
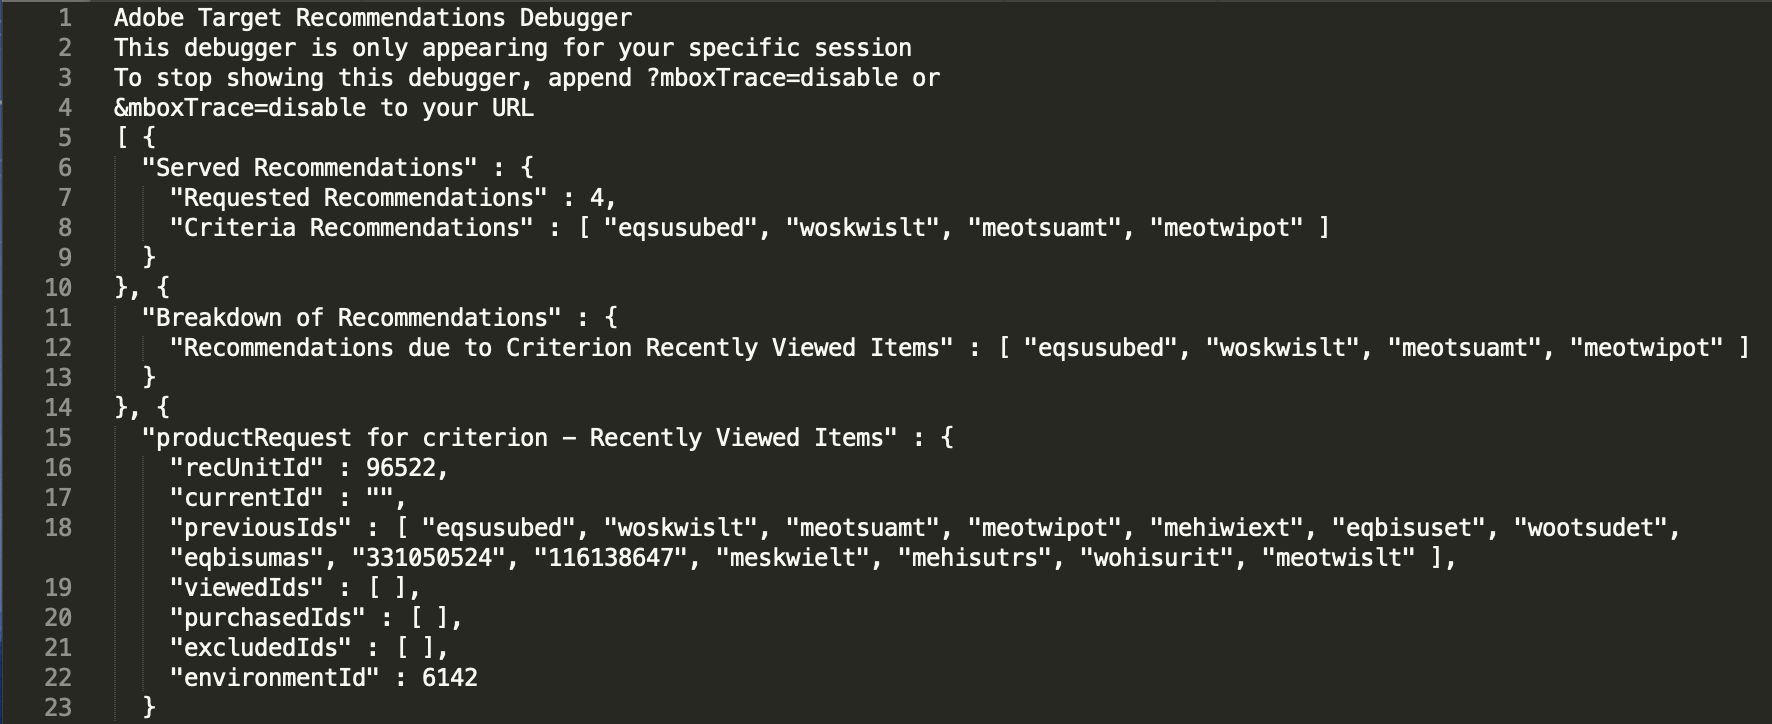
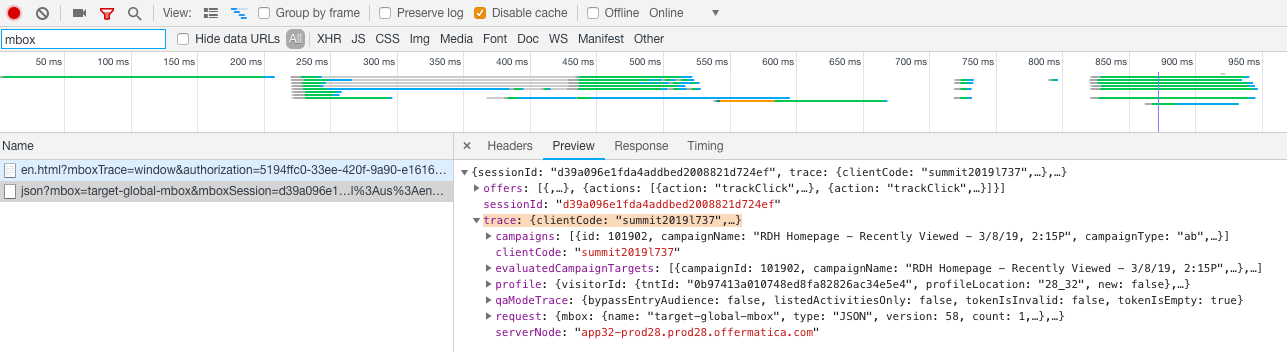
In the browser console, you can access mboxTrace by searching for “mbox” in the network call and finding “trace” in the preview of the global mbox request:
In this section, we will cover how you can customize the display of recommendations from Adobe Target Recommendations. You will learn:
With the Recommendations tab selected from the top nav bar, navigate to the Designs page in the left-hand navigation menu:
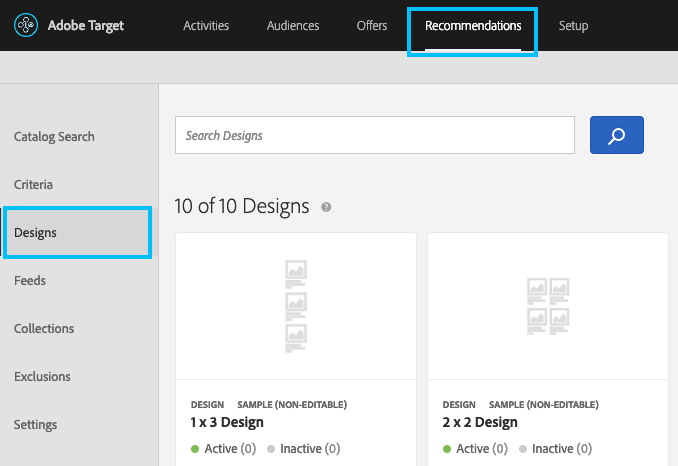
You will see a list of all currently available Recommendations Design templates.
Design templates are the way Recommendations specifies the format of the response to return to the browser or other requesting application.
Target Recommendations can return either JSON or HTML-formatted responses.
Let’s examine the format of a design template. Type Lesson 5 into the Search Designs box and press Enter or click the magnifying glass icon.
Mouse over the design template titled Lesson 5 Starter Design and click the Copy button ( ) that appears on mouseover. The Create Design window opens with a copy of the Design:
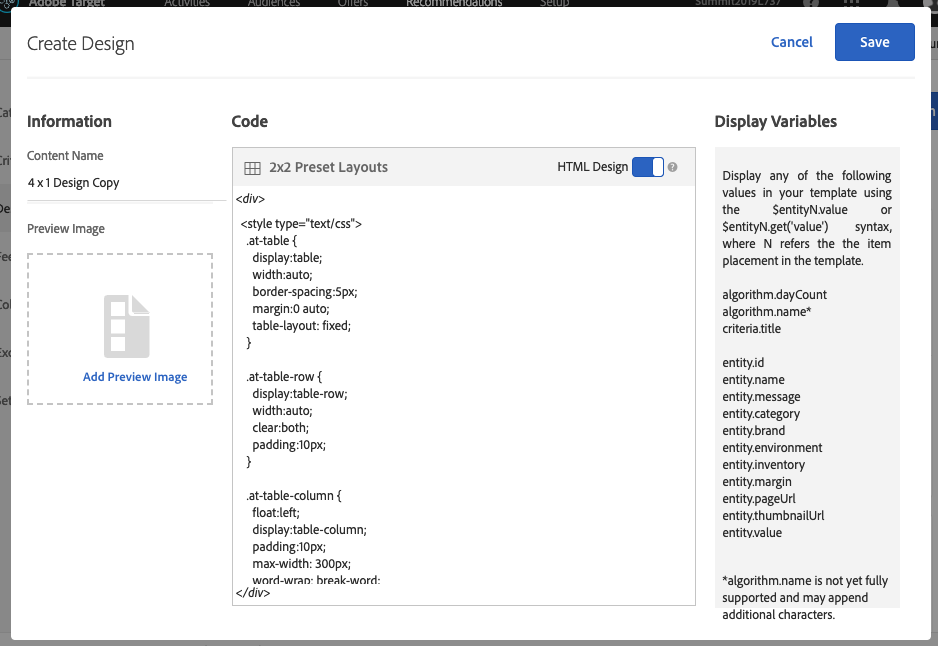
Start by renaming your design template YOURNUMBER – 4 x 1 Design:
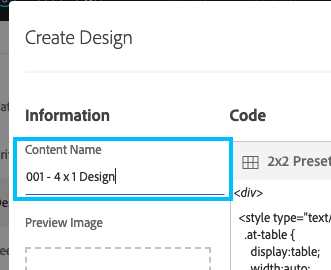
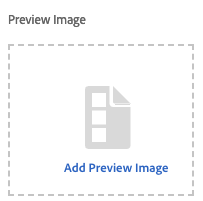
Note that you can upload a preview image if desired. This is useful to easily distinguish multiple designs in your library:
In the Code editor, you can specify the HTML, CSS, and/or JSON content of the design. Note that the current design contains HTML and CSS. Examine the current design contents.
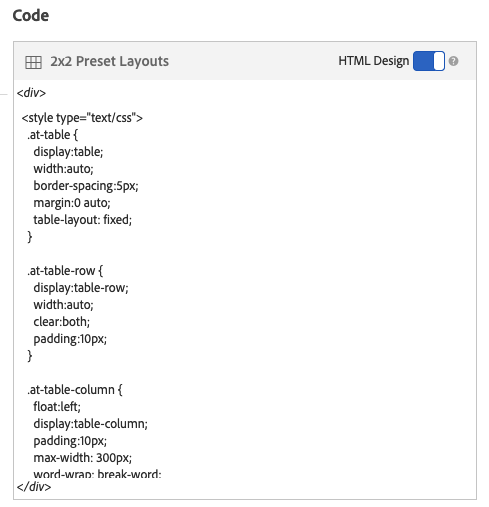
At the top of the Code editor, note the HTML Design toggle. Leaving this toggle on instructs Target Recommendations that the content should be returned as HTML. If left on, Target Recommendations will also wrap the contents in a <div> tag that allows Target to track clicks on the returned recommendations. Turning the toggle off instructs Target Recommendations that the content should be returned as JSON, and the content will not be wrapped in a <div> tag.
For now, click Save in the upper right corner to save your new design.
Search for your Design by typing YOURNUMBER into the search box, mouse over your newly created design (titled YOURNUMBER - 4 x 1 Design), and click the Edit icon ( ).
).
Scroll down in the design and notice that the design contains placeholder text for many of the product attributes we want to display on our page:
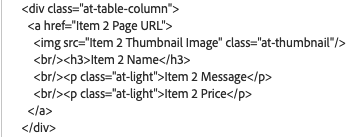
We need to replace this placeholder text with the correct variables to ensure the right product attributes are shown on our page.
To do this, we will use Velocity scripting syntax. Velocity is an open-source scripting language that allows web developers to insert variables into HTML or JSON. (For more information, visit: http://velocity.apache.org/engine/1.7/user-guide.html)
Note that the current template is intended to do the following for each of 4 products:
To do this, we must replace each placeholder for products 2-4. Using Product 1 as a guideline:
When you have finished, click Save to save your updated template. Then, return to your Recently Viewed Items activity from Lesson 3.1 and swap in the design template. Validate that the template displays correctly. (You may have to wait a few minutes for the displayed template to update.)
Extra Credit: Use Velocity scripting and conditional logic to changing the color of the item’s price to green if the price is less than or equal to $40.00 and red if the price is greater than $40.00.
Extra Credit: Add a 5th item to the display template.
Tip: If you change the number of items displayed in a design template, Target Recommendations needs to re-compute the algorithm to ensure a sufficient number recommendations are available, and Criteria status will change from Results Ready to Results Not Ready.