
![]()
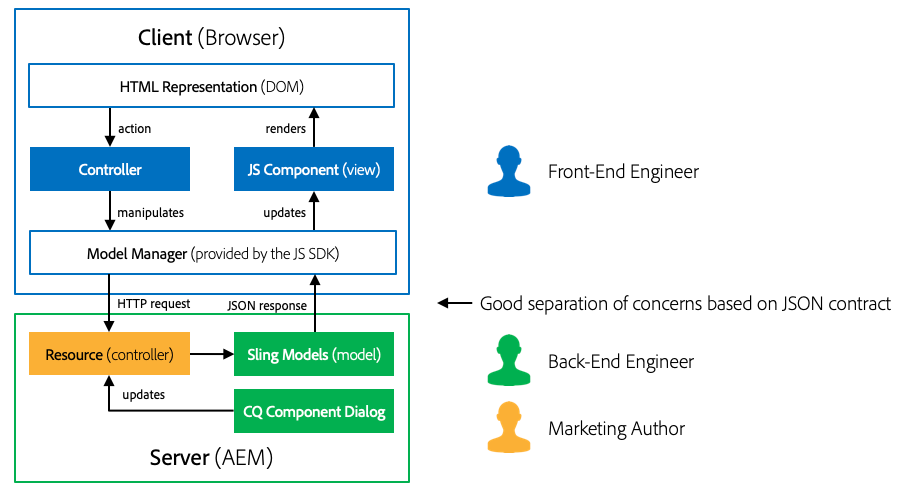
As brands move to Single Page Applications (SPA), too often the digital marketer has minimal control over content and layout decisions. With the SPA Editor framework in Adobe Experience Manager, digital marketers are no longer left out of the process. Front-end developers continue to build highly performant and rich experiences, while enabling content authors to make in-context editorial updates.
A local development environment with the following tools and technologies installed:
A local author instance of AEM should be installed running locally on port 4502
The lab will use Visual Studio Code as the IDE and screenshots will be of Visual Studio Code. IntelliJ, Eclipse are also great IDEs to work with.
See Set up a Local AEM Development Environment for detailed instructions.
Start by double checking that the above tools have been installed and available via the command line path.
Open up a new terminal and run the following commands:
$ java -version
java version "1.8.+"
Java(TM) SE Runtime Environment (build 1.8.0_111-b14)
Java HotSpot(TM) 64-Bit Server VM (build 25.111-b14, mixed mode)

$ mvn -version
Apache Maven 3.3.9
Maven home: /Library/apache-maven-3.3.9
Java version: 1.8.0_111, vendor: Oracle Corporation
Java home: /Library/Java/JavaVirtualMachines/jdk1.8.0_111.jdk/Contents/Home/jre

$ node --version
v10.8.0

$ npm --version
6.2.0
This lab has been written so that participants can complete the lab in either Angular or React frameworks. Throughout the manual you may see indicator icons like the following:
or
Complete only the exercise that corresponds to the framework you have chosen.
Or if you are ambitious do both!
There are a number for files that will be used in the lab. If completing this lab in person, the files are already downloaded to the Desktop under a folder named resources. You can also find the same resources online in the git repository.
SPA development will be done primarily in a webpack project outside of AEM. This offers several advantages:
At a high level, the integration approach is as follows:

The concept is similar to the integration of the core Java bundle, where the Java bundle is compiled into a jar file that is embedded into the ui.apps module and deployed to AEM as an AEM package.
To achieve this integration two tools will be used:
The Maven Archetype for SPA Starter Kit was used to create a new SPA project with React. The following parameters were used:
mvn archetype:generate -B \
    -DarchetypeCatalog=local  \
    -DarchetypeGroupId=com.adobe.cq.spa.archetypes  \
    -DarchetypeArtifactId=aem-spa-project-archetype  \
    -DarchetypeVersion=1.0.3-SNAPSHOT \
    -Dpackage=summitlab \
    -DgroupId=com.adobe.summit \
    -DartifactId=L738-spa-react \
    -Dversion=0.0.1-SNAPSHOT \
    -DprojectTitle="L738 SPA React App"  \
    -DprojectName=L738-react  \
    -DcomponentGroup="L738 React Content" \
    -DoptionFrontend=react
Open Visual Studio Code IDE
Click Open Folder and navigate to Desktop > resources > lesson-1 > L738-spa-react 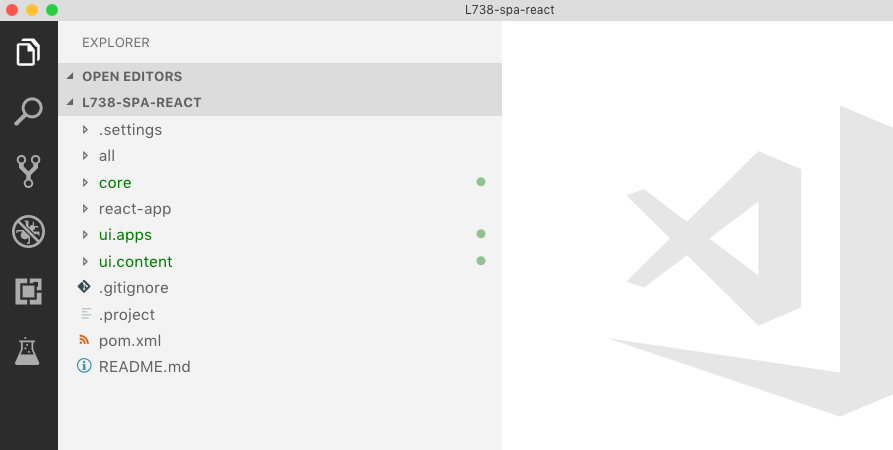
There are 5 folders in the project that represent individual Maven modules
Beneath the react-app folder, open the file: package.json. Inspect the npm scripts build command:
"build": "react-scripts build && clientlib --verbose"
This will trigger a production build of the react application and then copy the compiled JS and CSS into an AEM Client library.
Beneath the react-app folder, open the file: clientlib.config.js. This is the aem-clientlib-generator used to transform the production build of the react app into an AEM client library that will be copied into the ui.apps folder.
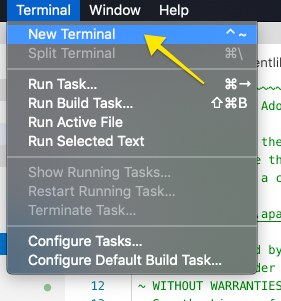
In Visual Studio Code from menu bar > Terminal > New Terminal
The terminal should default to be in the directory: ~/Desktop/resources/lesson-1/L738-spa-react.
Run the following command in the terminal:
$ mvn -PautoInstallPackage clean install
This will build and deploy the application to a local instance of AEM running at http://localhost:4502.
[INFO] ------------------------------------------------------------------------
[INFO] Reactor Summary:
[INFO]
[INFO] L738 SPA React App Reactor ......................... SUCCESS [  0.300 s]
[INFO] L738 SPA React App Core ............................ SUCCESS [  6.849 s]
[INFO] L738 SPA React App React App ....................... SUCCESS [ 32.572 s]
[INFO] L738 SPA React App - SPA UI apps ................... SUCCESS [  1.152 s]
[INFO] L738 SPA React App - SPA UI content ................ SUCCESS [  0.644 s]
[INFO] L738 SPA React App All-in-One ...................... SUCCESS [  0.885 s]
[INFO] ------------------------------------------------------------------------
[INFO] BUILD SUCCESS
[INFO] ------------------------------------------------------------------------
[INFO] Total time: 43.965 s
[INFO] Finished at: 2019-01-25T17:27:13-05:00
[INFO] Final Memory: 55M/714M
Open a new browser and navigate to AEM: http://localhost:4502.
Login using the credentials:
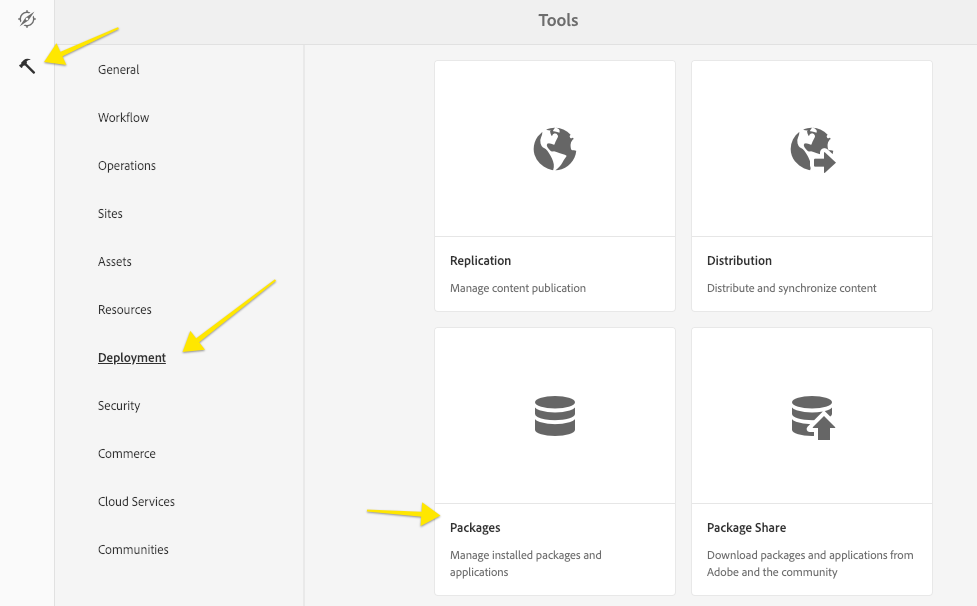
Click Tools > Deployment > Packages to navigate to CRX Package Manager:
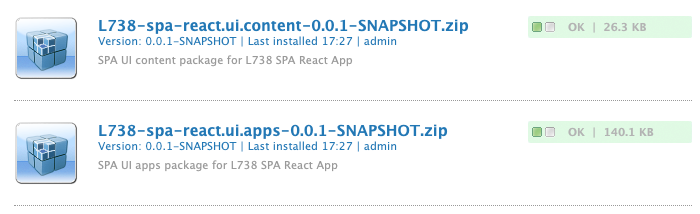
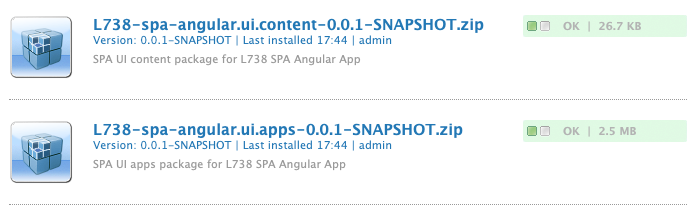
You should see that the package has been deployed:
The Maven Archetype for SPA Starter Kit was used to create a new SPA project with Angular. The following parameters were used:
mvn archetype:generate -B \
 -DarchetypeCatalog=local  \
 -DarchetypeGroupId=com.adobe.cq.spa.archetypes  \
 -DarchetypeArtifactId=aem-spa-project-archetype  \
 -DarchetypeVersion=1.0.3-SNAPSHOT \
 -Dpackage=summitlab \
 -DgroupId=com.adobe.summit \
 -DartifactId=L738-spa-angular \
 -Dversion=0.0.1-SNAPSHOT \
 -DprojectTitle="L738 SPA Angular App"  \
 -DprojectName=L738-angular  \
 -DcomponentGroup="L738 Angular Content" \
 -DoptionFrontend=angular
Open Visual Studio Code IDE
Click Open Folder and navigate to Desktop > resources > lesson-1 > L738-spa-angular 
There are 5 folders in the project that represent individual Maven modules
Beneath the angular-app folder, open the file: package.json. Inspect the npm scripts build command:
"build": "ng build --build-optimizer=false && clientlib"
This will trigger a production build of the angular application and then copy the compiled JS and CSS into an AEM Client library.
Beneath the angular-app folder, open the file: clientlib.config.js. This is the aem-clientlib-generator used to transform the production build of the angular app into an AEM client library that will be copied into the ui.apps folder.
In Visual Studio Code from menu bar > Terminal > New Terminal
The terminal should default to be in the directory: ~/Desktop/resources/lesson-1/L738-spa-angular.
Run the following command in the terminal:
$ mvn -PautoInstallPackage clean install
This will build and deploy the application to a local instance of AEM running at http://localhost:4502.
[INFO] ------------------------------------------------------------------------
[INFO] Reactor Summary:
[INFO]
[INFO] L738 SPA Angular App Reactor ....................... SUCCESS [  0.306 s]
[INFO] L738 SPA Angular App Core .......................... SUCCESS [  6.495 s]
[INFO] L738 SPA Angular App Angular App ................... SUCCESS [ 34.384 s]
[INFO] L738 SPA Angular App - SPA UI apps ................. SUCCESS [  1.922 s]
[INFO] L738 SPA Angular App - SPA UI content .............. SUCCESS [  0.615 s]
[INFO] L738 SPA Angular App All-in-One .................... SUCCESS [  1.137 s]
[INFO] ------------------------------------------------------------------------
[INFO] BUILD SUCCESS
[INFO] ------------------------------------------------------------------------
[INFO] Total time: 46.440 s
[INFO] Finished at: 2019-01-25T17:44:17-05:00
[INFO] Final Memory: 59M/707M
Open a new browser and navigate to AEM: http://localhost:4502.
Login using the credentials:
Click Tools > Deployment > Packages to navigate to CRX Package Manager:
You should see that the package has been deployed:
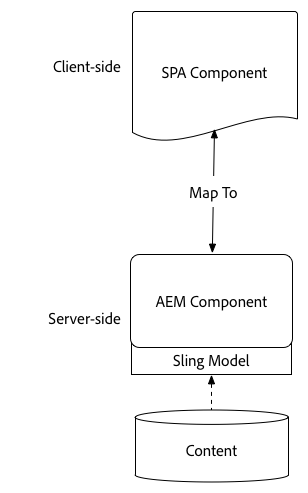
The goal of the SPA Editor is to allow marketers to be able to make in-context edits to a Single Page Application. In this lesson we will trace how authored content is persisted to the JCR and then exposed as JSON. We will then look at how the SPA inspects the JSON to map the data model to a front-end component. The Text component which is included out of the box by the SPA Starter Kit will be used.
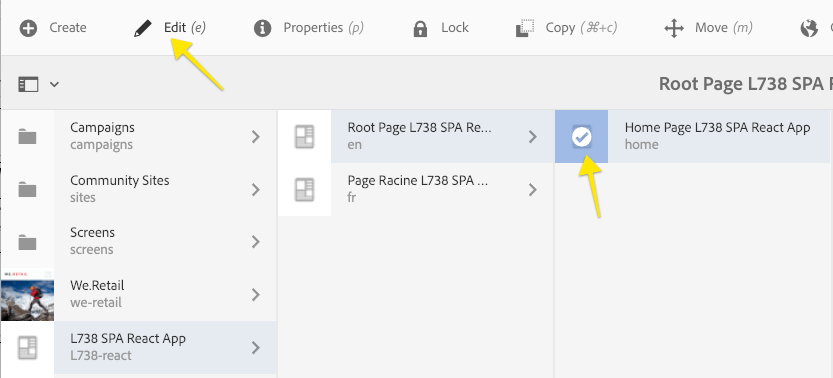
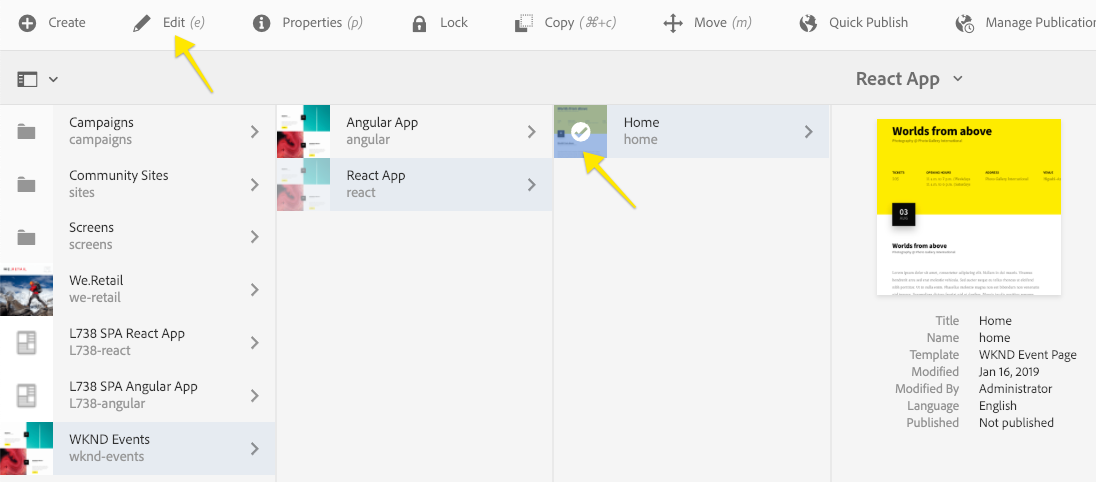
From the AEM Start Menu http://localhost:4502/aem/start.html Navigate to Sites.
![]()
![]() Navigate to L738-react > en > home and open the page using the Sites Editor:
Navigate to L738-react > en > home and open the page using the Sites Editor:
or ![]() Navigate to L738-angular > en > home and open the page using the Sites Editor:
Navigate to L738-angular > en > home and open the page using the Sites Editor:
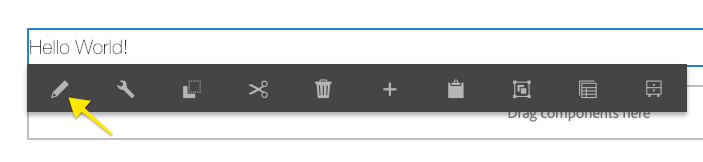
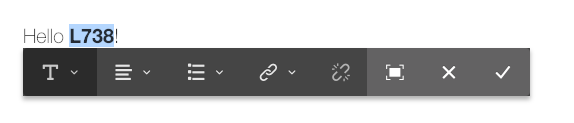
Select the existing Text component and click the edit icon (pencil) to engage the in-line editor.
Update the component to read Hello L738!
Add a new Text Component by opening up the Content Finder > Components > Drag+Drop a new Text Component on to the page:
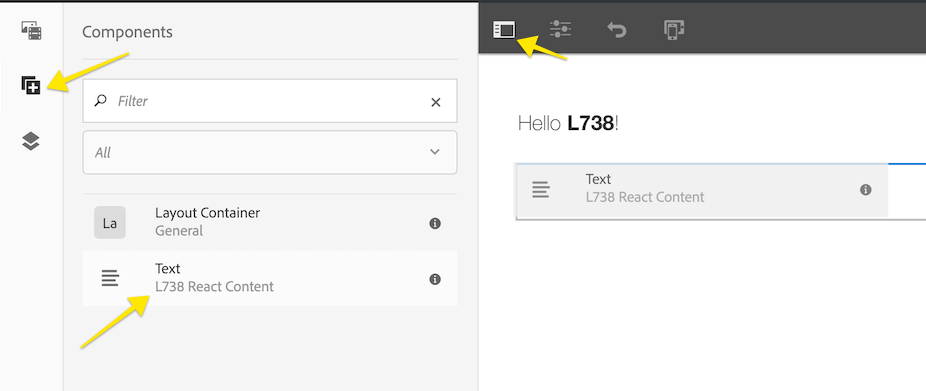
Edit the new Text component to create another message by clicking the Wrench icon ![]()
Visualize the persisted data in CRXDE lite by opening a new tab and navigating to http://localhost:4502/crx/de/index.jsp
Use the Navigation Tree on the left side to navigate to the Home Page
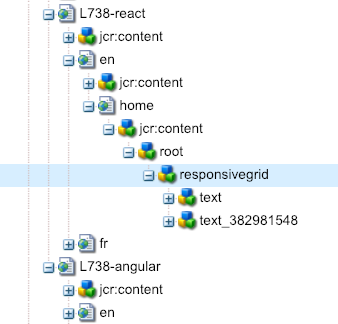
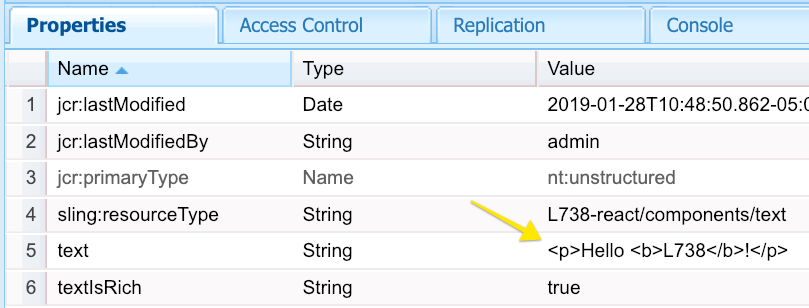
Select the first child node prefixed with text_. In the properties tab, you can observe the data associated with the text component you created
View the properties of the second Text component that was added to the page.
In the browser, return to the Home page:
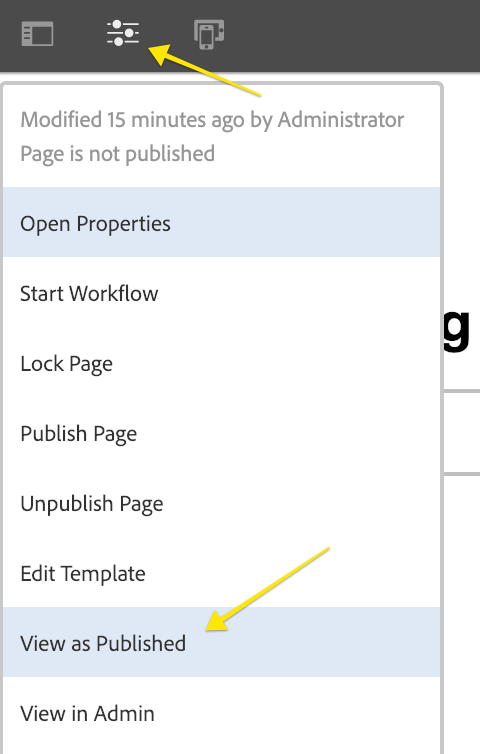
Click the Page Properties menu bar and select View as Published:
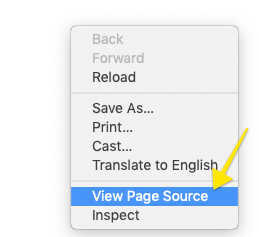
Right + Click the page to view the page's source:
When viewing the source, note that there is no HTML that represent the Text components added to the page. This is because the components are generated via the React or Angular Javascript application. Note the inclusion of the script tag at the bottom of the page. This loads the compiled React or Angular application:
Change the extension of the home page by adding .model.json selectors to view the serialized json. Search for the keyword text to find the JSON output of the text components:
Observe the JSON data structure to have a better idea of how your component is represented. Note the internal fields prefixed with the colon character. These fields are mostly used by the SPA SDK to traverse the hierarchy of components and enable the dynamic instantiation of components. We will explore further how the model of the component is generated on the backend in Lesson 6 - Back-end Development
![]() React:
React:
![]() Angular:
Angular:
angular-app > src > app > components > text > text.component.ts
angular-app > src > app > components > text > text.component.html
In this lesson we will install the WKND Events App. This application displays a series of upcoming events and information for the ficticious life-style brand WKND. The application provides an example how structured data can be combined with editorial content to create a rich and compelling experience. In the following lessons, the WKND Events App will be extended.
This version of the WKND Events app has been modified to include both React and Angular code bases. Note that this is not a standard, but done to make it easier to go through the lab material. In a real-world use case, typically only a single JS framework would be used.
In Visual Studio Code from menu bar > Terminal > New Terminal
The terminal should default to be in the directory: ~/Desktop/resources/lesson-3/aem-guides-wknd-events.
Run the following command in the terminal:
$ mvn -PautoInstallPackage clean install
This will build and deploy the application to a local instance of AEM running at http://localhost:4502.
[INFO] ------------------------------------------------------------------------
[INFO] Reactor Summary:
[INFO]
[INFO] aem-guides-wknd-events ............................. SUCCESS [  0.357 s]
[INFO] WKND Events - Core ................................. SUCCESS [  2.692 s]
[INFO] WKND Events - React App ............................ SUCCESS [ 59.979 s]
[INFO] WKND Events - Angular App .......................... SUCCESS [ 32.656 s]
[INFO] WKND Events - UI content ........................... SUCCESS [  5.754 s]
[INFO] WKND Events - UI apps .............................. SUCCESS [  1.213 s]
[INFO] ------------------------------------------------------------------------
[INFO] BUILD SUCCESS
[INFO] ------------------------------------------------------------------------
Open the browser and navigate to AEM: http://localhost:4502.
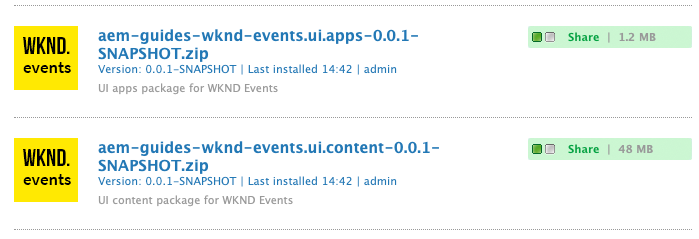
Click Tools > Deployment > Packages to navigate to CRX Package Manager: http://localhost:4502/crx/packmgr/index.jsp
You should see that the package has been deployed:
From the AEM Start Menu http://localhost:4502/aem/start.html Navigate to Sites.
![]()
![]() Navigate to WKND Events > React > Home and open the page using the Sites Editor:
Navigate to WKND Events > React > Home and open the page using the Sites Editor:
or ![]() Navigate to WKND Events > Angular > Home and open the page using the Sites Editor:
Navigate to WKND Events > Angular > Home and open the page using the Sites Editor:
Inspect the application's home page.
Switch the Sites Editor to Preview mode by clicking the Preview button in the upper right-hand corner: 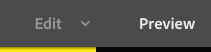 .
.
Navigate to different parts of the app by clicking the links in the custom List component.
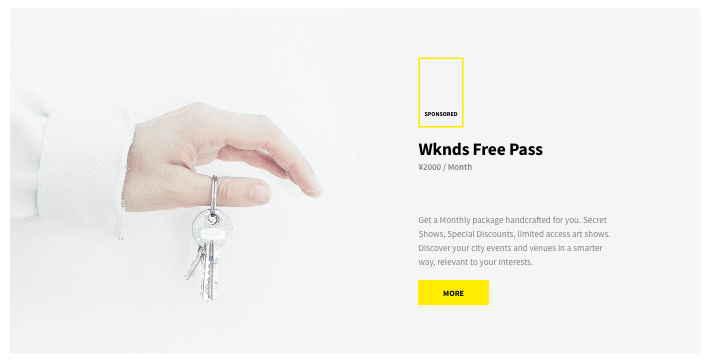
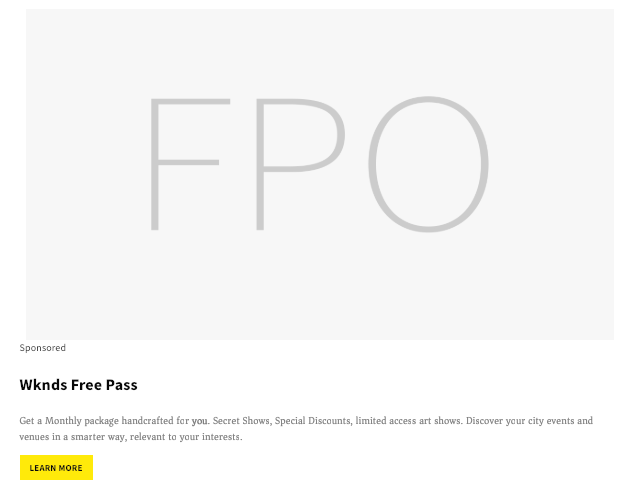
A new business requirement for the WKND Events App is to create a teaser-like component for promoted content. The mockup for the Promo component is below:
When planning a new component it is important to start with the JSON structure that will ultimately drive the SPA component. By defining the expected JSON structure upfront this allows both front-end and back-end developers to begin working in parallel.
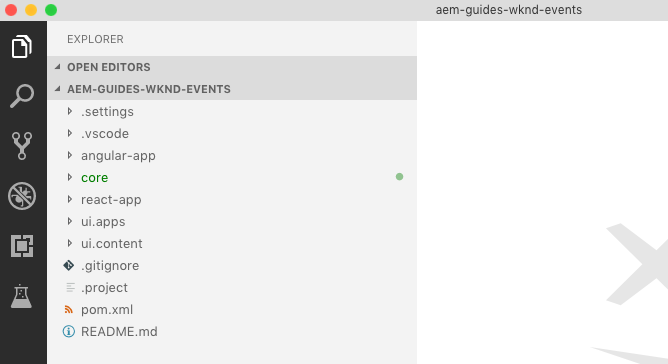
Switch back to the Visual Studio Code IDE and open the AEM Guides WKND Events project (from Lesson 3).
Open the mock JSON file:
Find the JSON for the Promo component by searching for the keyword promo. The JSON structure for the component has already been partially stubbed-out. Note the internal field :type and the value of wknd-events/components/content/promo. This is the property that will tie the React component with the JSON properties.
Update the JSON to add a new property with a key of offerText:
"promo": {
+    "offerText": "$2000 / Month",
    "actionItems": [
        {
            "title": "Learn More",
            "url": "/content/wknd-events/react/home/wknd-free-pass.html"
        }
    ],
    "description": "<p>Get a Monthly package handcrafted for <b>you</b>. Secret Shows, Special Discounts, limited access art shows. Discover your city events and venues in a smarter way, relevant to your interests.</p>\r\n",
    "title": "Wknds Free Pass",
    "image": {
        "src": "/images/fpo.jpg",
        "srcUriTemplate": "/content/wknd-events/react/home/_jcr_content/root/responsivegrid/promo.coreimg{.width}.jpeg/1549076604849.jpeg",
        "areas": [],
        "uuid": "135c380d-c6b5-4035-96a3-d18ef3556327",
        "lazyEnabled": false,
        "widths": [],
        ":type": "wknd-events/components/content/image"
    },
    "actionsEnabled": true,
    "linkURL": "/content/wknd-events/react/home/wknd-free-pass.html",
    "imageLinkHidden": false,
    "titleLinkHidden": false,
    ":type": "wknd-events/components/content/promo"
}The lesson illustrates how editable frontend components are developed and how the AEM data is provided as properties. Get more familiar with the notion of library of frontend component and the dynamic instantiation of components. Better understand the motivations and advantages of delegating the content structure to AEM. Learn how to support the author's experience from within the frontend project.
Within Visual Studio Code open the terminal (if not opened already: from menu bar > Terminal > New Terminal).
The terminal should already be in the directory: ~/Desktop/resources/lesson-3/aem-guides-wknd-events.
Navigate to the react-app directory with the following command:
$ cd react-app
Enter the following command to start the local developer server:
$ REACT_APP_PAGE_MODEL_PATH=mock.model.json npm start
Compiled successfully!

You can now view react-app in the browser.

Local:            http://localhost:3000/
On Your Network:  http://192.168.1.152:3000/

Note that the development build is not optimized.
To create a production build, use npm run build.
This should launch a new browser tab running at http://localhost:3000. Navigate to http://localhost:3000/content/wknd-events/react/home.html
You should now see the WKND Events App running using a mock JSON file located at react-app/public/mock.model.json.
Note the Promo component is not visible.
Within Visual Studio Code navigate to react-app > src > components > promo.
Open the file Promo.js. This is a partially stubbed out React component that will render the Promo content.
At the very bottom of the file, beneath the last } curly brace add the following line:
Save your changes.
Navigate to react-app > src > components and open the file MappedComponents.js.
Add the following line to the end of the file:
Save your changes.
Return to the browser and navigate to http://localhost:3000/content/wknd-events/react/home.html. You should now see a loosely styled version of the Promo component:
Return to Visual Studio Code and re-open Promo.js beneath react-app > src > components > promo.
In the render() method add the following snippet of JSX beneath the h3 Promo Title:
render() {
    ...
    <h3 className="Promo-title">{this.title}</h3>
+   <h6 className="Promo-offer">{this.props.offerText}</h6>
    ...
}
Save your changes. The component should now render the value of the property offerText.
At the top of the file add the following line beneath the last import statement:
Save your changes. This will now include some styles defined in the SaSS file Promo.scss.
Return to the browser and navigate to http://localhost:3000/content/wknd-events/react/home.html. You should now see a styled version of the Promo component with the offerText displayed.

Return to Visual Studio Code and in the terminal press control+c to stop the development server.
Within Visual Studio Code open the terminal (if not opened already: from menu bar > Terminal > New Terminal).
The terminal should already be in the directory: ~/Desktop/resources/lesson-3/aem-guides-wknd-events.
Navigate to the angular-app directory with the following command:
$ cd angular-app
Enter the following command to start the local developer server:
$ ng serve --proxy-config ./proxy.mock.conf.json
** Angular Live Development Server is listening on localhost:4200, open your browser on http://localhost:4200/ **
10% building modules 3/3 modules 0 active[HPM] Proxy created: [ '/content/**/*.model.json' ]  ->  http://localhost:4200
[HPM] Proxy rewrite rule created: "^/content/wknd-events" ~> "/mocks/json"
[HPM] Subscribed to http-proxy events:  [ 'error', 'close' ]
[HPM] Proxy created: [ '/content/**/*.jpg', '/content/**/*.jpeg' ]  ->  http://localhost:4200
[HPM] Proxy rewrite rule created: ".*" ~> "/mocks/assets/fpo.jpg"
[HPM] Subscribed to http-proxy events:  [ 'error', 'close' ]
Open a new browser tab and navigate to http://localhost:4200/content/wknd-events/angular/home.html
You should now see the WKND Events App running using the file located a angular-app/src/mocks/json/angular.model.json.
Note the Promo component is not visible.
Within Visual Studio Code navigate to angular-app > src > app > components > promo.
Open the file promo.component.ts. This is a partially stubbed out Angular component that will render the Promo content.
At the very bottom of the file, promo.component.ts, beneath the last } curly brace add the following line:
Save your changes.
Navigate to angular-app > src > app and open the file app.module.ts.
Update the @NgModule declarations to add the PromoComponent:
...
@NgModule({
declarations: [
    AppComponent,
    PageComponent,
    TextComponent,
    ImageComponent,
    HeaderComponent,
    ListComponent,
    EventInfoComponent,
    EventDateComponent,
    EventListComponent,
    ButtonComponent,
+   PromoComponent
 ]
...
Save your changes.
Update the entryComponents to add the PromoComponent:
Return to the browser and navigate to http://localhost:4200/content/wknd-events/angular/home.html. You should now see a loosely styled version of the Promo component:
Within Visual Studio Code navigate to angular-app > src > app > components > promo. Open the file promo.component.ts.
Add a styleUrls property to the @Component annotation to point to the file ./promo.component.scss:
...
@Component({
  selector: 'app-promo',
  templateUrl: './promo.component.html',
+ styleUrls: ['./promo.component.scss']
})
export class PromoComponent implements OnInit {
...
Save your changes.
Update the PromoComponent class to add a new @Input() for offerText:
export class PromoComponent implements OnInit {
  @Input() title: string;
  @Input() description: string;
+ @Input() offerText: string;
}
Save your changes.
Open the file angular-app > src > app > components > promo > promo.component.html. Add the following markup to render the value of offerText:
...
 <div class="Promo-content">
    <span class="Promo-sponsor">Sponsored</span>
    <h3 class="Promo-title">{{title}}</h3>
+    <h6 class="Promo-offer">{{offerText}}</h6>
...
Save your changes.
Return to the browser and navigate to http://localhost:4200/content/wknd-events/angular/home.html. You should now see a styled version of the Promo component with the offerText displayed.
Return to Visual Studio Code and in the terminal press control+c to stop the development server.
The lesson explores how data is processed and serialized on the AEM back-end. Implement the interfaces that constitute the main building blocks of the data structure exposed to the frontend libraries. As the project progresses, expose new fields. This lesson will also explore the requirements needed to create an AEM component with a Dialog to facilitate authoring.
A Sling Model is an annotation-driven POJO that is used to easily model data from the JCR and add business logic. The Sling Model Exporter is an annotation that can be added to a Sling Model to easily serialize the methods in the form of JSON output.
In Visual Studio Code, with the WKND Events project open, navigate to core > src > main > java > com > adobe > aem > guides > wkndevents > core > models.
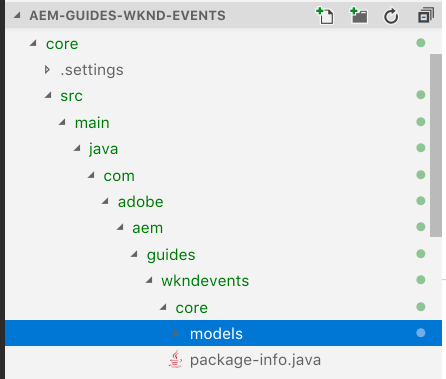
Open the file Promo.java. This is the Java Interface that will be implemented. It extends the Core Component Teaser. The Teaser component provides support for a Title, Description, Image and Call To Action buttons. We will extend the Teaser by adding support for the offerText.
Add the following method to the Promo.java interface:
Also note the static variable PN_OFFER_TEXT. The value of this variable will map to the name of the offerText property stored in the JCR.
Beneath models folder expand the impl folder and open PromoImpl.java. This is the class that will implement the Promo interface and is the Sling Model. Note the following annotations:
@Model(
    adaptables = SlingHttpServletRequest.class,
    adapters = {Promo.class, ComponentExporter.class},
    resourceType = PromoImpl.RESOURCE_TYPE,
    defaultInjectionStrategy = DefaultInjectionStrategy.OPTIONAL
)
@Exporter(
    name = ExporterConstants.SLING_MODEL_EXPORTER_NAME,
    extensions = ExporterConstants.SLING_MODEL_EXTENSION
)
These are the annotations that define the Sling Model and Sling Model Exporter. Also note the value of RESOURCE_TYPE=wknd-events/components/content/promo, which corresponds the internal :type value from Lesson 4 in the JSON model.
Add the following code within the PromoImpl class to map the JCR property to a Java variable named offerText:
public class PromoImpl implements Promo {
    ...

    @ValueMapValue
    @Named(Promo.PN_OFFER_TEXT)
    @Optional
    private String offerText;

    ...
}
The above code uses the @ValueMapValue annotation to inject the JCR property in to the String variable named offerText. The injection strategy is explicitly marked optional.
Finally add a getter method to expose the value of the offerText property in the JSON output:
An AEM component is needed in order to allow a content author to add new versions of the Promo component to the page. A dialog is also needed to allow the content author to edit the individual fields of the component.
In Visual Studio Code, with the WKND Events project open, navigate to ui.apps > src > main > content > jcr_root > apps > wknd-events > components > content > promo:
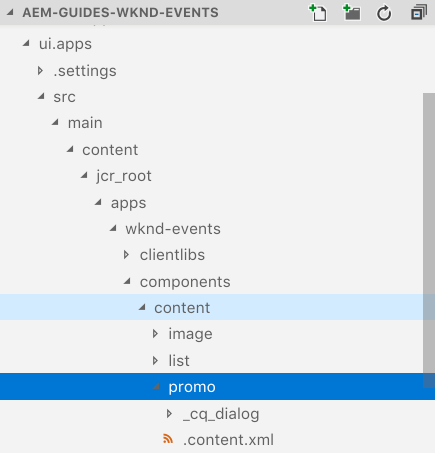
Beneath the promo folder open the file named .content.xml. This is the component definition for the Promo Component. Note the sling:resourceSuperType property. This allows the Promo component to inherit all of the functionality of the Teaser component.
Beneath the promo folder expand the folder named _cq_dialog and open the file named .content.xml beneath that. This partial XML represents the Dialog that will be shown to authors when editing the component in the AEM UI. Since this component inherits all of the functionality of the Teaser component, we only to insert a single additional field to allow the author to populate the offer text.
In the middle of the file, find the inner-most <items jcr:primaryType="nt:unstructured"></items> tag. Insert the following XML in between the two tags (replacing the TODO comment):
...
<items jcr:primaryType="nt:unstructured">
    <offerGroup
        jcr:primaryType="nt:unstructured"
        sling:resourceType="granite/ui/components/coral/foundation/well"
        sling:orderBefore="descriptionGroup">
        <items jcr:primaryType="nt:unstructured">
            <offertext
                jcr:primaryType="nt:unstructured"
                sling:resourceType="granite/ui/components/coral/foundation/form/textfield"
                fieldDescription="Text to display as the offer."
                fieldLabel="Offer Text"
                name="./offerText"/>
        </items>
    </offerGroup>
</items>
...In Visual Studio Code from menu bar > Terminal > New Terminal
Ensure you are in the aem-guides-wknd-events directory. You may need to run $ cd .. to navigate back to the root of the project.
Run the following command in the terminal:
$ mvn -PautoInstallPackage clean install
This will build and deploy the application to a local instance of AEM running at http://localhost:4502.
[INFO] ------------------------------------------------------------------------
[INFO] Reactor Summary:
[INFO]
[INFO] aem-guides-wknd-events ............................. SUCCESS [  0.357 s]
[INFO] WKND Events - Core ................................. SUCCESS [  2.692 s]
[INFO] WKND Events - React App ............................ SUCCESS [ 59.979 s]
[INFO] WKND Events - Angular App .......................... SUCCESS [ 32.656 s]
[INFO] WKND Events - UI content ........................... SUCCESS [  5.754 s]
[INFO] WKND Events - UI apps .............................. SUCCESS [  1.213 s]
[INFO] ------------------------------------------------------------------------
[INFO] BUILD SUCCESS
[INFO] ------------------------------------------------------------------------
Open the browser and navigate to AEM: http://localhost:4502.
Open WKND Events Home page:
Add Promo Component to the page. Configure the Promo component to match the mockups earlier in the Lab. Add a link to the the Promo component that points to: /content/wknd-events/angular/home or /content/wknd-events/react/home.
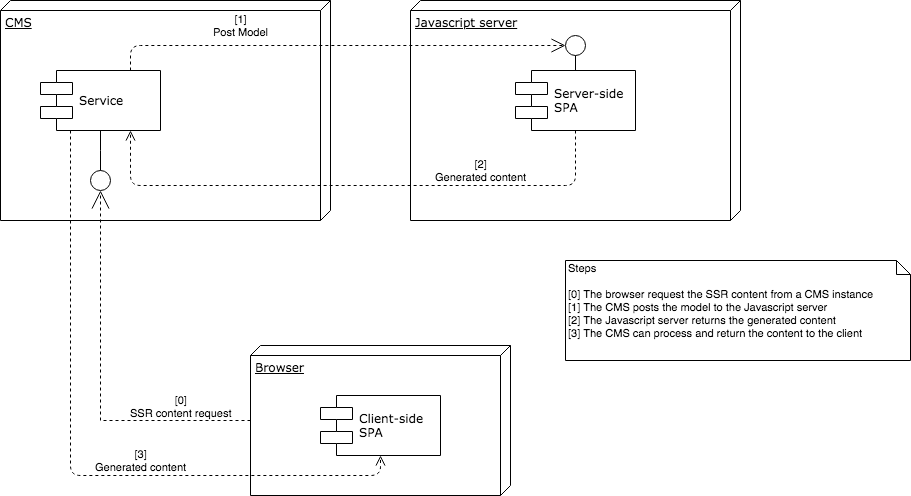
The lesson provides examples of Server-Side Rendered SPA and exposes the main advantages of such an architecture. Compare different architectures and their trade-off.
The WKND - events project only contains a React Server-Side environment. To proceed with the current exercise, please start with the provided initial content for chapter 7 located at:
Desktop > resources > lesson-7 > aem-guides-wknd-events-L7. Complete the final exercise with this code base.
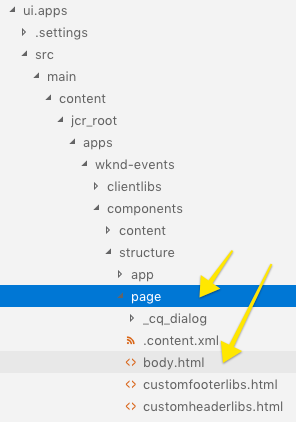
Open the file body.html beneath the page folder.
Modify the content of the template to un-comment the data-sly-resource:
<app-root id="root">
    <sly data-sly-resource="${resource @ resourceType='cq/remote/content/renderer'}" />
</app-root>
Open a terminal and ensure you are in the aem-guides-wknd-events directory.
Run the following command in the terminal:
$ mvn -PautoInstallPackage clean install
This will build and deploy the application to a local instance of AEM running at http://localhost:4502.
[INFO] ------------------------------------------------------------------------
[INFO] Reactor Summary:
[INFO]
[INFO] aem-guides-wknd-events ............................. SUCCESS [  0.357 s]
[INFO] WKND Events - Core ................................. SUCCESS [  2.692 s]
[INFO] WKND Events - React App ............................ SUCCESS [ 59.979 s]
[INFO] WKND Events - Angular App .......................... SUCCESS [ 32.656 s]
[INFO] WKND Events - UI content ........................... SUCCESS [  5.754 s]
[INFO] WKND Events - UI apps .............................. SUCCESS [  1.213 s]
[INFO] ------------------------------------------------------------------------
[INFO] BUILD SUCCESS
[INFO] ------------------------------------------------------------------------
Open a terminal window and navigate to aem-guides-wknd-events > react-app directory.
Run the following command to start the server:
$ npm run start:server
Debugger listening on ws://127.0.0.1:9229/3319c007-6e3c-4024-ae4d-cd1c9706764d
For help, see: https://nodejs.org/en/docs/inspector
Example exapp listening on port 4200!
Open a new browser tab and navigate to http://localhost:4502/system/console/configMgr.
Press control+f to search for a configuration named Remote Content Renderer - Configuration Factory
Click the + button next to the Factory to create a new configuration:

Replace the Content path pattern with the following:
/content/wknd-events/react(.*)
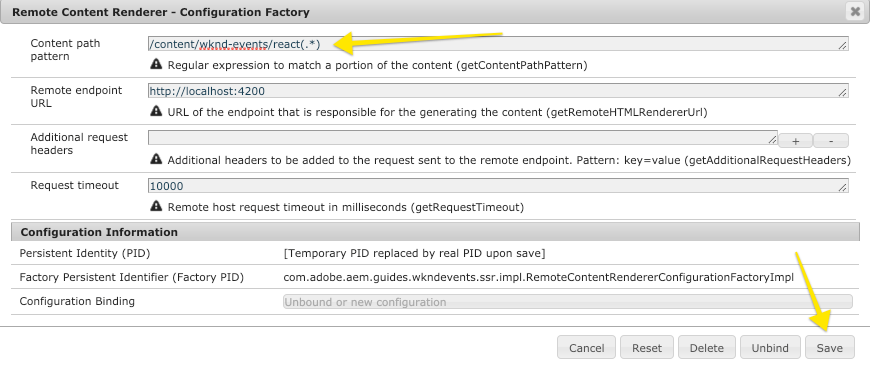
Save your changes.
In the browser navigate to the React Home page: http://localhost:4502/editor.html/content/wknd-events/react/home.html
Click the Page Properties icon > View as Published to view the page outside of the AEM editor:
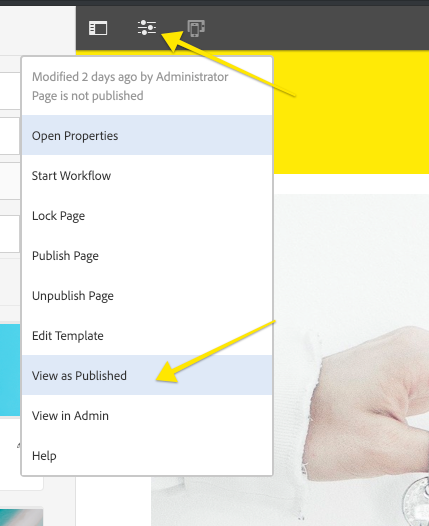
This should open a new tab with the following URL: http://localhost:4502/content/wknd-events/react/home.html?wcmmode=disabled
Open the browser's developer tools by clicking the 3 vertical dots in the upper right-hand corner > More Tools > Developer Tools
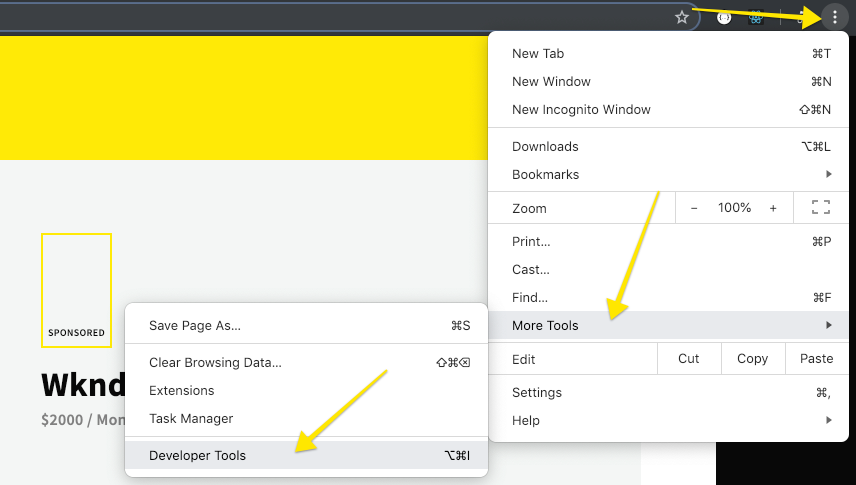
In the Developer Tool panel click the Network tab and then the XHR tab:
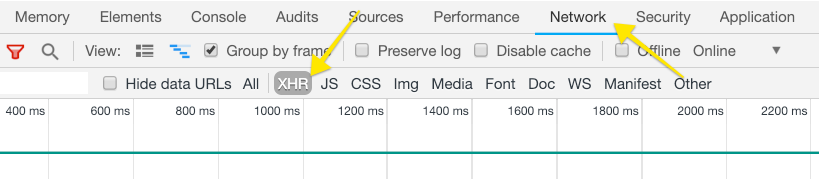
Refresh the page and notice that there is no XHR calls. This is because the app is initially populated by Server-side JSON.
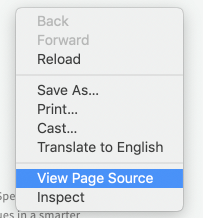
Right + Click the page and click View Page Source:
In the page source search for the tag __INITIAL_STATE__ to see the server-side JSON:
...
 <script type="application/json" id="__INITIAL_STATE__">
        {"rootModel":{"decoratedProperties":{"jcr:title":"React App"},"title":"React App",":path":"/content/wknd-events/react",":hierarchyType":"page",":children":{"/content/wknd-events/react/home":{"decoratedProperties":{"jcr:title":"Home"},"image":{"lazyEnabled":true,"widths":[],":type":"wknd-events/components/content/image"},"title":"Home",":path":"/content/wknd-events/react/home",":hierarchyType":"page",":type":"wknd-events/components/structure/page",":items":{"root":{"columnCount":12,"columnClassNames":{"responsivegrid":"aem-GridColumn aem-GridColumn--default--12"},"gridClassNames":"aem-Grid aem-Grid--12
...
The page source exposes a source code that hasn't yet been manipulated by the SPA script. Note that the server-side script has dumped the JSON model object used to generate the initial content of the app. Finally, the frontend script present in the browser synchronizes itself with the provided JSON model object.
Let's simulate a failure of the remote node server.
Return to Visual Studio Code or wherever you started Node Server.
Stop the Node Server by pressing: control+c.
Debugger listening on ws://127.0.0.1:9229/3319c007-6e3c-4024-ae4d-cd1c9706764d
For help, see: https://nodejs.org/en/docs/inspector
Example exapp listening on port 4200!
^C
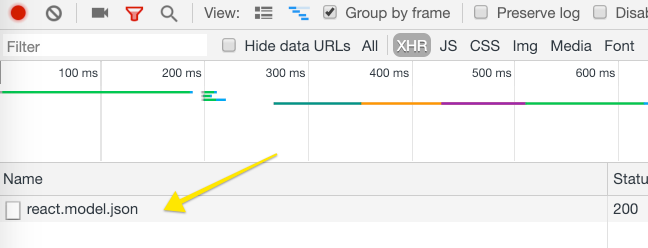
Return to the browser. Open http://localhost:4502/content/wknd-events/react/home.html?wcmmode=disabled. Refresh the page.
Notice that the app continues to work and there is now an XHR call for react.model.json
Follow the tutorial, read the public documentation, use the starter kit and follow the evolution of the developers' experimental project.