
In this training, you will learn how to get started with Adobe Target, Adobe Marketing Cloud’s tool for Conversion Optimization and Personalization. Adobe Target is designed for everyone, from novice to expert, to quickly and easily test and target content on any website, as well as personalize content for specific groups of users. These features of the product allow you to improve your conversion rate, either by finding the best messaging for an audience through an A/B or multivariate test, or by segmenting your traffic to different experiences based on your understanding of the audience’s preferences, using experience target. You will learn how to use the new visual editor, the custom code editors as well as the form composer to build these different experiences during this lab.
Understand high-level Adobe Target capabilities
Adobe Target is an industry-leading testing and personalization solution that lets marketers across all levels optimize and personalize digital experiences by creating, managing and analyzing A/B tests, rules-based targeting activities, MVT tests, and AI-driven personalization activities* within a single interface.
As part of the Adobe Marketing Cloud, Adobe Target gives users the ability to tap into and work with other Adobe solutions to superpower audience segmentation by using Adobe Audience Manager segments for targeting, reduce overhead for experience creation through Adobe Experience Manager integrations, and run in-depth campaign analysis, by viewing Target data within Adobe Analytics.
Powerful capabilities do not have to involve a lot of technical overhead. You can quickly implement Adobe Target by adding a single line of code added to each page where you’d like to test. Less technical practitioners, or those without access to development teams can easily set up a Target by using a tag management solution, such as Adobe DTM or Launch, without ever having to write or edit code. In short, Adobe Target allows you to test new content, and serve different content to different users based on audience criteria.
*Adobe Target has two main offerings - Standard and Premium. Target Premium offers more advanced personalization & automation features which will be covered in-depth in a different lab.
Target operates by having a reference to its mbox.js or at.js library on every page of your site. This allows you to use Target to manipulate the user experience as well as track user behavior on every page.
**Hard Coding Target or using another Tag Manager (Non-Launch Implementation) Implementation **
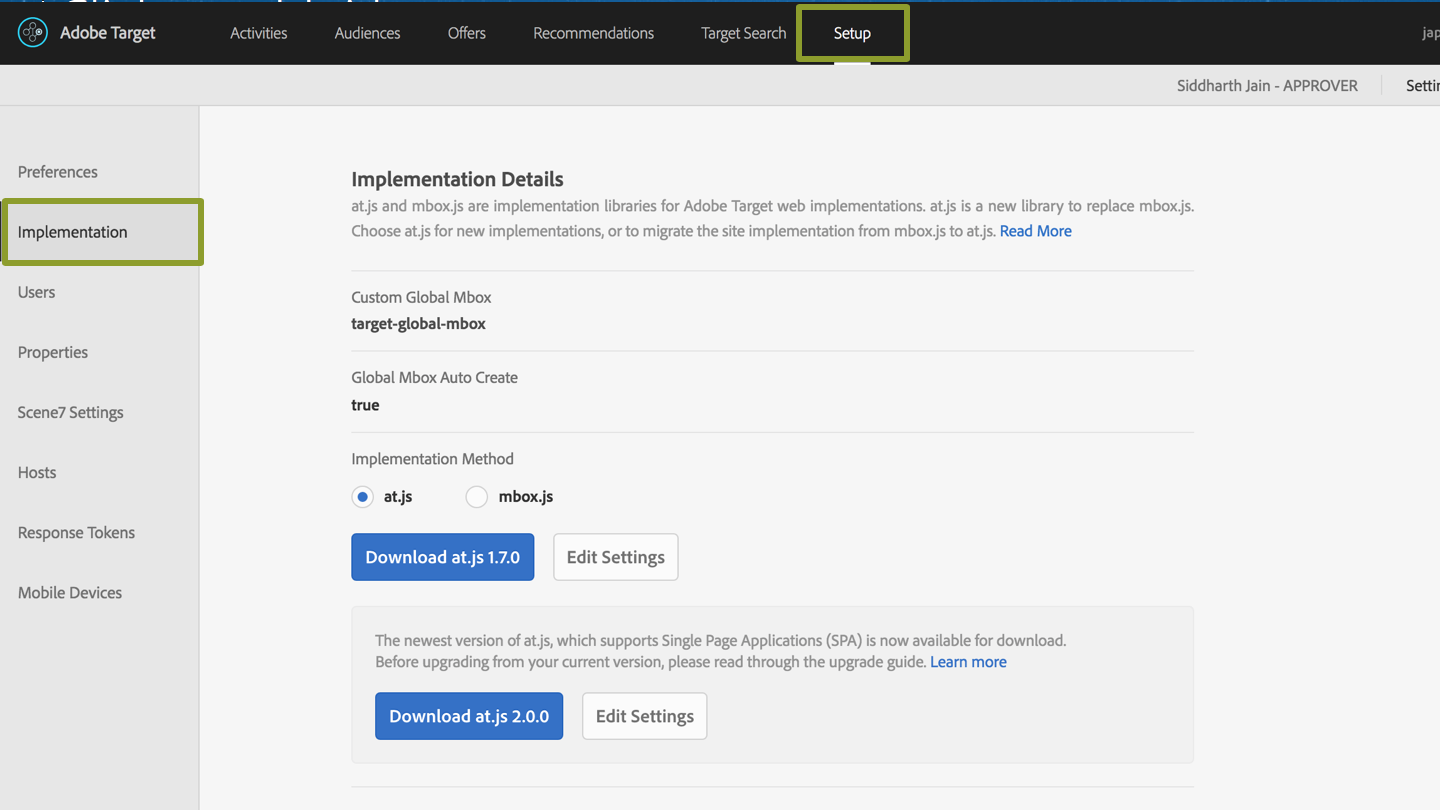
If you don’t use a tag manager like Adobe Launch, you can download the Mbox.js or AT.JS library from the Target interface Then, reference the file in the head section across your site. This file is all that is needed to enable Target.
For users that use Adobe Launch, just go into the Launch interface and configure Target extension. Using Adobe Launch is the preferred method for implementing Target, as the tool is designed to coordinate all Marketing Cloud activities to streamline sharing between the different solutions.

NOTE: Adobe Launch has replaced DTM. Launch is a revolutionary approach to tag management that enables third-party developers to build, maintain, and continuously update their own integrations with Adobe Experience Cloud across a unified platform that enables all those technologies to work together.
Adobe Target has its own extension in Adobe Launch which can be used to deploy at.js easily.
Before we dive deeper into activity creation, it’s important to get a good understanding of the terms and concepts you will hear frequently throughout this lab, and in your day-to-day workflow with Target.
NOTE: Auto-Target, Automated Personalization and Recommendations are available with Target Premium Only.
Go to https://experiencecloud.adobe.com

Log in using the credentials on your desk:
Your username: L739+(YOUR NUMBER)@adobeeventlab.com
Example: L739+00@adobeeventlab.com
Password: Adobe2019!
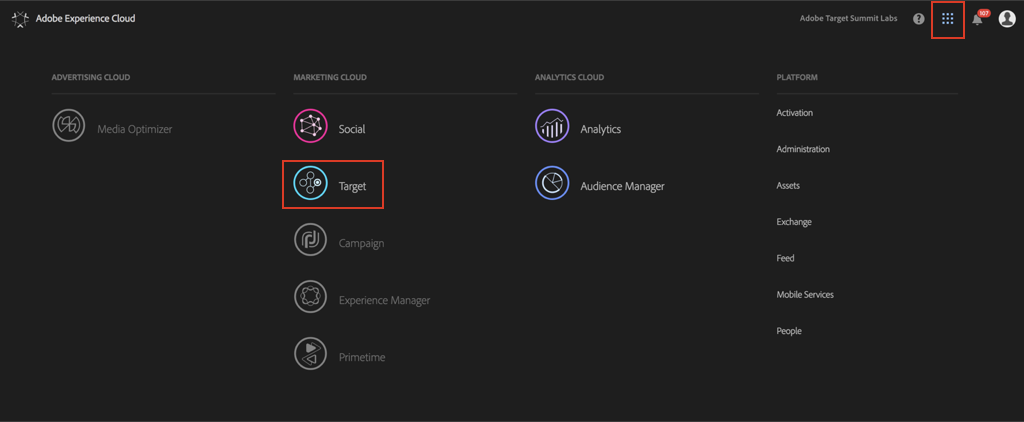
Click on the solution switcher button menu on the top right hand corner of your screen when you sign into the Experience Cloud.
Products available to your Adobe Experience Cloud account will be colored in, select the Target icon** **from this menu.
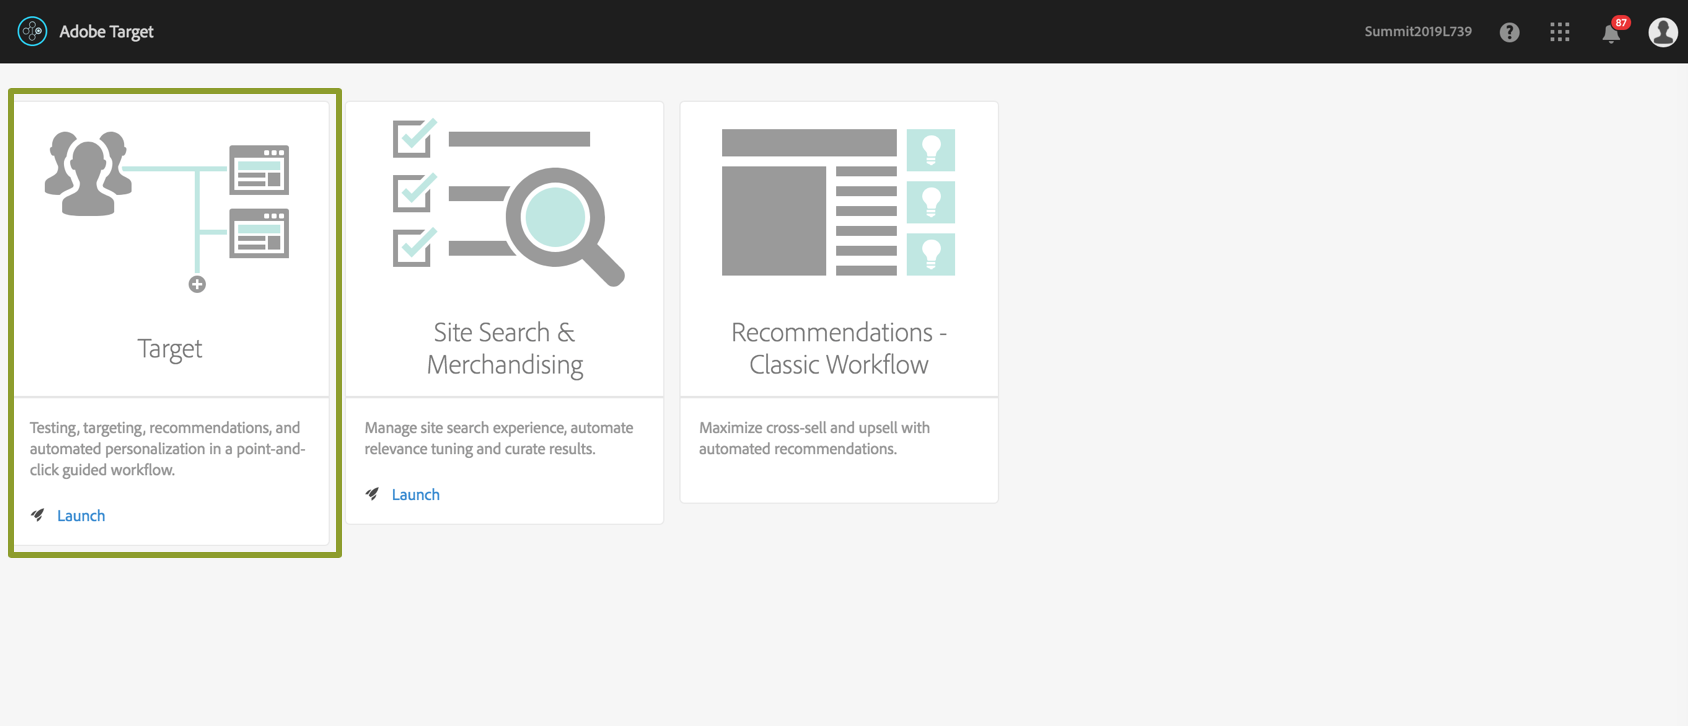
Choose “Target” on the left-hand side to launch Adobe Target.
An A/B Test is a way to compare two or more different variations to determine which one performs better. Users in the audience targeted in the test are split between the variations randomly, and then are tracked to see which group converts on the key or goal metric at a higher rate. Selecting the right “goal metric” is key to proper test design for an A/B test. For ecommerce companies, we recommend choosing a key metric directly tied to the bottom-line performance of the site, such as Conversion Rate or RPV. For a company that depends on leads, we would recommend leads submitted as a good starting point for a goal metric.
A/B testing is based on the concept of statistical sampling. By sending a representative sample of a given audience to the different variations, and by monitoring their actions after seeing the different experiences, we can determine if there is a statistically significant difference in conversion rate. The usual statistical significance level we look for is at least 95%, meaning that there is a 95% chance that any seen difference in the two conversion rates is based on a true difference in visitors’ reaction to the tested experiences, rather than just an unusual sample of the audience. In order to reach this significance level, we have to find the proper sample size to get to the result. Your sample size is determined by the smallest measurable difference between your control and variation you’d like to be able to measure while being 95% sure is true difference rather than a sampling error. The larger the sample size required, the longer the test has to run. The more traffic a site section or page gets, the less time it will take to collect a large enough sample. So how do we figure out how much traffic we will need for a test, and how long it will take? We use the Adobe Test Calculator. You can find the Adobe Test Calculator at: https://docs.adobe.com/content/target-microsite/testcalculator.html
The answer to this question is everything and anywhere! Some sample options are:
In a perfect world, we would be testing everything, everywhere all the time. However, there are some key factors in determining the right areas to test. The first consideration is visitor traffic. Given that we need a reasonable sample size to determine a winner, we should look to test only on pages with a healthy amount of traffic, to be able to generate learnings quickly.
Of course, that is not always possible, for instance for smaller brands or new product launches. In that case, when we are limited by low traffic, the next consideration becomes – testing high impact changes. Something that is likely to make a small difference (let’s say 2% better), will take an unreasonable amount of time to show that difference on a page that only has 1000 visitors a month. Testing bigger, more noticeable changes is important for getting answers quickly, especially on lower traffic pages and sites.
Finally, you should focus your efforts on areas that are likely to have the biggest impact on the bottom line KPIs for your business. For example, improving the order review page that will hopefully get more people to take the final step to convert is a great place to test, since success will directly result in generating more money for your business. On the other hand, testing on high traffic areas, like the homepage, allows even small incremental increase in final conversions to have a big impact on the bottom line due to number of visitors exposed to the winning experience. Use the test calculator, and your understanding of your business goals to shape your testing strategy and roadmap.
The key to having a successful test is identifying the right KPI, and the amount of traffic you need to see the minimum detectable lift with statistical confidence. When you use the test calculator to determine these variables before the test, you get an idea of how long you’ll have to run the test before declaring a winner. For example, let’s imagine we want to run an A/B test on the headline on a landing page that averages 10,000 visits per day and a 6.7% conversion rate. After plugging these numbers into the Adobe Test Calculator here’s what we can expect:
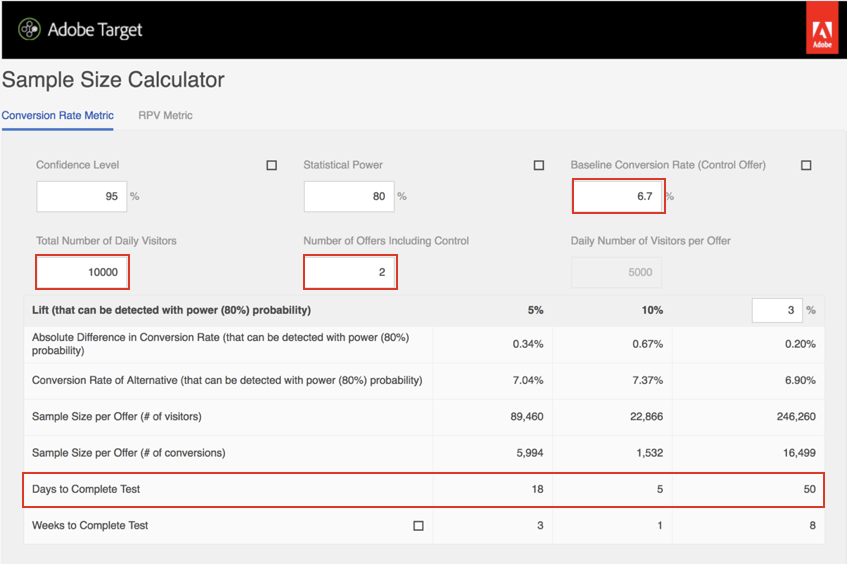
You can see with the inputs of 2 offers (control experience vs. what we’re looking to test), with 10,000 visitors a day, and a baseline 6.7% conversion rate, it would take 18 days to detect a 5% lift, 5 days to detect a 10% lift, and 50 days to detect a 3% lift, with statistical significance. In this case, I would decide to run the test for 18 days, and consider the test a draw if I see no greater than 5% difference between control and variation after 18 days. After 18 days, if I have a lift greater than 5%, then I can turn the test off, and declare a winner!
Now, let’s get to the fun part – creating your first activity. Our activity will be an A/B test targeted to a general audience, and will have an even traffic split between the following experiences:
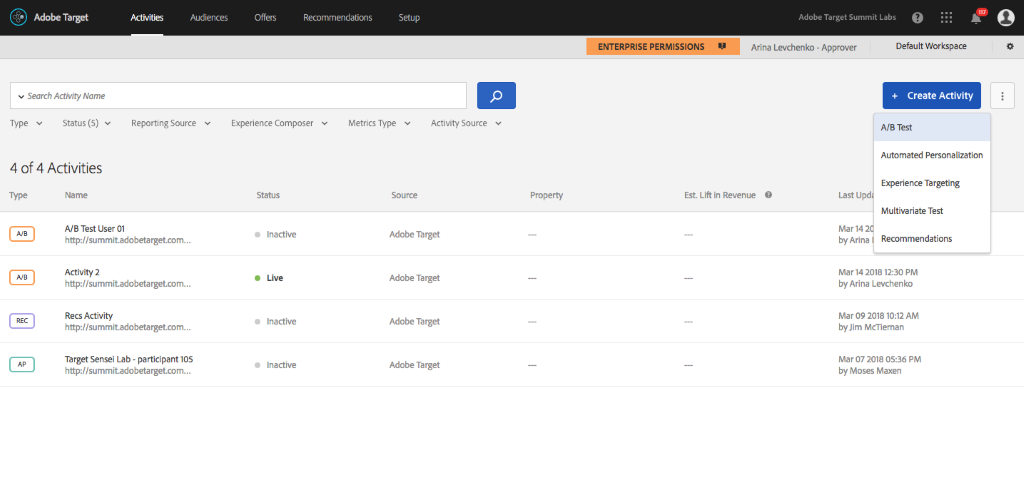
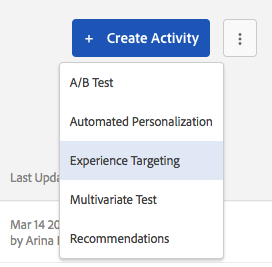
Click on the blue “Create Activity” button on the top right of the Activities List.
Next, select “A/B Test”.
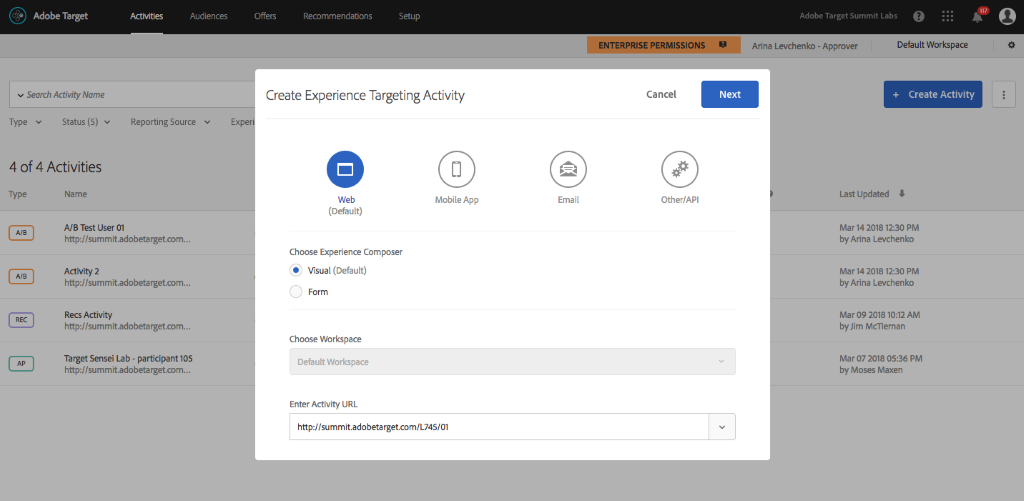
A “Create A/B Test Activity” box will pop up.
Select the Visual Experience Composer radio button.
Choose the initial URL you’d like to load into the visual editor.
For the sake of this lab, add the number at your desk beyond the last / in the Default URL in the browser: http://adobetargetlab.com/L739/YOURNUMBER
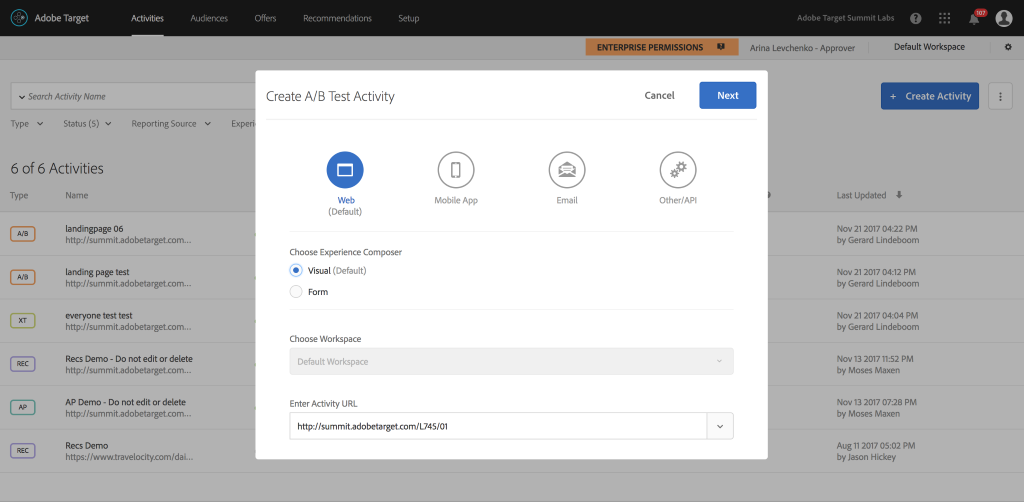
NOTE: Workspace capability is available as part of Enterprise Permissions, a feature which is available only in Adobe Target Premium. Standard customers will see a slightly different modal.
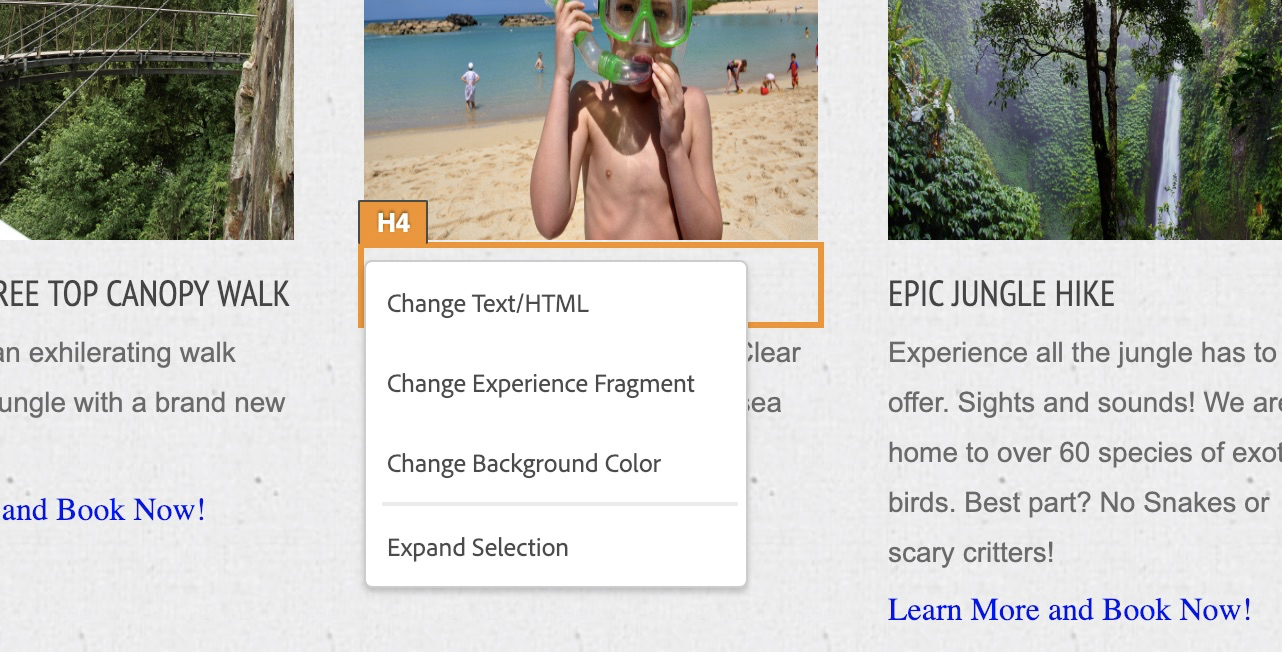
Click on the “Our Packages” within the VEC interface, an options menu will pop up
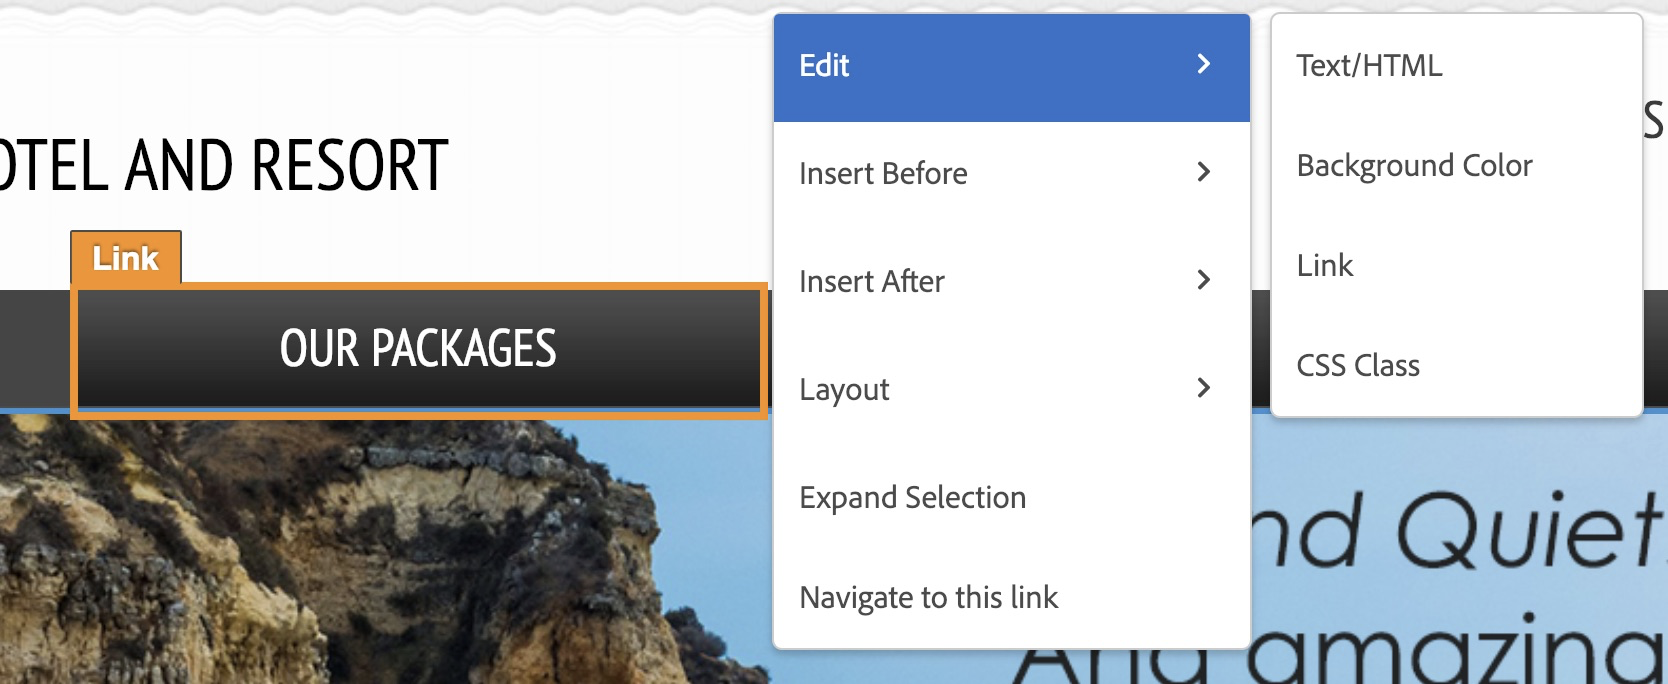
Select “Edit Text/HTML” in the pop-up menu
Change the button copy from “Our Packages” to “Best Deals”
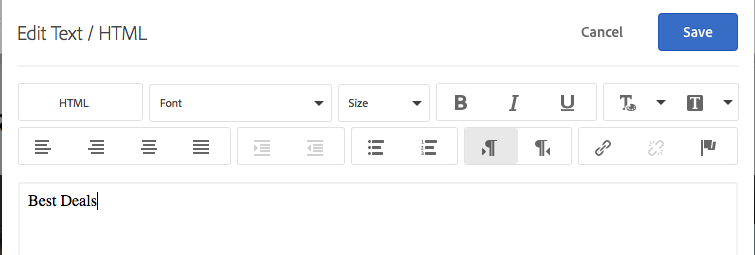
Click “Save”, and you should see the change take effect in the visual editor.
Click on the “Best Deals” , select “Edit Background Color” in the pop-up menu, and change the color to red

Click “Done” (Please take a fresh screenshot as this layout has changed)
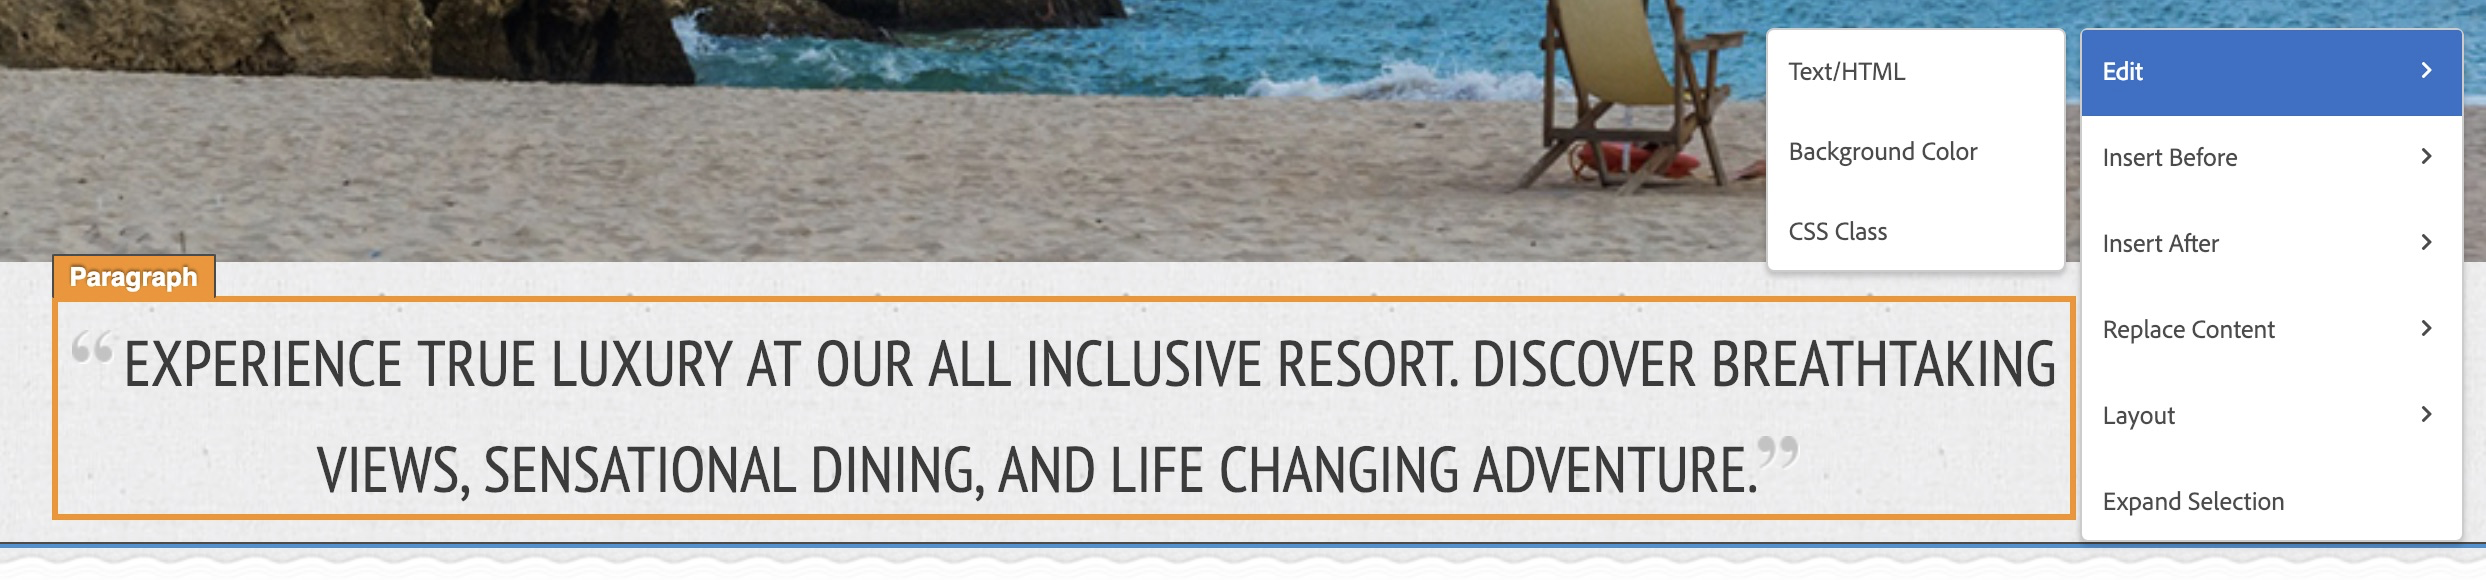
Review actions available within VEC for authoring experiences
Edit
Insert Before & Insert After
Replace Content
Layout
Expand Selection: This allows you to move to the parent element of the element selected. This is helpful in traversing the DOM hierarchy and reach the right element if not selected in first go
DOM Path Selector: This is even more powerful that Expand selection. It shows the DOM path of the selected element. You can even use this to traverse up and down the DOM hierarchy and thus not just select parent but also siblings or child elements.
Undo/Redo

Any unintended un-saved changes can be undone and redone using the icons at the top of the page.
Click on the “+ Add Experience” link on the left navigation panel to add experience C
Click into the quote section, an options menu will pop up
Click “Remove Item”
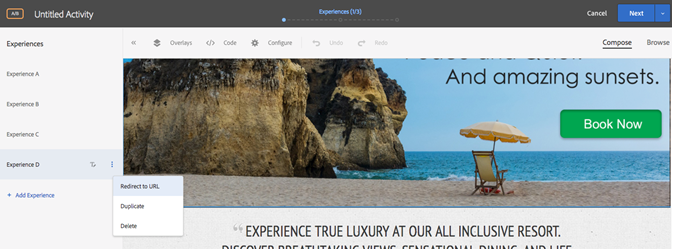
Click on the “+ Add Experience” link on the left navigation panel to add experience D
Click the link icon as you mouse to the right of experience “D” and select redirect and then type in www.adobe.com
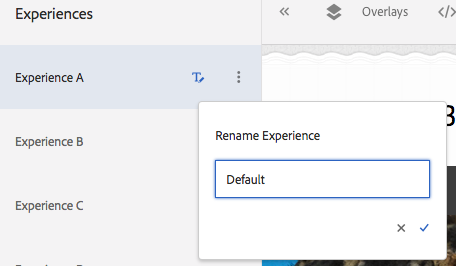
Click on the letter Icon, as you mouse to the right of Experience A
Select “Rename Experience”
Type in “Default”
Rename Experiences B-E
The Code Editor
Target also offers the option of inserting your own custom code directly onto the page. In order to do so, click on the brackets located in the top right corner of the screen. You will notice that a code editor pops up on the bottom of the screen. Code entered here will execute immediately follow the <body> tag. This allows you to drop your own code onto the page.
TIP: We have provided some out of the box templates to help you with some very common use cases. Do check out these Experience Templates. You can even contribute with your own templates as the this is an open sourced project.
In addition, we also allow more than one custom code to be added with a name (optional). This way, you can modularize your custom codes which helps in debugging or making contained changes later.
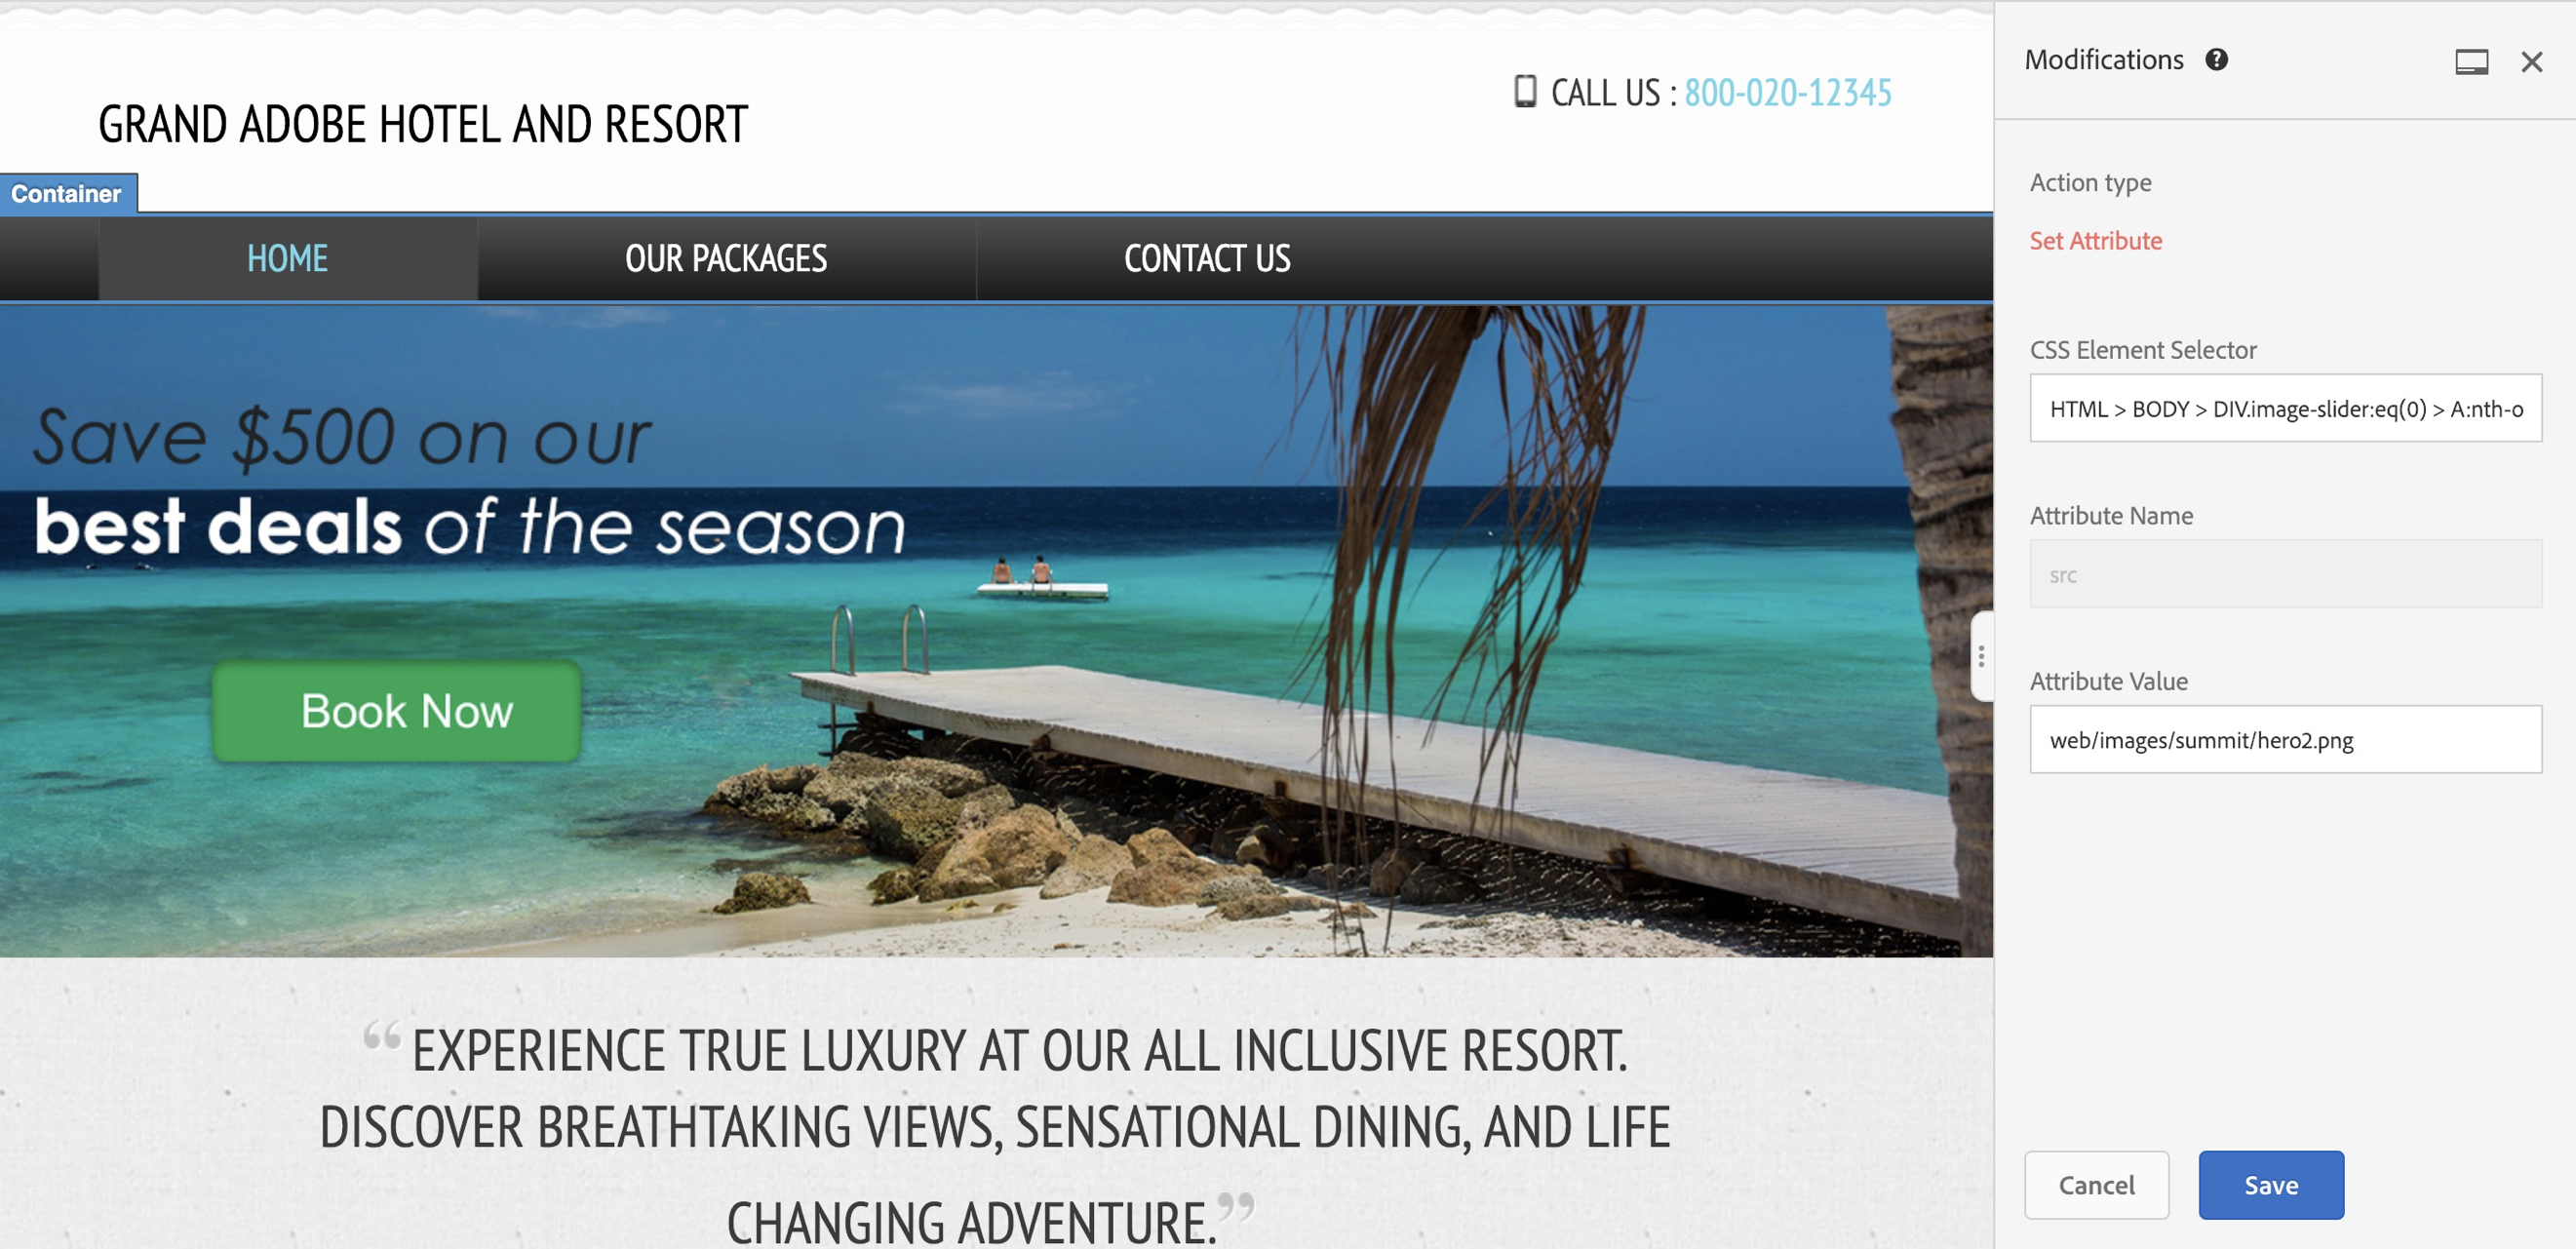
The modifications tab next to the custom code editor allows you to see all the modifications you have set so far within an experience using the VEC, as well as their selector paths. You can also delete modifications you’ve previously made without having to use the redo functions in the VEC. Please change the wording because the layout has changed.
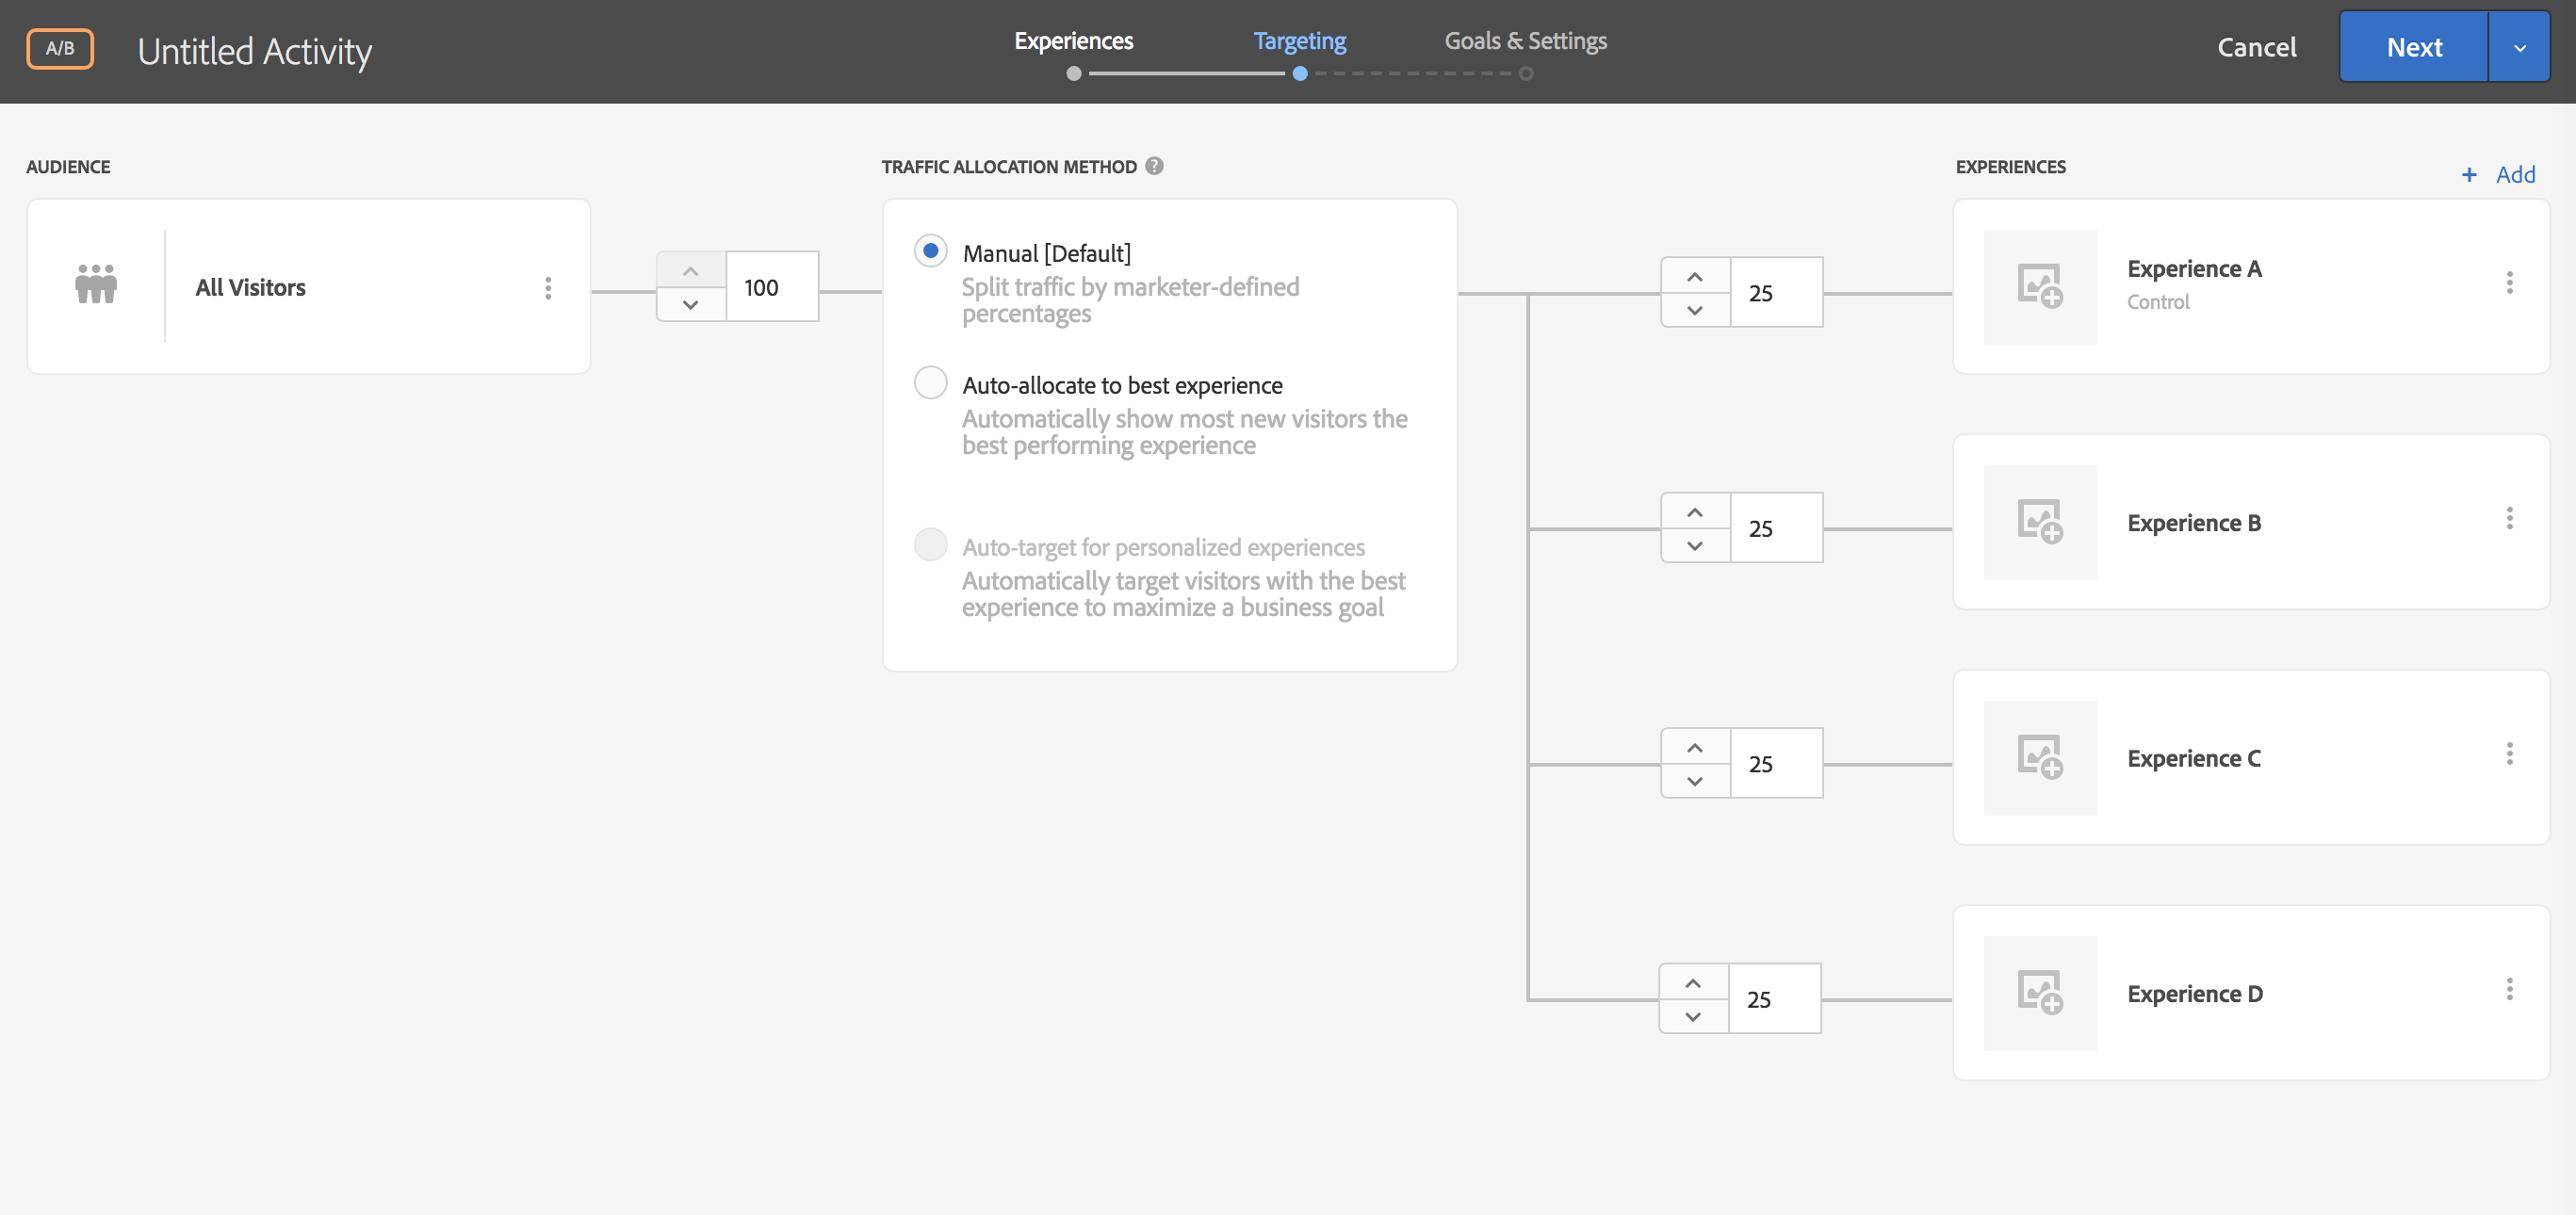
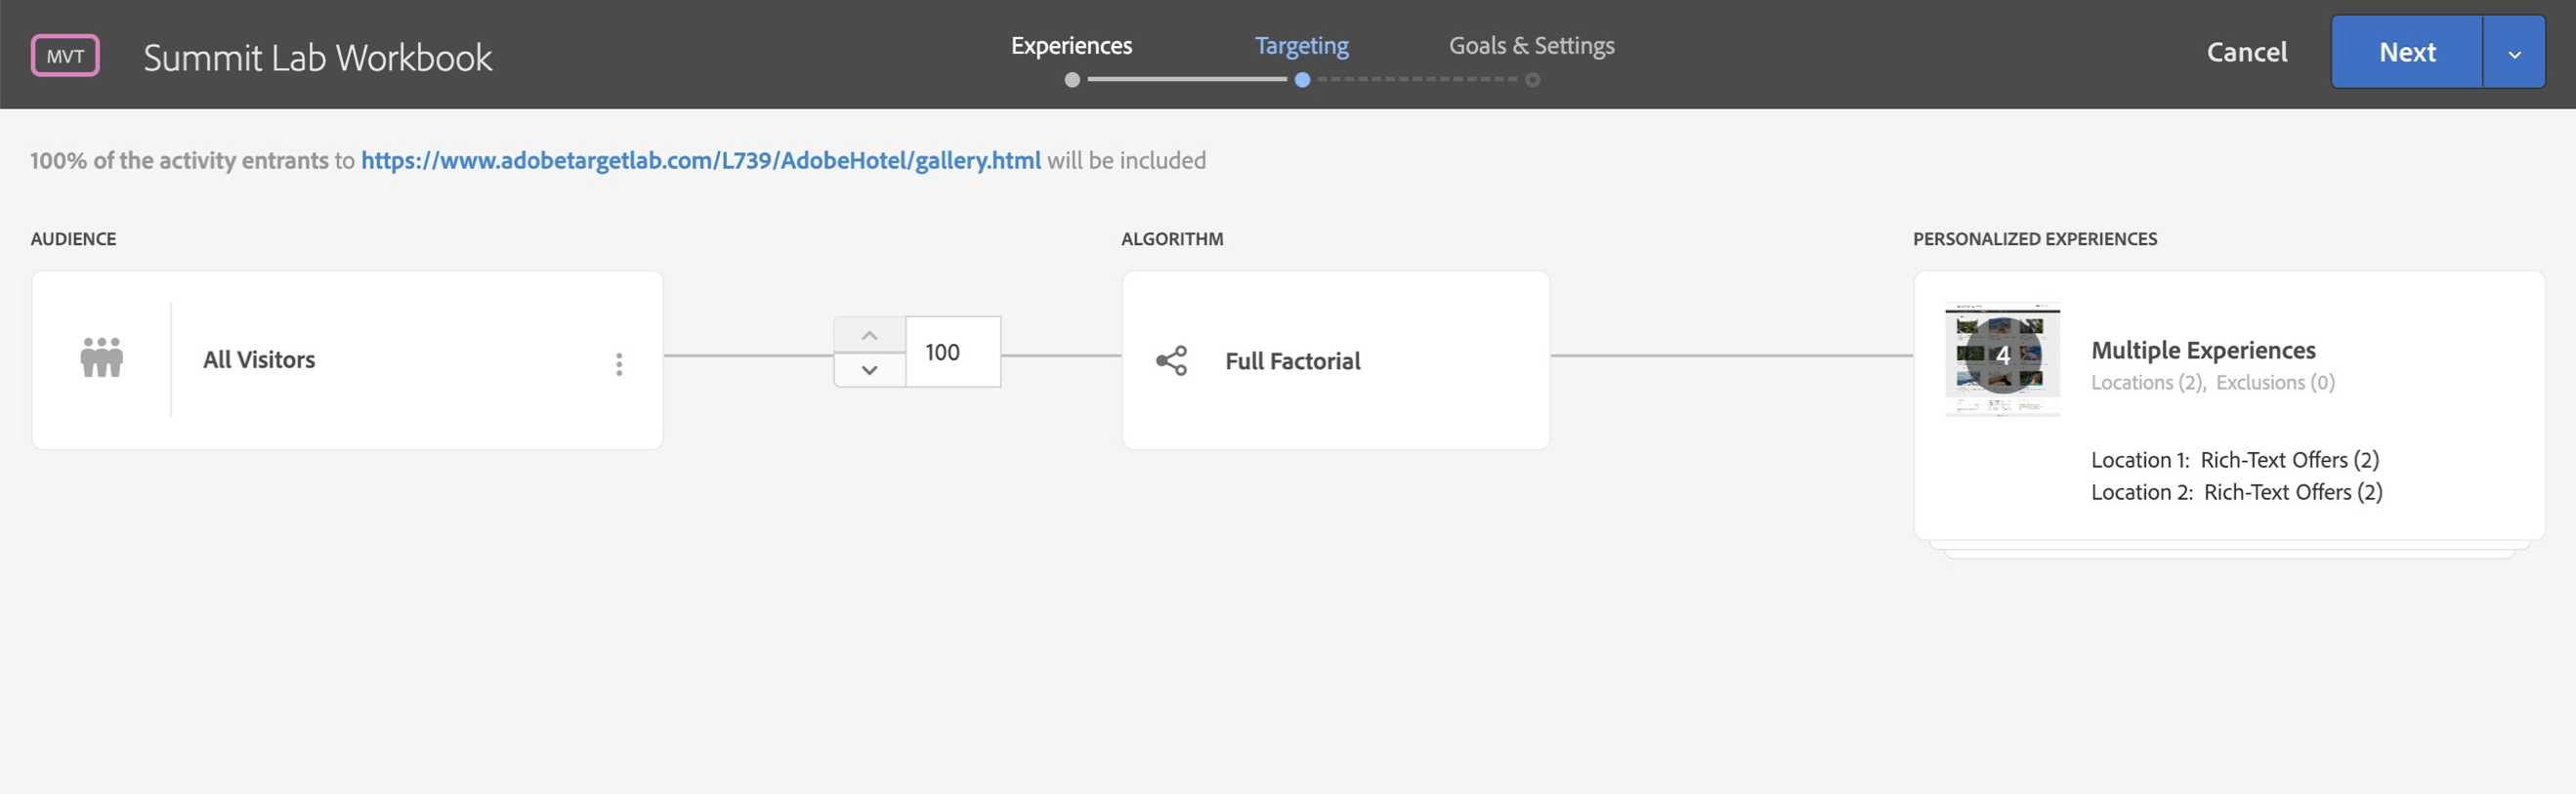
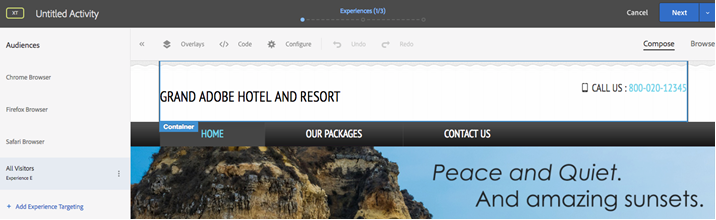
This is the guided workflow that helps you build your activity. The Activity diagram is where you will define who will see your activity and the experience they will have on your website.
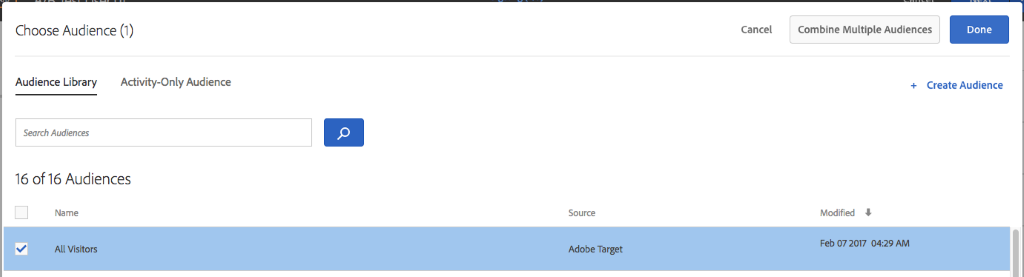
Click on three dots in the “AUDIENCE” section to review all available audiences
Select “All Visitors” and click “Done”
Audience Creation
You can select, edit and reuse any out-of-the-box audience, or easily create your own based on all available visitor data captured in the product, or any data source (such as CRM or 3rd party data suppliers) fed into it via APIs.
For reference, here is the current list of the various targeting options:
Browser: You can target users who use a specific browser or specific browser options when they visit your page.
Parameters: Custom parameters are mbox parameters. If you pass any mbox parameters to mboxes, or use the targetPageParams function, those parameters appear here for use in audiences.
Geo: Target users based on their geographical location, including their country, state/province, city, zip/postal code, DMA, or mobile carrier.
Network: You can create audiences based on network details.
Mobile: Target mobile devices based on parameters such as mobile device, type of device, device vendor, screen dimensions (by pixels), and more.
Operating System: You can target visitors who use a certain operating system.
Site Pages: Target visitors who are on a specific page or have a specific mbox parameter.
Target Library: Target users based on pre-built targeting rules.
Time Frame: You can add start/end dates and times to target users who visit your site during a specific time frame.
Traffic Sources: Target visitors based on the search engine or landing page that refers them to your site.
Visitor Profile: Target visitors who meet specific profile parameters.
Types of Audiences
Library Audience: Allows you to save a Target audience in Library so that it can be used in multiple activities. Marketing cloud audiences from AAM or Analytics shared with Target also land in Library Audiences
Activity-Only Audiences: Allows you to create one-off Audiences within the activity itself. Such audiences are available only within the scope of that audience.
Combined Audiences: A special kind of activity-only audiences where in you can combine two or more existing audiences to form a new audience.
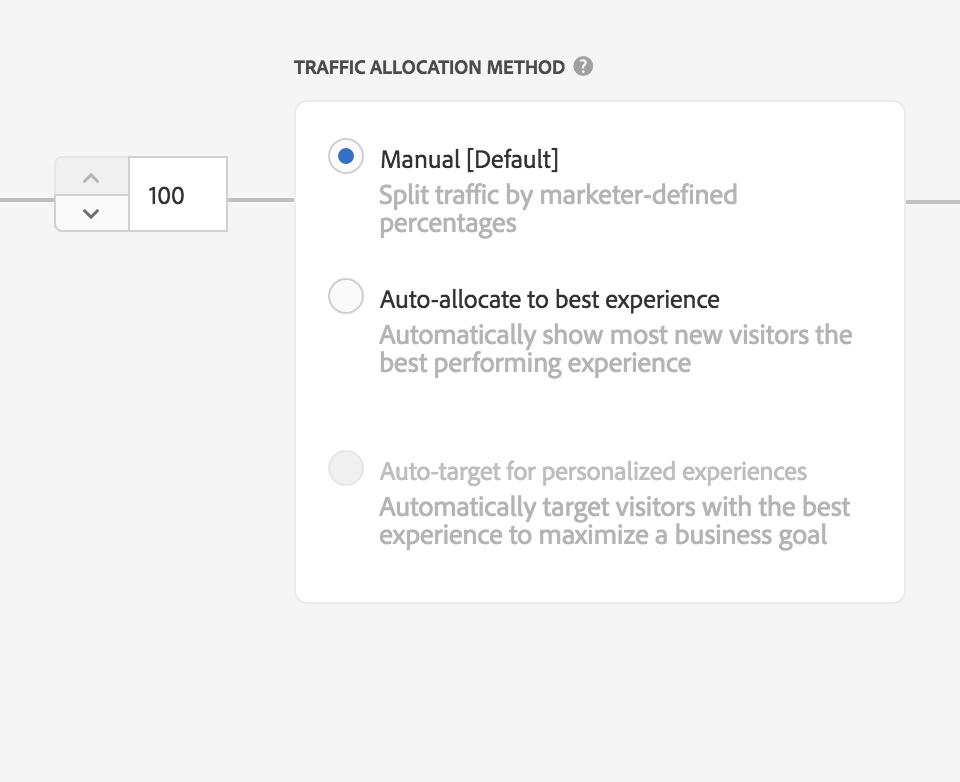
Leave the “Manual [Default]” radio button selected in the “Traffic Allocation Method” section, and allow 100% of visitors to enter the campaign.
Toggle the up and down arrows to see the traffic allocation options
Set all experiences to receive the same amount of traffic
Click “Next” to proceed to the “Goals & Settings” step of the workflow
Traffic Allocation & Splitting
Manual: Target automatically splits the traffic evenly across each experience variation, while allowing you to override this with a custom split. You also have the option of changing from a manual split to an Auto-Allocate option, which uses a multi-armed bandit algorithm to distribute traffic. In general, Adobe recommends using an even split when manually allocating traffic.
Auto-Allocate: Initially the traffic is spread equally by Target but as time goes on, Target shifts the traffic to winning experience. You benefit from lift more quickly because activity entrants who would have been sent to less-successful experiences are shown potential winning experiences. There is no notion of a "control" experience in such a test.
Auto-Target: Instead of figuring out one best experience, Auto-Target uses advanced machine learning to select from multiple high-performing marketer-defined experiences, and serves the most tailored experience to each visitor based on his or her individual customer profile and the behavior of previous visitors with similar profiles, in order to personalize content and drive conversions. Thus, every experience becomes a winning experience for its audience.
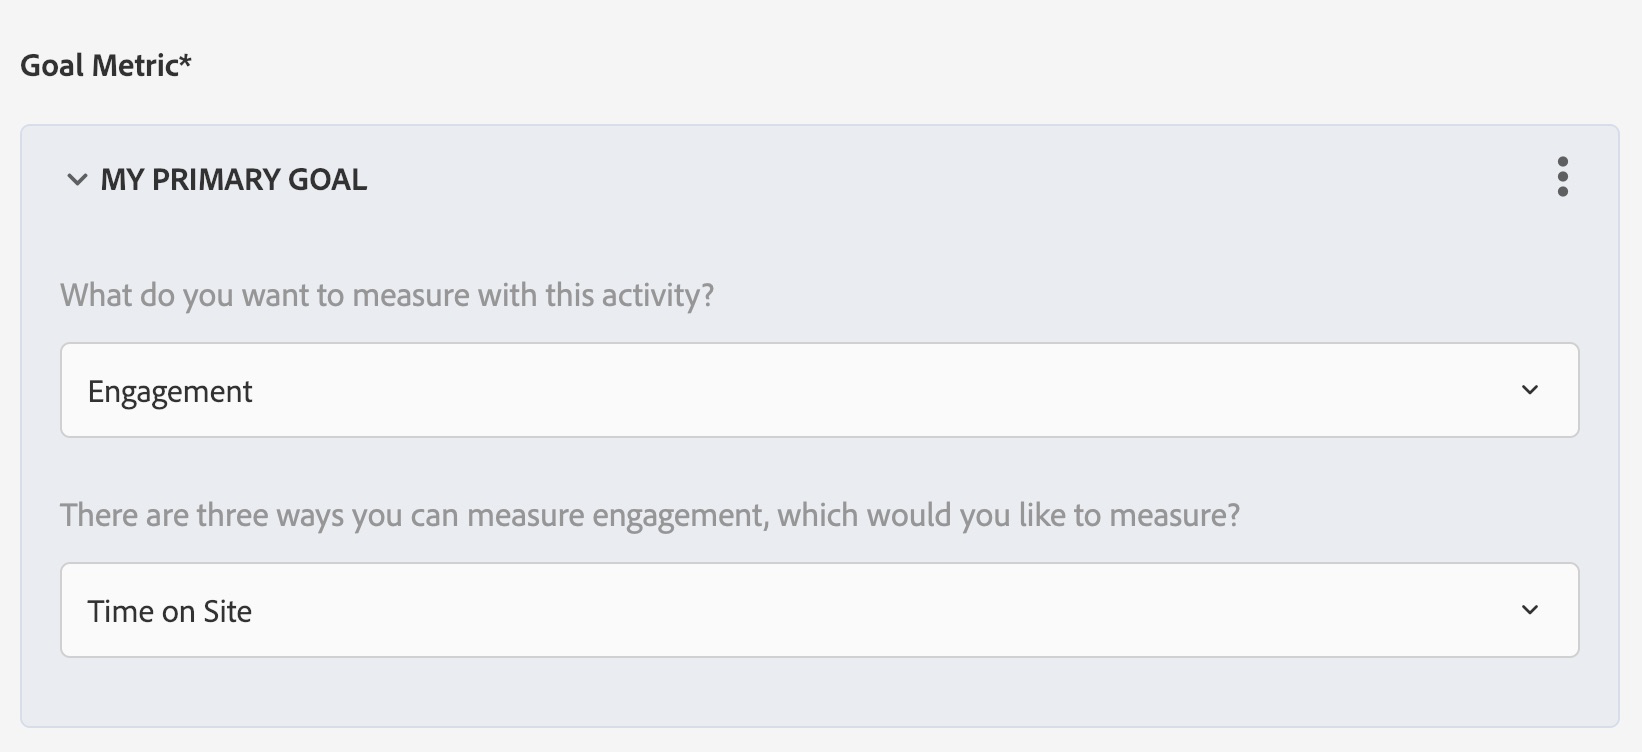
One of the main advantages of Target is the ease of setting up metrics. Click-tracking on standard HTML links is simple to create in Adobe Target and requires no coding!
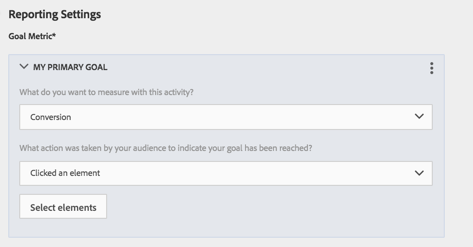
In the “My Primary Goal” panel, pick “Conversion” from the first drop-down menu, then in the menu below, choose “Clicked an Element”.
Next, click “Select Elements,” and the VEC will reopen.
Click on the “Contact Us” space, and a blue box will appear around the button that says “Selected.”
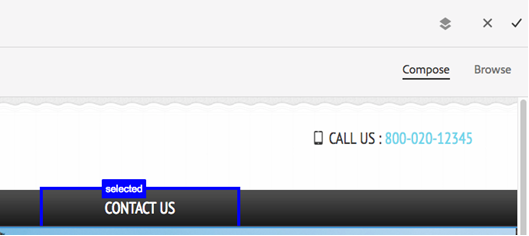
Click on the checkmark symbol in the top right hand corner of the VEC.
You will return to the metric set up screen, with your primary metric set up.

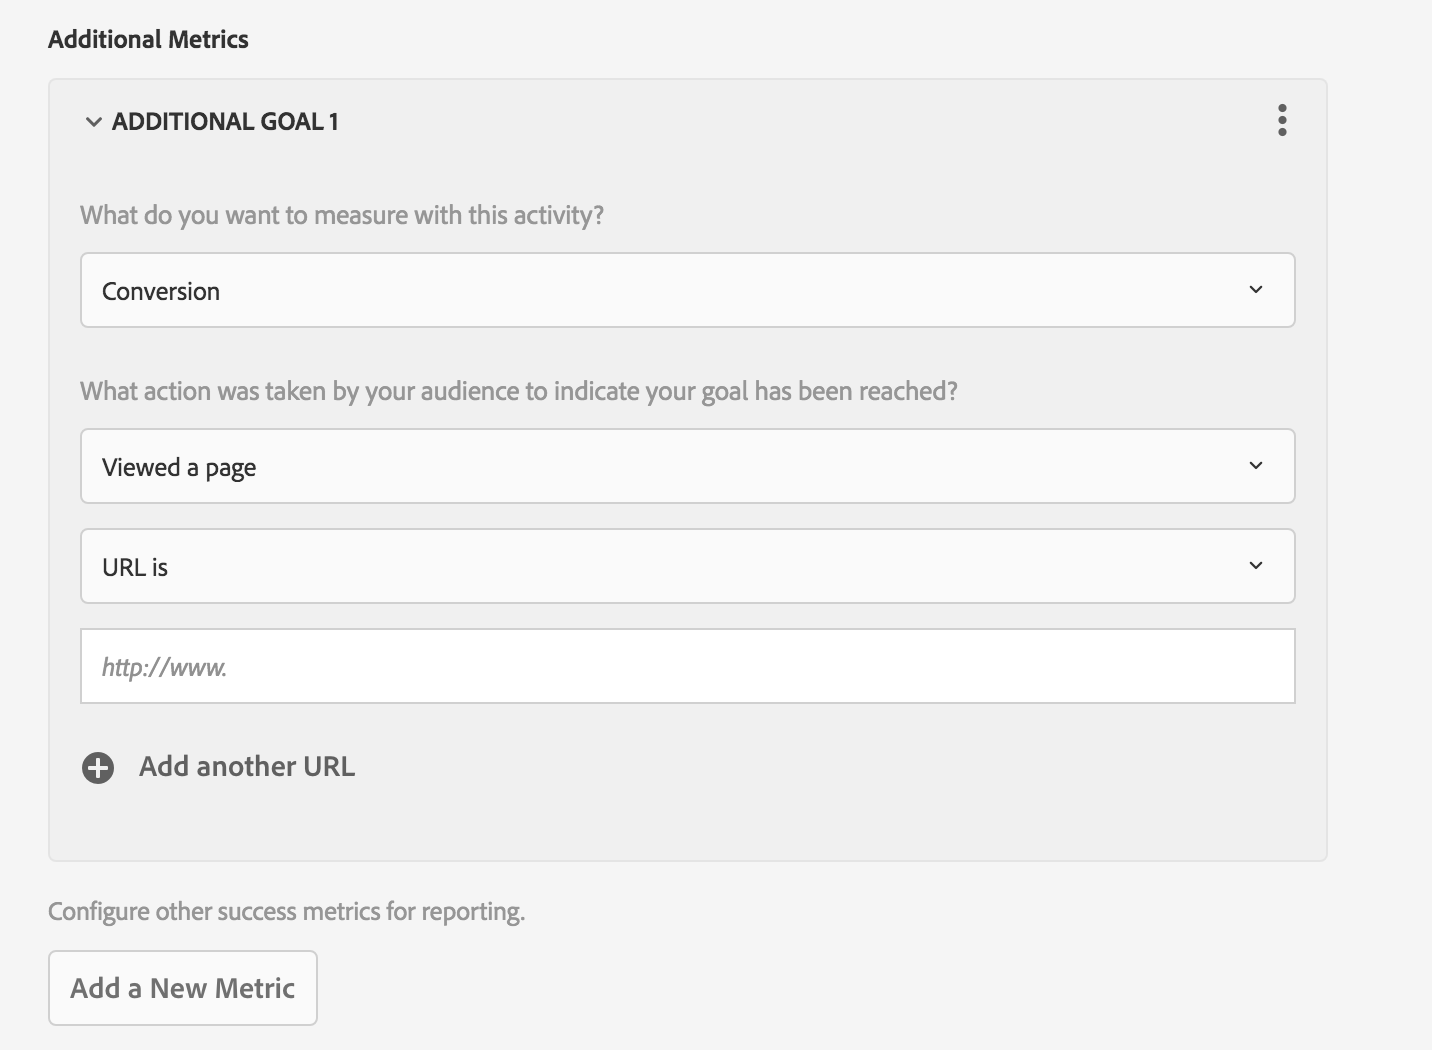
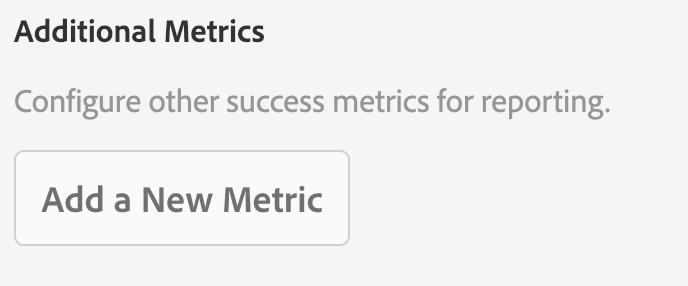
Although you should have a single KPI to determine your winner in an A/B test, you can add additional metrics to add color to your test results. For example, the end goal in e-commerce is to sell more, but getting more users to the cart, or funneling users towards areas of focus could add context to any increase in sales. In order to add additional metrics, you can click on the “Add a new metrics button” below your primary goal and set up additional metrics to track within a test.
Click “Add a new Metric” under “Additional Metrics”
In the “Additional Metrics” panel, pick “conversion” from the first drop-down menu, then in the menu below, choose “Viewed a Page.”
Type in the URL for the “Our Packages” page - http://www.adobetargetlab.com/L739/YOURNUMBER/gallery.html
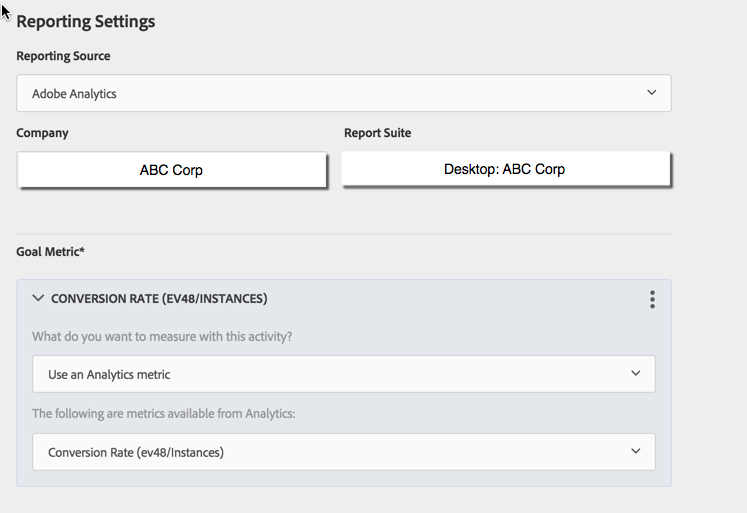
Metric Options: Analytics for Target (A4T)
One option for organizations who also use Adobe Analytics is to use their Analytics metrics as their goals within their A/B test. The requirement for A4T to work is to have integrated your Visitor ID service, as well as having an applicable SKU for Target & Analytics. Please reach out to your Adobe Representative or Consultant if you have a question about access for A4T.
First, change your reporting source from Adobe Target to Analytics. Then, for your primary metric, you have a choice between using a Target metric, such as the built-in click tracking, or for you to use any of your analytics goals. This key metric will be kept within the Target Standard reporting, and will include lift and statistical confidence. However, the same results will be available within Adobe Analytics, and you will also be able to look at all your analytics metrics divided by test experience within your analytics interface.
Adding additional audiences for reporting will add even further color to your results beyond which variation won overall. Looking at additional segments can offer some insight into why one variation beat another, and serve as a source of ideas for iterative testing and personalization campaigns.
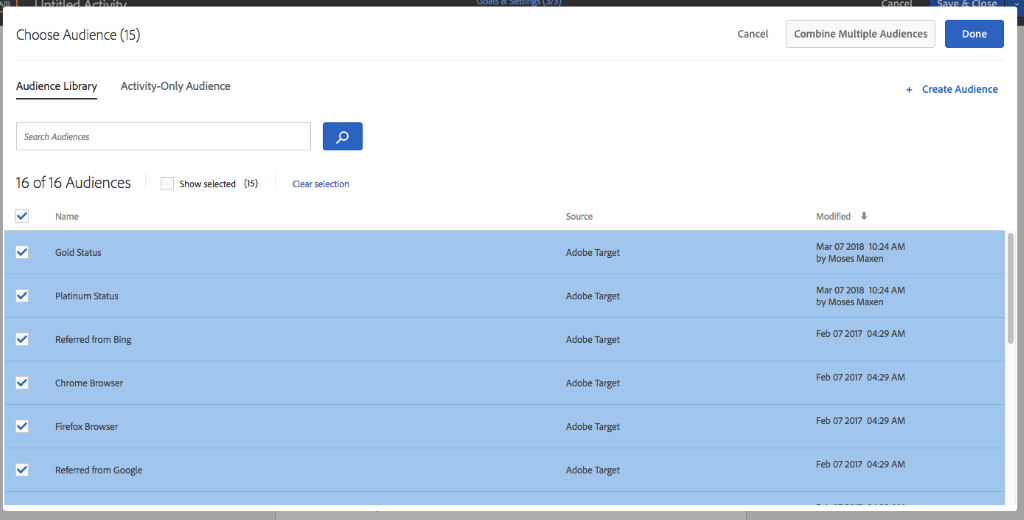
Click the “+” icon to add some audiences for reporting.
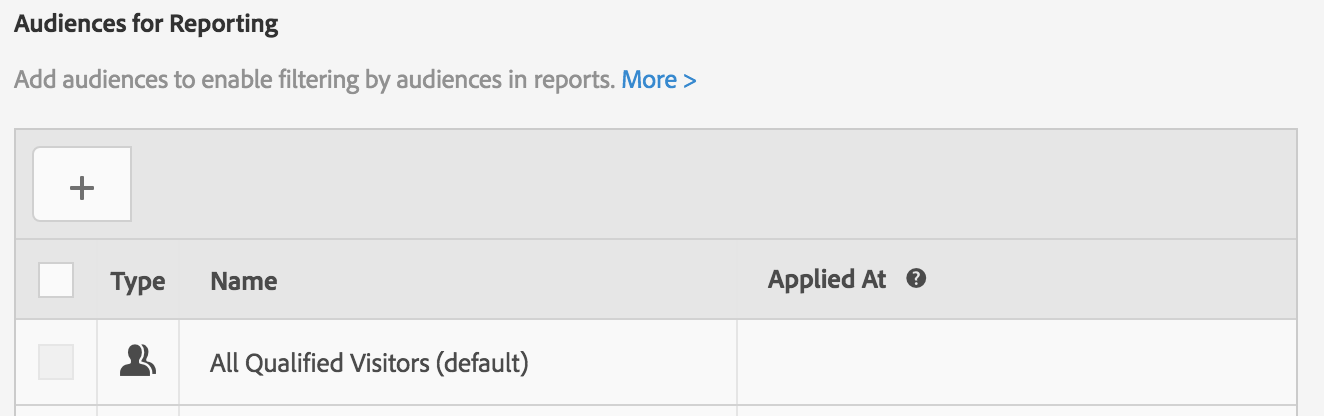
On the "Audiences" screen, click the checkbox to the left of “Name” to select all audiences.
Finally, click “Done” on the top right to return to the settings page.
Click into the “Untitled Activity” field on the top nav, and rename your activity as follows: “A/B Test User YOURNUMBER” (for instance, user 01, will have the following activity name: “A/B Test User 01”

Click “Save & Close” button on the top right to save your activity and continue to the Overview page.
Other Settings & Priority
Target uniquely offers additional custom settings, such as priority, which allows you to set the priority of concurrently running tests to safeguard the accuracy of your results. You can also schedule the launch of the test, and add notes.
Quick Editing
While editing activities, you can enter any of the three steps directly from the Activity overview page. Similarly, you can make changes on any step without exiting the activity using the Save option or you can exit the activity directly from any step without having to go through the three step process by using Save & Close option.
Synching and Activating
On the top left of the overview page, you will see a spinning “synching” notice on the top left of the screen for a few moments. At this point, the test is synching with the Target delivery network.
Once an activity is synched it will be inactive and the activation dropdown will appear on the top right, near the “Edit Activity” field.
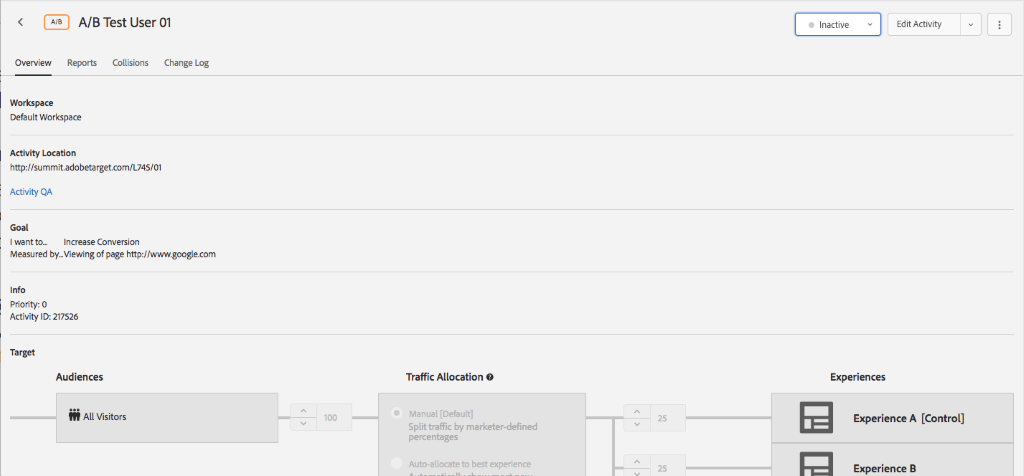
There are six statuses of Adobe Target activities:
Preview Links
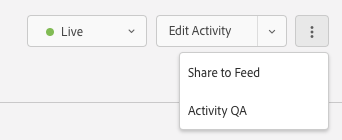
Before launching your test, you might wish to have your QA team review your test experiences. Click the “View Activity QA” link to open the Activity QA overlay.
These URLs will allow you to jump directly to a test experience.
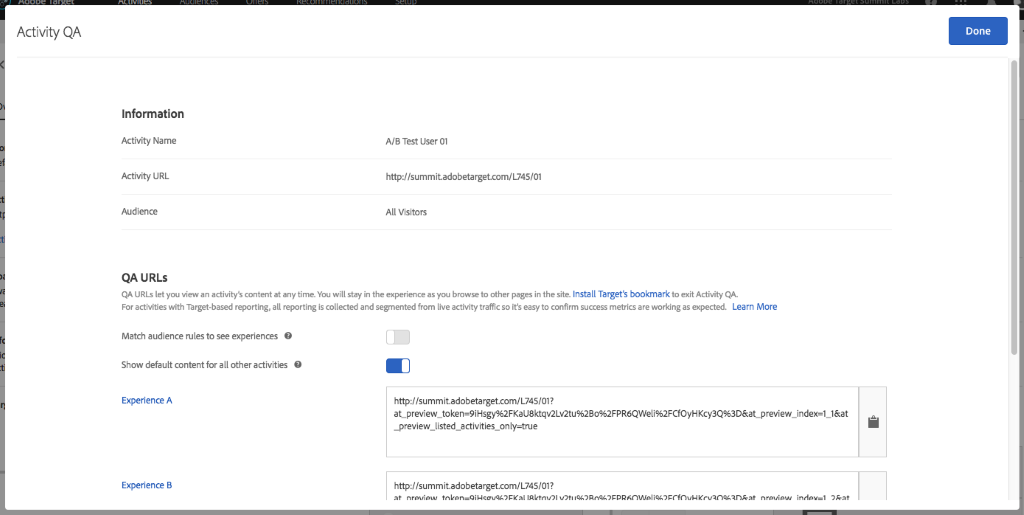
Once your test experiences pass review, you are ready to activate your test. Simply click the “Activate” button. Please note that converting in your preview experiences will not impact your metrics.
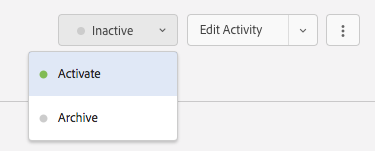
Go back to the Activities list and confirm that your activity is Live.

Congratulations! You just launched your first test with Adobe Target!
Now that your A/B test is live, it’s time to generate some traffic. In a real-world scenario, your visitors will begin entering the campaign as soon as it’s turned on. However, since we’re just practicing, you’ll need to simulate traffic to your website.
Open an incognito browser
Navigate to the URL your test is running on (remember, traffic is split randomly, so don’t worry if you’re not seeing one of your tested experiences on the very first visit)
Click “Contact Us” to trigger a conversion (if you set up a different “primary metric”, do the action that corresponds to what you have set up)
Close out the incognito browser
Repeat steps 1, 2 and 4 for ~8 times to generate some traffic (IMPORTANT: do not trigger a conversion on every single visit, to make sure there’s a performance difference between your experiences)
Once you’re done, follow this section to review your reporting interface
Once a campaign is live, the overview screen gives you a succinct summary of your Activity, and allows you to easily manage the campaign while it’s in-flight.
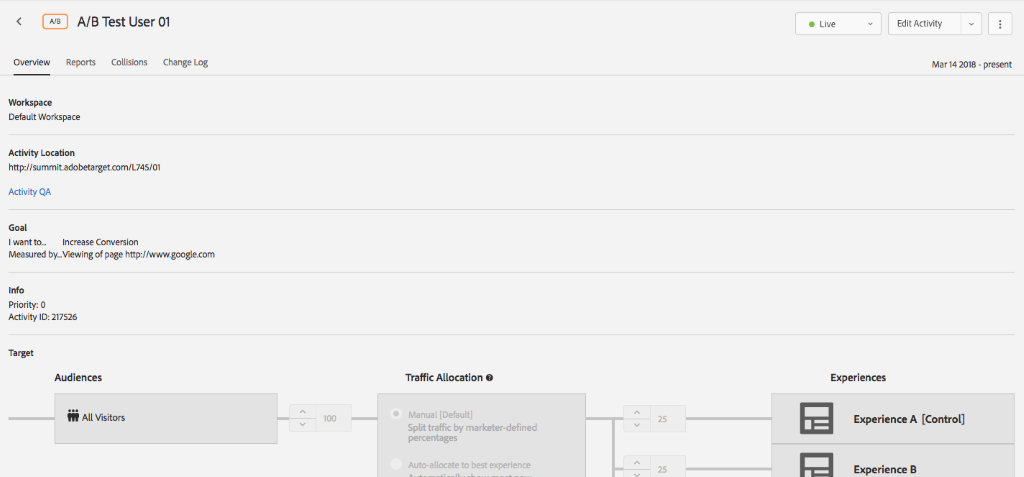
The controls on top help you quickly:
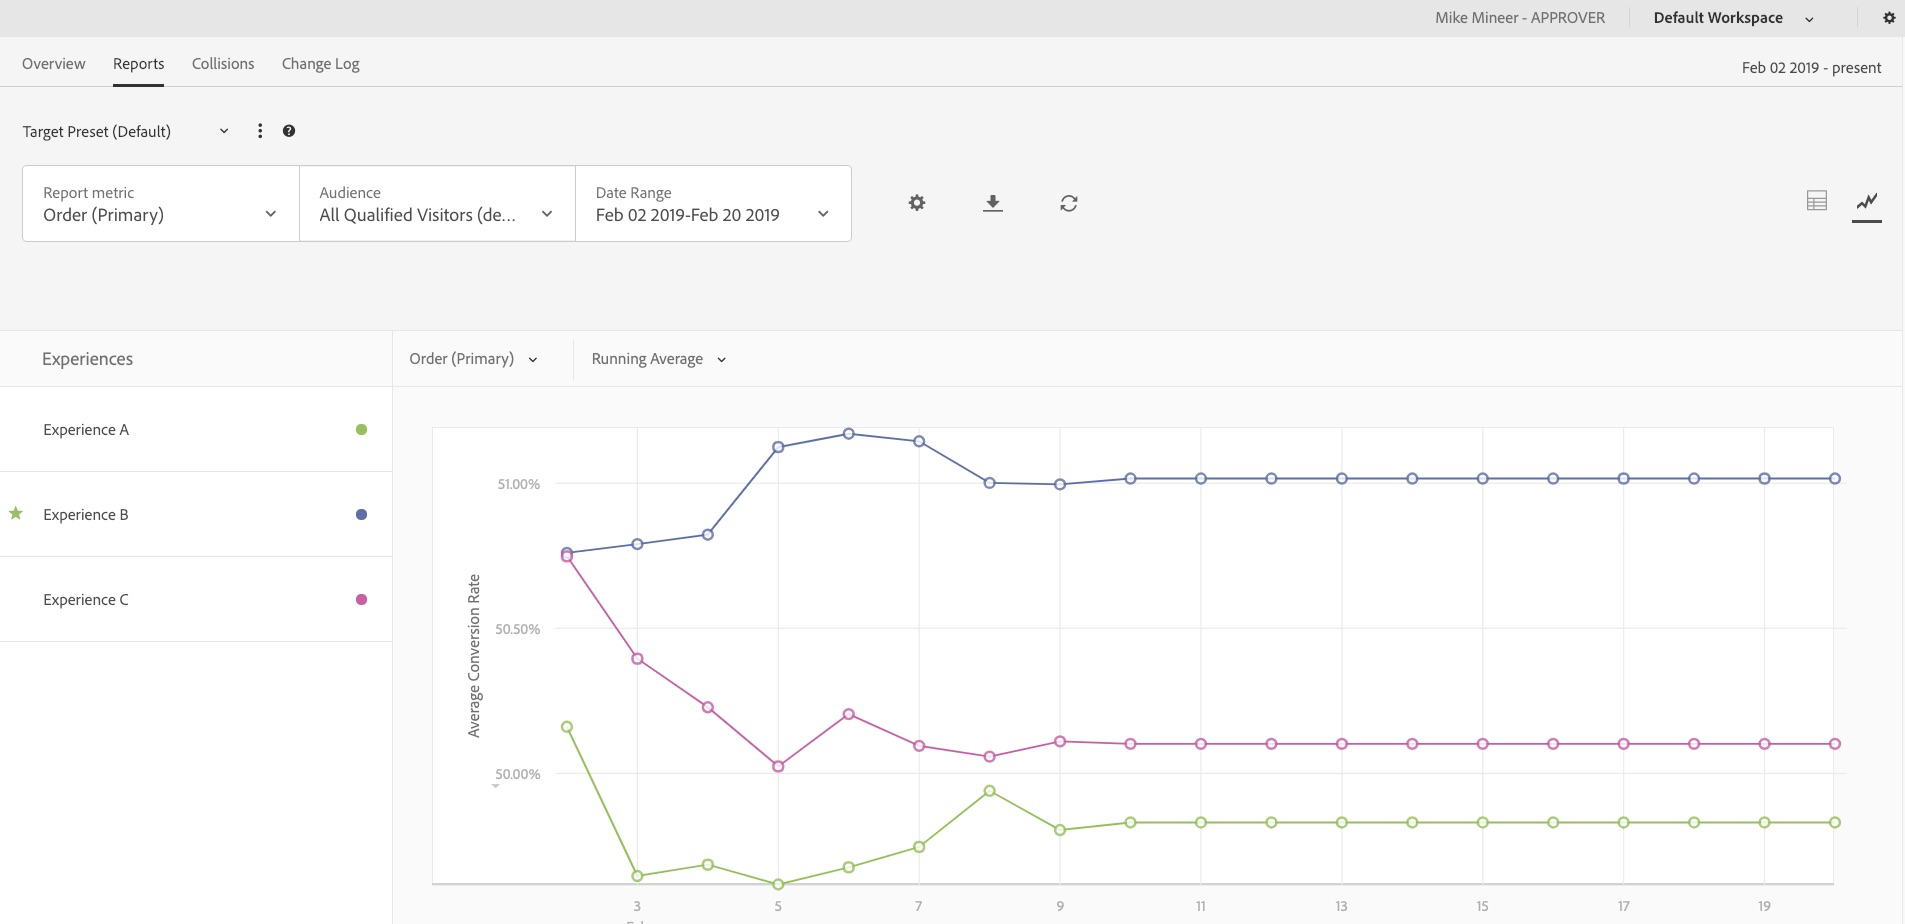
Click on the Reports tab to view the progress of your test. When you select graph mode, it will adapt to available screen area. The data table has our familiar measures of visitors, metrics, lift, and confidence. Winning experiences are indicated with a 
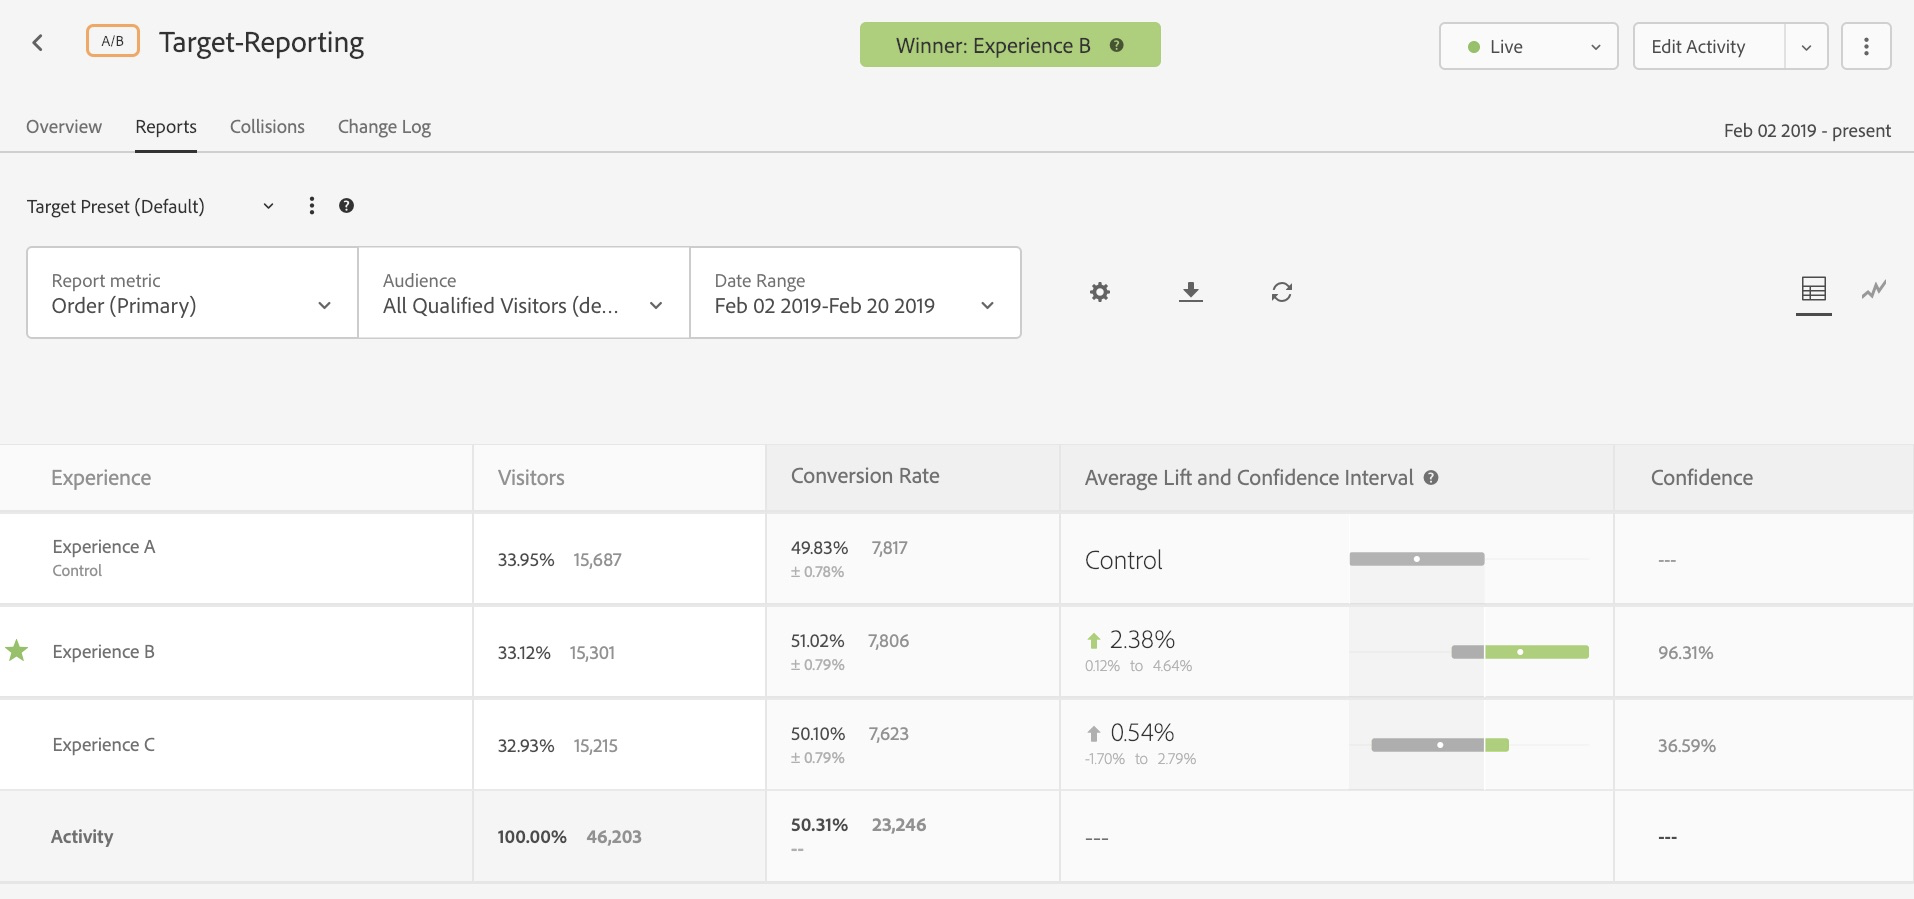
You may toggle the reporting to present a graph view, by clicking the icon on the far right
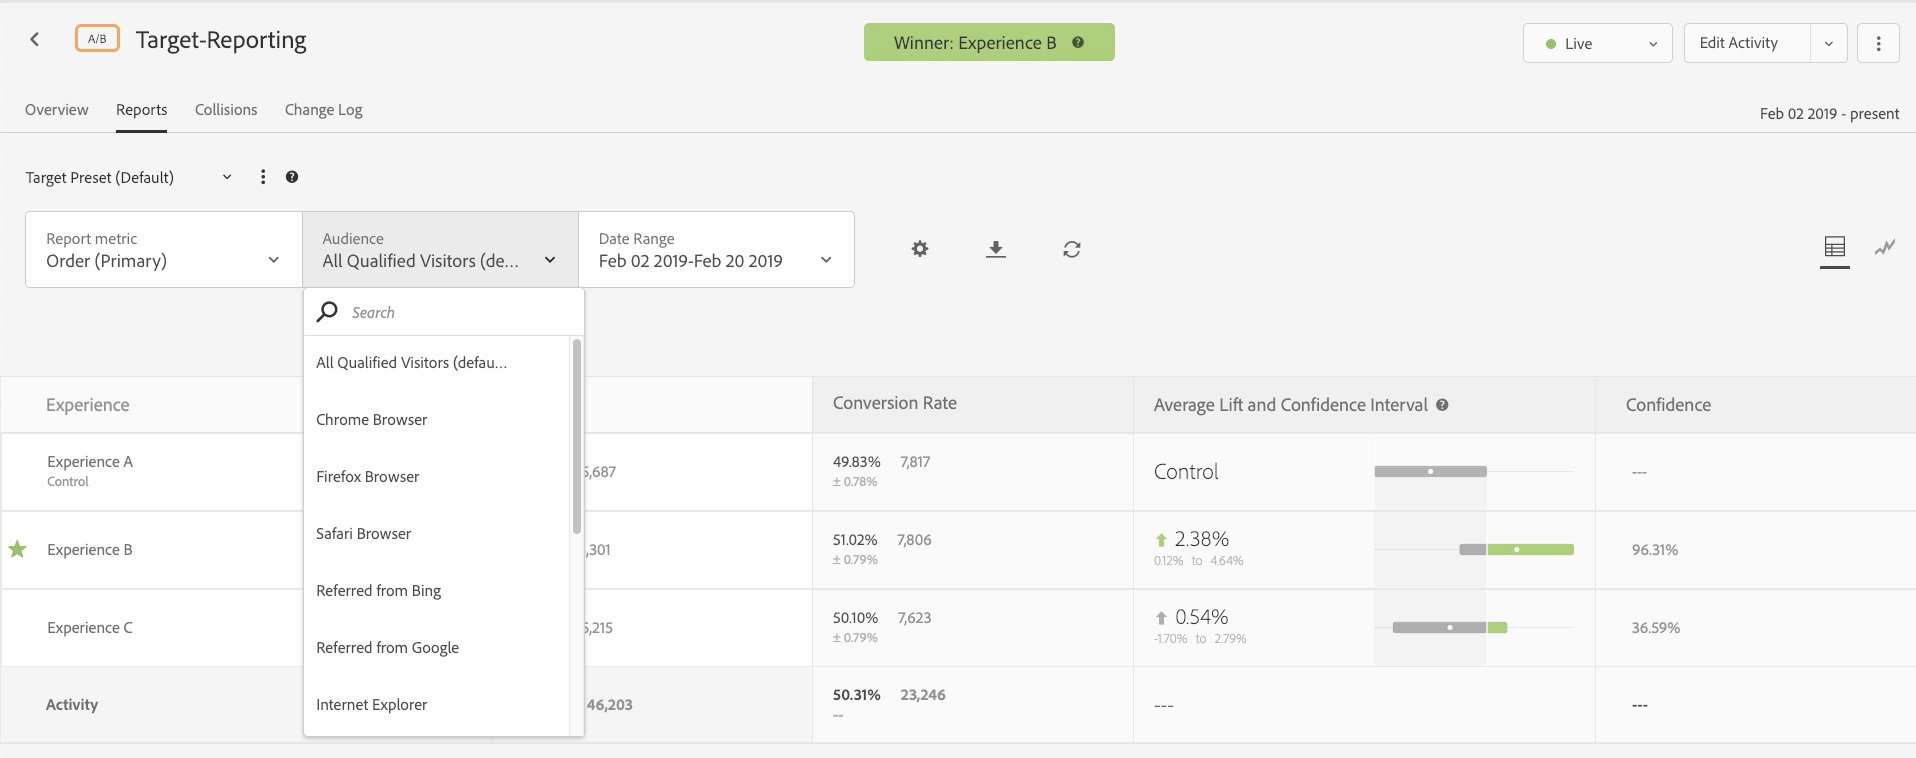
You can filter your test results to show data for a specific audience segment. This type of analysis is critical to identifying targeting opportunities. Click the “All Qualified Visitors” link to select a different audience.
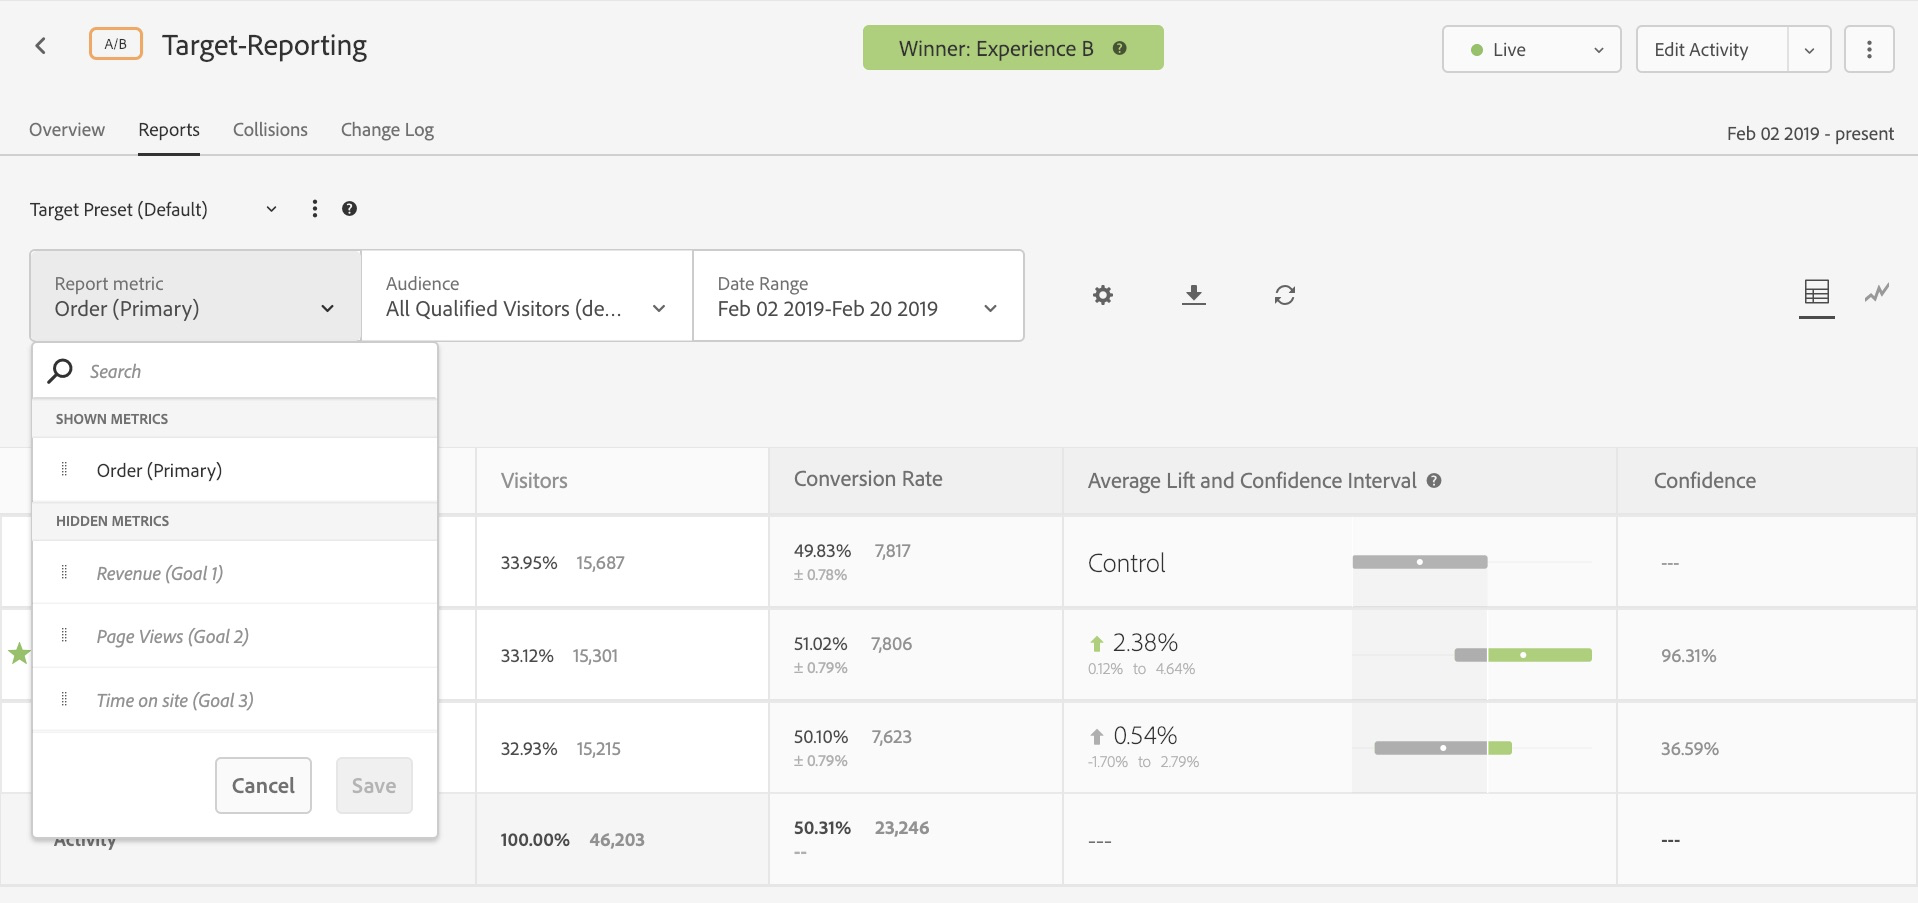
Click the Report metric box in order to look at metrics other than your Primary Metric. You can even select more than one metric.
Clicking the “Settings” gear icon will allow you to change metric settings such as:
You can save up to ten different presets of an individual activity's report after configuring it for metrics, date ranges, audiences, advanced settings, and so forth. This way you can save time in evaluating results.
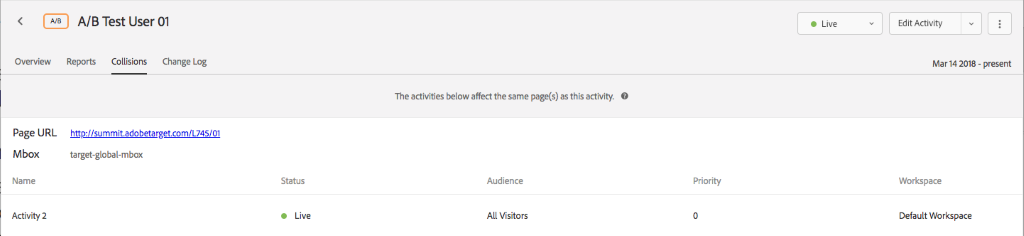
Click on the Collisions tab.
The Collisions tab will tell you if there’s a danger of your activity overlapping with another activity set up on the same page. If the audience to the two activities overlaps, you can use the priority settings to determine which activity should get precedence.
Now, let’s have more fun – creating your next activity. This activity will be a Multivariate test targeted to a general audience and will have an even traffic split since Multivariate tests use the Full Factorial Algorithm and you cannot select any other options.
Please note: You don’t create different experiences in this type of activity
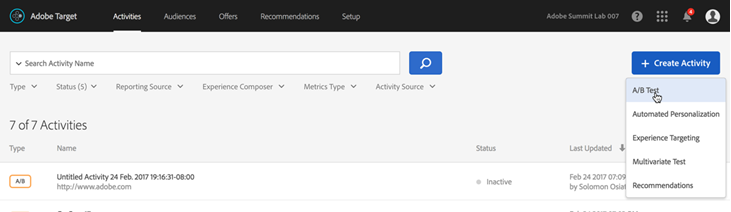
Click on the blue “Create Activity” button on the top right of the Activities List.
Next, select “Multivariate Test”.
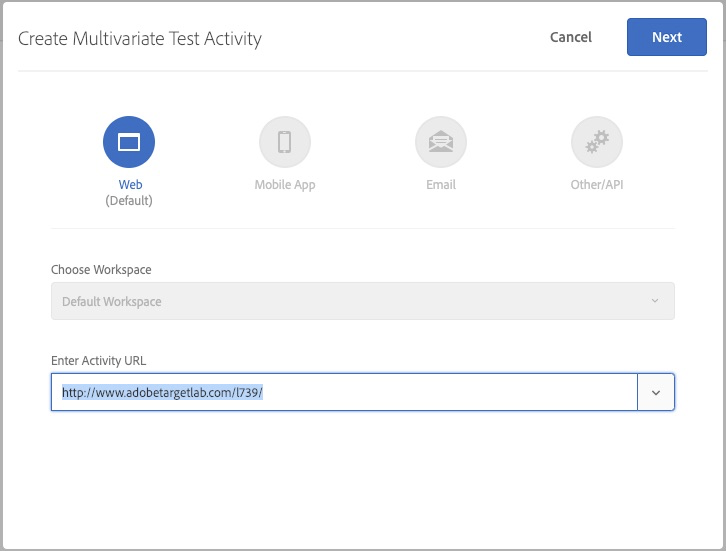
A “Create Multivariate Test Activity” box will pop up.
Choose the initial URL you’d like to load into the visual editor.
For the sake of this lab, add the number at your desk beyond the last / in the Default URL in the browser: http://www.adobetargetlab.com/L739/YOURNUMBER/gallery.html
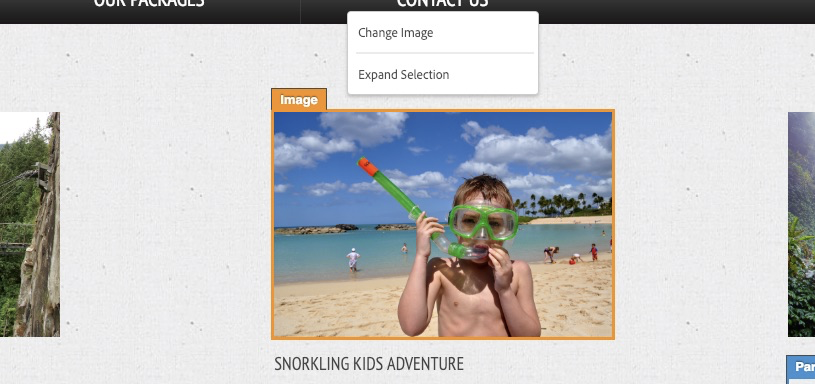
Click on two different images and change it something different, yet similar. You can choose any picture available in the popup.
Change the title text on two adventures (it can be the same offers as the images above or different ones)
Notice: you’re not creating multiple experience but simply changing multiple items on the page. Target will automatically create the experiences for you.
Note: This is the guided workflow that helps you build your activity. The Activity diagram is where you will define who will see your activity and the experience they will have on your website.
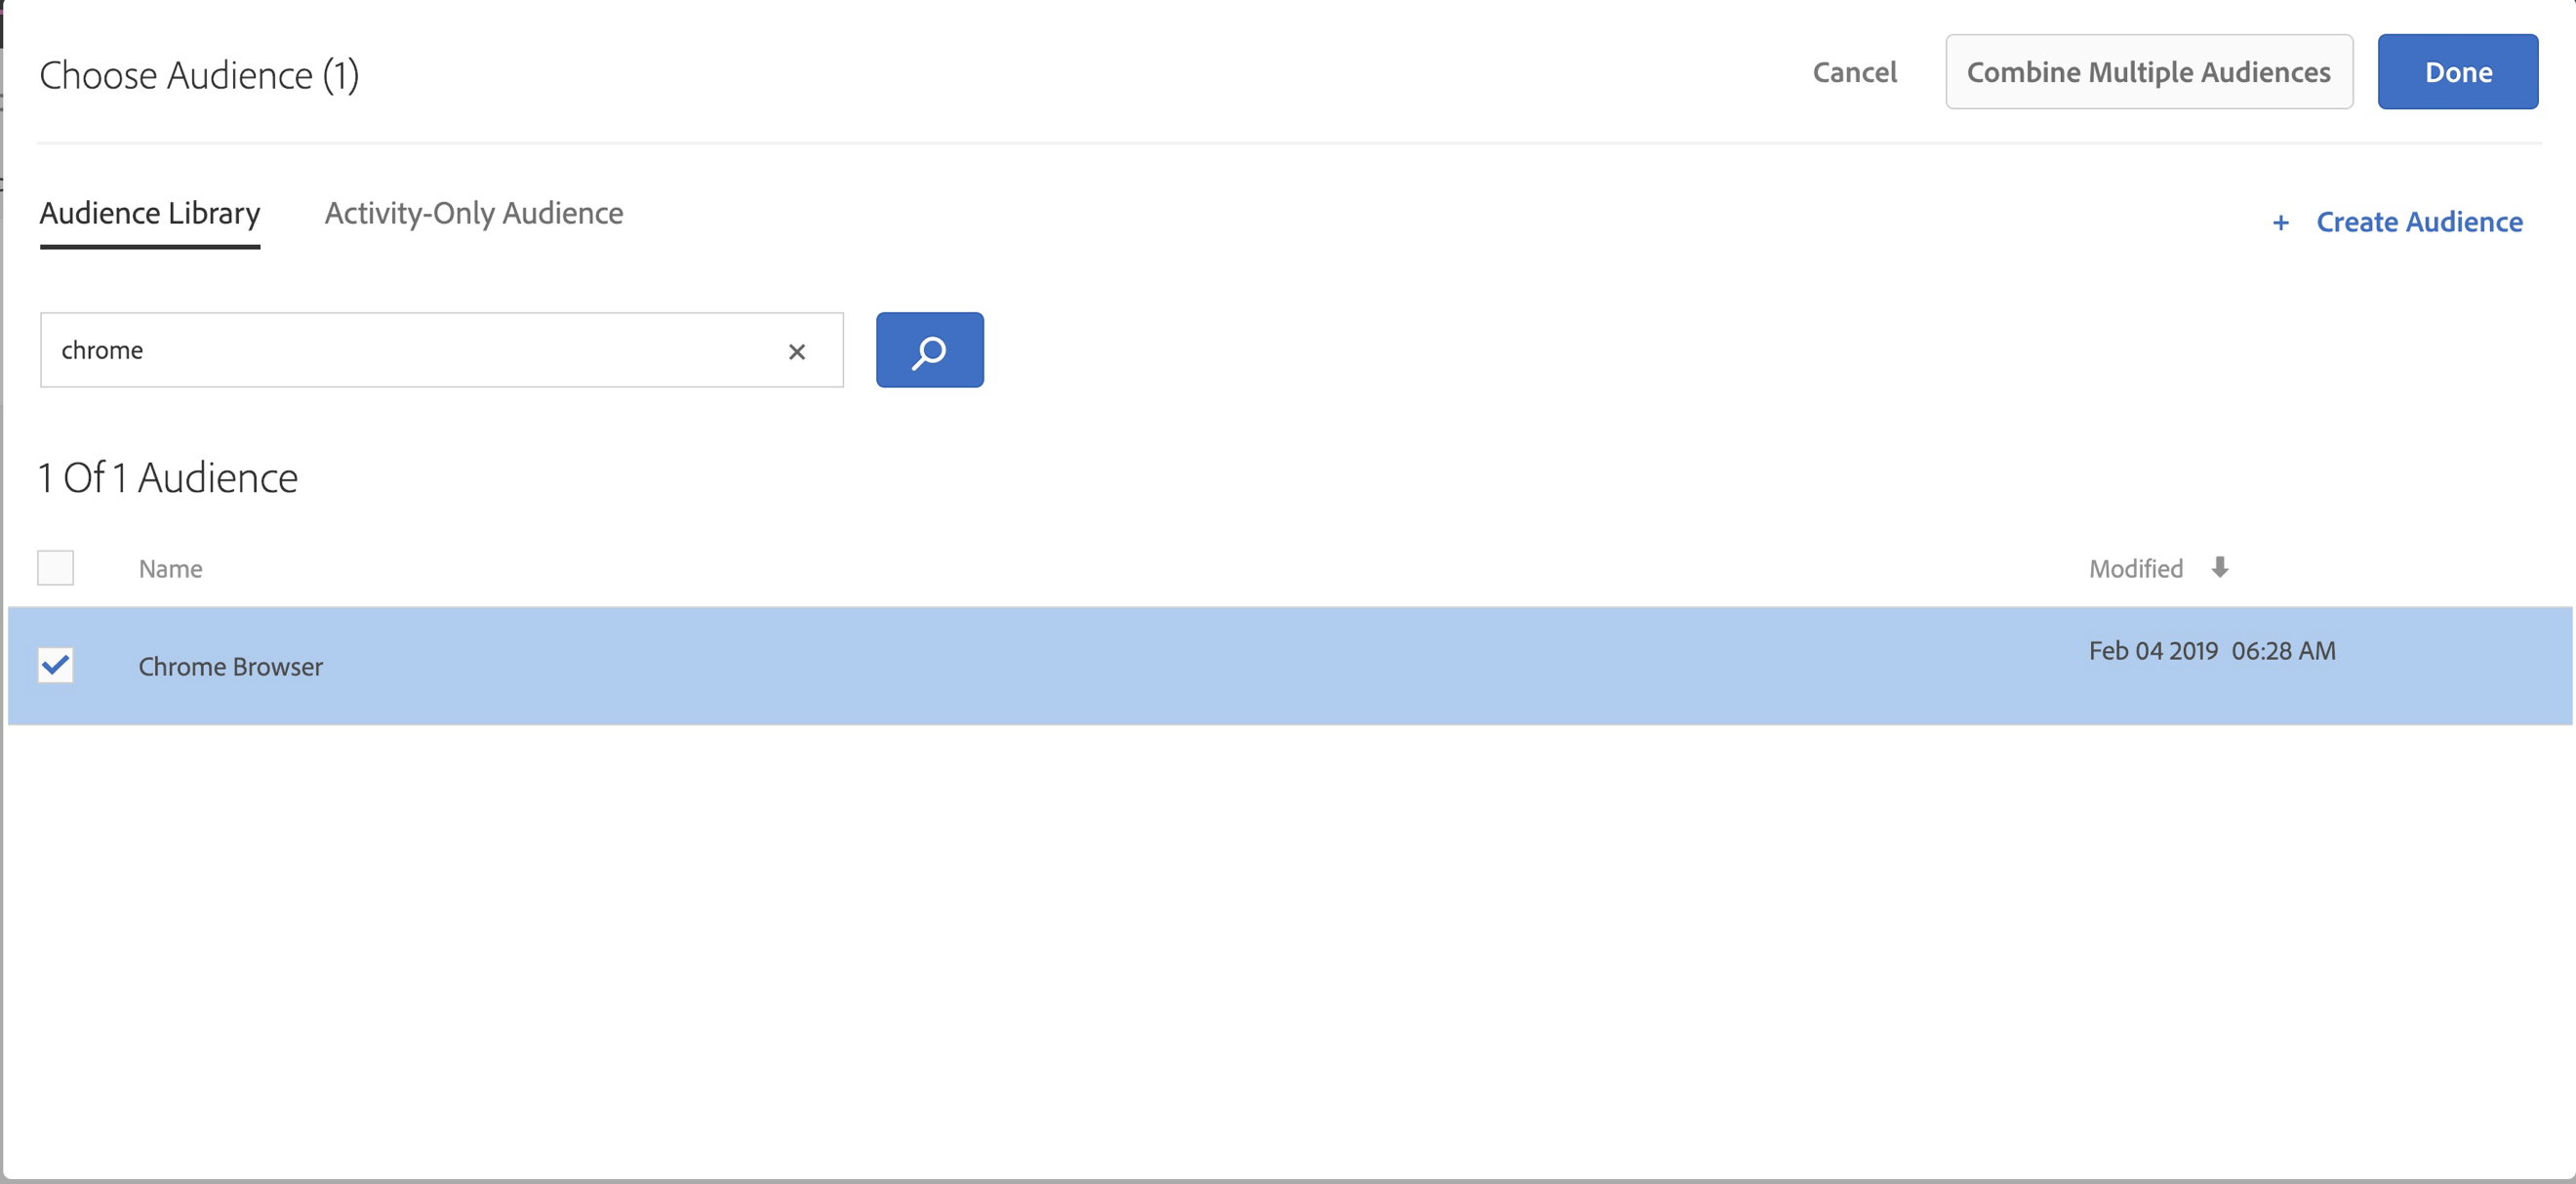
Click on three dots in the “Audience” section to review all audiences available to you
Select “Chrome Browser” and click “Done” (If you’re using a different browser then select that browser.
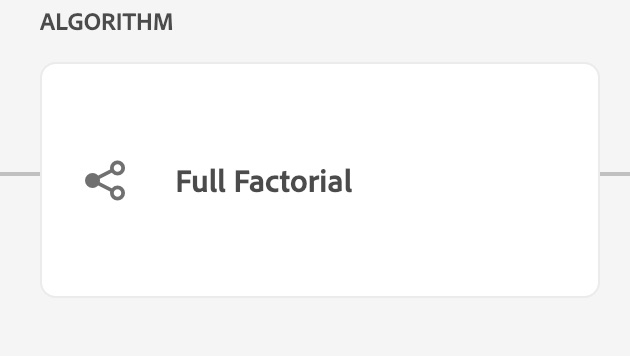
Notice, you cannot select anything here. Multivariate tests always use the Full Factorial Algorithm
In the “My Primary Goal” panel, pick “Conversion” from the first drop-down menu, then in the menu below, choose “Clicked an Element”.
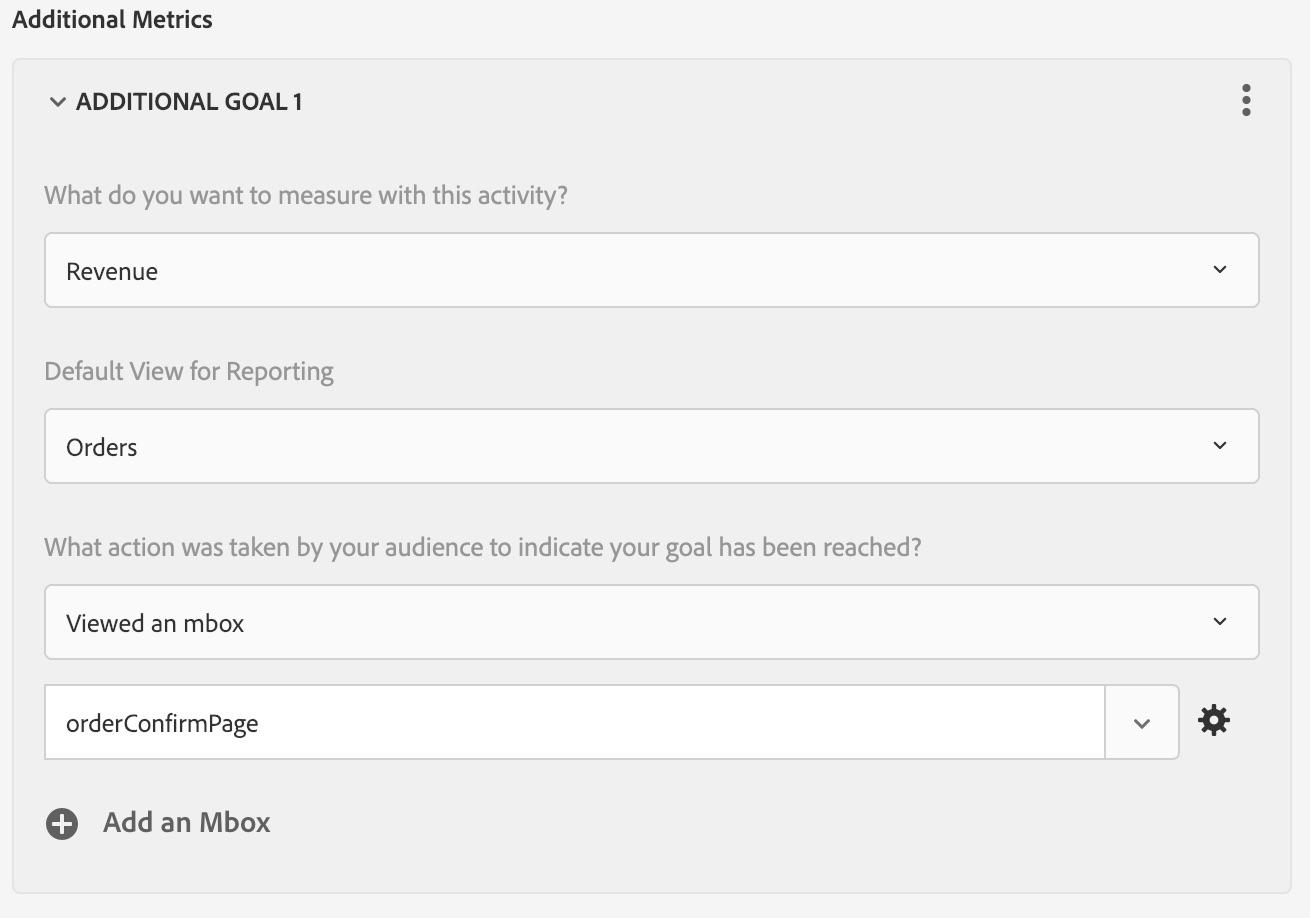
Click on “Add a New Metric”
Select “Revenue” from the 1st dropdown (this will add an additional dropdown)
Select “Orders” from the 2nd dropdown
Select “Viewed an mbox” from the 3rd dropdown
Select “orderConfirmPage” from the 4th dropdown
Click on the blue “Create Activity” button on the top right of the Activities List.
Next, select “A/B Test”.
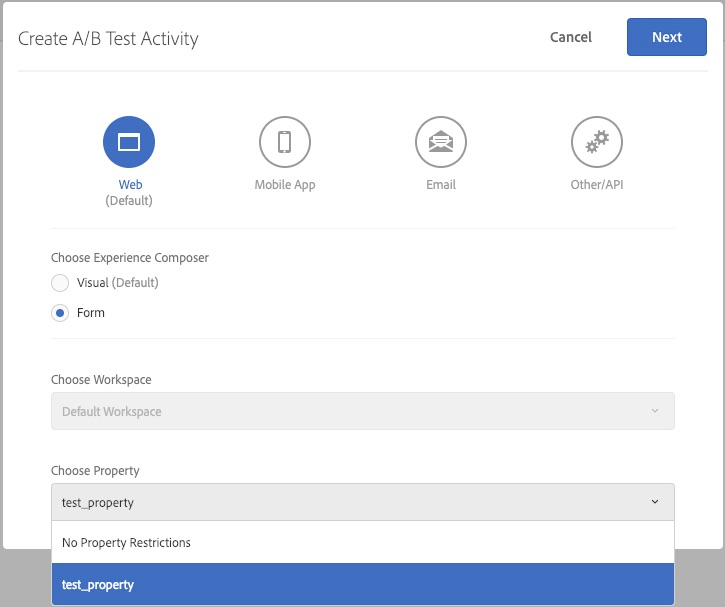
A “Create A/B Test Activity” box will pop up.
Select the Form Based Composer radio button.
Choose “test_property” in the Choose Property dropdown
Default URL in the browser: http://www.adobetargetlab.com/L739/YOURNUMBER
NOTE: Workspace capability is available as part of Enterprise Permissions, a feature which is available only in Adobe Target Premium. Standard customers will see a slightly different modal.
Click on the arrow next to Default Content
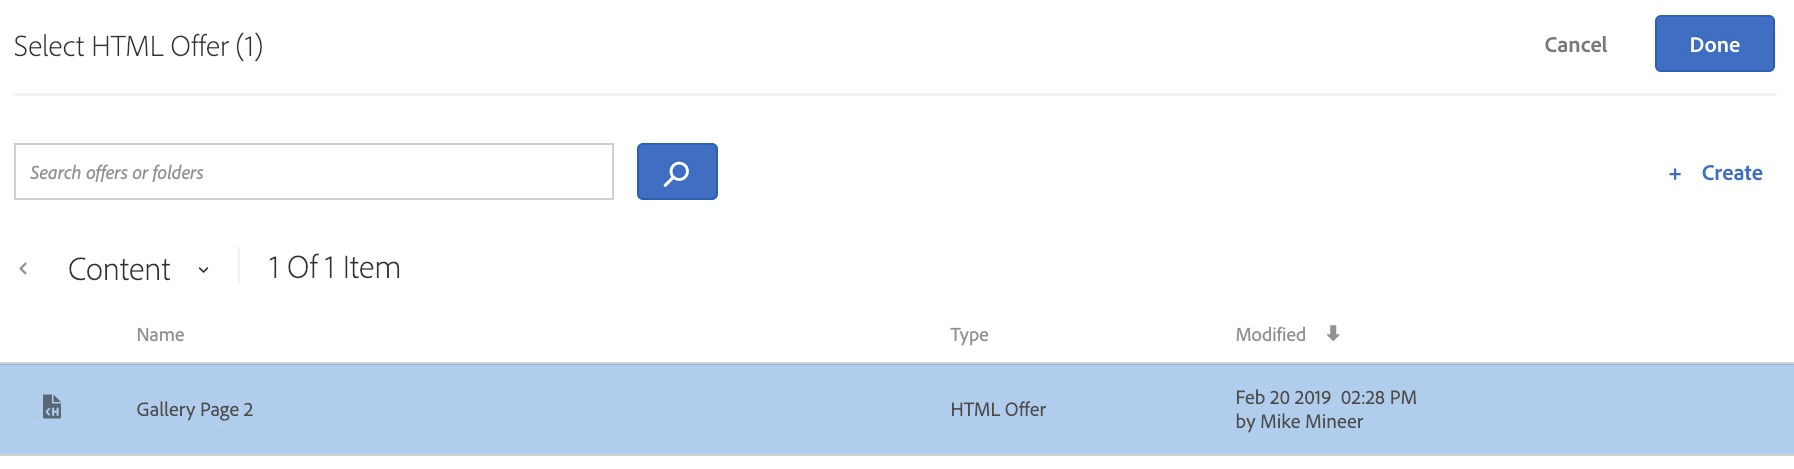
Choose “Change HTML Offer”
Select one of option available in the list and click done.
Note: Each of the items is designed to display the page a little different.
You can see the code that will be placed on your site
Note: You can choose additional locations to place the code at various locations on your site
Choose and Audience, Traffic Allocation Method, and Traffic Split the same as in Exercise 3
Choose metrics as described in Exercise 3
Click to make the activity live
Use the QA links to see the live version
Definition
Template testing - Including additional URLs for your changes to take place
Sometimes you’ll want to add additional pages for the changes you made in the VEC to apply. This works well for elements that occur on multiple pages, such as the global nav, or when you want to include a page that is duplicated in multiple environments. Your additional options for targeting template changes to multiple pages include
Create a template test that changes the “Contact us” copy on the global nav, to “Reserve now” across all site pages.
Click on the blue “Create Activity” button on the top right of the Activities List.
Next, select A/B Test.
Select the Visual Experience Composer radio button.
Choose the initial URL you’d like to load into the visual editor.
For the sake of this lab, add the number at your desk beyond the last / in the Default URL in the browser: http://www.adobetargetlab.com/L739/YOURNUMBER
### Step 3 — Create Template Targeting
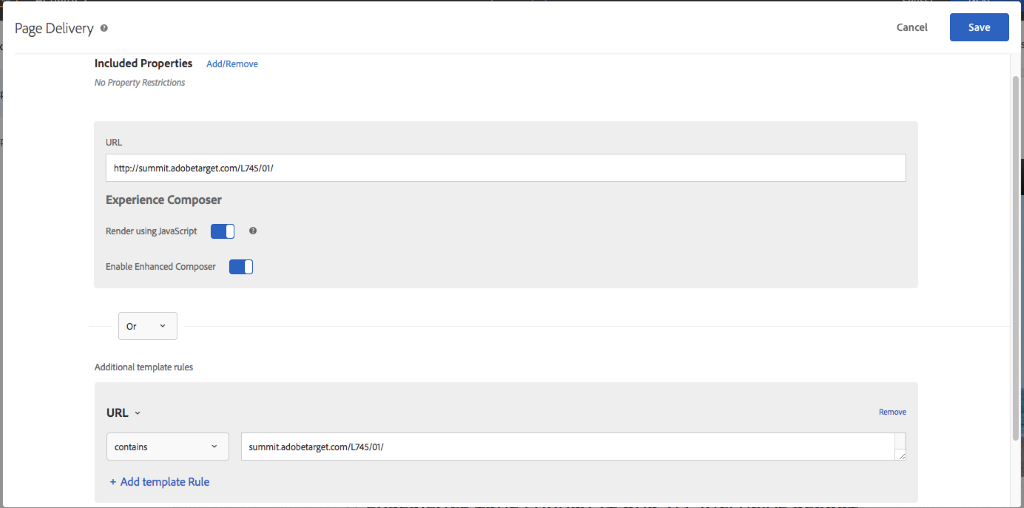
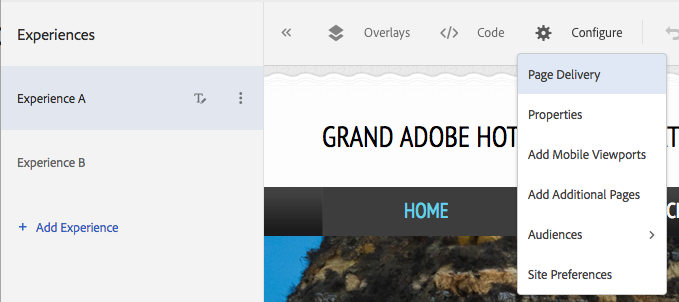
Click the “Configure” gear icon and select “Page Delivery” from the menu.
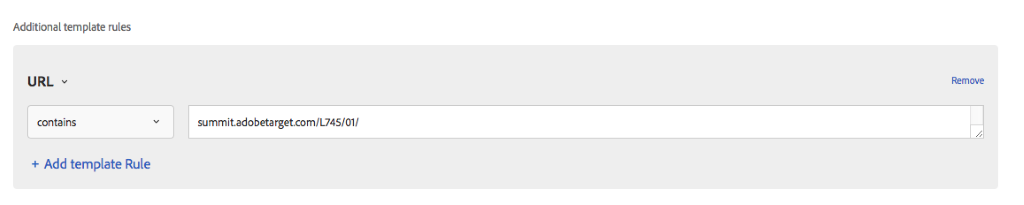
Click “Add template Rule” and select “URL” from the pop-up menu
Change the targeting condition to “contains” and enter “http://www.adobetargetlab.com/L739/YOURNUMBER “ into the field; click “Save”
Edit the experience as usual, to change “Contact Us” to “Reserve Now”

Target the campaign to “All Visitors” and direct 100% of traffic to the “Reserve Now” experience
Set up your primary success metric as clicks on the “Reserve Now” button
Rename your campaign to “Template Test User YOUR NUMBER” and save
Definition
Journey Testing- Adding Additional Pages to a Single Experience
On occasion, you will want to create a multipage experience for users placed in a variation. An example would be when you want to change multiple steps in a checkout funnel to highlight a different feature or benefit. This is easy to do in the new VEC.
Create a multi-page journey test that changes the reinforces “luxury” messaging of Grand Adobe Hotel and Resort, as follows:
Click on the blue “Create Activity” button on the top right of the Activities List.
Next, select A/B Test.
Select the Visual Experience Composer radio button.
Choose the initial URL you’d like to load into the visual editor.
For the sake of this lab, add the number at your desk beyond the last / in the Default URL in the browser: http://http://www.adobetargetlab.com/L739/YOURNUMBER
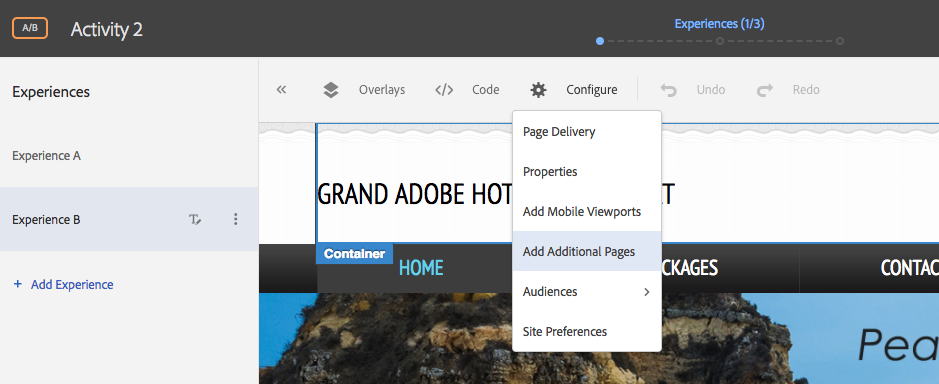
Click the “Configure” gear icon located in the top right corner of the VEC and select additional pages.
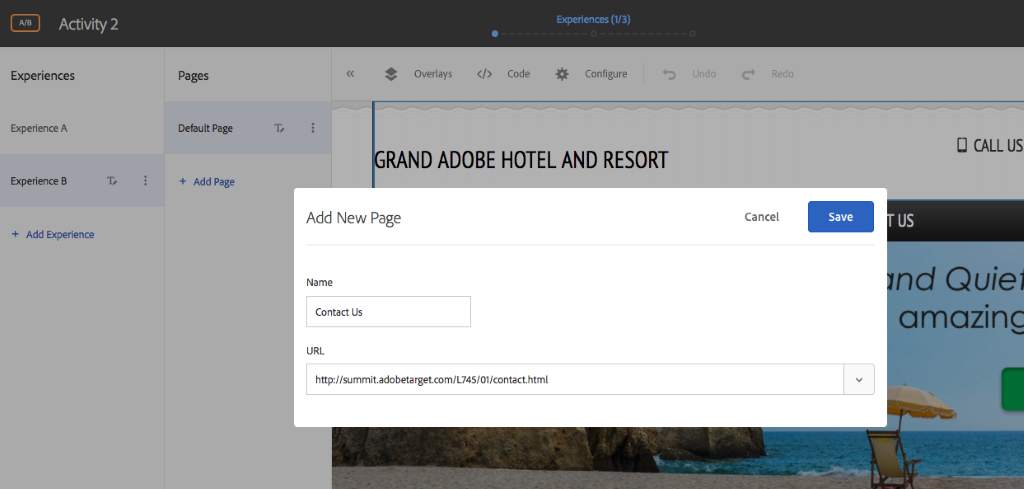
Click “+ Add Page” Icon on the new (pages menu) that appears and add the URL for the “Contact Us” page so it can be part of your experience. Then edit the page just like you did the original page.
Repeat the previous step for the “Our Packages” page.
Please note that now users can enter into the campaign from either page.
Experience Targeting is the bedrock of most personalization campaigns. In an Experience Targeting campaign you create a specific experience for a specific audience.
In an A/B test, you are testing one experience against another for the same audience, thereby determining which one is the best for that chosen audience. In Experience Targeting (or Rules Based Personalization), we are choosing a specific experience for a specific audience. Therefore, there is no winner in an experience targeting campaign unlike an A/B test. You should still consider return on investment when creating an Experience Targeting campaign. There is a cost to having to maintain extra experiences, and if you don’t think the changes are impacting your bottom line, then its best to only maintain a single experience.
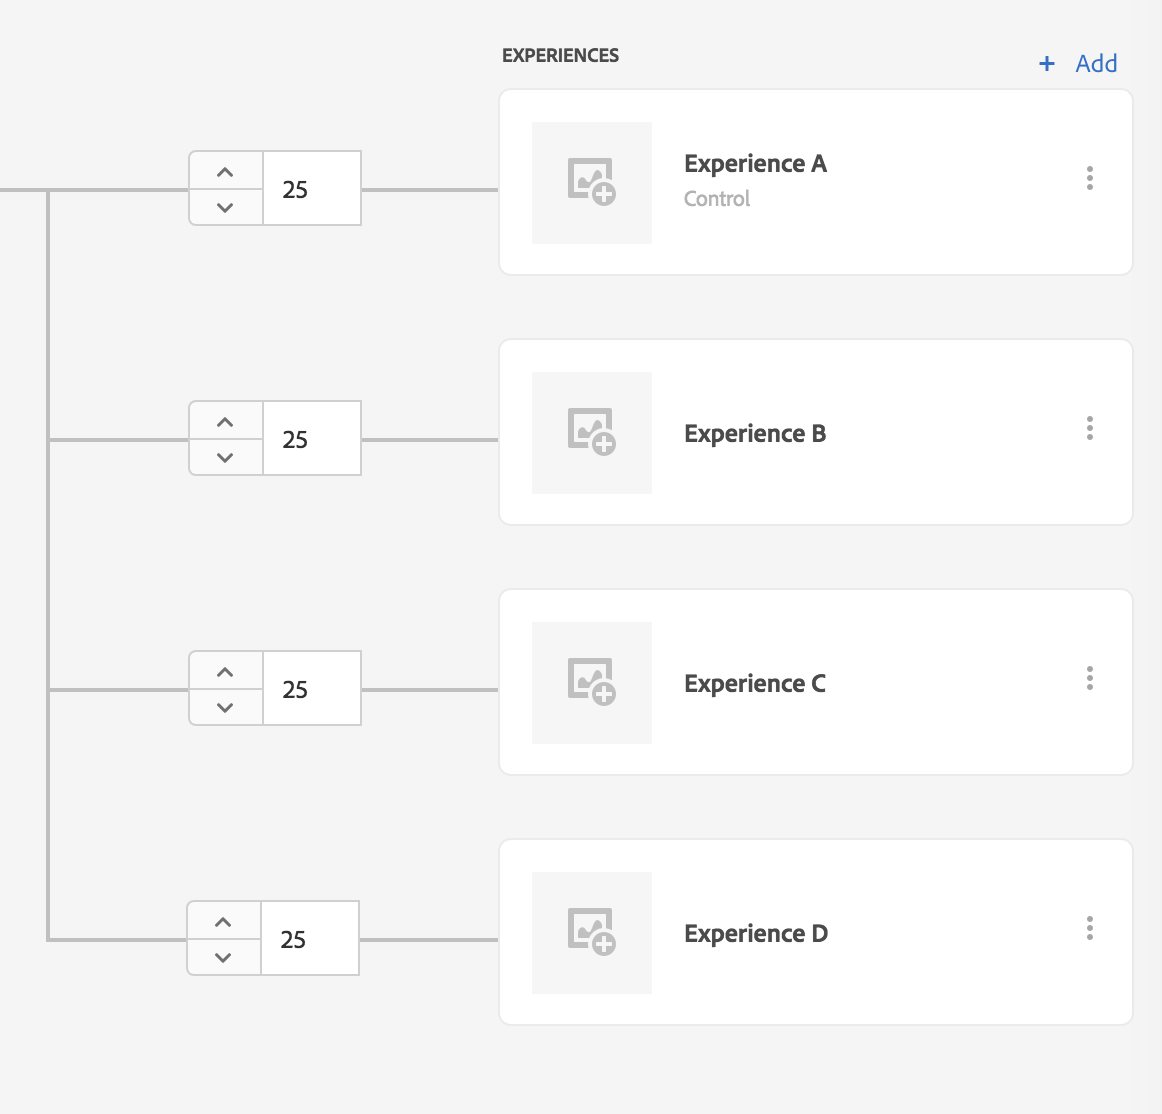
Create an Experience Targeting campaign with 4 experiences of your choice for the following audiences:
Again: start by clicking the “Create an Activity” button in the top right corner of the Activities list page. Then select Experience Targeting.
Next, load the URL you’d like to offer the personalized content on.
Choose an Audience AND an experience
The biggest difference with Experience Targeting is that you’ve defined what content to show to what audience. You’ll see that rather than having different variation names in the left-hand menu, you have the option to add additional audiences, which then allows you to build an experience for each audience. The actions within the VEC are the same as they are for the A/B test.
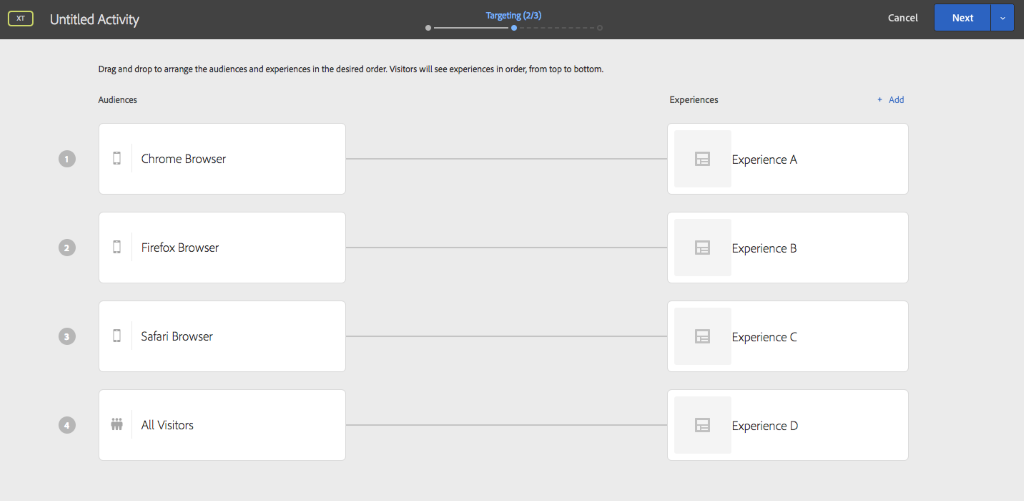
Please create 4 different experiences for 4 different audiences. Once you’ve created your new experience, click the blue “next” button to move onto the next step.
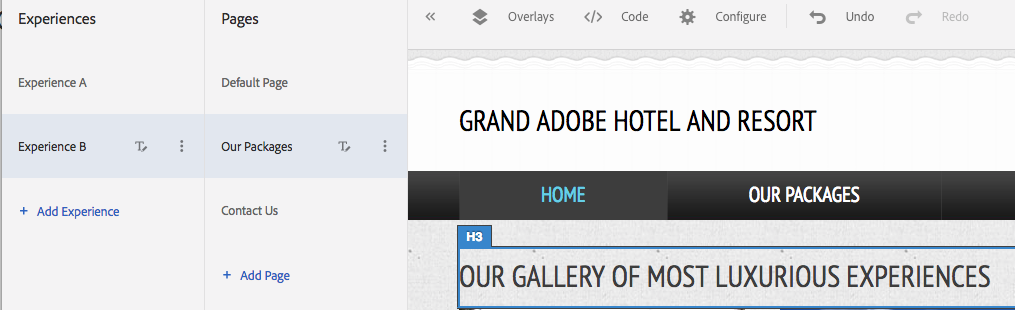
When you are done building the experiences, your Targeting Criteria should look like the model below.
Quick Actions
You can re-order experiences from this step. You can easily add a new experience or jump within VEC of any experience directly from here as well.
Setting up metrics for an experience targeting campaign is the same as an A/B test. Replicate the set-up you’ve done for your A/B test. Before launching, please turn off any campaigns that may already be live on your site.
Audiences allow you to target our activities to specific users. Let’s take a closer look.
From the Audiences list page, select “Audiences List” in the left-hand navigation.
This is where you can create a custom audience using any and all available visitor data. The Audience list shows you all of the Audiences in your account, including audiences shared from the Marketing Cloud. You can create your own Audiences based on all available visitor data captured in the product, or any data source (such as CRM or 3rd party data suppliers) fed into it via APIs. You are also able to select audiences fed by Adobe Analytics, and Audience Manager. These Audiences appear with the source “Marketing Cloud.”
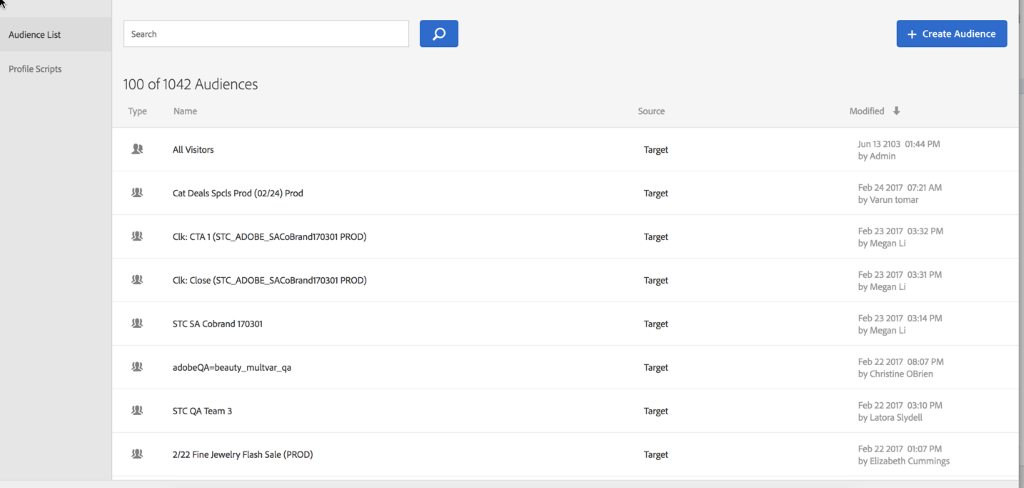
Like the Activities list, you can filter the Audiences list using the search box and sort it in different ways.
The “Source” column indicates the origin of the audience. All the audiences in this test account say “Adobe Target”, but you may see audiences with the “Marketing Cloud” source in your account.
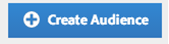
Click the blue “Create Audience” button to open the Audience Builder.
You can build rules based on the following types of information:
When using multiple rules in one audience, you have the option to set either an AND or OR criteria for each rule. You also have the option of adding multiple criteria to meet the rules. This is by definition, an OR criteria. See the example below for a geotarget that would apply to users in Florida or Texas.
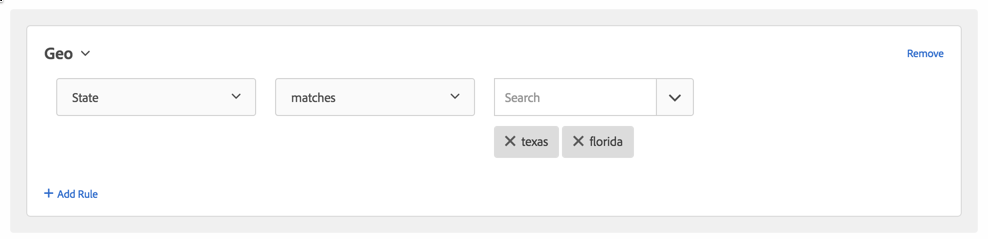
Take some time to build the following segments. Please user YOURNUMBER at the beginning of the audience name, e.g. “01 Paid Search Traffic”:
Click on the Solution Switcher Widget (9 dots in the top right corner of Target)

Click on Analytics

Click on Components > Segments
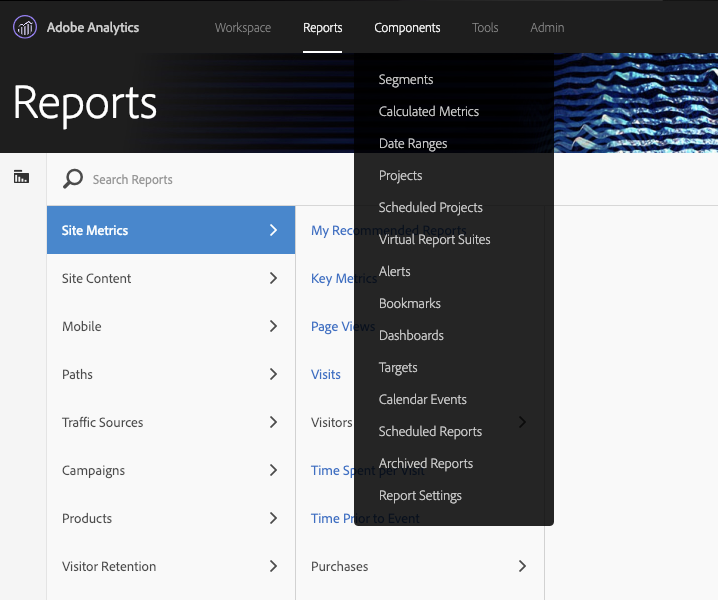
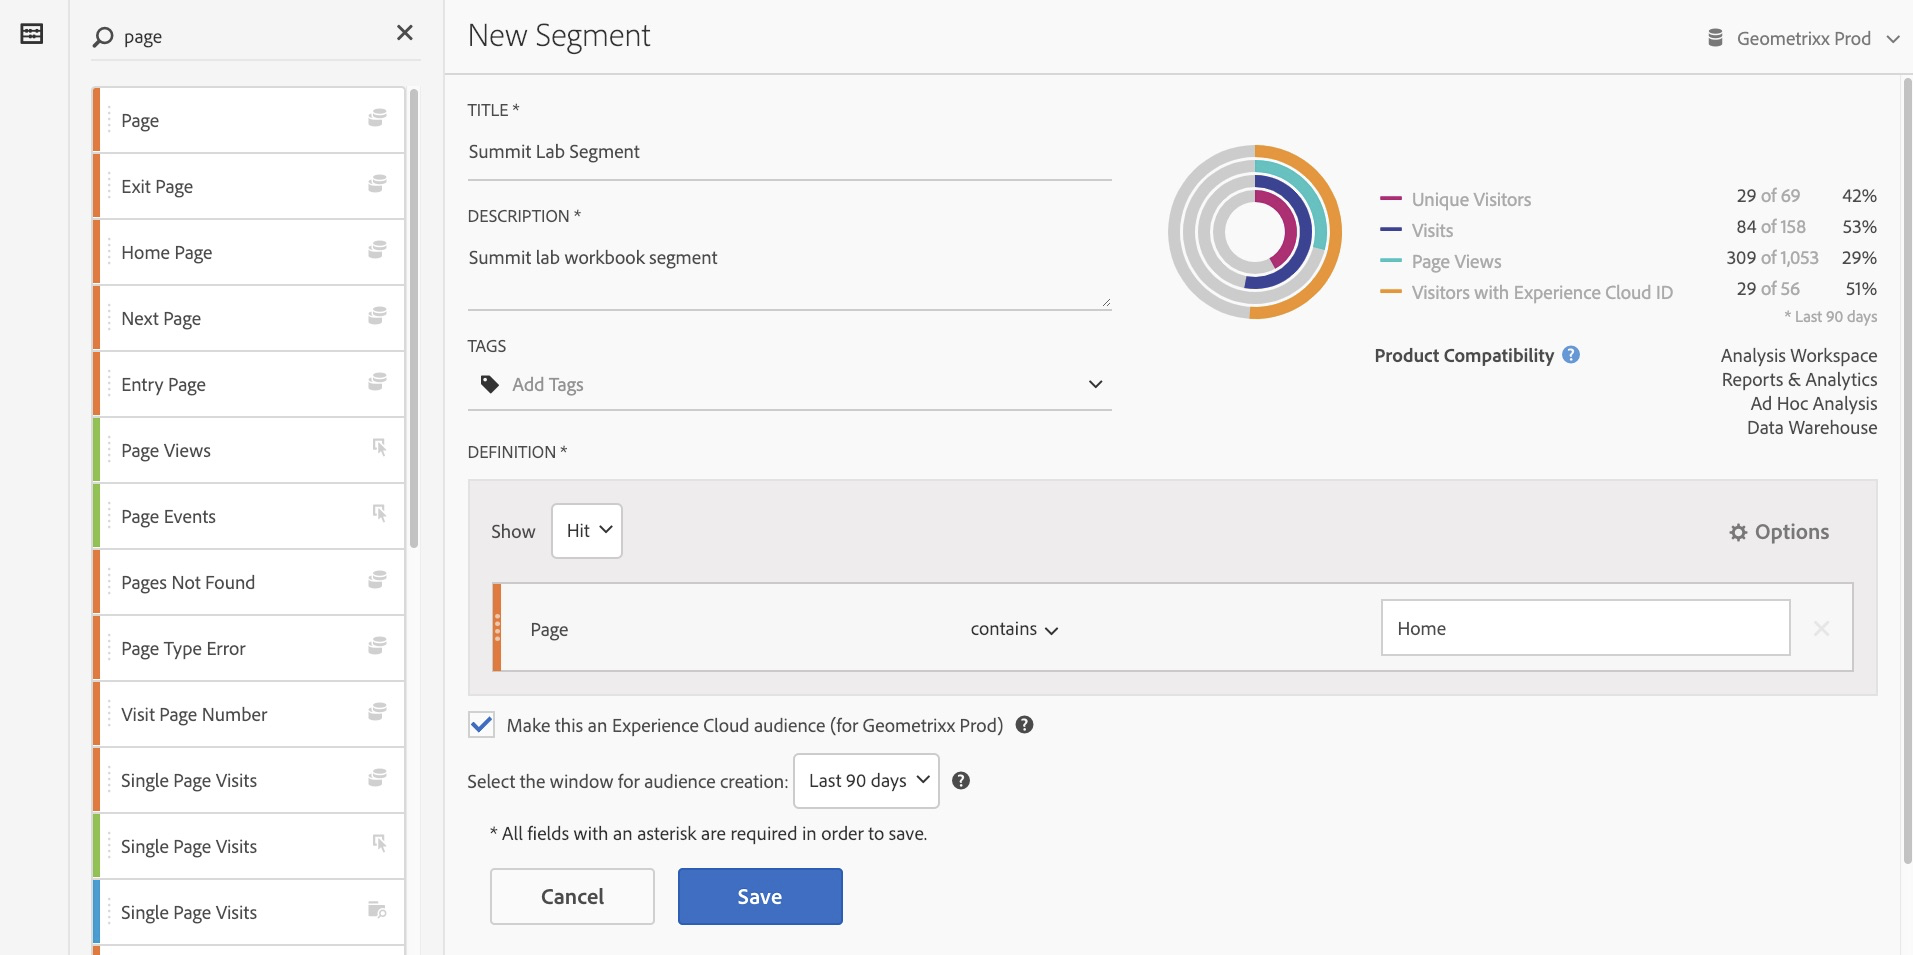
Click Create new segment
Create a segment where a visitor has visited the Home Page
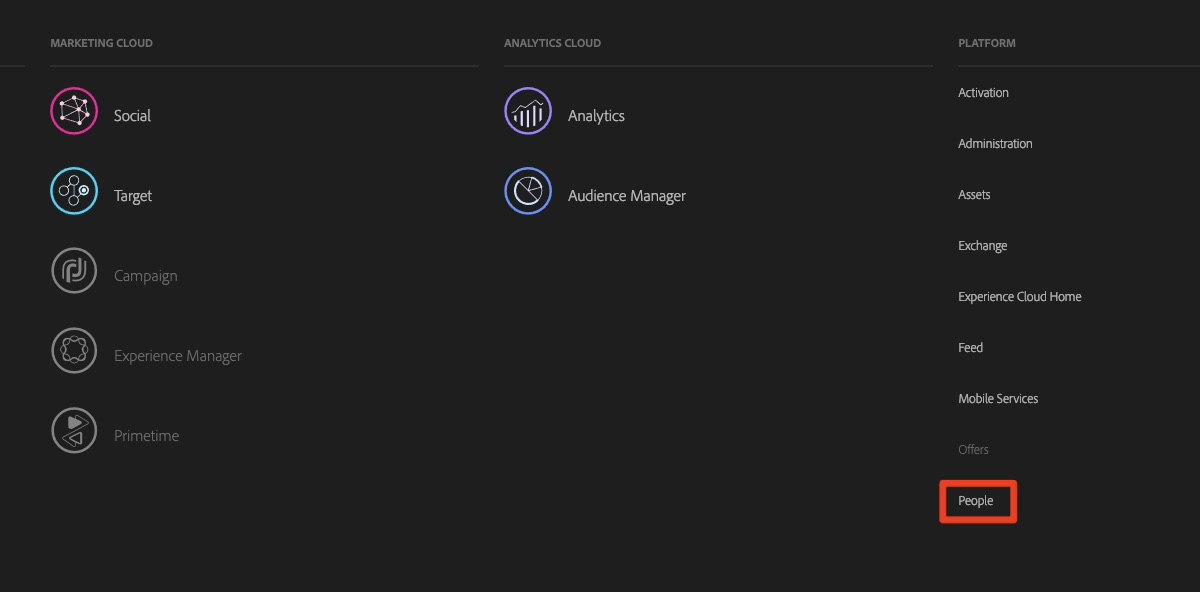
Click on the Solution Switcher Widget again
Select People
Find your Segment (you might need to search for it)
Click on the Solution Switcher Widget
Choose Target
Click on Target
Click on Audiences
Search for your Audience
Note: Your Analytics Audience is now available in Target
We have pre-empted some questions you may have and answered them here. We are also sharing URLs to resources you may find extremely helpful as you use Adobe Target.
Q. How long should I run a manual A/B activity?
A. It’s both an art and a science, but you can use sample size calculator to get guidance. You can also review “How long should you run an A/B Test” in the help documentation.
Q. What is difference between Auto-Allocate and Auto-Target?
A. Please check out this infographic. Note that Auto-Target is available only with Target Premium.
Q. Does Target allow me to run an activity on a single page only?
A. Not at all. Check out Template Rules to include many similar structured pages to the activity while still creating the experience on the single URL provided.
Q. I have a checkout flow. Can I test the entire funnel?
A. Try out the Multipage Activity feature that lets you create multiple pages within experiences. You can even use metric dependency to ensure that counting of visitors happens as per your expectations.
Q. I heard that Target does not support Single Page Apps. Is that true?
A. Target has supported SPAs since we launched at.js 1.0. However, the convenience of the VEC (VEC for SPA) when working with SPAs was added with our February 2019 release.
Q. Can Target Standard be used only for testing?
A. No. Target Standard can be used to personalize using an Experience Targeting activity. Experience Targeting is rule-based personalization that lets you target specific audiences by defining both the audience and the associated experience.
Q. But Target Standard is all about testing and targeting for only websites, right?
A. Not at all. You can use Target Standard (and Premium) for any surface, including mobile apps, kiosks, Alexa devices, screens, and more. You must use the Form-Based Experience Composer for these implementations. In some cases, you might need to use server-side integration.
Q. Can I use Target Standard for Mobile apps?
A. Yes, provided you purchase an additional SKU for Mobile. What’s more, we now have a VEC for mobile apps too.
Q. Server-side Integration? You have APIs too?
A. Yes, we do. We have public APIs exposed on Adobe I/O that you can use to perform multiple tasks. Our developer portal can guide you. You can use our Admin APIs to operate on activities, offers, audiences, and reports. You can use Delivery APIs to manage responses from Target. You can even use Profile APIs to manage user profiles. For more information, see Server Side: implement Target.
Q. How can I run test in a non-website scenario with the VEC?
A. You don’t use the VEC in such cases. The Form-Based Experience Composer can be used to run activities on any surface.
Q. Does Target Standard provide Enterprise Permissions capability?
A. No. You must upgrade to a Target Premium license for Enterprise Permissions.
Q. Does Target Standard work only with Adobe Analytics?
A. No. It can work with Google Analytics as well. However, such integrations end up being client-side integrations. The Analytics for Target (A4T) feature is a server-side integration and, hence, is more reliable.
Q. Can Adobe Target activity details be sent to Google analytics?
A. Yes. You can use response tokens to expose Target variables on client-side and then send these as part of your Google Analytics calls.
Q. Hmm. So, you have out-bound integrations. What about in-bound integrations?
A. Great Question! We have this capability too with the data provider functionality. You can pass in weather information, for example, to personalize experiences.
Q. Those are some neat advanced capabilities I was not aware of. Coming back to the Target VEC again. We get a message to load unsecured library every time we load website within the VEC.
A. Well, that’s not Target. That message is shown by your browser. Browsers don’t allow HTTP (unsecured) content to be loaded along with HTTPs (secured) content. Because the Adobe Experience Cloud is on HTTPs, whenever a site with an HTTP URL, or when site is making calls to HTTP resources, is attempted to load within the VEC, the browser gives this warning. Only an end-user can override this warning.
Q. Even then, I have heard that the VEC needs IP Whitelisting, some Proxy and external tools to open up some sites within the VEC. Is it true?
A. Well, that’s correct. Internal websites (not exposed to the internet) requires customers to whitelist our Proxy servers and then use the Enhanced Experience Composer. Similarly, if customer sites have advanced security policies such as X-Frames-Options or iframe busting code, then again, we request whitelisting of our Proxy Servers and/or request use of tools like Requestly. However, we have now launched the VEC Helper Extension, which automatically does what Requestly used to perform once rules were set by user. What’s more, you don’t need to enable the Enhanced Experience Composer either.
Q. Oh, an extension. Do you have any other useful extension?
A. Yes, we have the Adobe Debugger that can be super helpful to debug issues.
Q. This is wonderful. This is too much to chew in one day. I am wondering if I am not aware of all the learning resources. How can I get continuous knowledge?
A. We have tons of sources for you to learn and grow yourself and your optimization and personalization program. Some of the free learning resources are
Product Documentation (NOTE: We have recently moved our Product documentation from marketing.adobe.com to this new domain.)
Adobe Target Webinars
In-Product Tips and Coach marks
And then, we have paid learning courses and certification programs too. We also have Adobe Consulting Services that can manage your programs and/or get you started.
Q. How can learn what others have done to succeed in testing and personalization?
A. Please see customer success stories, which can give you some ideas of what is possible with Target and how others are taking advantage of Target to achieve their KPIs.
Q. What can I do in return for you? 🙂
A. You can complete the Lab Survey and give us the best rankings to make our lab the best lab 🙂. But, jokes aside, we would like honest feedback on Adobe Target via the Forum, CSMs, Customer Care, in-product surveys, or simply directly over email or F2F when you have something to share. We look at all these channels seriously and try to improve our product and services.
Print-friendly links to resources referred in FAQ section
Sample Size Calculator https://docs.adobe.com/content/target-microsite/testcalculator.html
How long should you run A/B Test: https://docs.adobe.com/content/help/en/target/using/activities/abtest/sample-size-determination.html
Adobe Target Automation Infographic: https://wwwimages2.adobe.com/content/dam/acom/en/marketing-cloud/target/pdf/54658.en.target.infographic.automation-sensei-update-2017-summit.pdf
Template Rules: https://docs.adobe.com/content/help/en/target/using/experiences/visual-experience-composer-vec/temtest.html
Multipage Activity: https://docs.adobe.com/content/help/en/target/using/experiences/visual-experience-composer-vec/multipage-activity.html
Metric Dependency: https://docs.adobe.com/content/help/en/target/using/activities/multivariate-test/create-mvt/goals-and-settings.html
VEC for SPA: https://docs.adobe.com/content/help/en/target/using/experiences/spa-visual-experience-composer.html
Experience Targeting: https://docs.adobe.com/content/help/en/target/using/activities/experience-targeting/experience-target.html
Form Based Experience Composer: https://docs.adobe.com/content/help/en/target/using/experiences/form-experience-composer.html
VEC for Mobile Apps: https://docs.adobe.com/help/en/target/using/implement-target/mobile-apps/composer/mobile-visual-experience-composer.html
Adobe Target’s Developer Portal: http://developers.adobetarget.com/
Server Side Integration: https://docs.adobe.com/content/help/en/target/using/implement-target/server-side-implement-target/api-and-sdk-overview.html
Enterprise Permissions: https://docs.adobe.com/content/help/en/target/using/administer/manage-users/enterprise/property-channel.html
Analytics for Target (A4T): https://docs.adobe.com/content/help/en/target/using/integrate/a4t/a4t.html and https://spark.adobe.com/page/Lo3Spm4oBOvwF/
Response Tokens: https://docs.adobe.com/content/help/en/target/using/administer/response-tokens.html
VEC Helper Extension: https://docs.adobe.com/content/help/en/target/using/experiences/visual-experience-composer-vec/troubleshoot-composer/vec-helper-browser-extension.html
Adobe Debugger: https://marketing.adobe.com/resources/help/en_US/experience-cloud-debugger/
Product Documentation - https://docs.adobe.com/content/help/en/target/using/target-home.html.
Personalization Thursdays Recordings - https://landing.adobe.com/acs/2018/na/adobe-target/personalization-thursdays-registration.html
Target Basics Recordings - https://landing.adobe.com/acs/2018/na/adobe-target/registration.html
Monthly Newsletter - https://www.adobe.com/subscription/adobe_target_newsletter.html
YouTube Channel - https://www.youtube.com/channel/UC75Ir2u14wz-0IKWH-RkWAA
Experience League - https://landing.adobe.com/experience-league/
Experience Makers - https://www.youtube.com/playlist?list=PL--Krn5r55ZZ7mvOWrqvpZ7B0-v9UlC3i
Learning Courses and Certification: https://www.adobe.com/training.html
Adobe Consulting Services: https://www.adobe.com/in/experience-cloud/service-support/consulting-services.html
Target Customer Success Stories: https://www.adobe.com/in/marketing/target/customer-stories.html
Target Forum: https://forums.adobe.com/community/experience-cloud/marketing-cloud/target