Work smarter, not harder, with Adobe Sensei powered services in AEM
Table of Contents
Lab Overview
Welcome to the lab Work smarter, not harder, with Adobe Sensei powered services in AEM. In this Lab, we will look at how Adobe Sensei services in AEM can help you search for, and discover relevant assets as well as improve efficiencies for content authors.
We will also learn how to configure the required Sensei services in AEM.
Key Takeaways
- Learn how to configure Smart Content Services in AEM.
- Learn how to use Smart Tags & Enhanced Smart Tags.
- Learn how to configure Dynamic Media in AEM.
- Learn how to use Smart Crop and Smart Swatch.
Prerequisites
As a Summit Lab attendee, all required services have been provisioned. If you are using this workbook outside of the Summit lab, you will require the following:
- Adobe Experience Manager 6.5 Author
- Adobe Experience Cloud with Smart Content Services Provisioned
- AEM Dynamic Media provisioned
Lab Credentials
Lesson 0 - Setup & Configuration
Objective
- Review Smart Content Services configuration.
- Review AEM Dynamic Media - Scene 7 mode configuration.
Lesson Context
Using Adobe Sensei services in AEM requires configuring your provisioned Adobe Experience Cloud services in AEM. This lesson walks through the configuration steps.
- Note: Provisioning of Smart Content & Dynamic Media services in the Adobe Experience Cloud is not covered in this lab.
Exercise 0.1
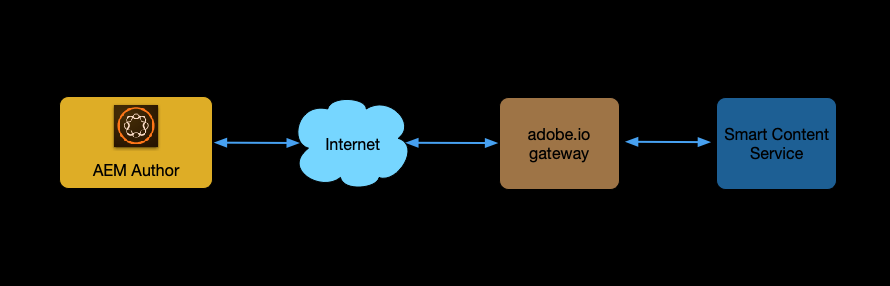
Smart Content Services Architecture
Step 1: Open the Chrome Browser and navigate to http://localhost:4502, or click the bookmark titled AEM Author.
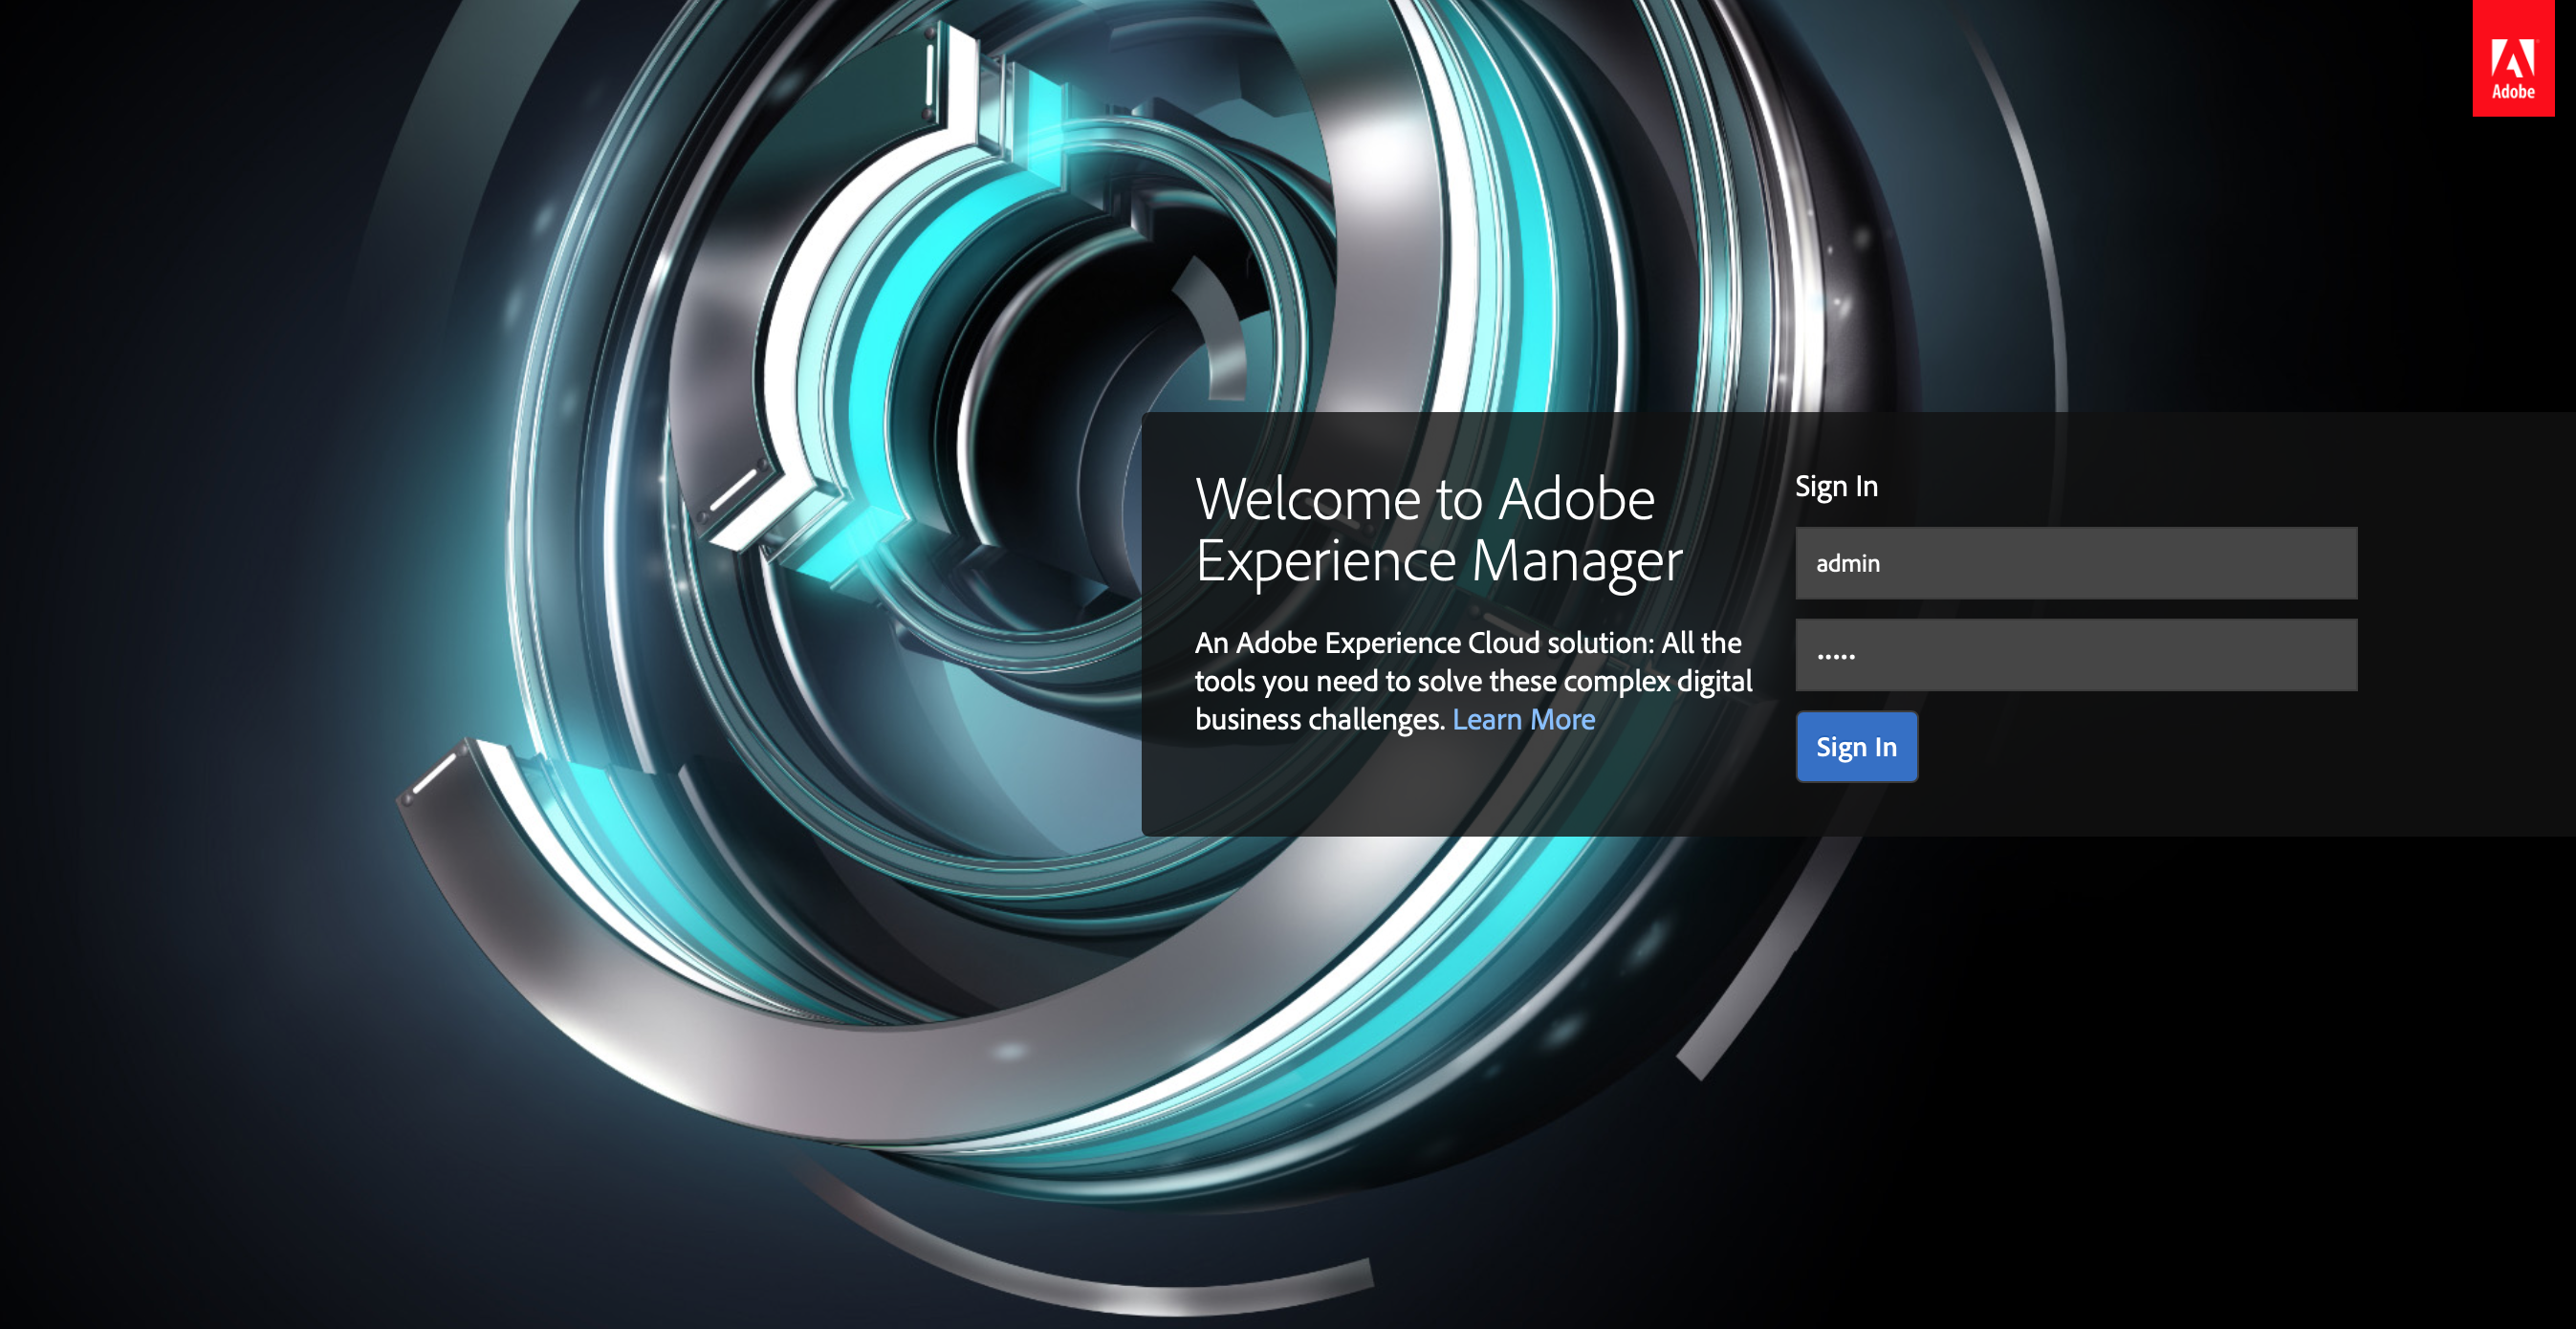
On this page, login with the credentials:
- username: admin
- password: admin
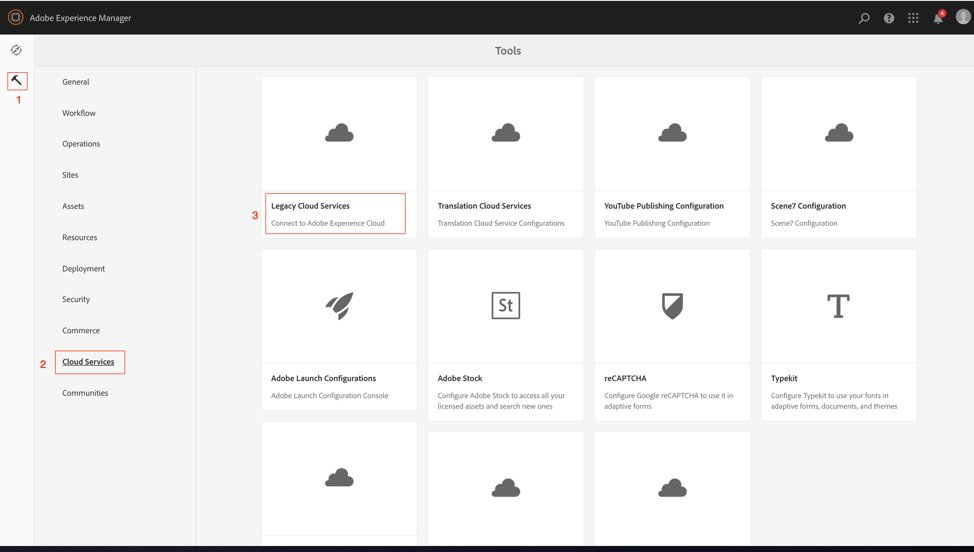
Step 2: Navigate to Legacy Cloud Services by clicking on the AEM logo > tools (hammer icon) > Cloud Services > Legacy Cloud Services.
Step 3: Locate Assets Smart Tags and click on Show Configurations, then L741(Assets Smart Tags).
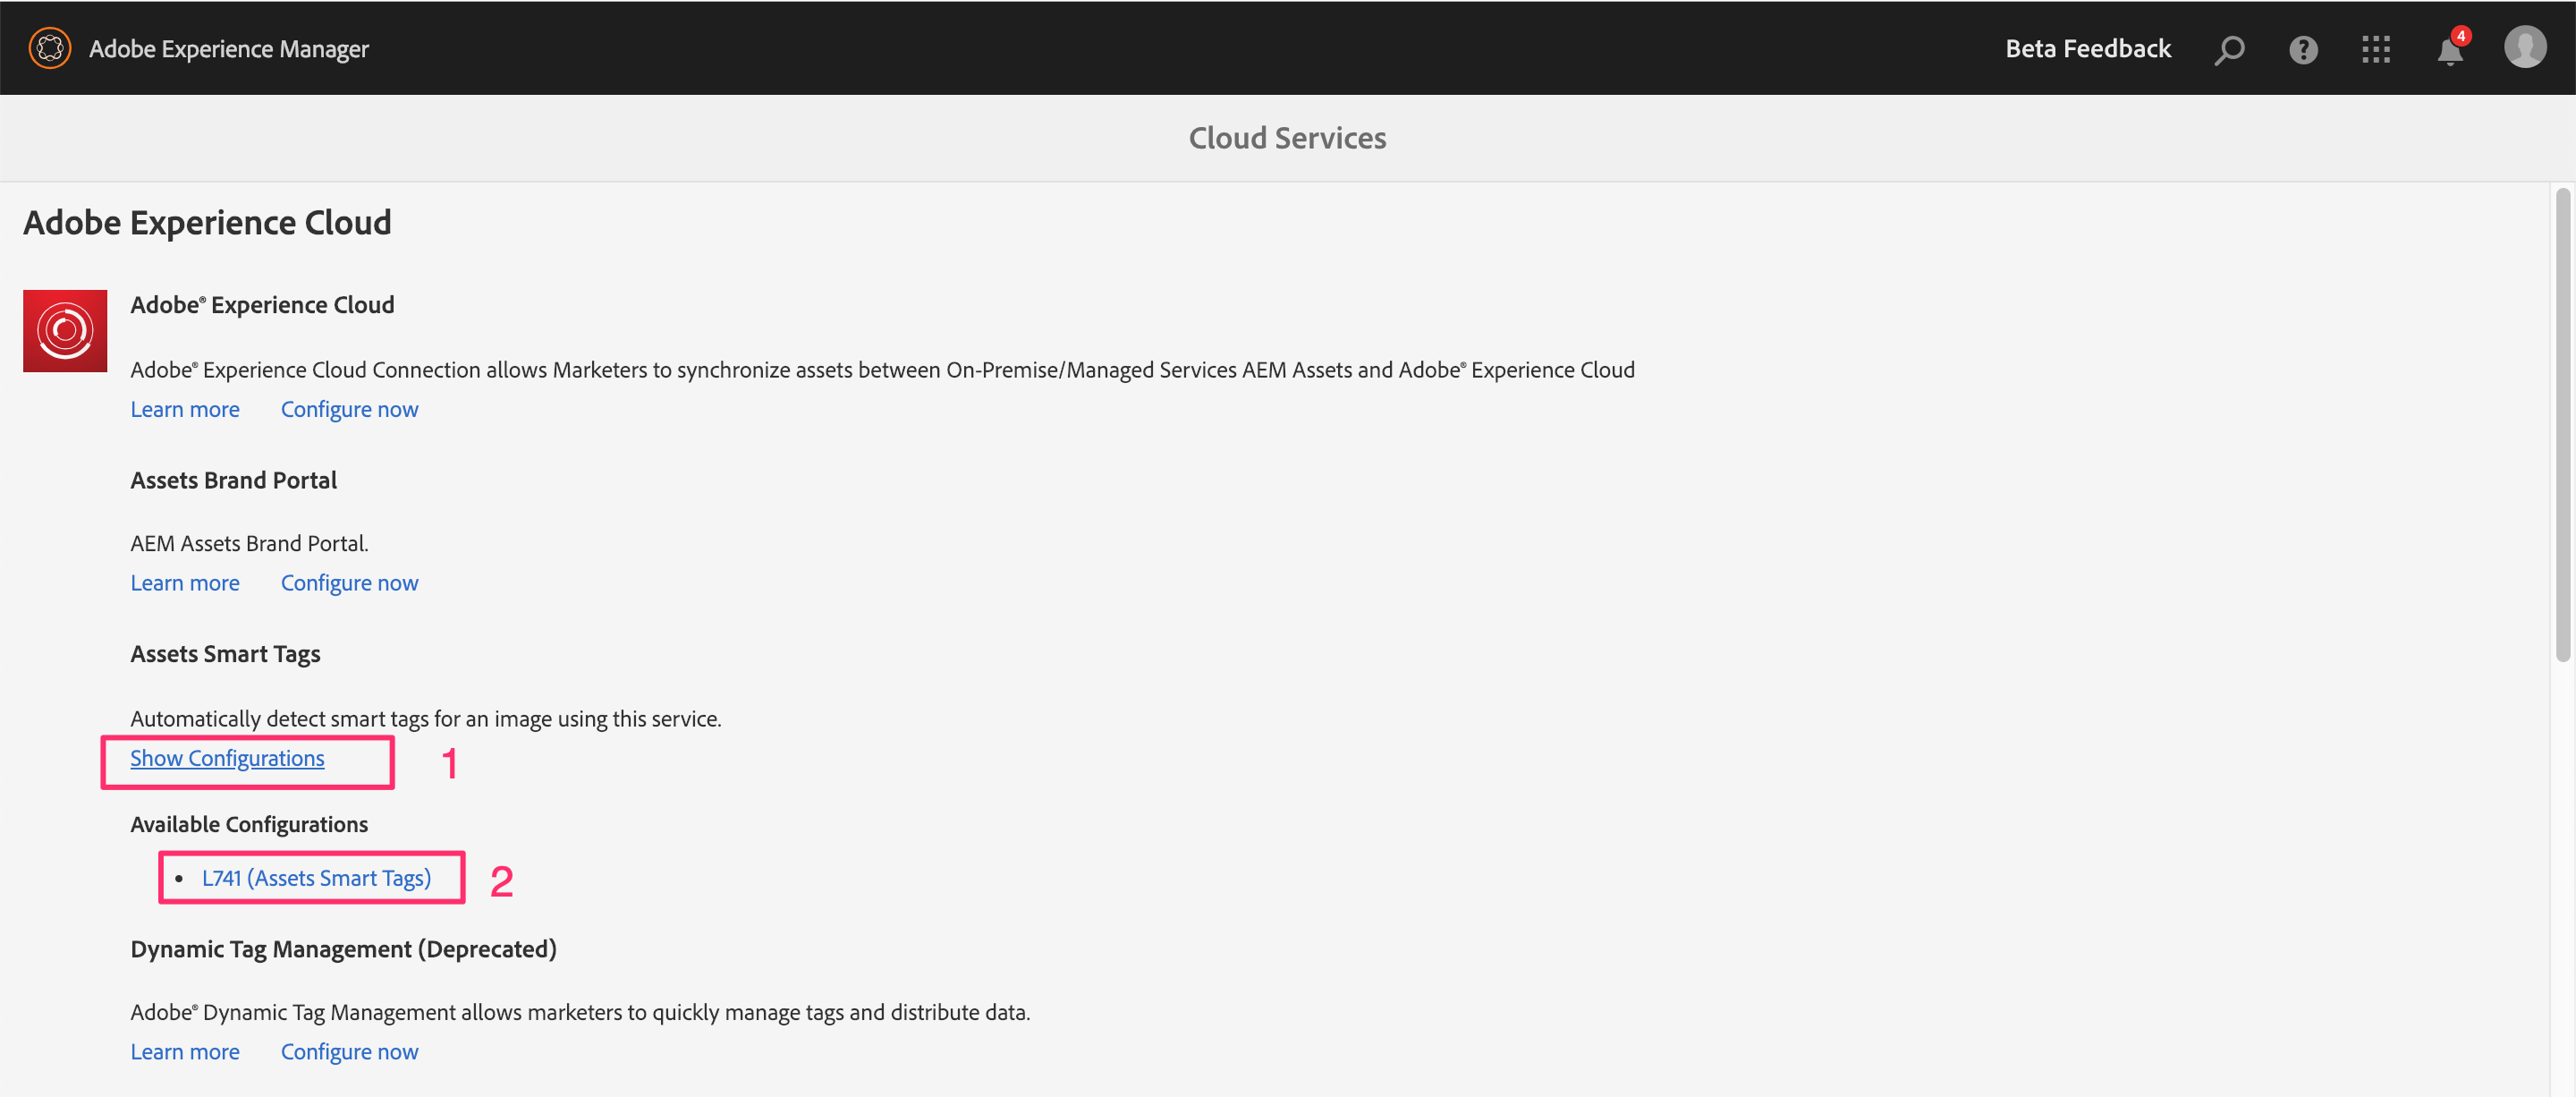
Step 4: Review the configurations for the Smart Tags cloud service.
Do not modify these configurations
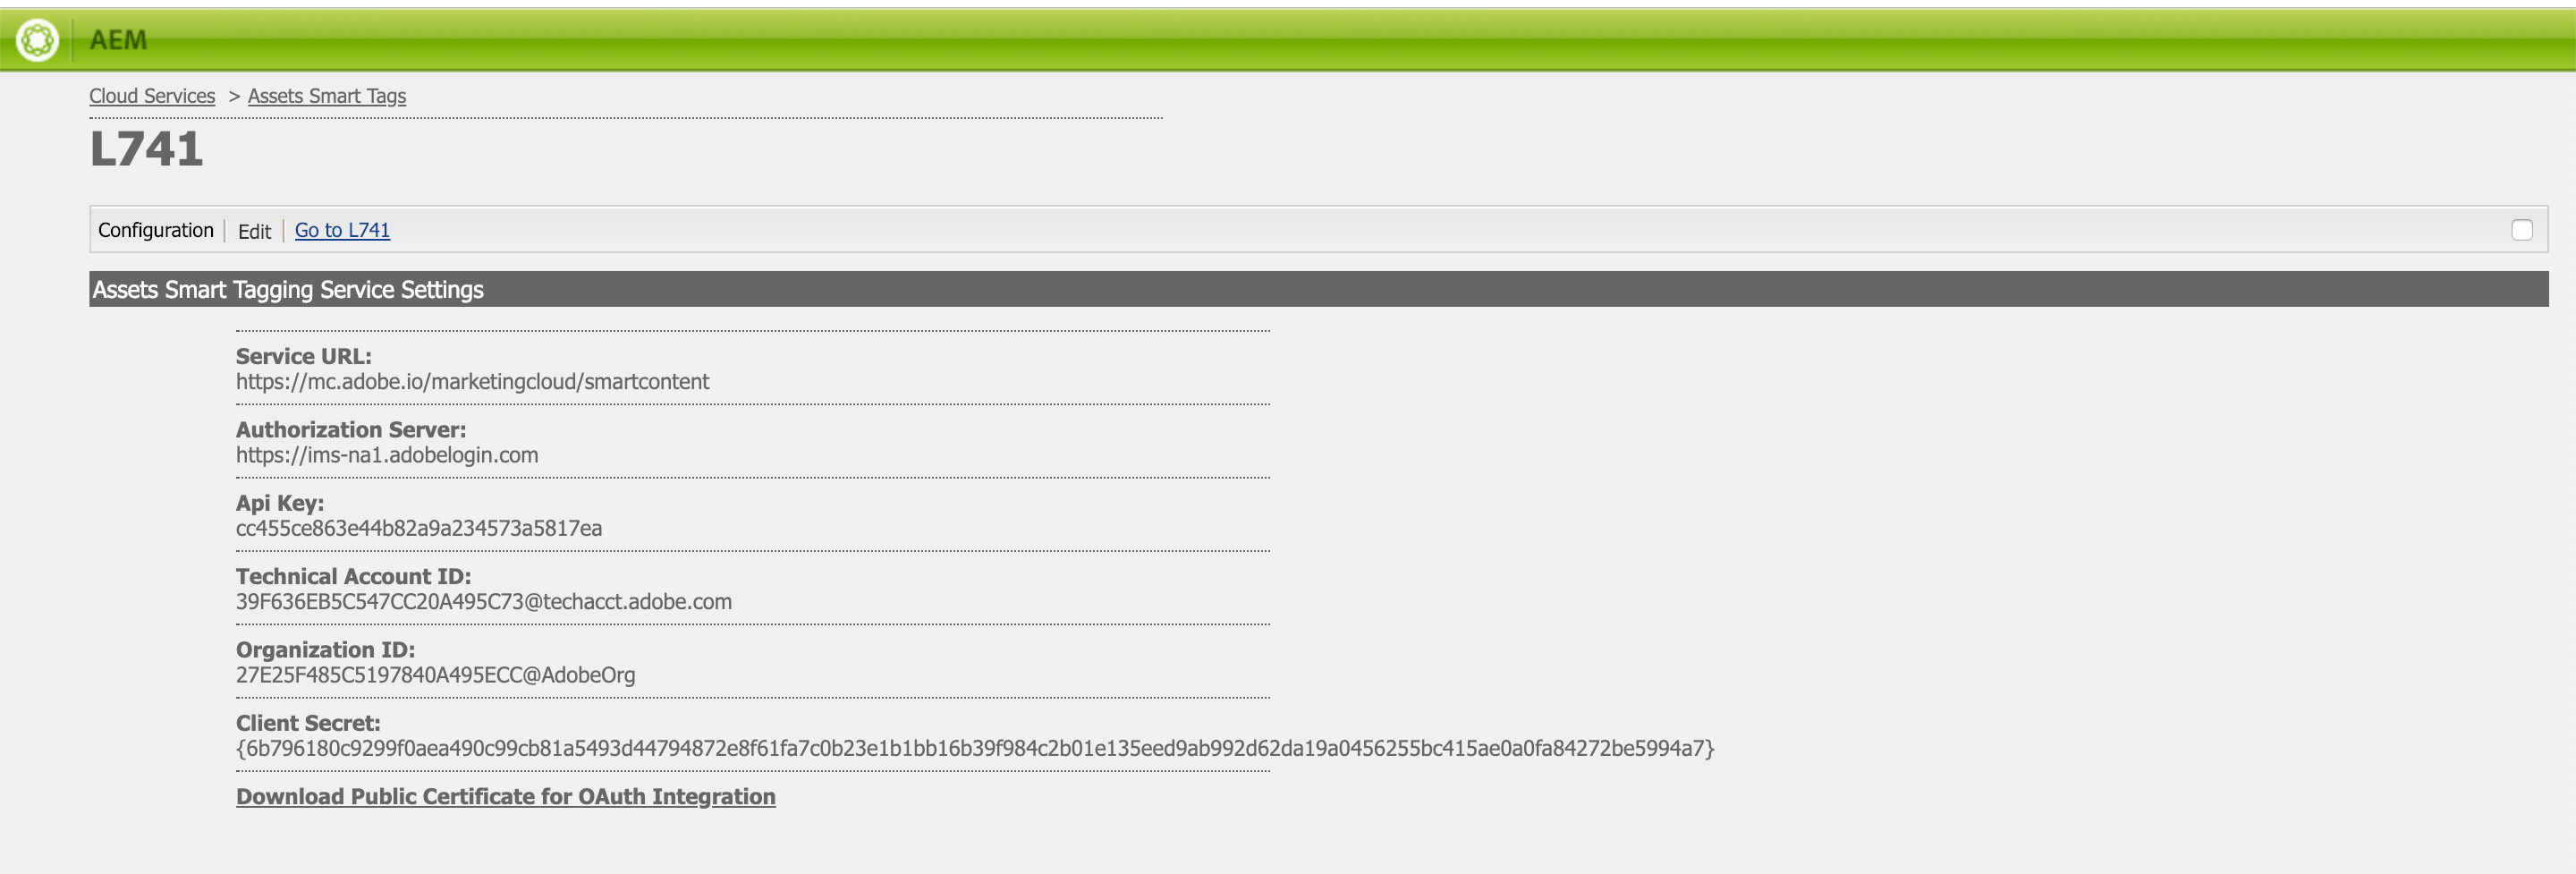
Service URL: Default valueAuthorization Server: Default valueApi Keys: Retrieved from Adobe I/O integrationTechnical Account ID: Retrieved from Adobe I/O integrationOrganization ID: Retrieved from Adobe I/O integrationClient Secret: Retrieved from Adobe I/O integrationPublic Certificate: To be added to Adobe I/O integration
Click on the browser bookmark AEM Author to return to the AEM start screen.
Step 4: Review Smart Tagging step in workflow.
- Open Global Navigation by clicking on AEM logo on upper left corner of the screen
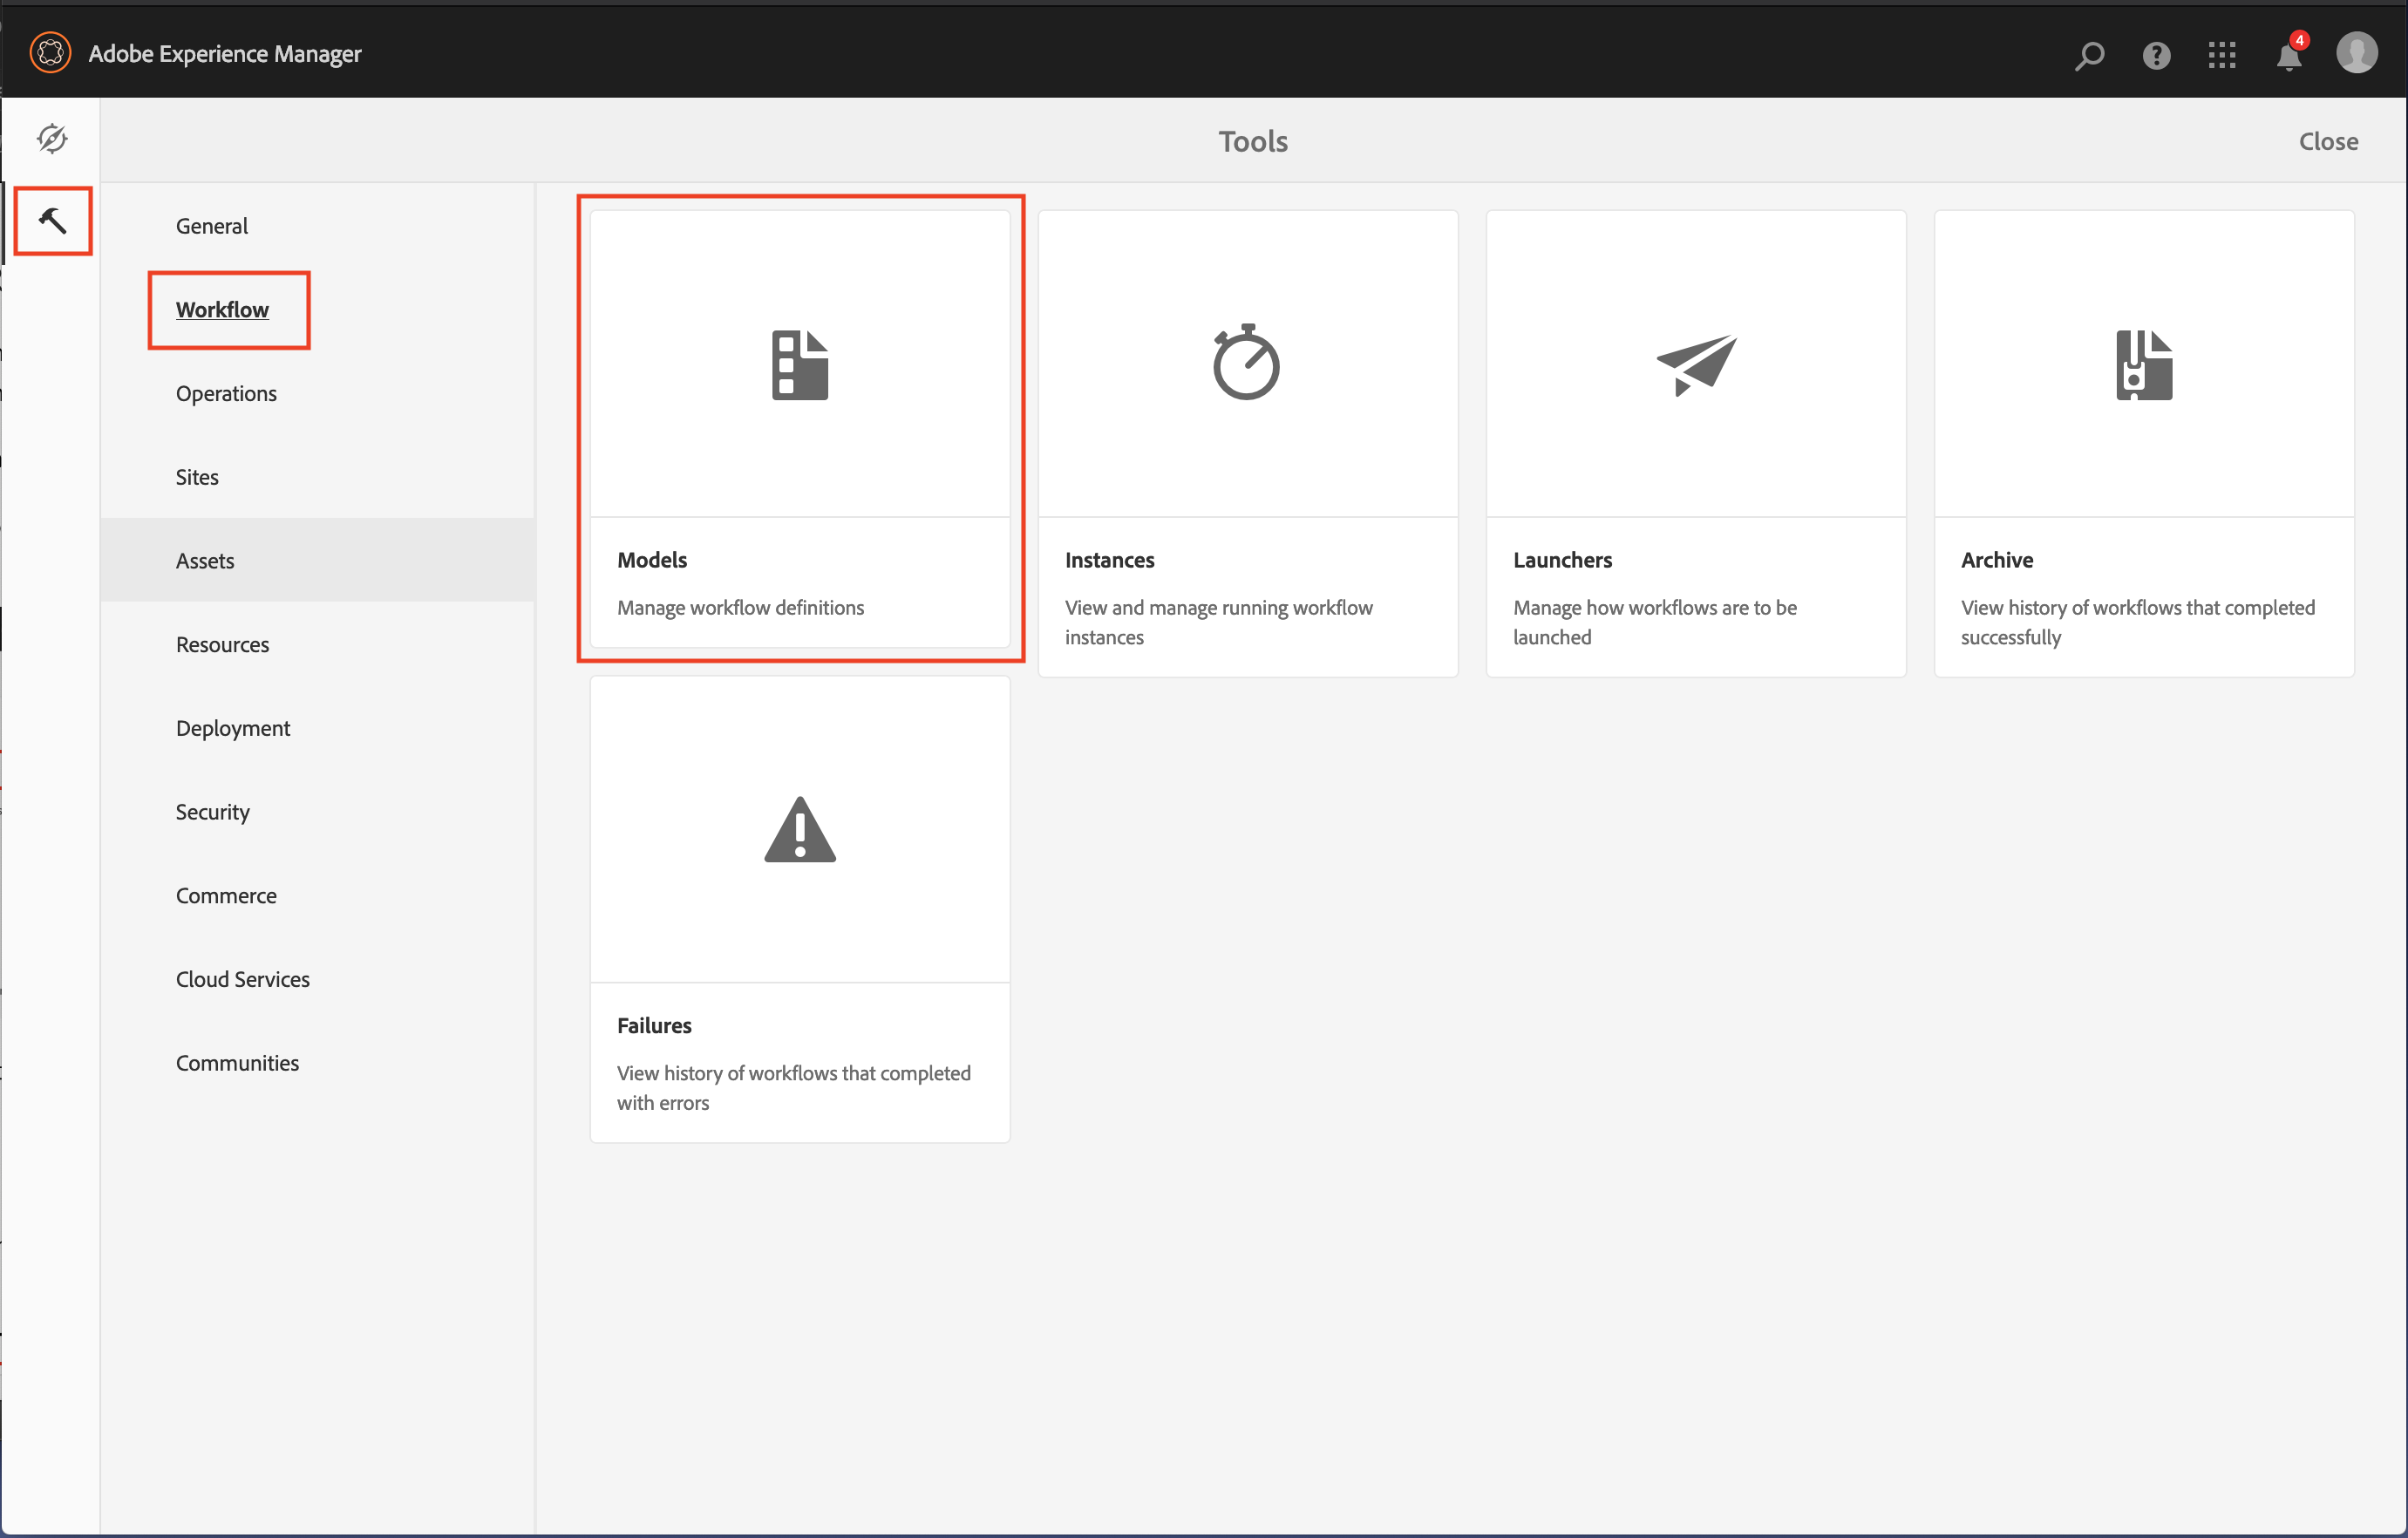
- Select Tools then select Workflow to open workflow related cards
- Navigate to the Models card to open Workflow Models listing in AEM
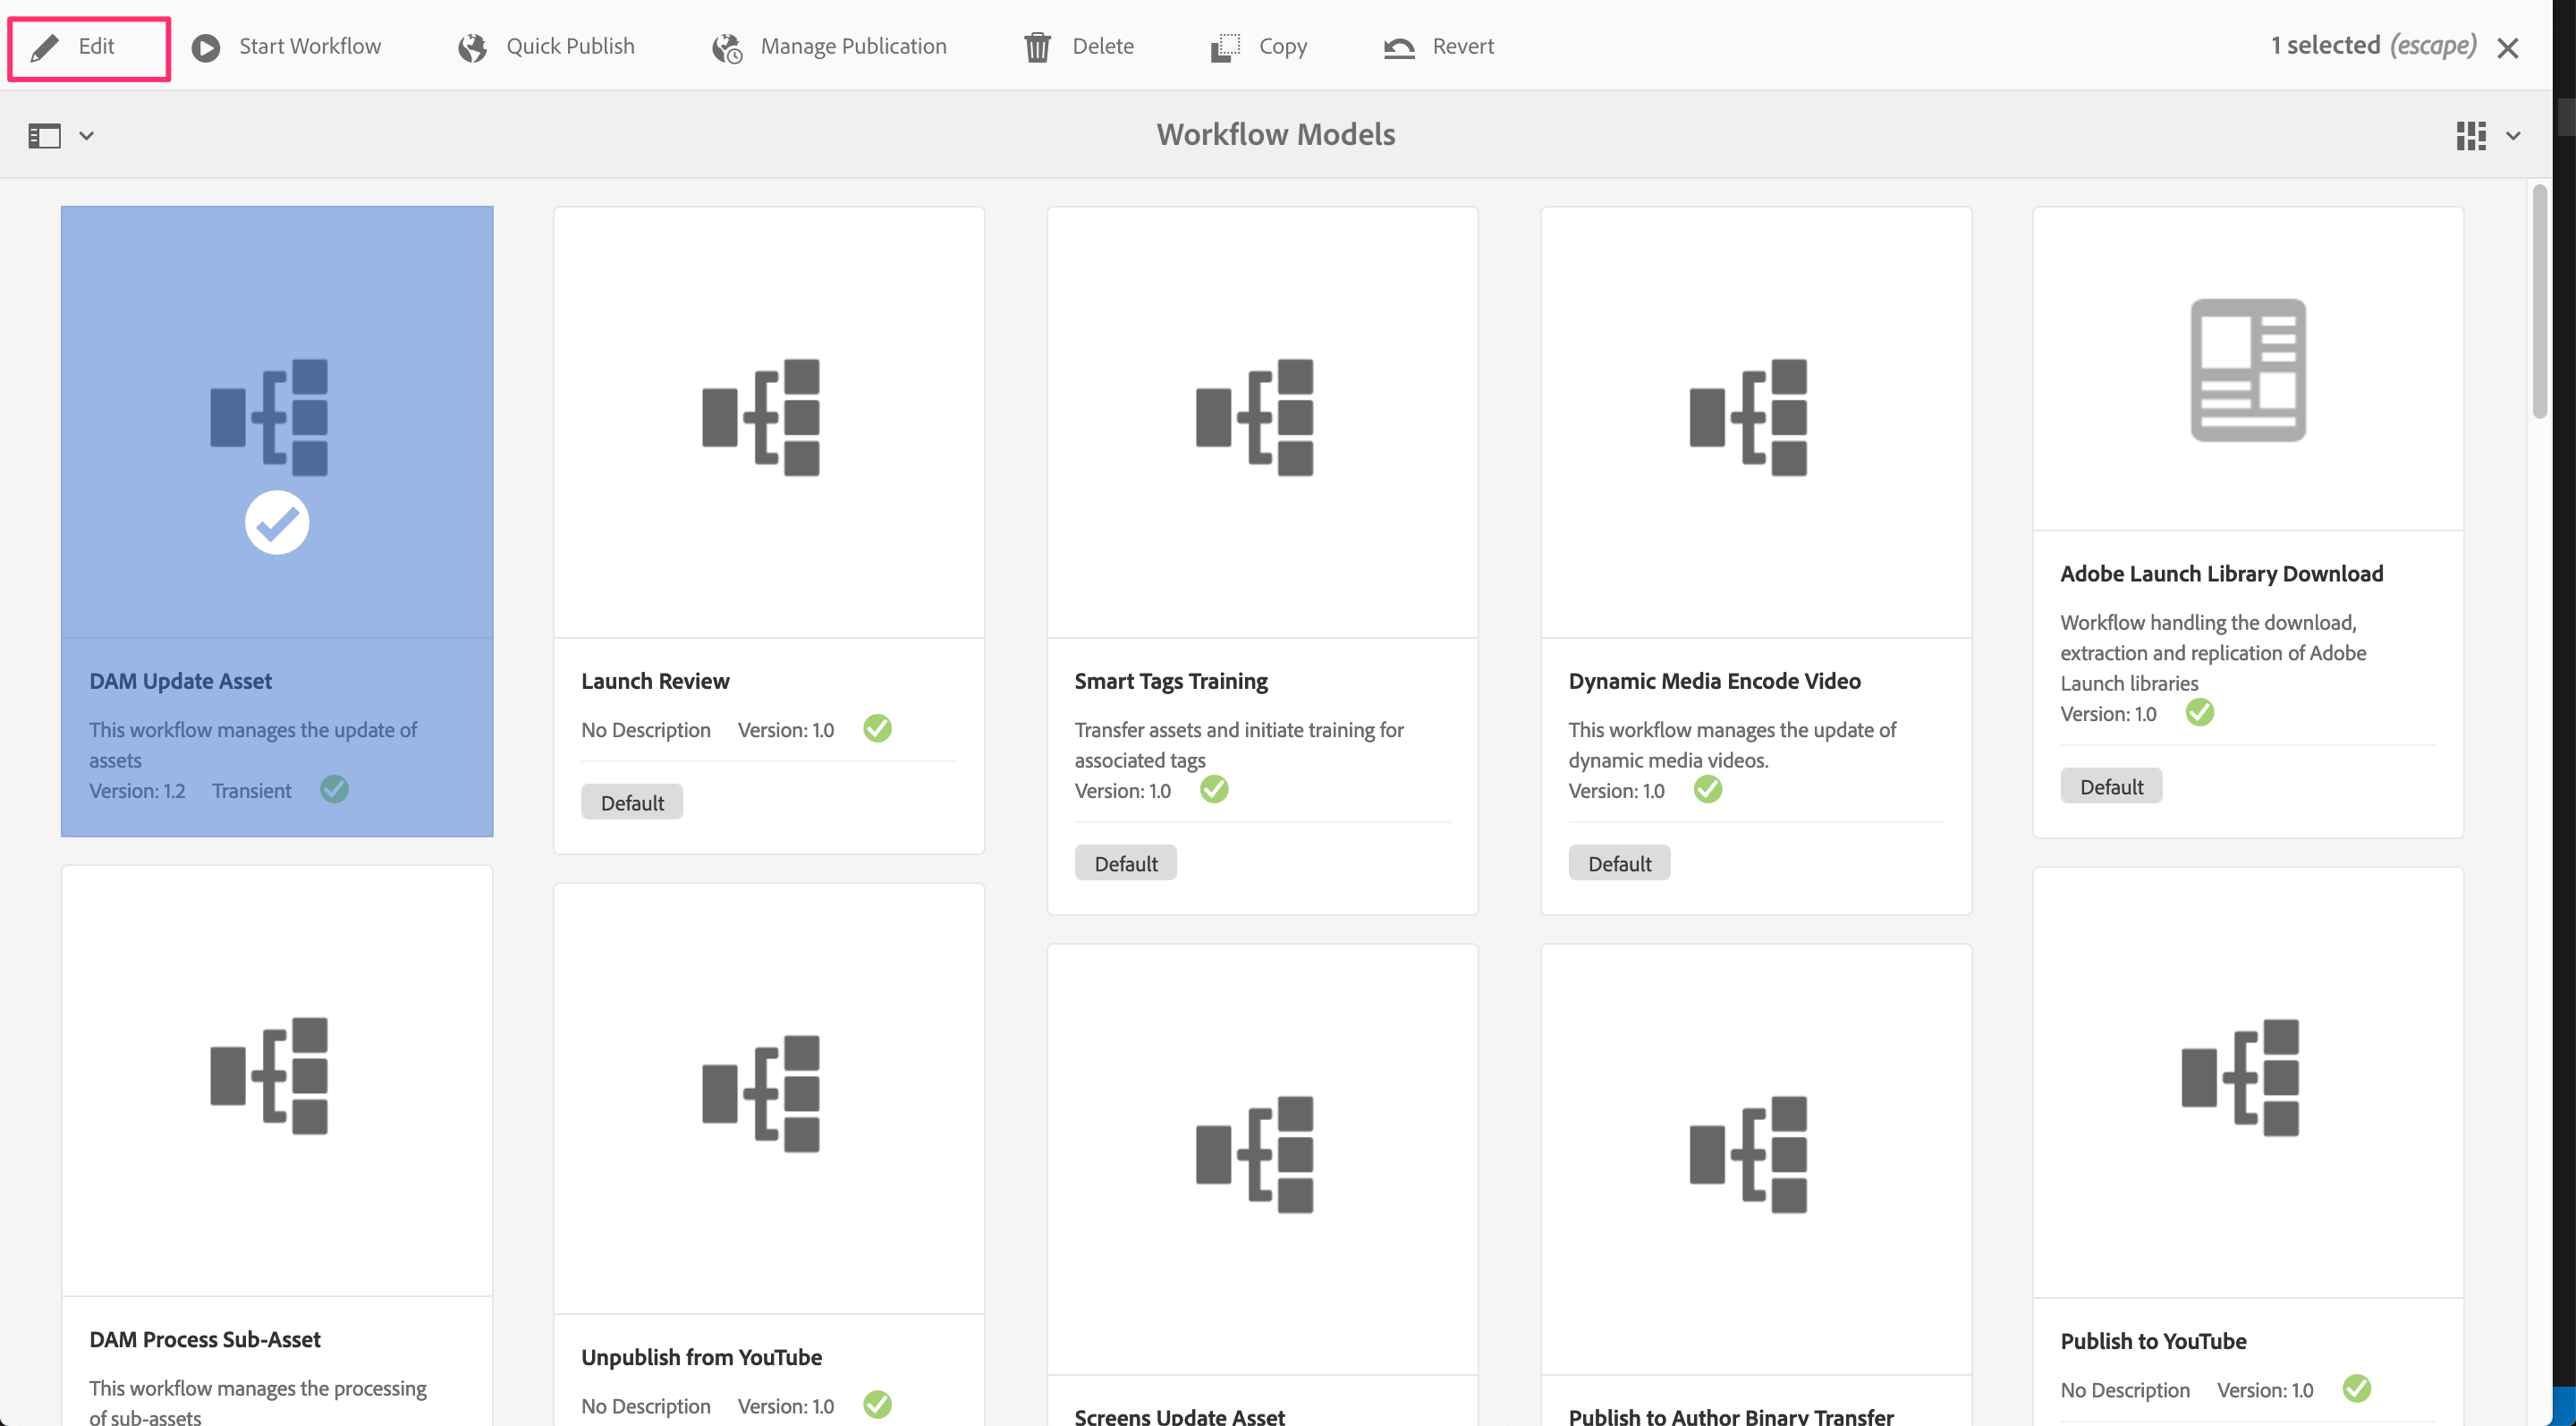
- Look for DAM Update Asset in workflow models
- Select the workflow by click on checkbox
- Click on Edit items in top toolbar
- Select the Smart Tag Assets Process step and click on the wrench icon to review its settings

Exercise 0.2
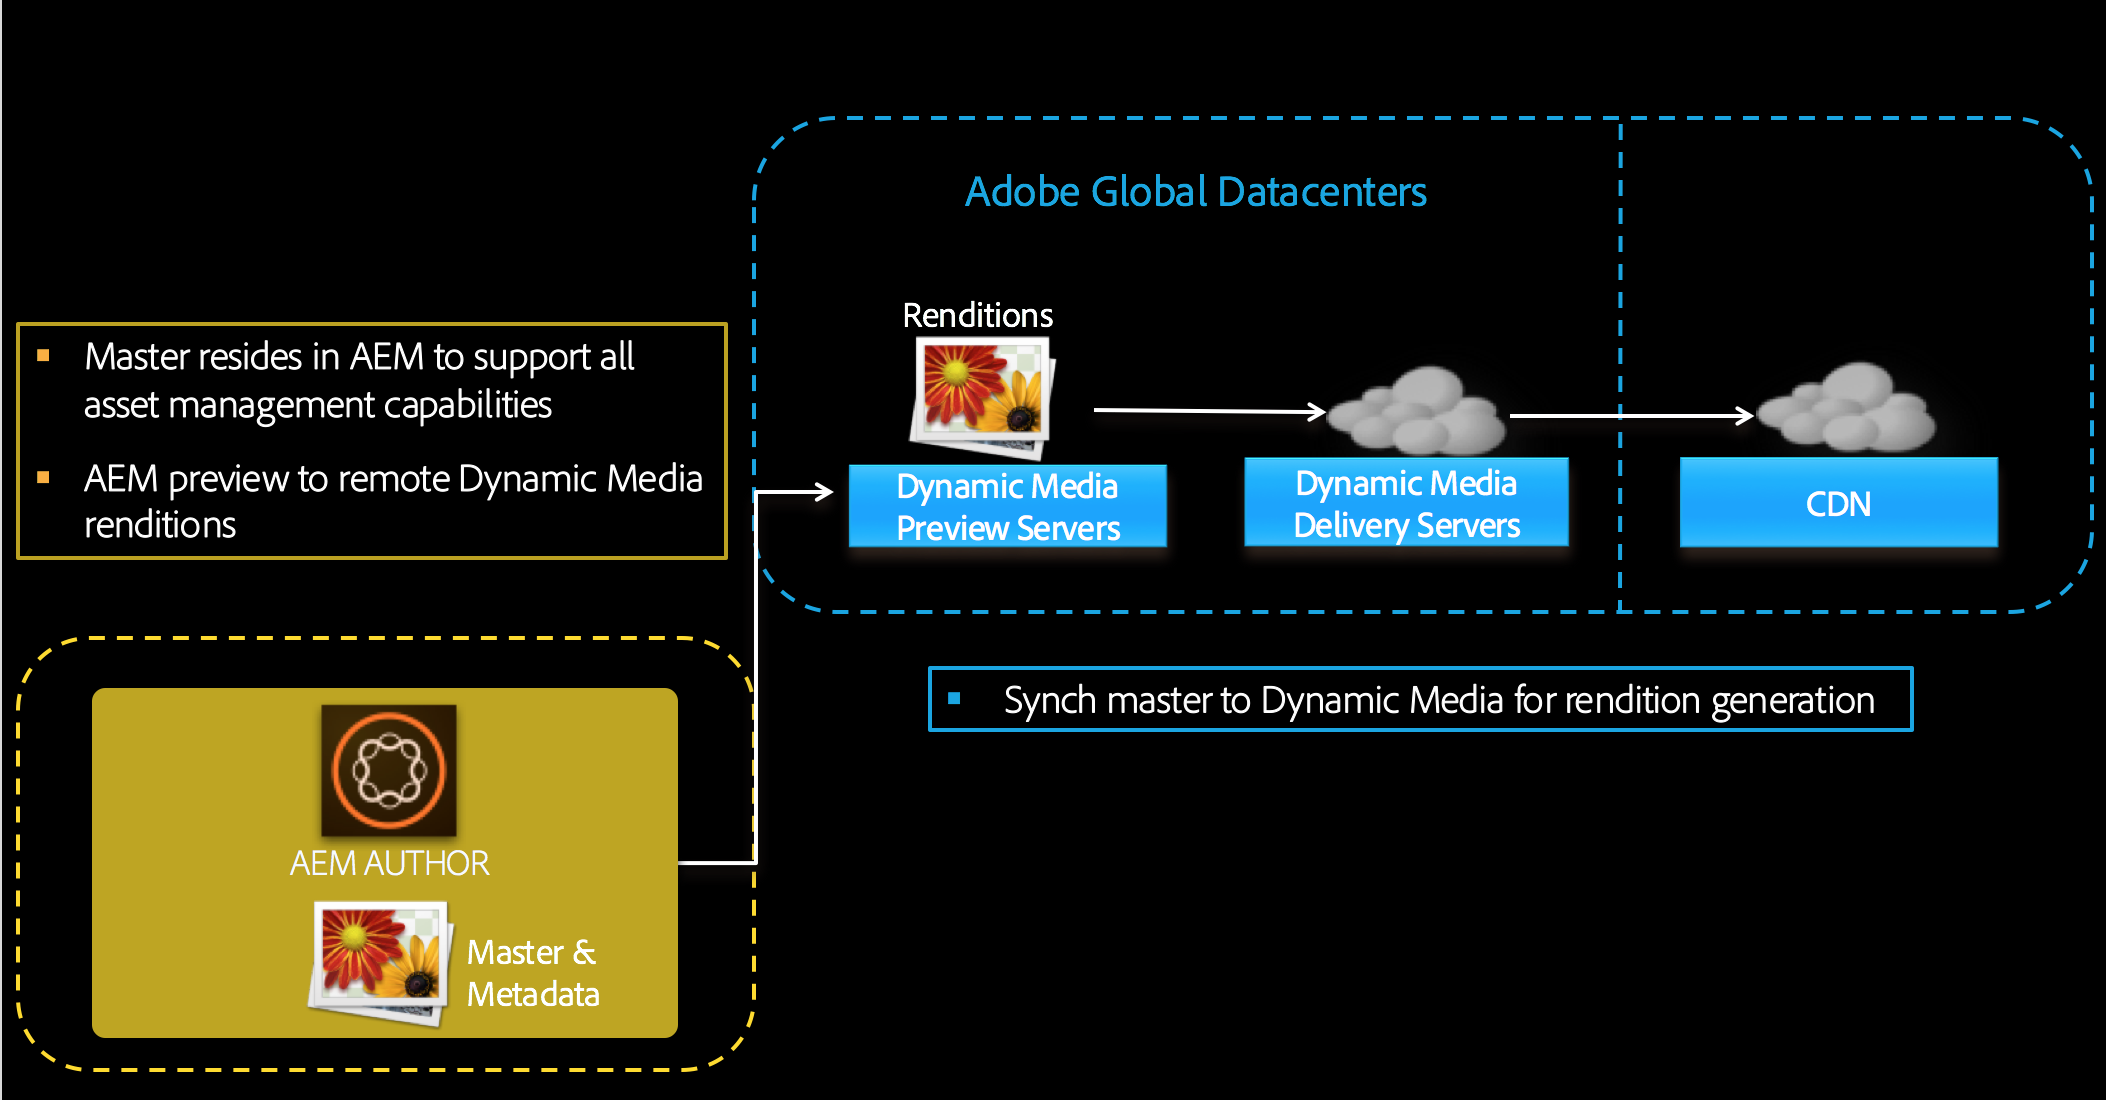
Dynamic Media Architecture
AEM must be started in dynamicmedia_scene7 runmode to proceed. This has already been done in your lab instance. If you are using this workbook outside the context of this lab, you can enable the appropriate runmodes from the command line by entering the following command:-
java -Xms4096m -Xmx4096m -Doak.queryLimitInMemory=500000 -Doak.queryLimitReads=500000 -jar cq-quickstart-6.5.0.jar -gui -r author,dynamicmedia_scene7 -p 4502
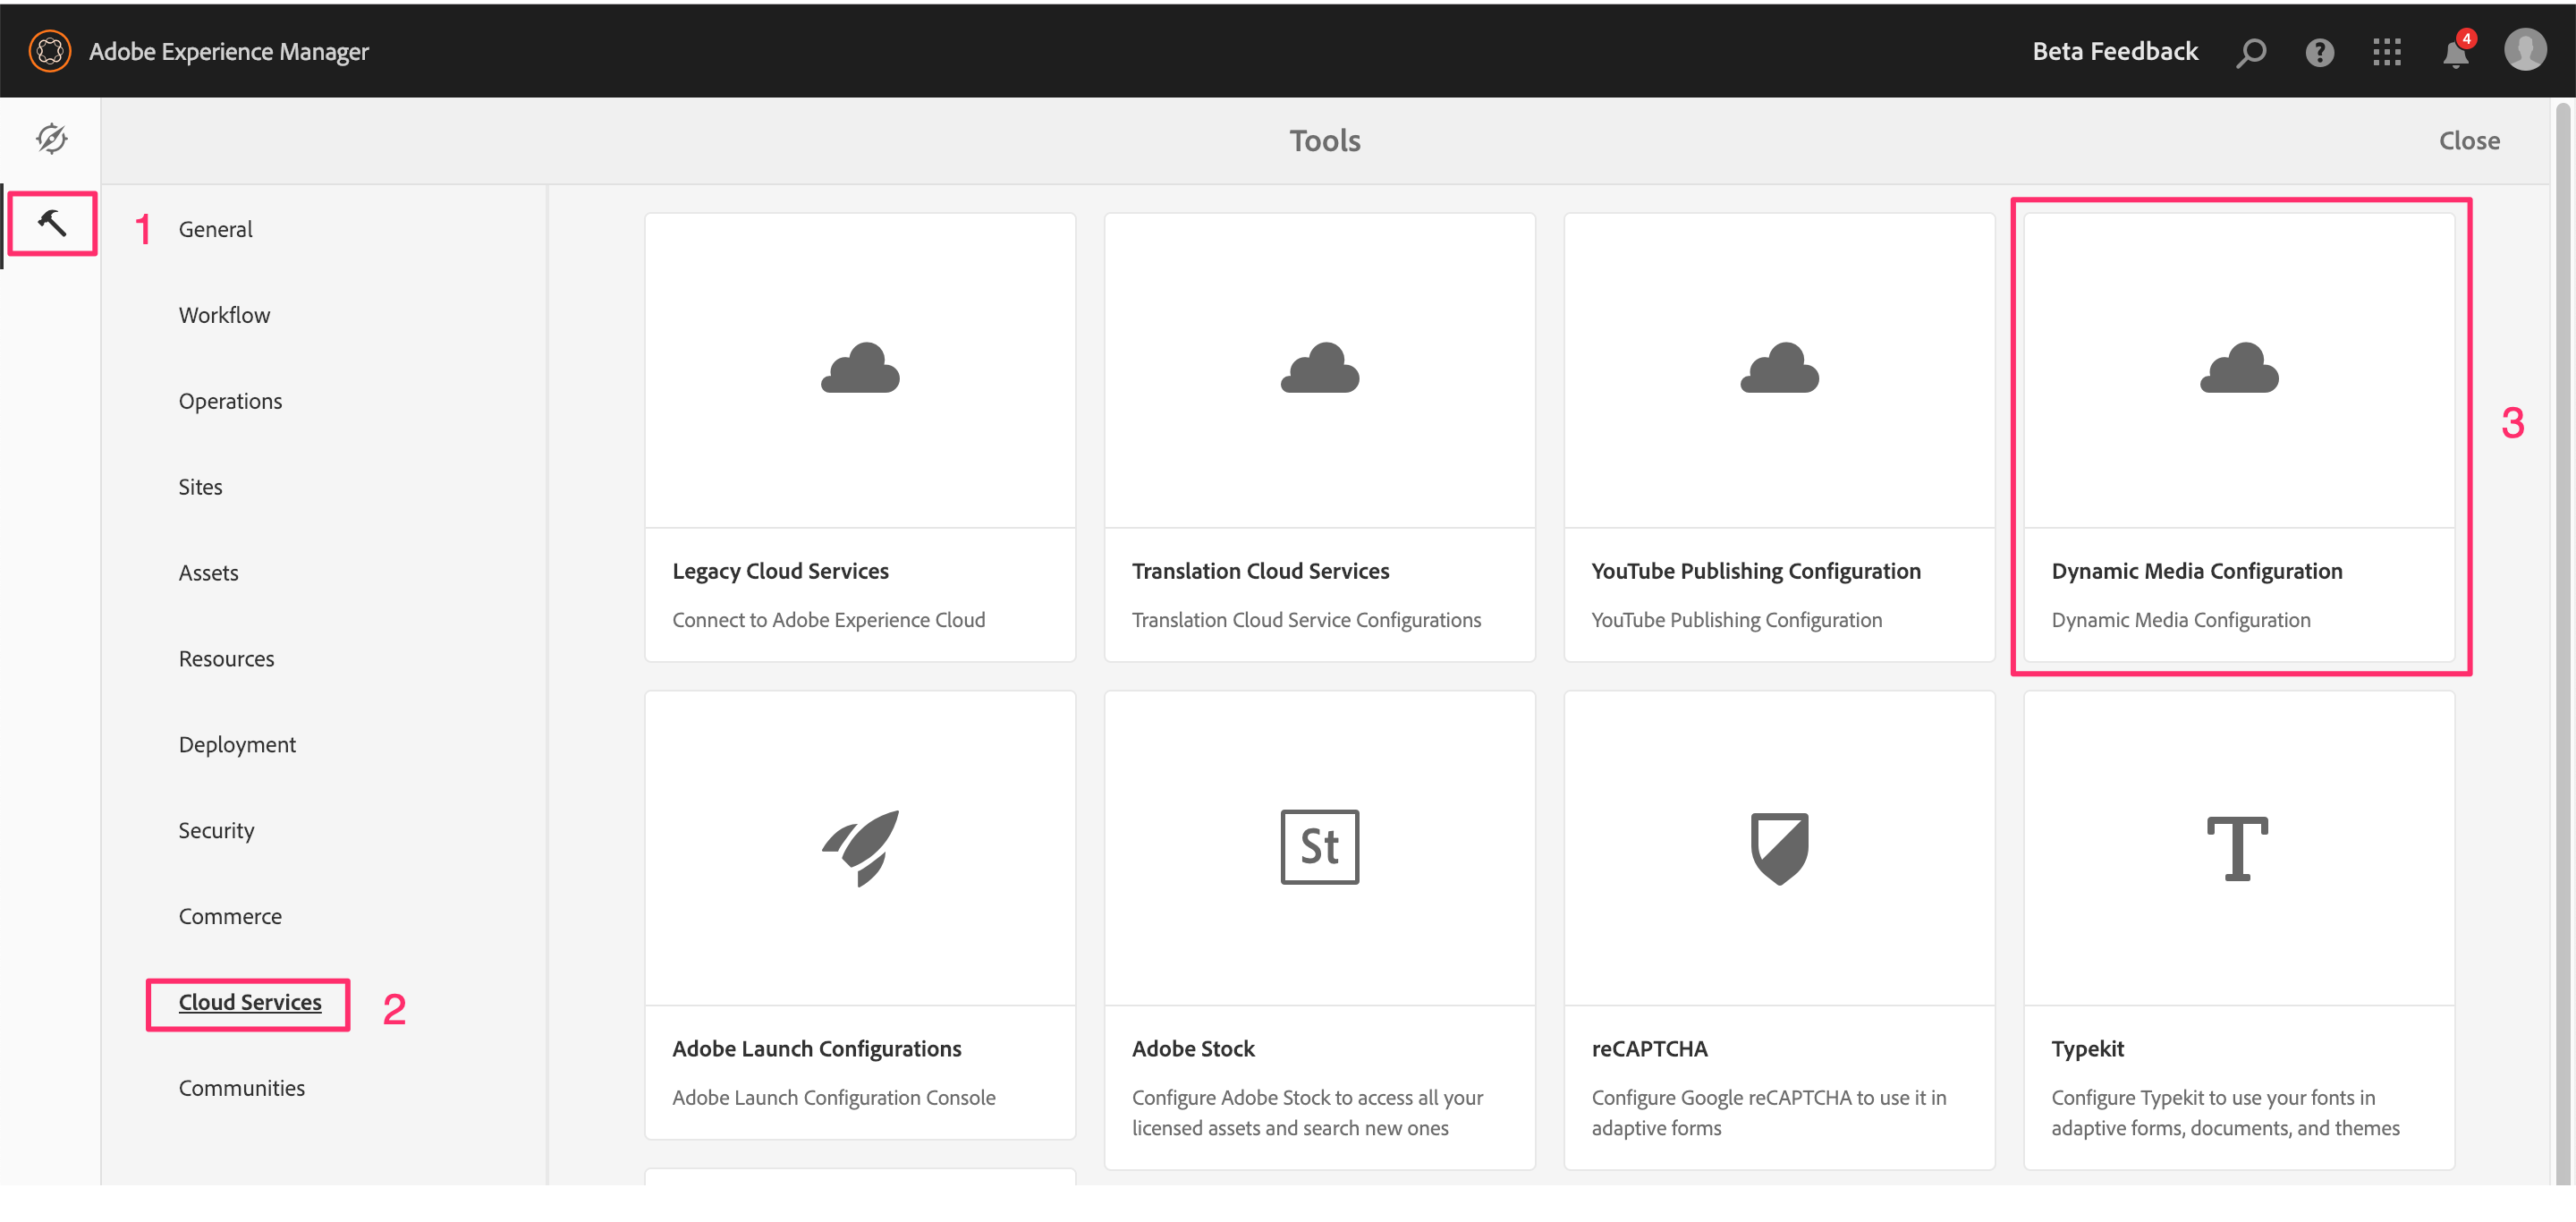
Step 1: Navigate to Dynamic Media Configuration by clicking on the AEM logo > tools (hammer icon) > Cloud Services > Dynamic Media Configuration.
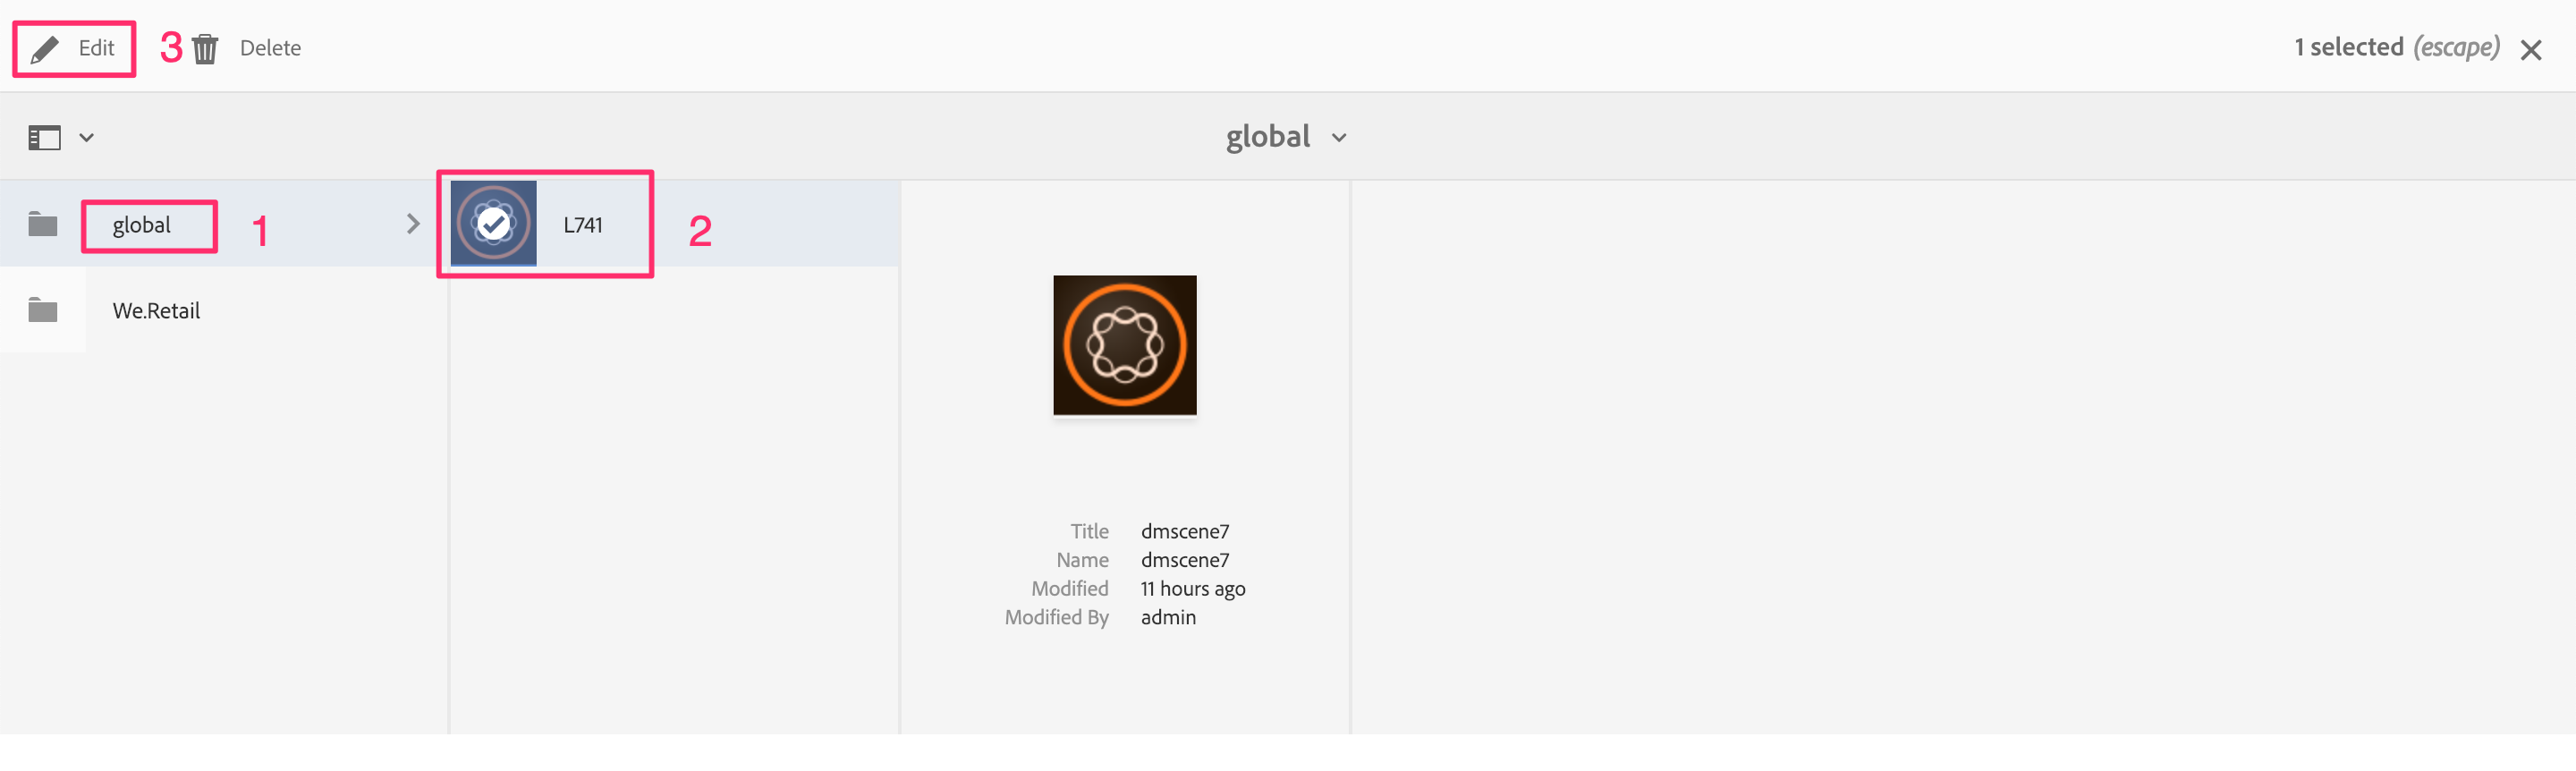
Step 2: Navigate to global (click on the text, not on the folder) > L741 > Edit.
Step 3: Review the configurations for the Dynamic Media cloud service.
Do not modify these configurations.
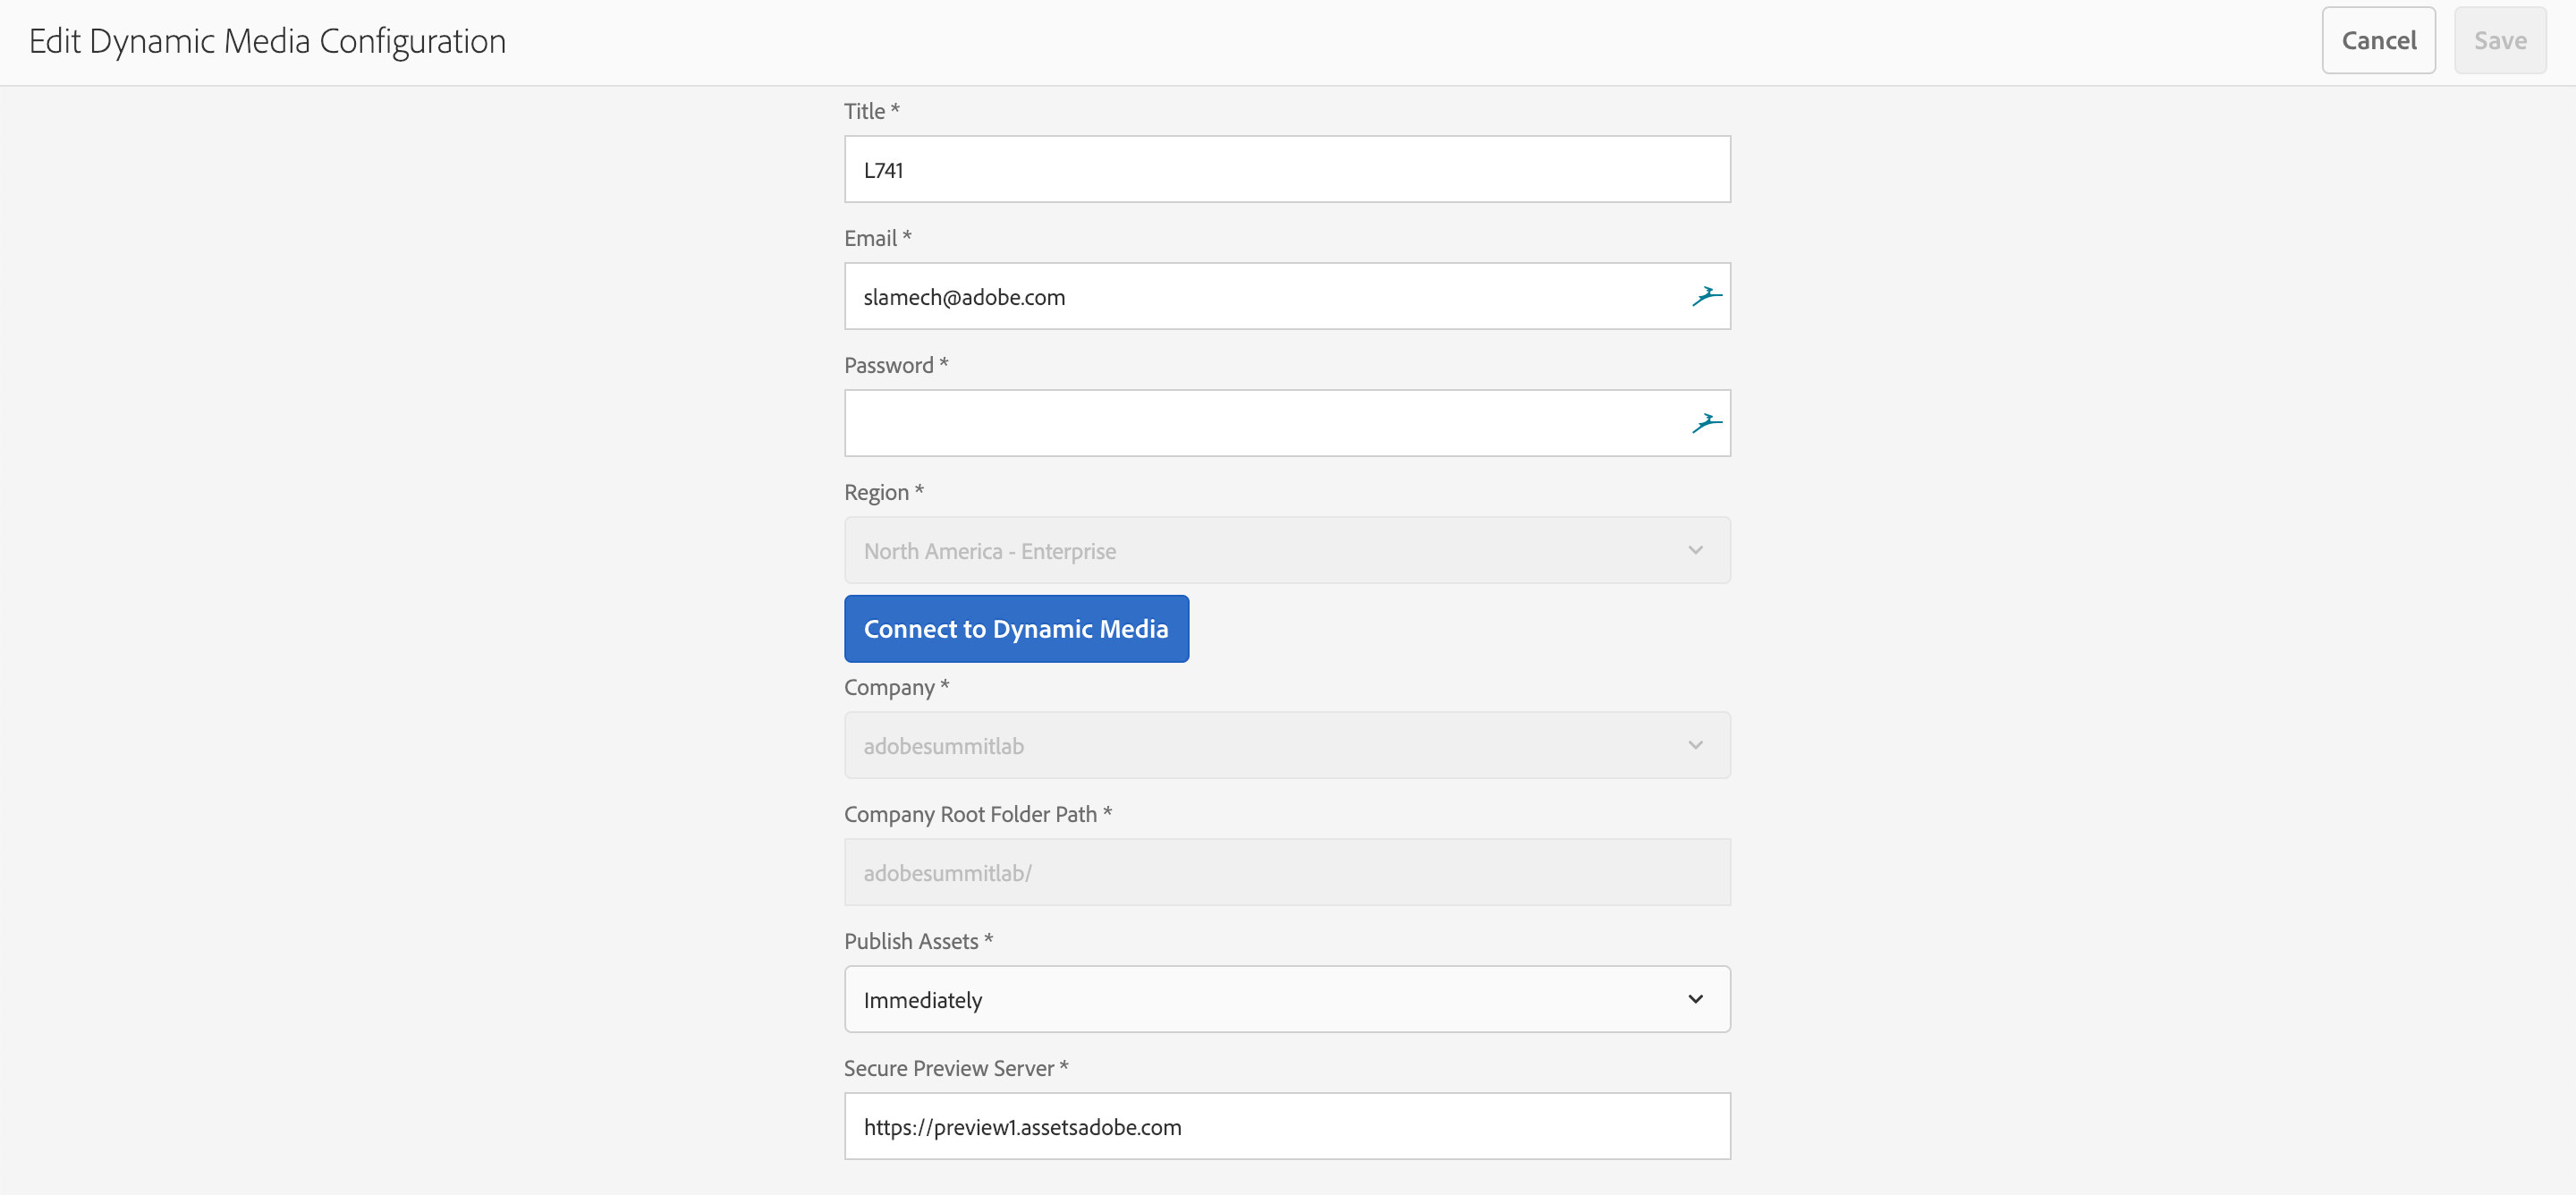
Title: Title for the configurationEmail: Email address for Dynamic MediaPassword: Password for Dynamic MediaRegion: _Region where Dynamic Media is provisionedCompany: The name of the Dynamic Media account.Company Root Folder: Root folder to publish assets toPublish Assets: Immediately means assets are published to Dynamic Media upon uploadSecure Preview Server: URL to securely preview asset renditions
Step 4: Click the Cancel button to exit the Dynamic Media configuration page.
Objective
- Learn how to leverage the Smart Tagging capability in AEM to enhance search efficiency by automatically adding relevant metadata to an asset.
- Learn how to moderate & curate the suggested Smart Tags in AEM.
Lesson Context
In this lesson, we will leverage smart tagging to automatically tag assets that are uploaded into a particular folder and further learn how to manage Smart Tags in AEM.
Exercise 1.1 Create Folder & Enable Smart Tagging
Assuming you have already logged into AEM & reviewed the smart tagging configuration as described in lesson, please proceed with this exercise.
Step 1: Create a Folder
Having logged into AEM, Navigate to the Assets section in AEM: http://localhost:4502/assets.html/content/dam.
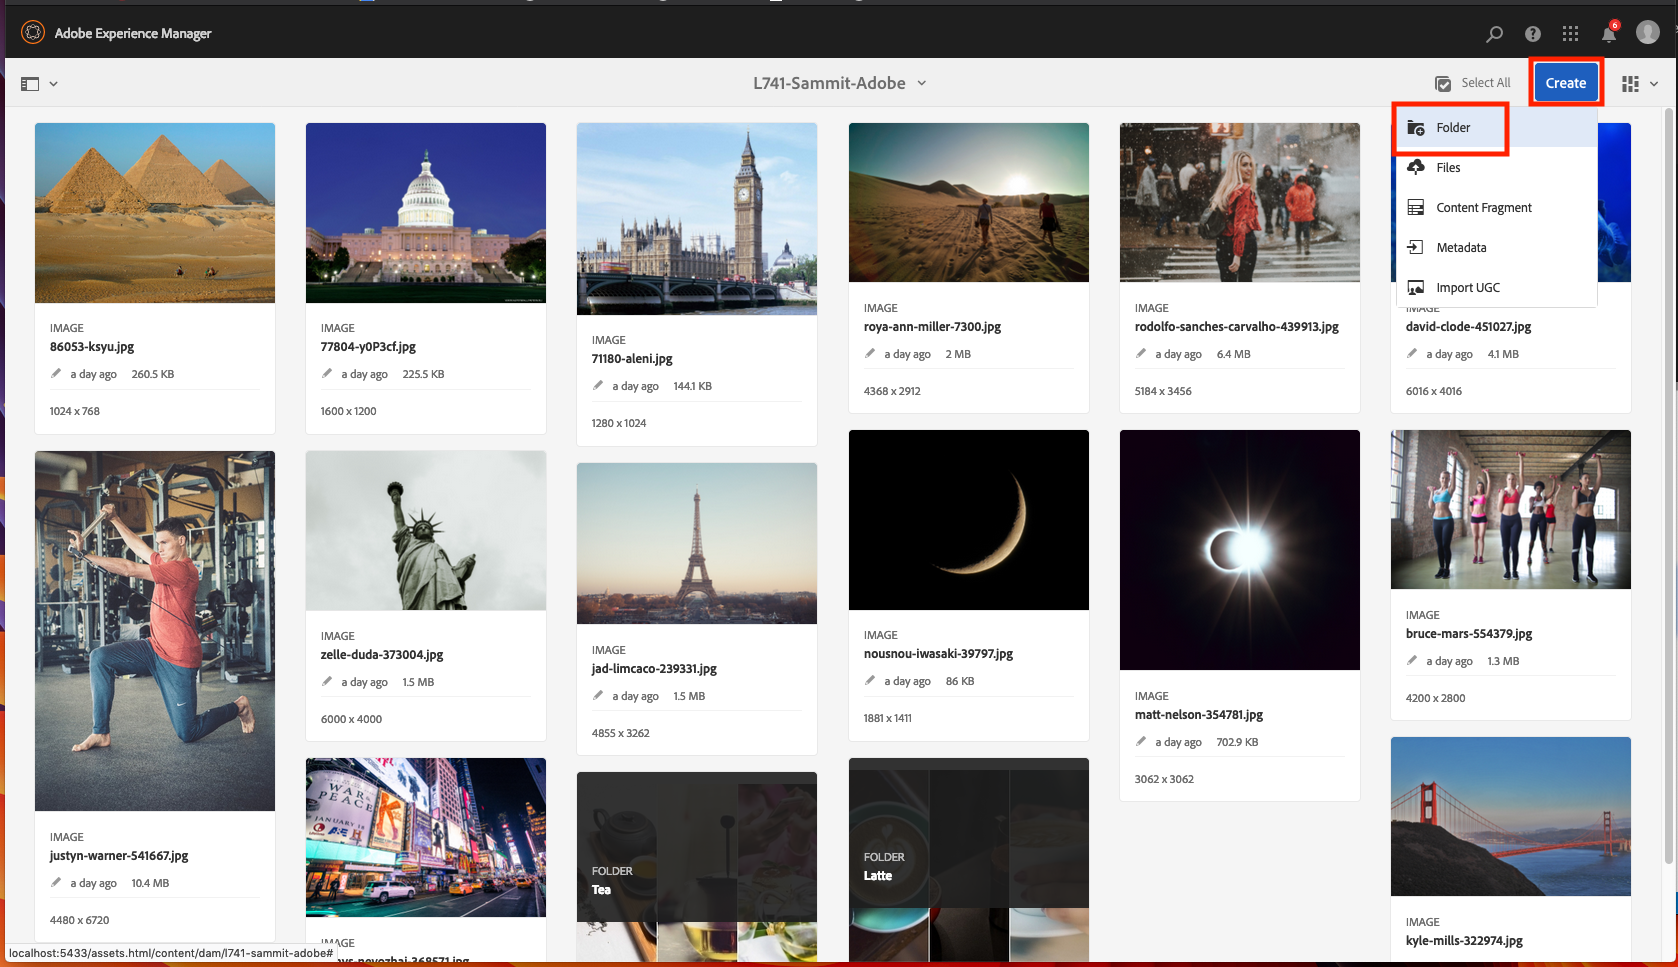
Click on Create button.
Select Folder from the fly out menu.
Provide Name & Title for the folder as L741-Name-Company (e.g. L741-Jane-Acme)
Click on Create Button to create the folder

Inside the given folder, create two different folders as Latte and Tea.
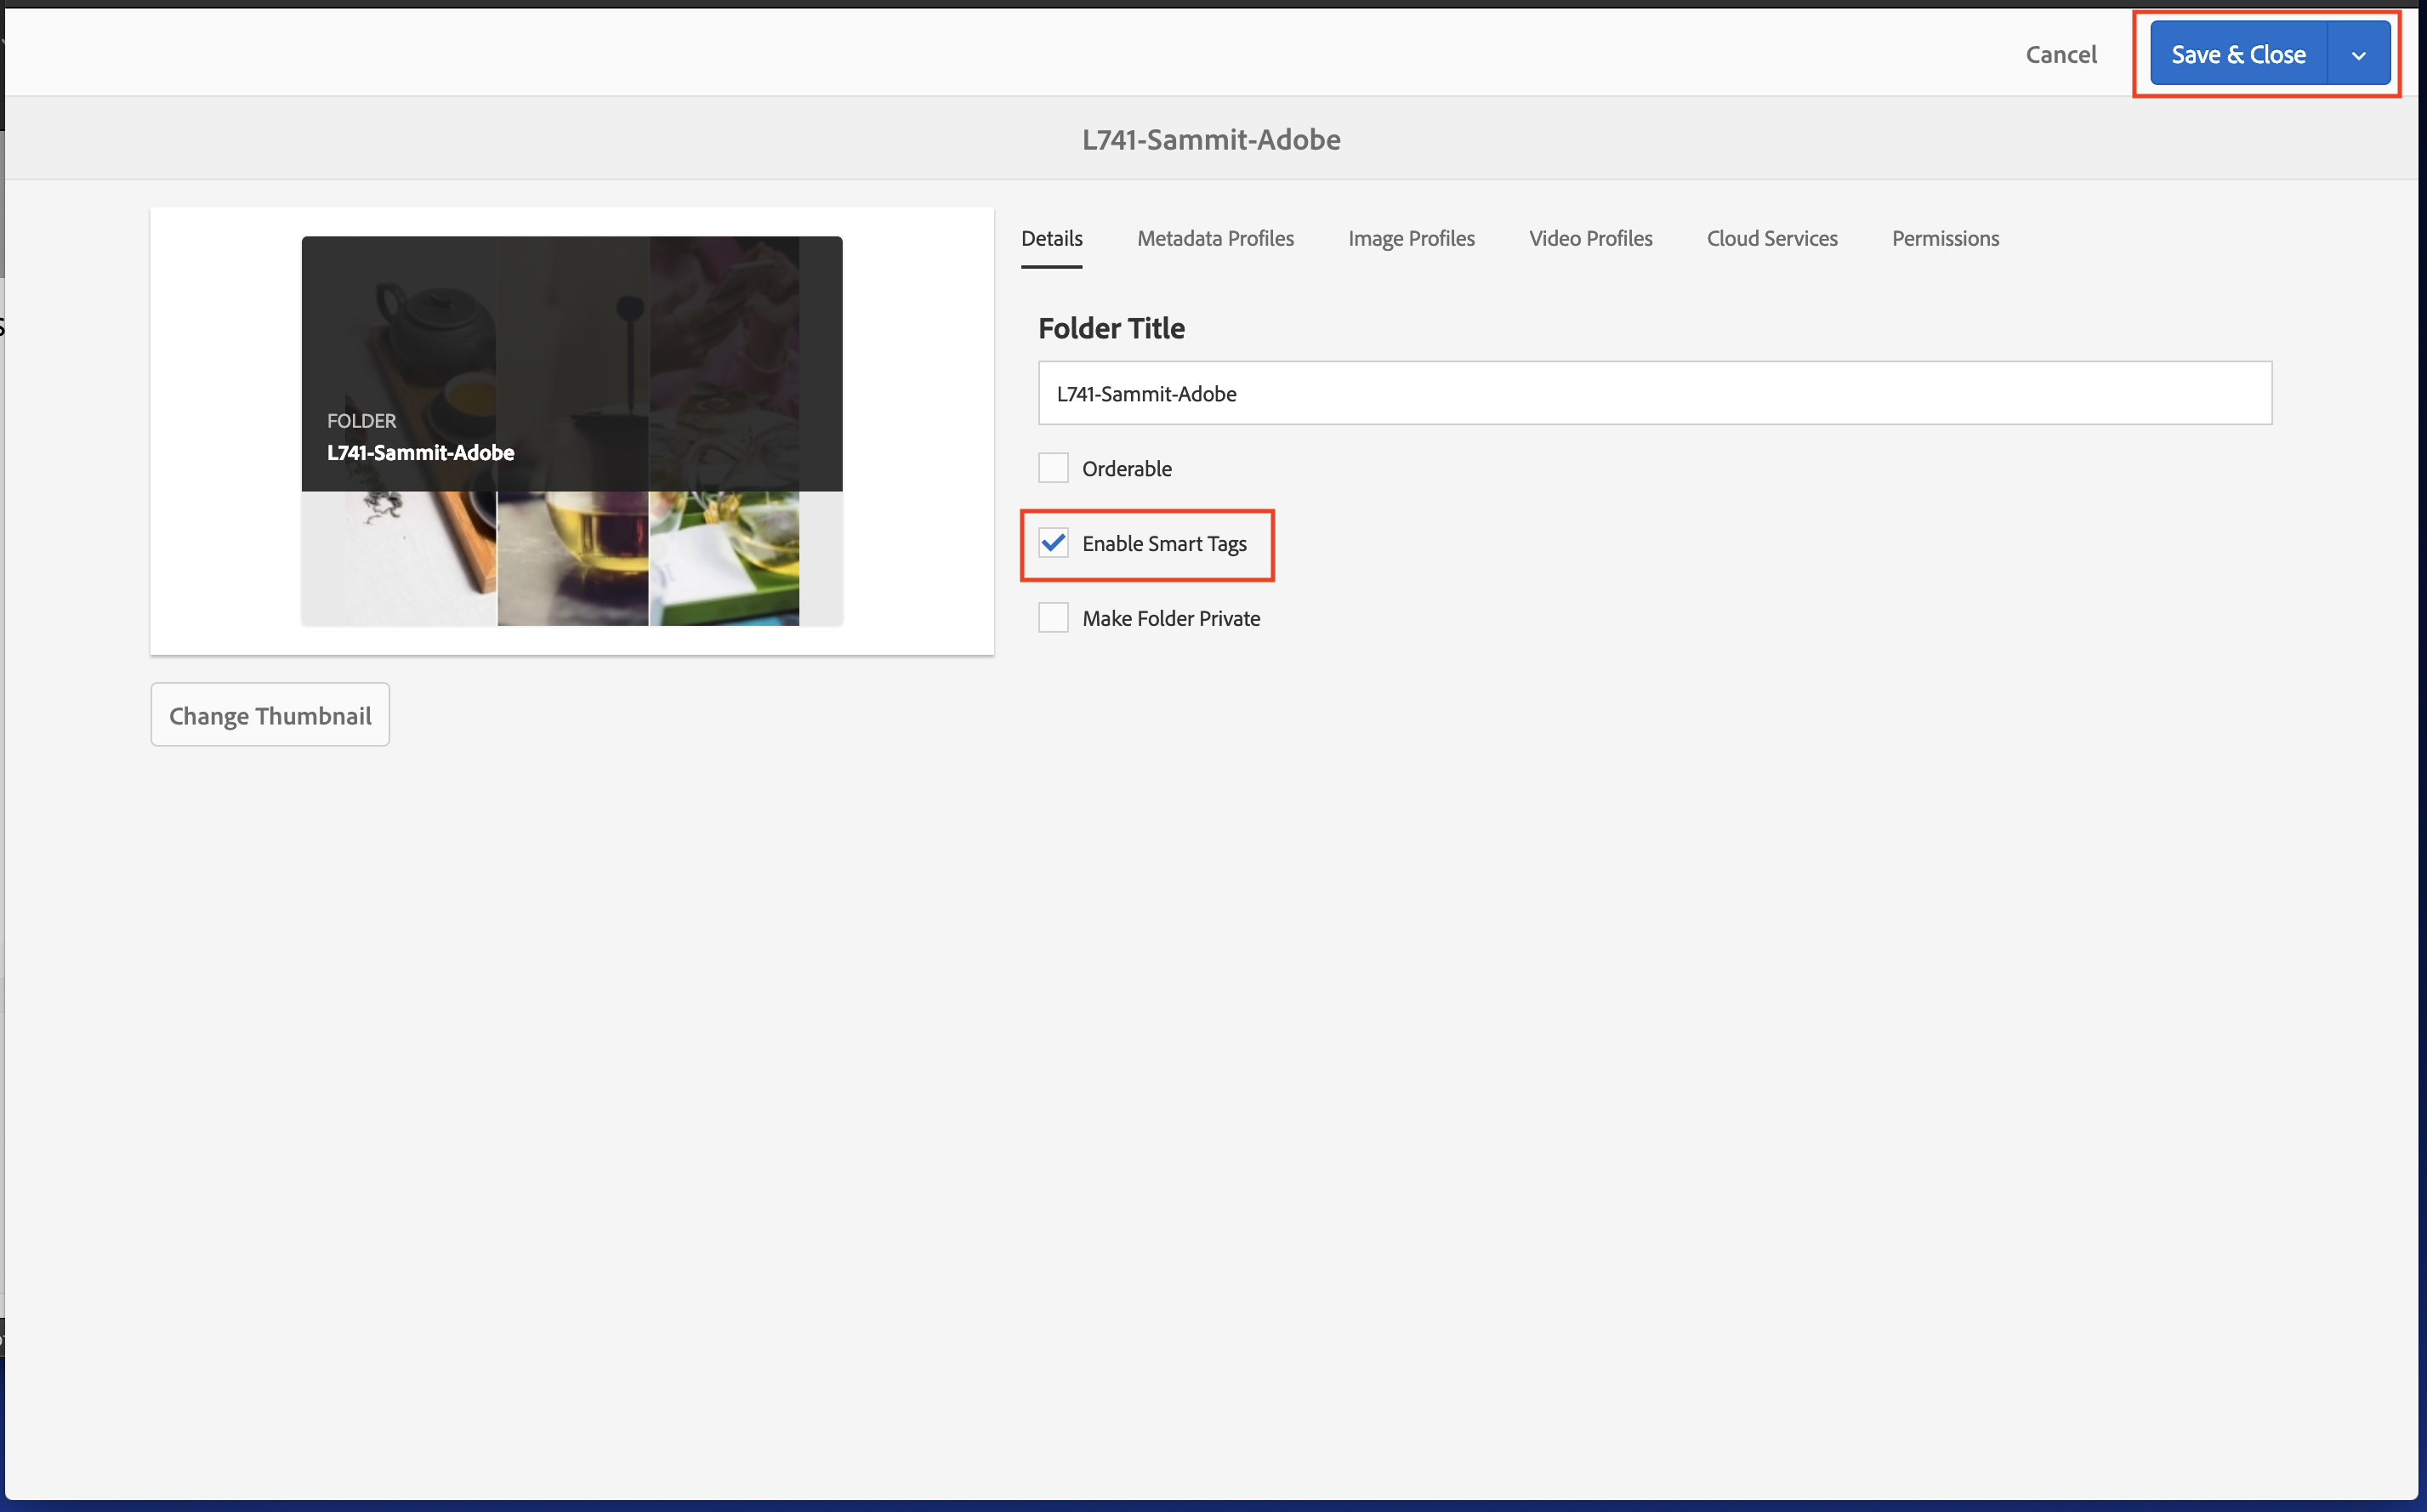
Step 2: Enable Smart Tagging
- To enable Smart Tagging, select the newly created folder by hovering over it and selecting the check mark.
- Open the Properties folder by clicking on Properties in the top tool bar.
- Check the Enable Smart Tags option and click Save.
With this step, the given folder is setup to automatically tag any asset that is uploaded into this folder.
With the folder enabled for smart tagging, lets move forward with uploading the assets.
Step 1: Navigate to Folder
- Go to the folder you created in above exercise L741-Name-Company e.g.L741-Jane-Acme
Step 2: Upload Assets
- Open the Finder on the desktop.
- Navigate to Desktop > Assets > Lesson 1 > Smart Tags.
- Select All the files & upload them into AEM (Using one of the methods below).
- Drag & Drop files to given folder in AEM.
- Upload the assets using Create button & select File.
This module will allow you to multi-select all the files & serial upload them into AEM.
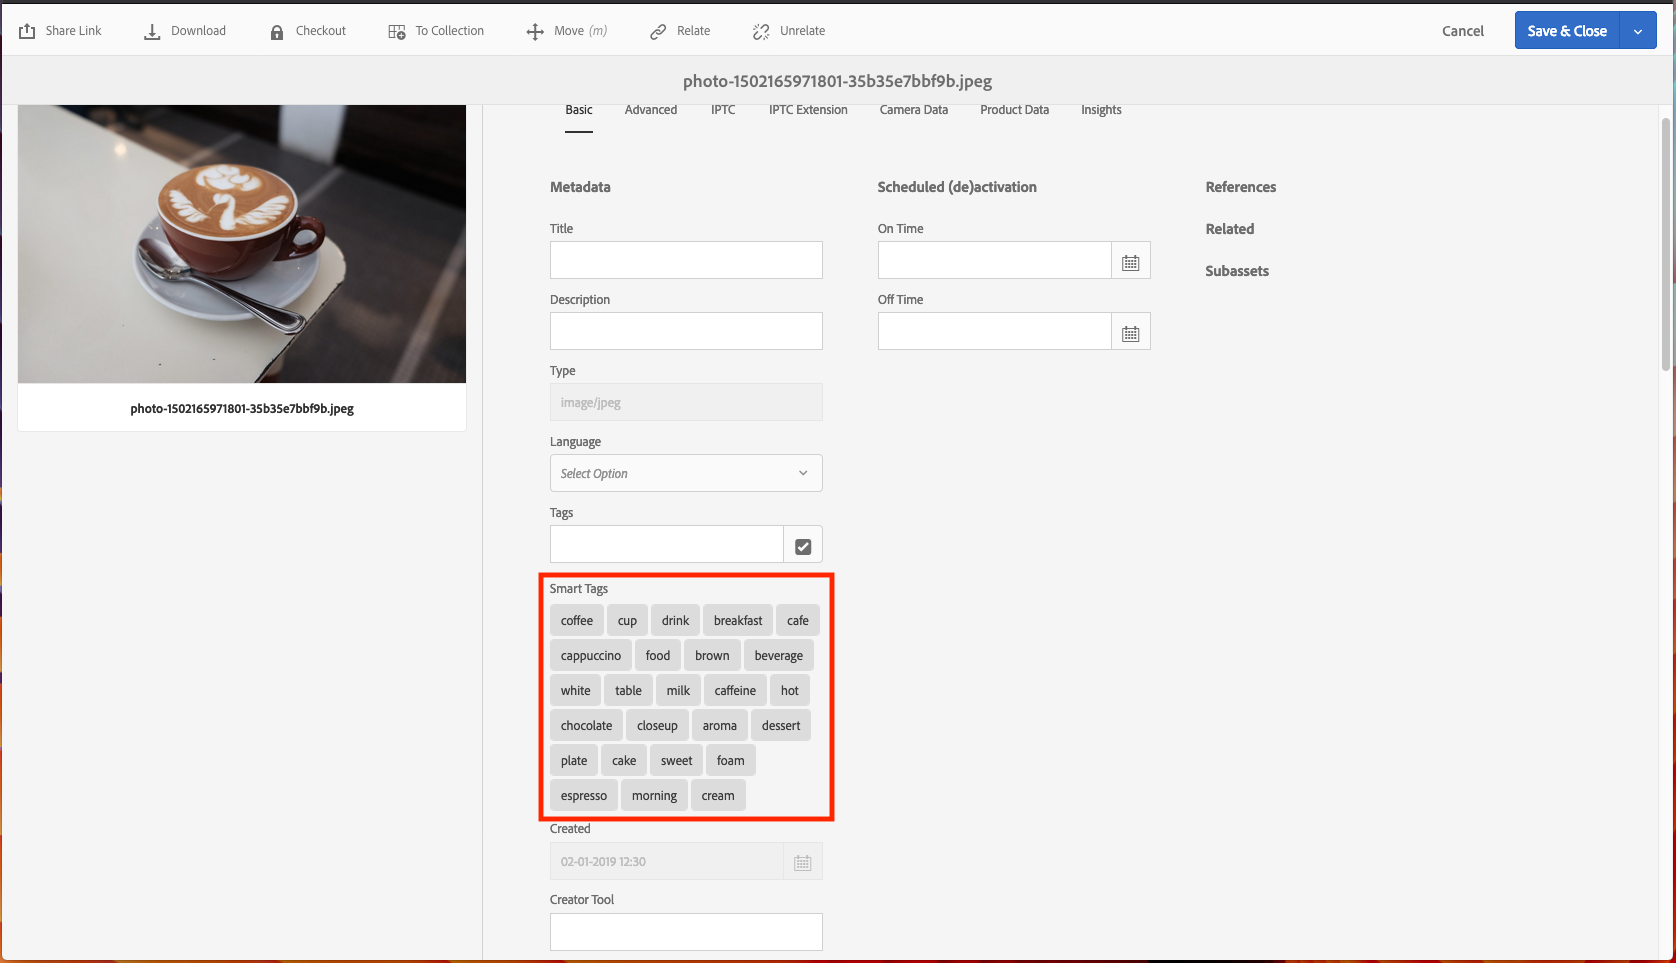
Step 3: View Smart Tags
Wait for processing to be complete for all the assets then refresh the page (this might take 1-2 minutes).
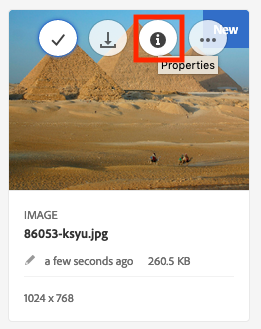
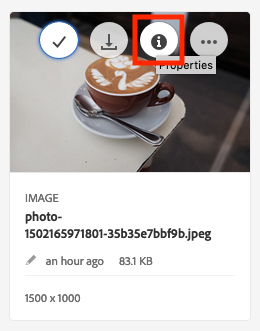
Check the Properties of Asset by clicking on the 'i' link by hovering over the file card view.
Notice all the smart tags are added in the Smart Tags section under Tags section of metadata.
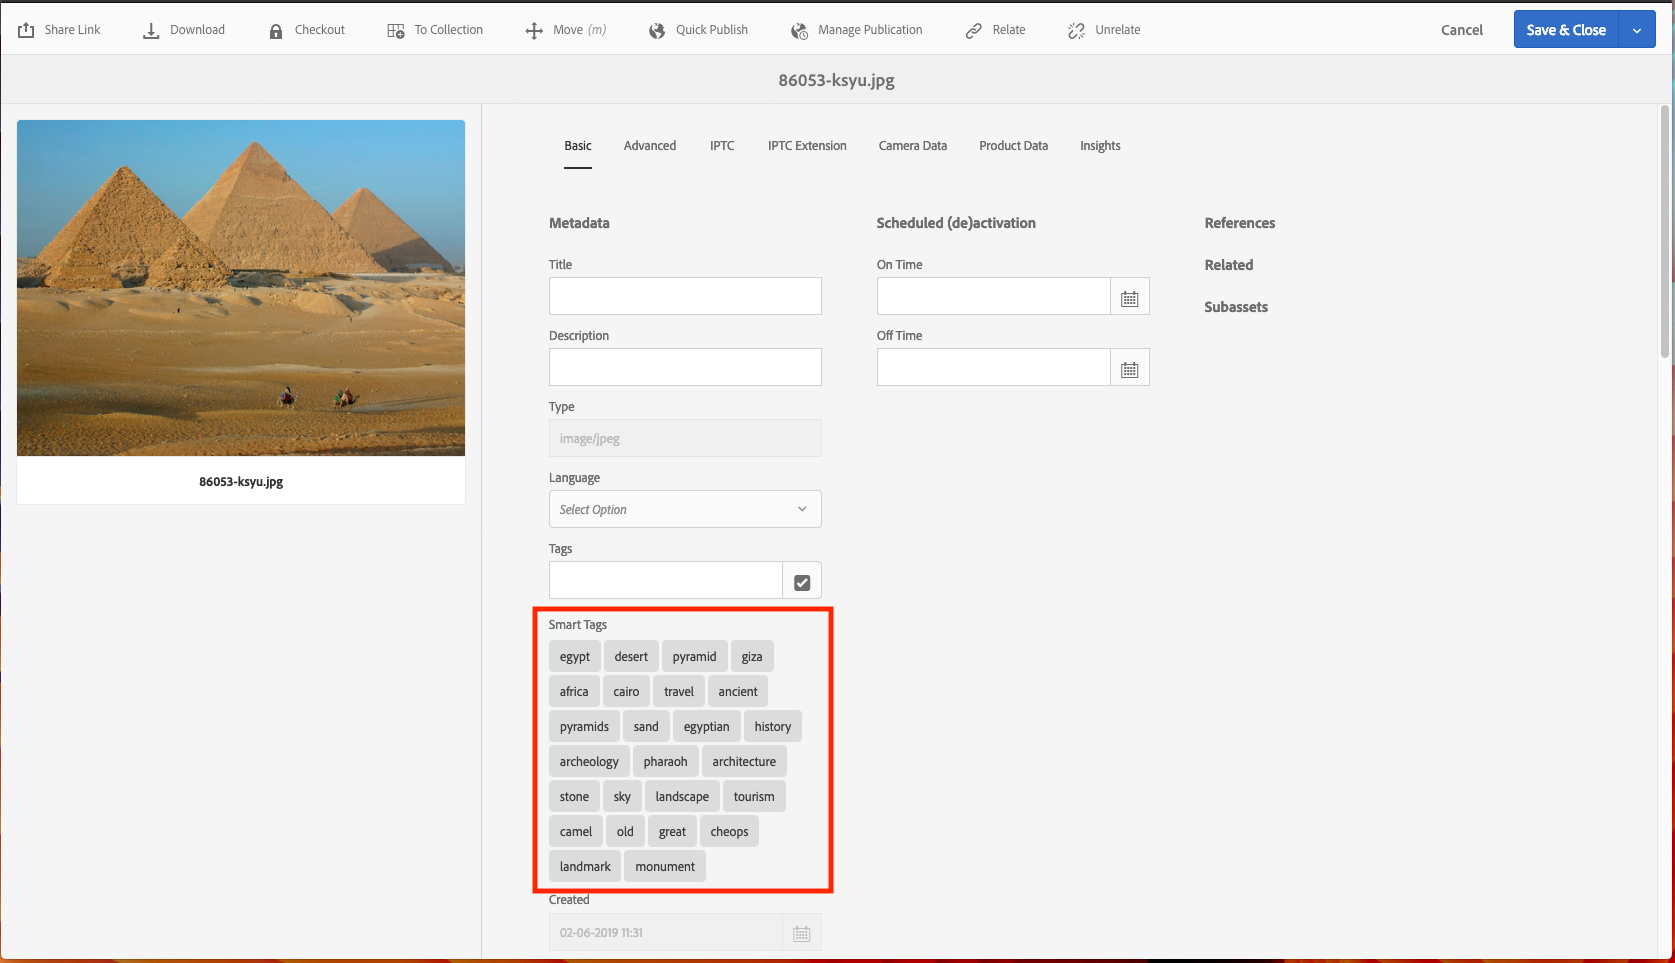
Review the newly added smart tags to the asset.
As part of this exercise, lets learn about the process to moderate and curate smart tags in AEM.
Step 1: Select Image for which tags need to be moderated
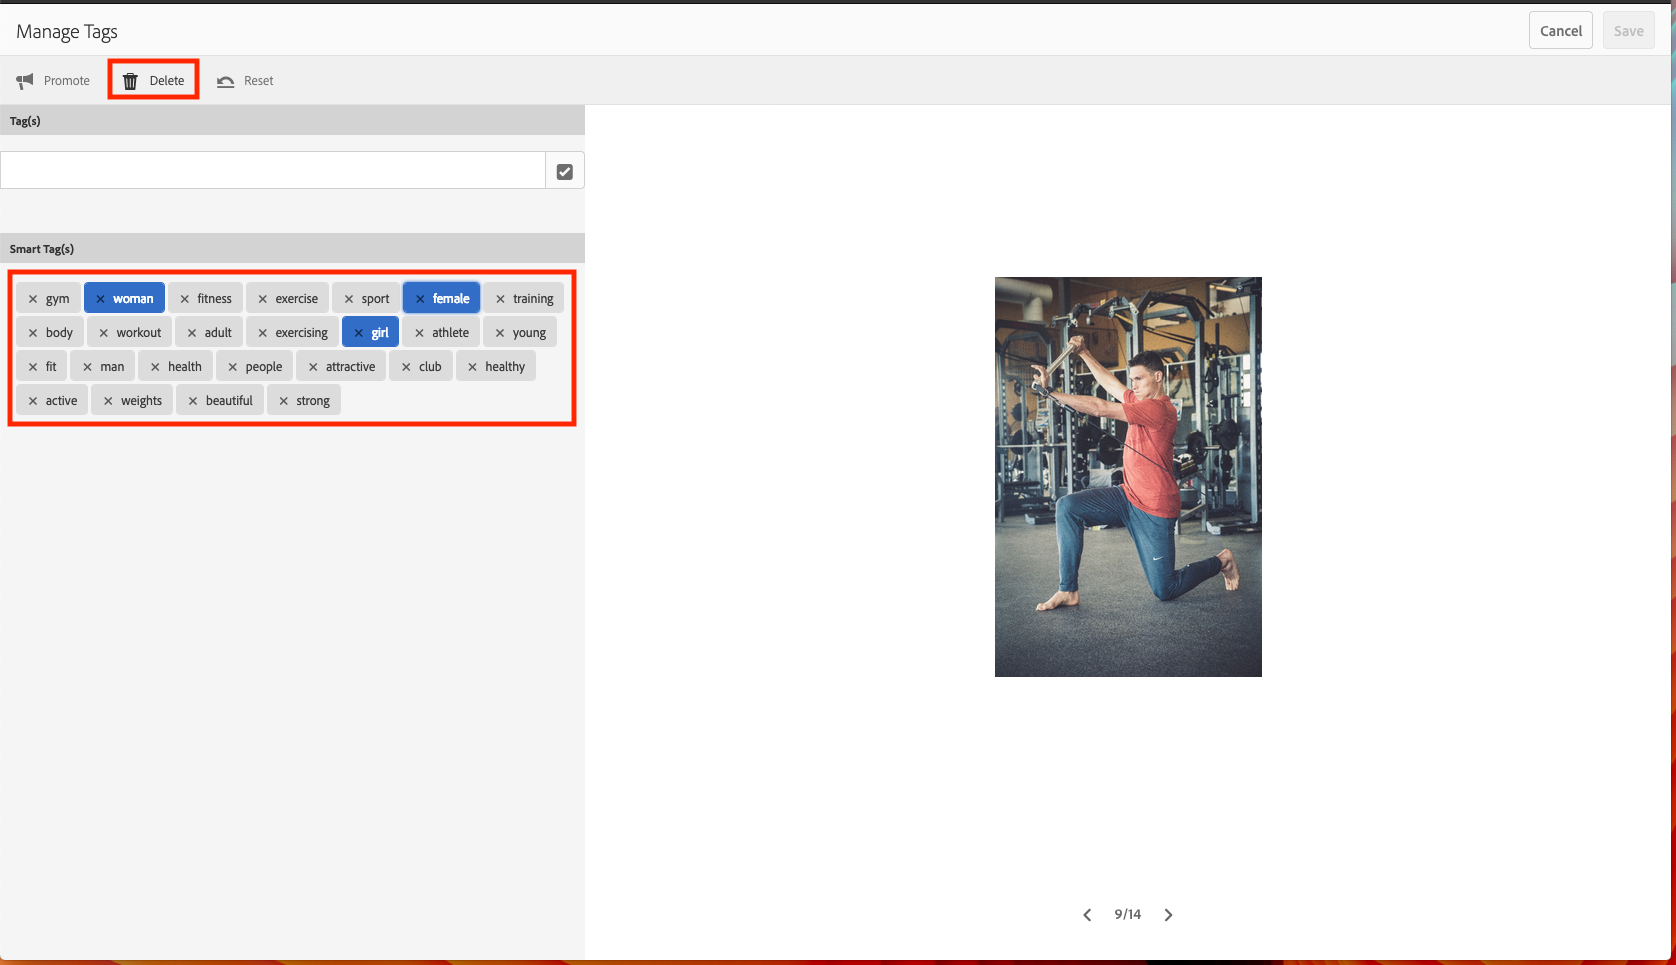
Step 2: Purge unwanted Tags
- In the Tag moderation screen, select the tags that are not relevant to the images by click on them.
- Example, women, female, girl in below image.
- Once selected, click on the Delete button on top toolbar to remove these tags from the image.
Step 3: Promote Relevant Tags
- We can also indicate relevant tags to indicate higher priority to some of the relevant tags by promoting them.
- Do this by selecting the relevant tags and click Promote button in top toolbar.
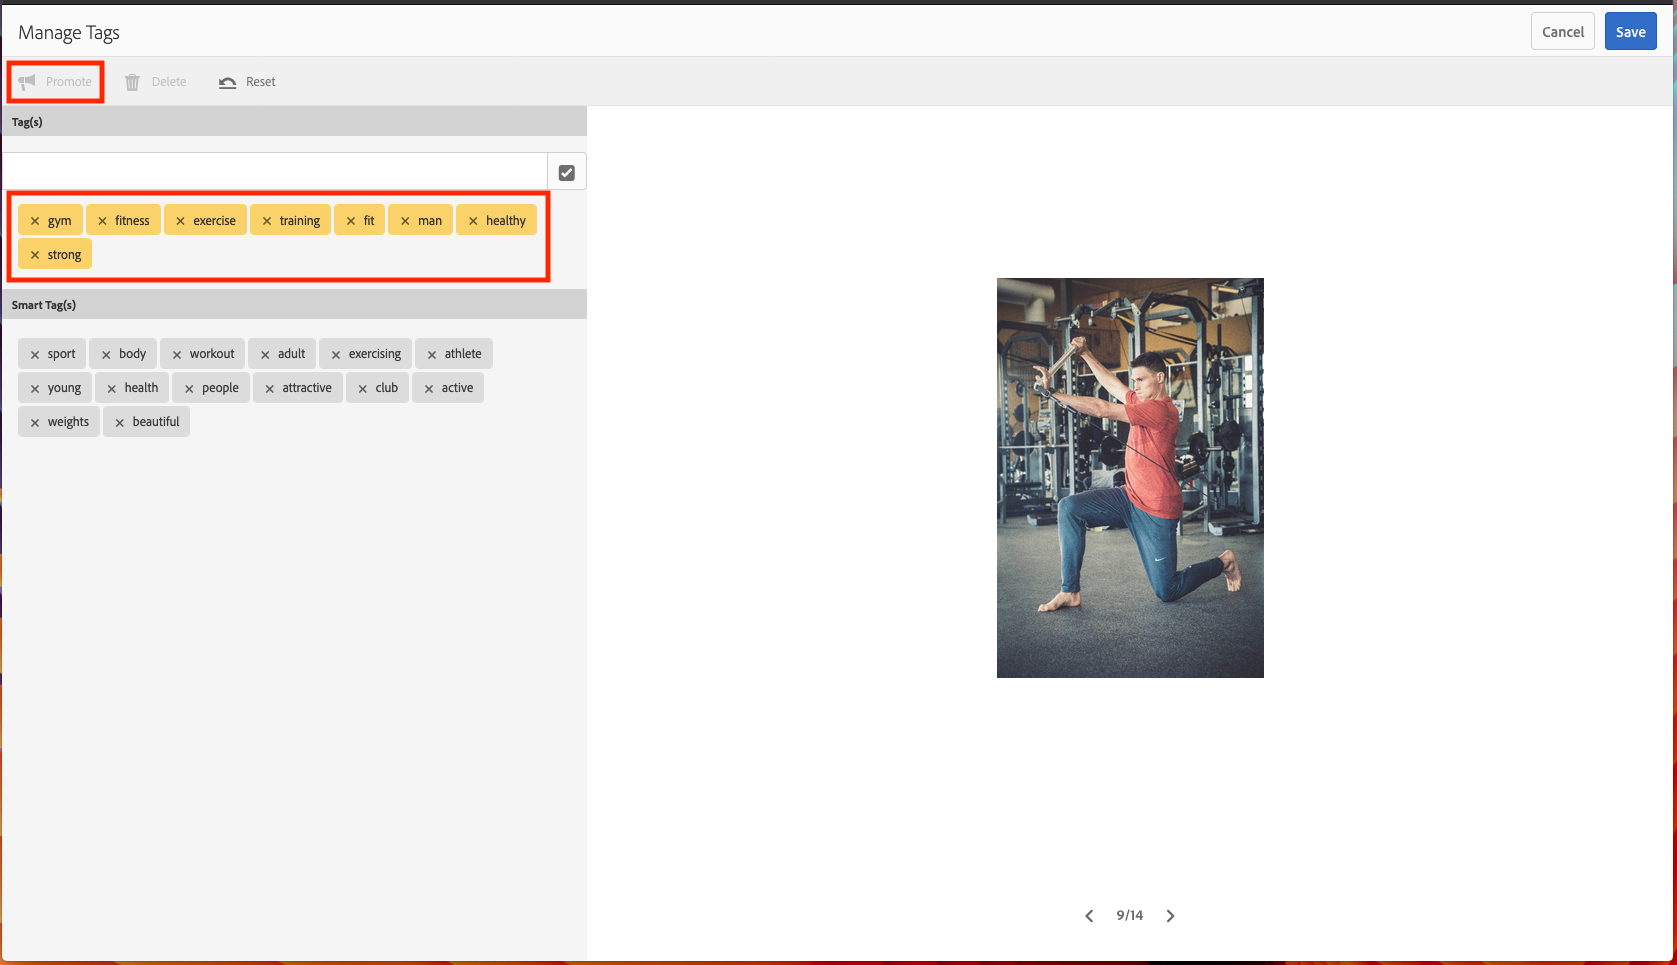
- Click Save to save the changes done to tags for given image.
The Tag moderation screen allows you to switch between multiple assets so same action can be performed on all the assets.
With this exercise you have moderated the smart tags to match the asset and promoting the relevant tags will boost the search ability of the image.
Lets search by using the newly added smart tags in AEM.
Step 1: Navigate to Assets
Step 2: Perform Search
- Click on the lens icon in the top right corner of the search to open Omnisearch in AEM.
- Perform the search by using the term fitness and hit enter.
- The search result page will bring up same image we had curated to promote the relevant tag.
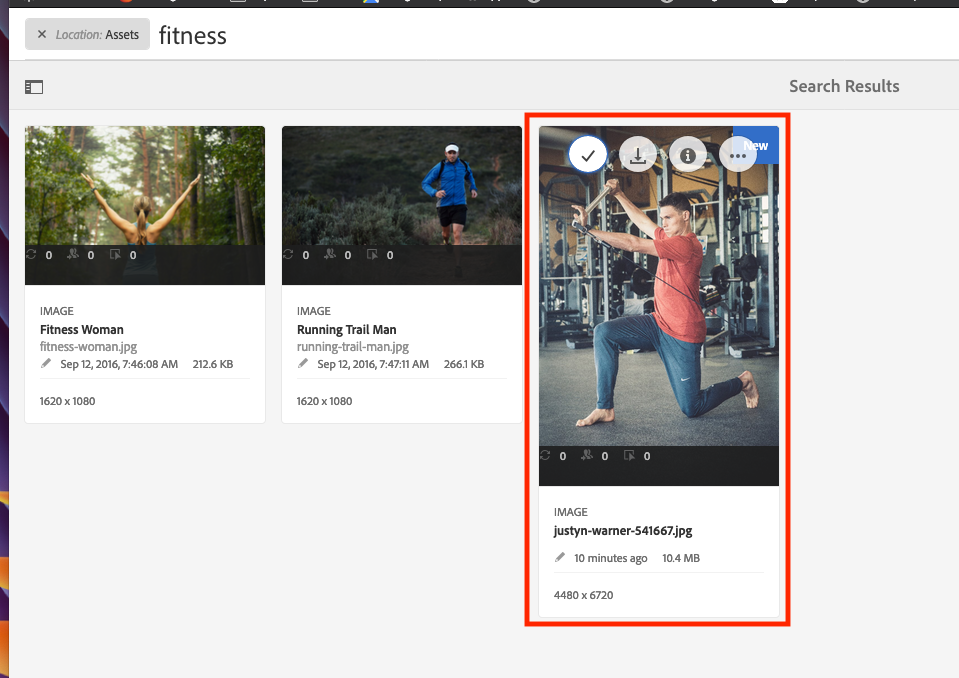
This exercise demonstrates Smart Tagging capabilities in AEM to make assets more discoverable through the tags and also helps in increasing the efficacy of the search through tag moderation.
Objective
- Understand how you can train the Smart Tagging Service in AEM with your custom tags.
- Learn how to apply custom tags to new assets ingested in AEM.
Lesson Context
The exercises in this lesson demonstrates the Enhanced Smart Tagging capabilities in AEM and lets you understand the process to follow to train and use the service effectively.
Exercise 2.0: Folder Setup
This exercise covers the steps required to setup the folder structure and upload relevant Smart Tags training images into AEM.
Step 1: Create a Folder
- Create a subfolder named Training.
- Navigate into the newly created Folder.
- Click on Create button.
- Select Folder from the fly out menu.
- Create a subfolder named Latte.
- Click on Create Button to create the folder.
- Repeat the steps above to create a folder named Tea at the same level as Latte.
Step 2: Upload Latte Assets
- Navigate to Latte folder inside your own folder.
- Open Finder on the desktop.
- Navigate to Desktop > Assets > Lesson 2 > Latte.
- Select All the files & upload them into AEM (Using one of method below).
- Drag & Drop files to given folder in AEM.
- Upload the assets using Create button & select File.
Step 3: Upload Tea Assets
- Navigate to Tea folder inside your own folder.
- Open Finder on the desktop.
- Navigate to Desktop > Assets > Lesson 2 > Tea.
- Select All the files & upload them into AEM (Using one of method below).
- Drag & Drop files to given folder in AEM.
- Upload the assets using Create button & select File.
Step 4: View Smart Tags
Wait for processing to be complete for all the assets then refresh the page (This might take 1-2 minutes).
Check the Properties of Asset by clicking on the 'i' link by hovering over the file card view..
Notice all the smart Tags are added in the Smart Tags section under Tags section of metadata.
Review the newly added smart tags to the asset.
At the end of this exercise you should have all the Latte and Tea images uploaded to there respective sub-folders in AEM & each should have Smart Tags assigned to them.
Exercise 2.1: Taxonomy
For the enhanced smart tags to work efficiently, you need to have a well-structured taxonomy of tags defined to represent the concepts/tags applicable to your business or domain.
Step 1: Create Taxonomy
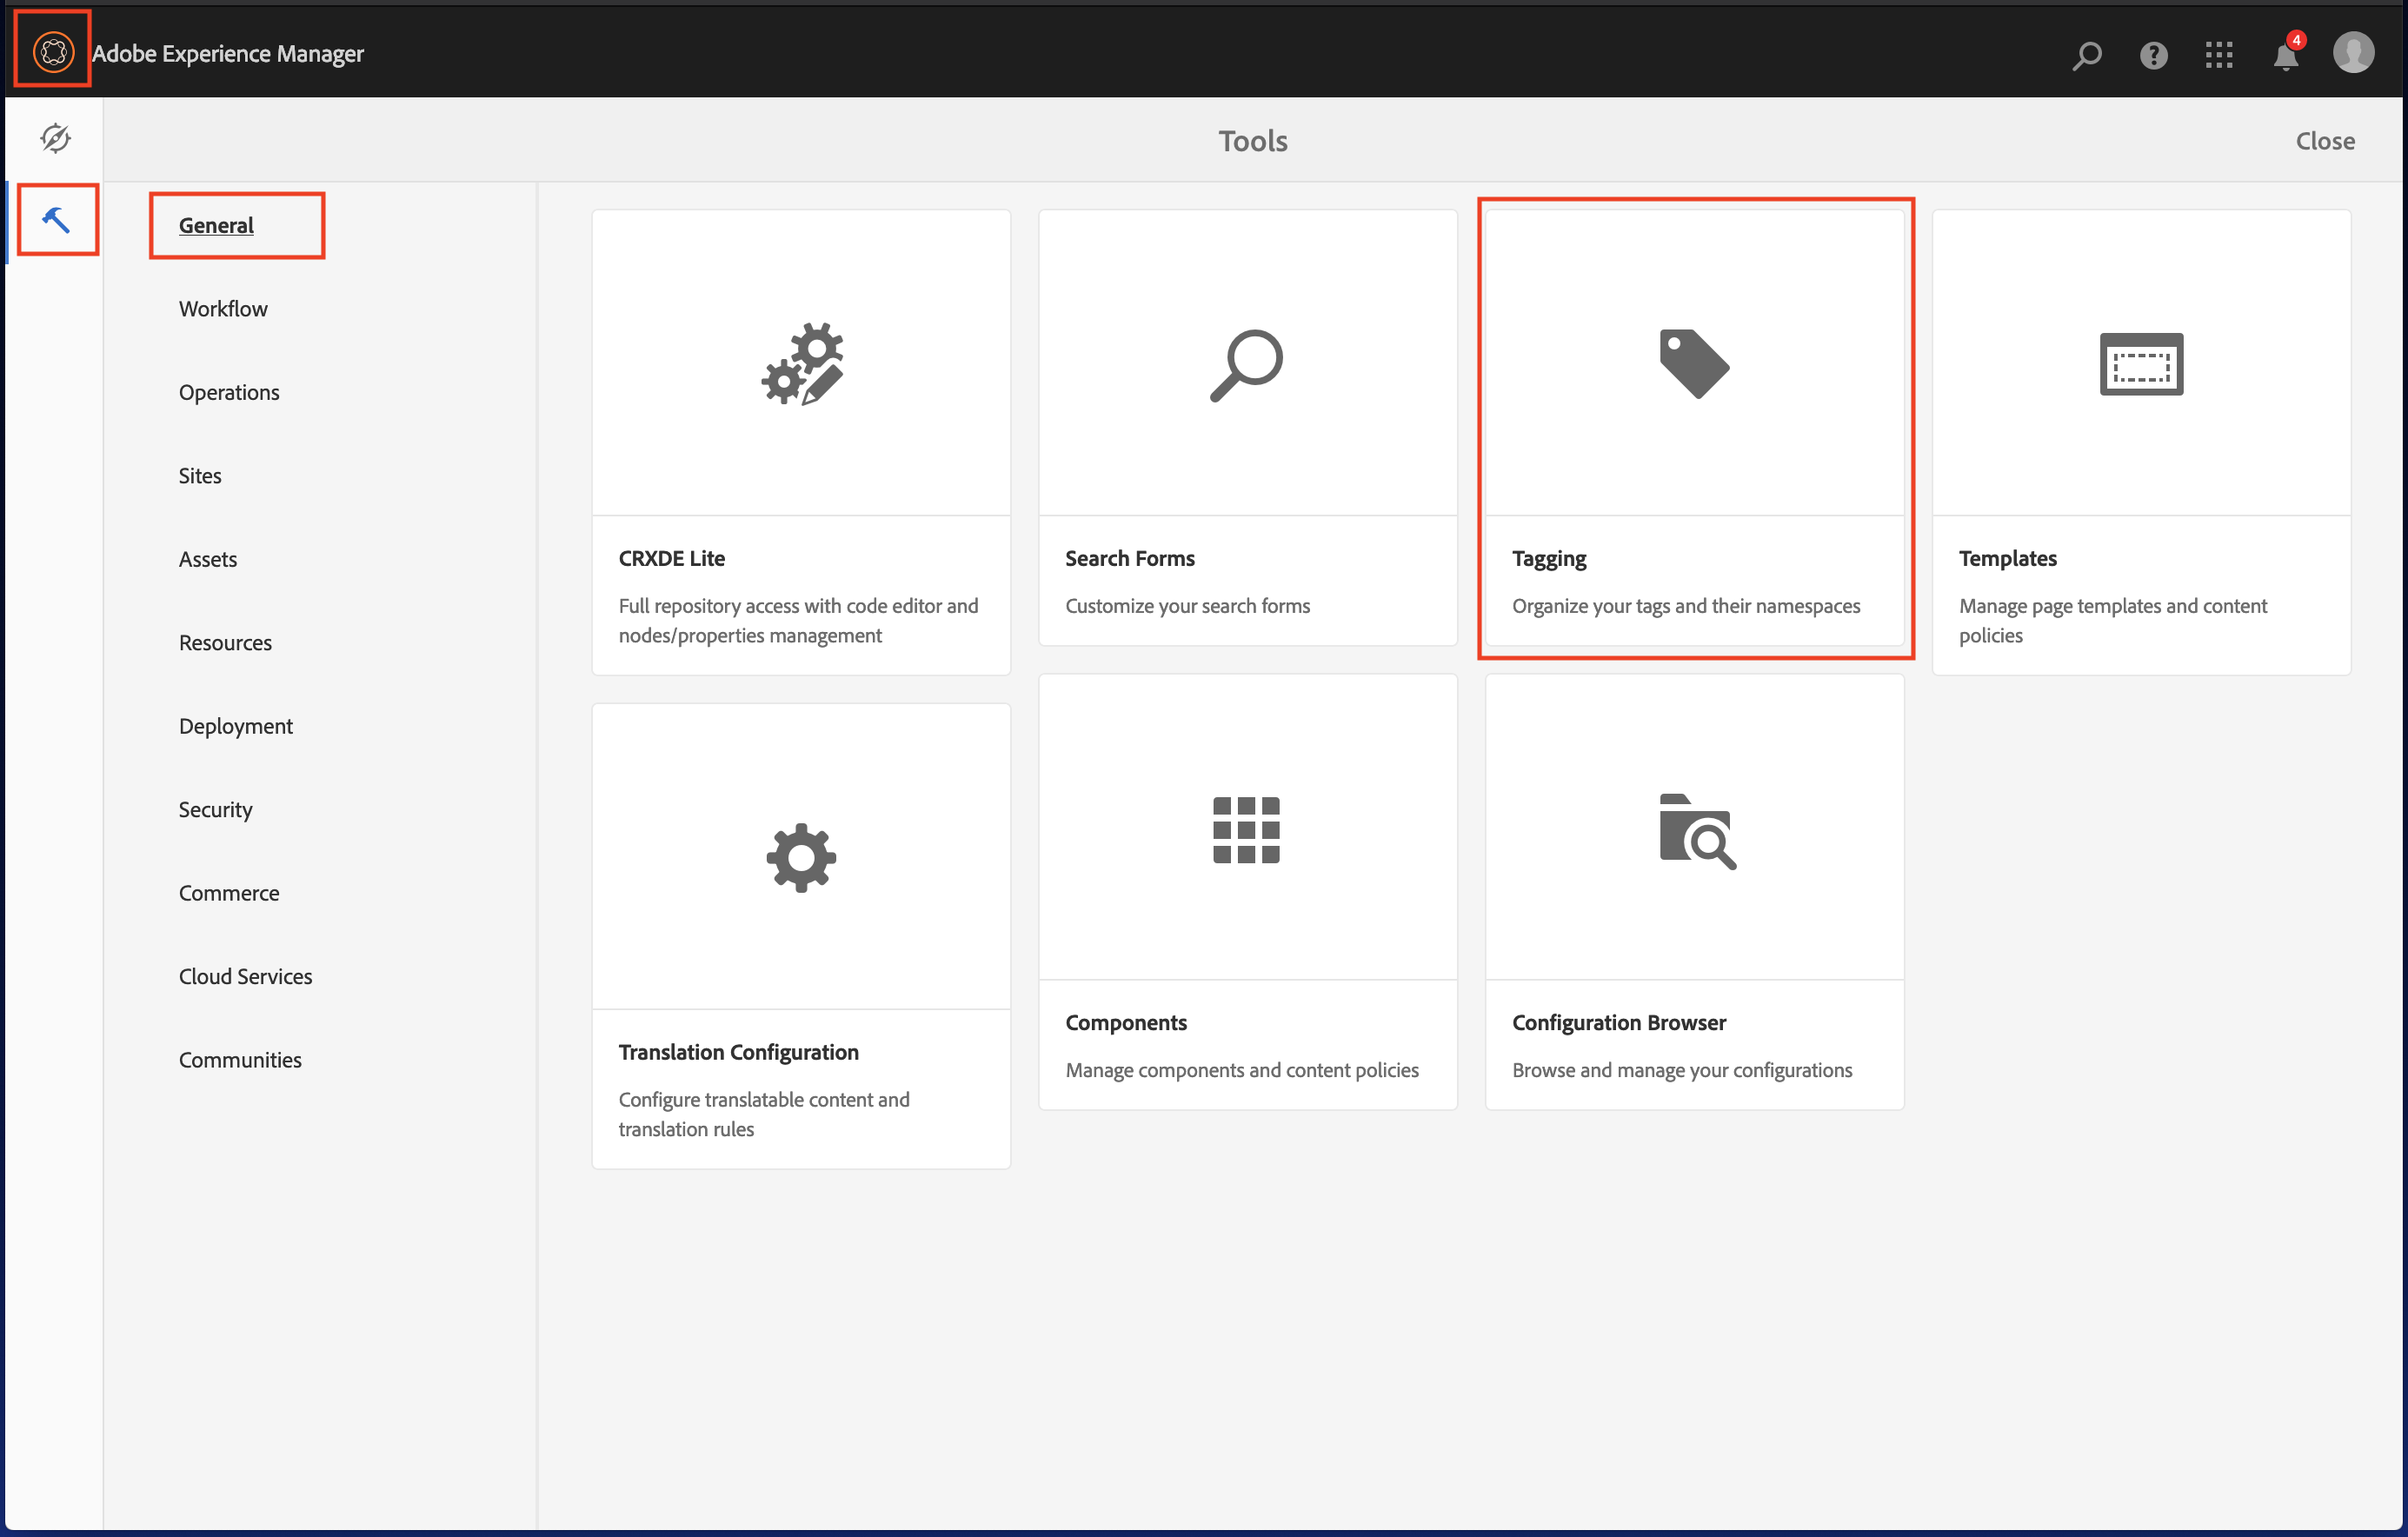
- To open Tag Manager, Click on the AEM logo on upper left corner of screen then click on Tools -> General -> Tagging.
- Click on Create and select Create Namespace.
- Enter the title Drinks.
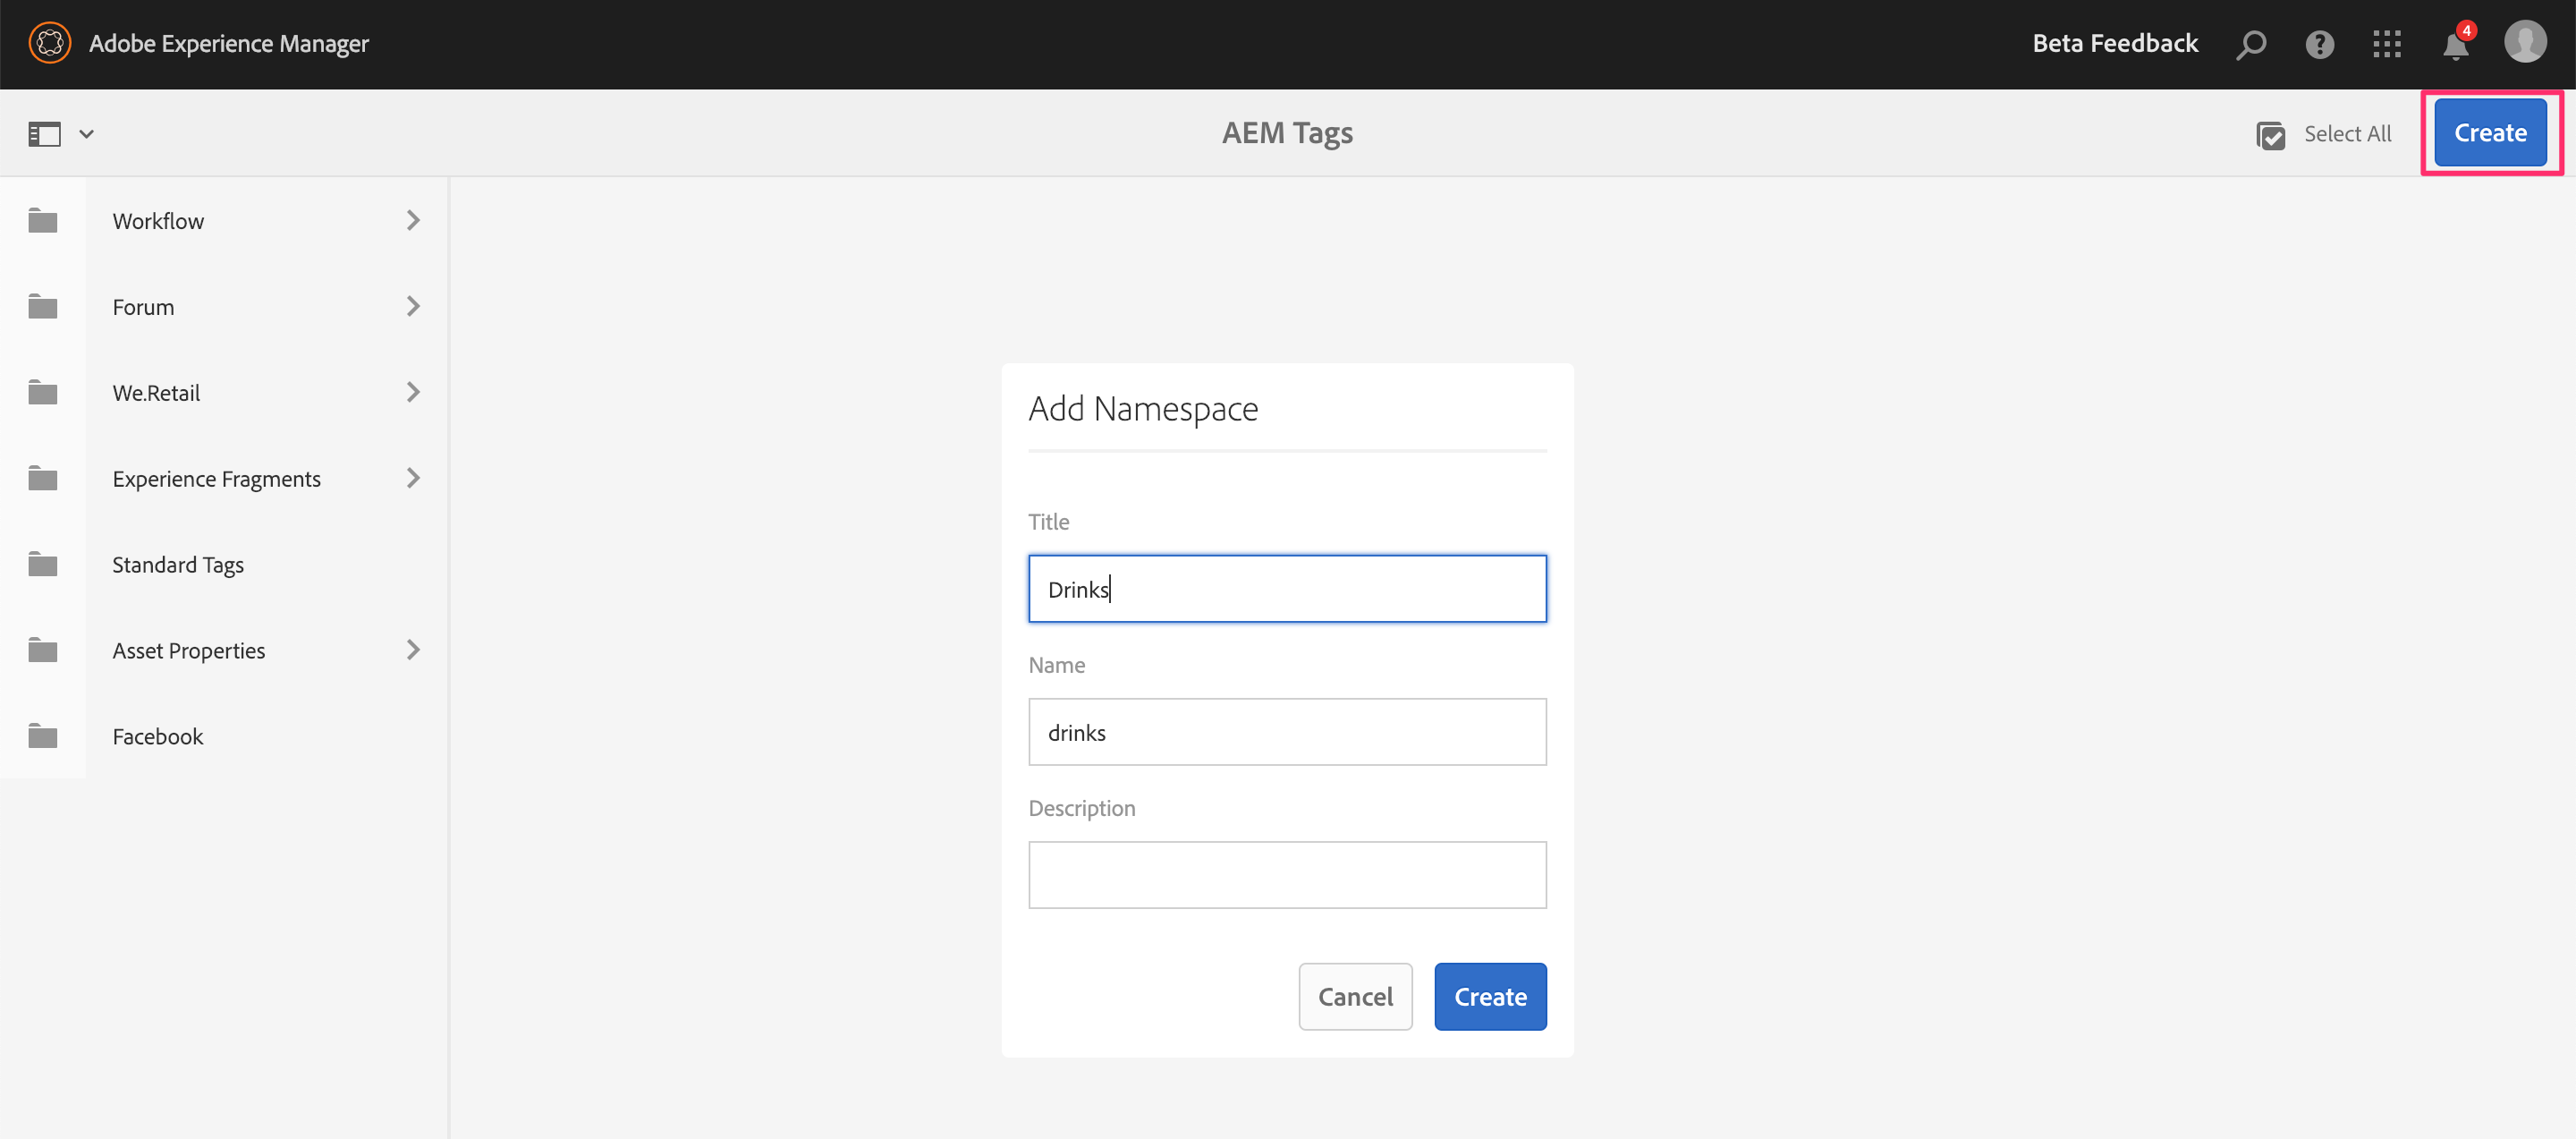
- Select the newly created Namespace by selecting the Text (not the folder icon).
- Click on Create and Create Tag.
- Enter the Title Latte.
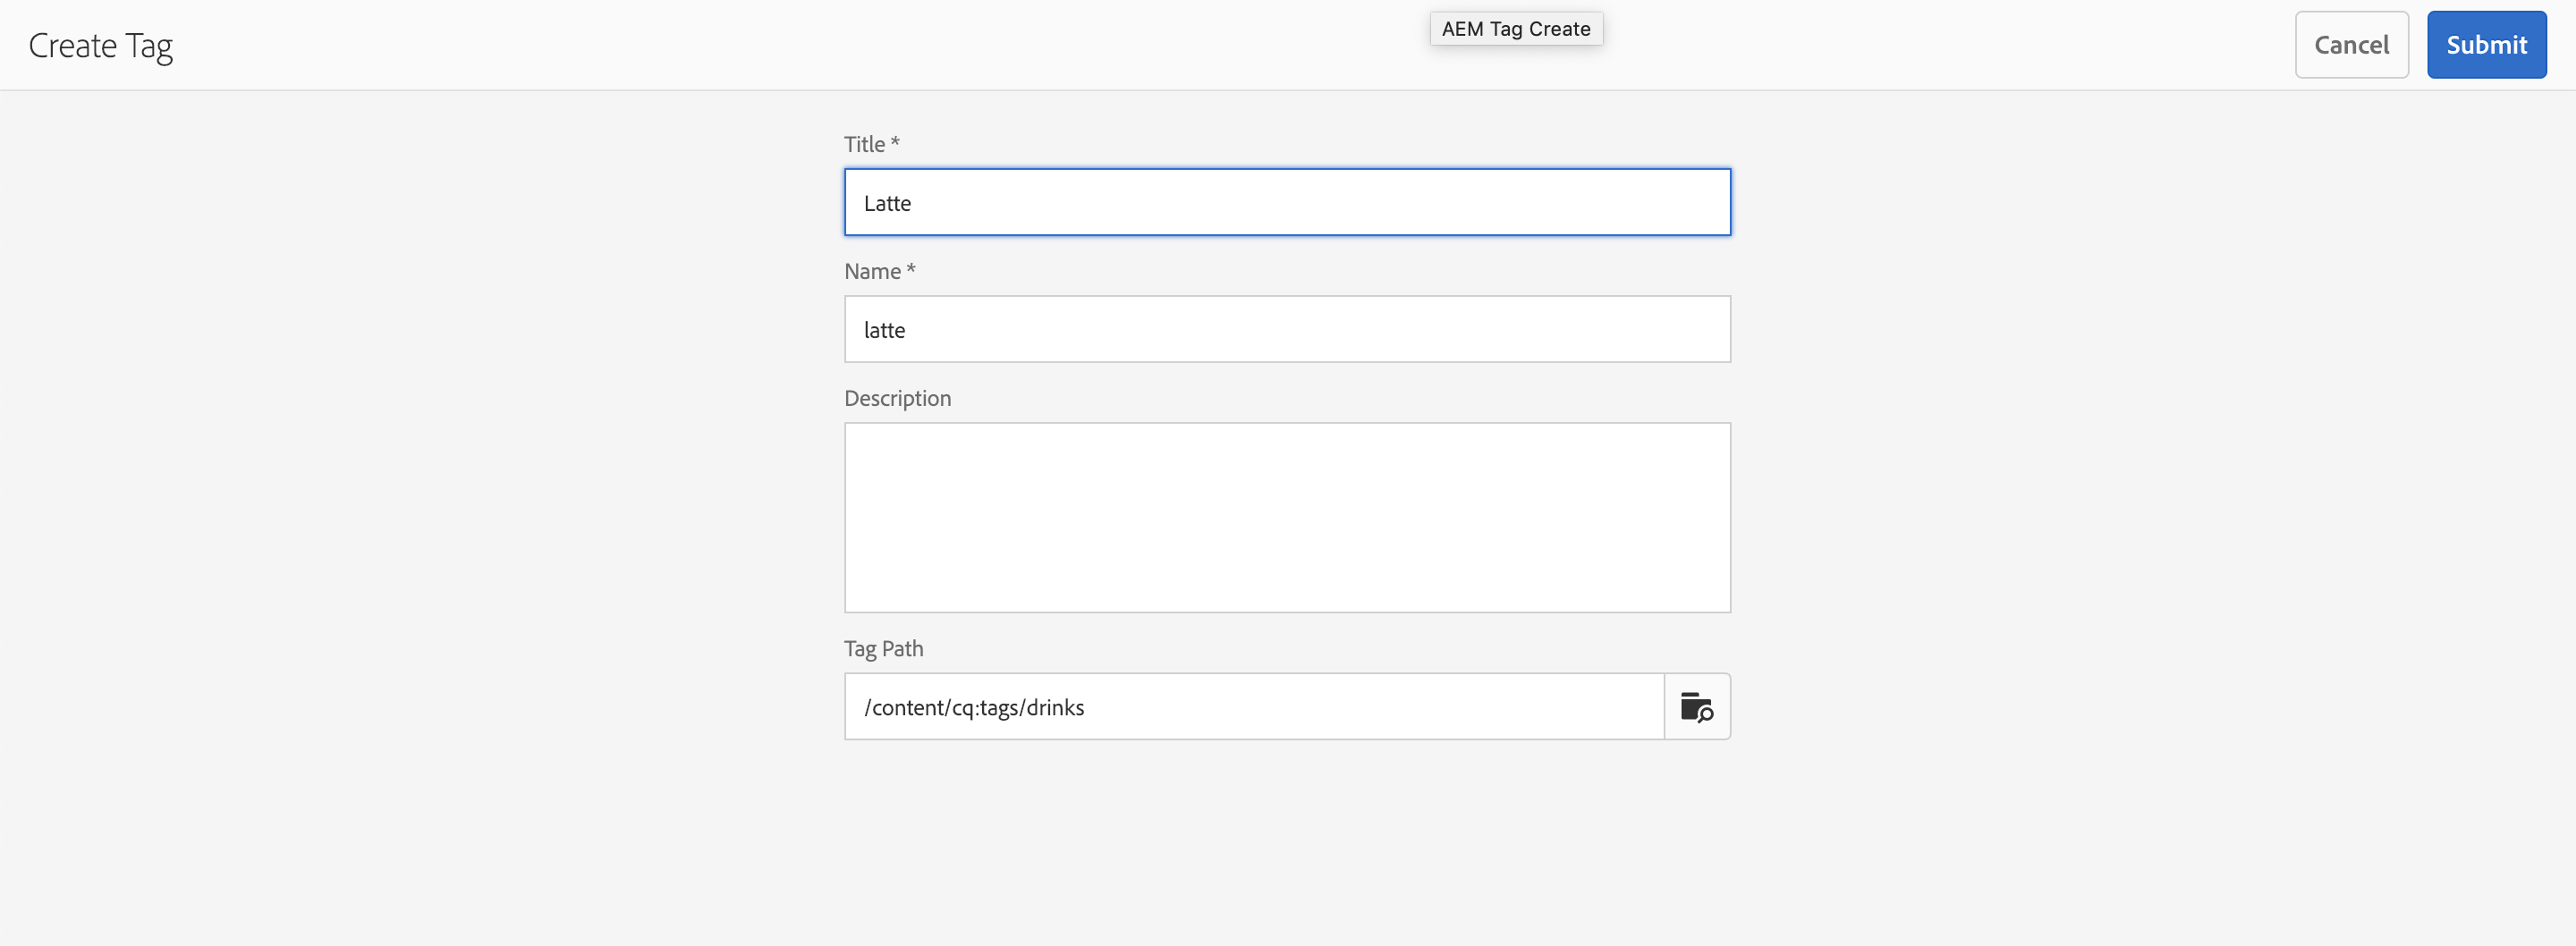
- Repeat the steps above to create tags by the names Coffee, Tea, & Chai under the Drinks Namespace.
The final taxonomy should look similar to the following illustration.
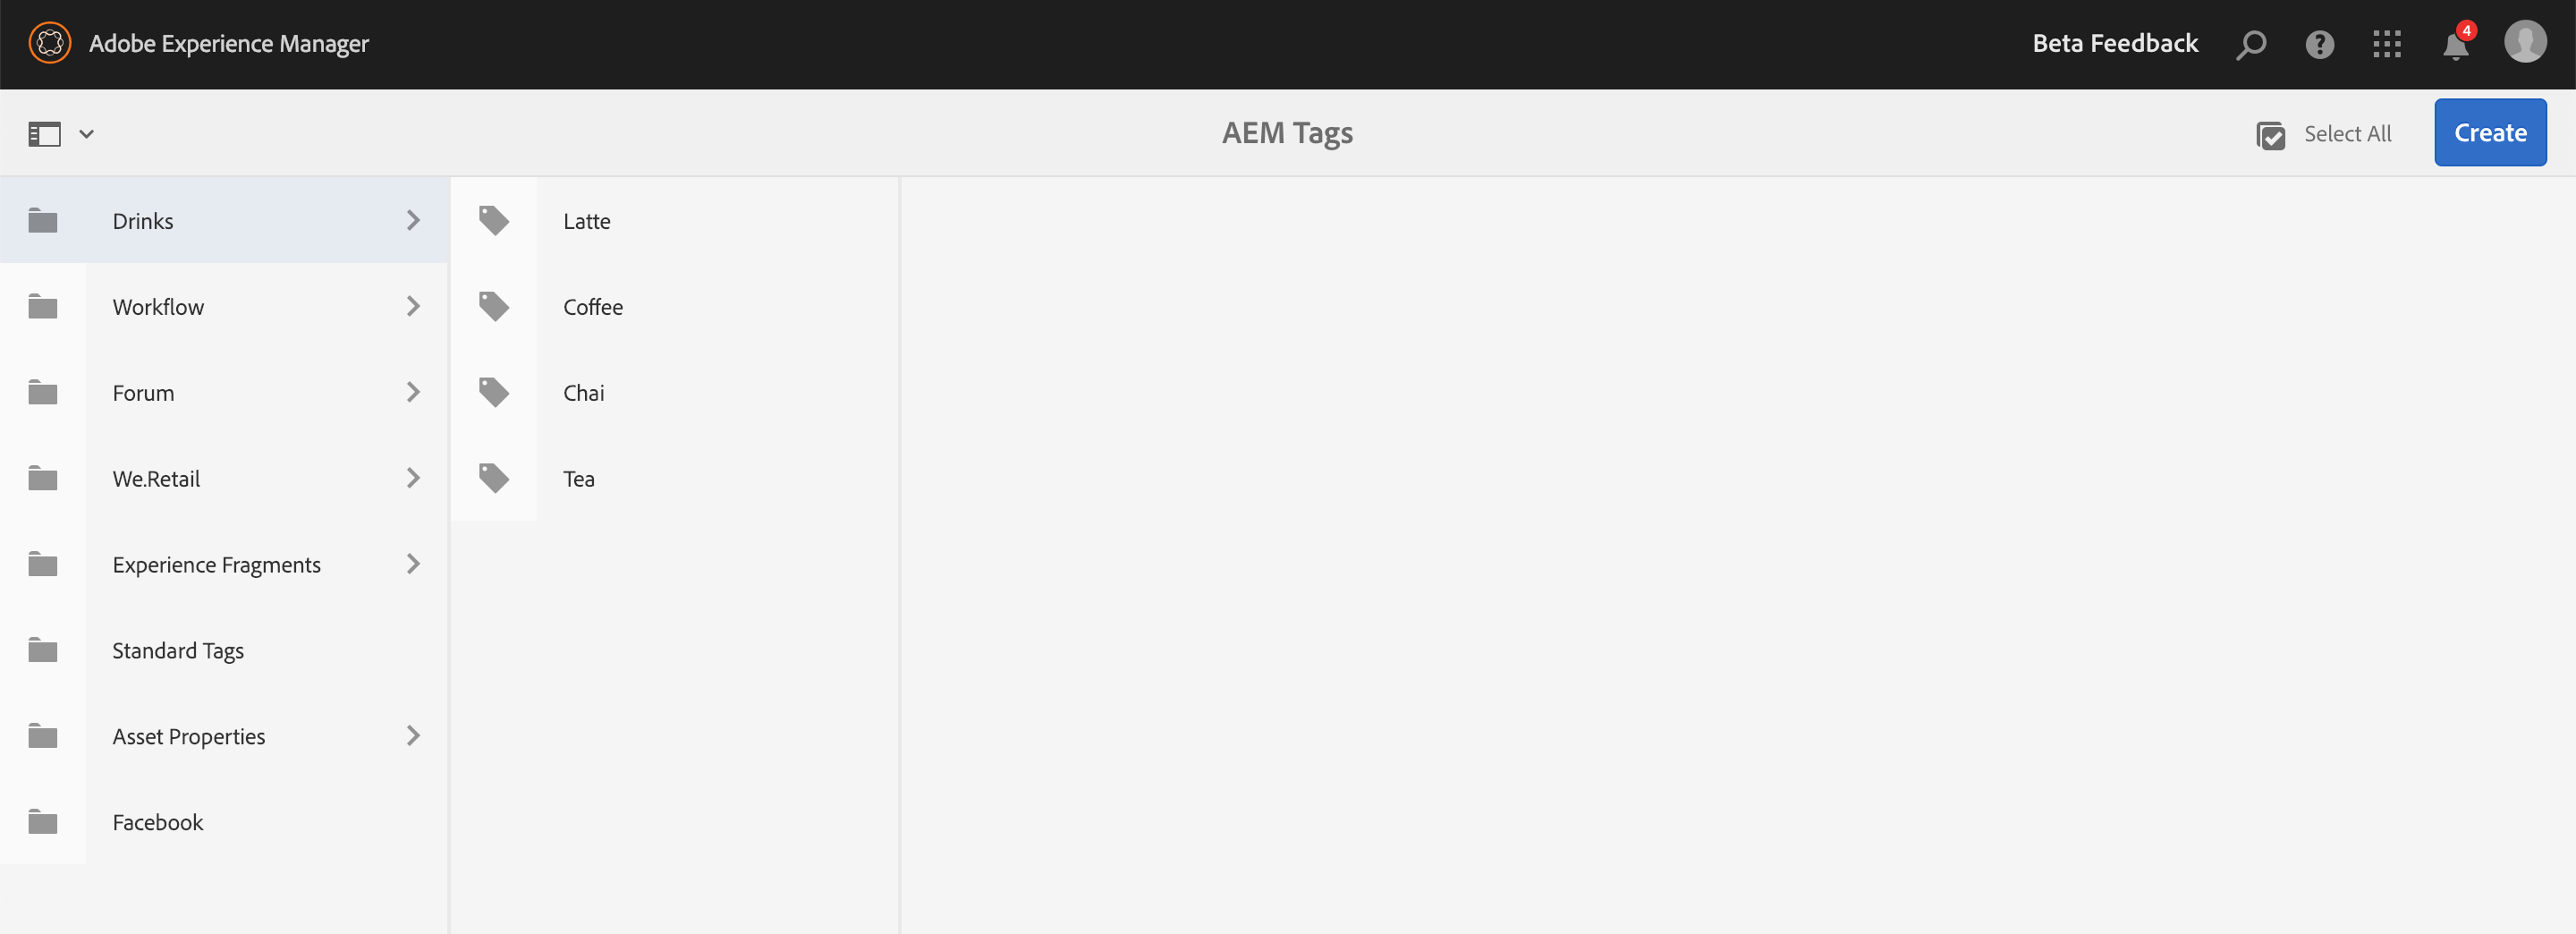
We will be using the tags to train the Smart Tagging service.
Note: This exercise assumes that required subfolders 'Latte' & 'Tea' have been already created and assets uploaded to each accordingly.
Step 1: Tag assets with custom tag for Latte
- Go to L741-Name-Company > Training > Latte folder in AEM (e.g. /content/dam/l741-jane-acme/training/latte).
- Click on Select All & open Properties.
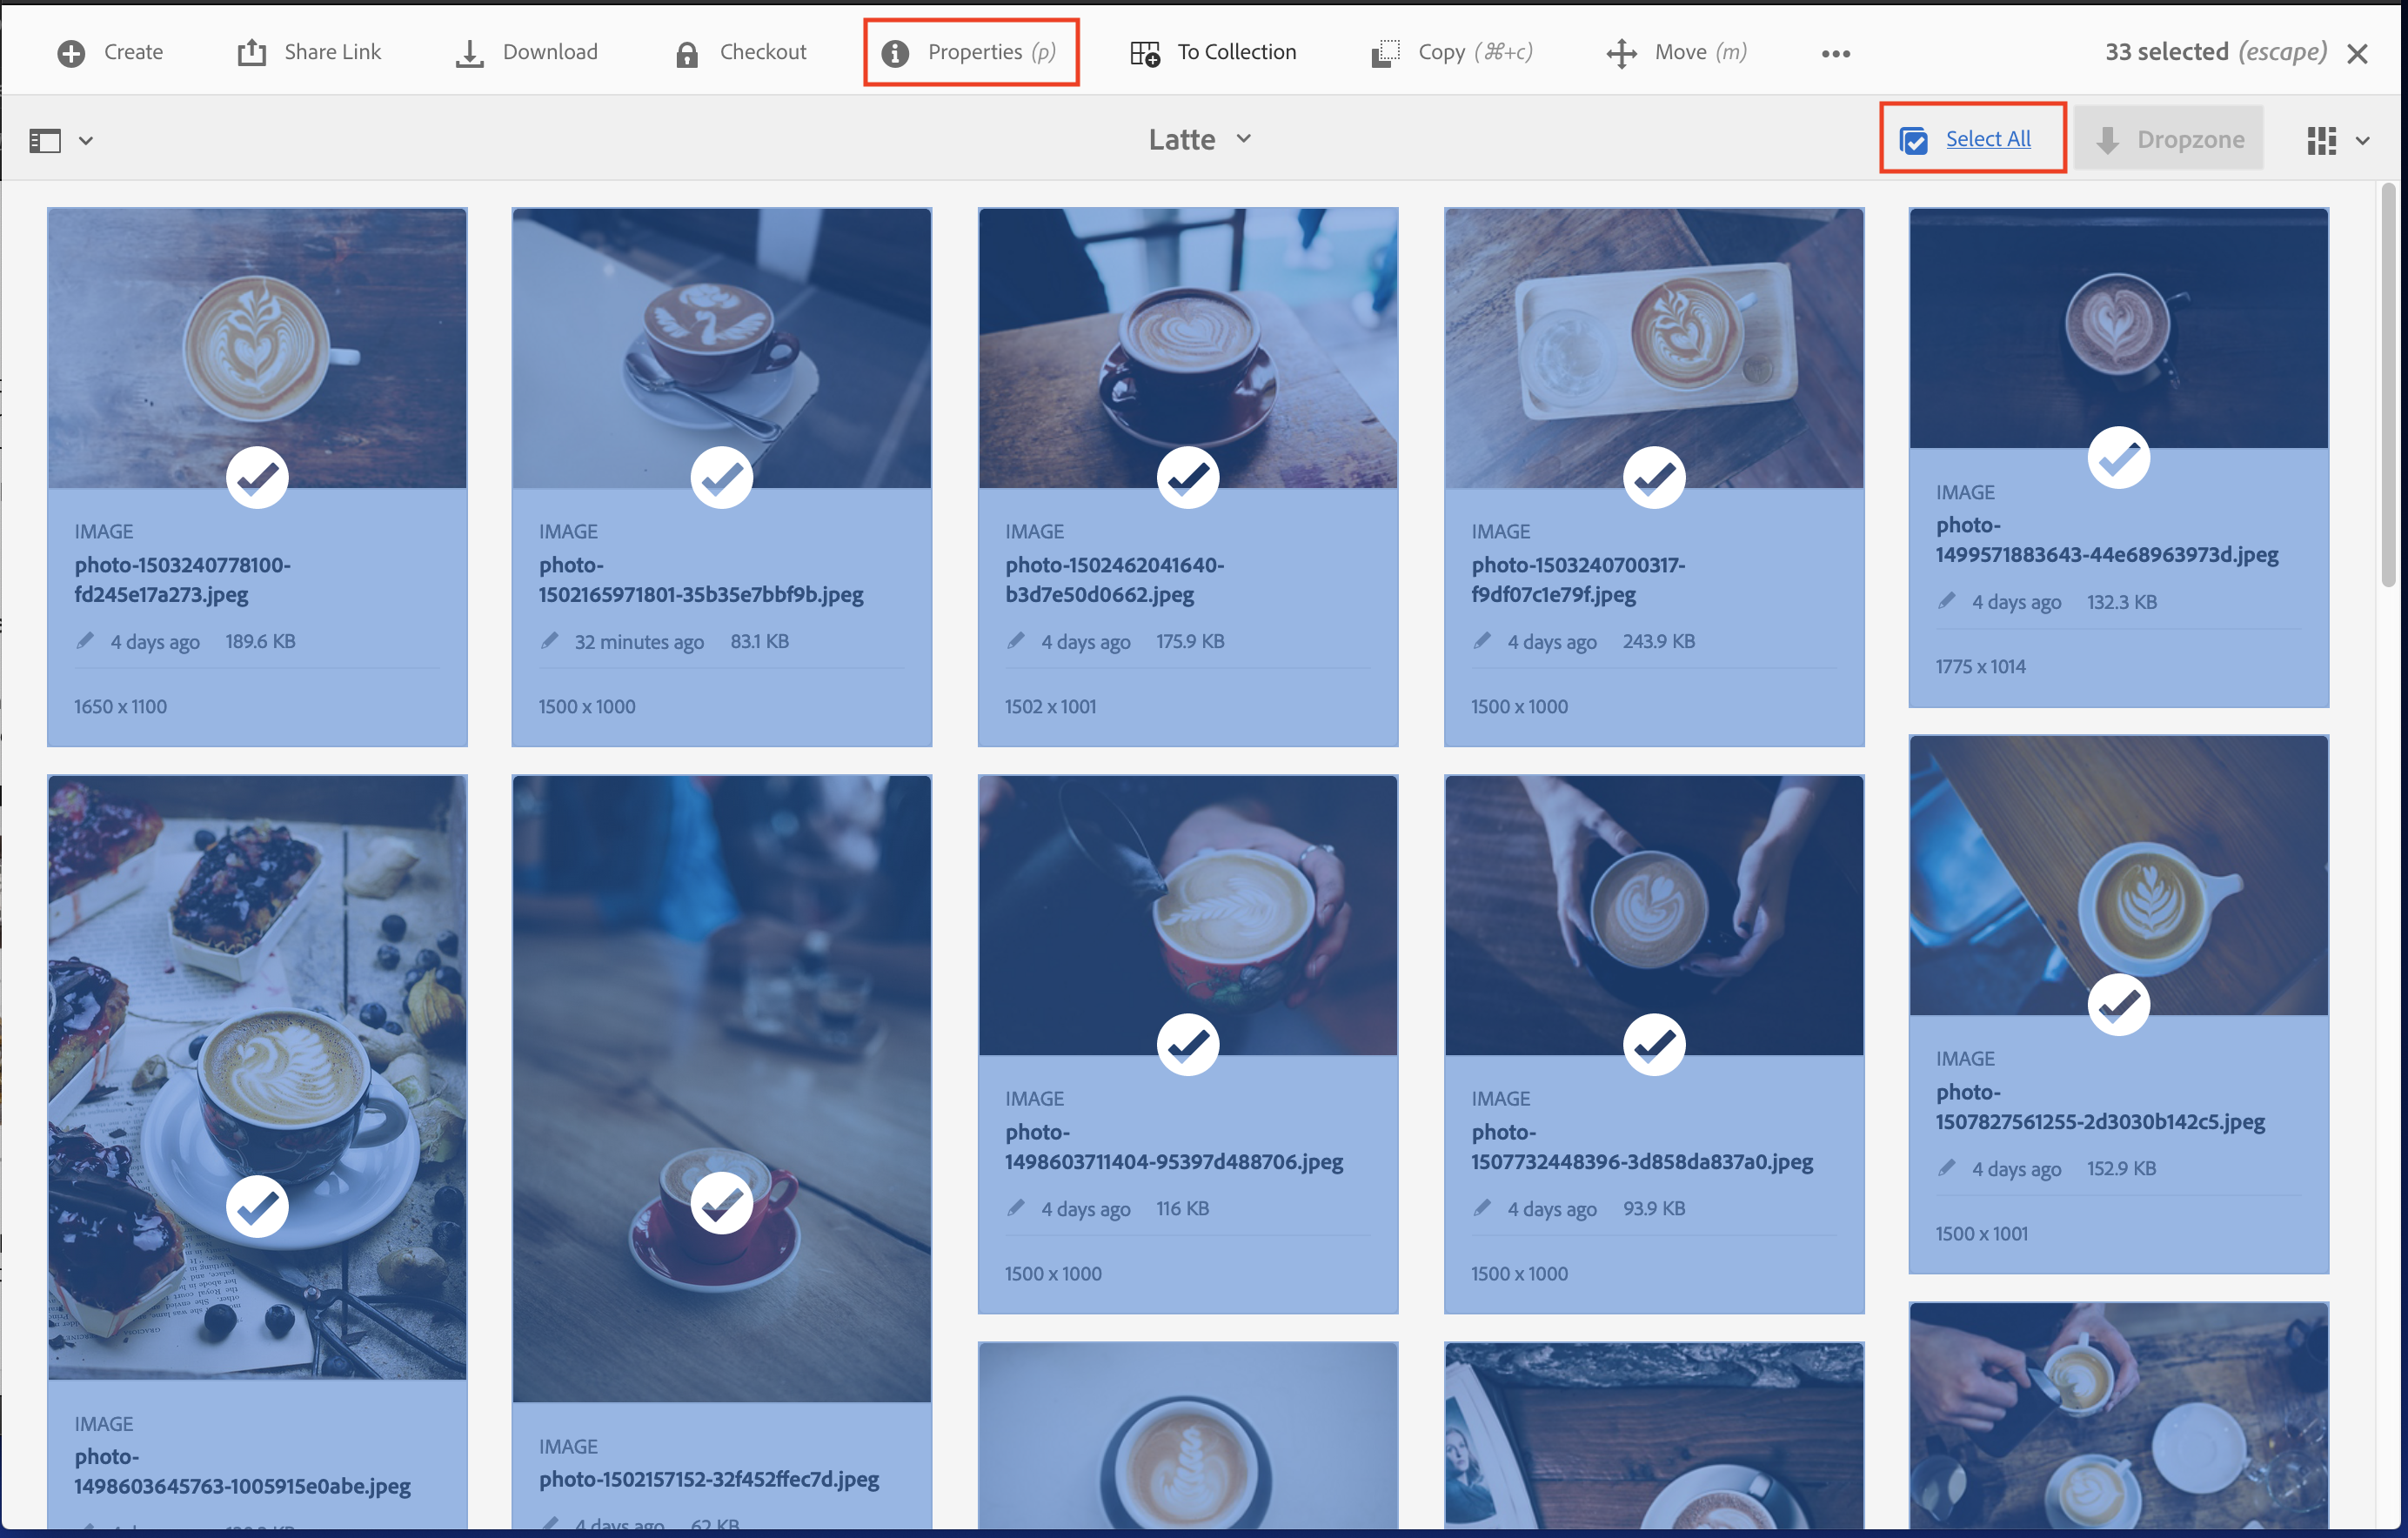
- In Properties, open the Tags property.
- Navigate to Drinks, select the tags Latte & Coffee in the taxonomy, then hit Save to apply the tag.
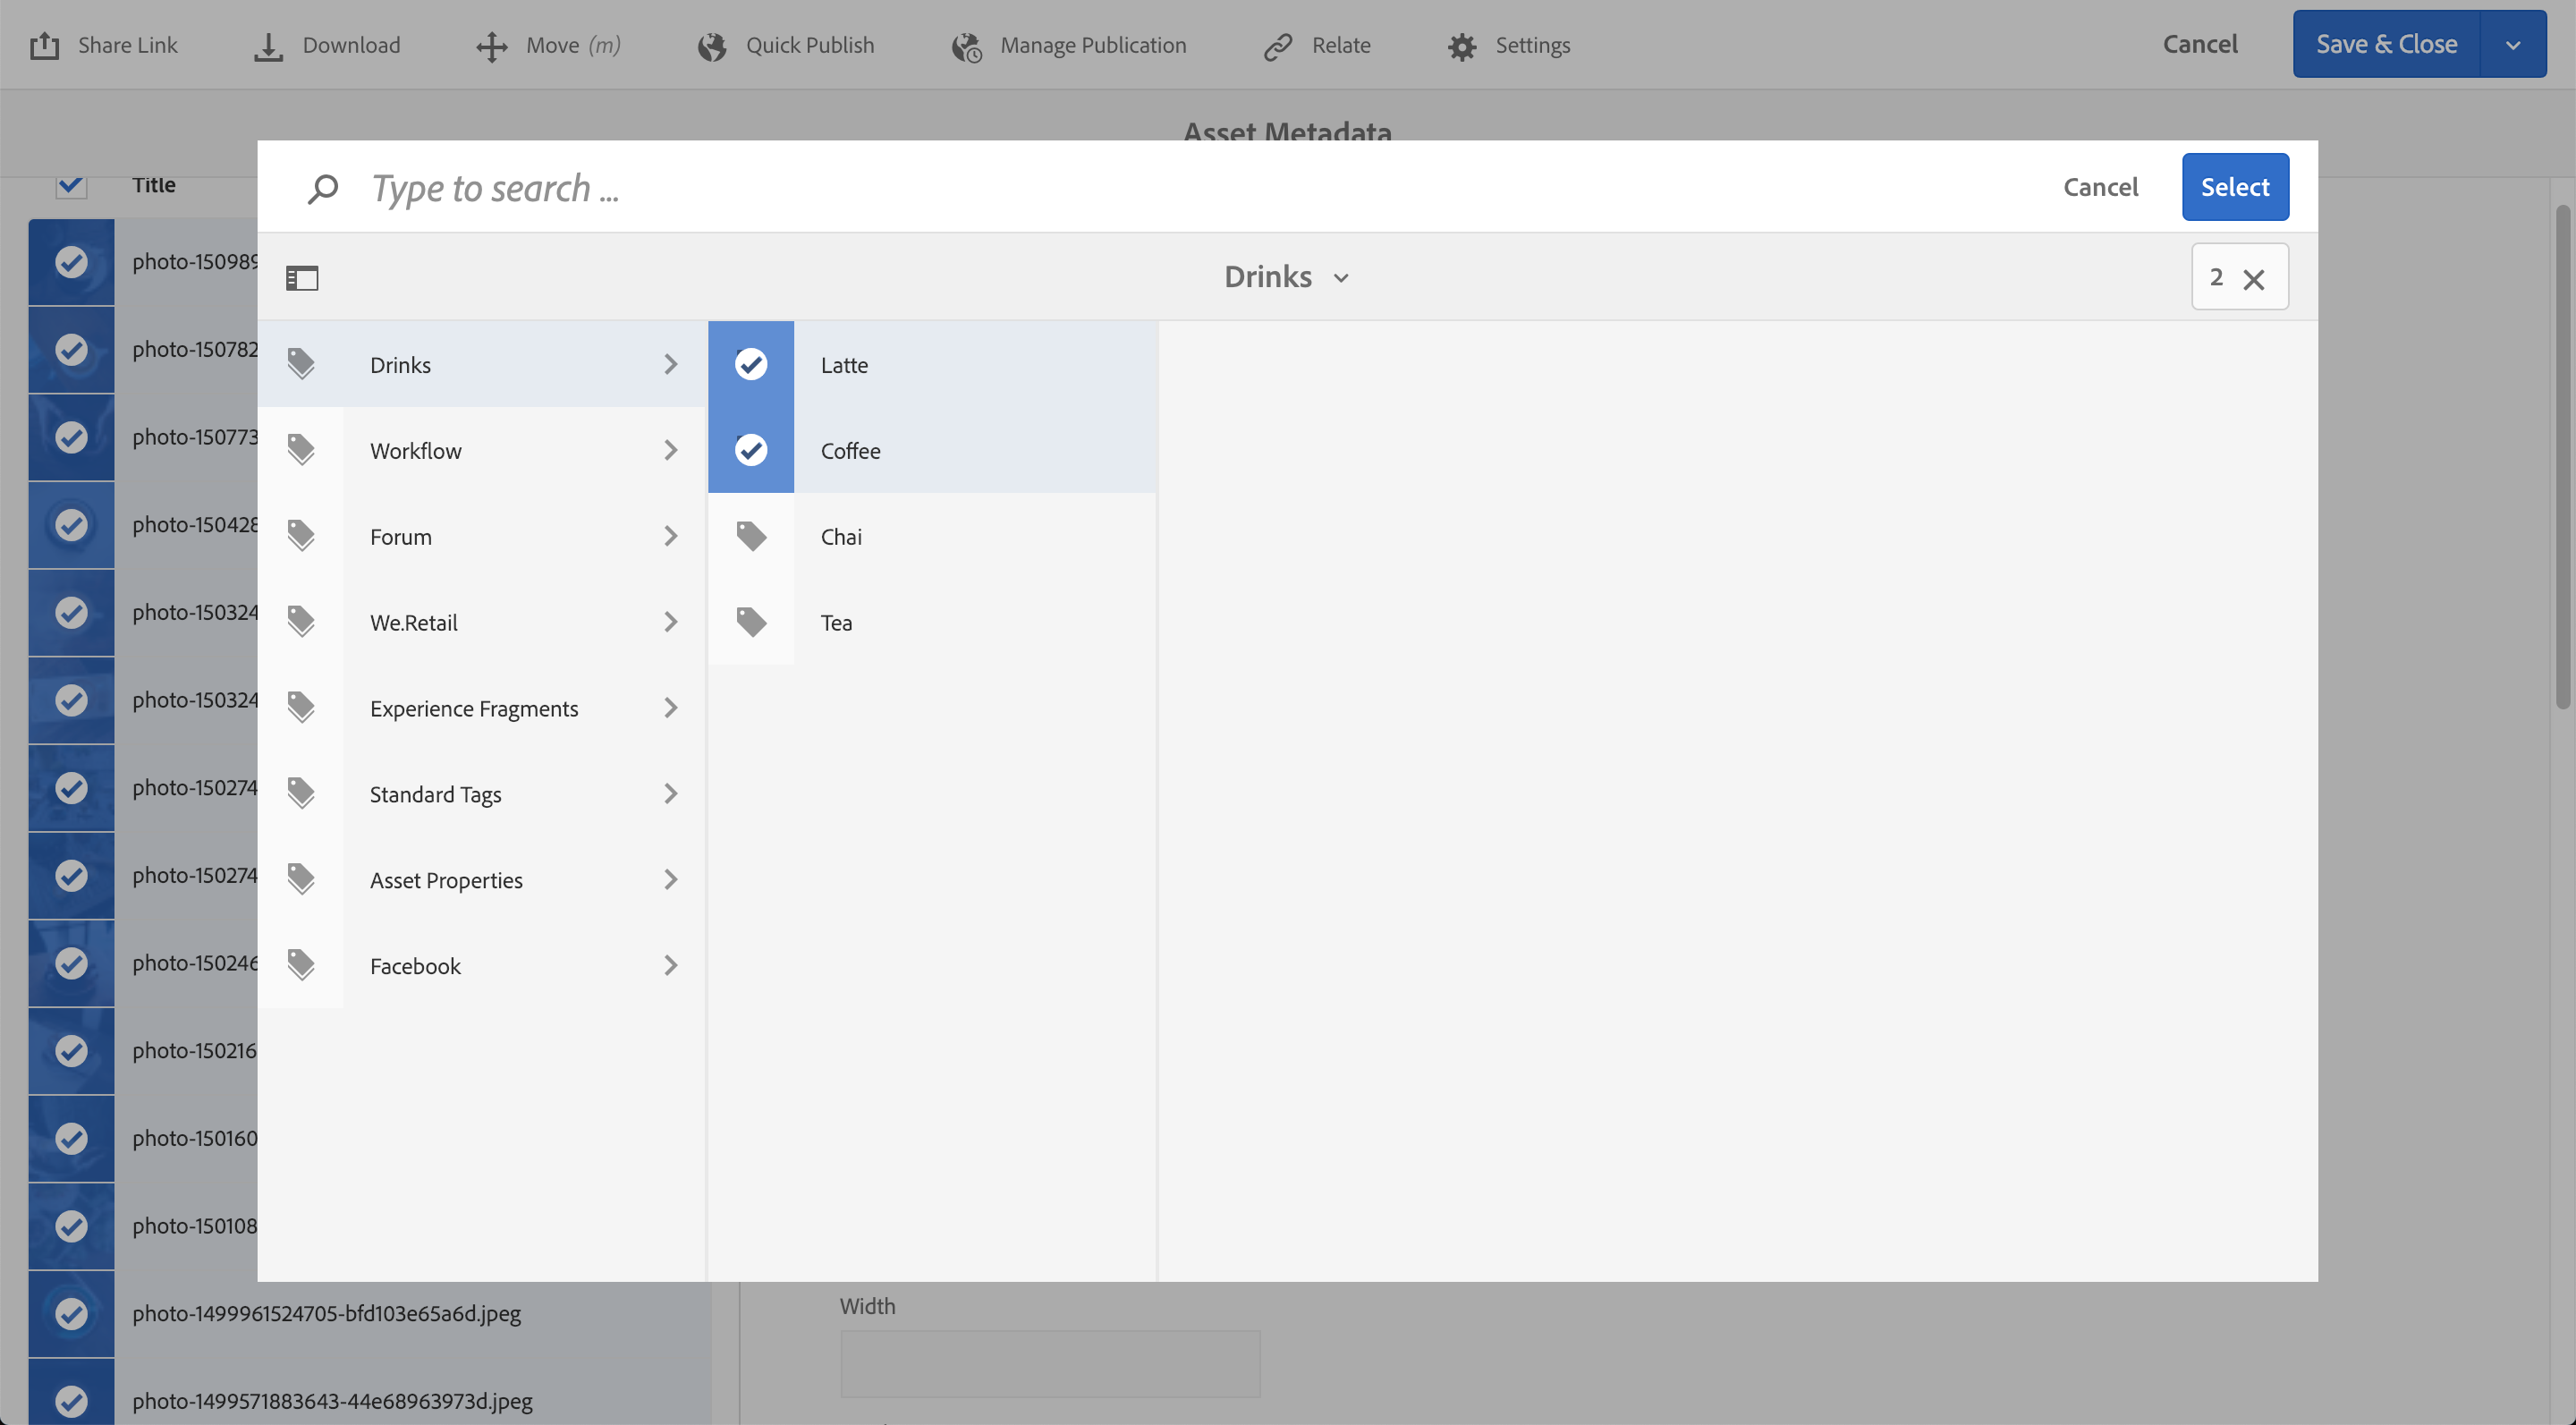
- Click Save & Close button, then select Append Mode option & hit Submit.
Step 2: Tag assets with custom tag for Tea
- Go to L741-Name-Company > Training > Tea folder in AEM (e.g. /content/dam/l741-jane-acme/training/tea).
- Click on Select All & open Properties.
- In Properties, open the Tags Section.
- Navigate to Drinks, select the tags Chai and Tea in the taxonomy, then hit Save to apply the tag.
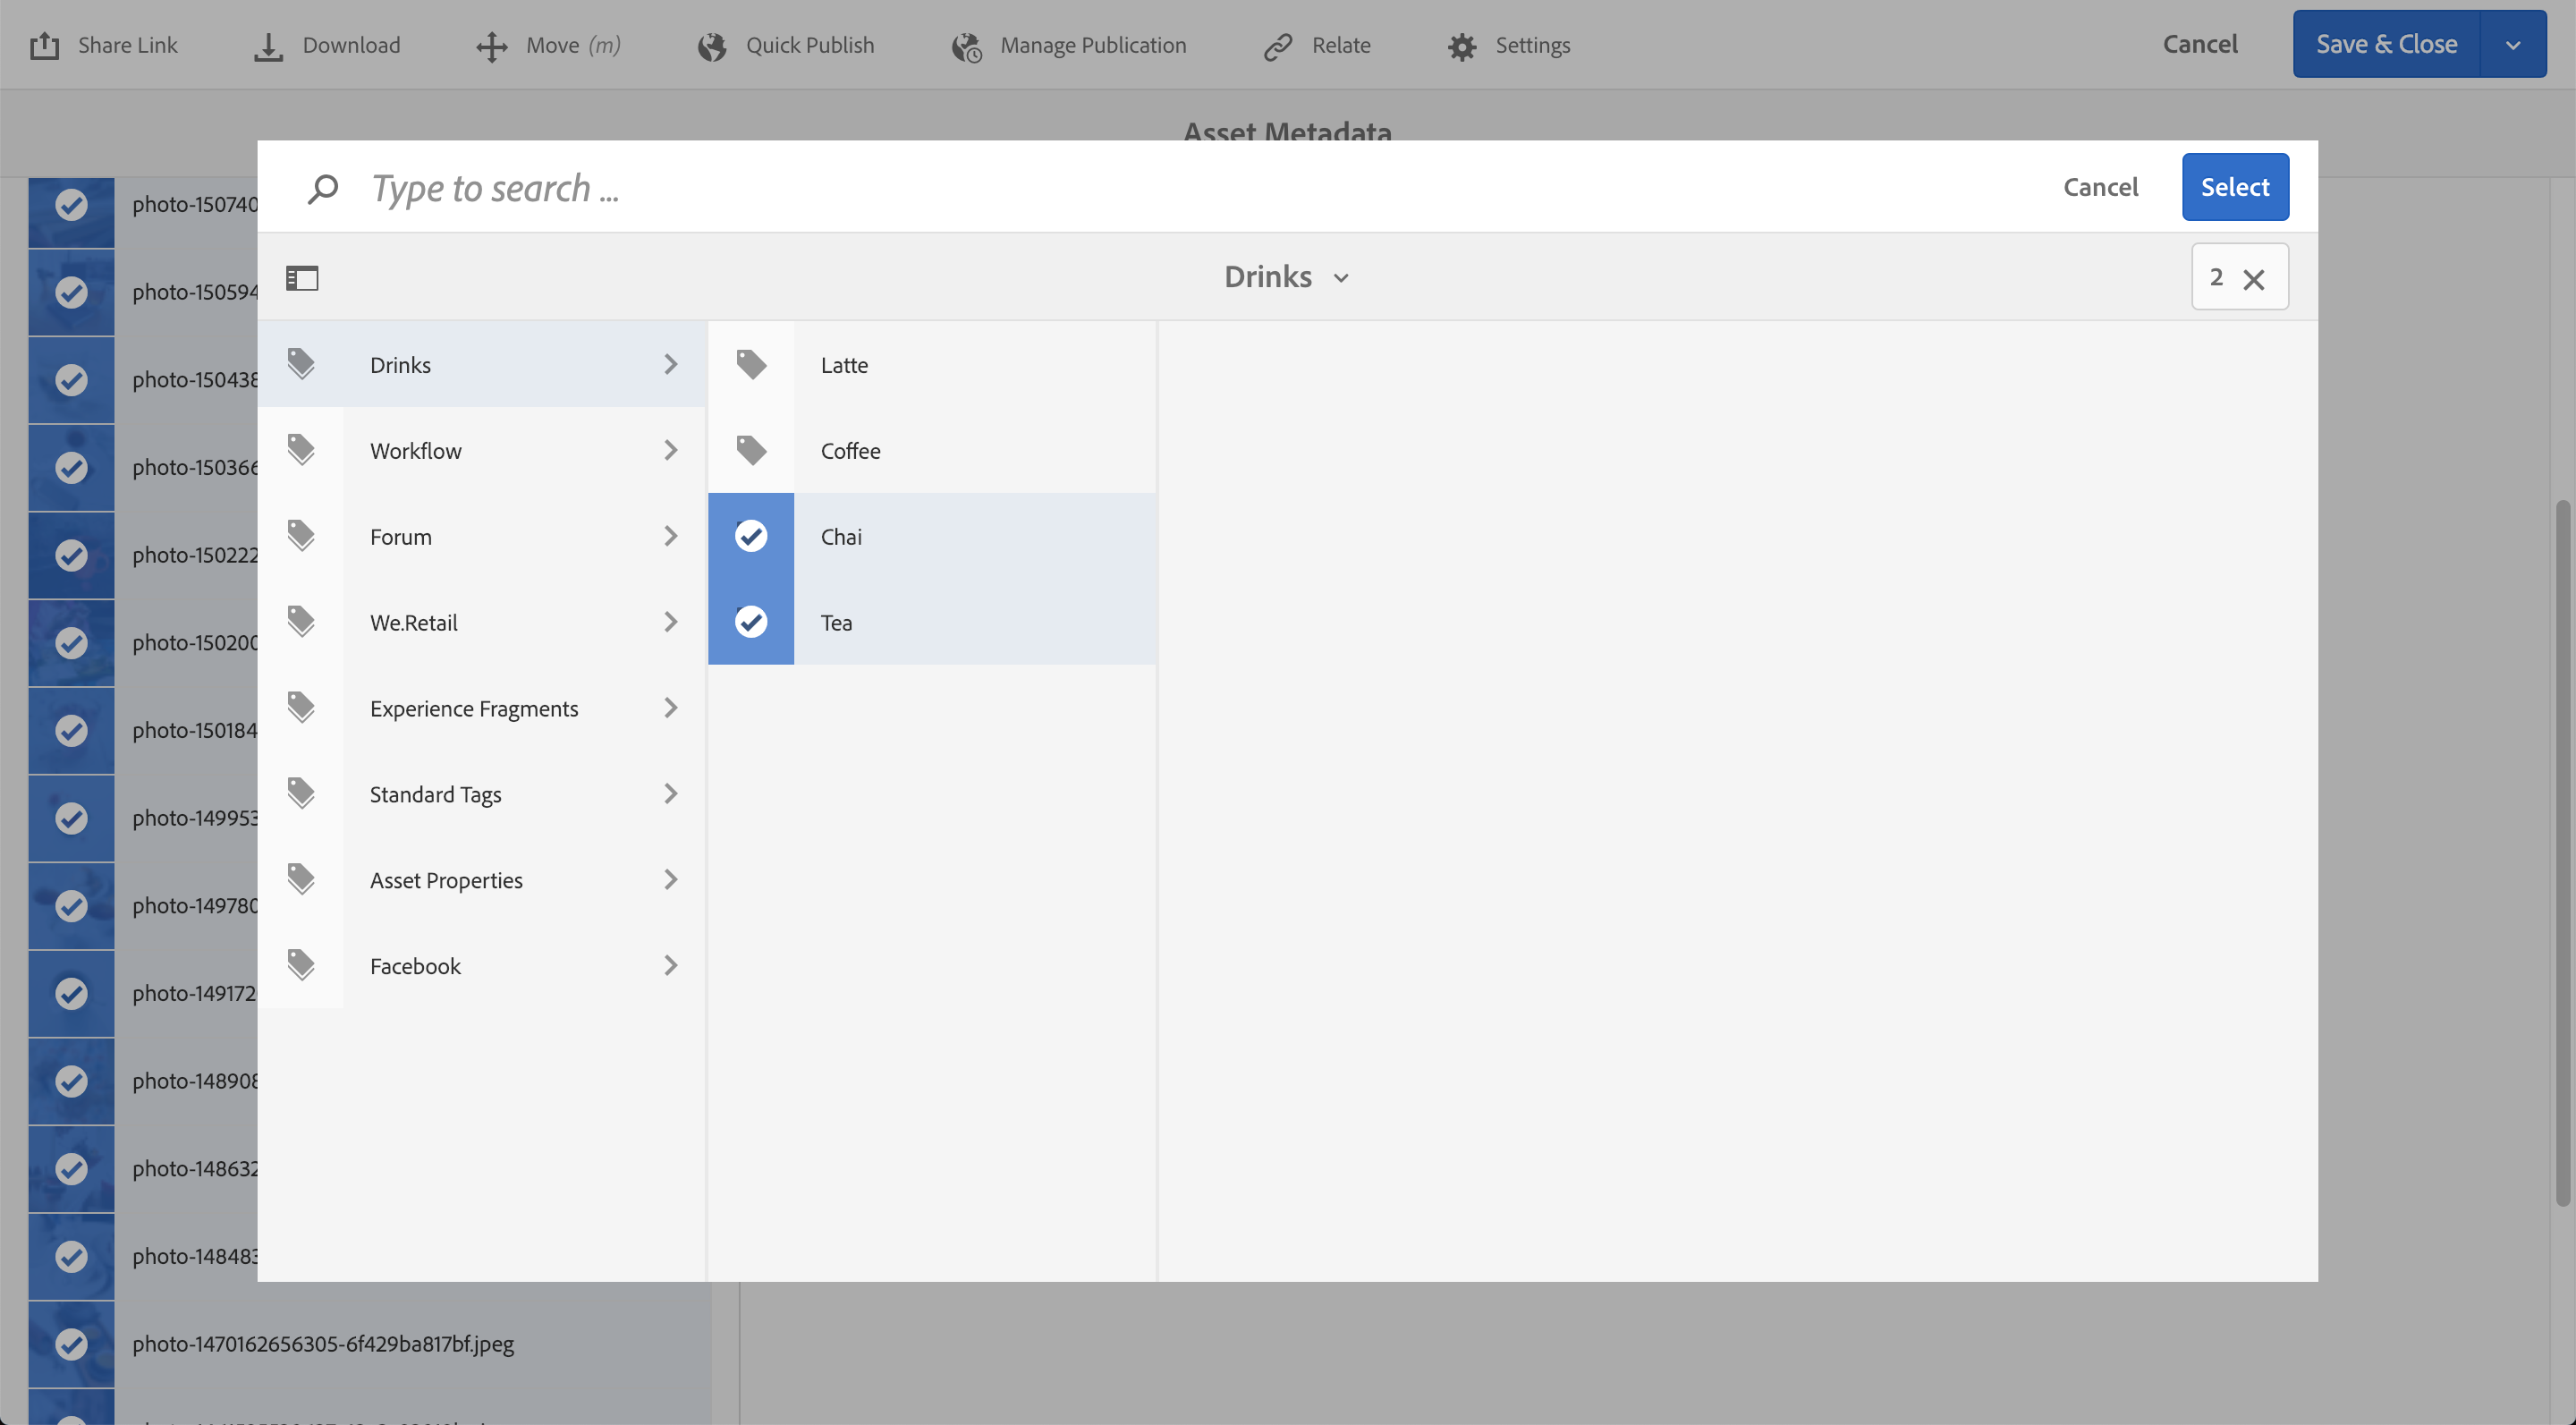
- Click Save & Close button, then select Append Mode option & hit Submit.
As part of the exercise, we will train the Smart Tagging service for custom tags by running the Smart Tagging Training workflow in AEM.
Step 1: Smart Tags Training workflow
- Open Global Navigation by clicking on AEM logo on upper left corner of the screen.
- Select Tools then select Workflow to open workflow related cards.
- Navigate to the Models card to open Workflow Models listing in AEM.
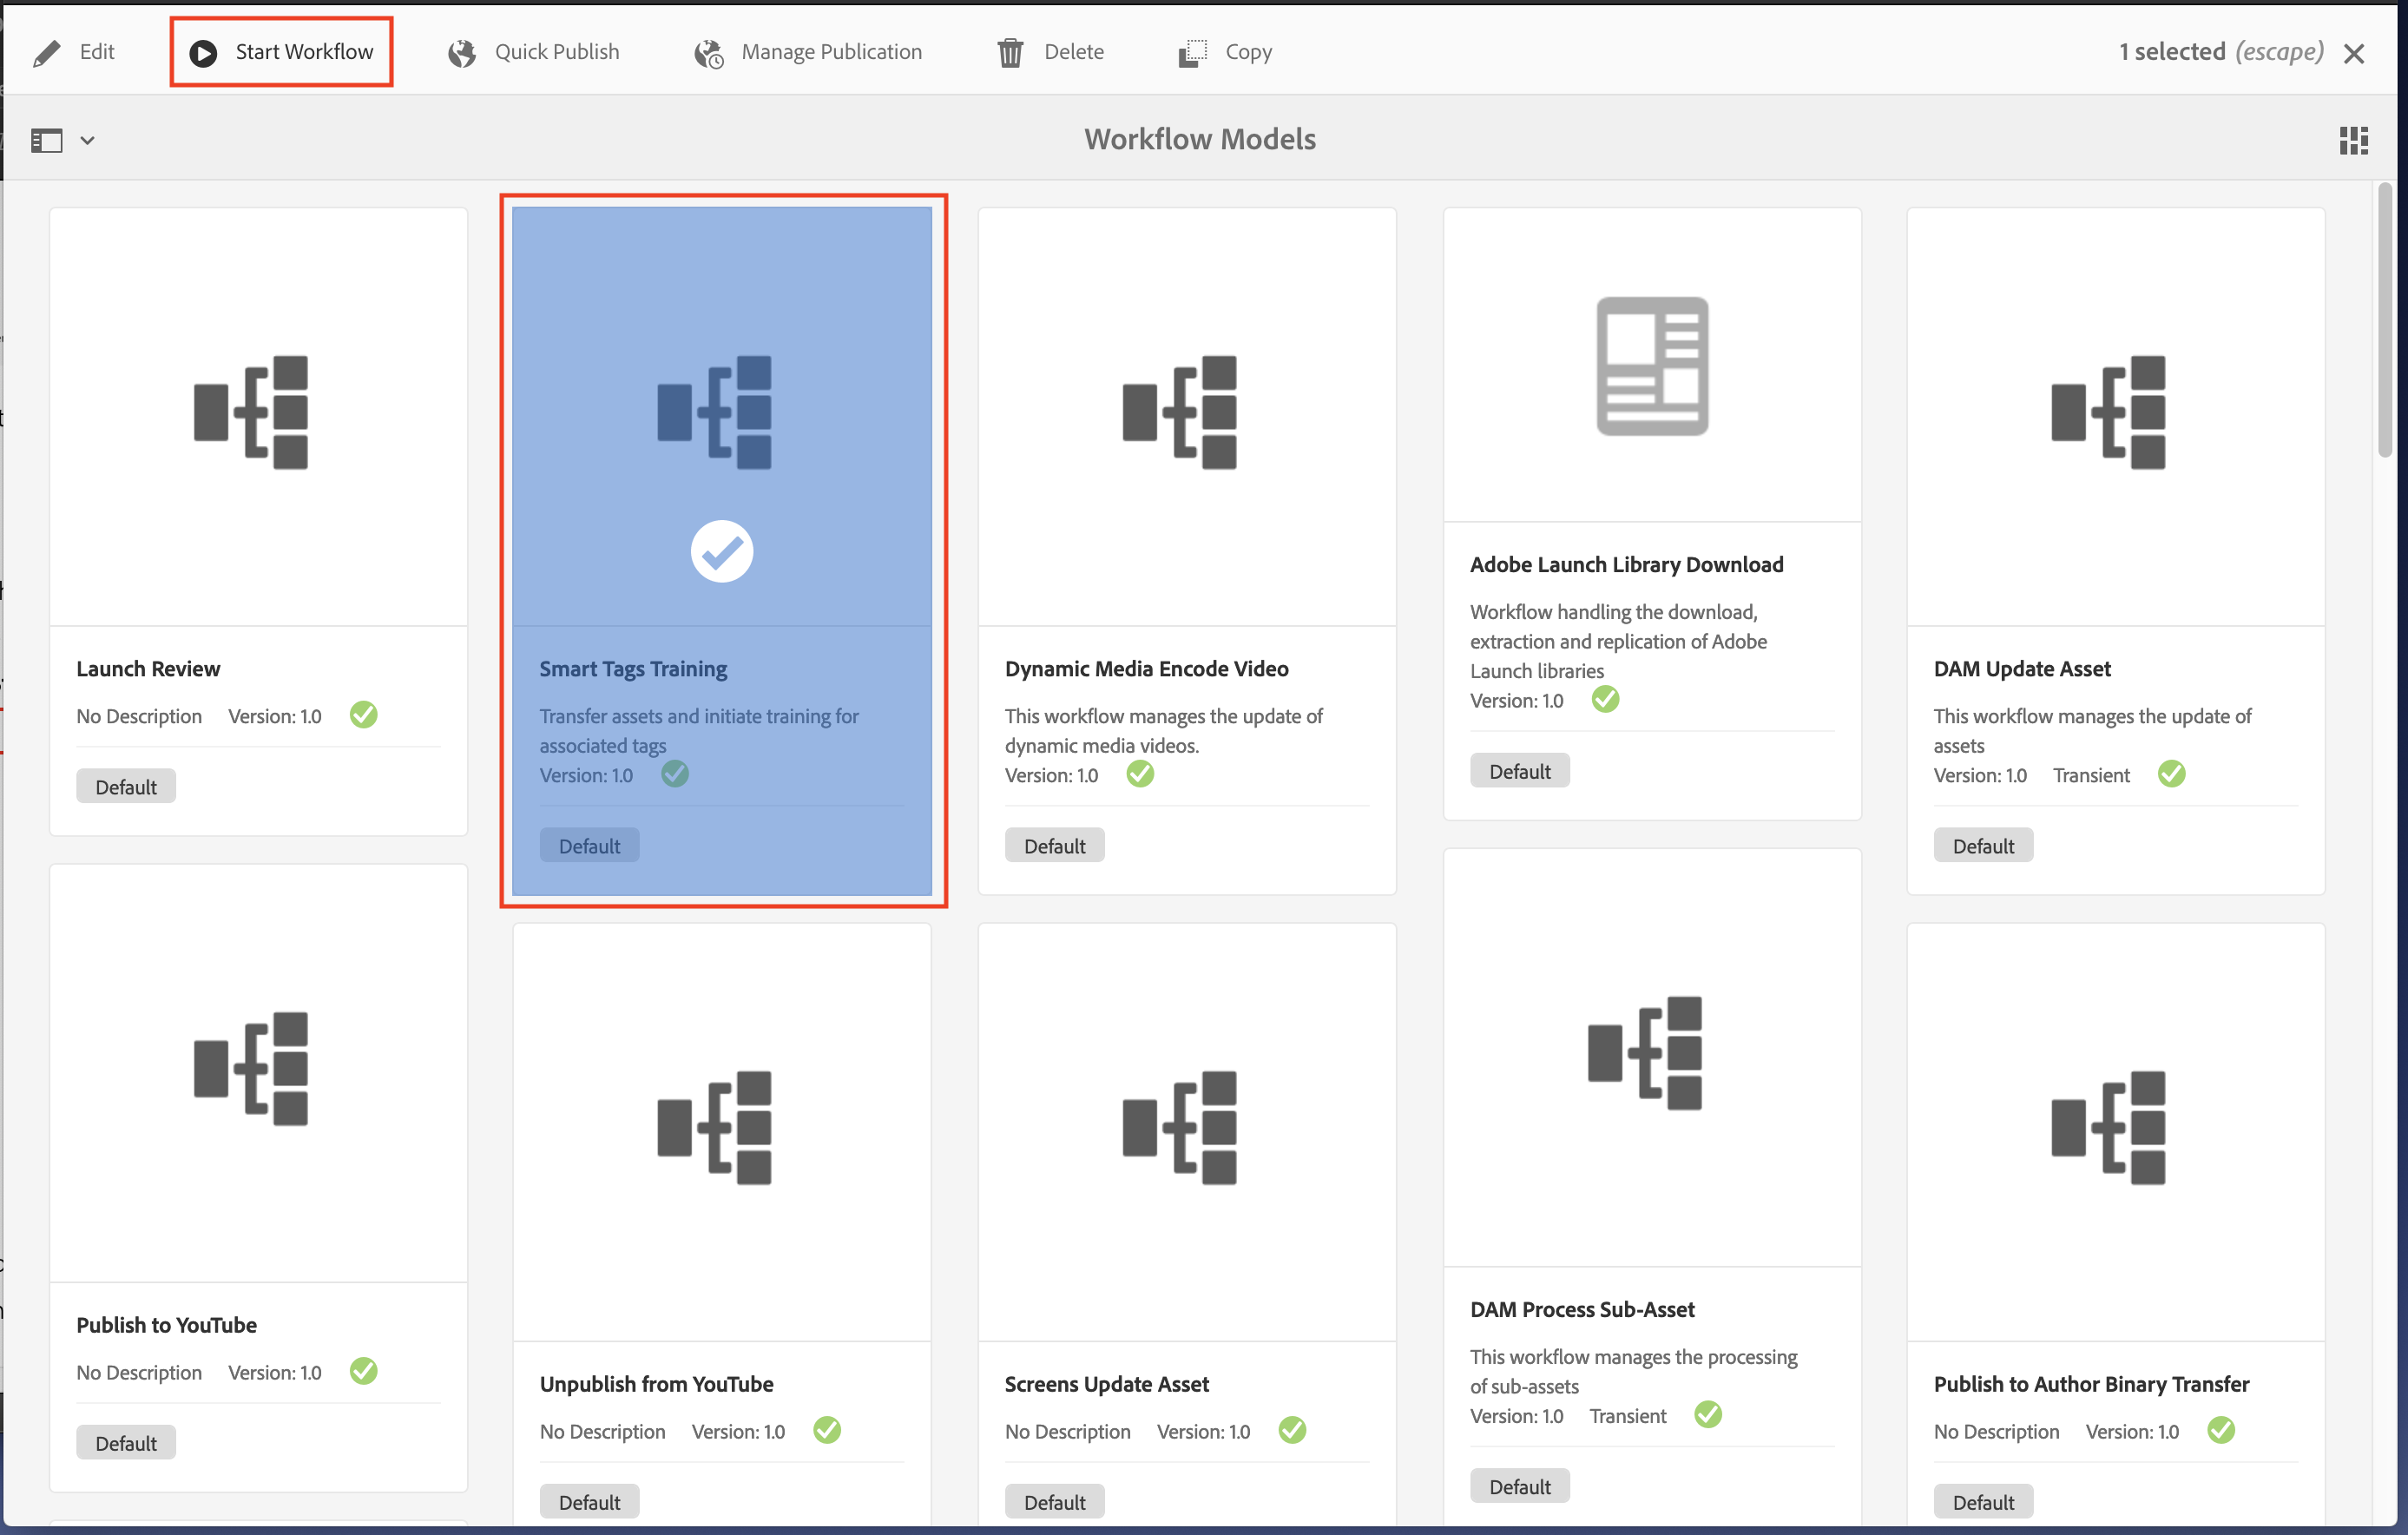
Step 2: Start Smart Tags Training workflow
- Look for Smart Tags Training in workflow models.
- Select the workflow by click on checkbox.
- Click on Start Workflow items in top toolbar.
- In the popup dialog for the workflow, click on the browse icon under Payload field
- Choose the parent folder you have created for this lab (e.g. L741-jane-acme/training)
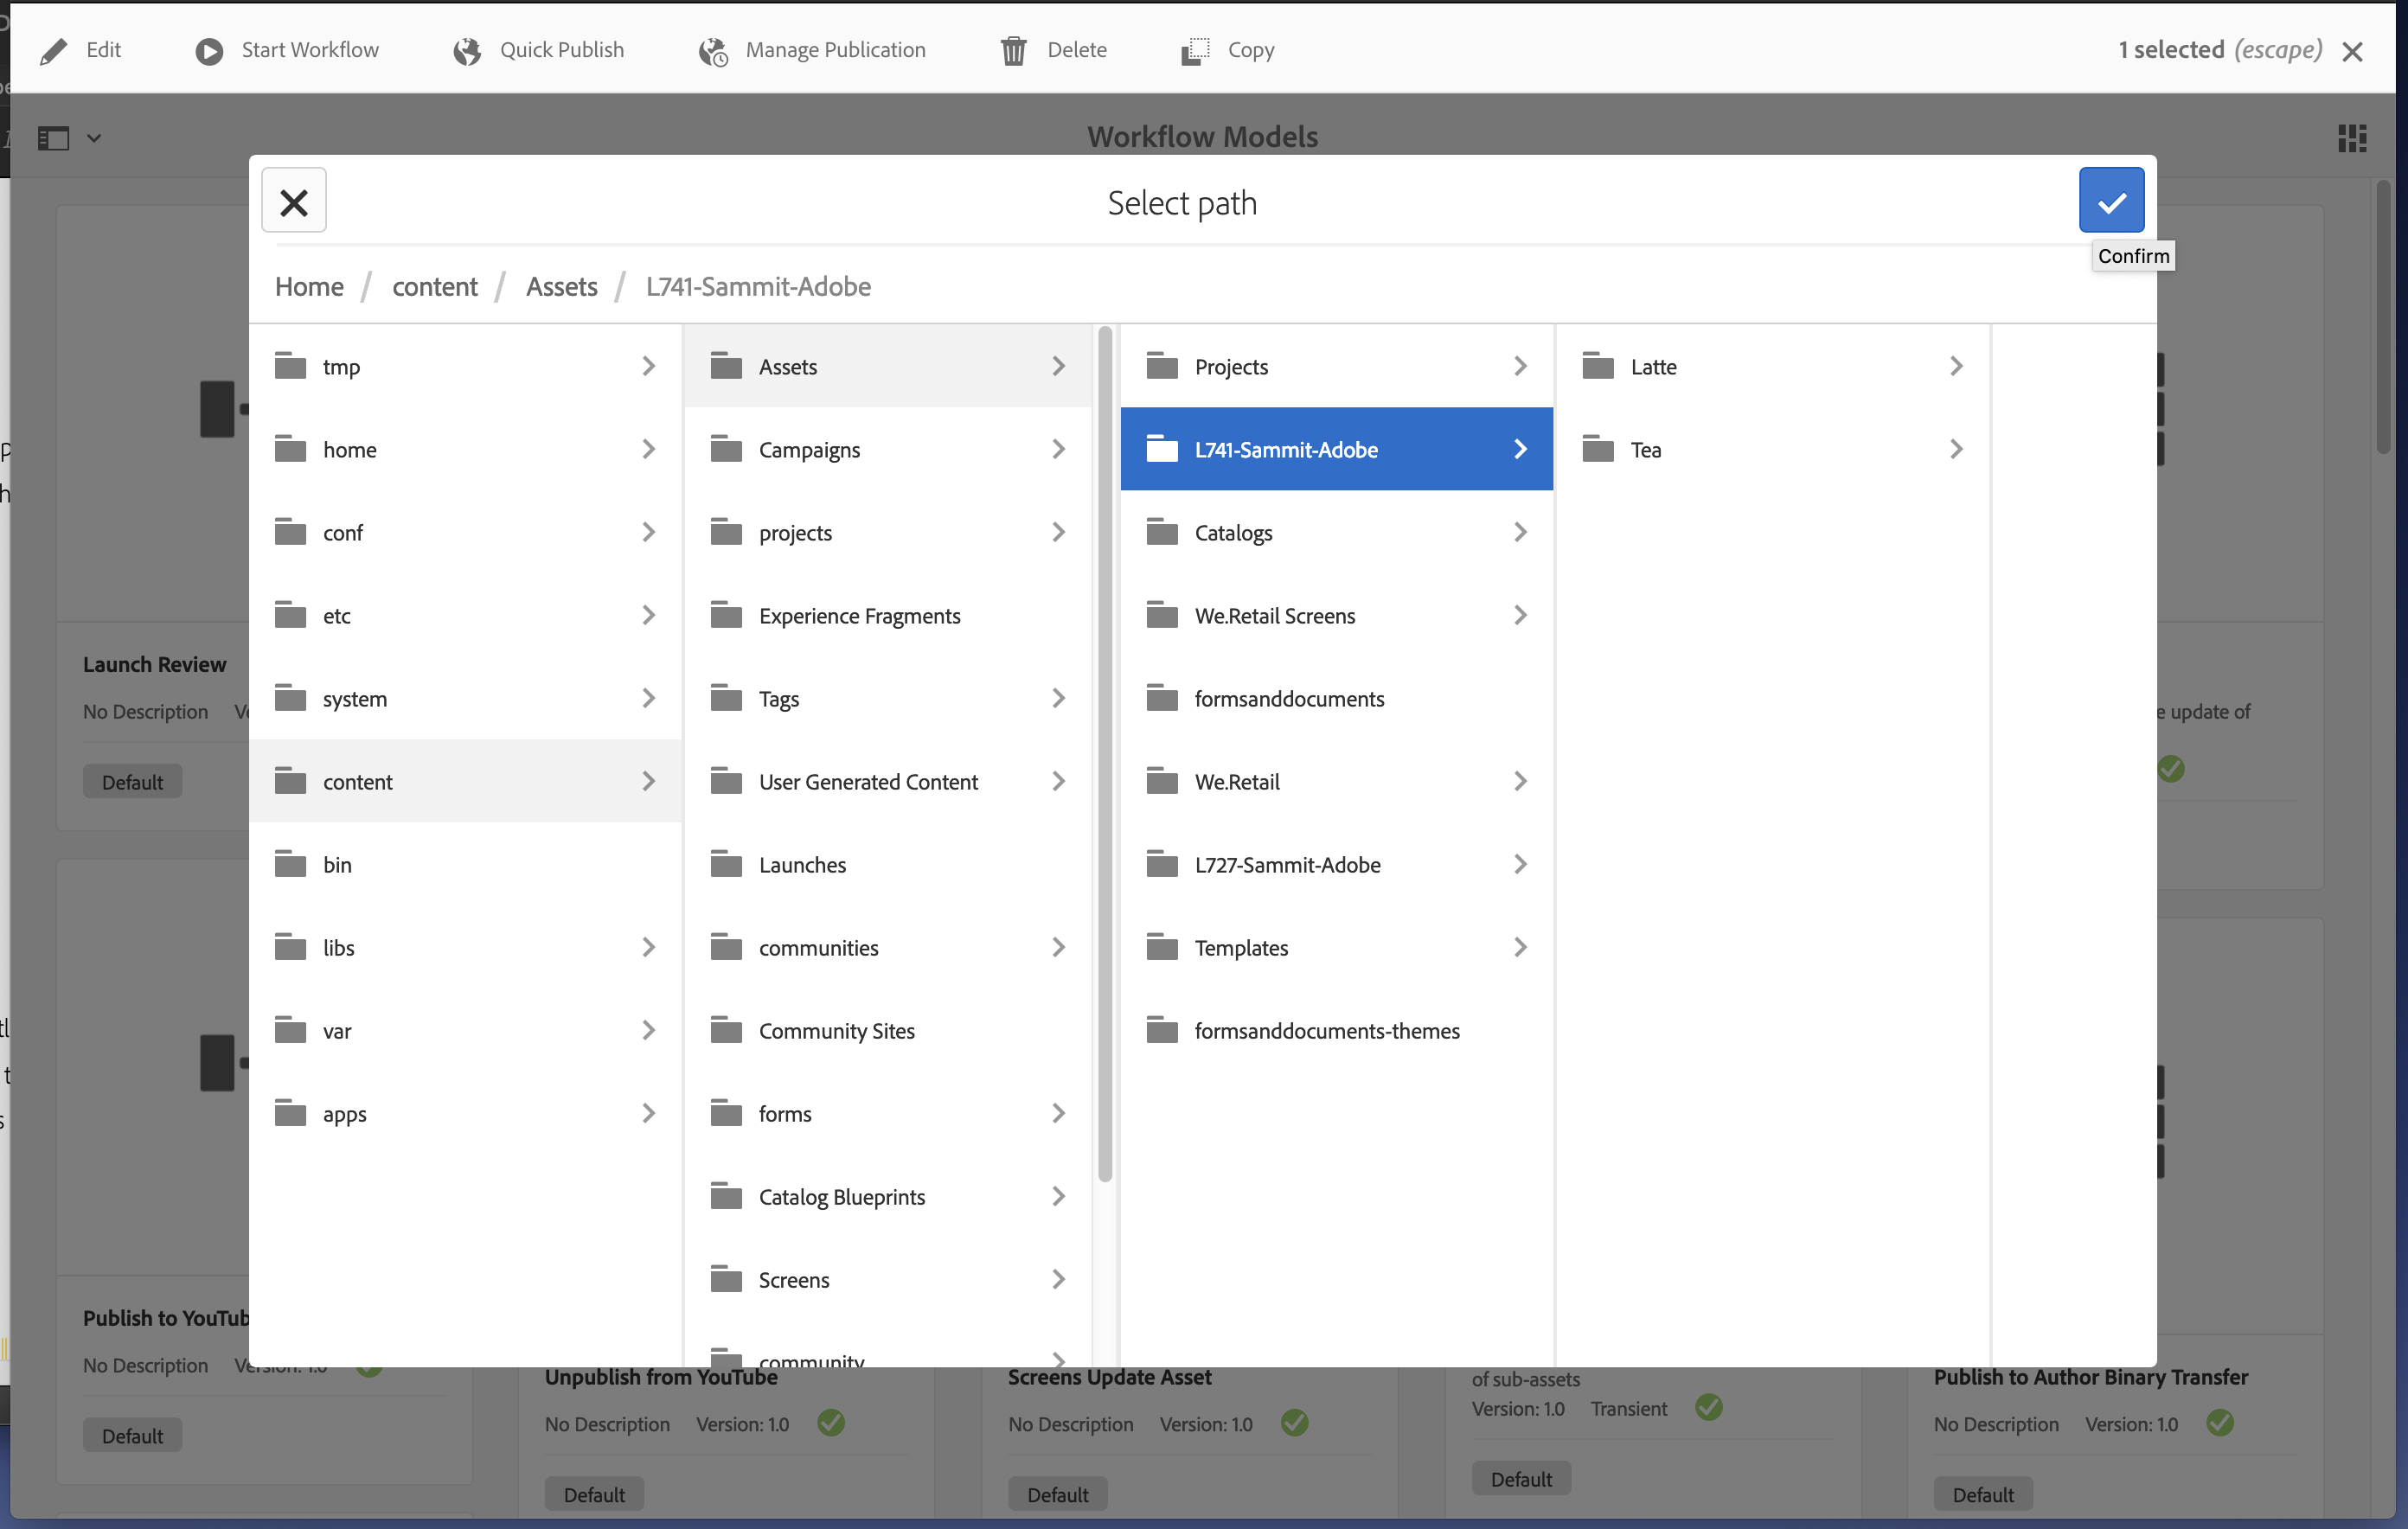
- Give a Title to your workflow and click Run.
- This step will trigger the Smart Tags Training workflow and let it run in background.
- Once the workflow is complete, The Smart Tags Services would have learned about custom tags you had setup for sample assets.
Exercise 2.4: Verifying status of the Training
To check whether the Enhanced Smart Tags service is trained on your tags with the training set of assets, review the training workflow report from the Reports console.
- Click on the AEM logo, and go to Tools > Assets > Reports.
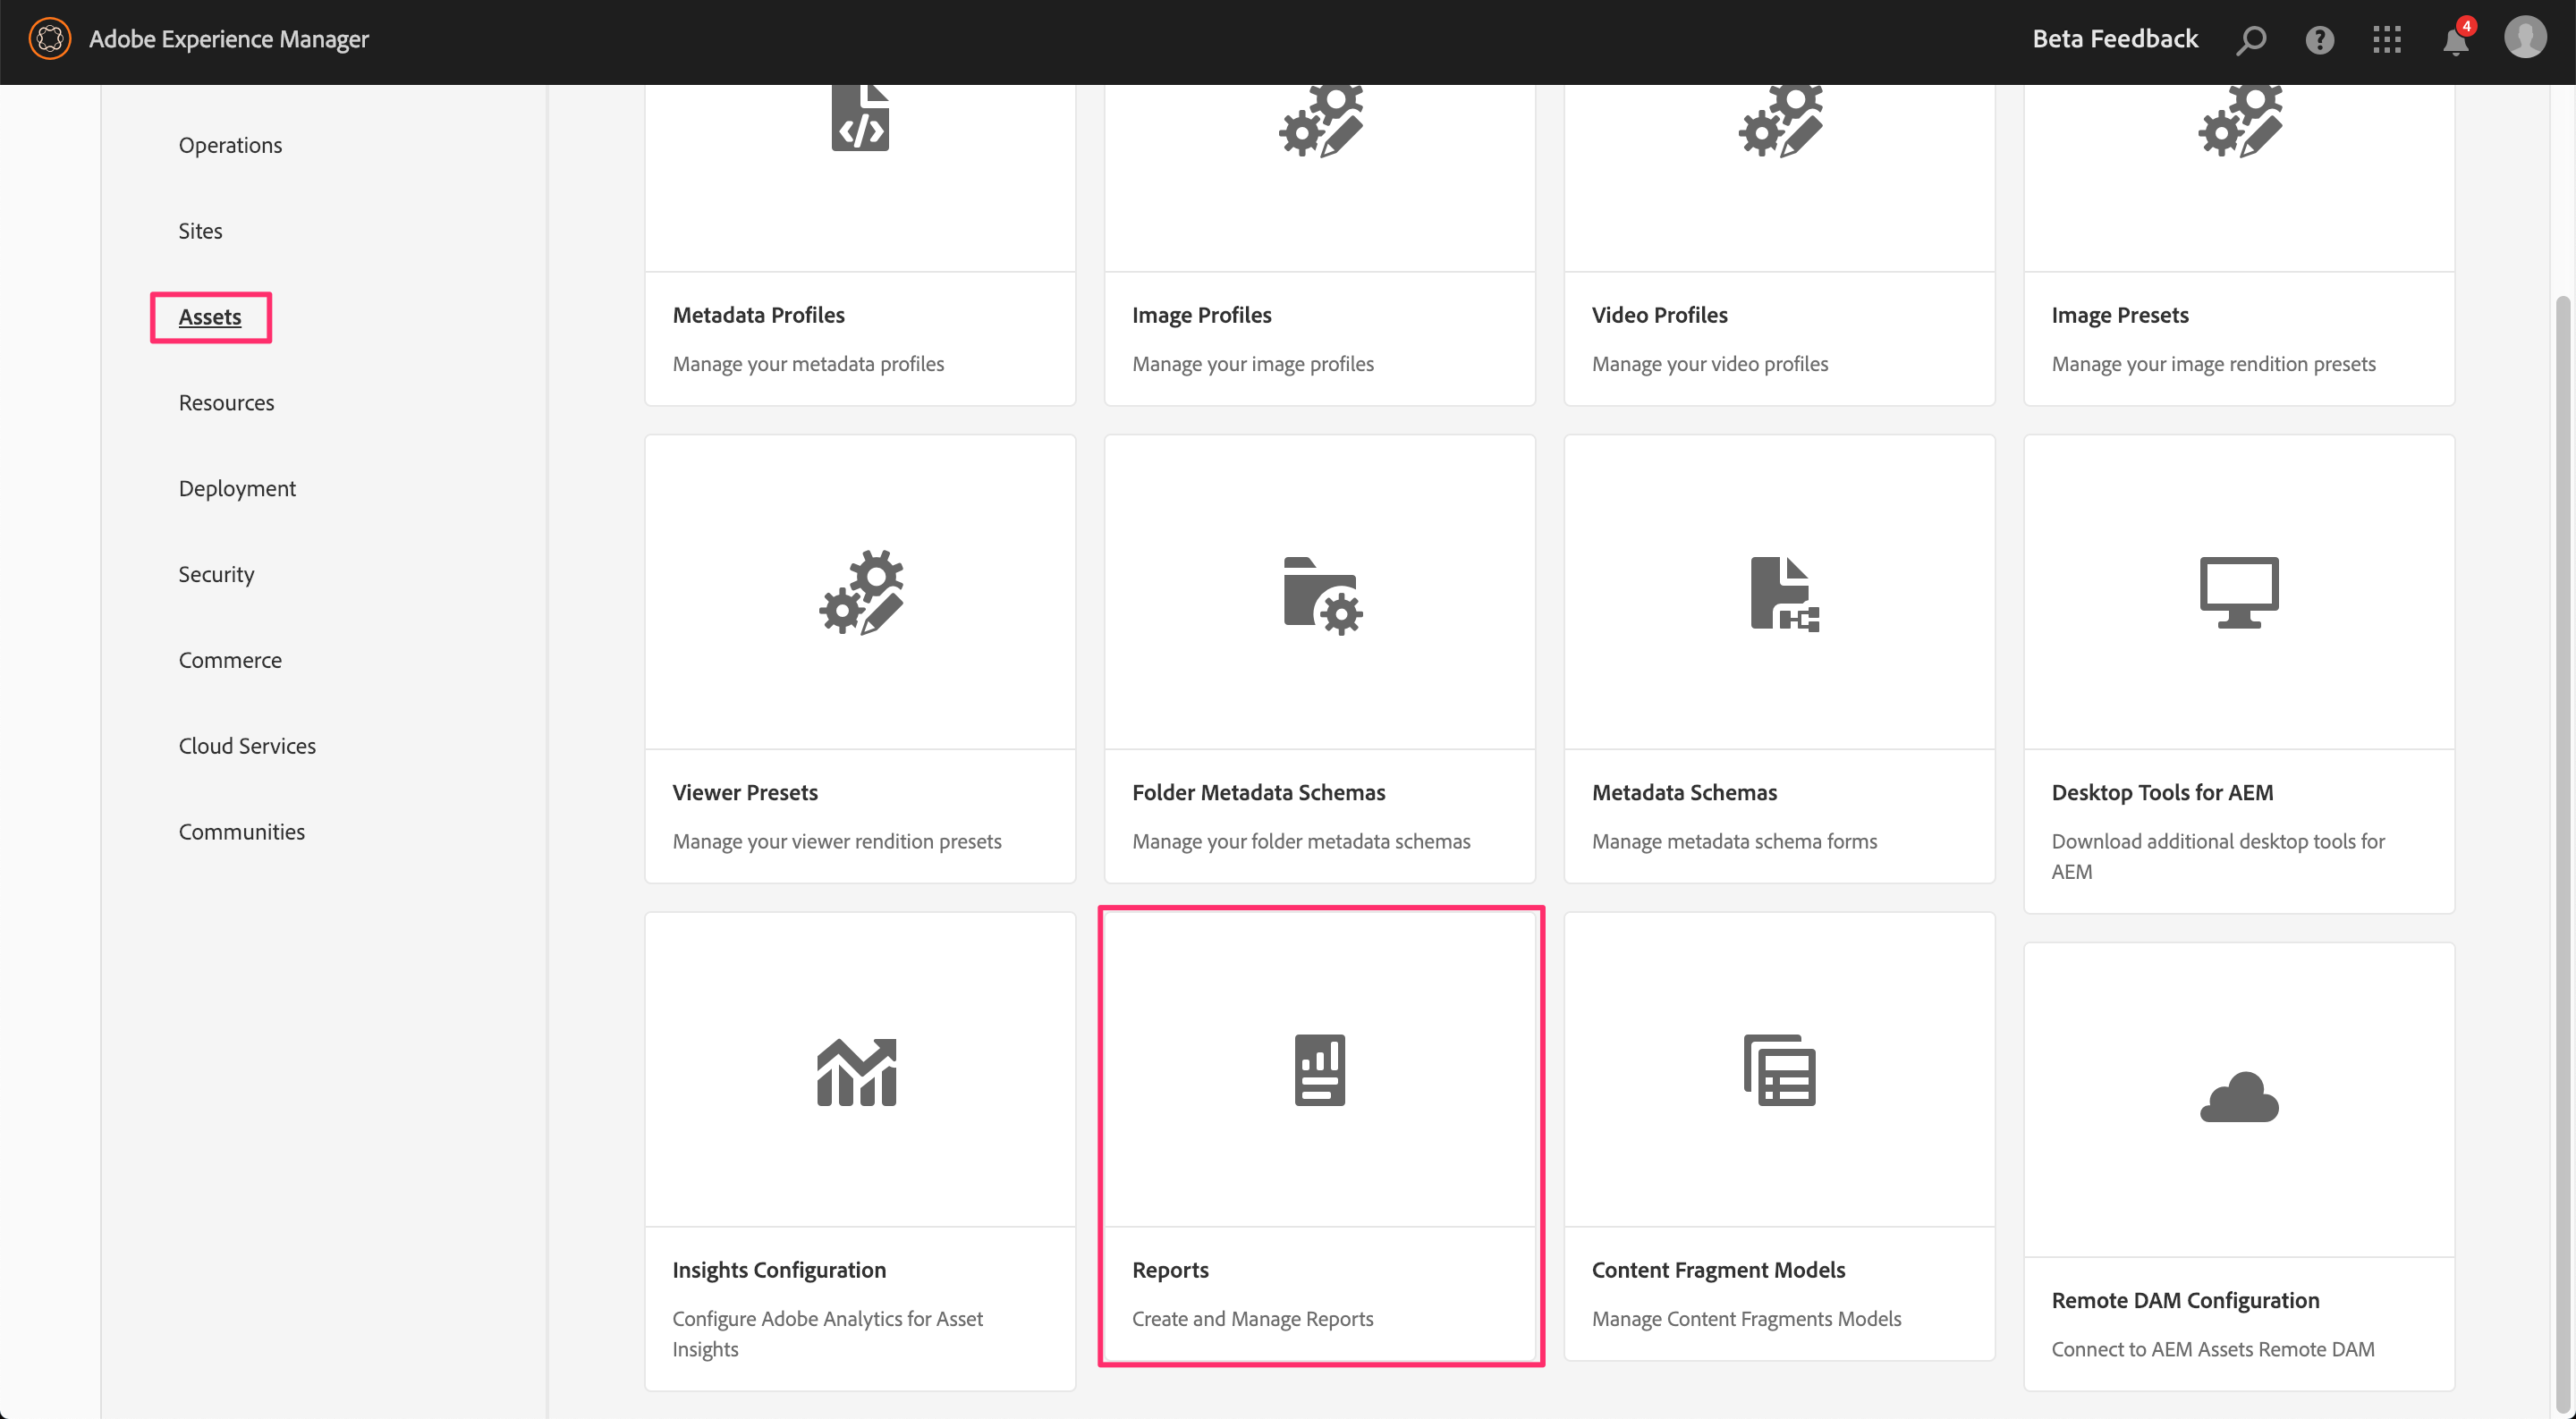
- In the Asset Reports page, click Create.
- Select the Smart Tags Training report, and then click Next from the toolbar.
- Specify a title and description for the report. Under Schedule Report, leave the Now option selected. Then, click Create from the toolbar.
- In the Asset Reports page, select the report you generated. To view the report, click the View icon from the toolbar.
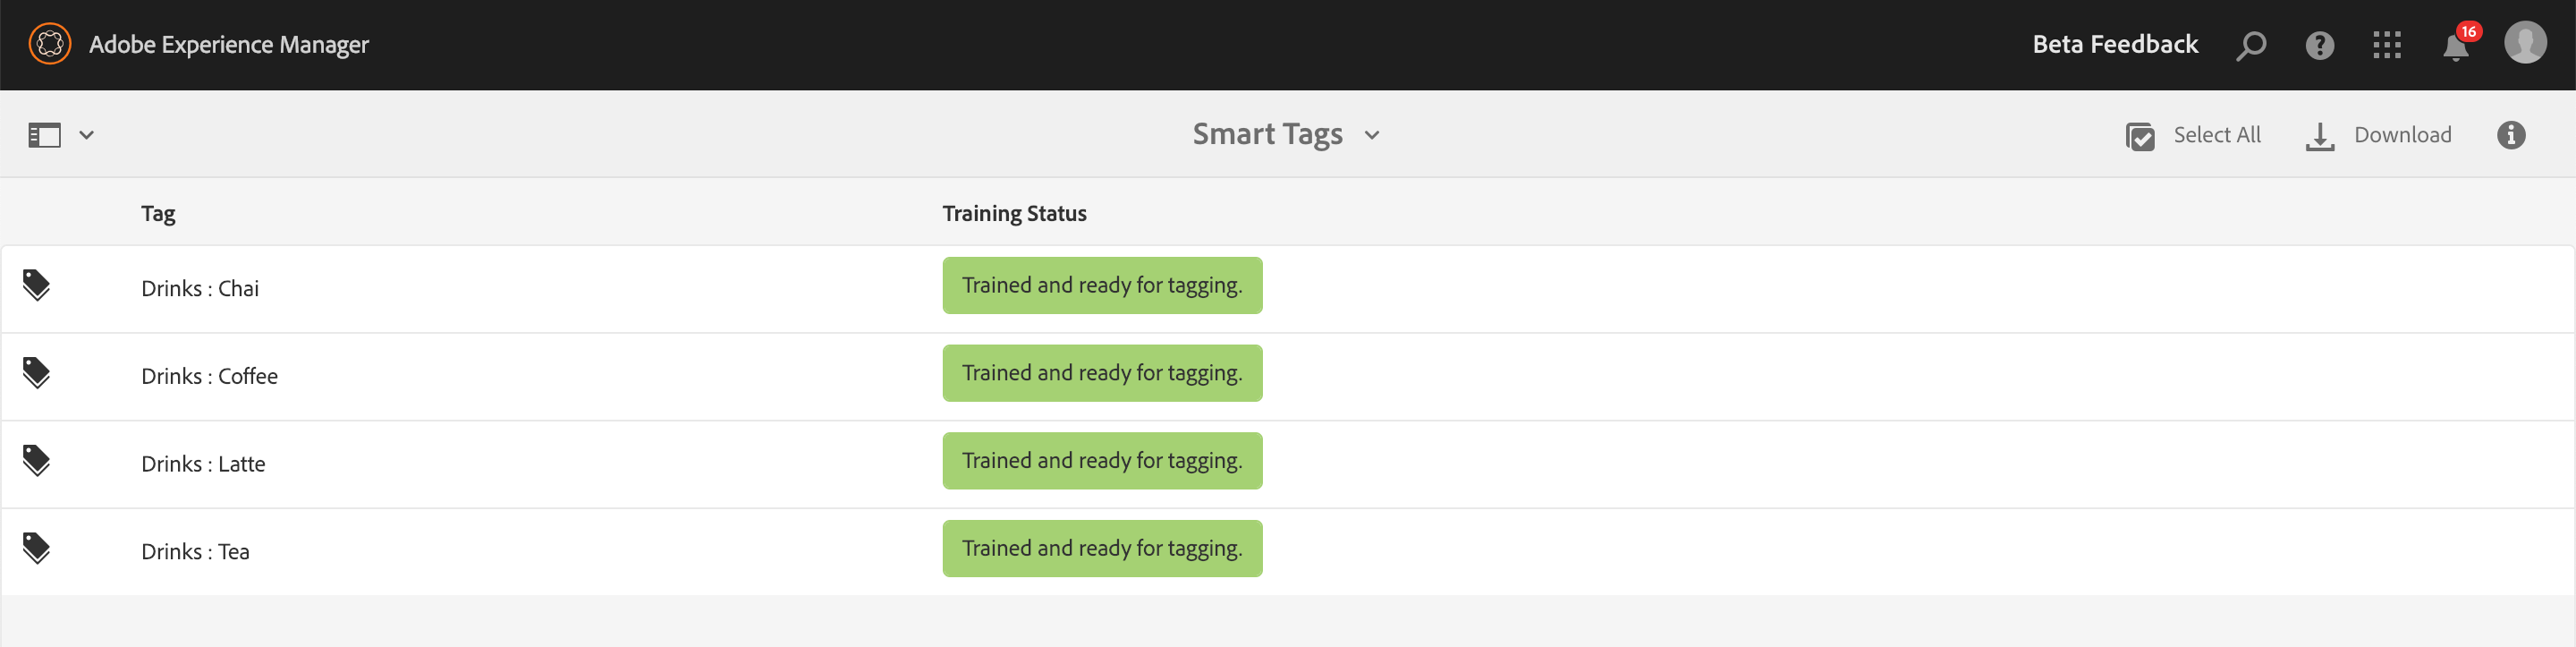
- The report displays the training status for the tags you trained.
- Green color in the Training Status column indicates that the Enhanced Smart tags service is trained for the tag.
- Yellow color indicates that the service is not completely trained for a particular tag.
- In this case, add more images with the particular tag and run the training workflow to train the service completely on the tag.
- If you do not see your tags in this report, run the training workflow again for these tags.
Step 1: Create Test Folder
Step 2: Enable Smart Tagging
- Using Folder Properties, enable Enable Smart Tags option for test folder and hit Save.
Step 3: Upload Test Assets
- In AEM open the test folder your just created
- Open Finder on the desktop
- Navigate to Desktop > Assets > Lesson 2 > Custom Smart Tags
- Select All the files & upload them into AEM (Using one of method below)
- Drag & Drop files to given folder in AEM
- Upload the assets using Create button & select File
This module will allow you to multi-select all the files & serial upload them into AEM
Step 4: Asset Properties to validate application of custom smart tags
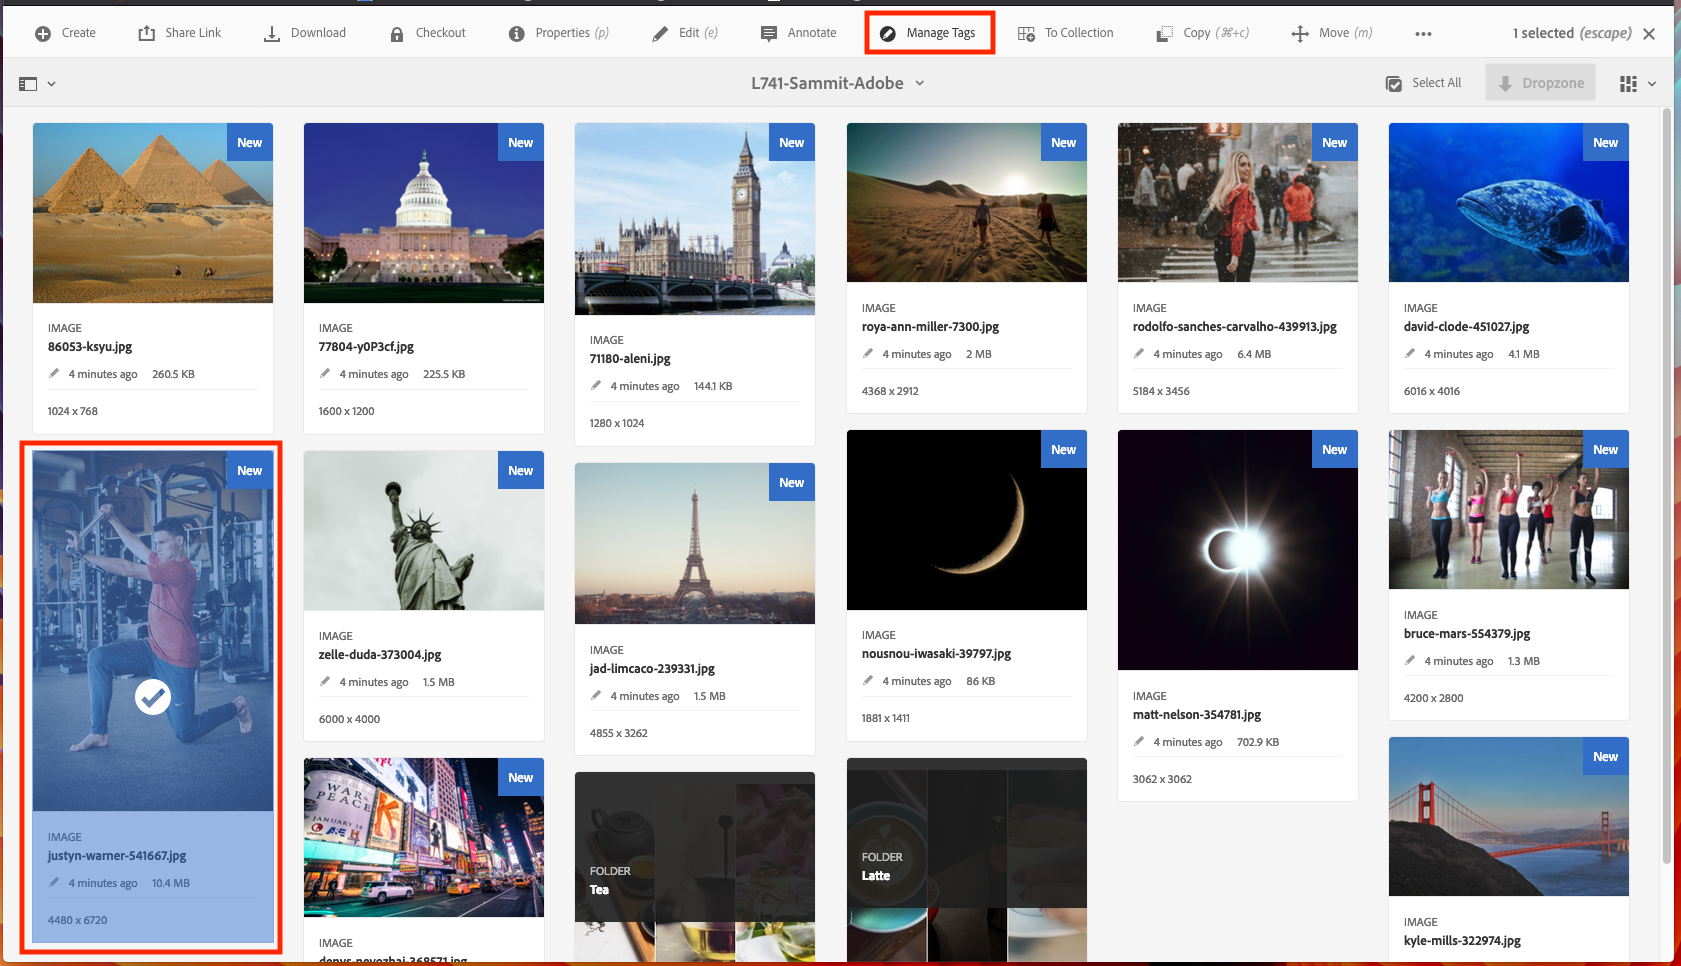
- Navigate to the test folder 'L741-Test-Name-Company'.
- Select any asset by hovering over the asset and selecting check mark icon.
- Click on Manage Tags from top toolbar.
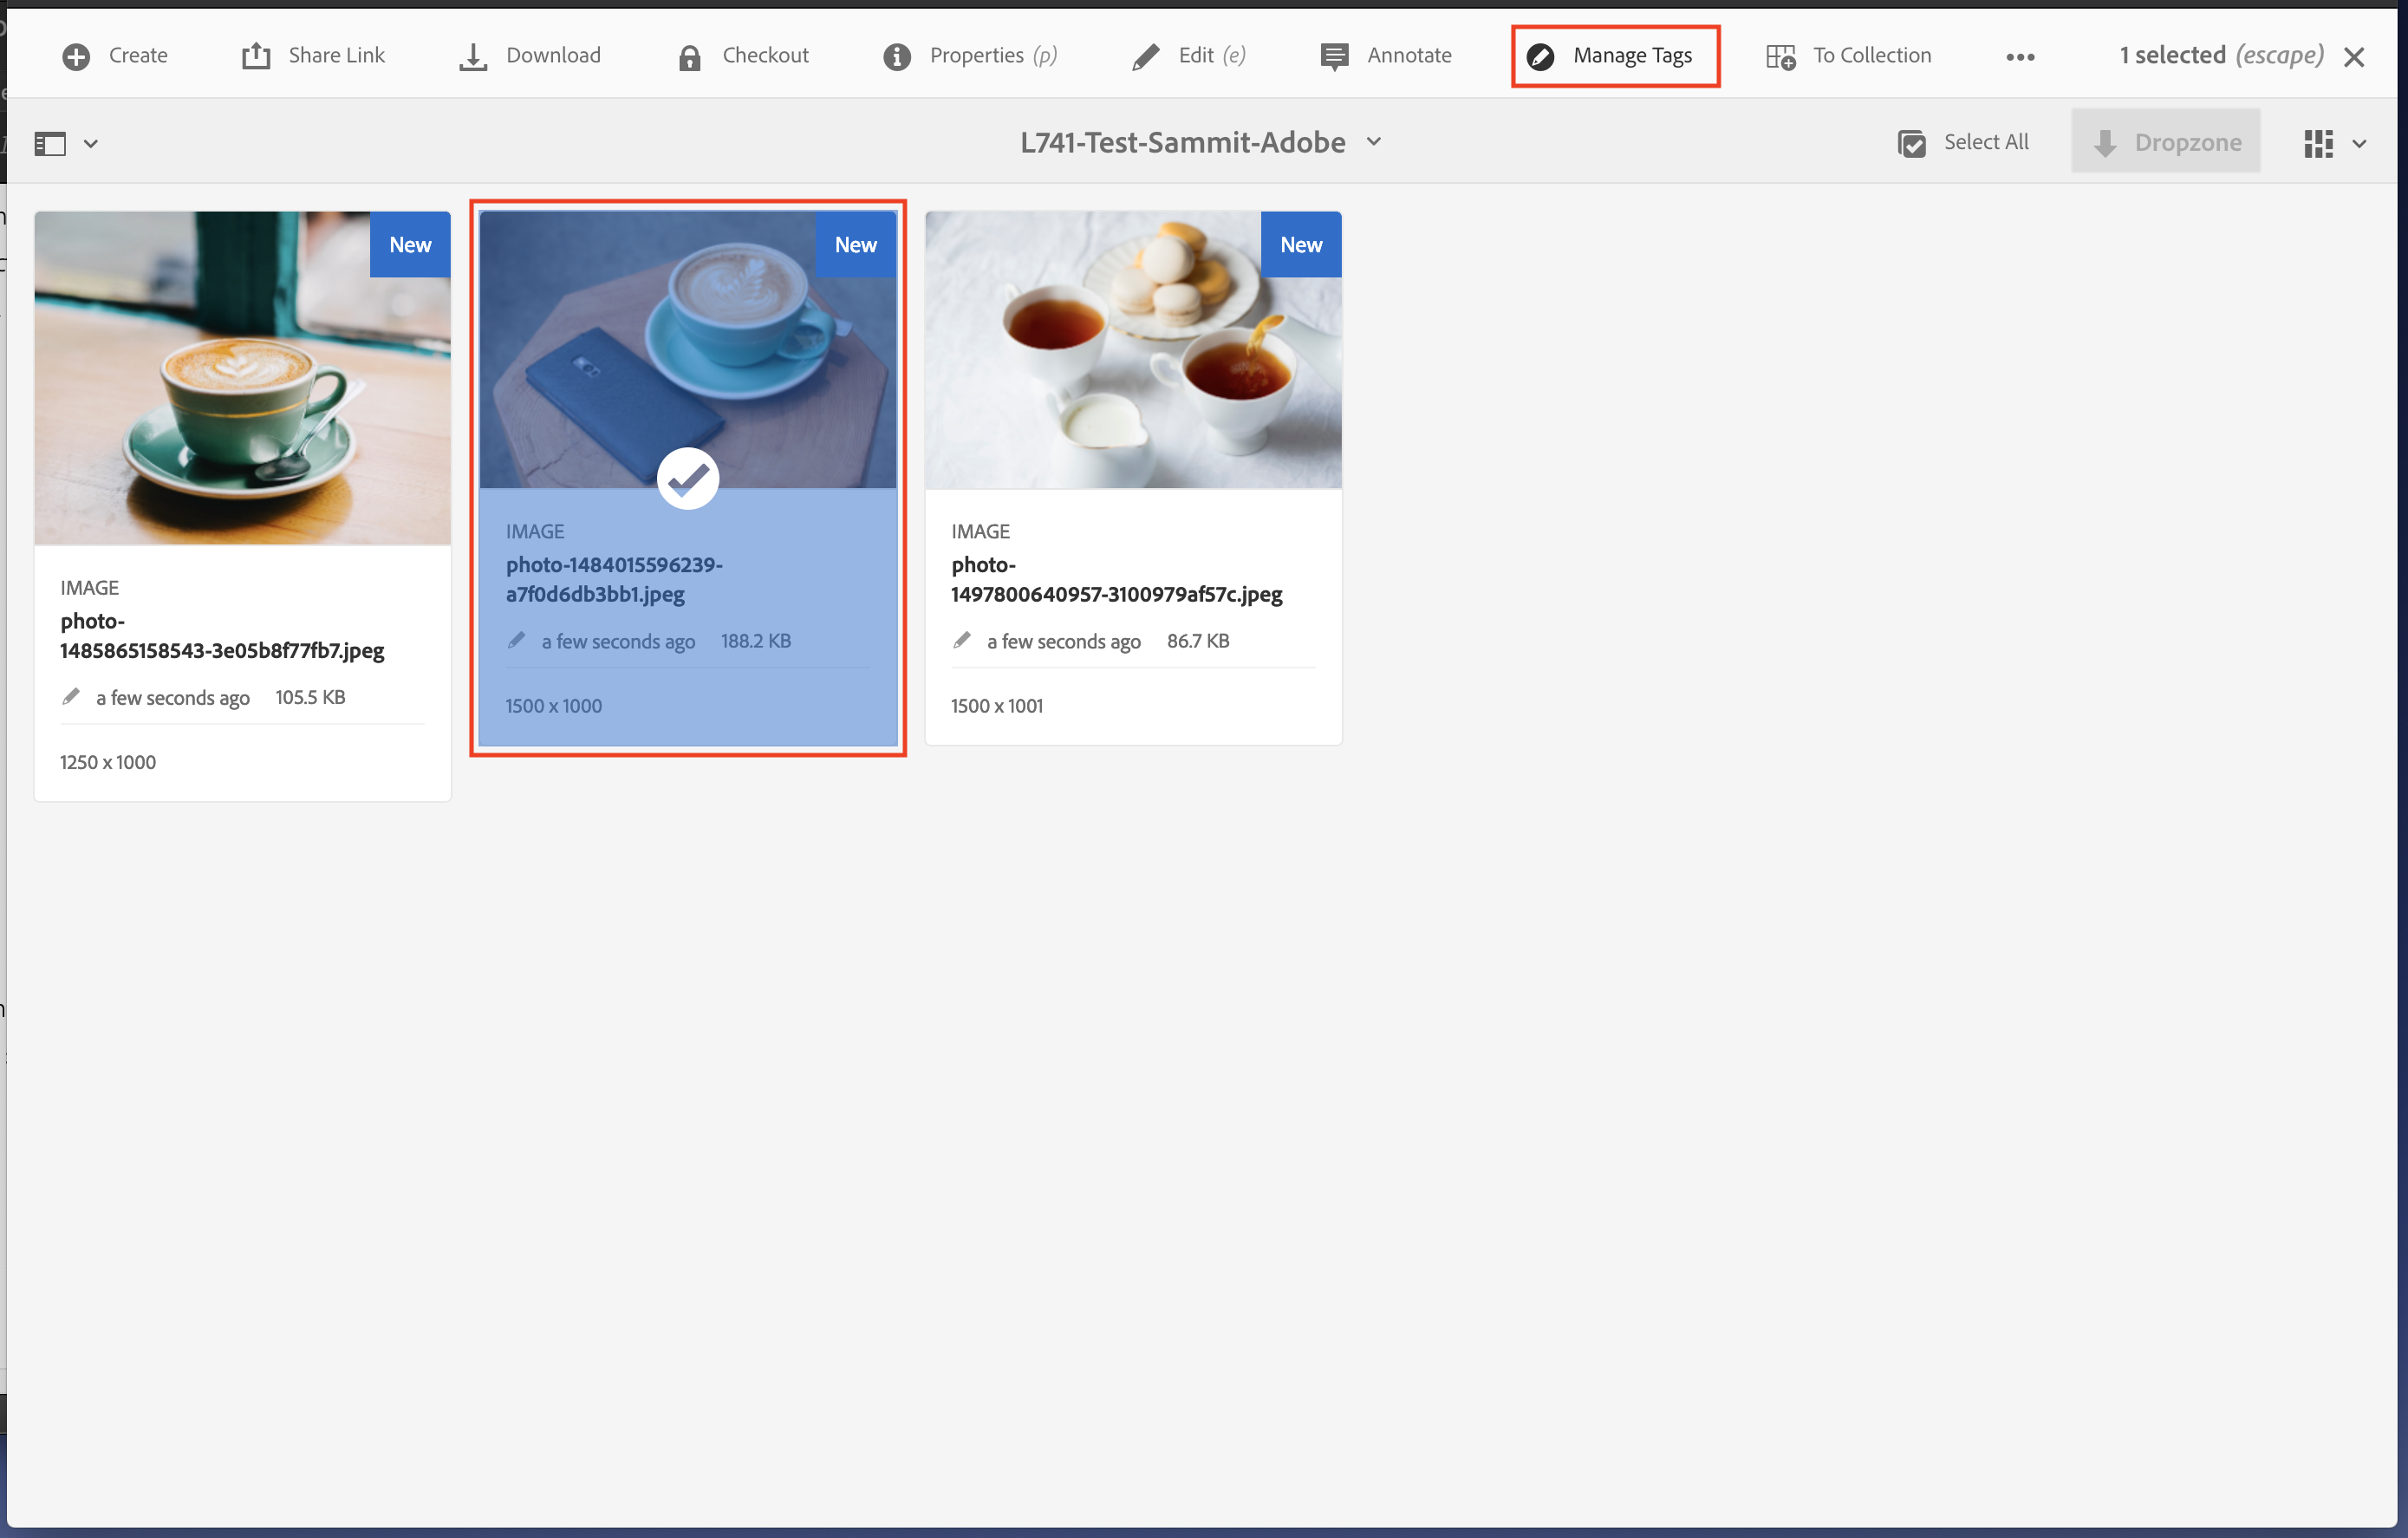
- You should see the custom smart tag applied to these assets.
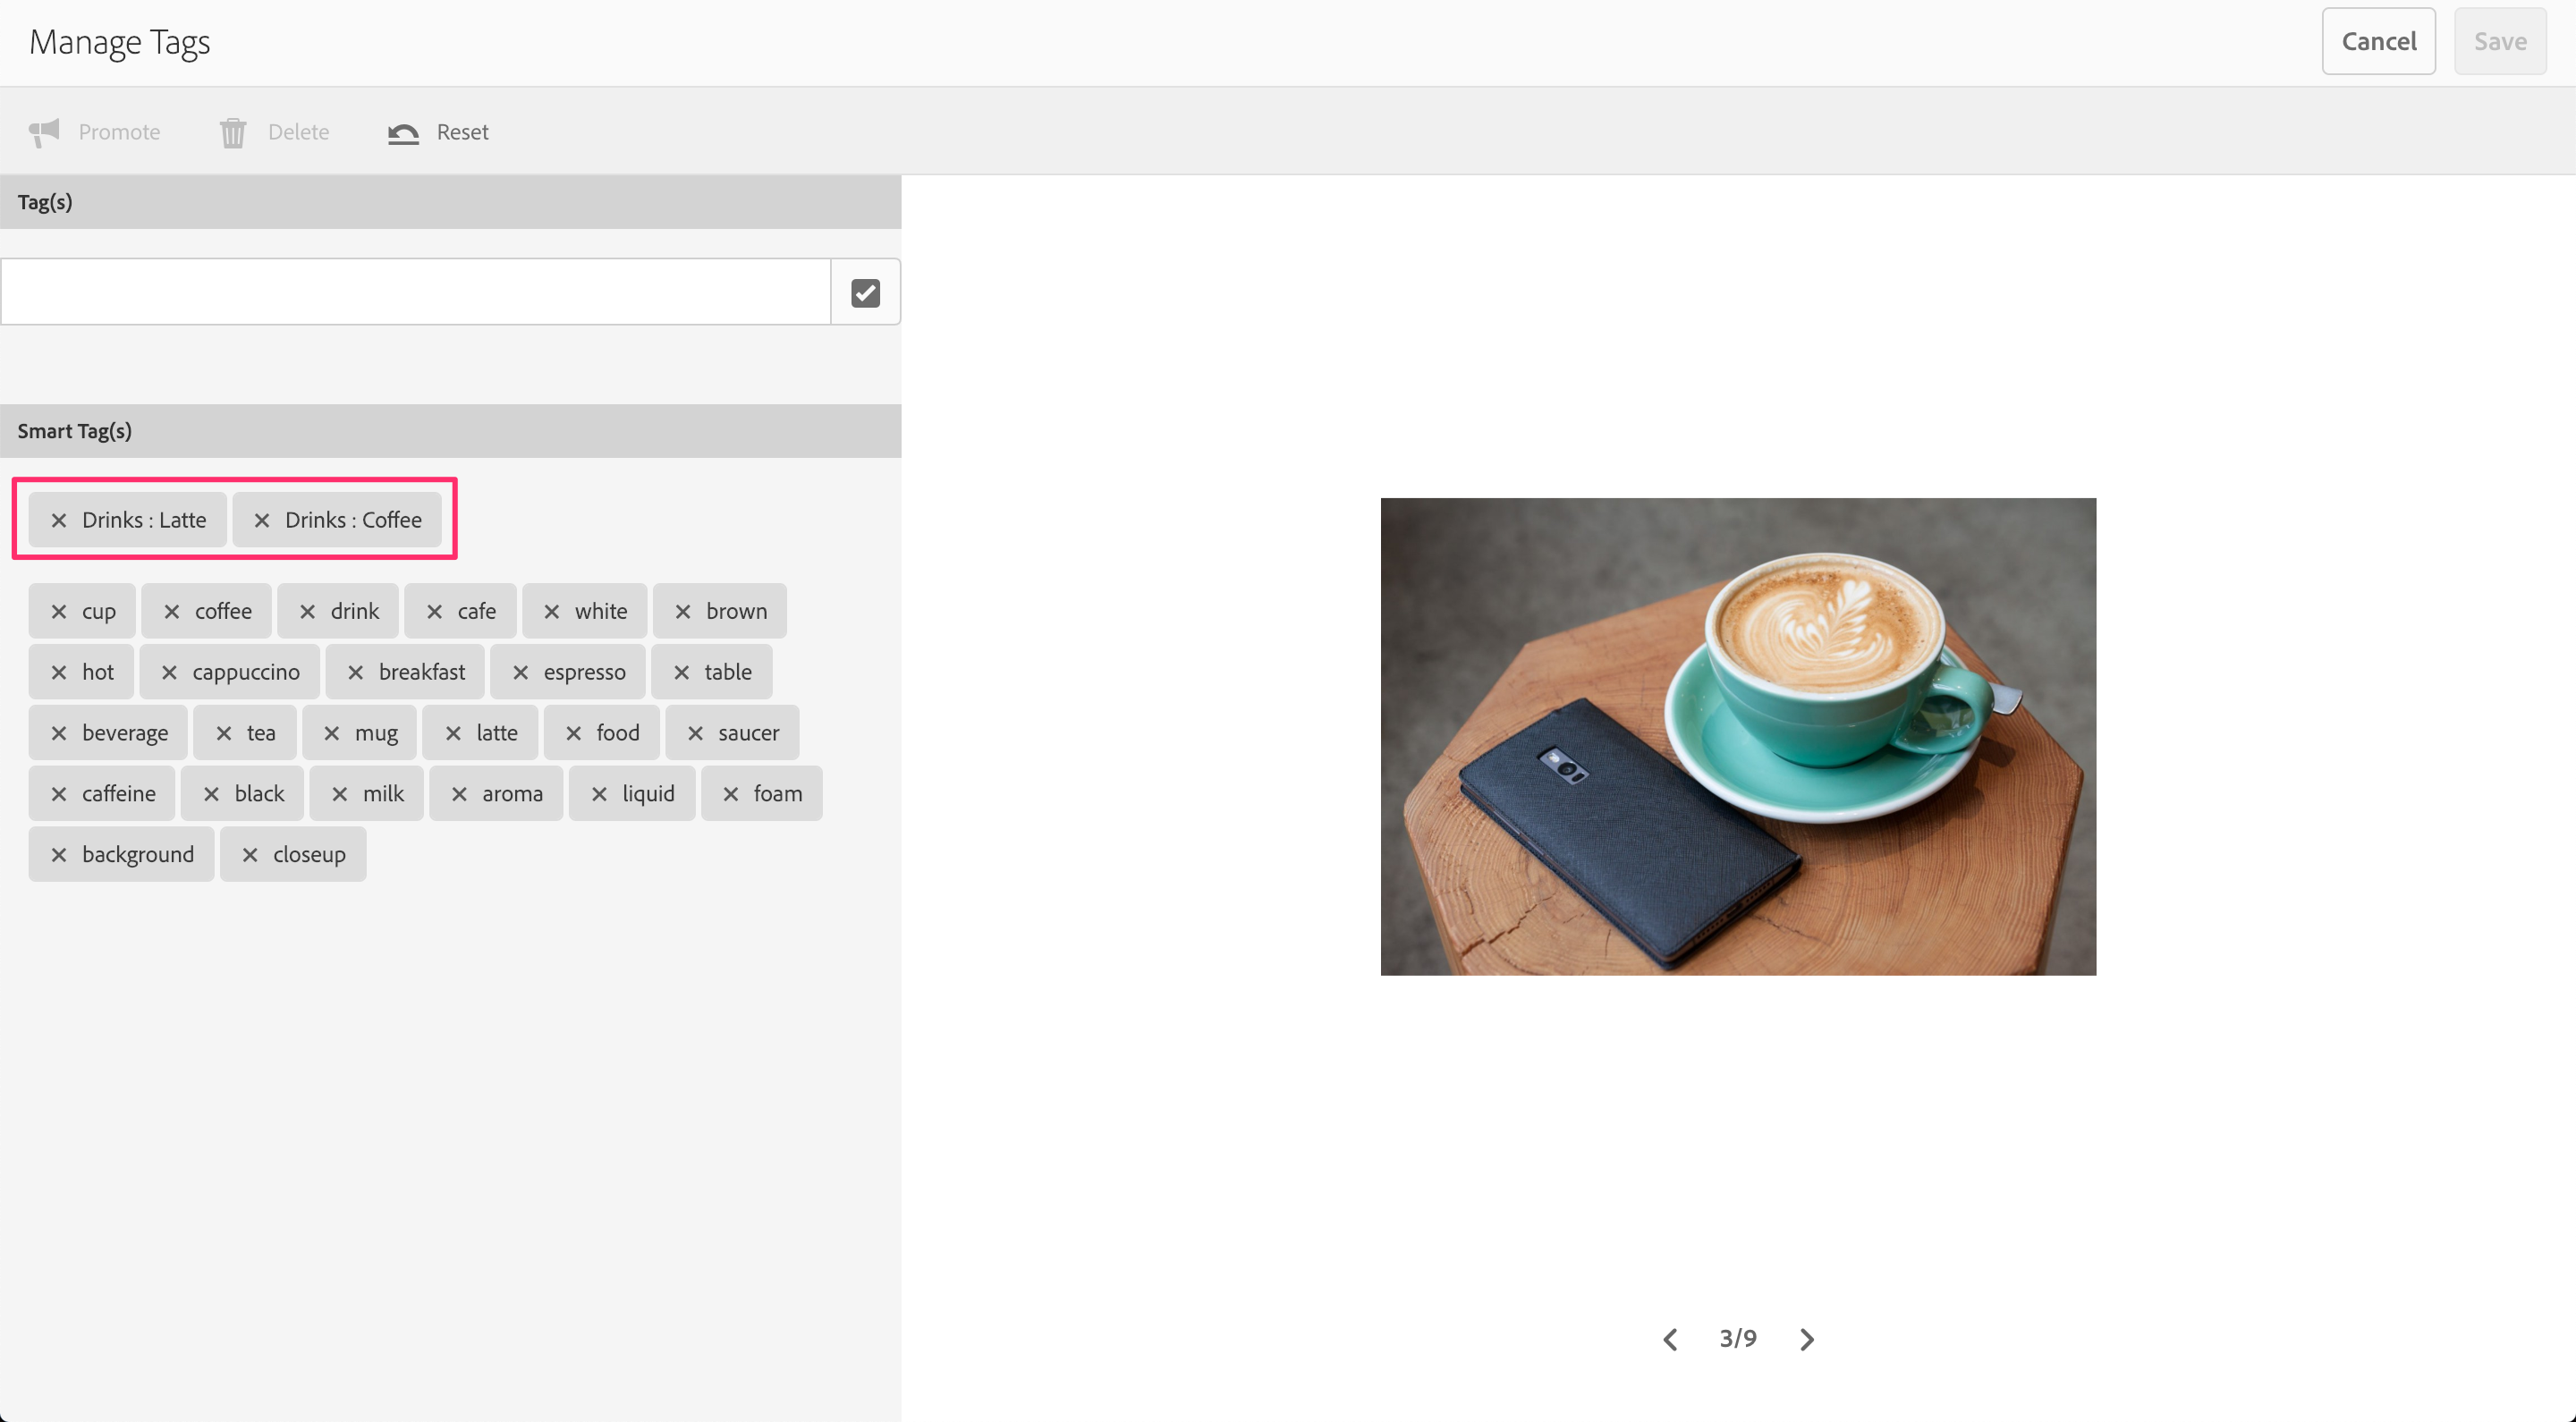
Any new assets ingested after training can potentially be tagged with custom tags based on subject of the images being ingested.
Lesson 3 - Smart Crop
Objective
- Create a Smart Crop Image profile.
- Apply profile to newly uploaded assets.
Lesson Context
Cropping images can be a time-consuming and labor-intensive endeavor that requires drawing, measuring, and cutting. With smart crop, you can compress workflows and eliminate hours of tedious work. Powered by Adobe Sensei, our AI and machine learning framework, it automatically detects and crops the focal point in any image and captures the intended point-of-interest, regardless of screen size.
Exercise 3.1
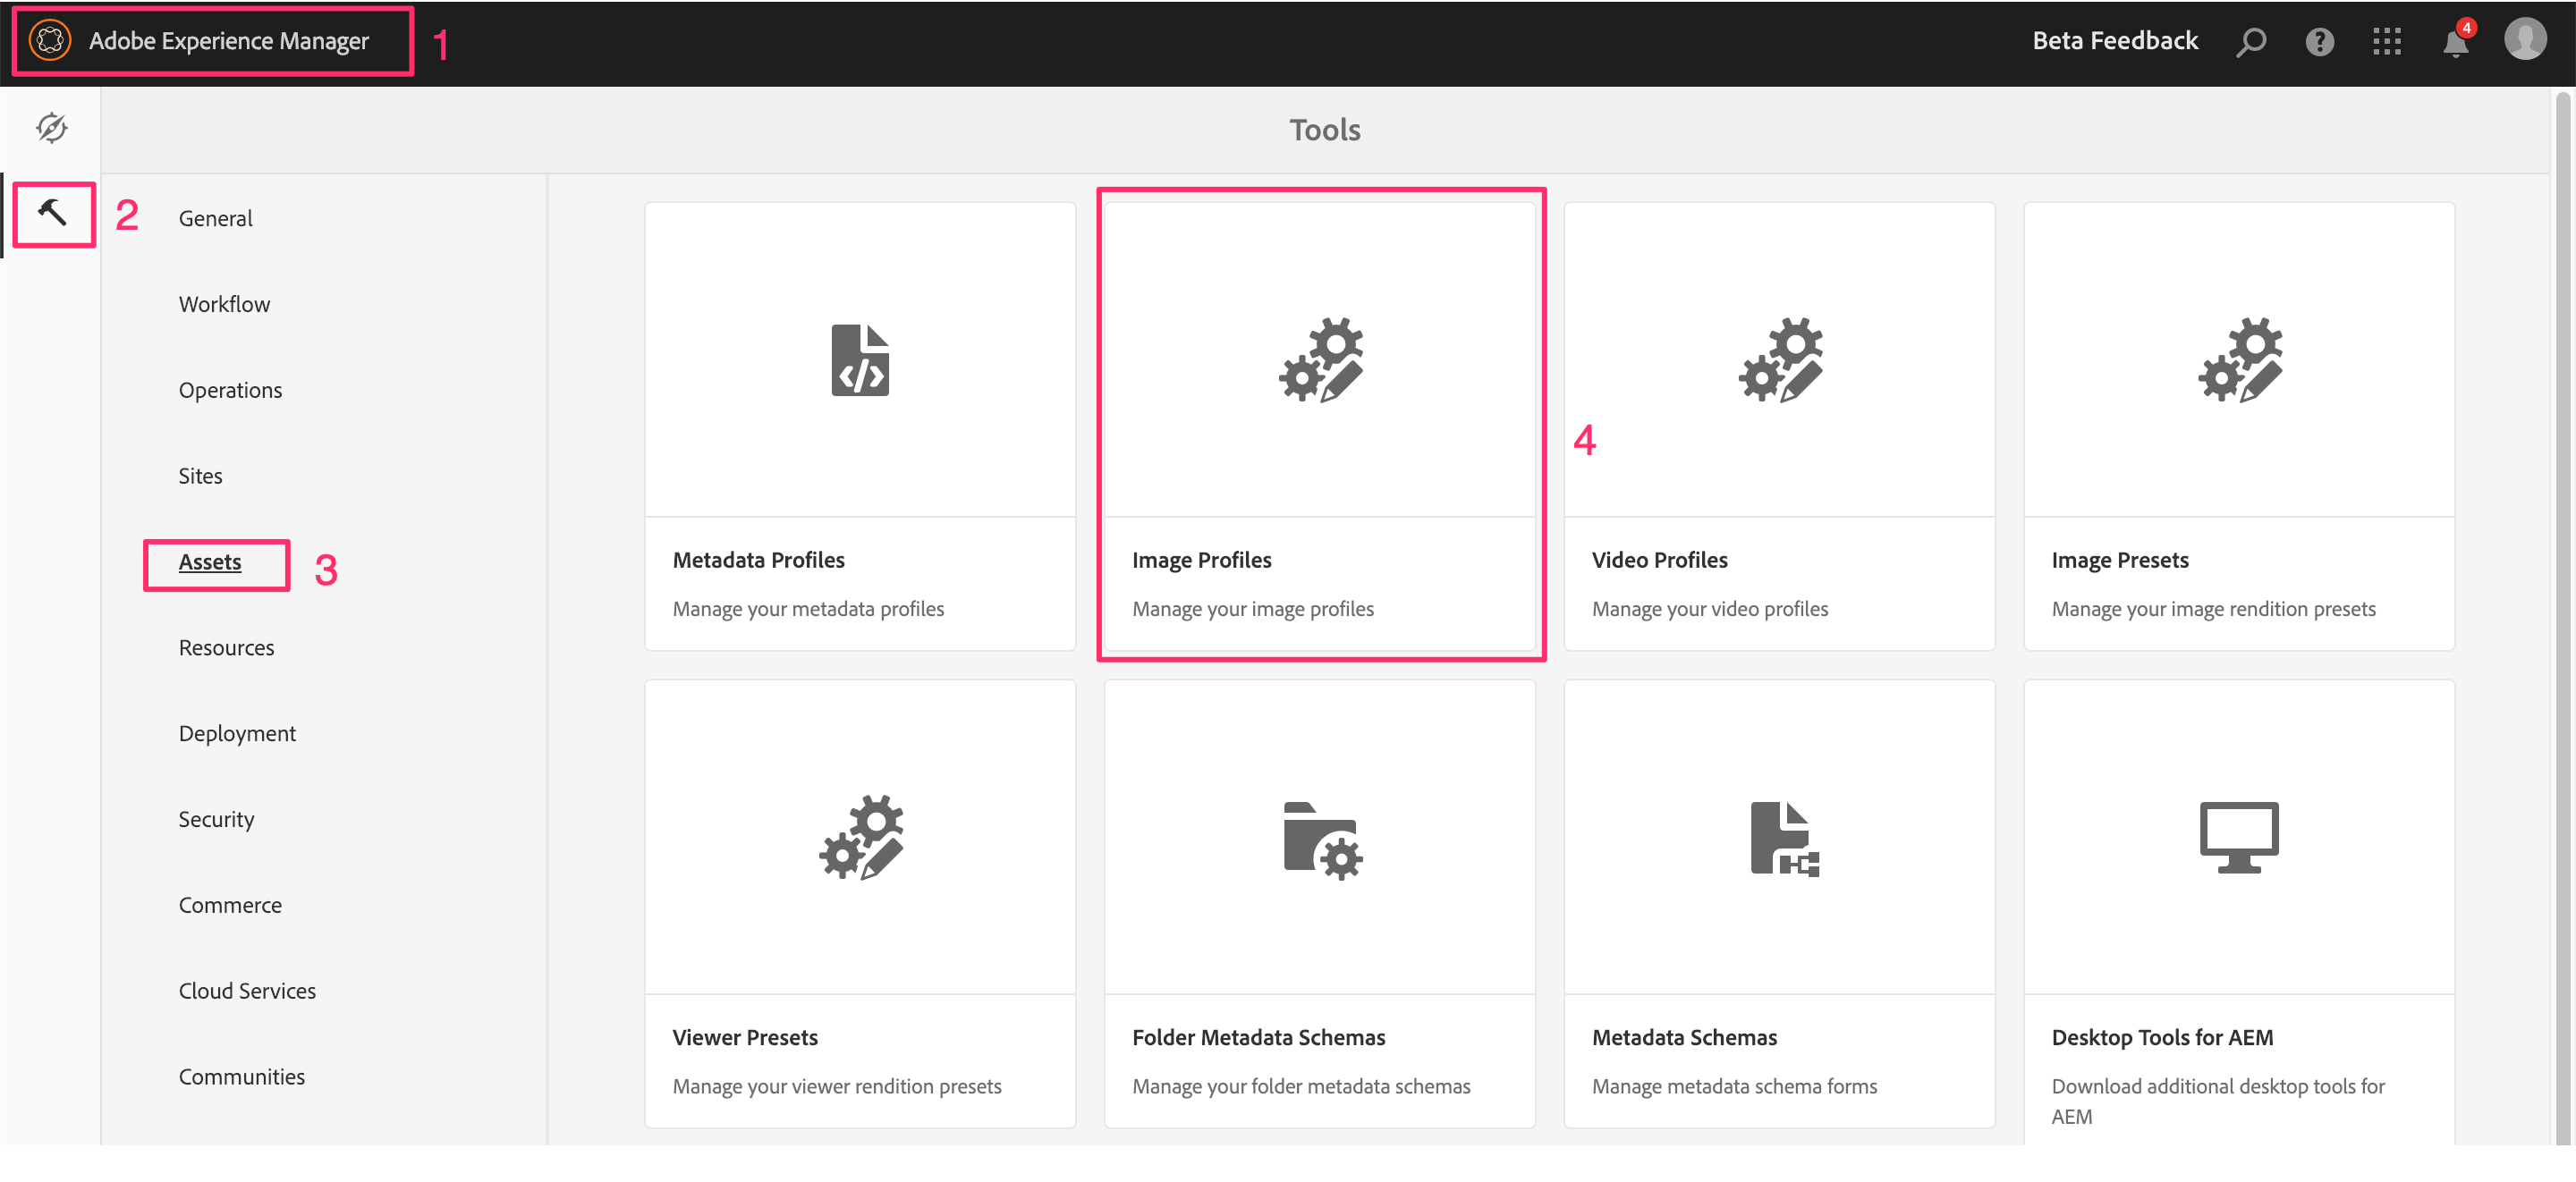
Step 1: Navigate to Image Profiles by clicking on the AEM logo > tools (hammer icon) > Assets > Image Profiles.
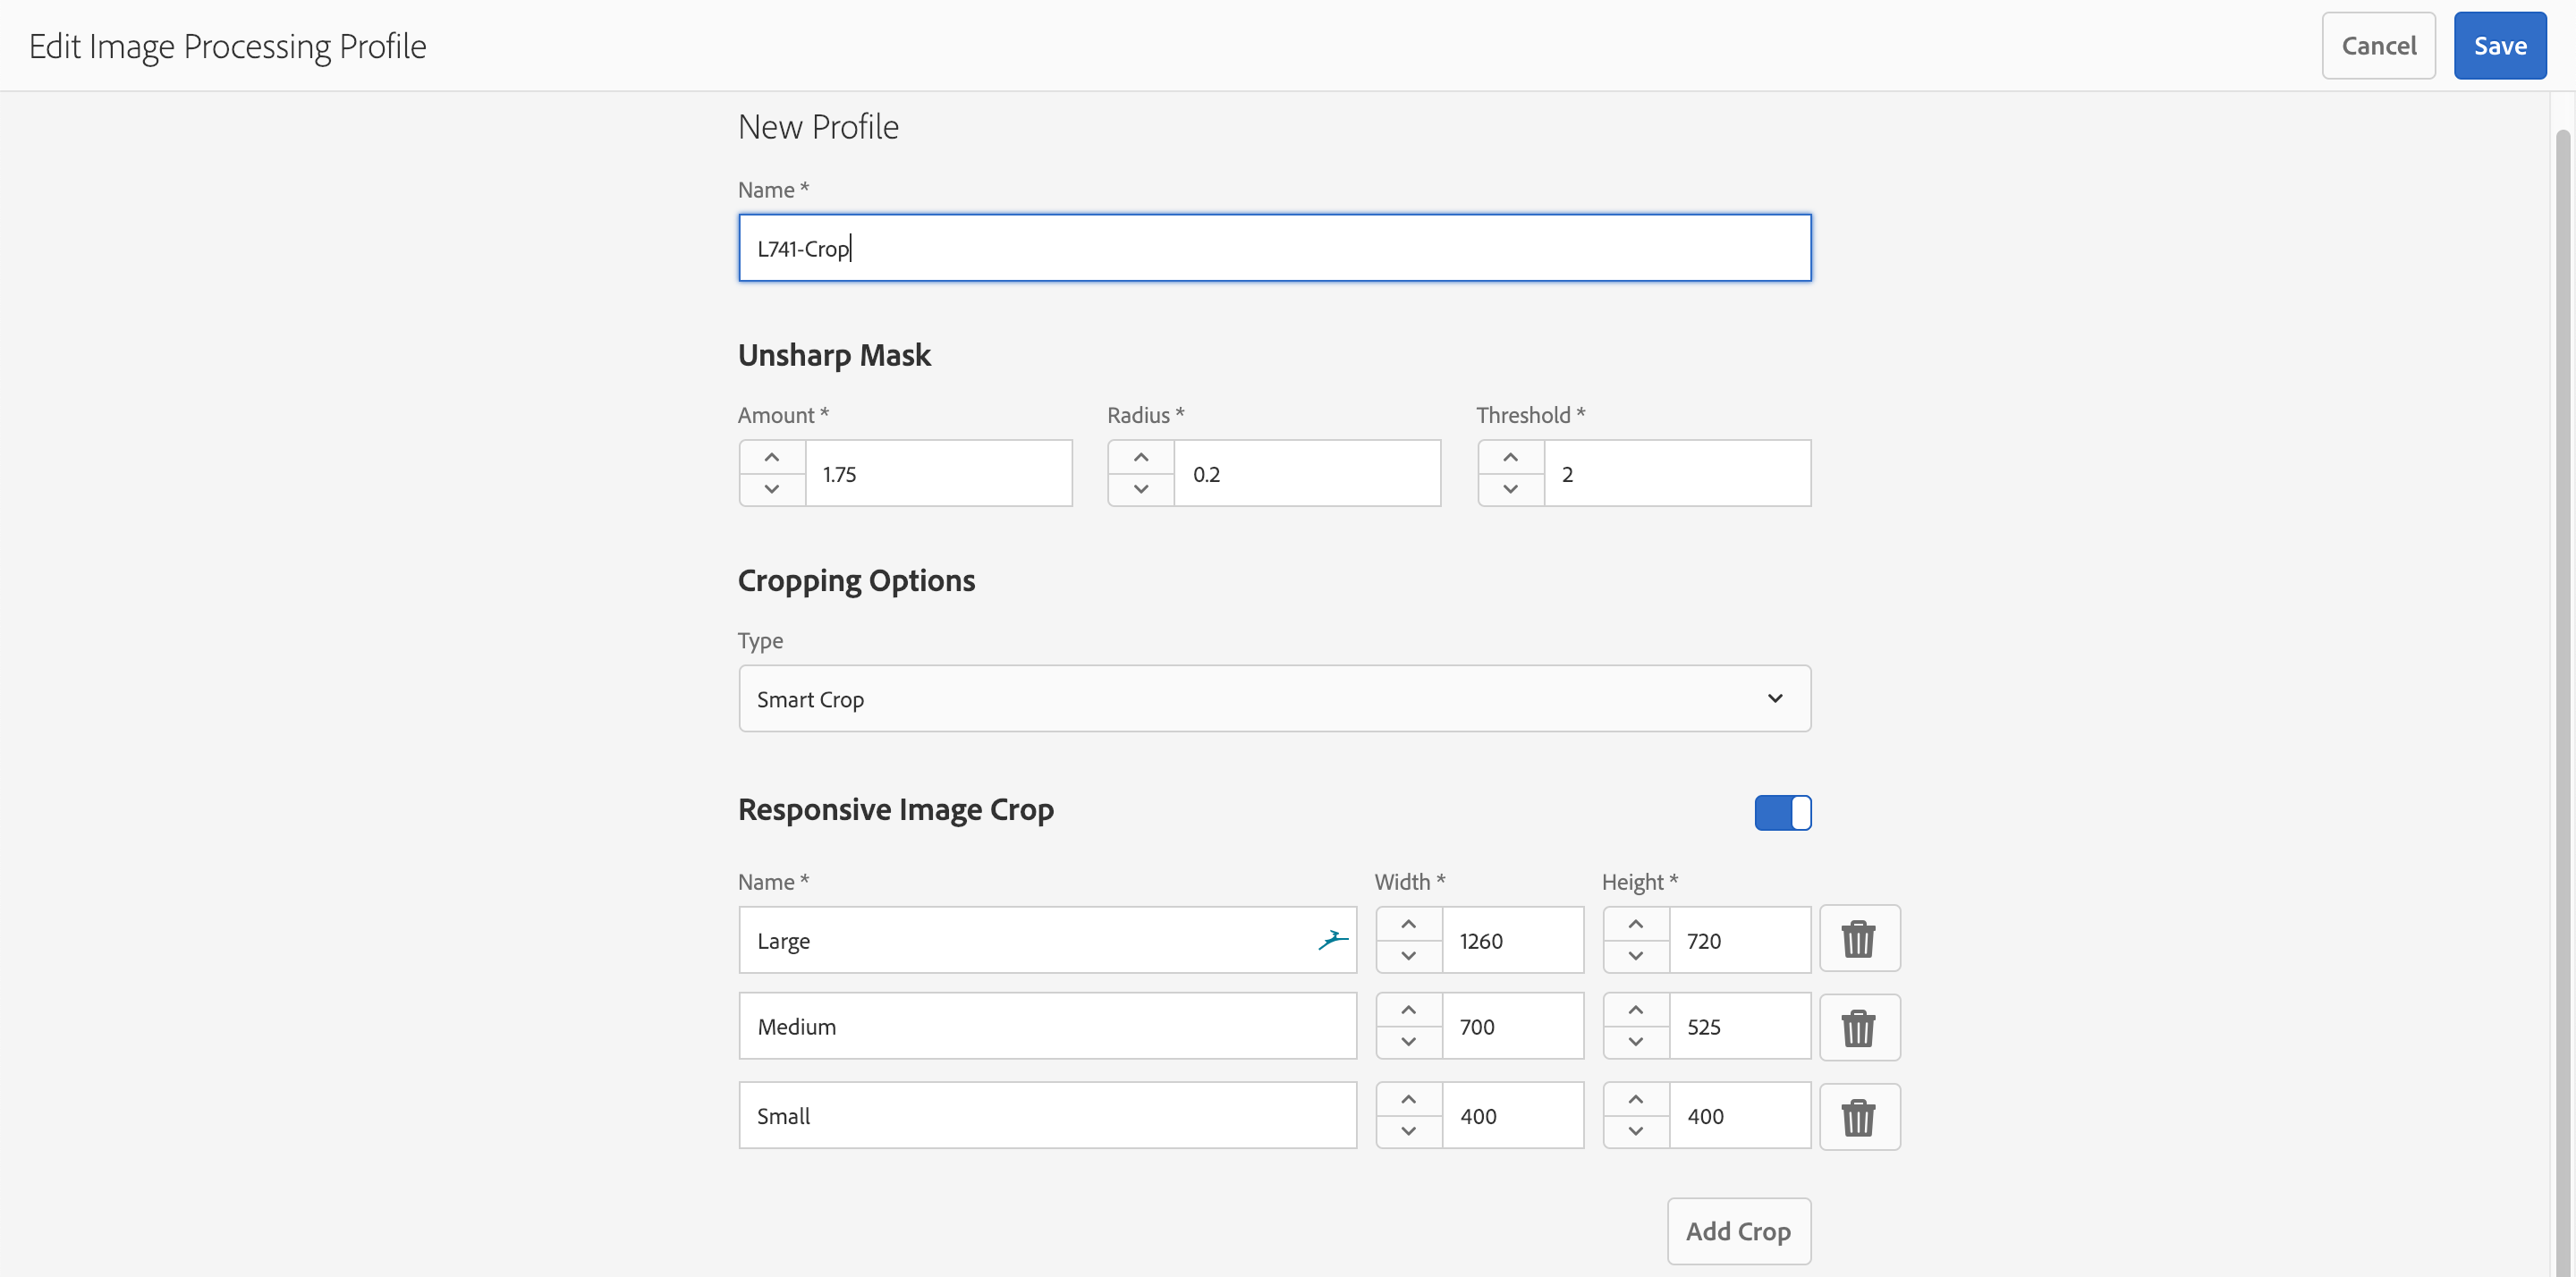
Step 2: Click on the Create button in the upper right corner. On the create page.
- Provide a name e.g.
L741-Crop.
- Under
Cropping Options select Smart Crop.
- You may choose to use the default crops, add additional crops or replace the default crops by providing a
Name, Width, & Height.
- Click Save when done.
Exercise 3.2
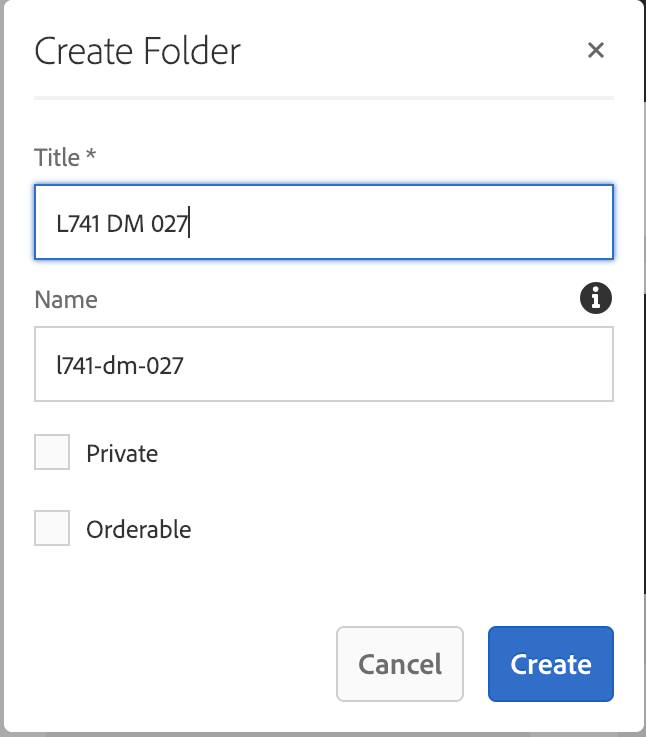
Step 1: Create a folder
- Having logged into AEM, navigate to the Assets section in AEM by clicking on AEM Logo > Navigation (compass icon) > Assets > Files, or going directly to this URL: http://localhost:4502/assets.html/content/dam.
- Click on Create button.
- Select Folder from the fly out menu.
- Provide Name & Title for the folder as L741-DM-Attendee Number (e.g. L741-DM-027).
Note: Your attendee number can be found on your workstation.
- Click on Create Button to create the folder.
Step 2: Apply your Image Profile
- Select your newly created folder by hovering over it and clicking the check sign.
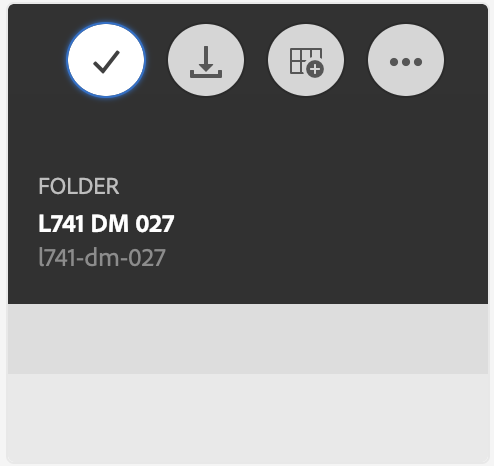
- Click Properties in the contextual menu above.
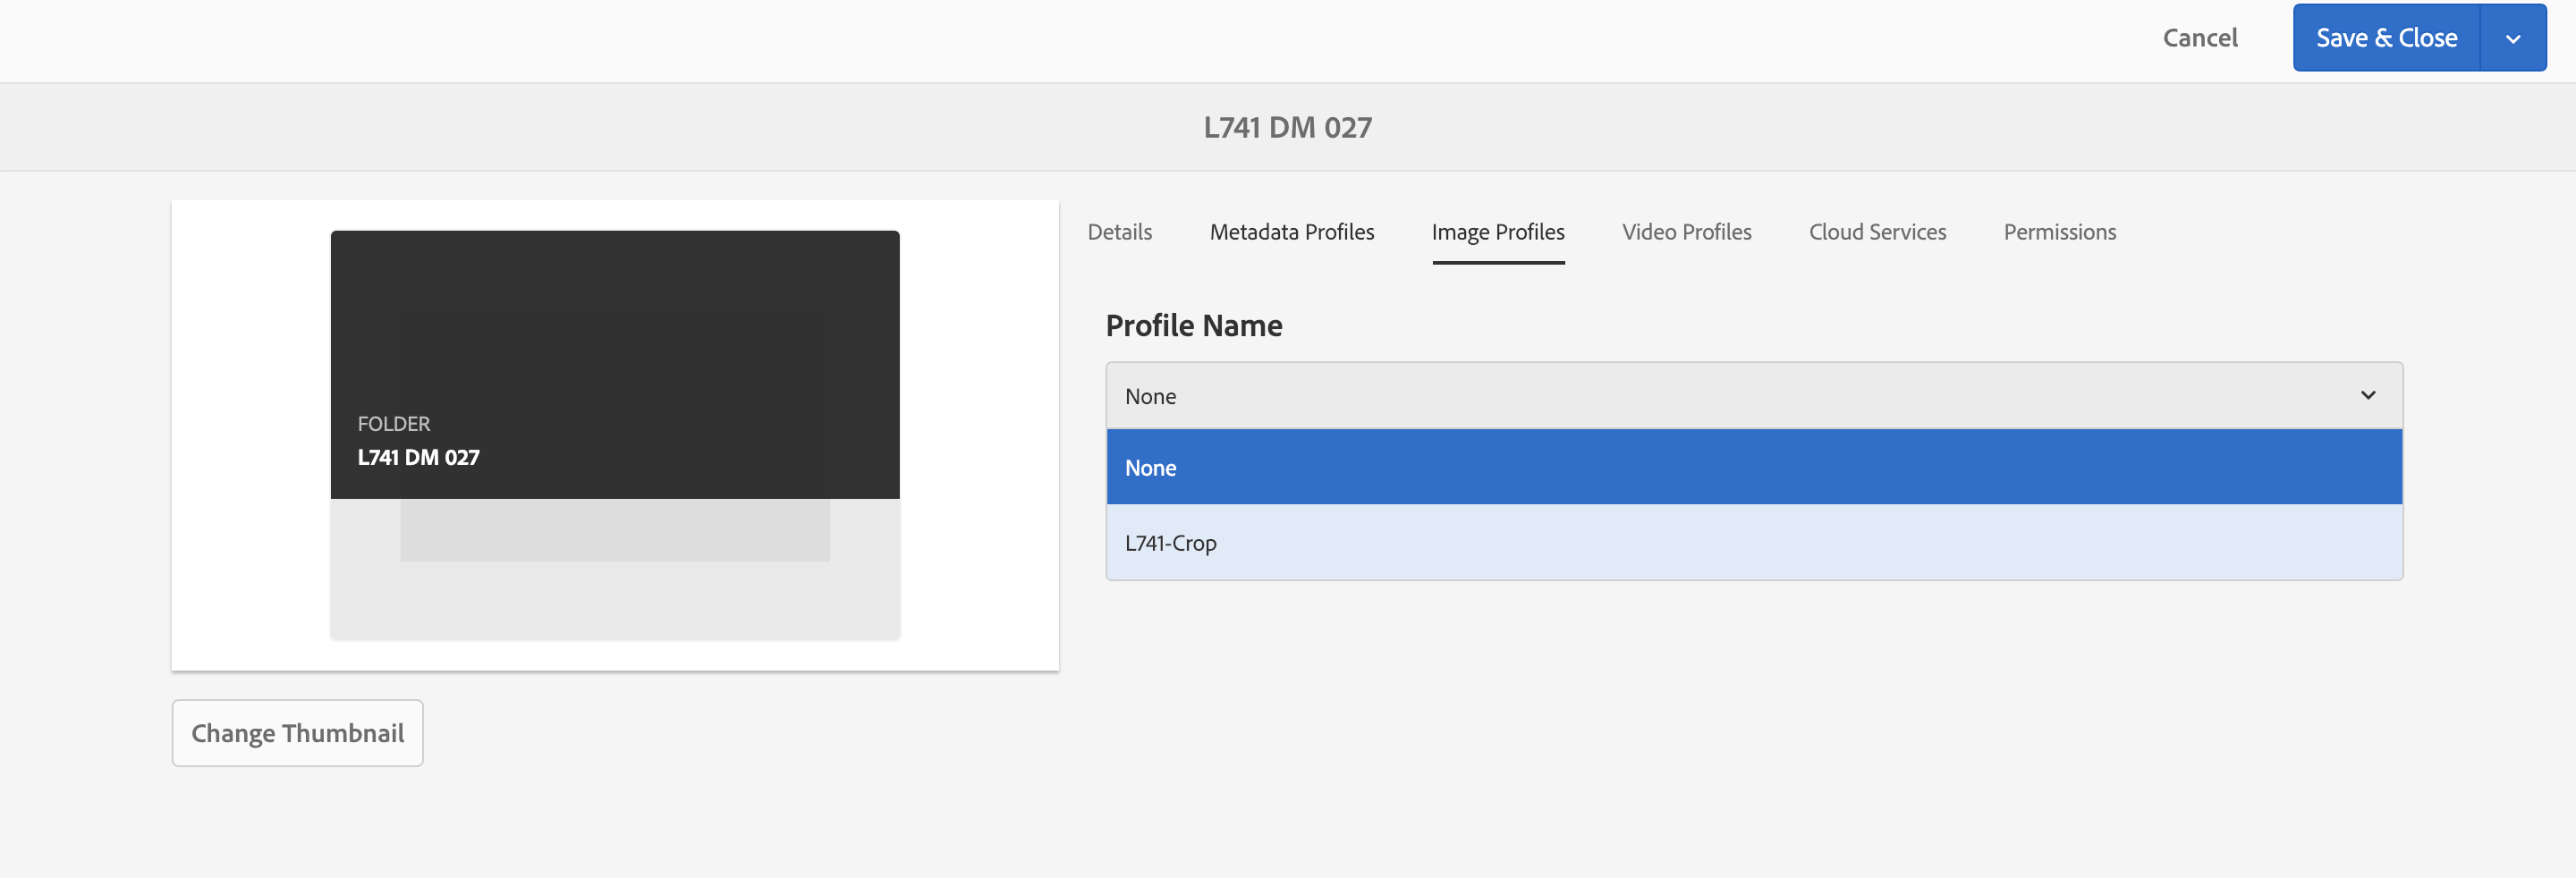
- Select the Image Profiles tab.
- From the Profile Name drop down, select your newly created image profile.
- Click Save & Close to save your configurations.
Exercise 3.3
Step 1 Upload assets to be cropped
- Navigate into the folder you created.
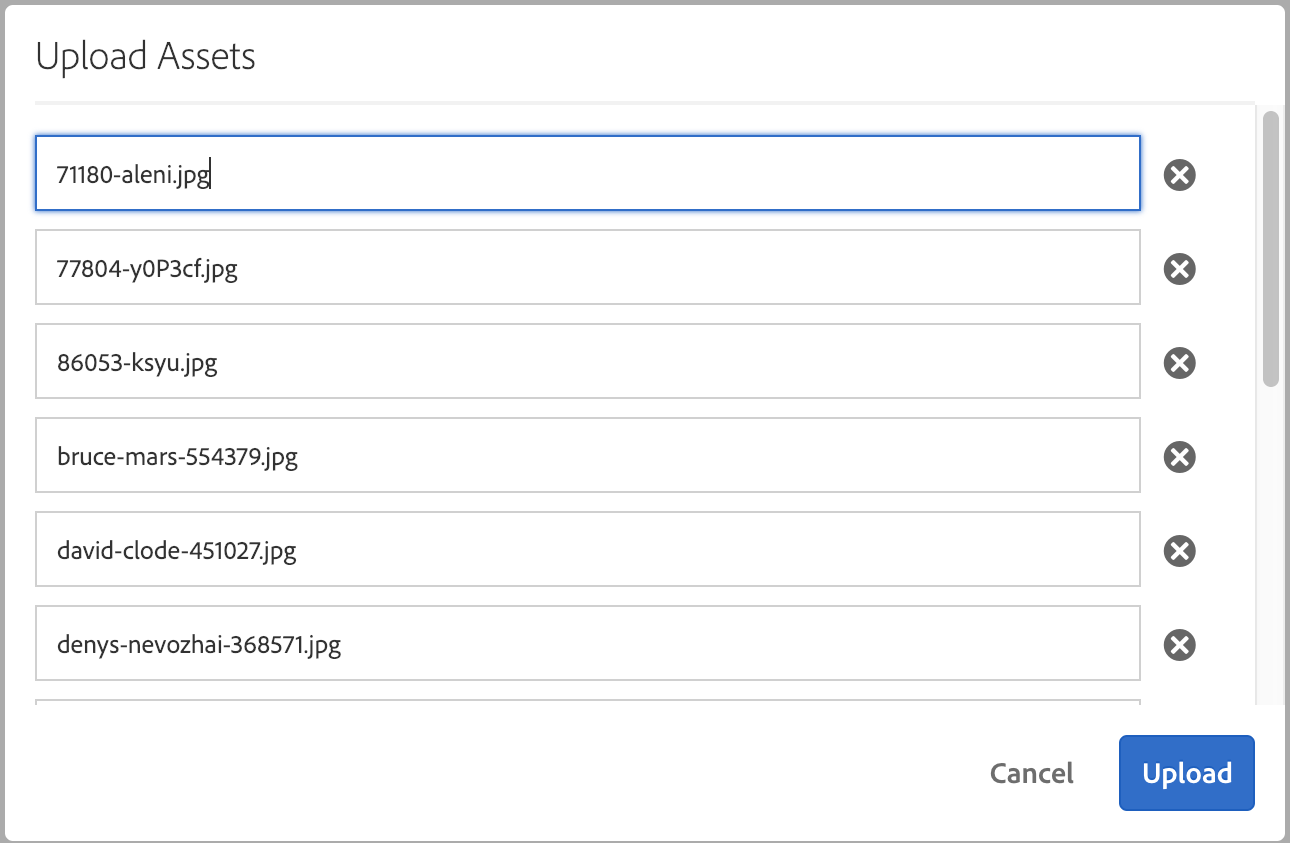
- Click on the Create button in the upper right corner and select Files.
- In the dialog, navigate to Desktop > Assets > Lesson 3.
- Select all the assets in the folder and click Open.
- In the next dialog click the Upload button.
Step 3 View cropped assets
- Wait for the Processing flags to complete.
- Once the assets are processed, select one of the assets by hovering over it and clicking the check sign.
- From the contextual menu above, click on Smart Crop.
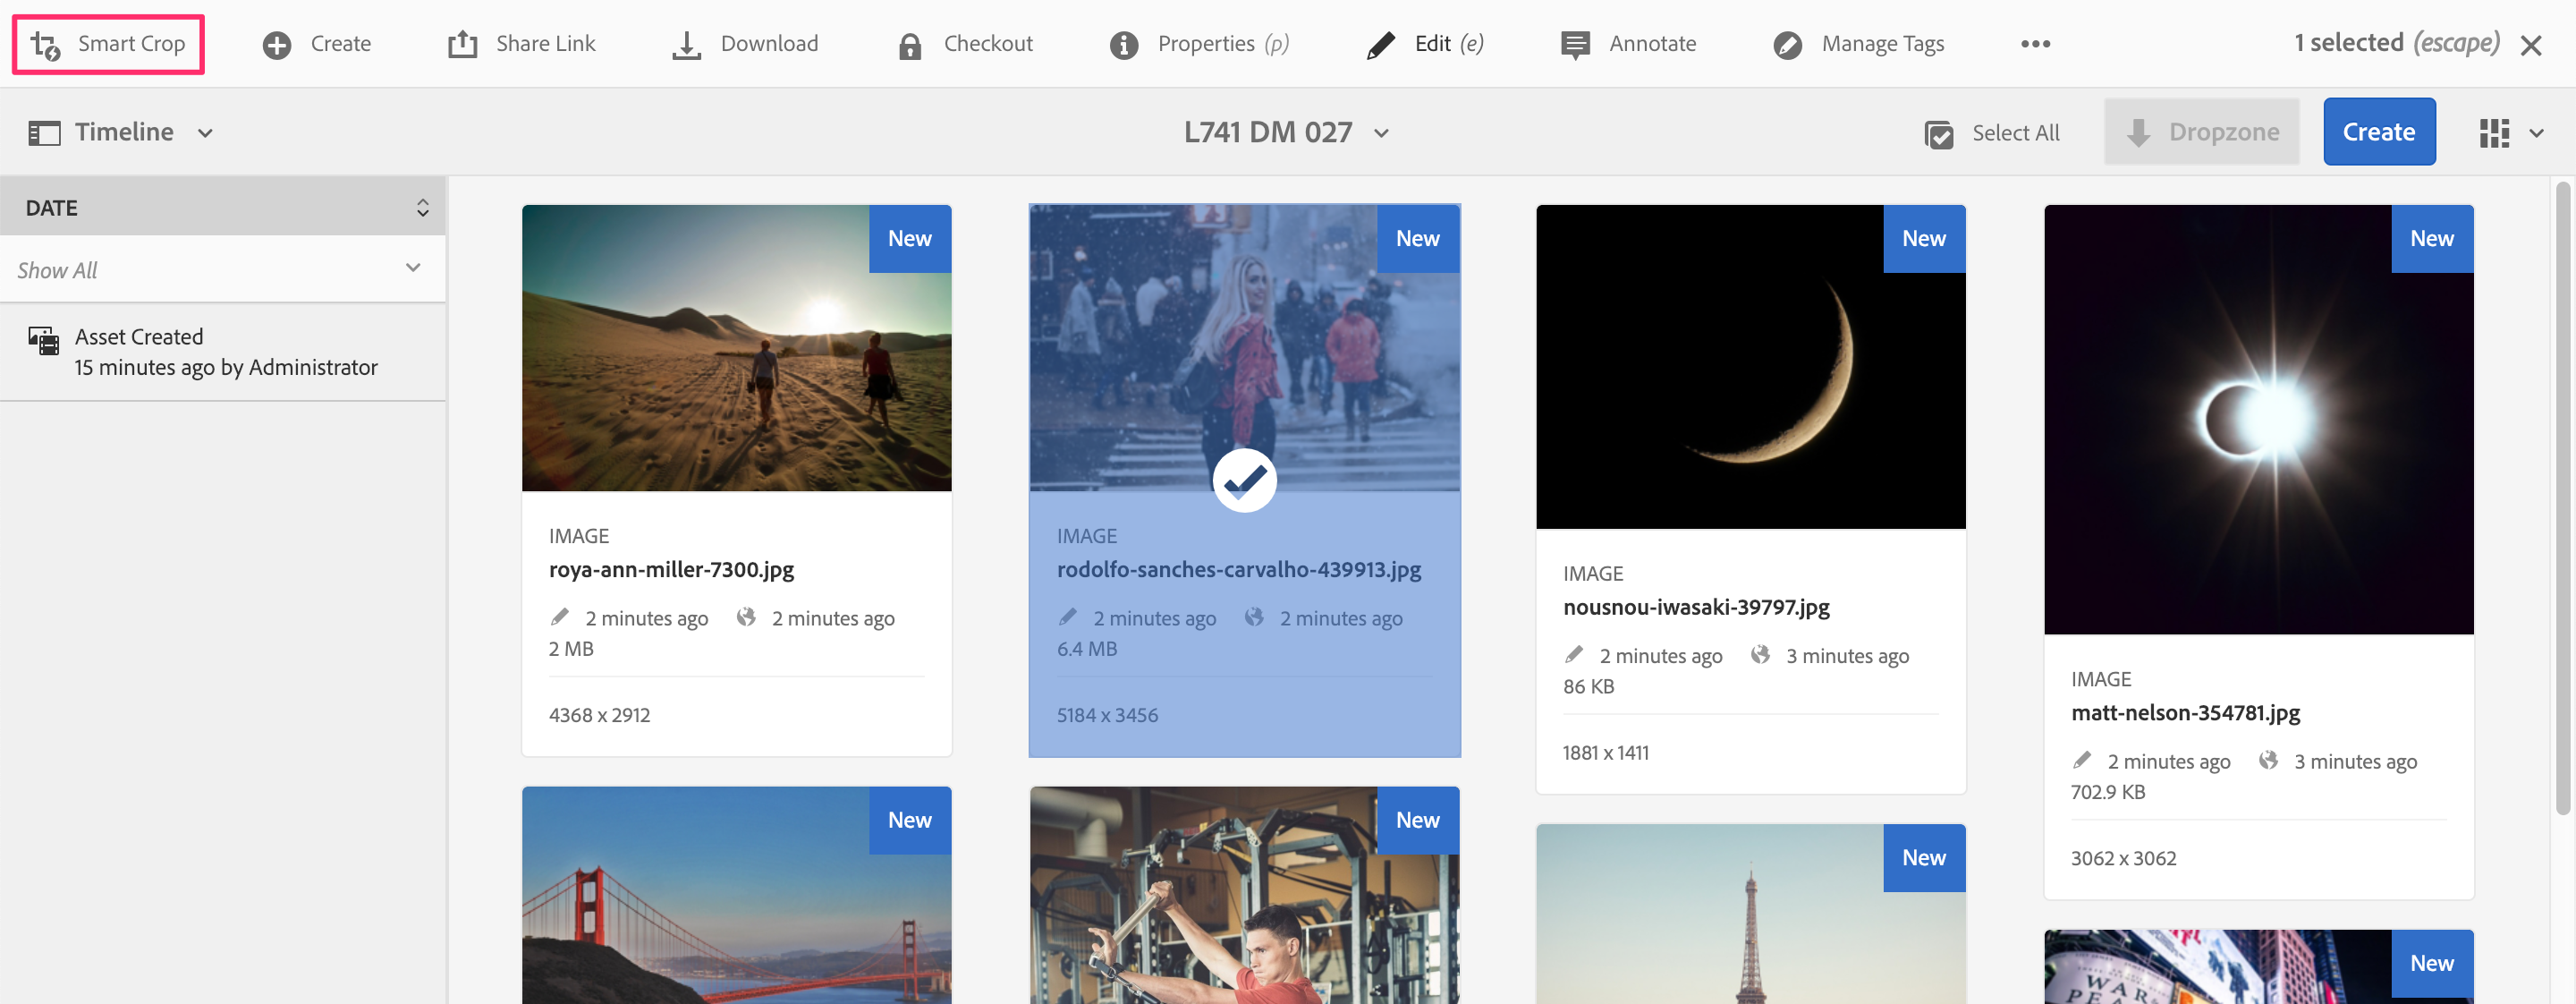
- Review the crops that have been generated. Adjust them by dragging the crop regions if needed.
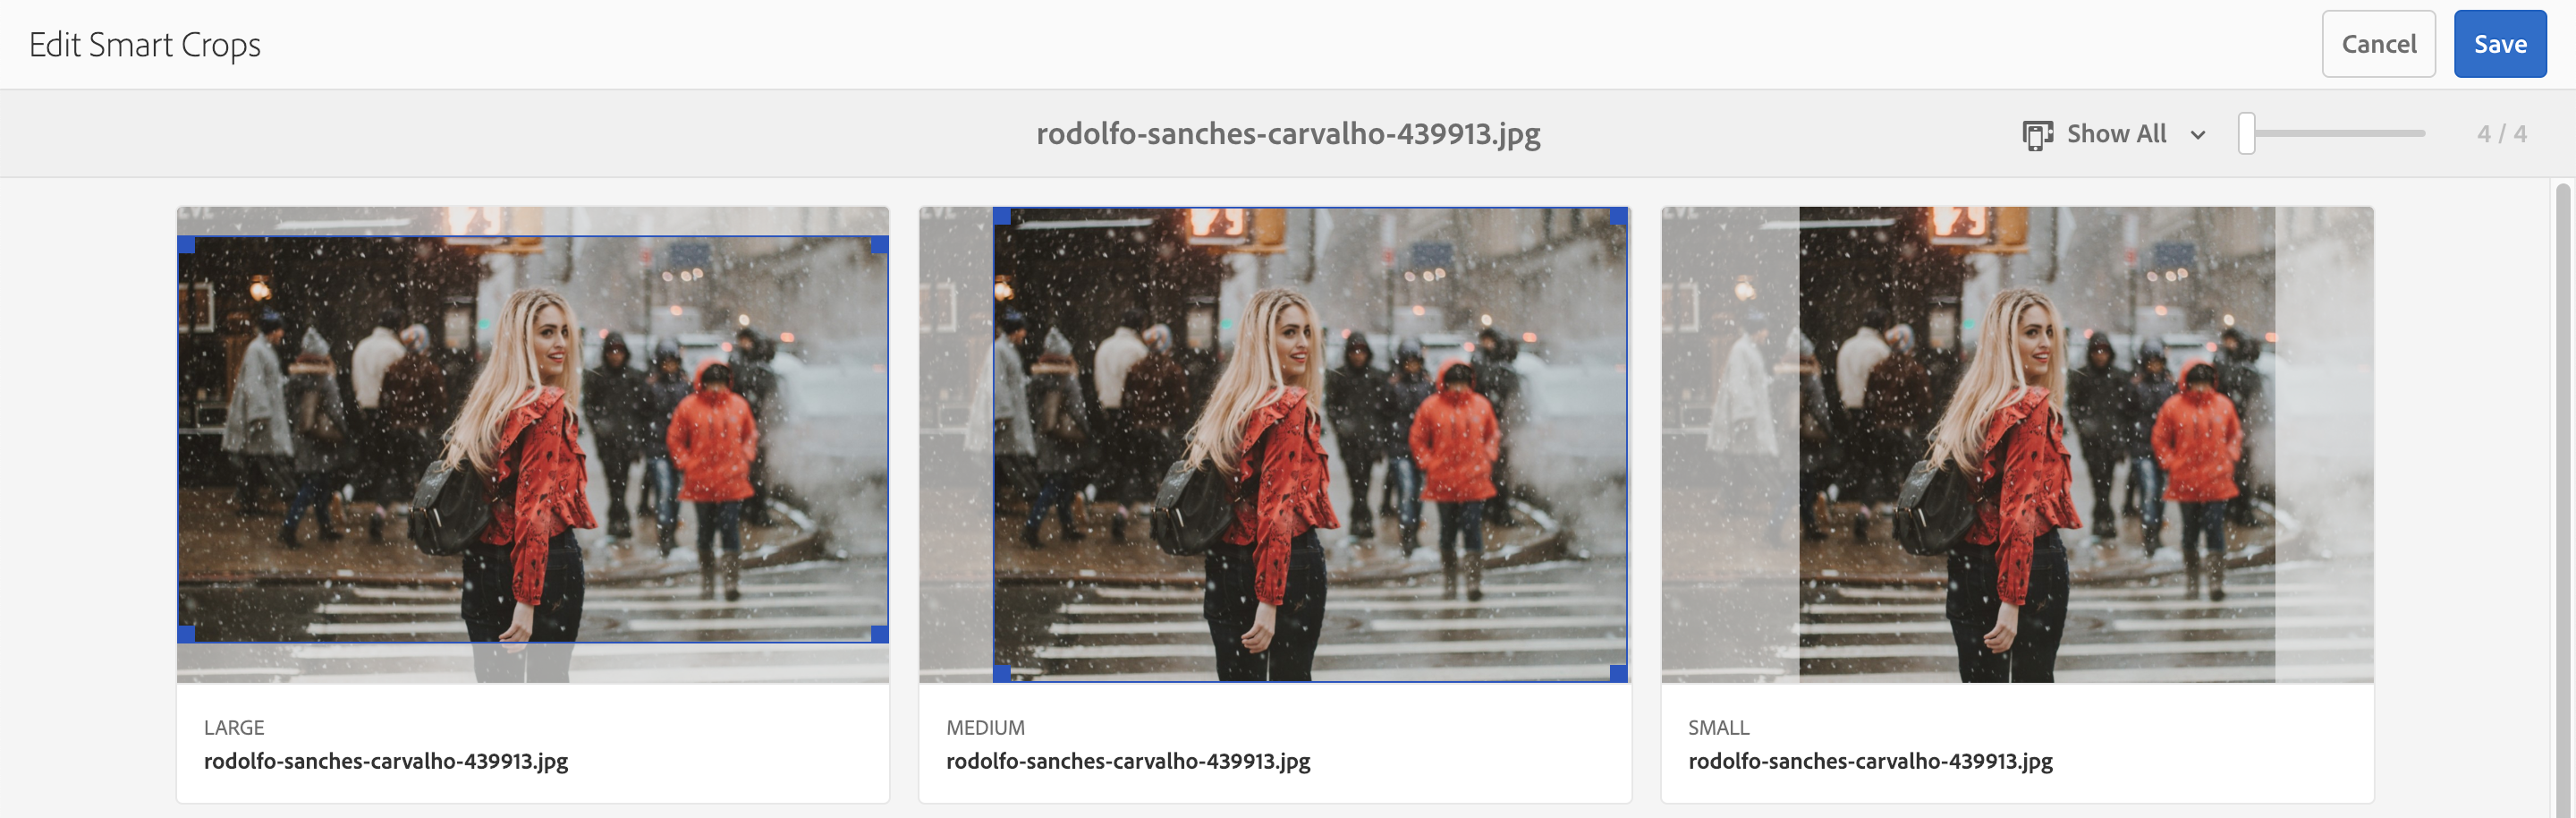
- Click the Cancel button when done, or the Save button if the crops were adjusted.
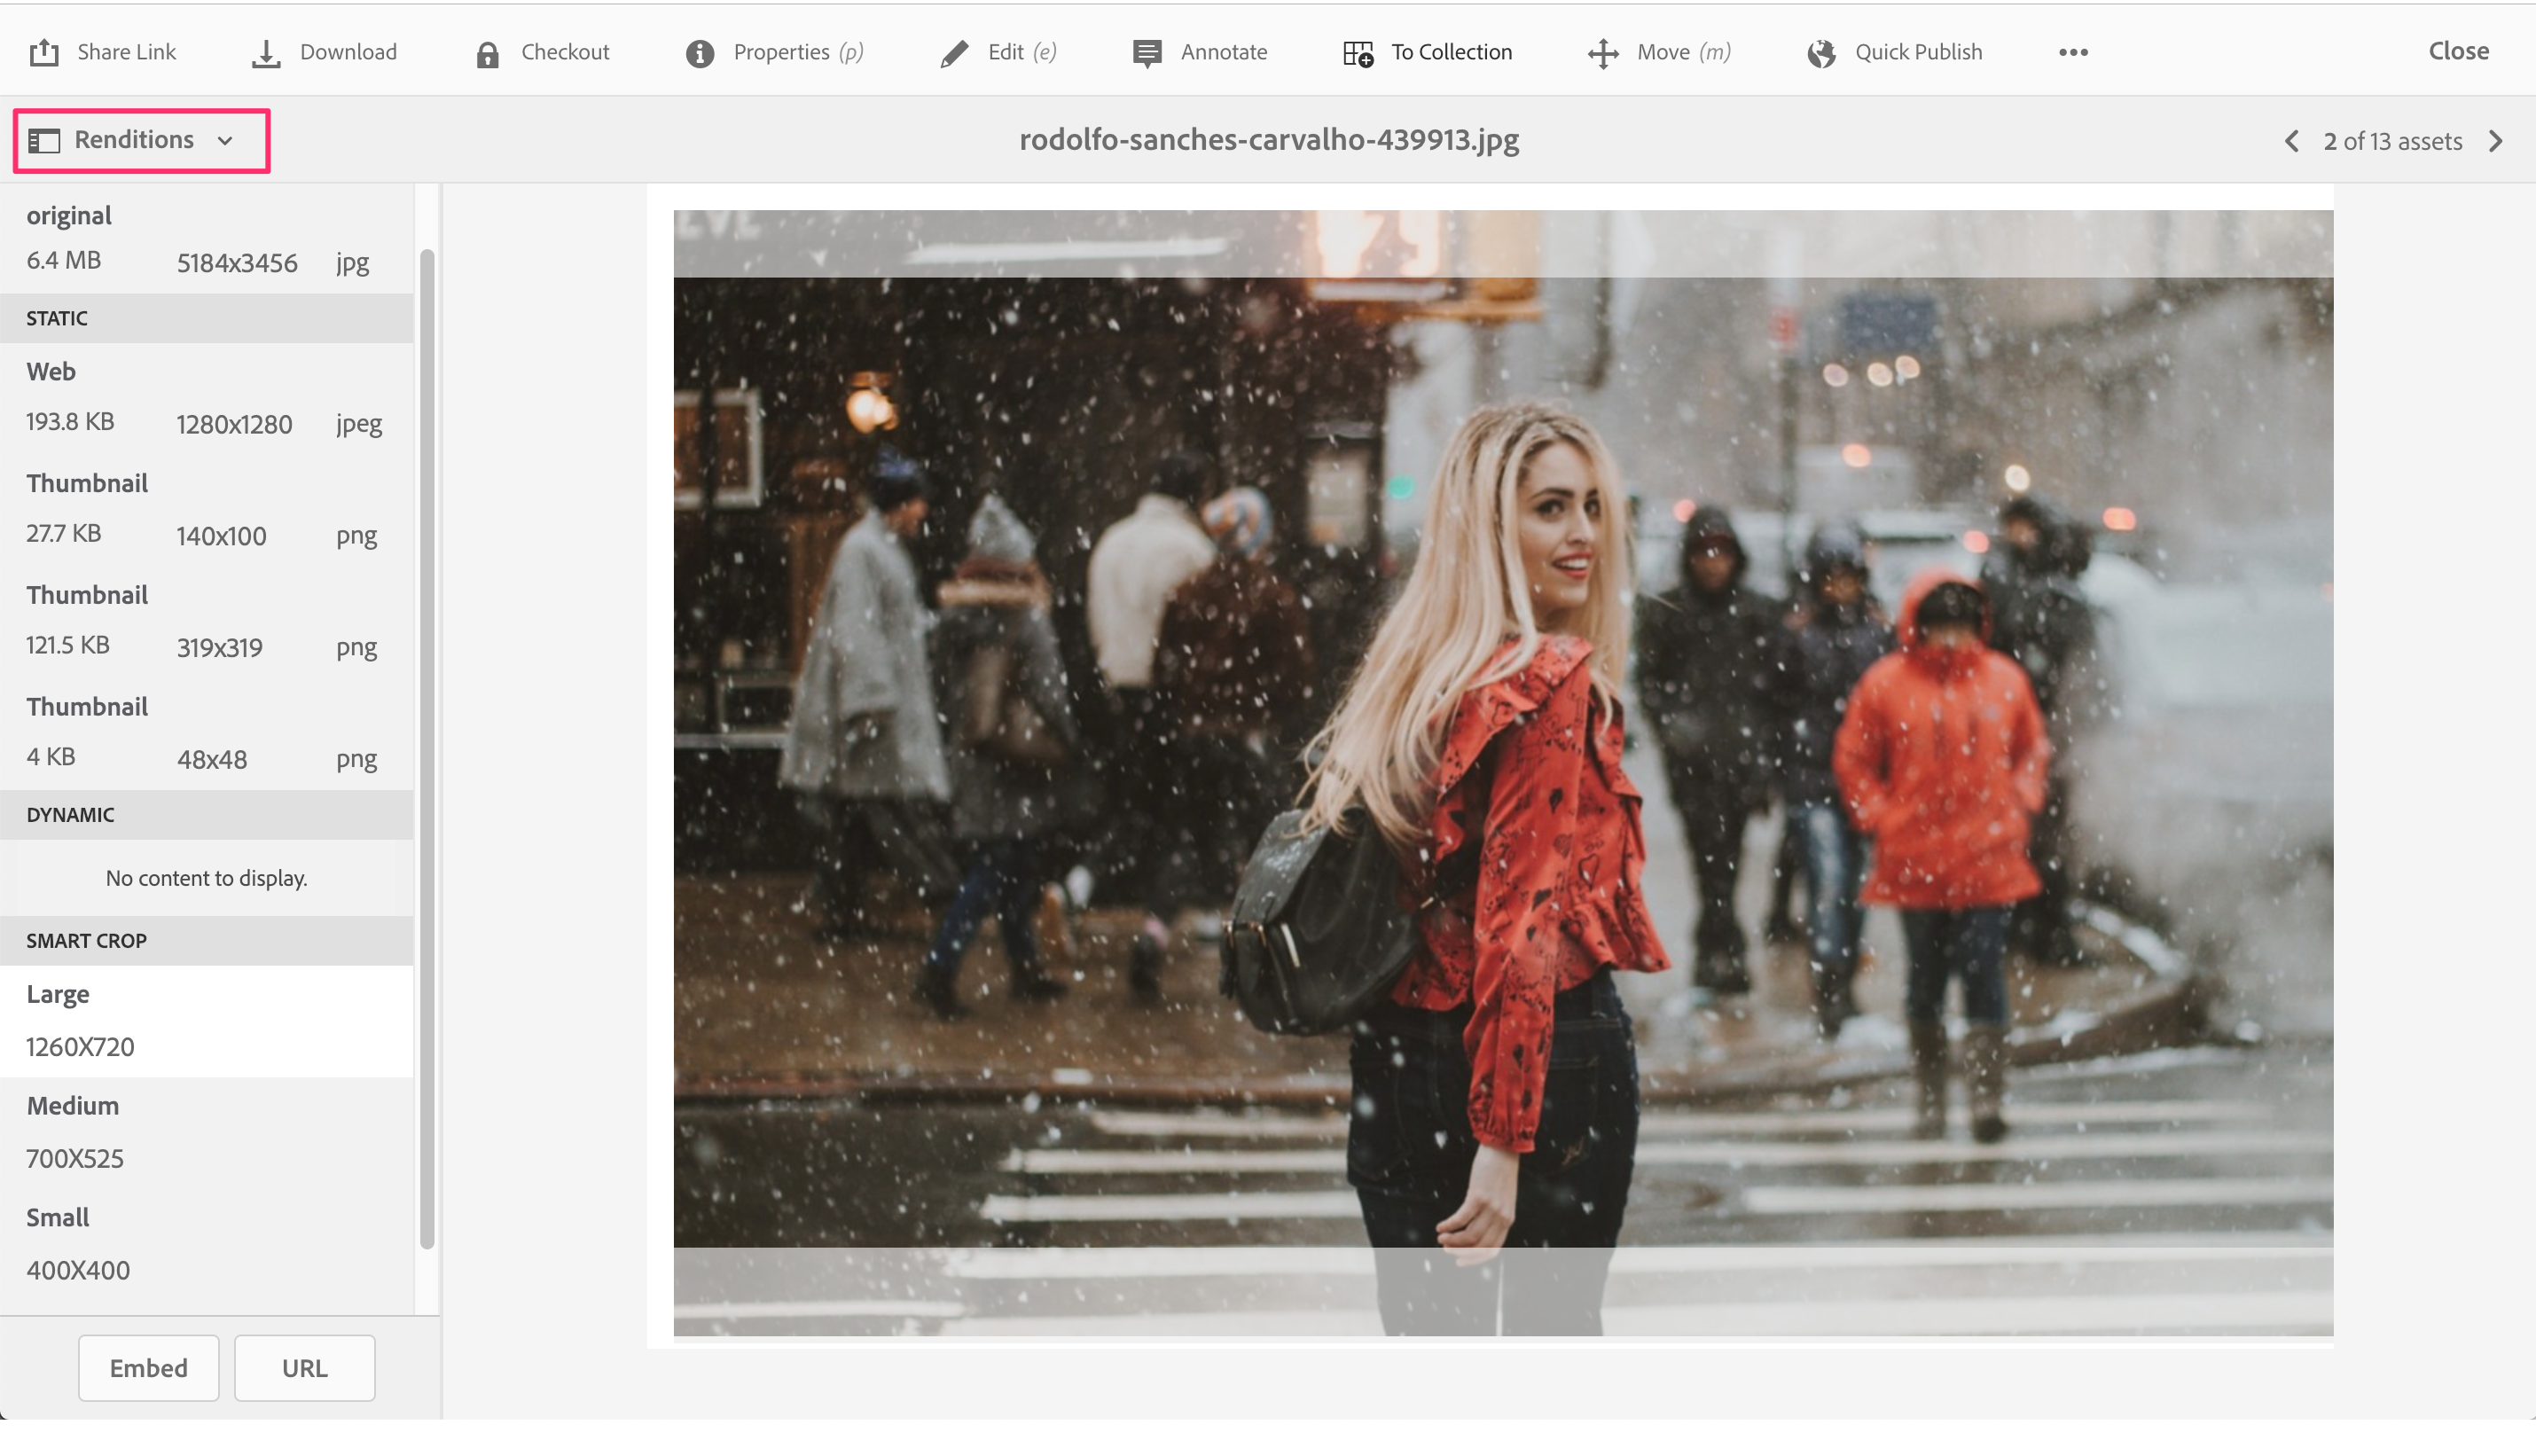
- Click on one of the newly uploaded assets. This time on the thumbnail itself rather than the contextual menu.
- From the sidebar select Renditions.
- Select the different Smart Crop renditions in the left rail and review them.
- Click on the Embed and URL buttons to view the embed codes and direct URLs to the crops.
This exercise demonstrates creating Image Profiles with crops and applying them to assets.
Lesson 4 - Smart Swatch
Objective
- Enable a Smart Swatch on Image profile.
- Apply profile to newly uploaded assets.
Lesson Context
Smart Crop can also be used to automatically locate and capture swatches from product imagery to show color or texture, saving hours of effort in the content creation process.
Exercise 4.1
Step 1: Navigate to Image Profiles by clicking on the AEM logo > tools (hammer icon) > Assets > Image Profiles.
Step 2: Select the previously created Image Profile and click Edit Image Processing Profile.
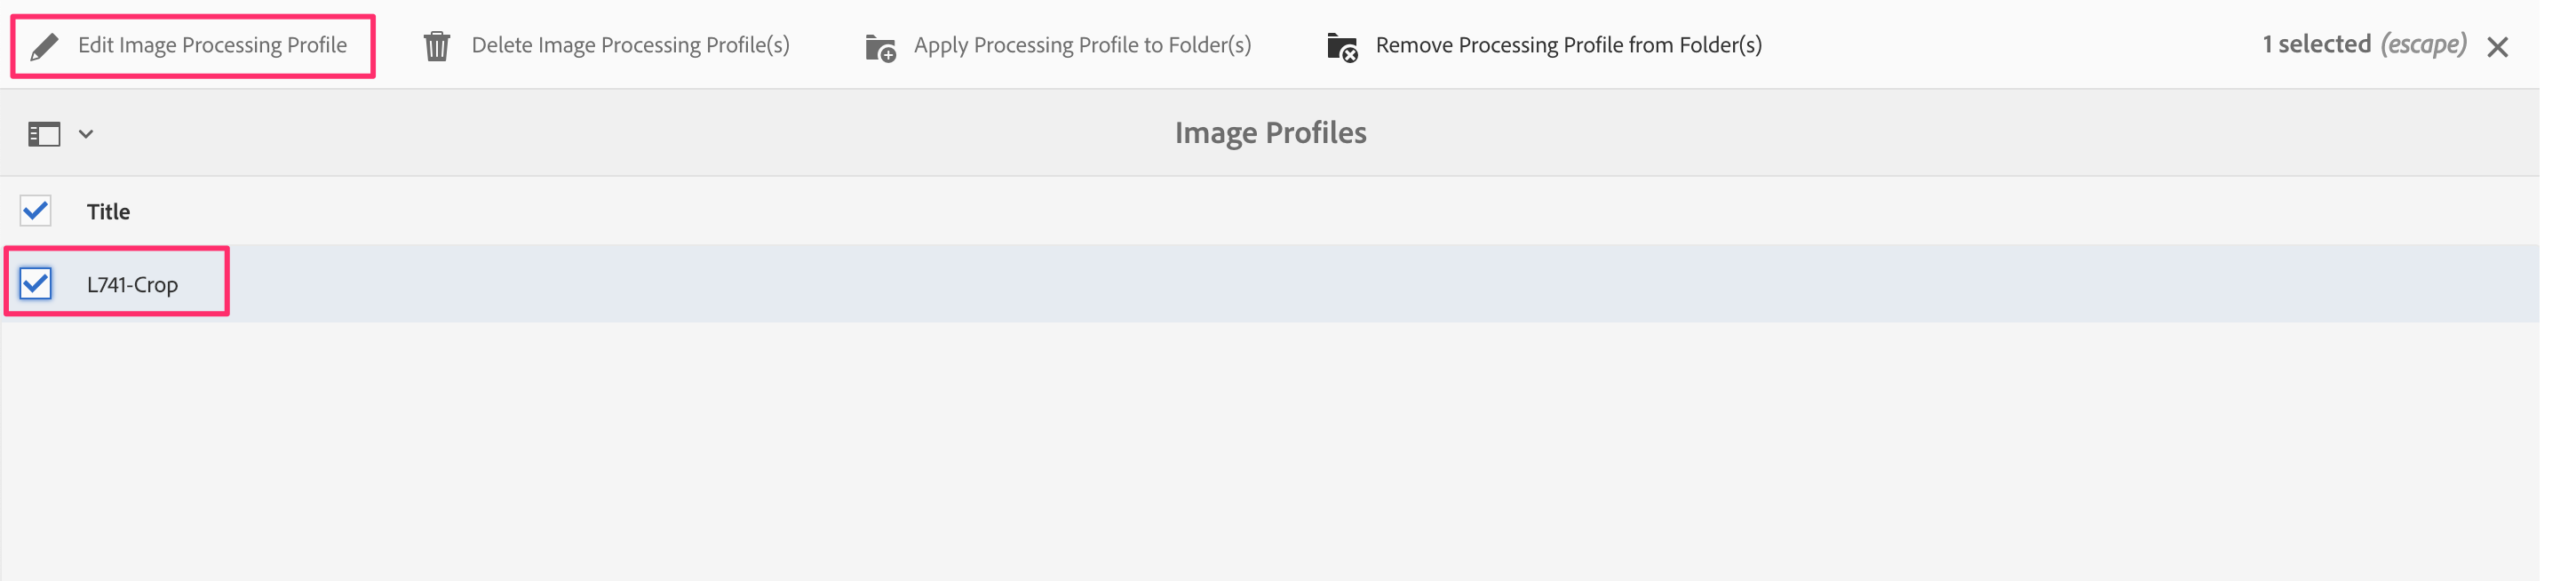
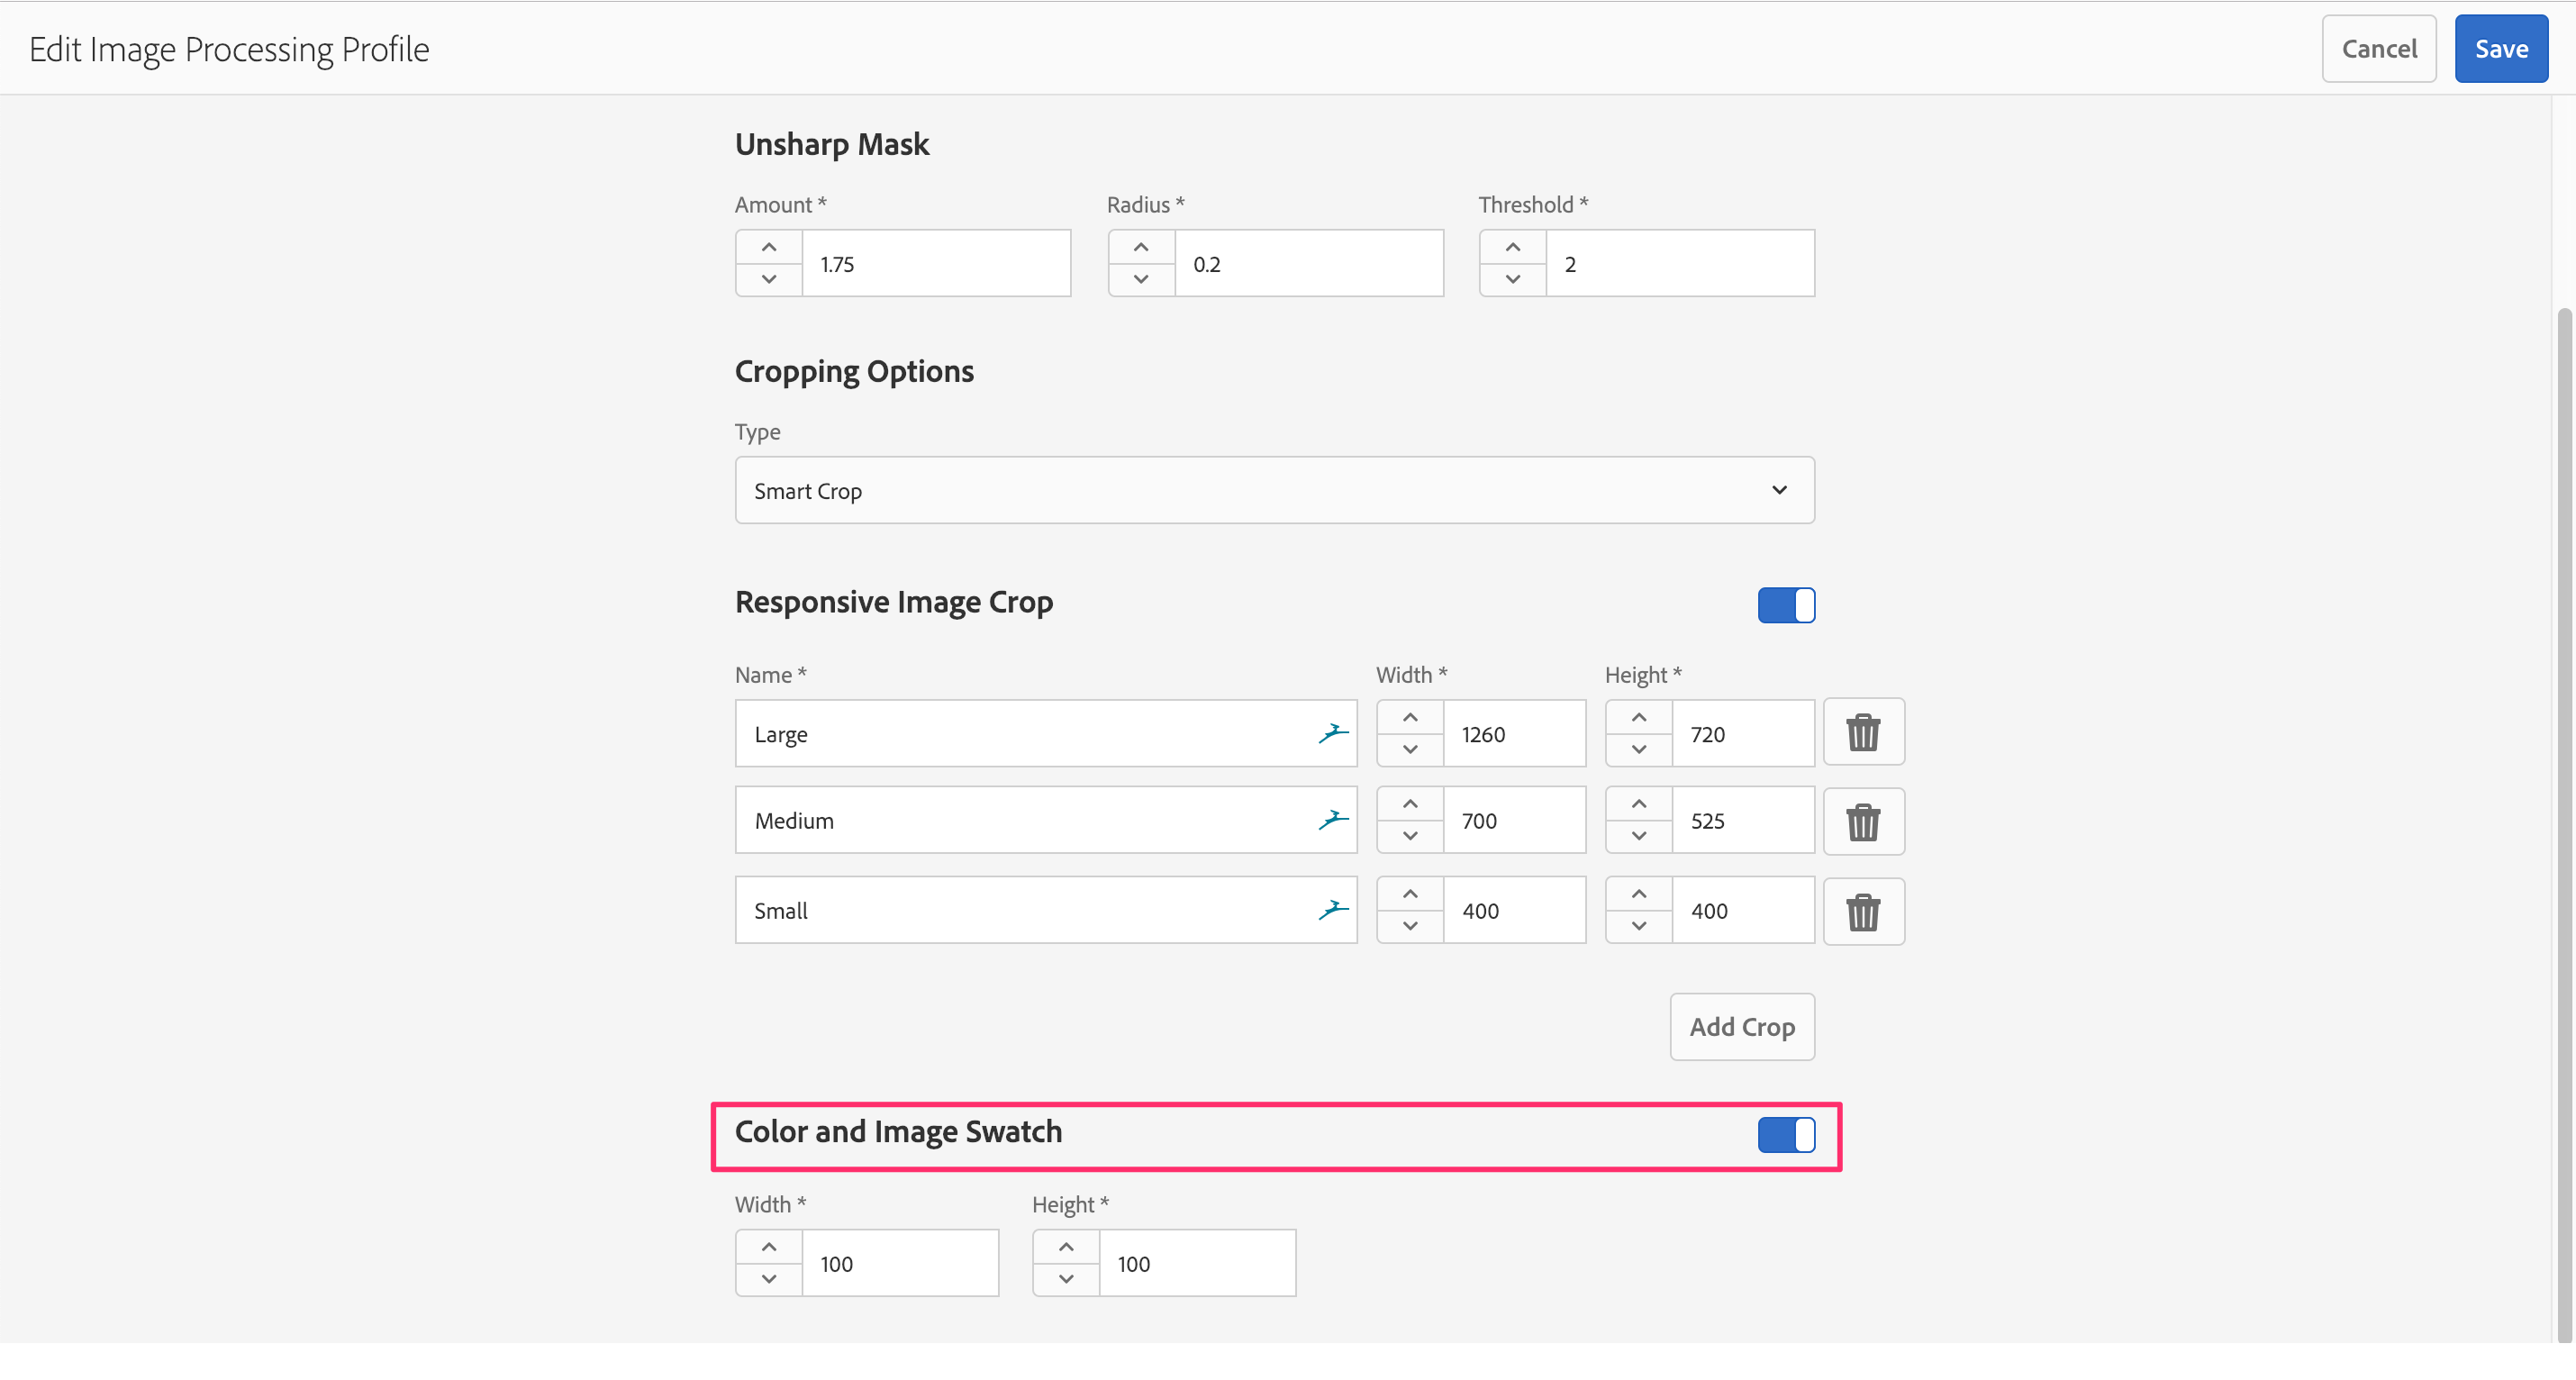
- Scroll to the bottom of the page and enable Color and Image Swatch.
- Adjust the size of the swatch if needed.
- Click Save when done.
Exercise 4.2
Step 1: Navigate to your DM folder.
- Having logged into AEM, Navigate to the Assets section in AEM by clicking on AEM Logo > Navigation (compass icon) > Assets > Files, or going directly to this URL: http://localhost:4502/assets.html/content/dam.
- Select previous created DM Folder L741-DM-Attendee Number (e.g. L741-DM-027).
Note: Your attendee number can be found on your workstation.
Exercise 4.3
Step 1 Upload assets for swatch creation
- Navigate into the folder you created.
- Click on the Create button in the upper right corner and select Files.
- In the dialog, navigate to Desktop > Assets > Lesson 4.
- Select all the assets in the folder and click Open.
- In the next dialog click the Upload button.
Step 2 View processed assets
- Wait for the Processing flags to complete.
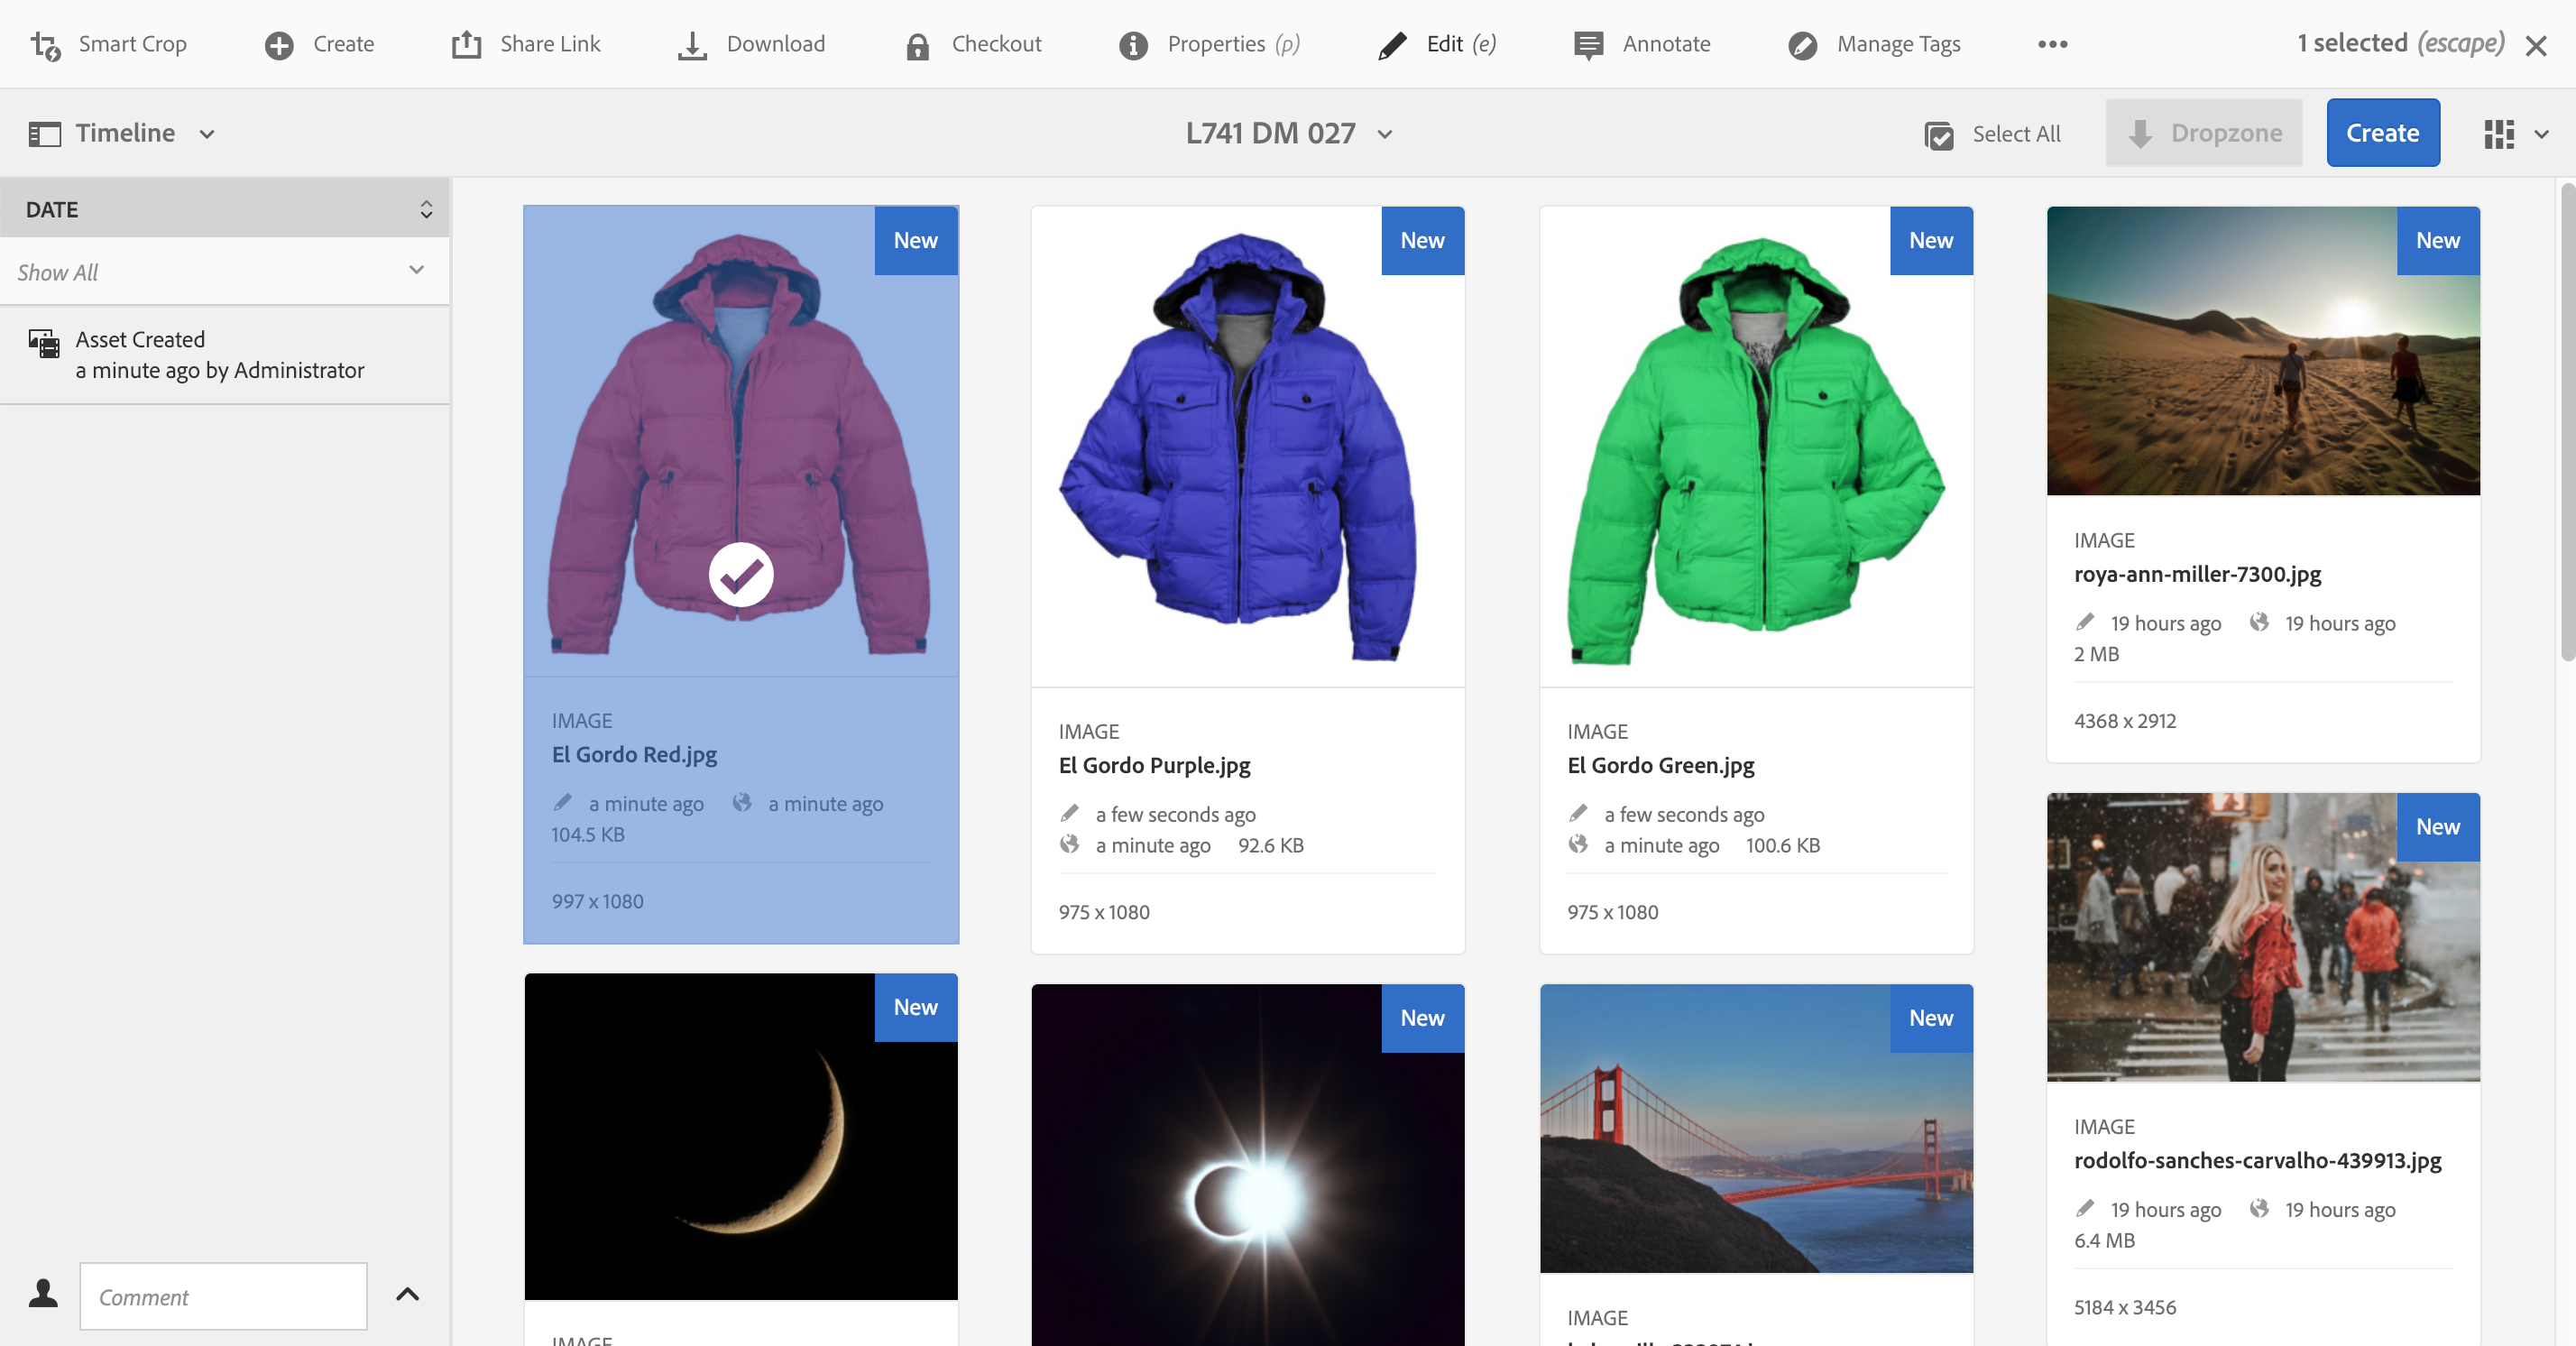
- Once the assets are processed, select one of the assets by hovering over it and clicking the check sign.
- From the contextual menu above, click on Smart Crop.
- Review the swatches that have been generated. Adjust them by dragging the crop regions if needed.
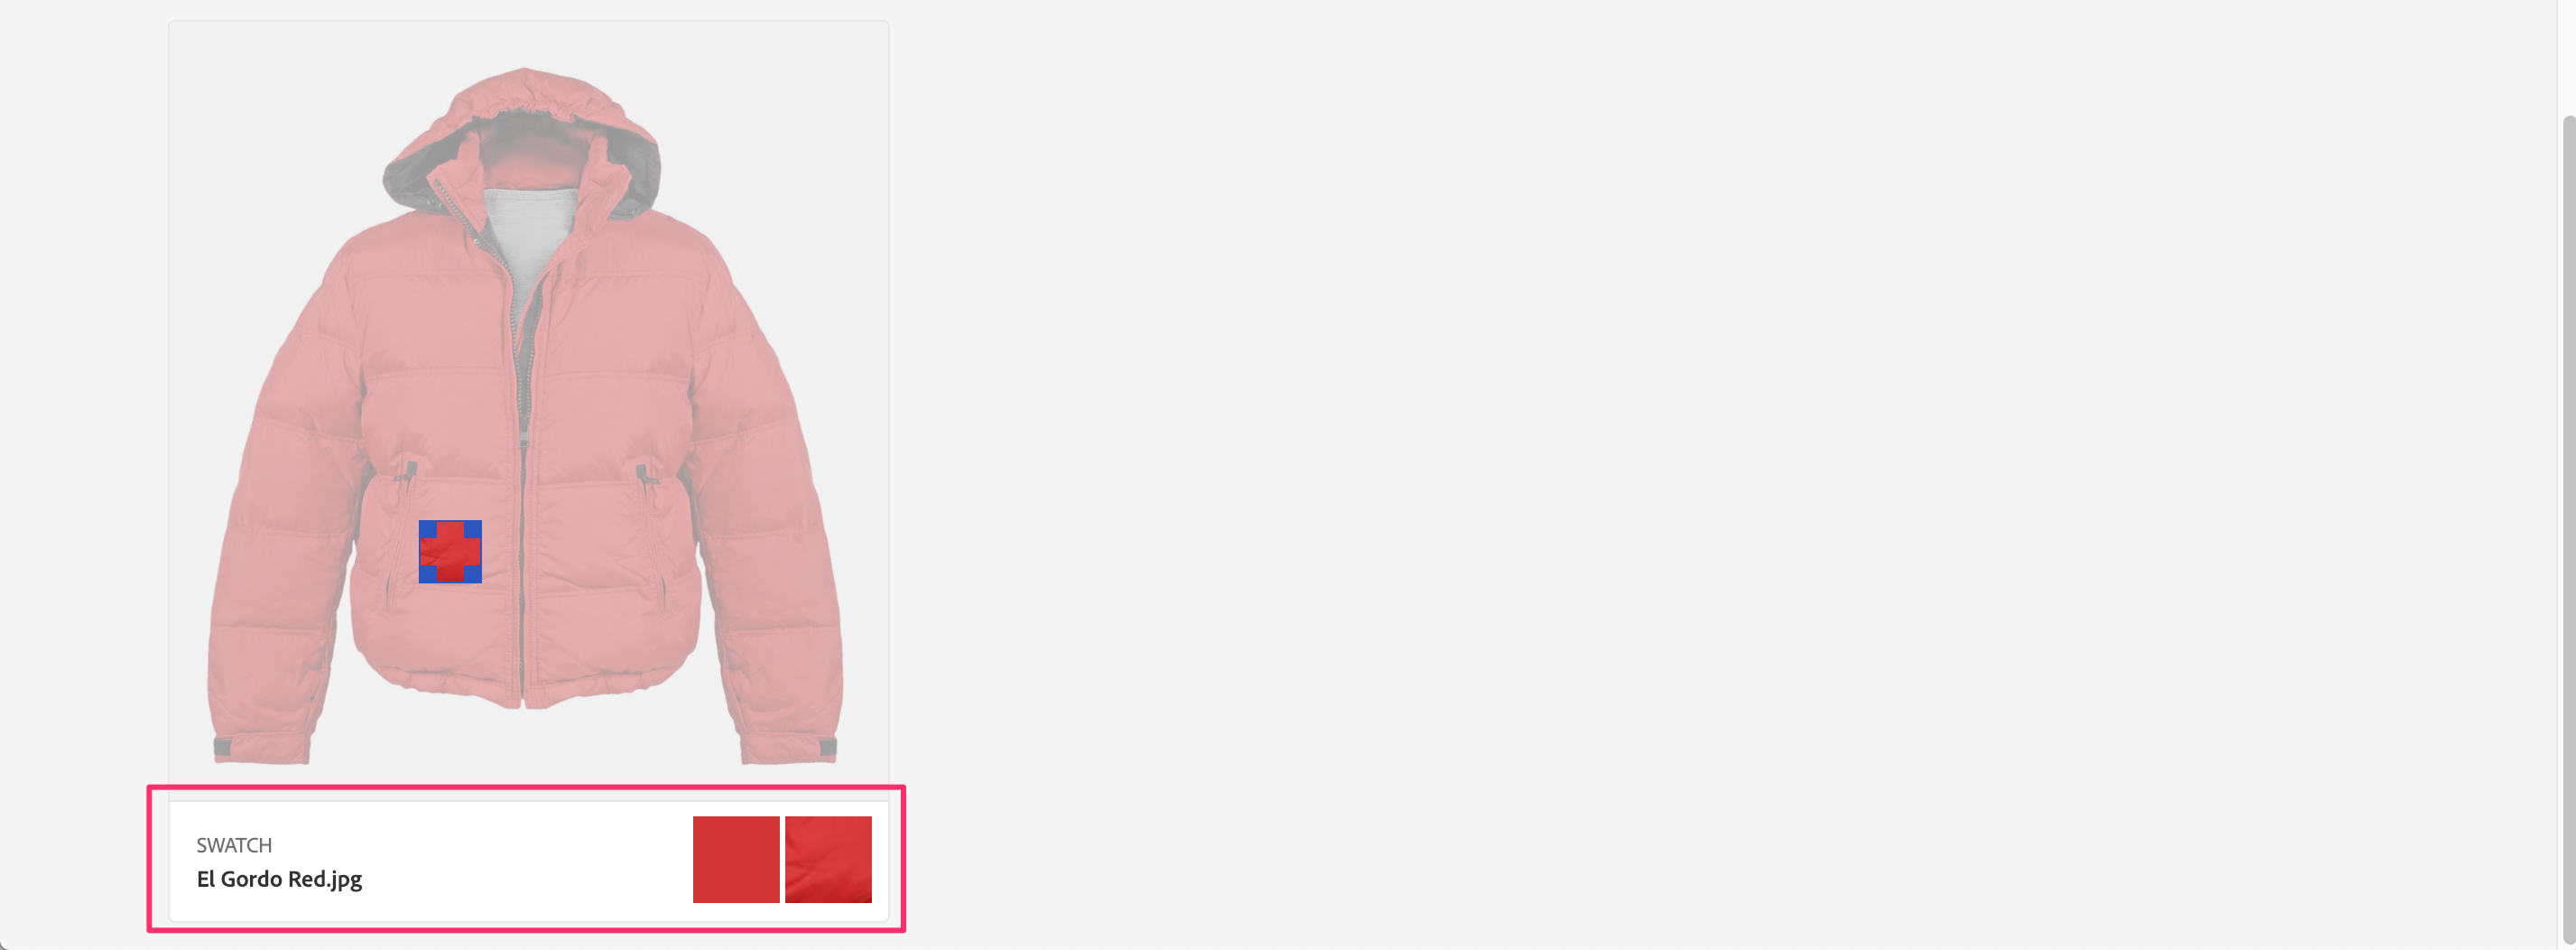
- Click the Cancel button when done, or the Save button if the crops were adjusted.
- Click on one of the newly uploaded assets. This time on the thumbnail itself rather than the contextual menu.
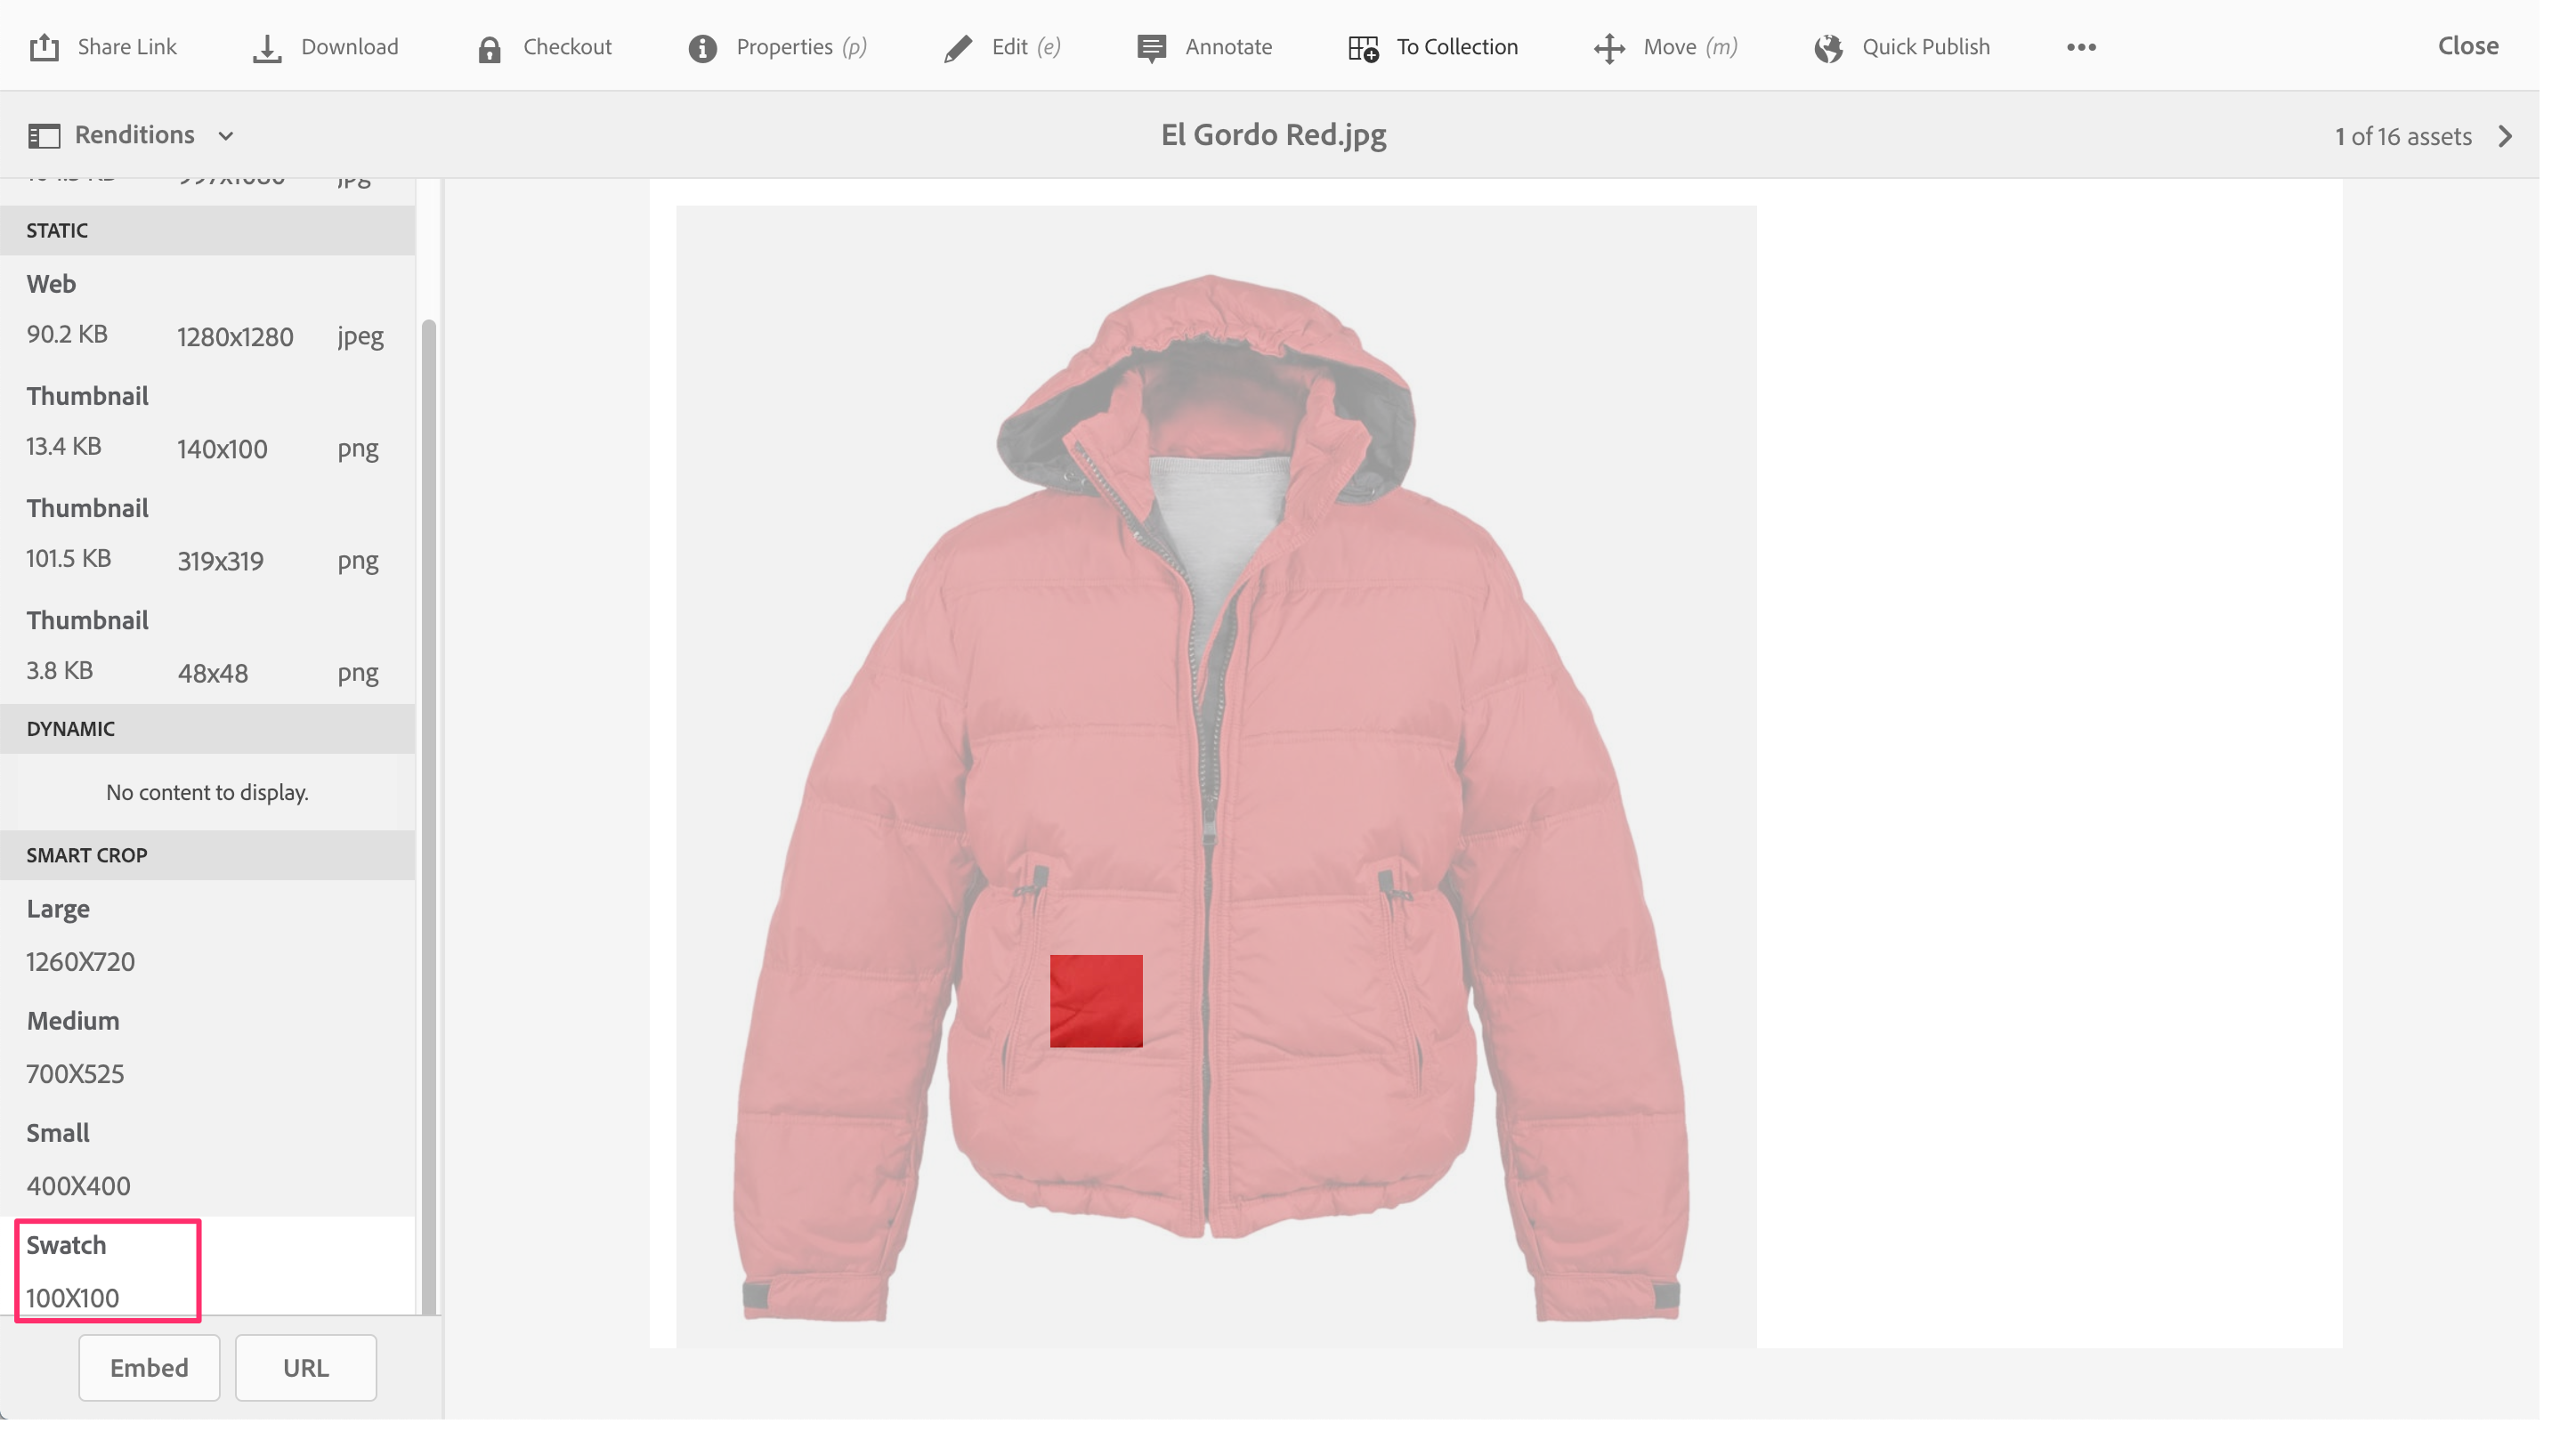
- From the sidebar select Renditions.
- Locate the different Smart Crop renditions in the left rail and review the swatch.
- Click on the Embed and URL buttons to view the embed codes and direct URLs to the crops.
This exercise demonstrates creating Image Profiles with color and image swatches and applying them to assets.
Appendix
This section contains some helpful resources and links to help delve deeper into some of the activities completed in this lab. While they are not required for the successful completion of the lab, nevertheless reviewing them may provide further context to the lessons.
Detailed instructions for setup of Dynamic Media - Scene7 mode can be found here - https://helpx.adobe.com/experience-manager/6-4/assets/using/config-dms7.html.
Best practices for effectively training the Smart Content Service - https://helpx.adobe.com/experience-manager/6-4/assets/using/smart-tags-training-guidelines.html.
Creating an Adobe I/O integration
Enabling Smart Content Services in AEM requires the creation of an integration in Adobe I/O. The steps are as follows
Detailed instructions on creating an Adobe I/O integration for Smart Content Services can be found here - https://helpx.adobe.com/experience-manager/6-4/assets/using/config-smart-tagging.html.
Your Experience Cloud org needs to be provisioned for Smart Content Services.