
Devices don’t buy products—people do. In this hands-on lab, we focus on how to achieve a people-based marketing strategy in Adobe Audience Manager by leveraging the Adobe Experience Cloud Device Co-Op, profile merge rules, and instant cross-device suppression. Learn how to engage consumers as they move among screens and devices without overspending impressions. It’s time to make your audience and pockets happy!
When thinking of Audience Manager Data Collection terminology, the easiest way of doing it is to map it to the core functions of a Data Management Platform (DMP).
Figure 1: Audience Manager Data Collection as DMP Functions
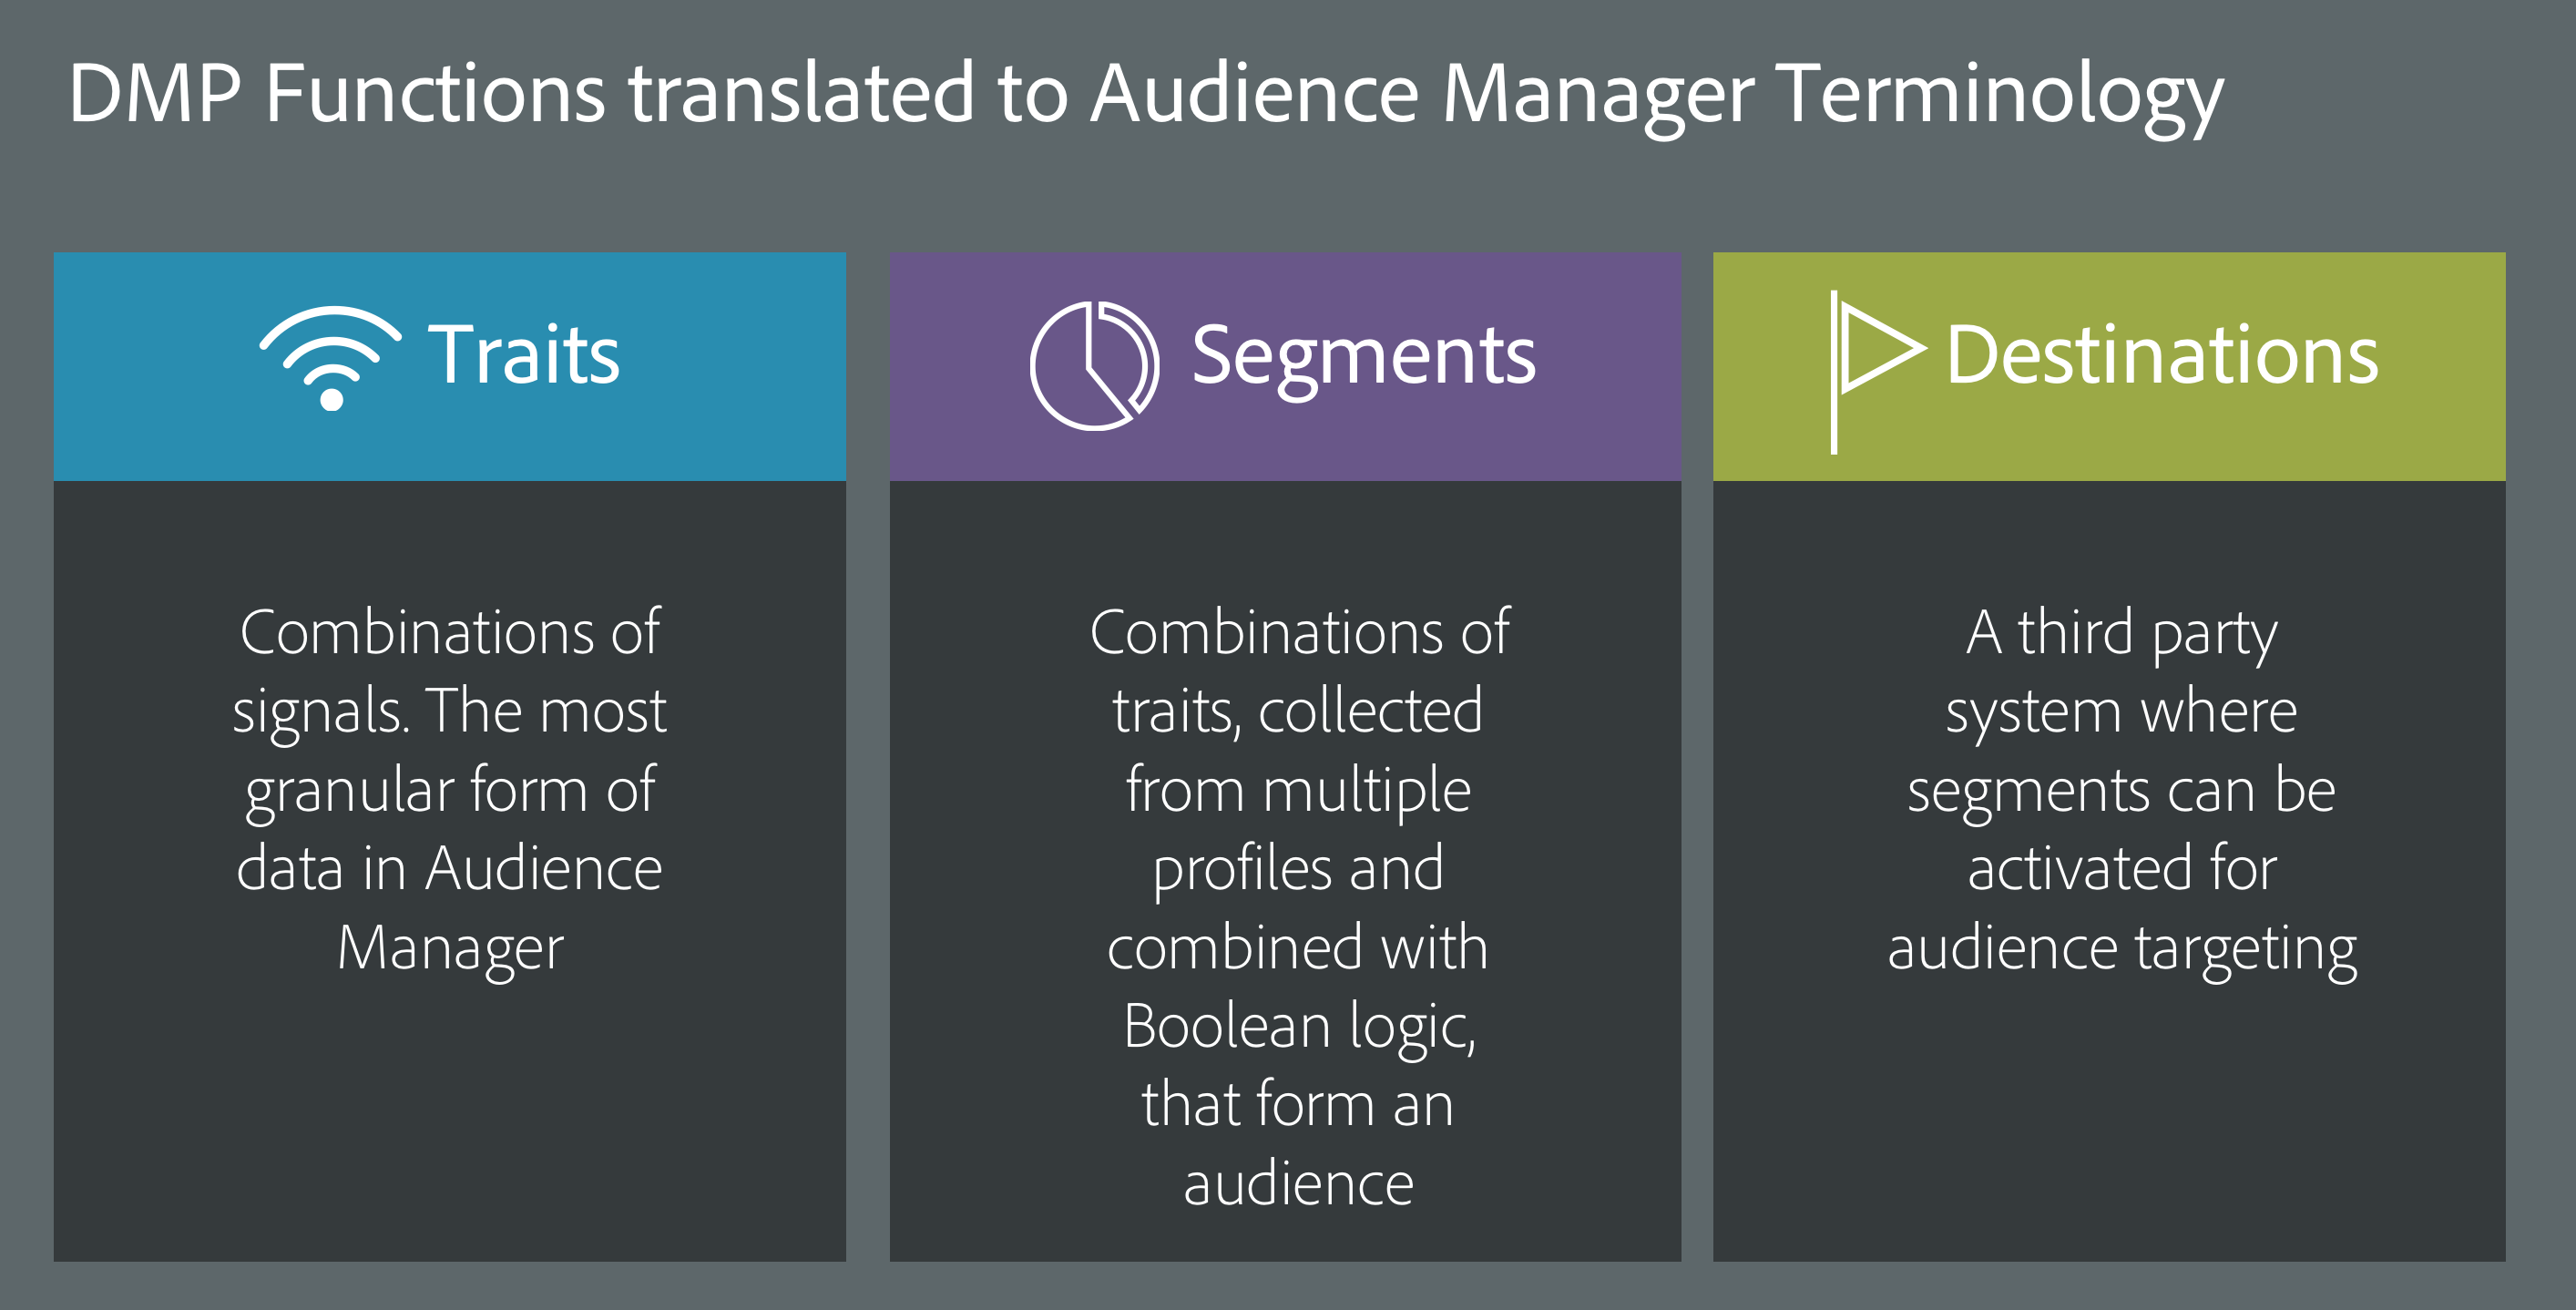
This is the simplest unit of data collected in Adobe Audience Manager. Examples include: gender=female, city=LasVegas, purchase_item=jeans. These key/values are free formed and are defined by Audience Manager customers and partners, to match their business use cases.
Whenever an end-user activity is detected on the client side, a combination of Signals will be generated. We can create Traits, which are combinations of Signals in order to store this information on the enduser's Audience Manager profile. For instance, we could create a trait such as: gender == male AND age >= 21.
Similar to the relationship between signals and traits, Segments are made up from Traits, using Boolean logic. Think of a segment as a query - you want to target consumers that have a specific set of traits. What's powerful about Segments is that it can combine multiple profiles belonging to the same person. You can imagine a prospect, Jane, browsing from multiple devices (tablet, smartphone, laptop). Each device will translate to a dedicated Audience Manager profile. Depending on your use case, you might want to combine traits coming from all these 3 profiles and have a segment rule on top of those. If Jane signed up from Laptop (gender=female), looked at the season sales from tablet (page_viewed=season_sales) and viewed an item from smartphone (product_view=sunglasses_sku), we can combine these traits and include Jane in the "Females that are interested in the Season Sales and looked at Sunglasses SKU". Hence, the segmentation function receives traits and profile merge rules as input.
Once an audience is segmented, as clients, we want to proceed to activation. For example, let's consider our previous segment. We know Jane looked at the product, but she didn't purchase it. We could leverage this information and personalize the web property for Jane. On her next visit, we could display the Sunglasses on the main page and perhaps offer a discount. Or, we could target her on 3rd party websites, by exporting this segment information to a Demand Side Platform (DSP) such as Adobe Media Optimizer (or 3rd party ones) and creating an advertising campaign. This is where Destinations kick in. They are, exactly as the name suggests it, a setup for passing on that audience to either back to your system (ie. for on-site personalization) or any other 3rd party system you have access to. What is really nice about it is that all happens out of the box. Once you set such a destination, Audience Manager will take care of your data flow.
Figure 2: Audience Manager Data Collection Flow

For this exercise, you will into the shoes of a Popular Retailer Marketer, who wants to explore his Audience Manager account.
Login to your lab machine with the following credentials
Open the Google Chrome browser.
In the Bookmarks bar, you should see a lab entry. Click on it or enter:
https://bit.ly/2sa5BIx
Input your lab machine number
Figure 3: Enter lab machine number

Go to AAM User Interface.
Figure 4: Go to AAM
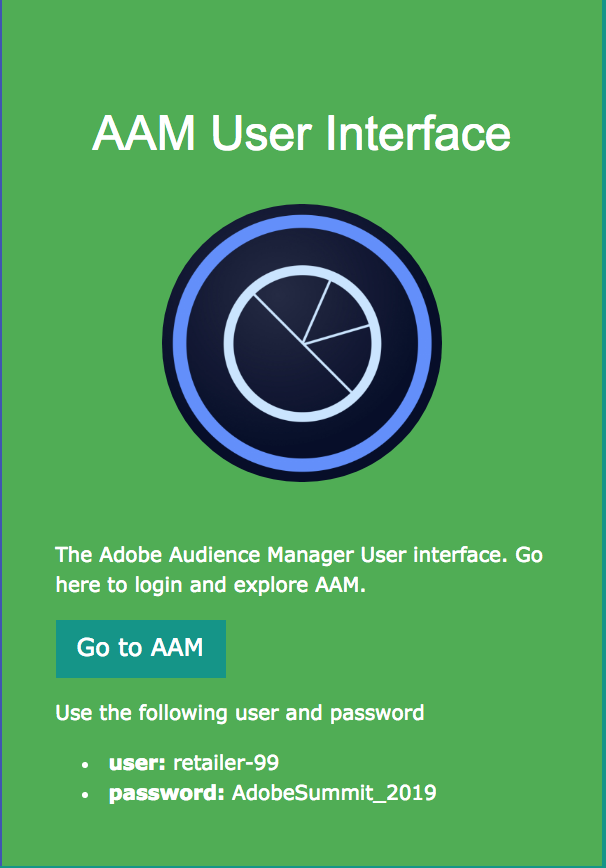
Notice your Audience Manager Credentials. You will use these in order to login to your Audience Manager Account.
Click on Go to AAM.
It is time to explore your Audience Manager Data Collection configuration.
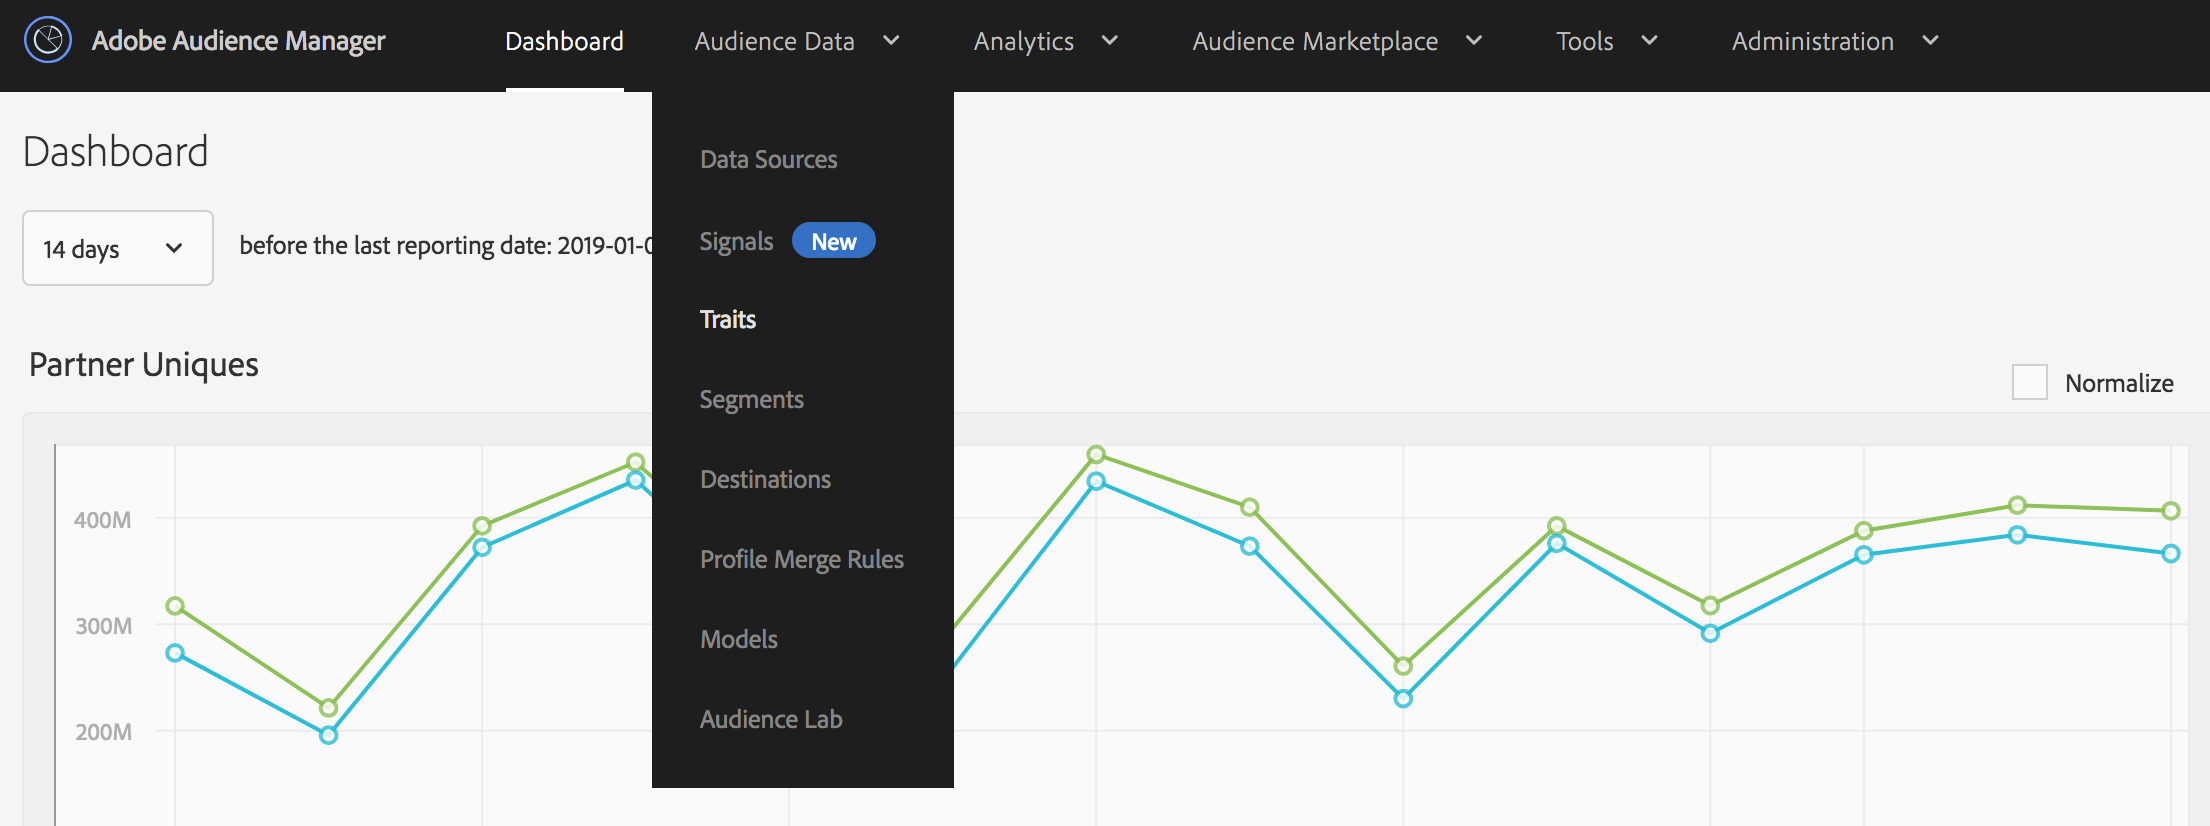
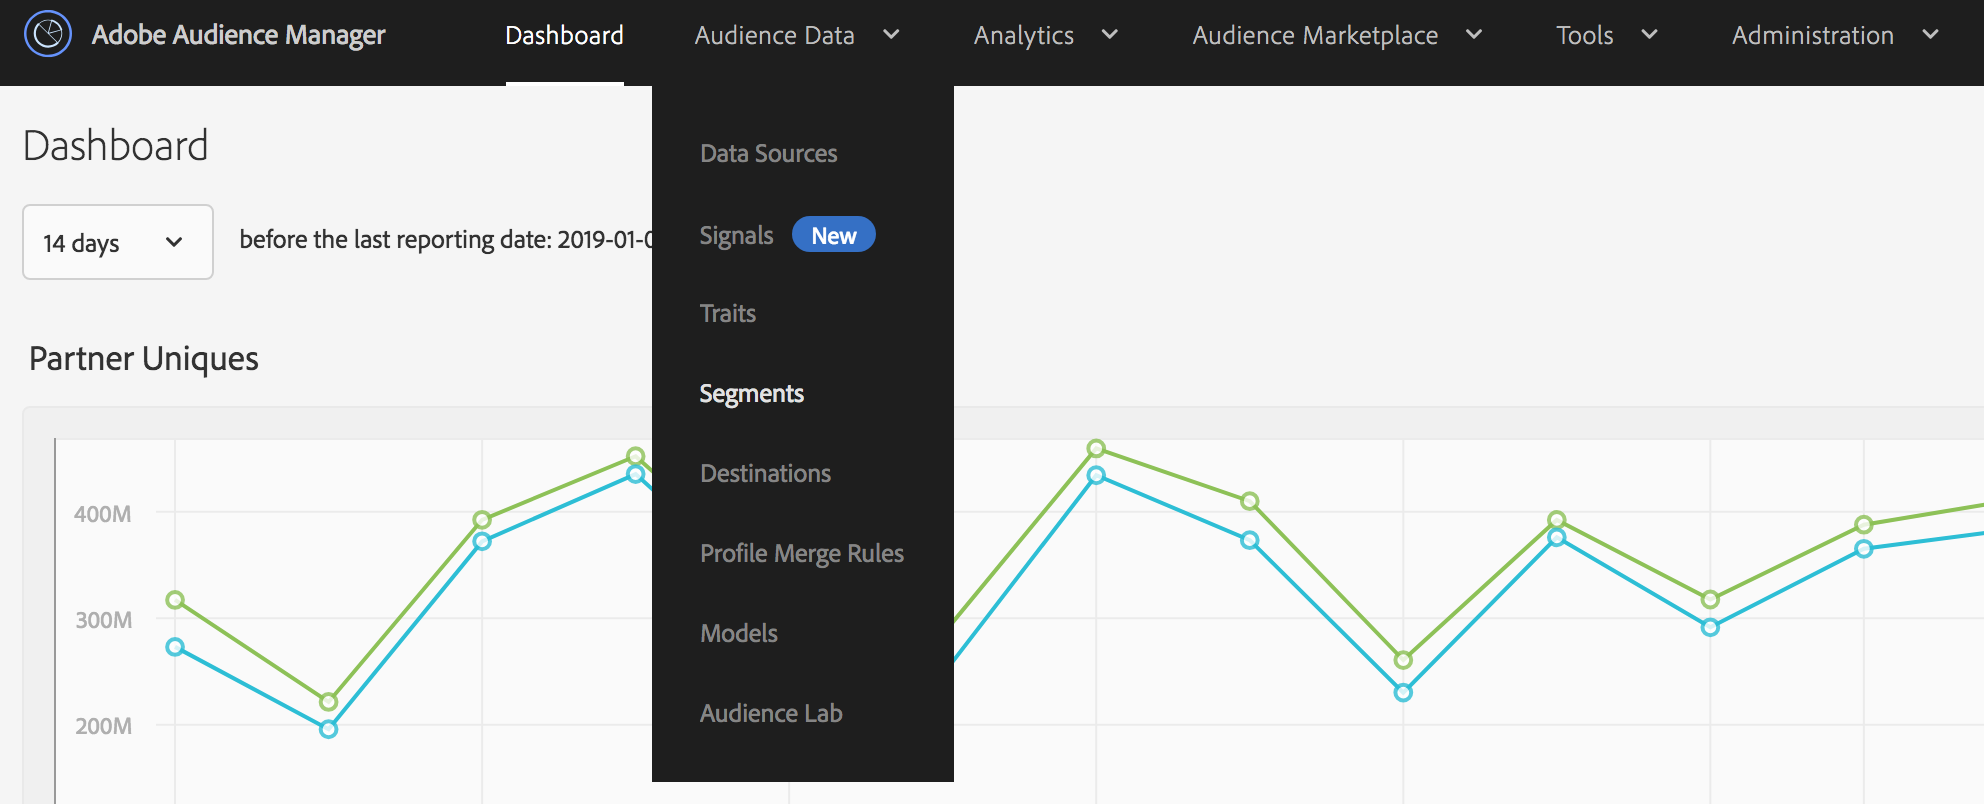
While on the Audience Manager Portal, click on the menu item Audience Data.
Below, you should see the Traits menu subitem. Click on it.
Figure 5: Access Traits
Explore the Traits panel.
Figure 6: Explore Traits
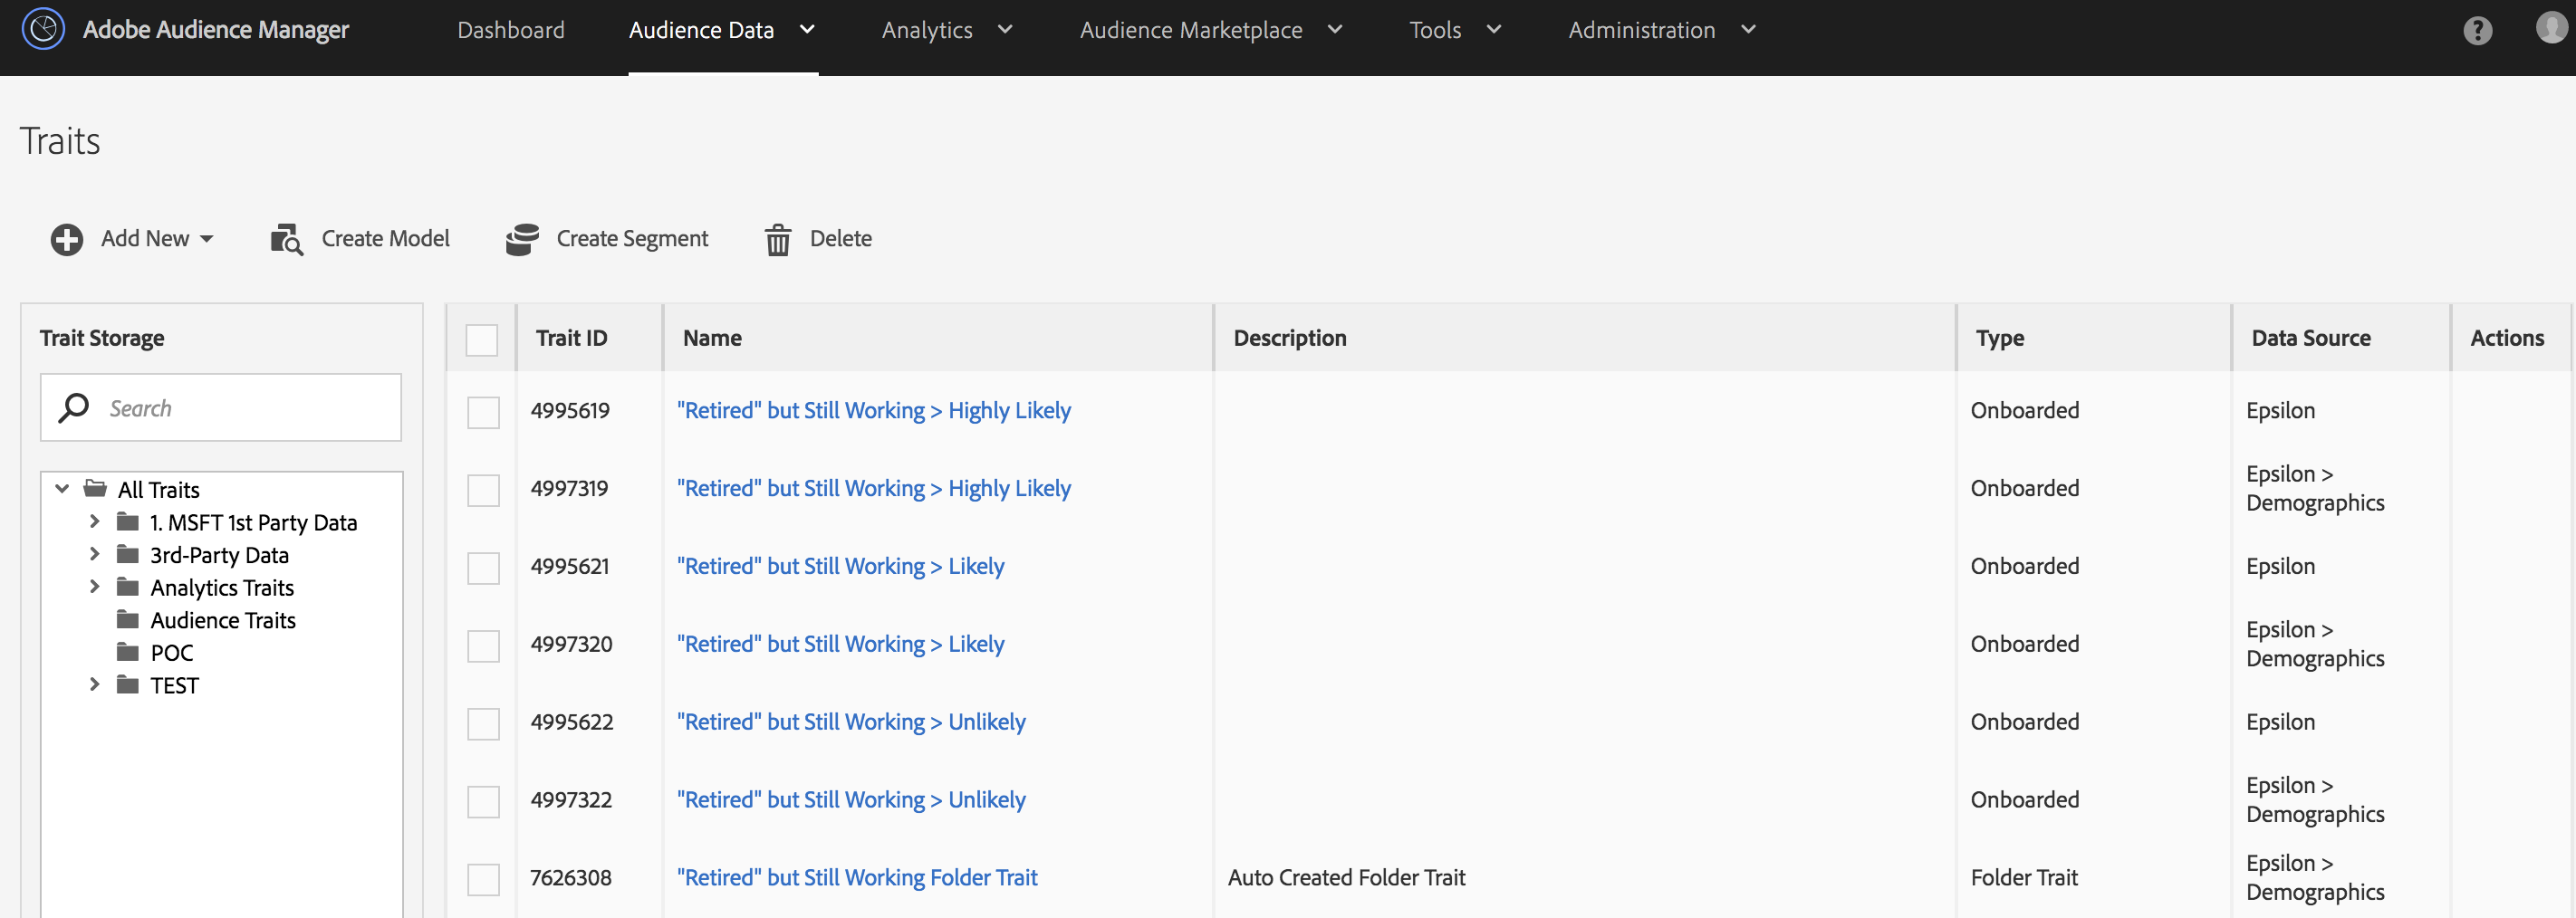
To speed things up, we have pre-created for you the traits needed for this lab. You can also create new traits, but they will not be taken into account into our demos.
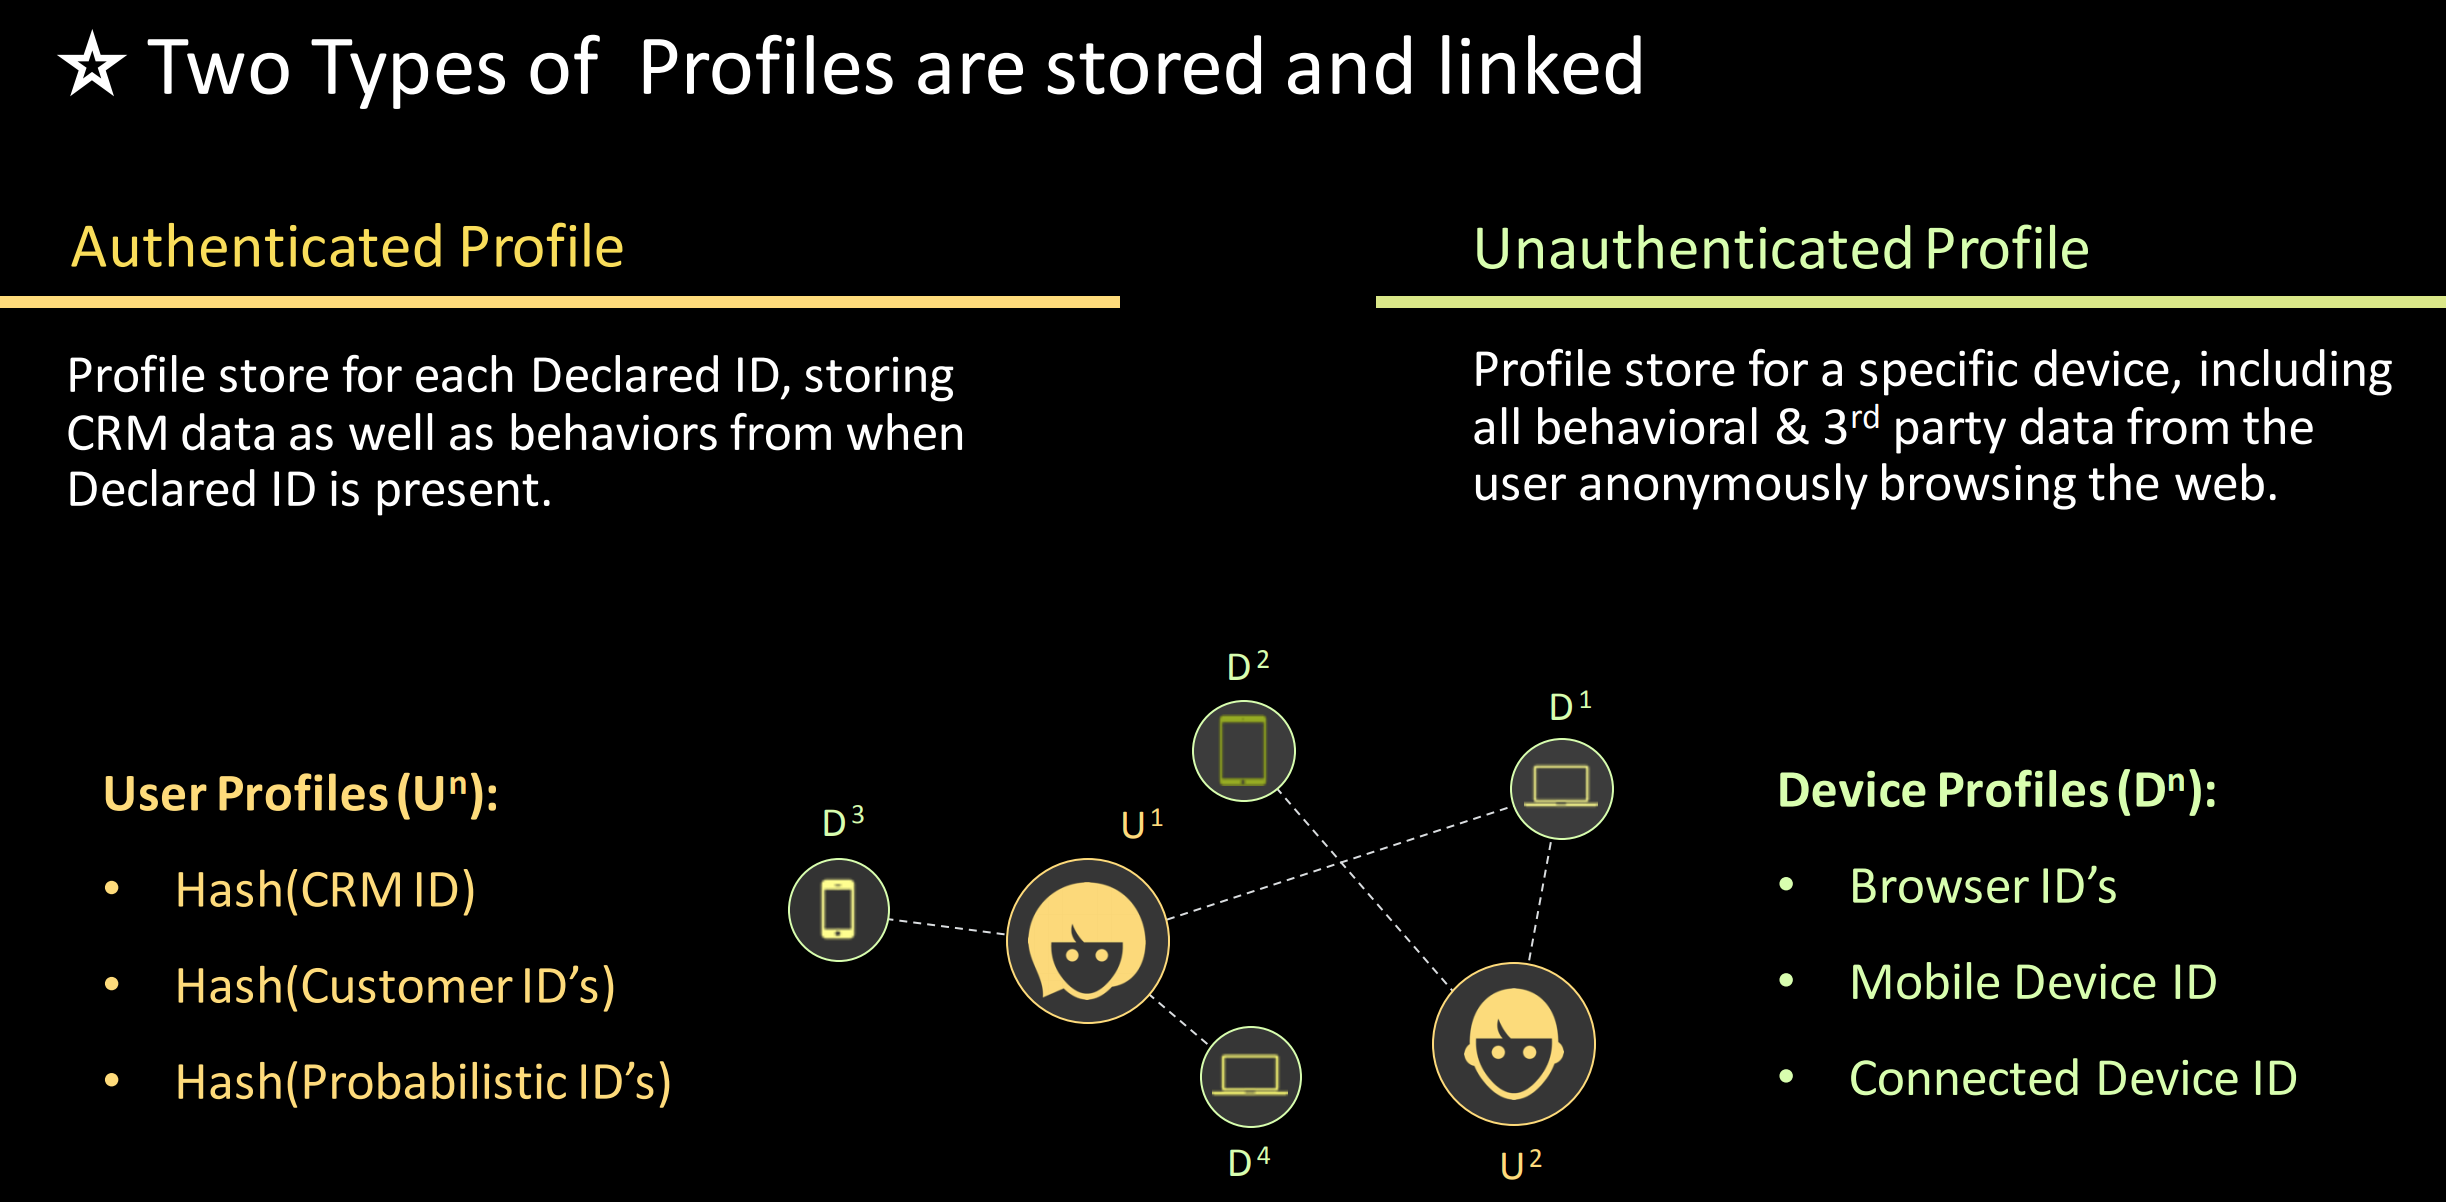
As previously mentioned, traits are collected into Audience Manager profiles, which can be split into two categories:
authenticated - traits are evaluated against signals collected within an authenticated end-user activity
unauthenticated - traits are evaluated against signals collected within an unauthenticated end-user activity
Figure 7: Audience Manager Types of Profiles
Based on these two types of profiles, you can define how you would like to combine the collected traits when performing segmentation. The Profile Merge Rules define the way you combine the different kind of profiles.
Figure 8: Audience Manager Options to merge Profiles
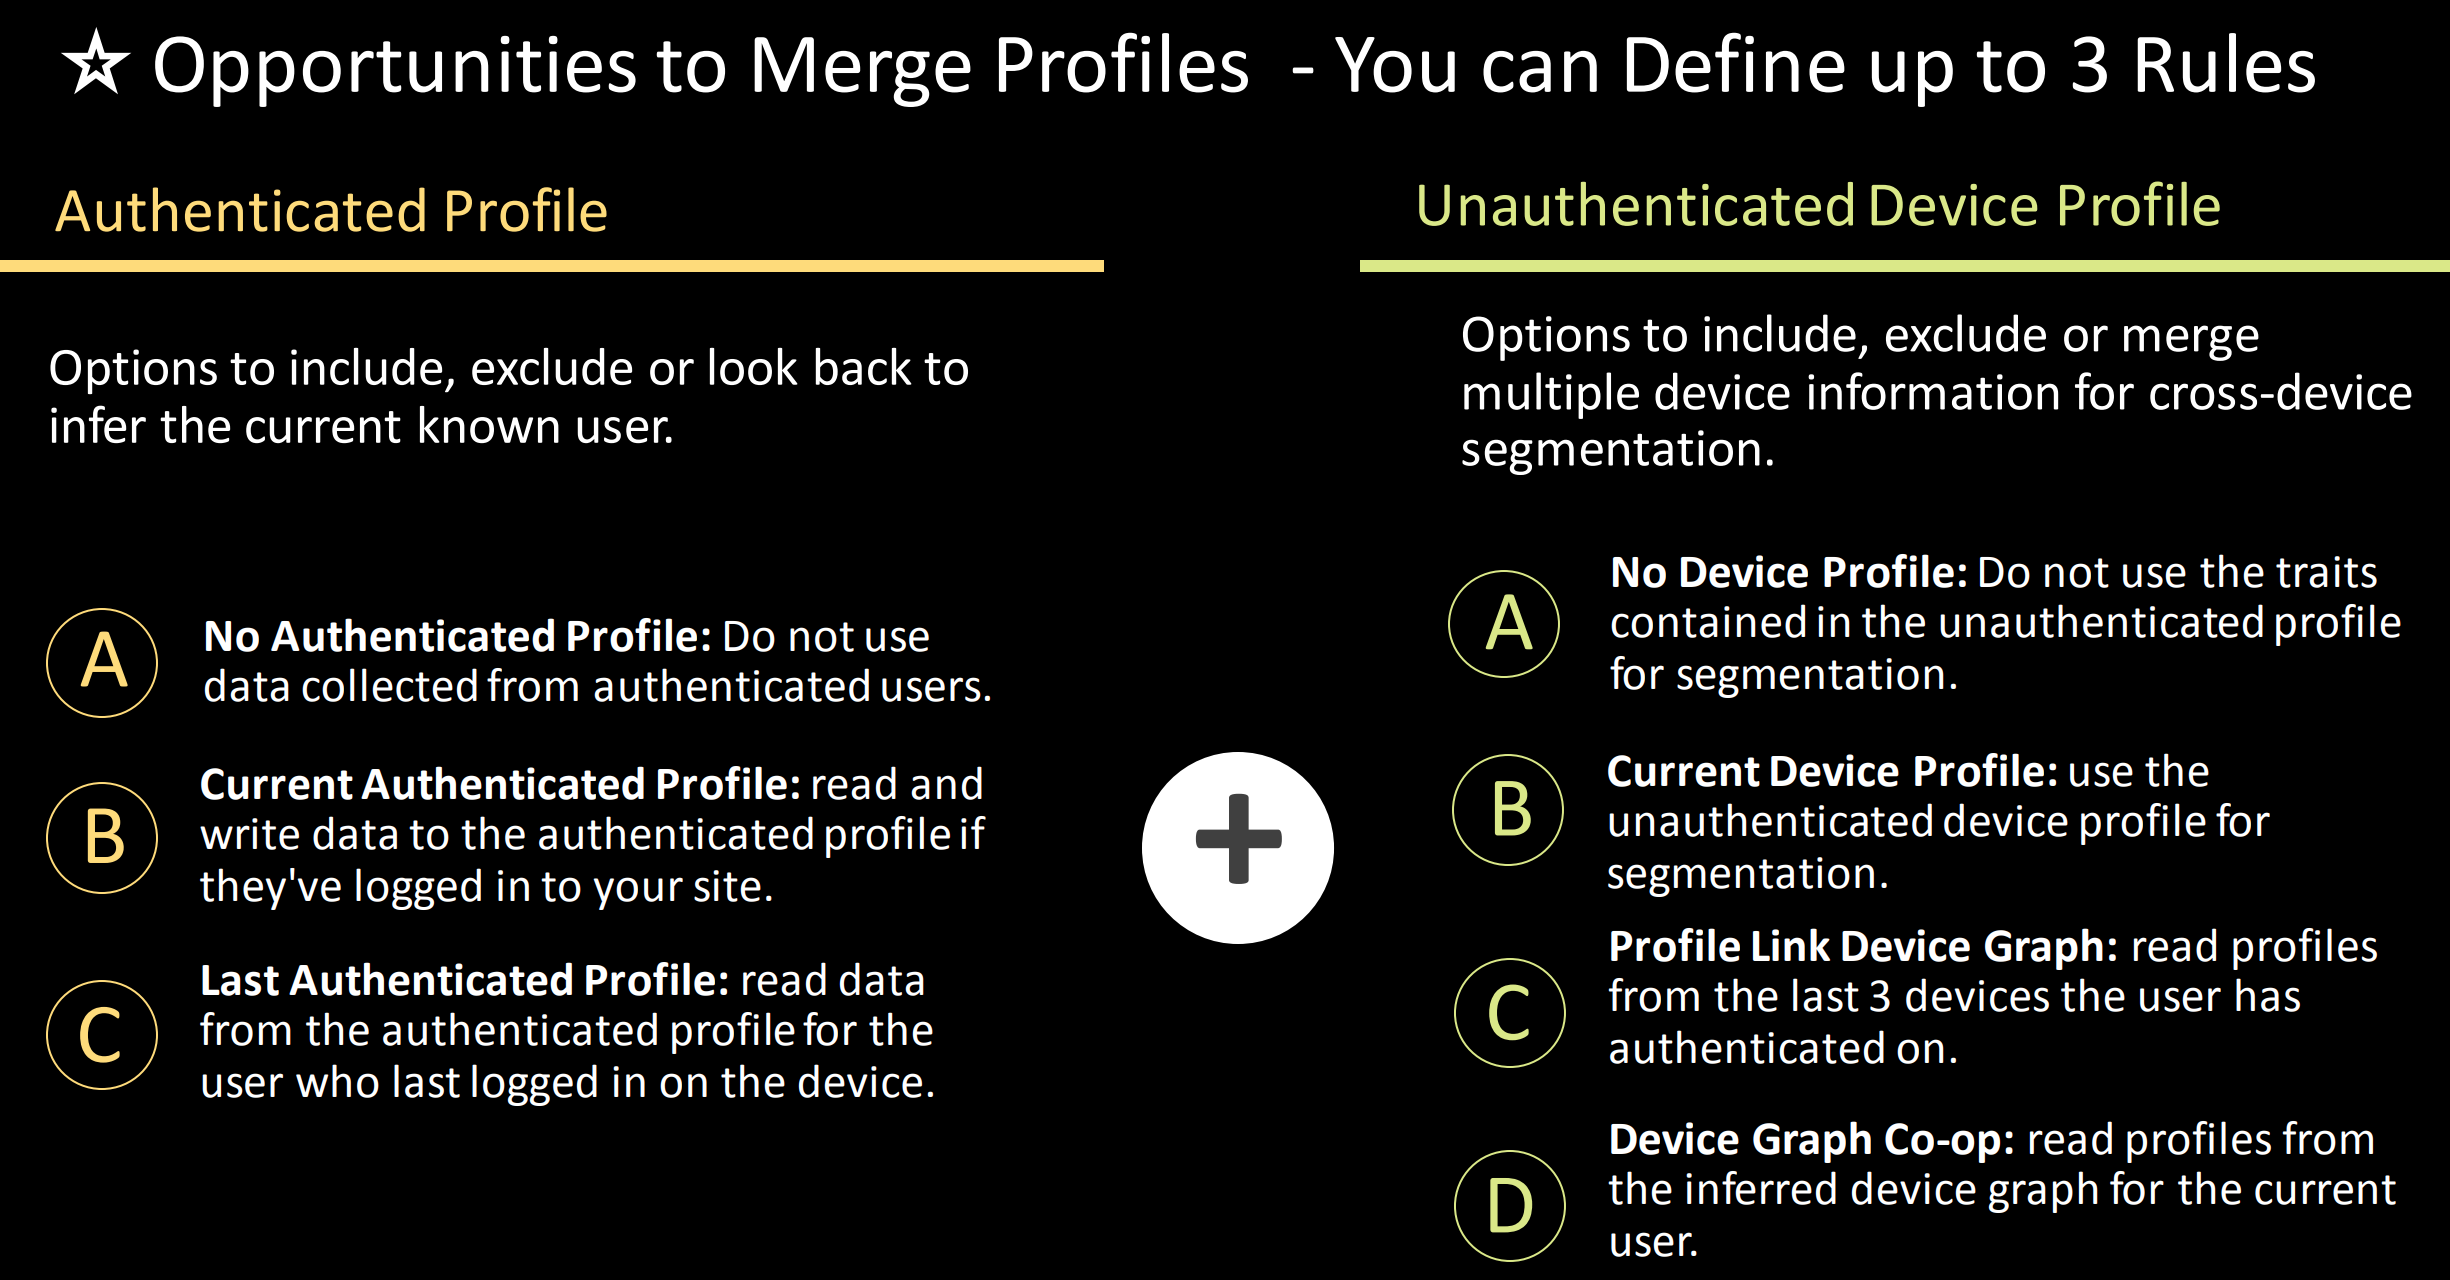
When creating a profile merge rule, you need to pay attention to the sensitivity and context of your product. How you might want to combine data across devices might differ very much depending on whether you are selling ringtones or whether you are selling wedding rings. If I found out that my sister is interested in Rihanna, that would not be at all a surprise. If your girlfriend finds out that you are about to propose to her because of some activity where you were searching for wedding rings on another device, that would be pretty upsetting.
For our demo, the PopularRetailer wants to go broad and use the data that’s available in the authenticated profile along with the data present in the device-level profiles.
It is time to see how you can define such profile merge rules in Audience Manager!
While on the Audience Manager Portal, click on the menu item Audience Data.
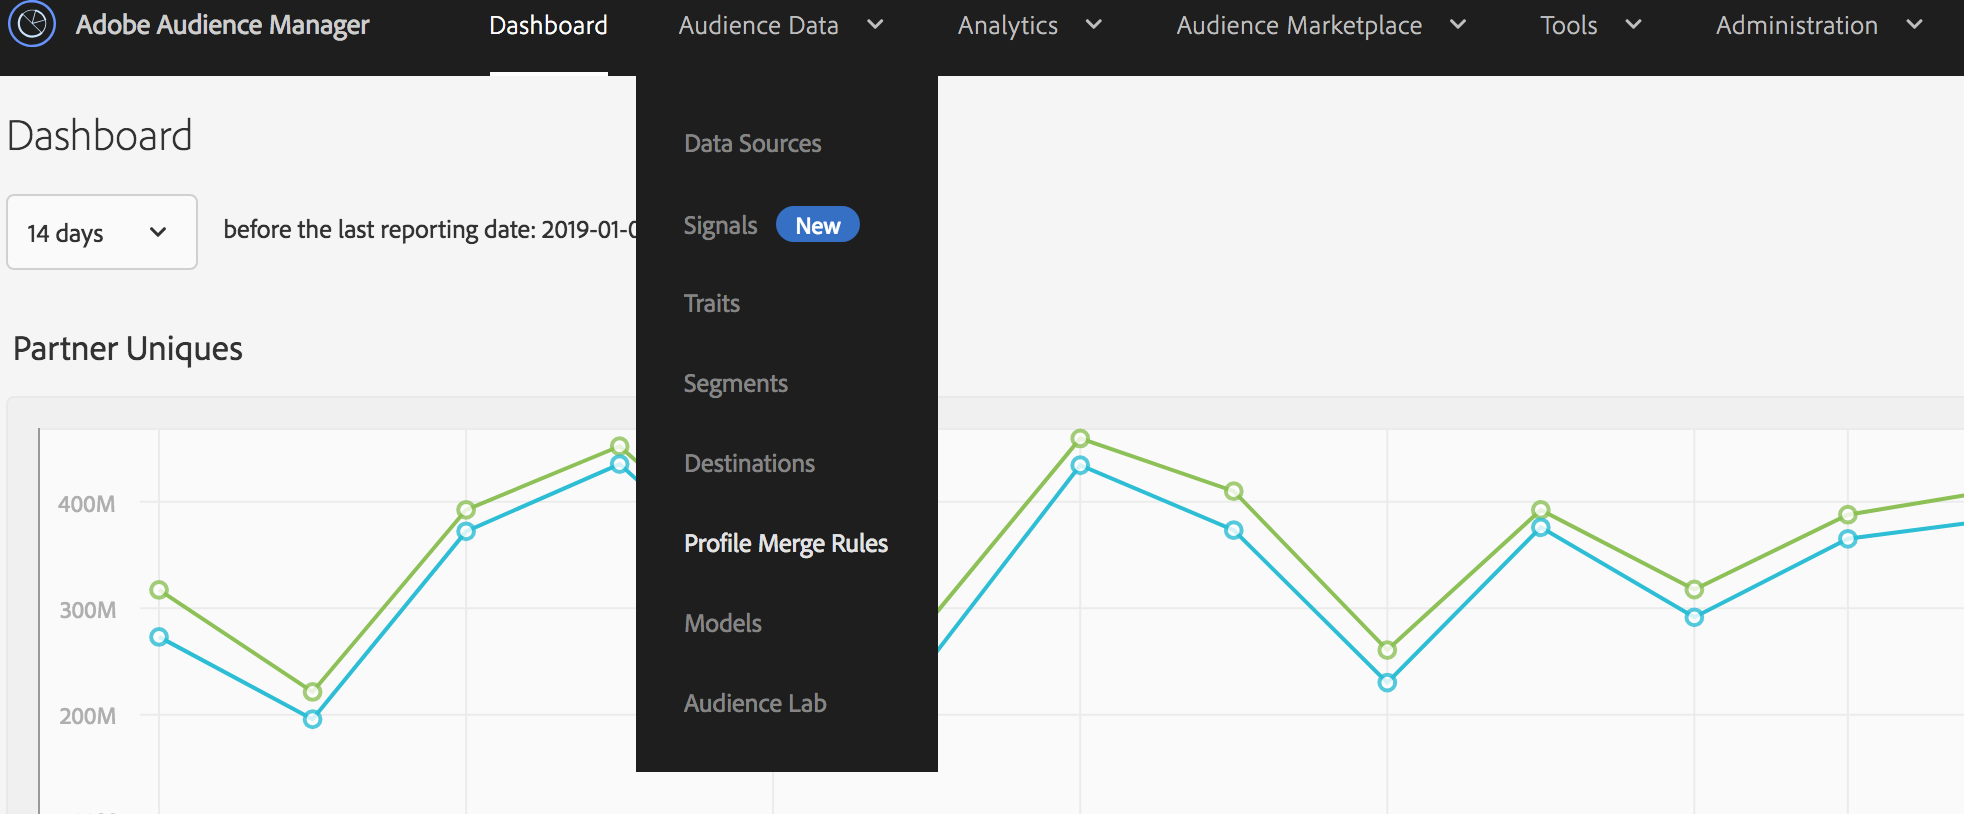
Below, you should see the Profile Merge Rules menu subitem. Click on it.
Figure 9: Access Profile Merge Rules
Explore the Profile Merge Rules panel.
Figure 10: Explore Profile Merge Rules
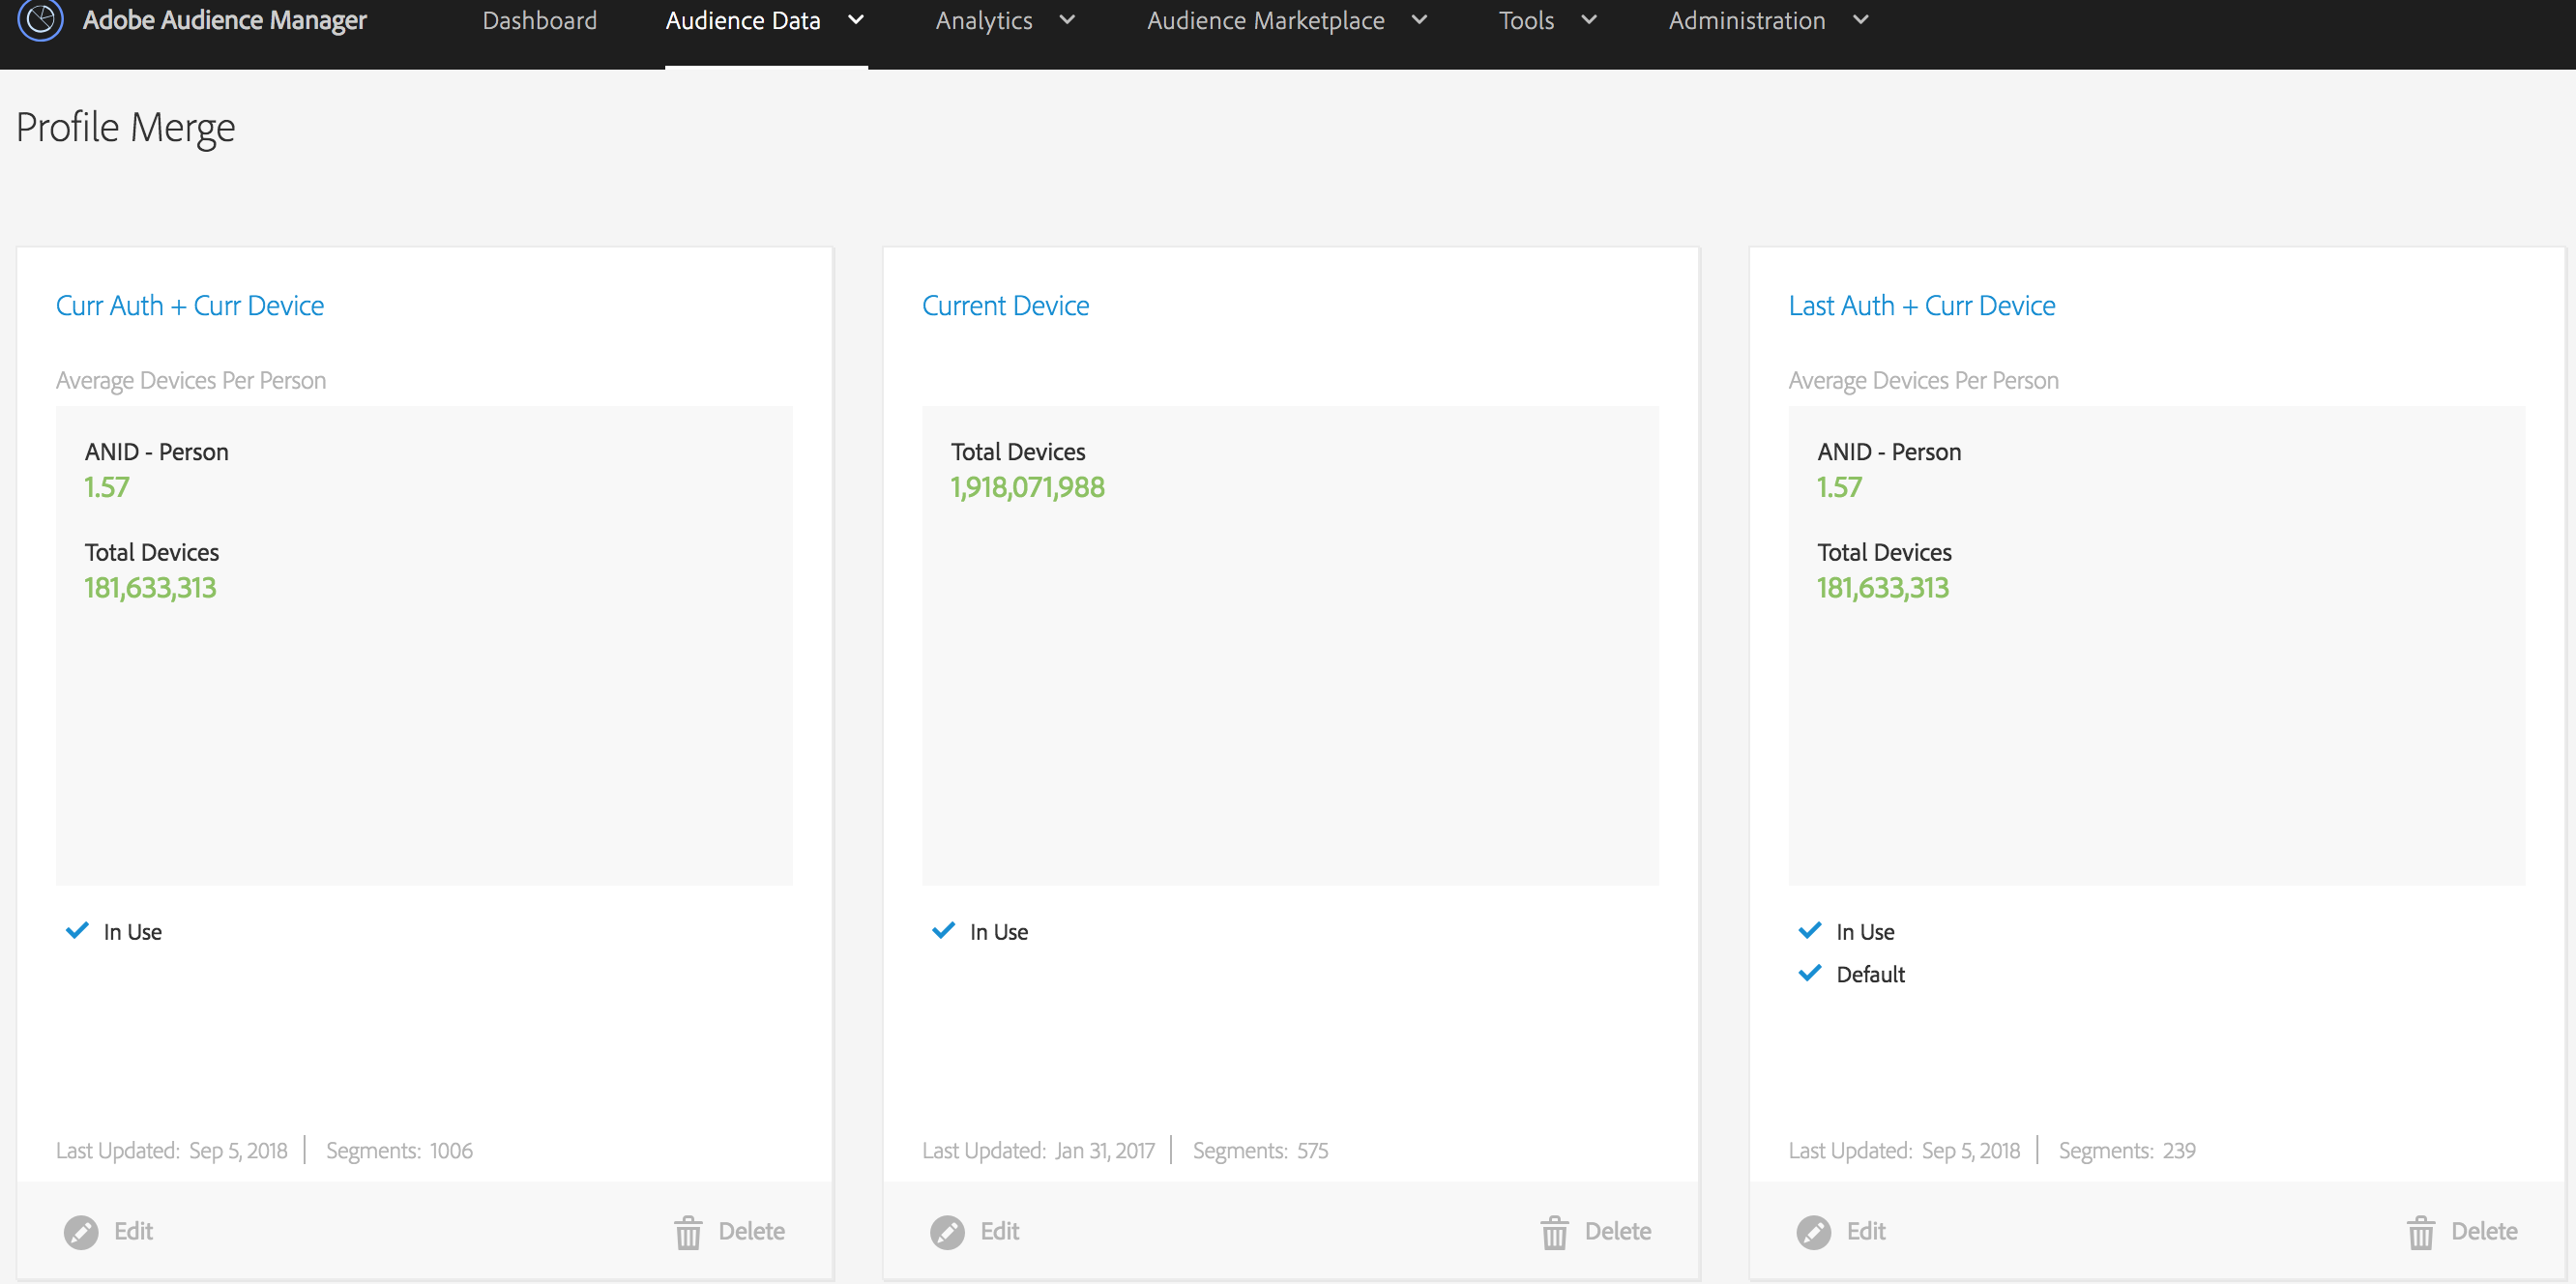
To speed things up, we have pre-created for you the profile merge rules needed for this lab. You can also create new profile merge rules, but they will not be taken into account into our demos.
To have a consistent experience with the one shown during the demo, do not modify the existing profile merge rules.
For our demo, we have pre-created 6 segments:
While on the Audience Manager Portal, click on the menu item Audience Data.
Below, you should see the Segments menu subitem. Click on it.
Figure 11: Access Segments
Explore the Segments panel.
Figure 12: Explore Segments
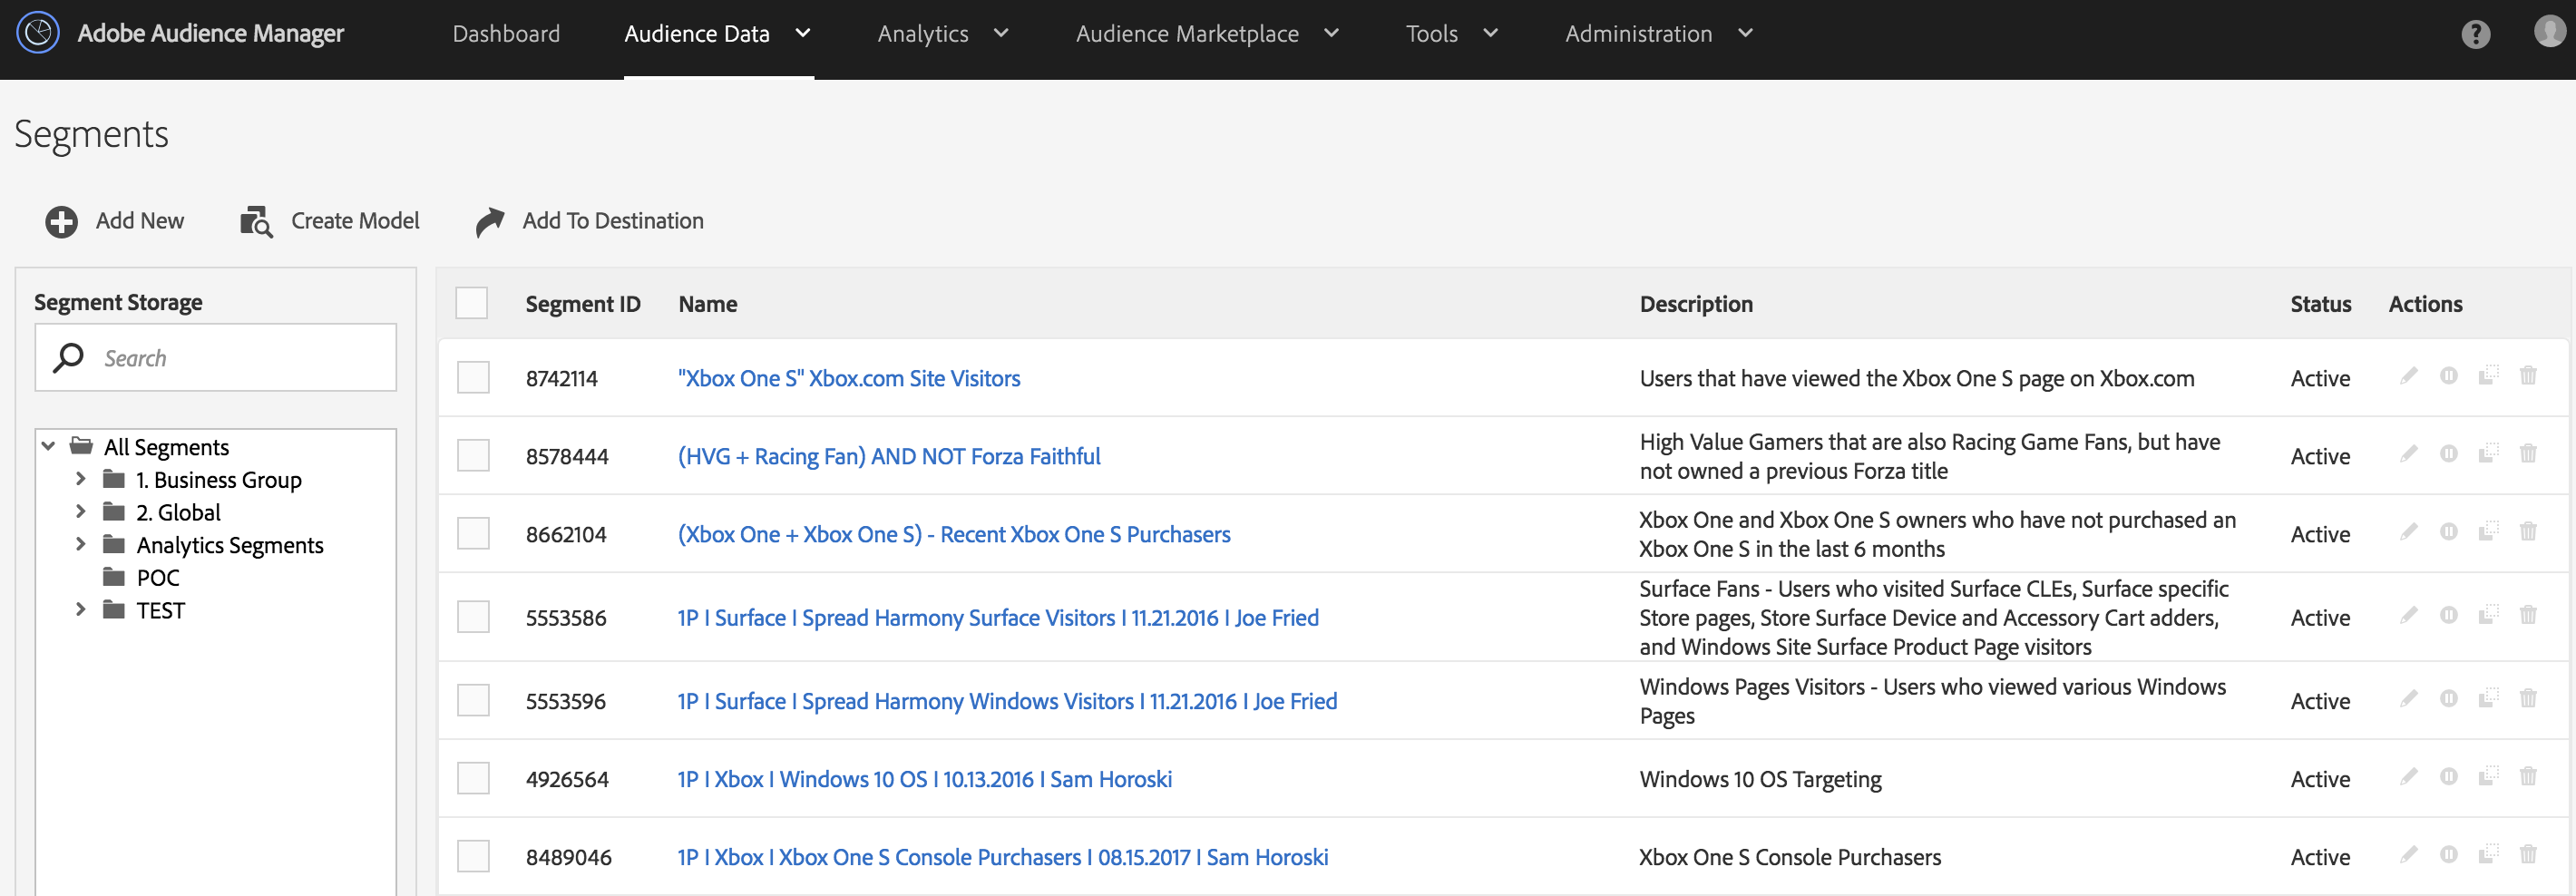
To have a consistent experience with the one shown during the demo, do not modify the existing segments.
In this part of the lab, we'll play the role of the Marketing Director of PopularRetailer. Our mission is to individualize the Customer Experiences on our brand. As part of this journey, we will need to understand our target audience, spot those traits that best define it and perform segmentation based on the different interests. Using these segments and the power of Adobe Audience Manager, we will be able to engage our customers with personalized experiences on our brand, consistent across their multiple devices. For starters, we want to personalize the content on PopularRetailer, depending on what items our prospect views.
Open a new tab in the Google Chrome browser.
In the Bookmarks bar, you should see a lab entry. Click on it or enter: http://bit.ly/summit747
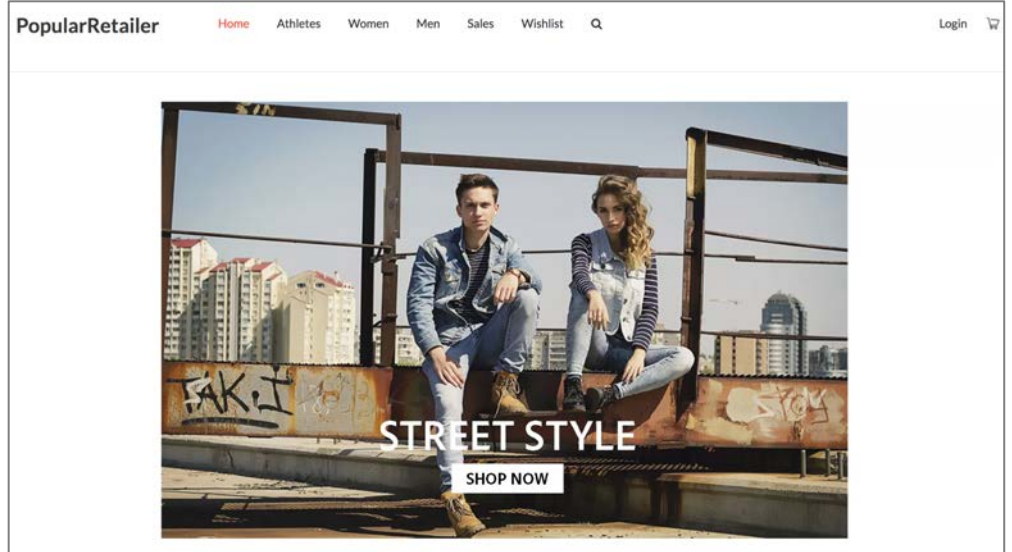
Click on PopularRetailer
Figure 13: Popular Retailer

Since you are a first time user, you will be presented with a common experience.
Whenever our prospect goes to the "Athletes" blog page, we want to collect that information and store it on their profile, in Audience Manager. In order to achieve this, we need to instrument our webpage to send a signal to Adobe Audience Manager: c_page = Athletes. This instrumentation, on your webpage or mobile app, can happen in a number of ways:
For this lab, PopularRetailer is already integrated with Audience Manager by using Adobe Launch. We will not spend too much time on how this integration with Adobe Launch is achieved, since it is out of scope of this lab. However, you can assume that whenever you visit a page on PopularRetailer, a signal is automatically being sent to Audience Manager (ie. c_page=<page_name>).
Go to Google Chrome, where you have opened the PopularRetailer website.
On the top bar, you should see a tab called Athletes. Click on it.
Figure 14: Click Athletes
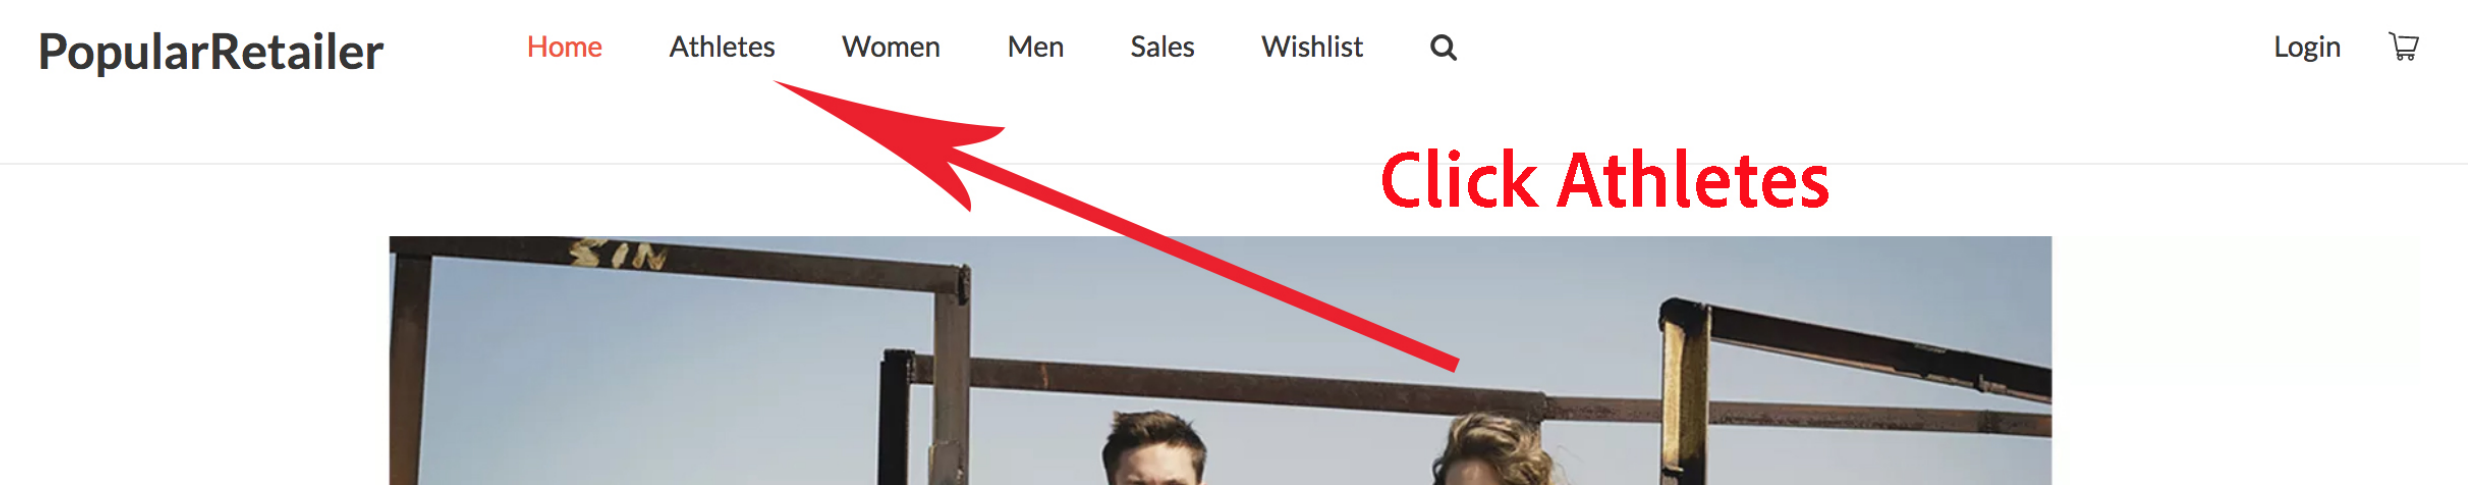
We have instrumented the Athletes blog page to send a signal to Audience Manager. The signal is: c_page = Athletes Based on this signal, your profile has been augmented with the “Athletes” trait. This trait was pre-created in the UI.
Obviously, one does not become an Athletic person, just by clicking once on the Athletes tab. This is happening just for the purpose of our demo. It is up to you to fine tune this kind of segment acquisition. For instance, you might want to qualify for the Athletic segment only if the person has viewed the Athletic page at least 15 times. You can achieve this using Adobe Audience Manager’s recency frequency capability Or you can provide a form and ask the user to check some boxes, among which one that says “I exercise 5 times a week”. You can look at the items that she has previously bought. Note that you can also enhance your audience profiles even further, by acquiring 3rd party data through Audience Marketplace. This can be geographic, demographic and behavioral data. It includes location, age, gender, income, spending patterns and more.
In order to better understand what's happening behind the scenes, we have created a tool called Audience Manager Demo Companion for this lab. This tool allows us to peak inside Audience Manager and explore the profile from our current device. Let's see what happened after we visited the Athletes page in the previous exercise.
Open a new tab in the Google Chrome browser.
In the Bookmarks bar, you should see a lab entry. Click on it or enter: http://bit.ly/summit747
On the bottom, click Open Demo Companion
Figure 15: Open Demo Companion

In the demo companion, select the last recorded trace
Click on the PROFILES tab
Check that the “Athletic Trait” was stored on the Google Chrome profile
Figure 16: Athletes trait in Demo Companion

When the browser loads the Athletes blog article, an HTTP call is being made to Adobe Audience Manager. This HTTP call contains two important pieces of information:
The AAM ID is NOT a cross device id. Therefore, if the user has 3 devices, it will have (at least) 3 AAM IDs. The AAM ID is stored in a third party cookie. If you happen to have and use two browsers on your device, these will not share the cookie storage. As such, we will get two distinct Audience Manager IDs, one for each browser.
The mobile apps using the AAM SDK, will store the Audience Manager ID in the app's internal storage. Multiple apps installed on the same device, will have different AAM ids.
In our case we are dealing with a website. The website is integrated with the VisitorID.js library, maintained by the Adobe Audience Manager team. This javascript library takes care of generating an Audience Manager ID, when none is available. It does so by triggering a call from the browser to the Visitor ID service.
Let's emulate the Visitor ID call to Audience Manager, which the VisitorID.js library is making from the browser. Open up the Terminal app on your iMac, by pressing Command + Shit and typing Terminal. Then copy paste this HTTP call command and press enter:
curl "http://dcs-beta.demdex.net/id?d_visid_ver=2.0.0&d_rtbd=json&d_ver=2&d_orgid=A71B5B5B54F607AB0A4C98A3%40AdobeOrg"
HTTP parameters sent:
| Name | Description |
|---|---|
| d_visid_ver=2.0.0 | The VisitorID.js library version |
| d_rtbd=json | This parameter instructs AAM to return a json response |
| d_orgid=... | Represents the IMS organization id, which uniquely identifies the Audience Manager client which is making the call (eg. PopularRetailer) |
Notice that the HTTP API contains demdex.net, which is the Audience Manager's domain.
The formatted Visitor ID json response will look like this:
{
   "d_mid":"88819962471507989271280036438453367558",
   "id_sync_ttl":604800,
   "d_blob":"cIBAx_aQzFEHcPoEv0GwcQ",
   "dcs_region":7,
   "d_ottl":7200,
   "ibs":[
      {
         "id":"411",
         "ttl":10080,
         "tag":"img",
         "fireURLSync":1,
         "syncOnPage":1,
         "url":[
            "//cm.everesttech.net/cm/dd?d_uuid=89334862240161643561259517779946724685"
         ]
      }
   ],
   "subdomain":"aamsummit"
}
Notice the d_mid parameter, which represents the Marketing Cloud ID. The MID can be decoded by Audience Manager to obtain an AAM ID.
Open up the Terminal app on your iMac. Then copy paste this HTTP call command and press enter:
curl -v "https://dcs-beta.demdex.net/event?d_mid=88819962471507989271280036438453367558&d_orgid=A71B5B5B54F607AB0A4C98A3@AdobeOrg&d_rtbd=json&d_full=1&c_page=athletes-blog"
HTTP parameters sent:
| Name | Description |
|---|---|
| c_page=athletes-blog | The signal sent to AAM. This notifies AAM that the visitor has looked over the athletes blog. We have already created a trait which rule's states that c_page == "athletes-blog". Because of this we will qualify this device for the Athletes gtrait. |
| d_rtbd=json | This parameter instructs AAM to return a json response |
| d_orgid=... | Represents the IMS organization id, which uniquely identifies the Audience Manager client which is making the call (eg. PopularRetailer) |
| d_mid=... | Represents the Marketing Cloud ID. Audience Manager will decode this id and will obtain an AAM ID. The resulting trait will be stored keyed of this device id. |
The formatted json response will look like this:
{
   "uuid":"89334862240161643561259517779946724685",
   "dcs_region":7,
   "data_collection":{
      "traits":[
         {
            "id":{
               "id":"89334862240161643561259517779946724685"
            },
            "new_traits":[
               {
                  "id":5923404
               },
               {
                  "id":5923375
               }
            ]
         }
      ],
      "merge_rules":[
         // contains all the segments qualified
      ]
   }
}
Notice the new_traits field. This contains two newly qualified gtraits:
Now that we have collected the Athletes trait in the Audience Manager profile for this prospect, we can start leveraging it for onsite personalization. For the purpose of this exercise, whenever this prospect goes on PopularRetailer's main page, we want to show a banner with athletic clothes. This can be achieved in a number of ways:
For this lab, we have a simple Javascript integration on the website. The script runs on the enduser's browser and can take decisions on how to customize the web page. In order to make an informed decision, the script needs to know what are the Audience Manager segments this person is qualified for. If the person is qualified for the Athletes segment, we can show a banner for athletic people. If not, we can display the common experience.
Luckily, there is a way for this Javascript, running in the browser, to be informed about the current qualified segments. This is achieved by using a Cookie Destination in Adobe Audience Manager.
To sum up, for this onsite personalization, we need the Athletic trait, the Athletes segment and the cookie destination. As seen in exercises 1.2 and 1.4, the trait and segments are already created. Let's now create the cookie destination and see it in action.
Let's now see this in action:
Go to the PopularRetailer tab in Google Chrome.
Go to the PopularRetailer home page by clicking the brand logo.
Based on the Athletic trait, you should now see a customized offer for men & women
Figure 17: Athletes banner on home page

Open the demo companion again
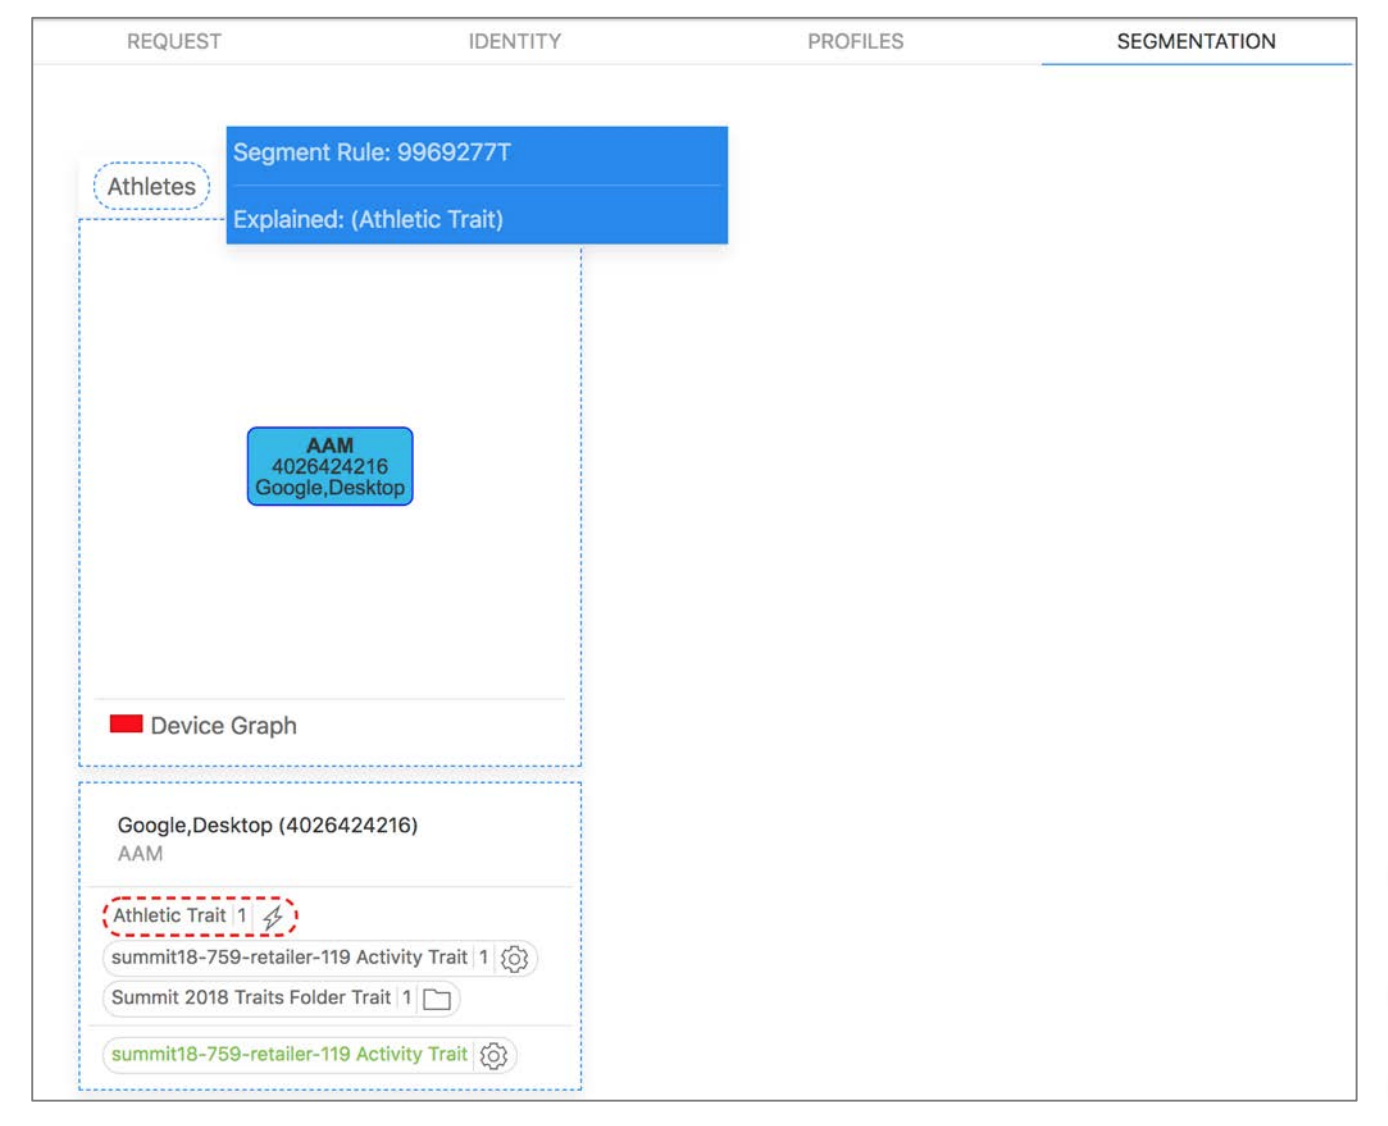
Click on the SEGMENTATION tab
Click on the Athletes segment
Figure 18: Athletes segment
So far we have been accessing the website from a single device. Let’s see what happens when we visit it from a different device. For this purpose, you can either open up a new browser Opera or, if you will, you can access the demo website from your personal device such as your smartphone or laptop.
When you access the website from a different device, you are again a first time user. As such, the common experience is being presented to you, with no personalization taking place just yet.
Figure 19: Second device - common experience
You should now see see a personalized experience on the second device, with athletic clothes.
Figure 17: Athletes banner on home page
So what just happened? How did we get the athletic experience, give that we have not qualified for the Athletic trait on this second device? This is where the Adobe Device Co-op magic is taking place. Based on probabilistic signals (e.g. IP Address), the Adobe Co-op algorithms will clusterize the two device profiles together: Google Chrome device profile + Opera device profile. In the real world, given the huge amount of device profiles (billions), the clustering algorithm for Device Co-Op runs only once every week. For this lab (with just a few profiles), we’ve sped up this process for demo purposes, which is the reason you had to wait 30 seconds at step 2. During those 30 seconds, we've emulated the device graph creation algorithm to see how it works.
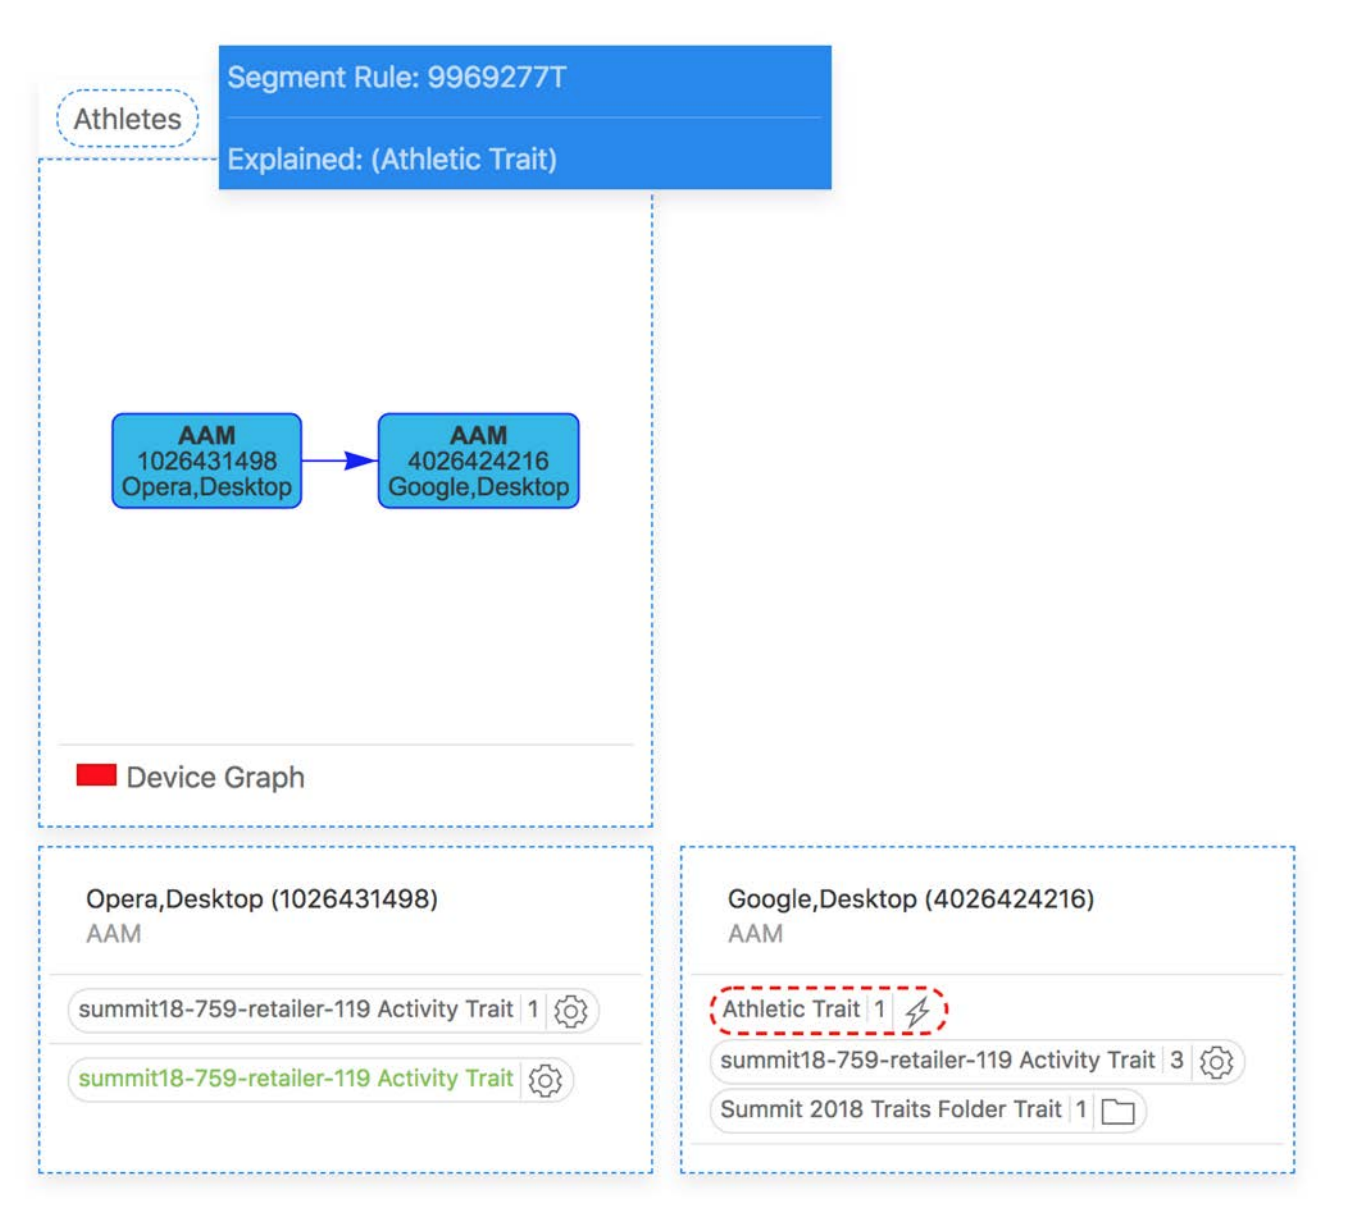
You should see 2 devices in the graph. The Athletic trait is stored on the Google desktop device and can be used on the Opera device, for a consistent cross-device experience.
Figure 20: Companion app - two devices
When clicking on the sales tab, you will get qualified for the “Interested in the Season Sales” trait.
Wait for 30 seconds
In Opera, go on the PopularRetailer demo website home page.
You should now see a personalized experience based on the Athletic trait (from Chrome) and the Season Sales trait (from Opera). As such, the "Workout clothes on sale for men & women" picture should be displayed.
Figure 21: Second device

You should see the same experience across devices, based on traits coming from both devices.
We’re now performing personalization based on cross device activity. This enables us to discuss with our customer as a person, rather than target her as individual devices.
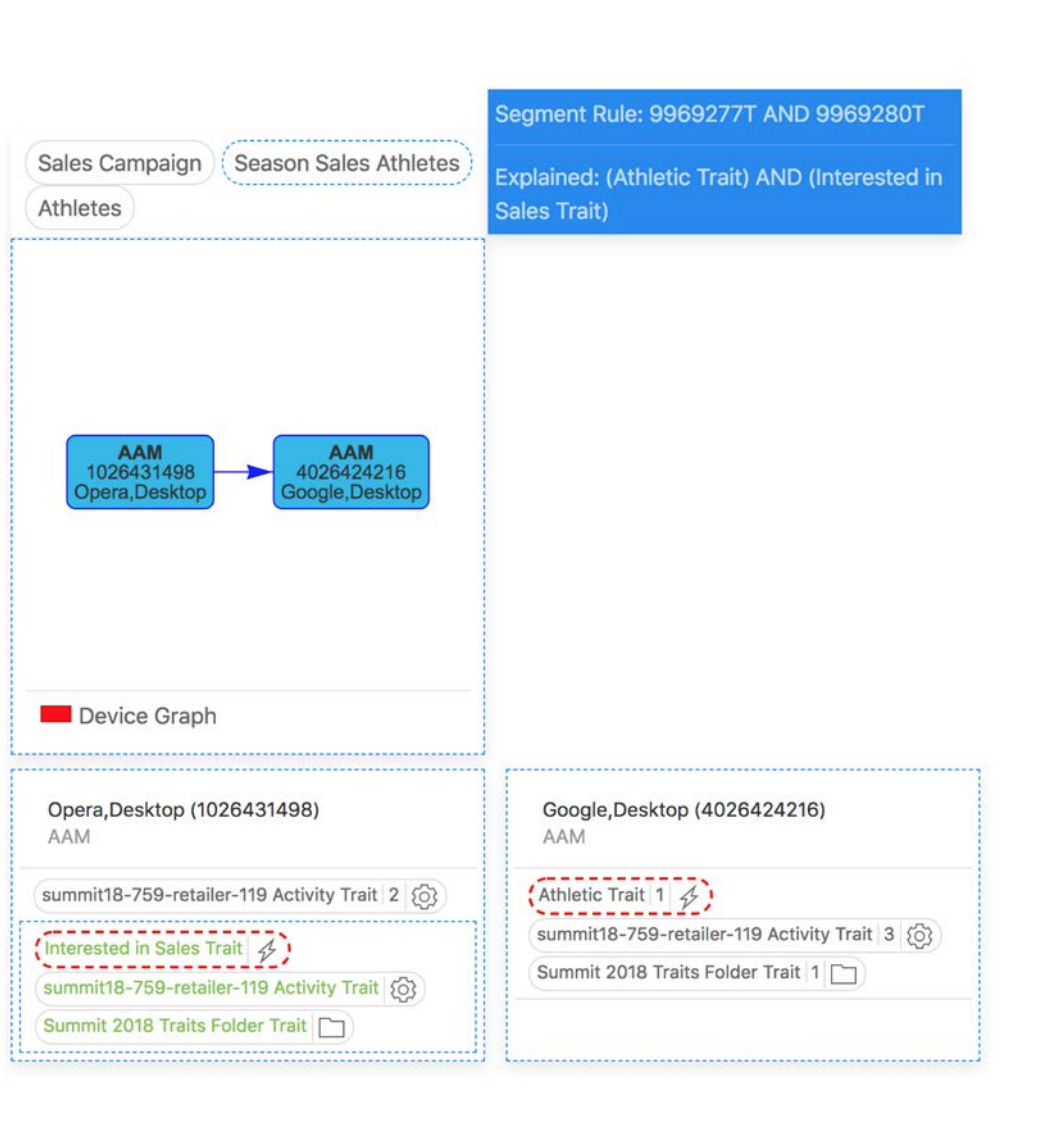
The Chrome profile contains: Athletic trait The Opera profile contains: Interested in the Season Sales trait As such, by combining the two, we are qualifying for the “Season Sales Athletes”
Figure 22: Companion app - traits on two devices
In the previous chapter, we've leveraged the collected data to perform onsite personalization across the two devices (the two browsers: Chrome and Opera). These are the two devices we've used to visit PopularRetailer. What happens though, if our prospect has a 3rd device, which they have never used to visit PopularRetailer? Given all these 3 devices belong to the same prospect, we would like to be able to target her on all of them. For instance, if our prospect uses the third device on a different site, we would like to speak to her about the seasons sales we have. But how can we do this, given that the third device is completely unknown to PopularRetailer?
This is where the Adobe Device Co-Op comes into play. Our prospect may have never used the third device on PopularRetailer. However, what if she used it on a PopularTravel website? What if PopularTravel and PopularRetailer were both part of the Adobe Device Co-Op? Well, in this case, both these customers will be able to speak with our prospect on all 3 devices.
Figure 23: Device Co-Op
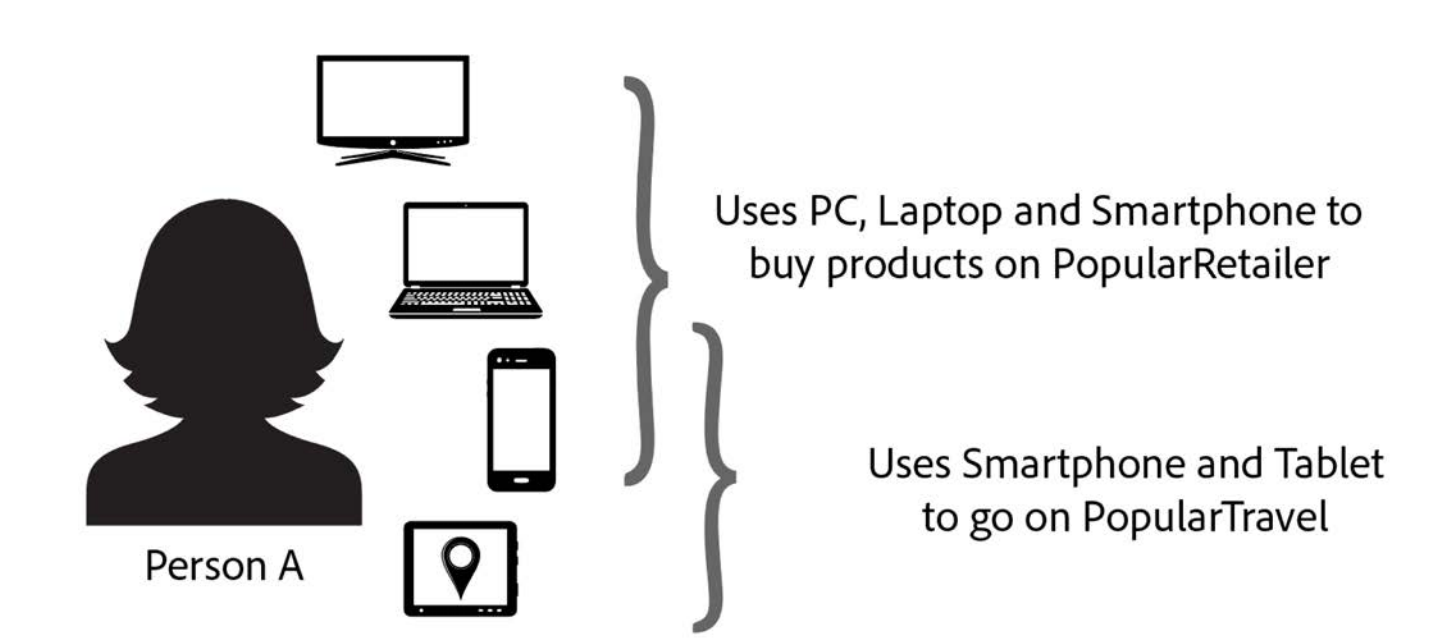
In the figure above, because of the shared device, both companies will be able to market to Person A on all four devices.
Open the third browser: Mozilla Firefox browser.
In the Bookmarks bar, you should see a lab entry. Click on it or enter: http://bit.ly/summit747
Click on "Go to Popular Travel"
Figure 24: Popular Travel
On the PopularTravel let's look at the Dubai – All stunning places tour
Figure 25: Popular Travel tour
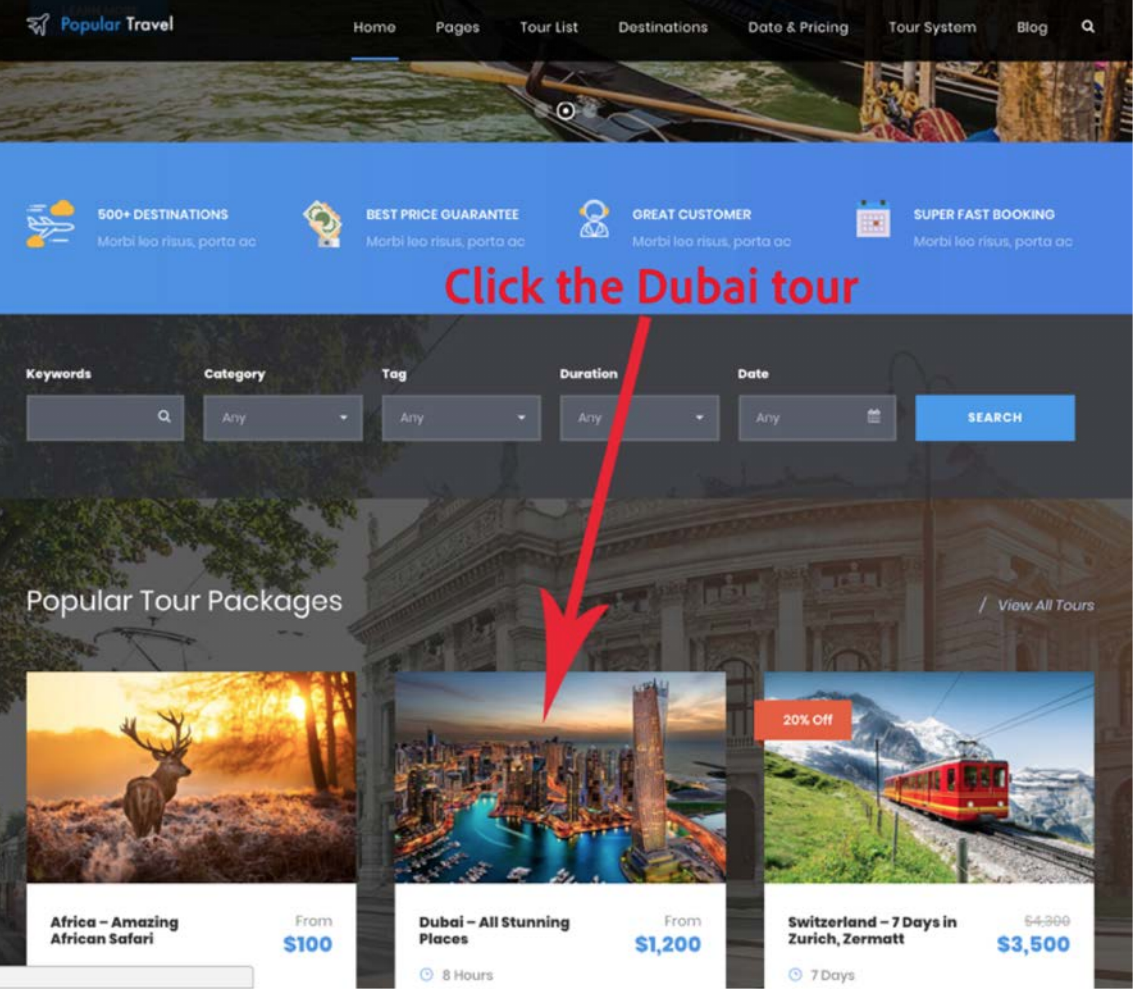
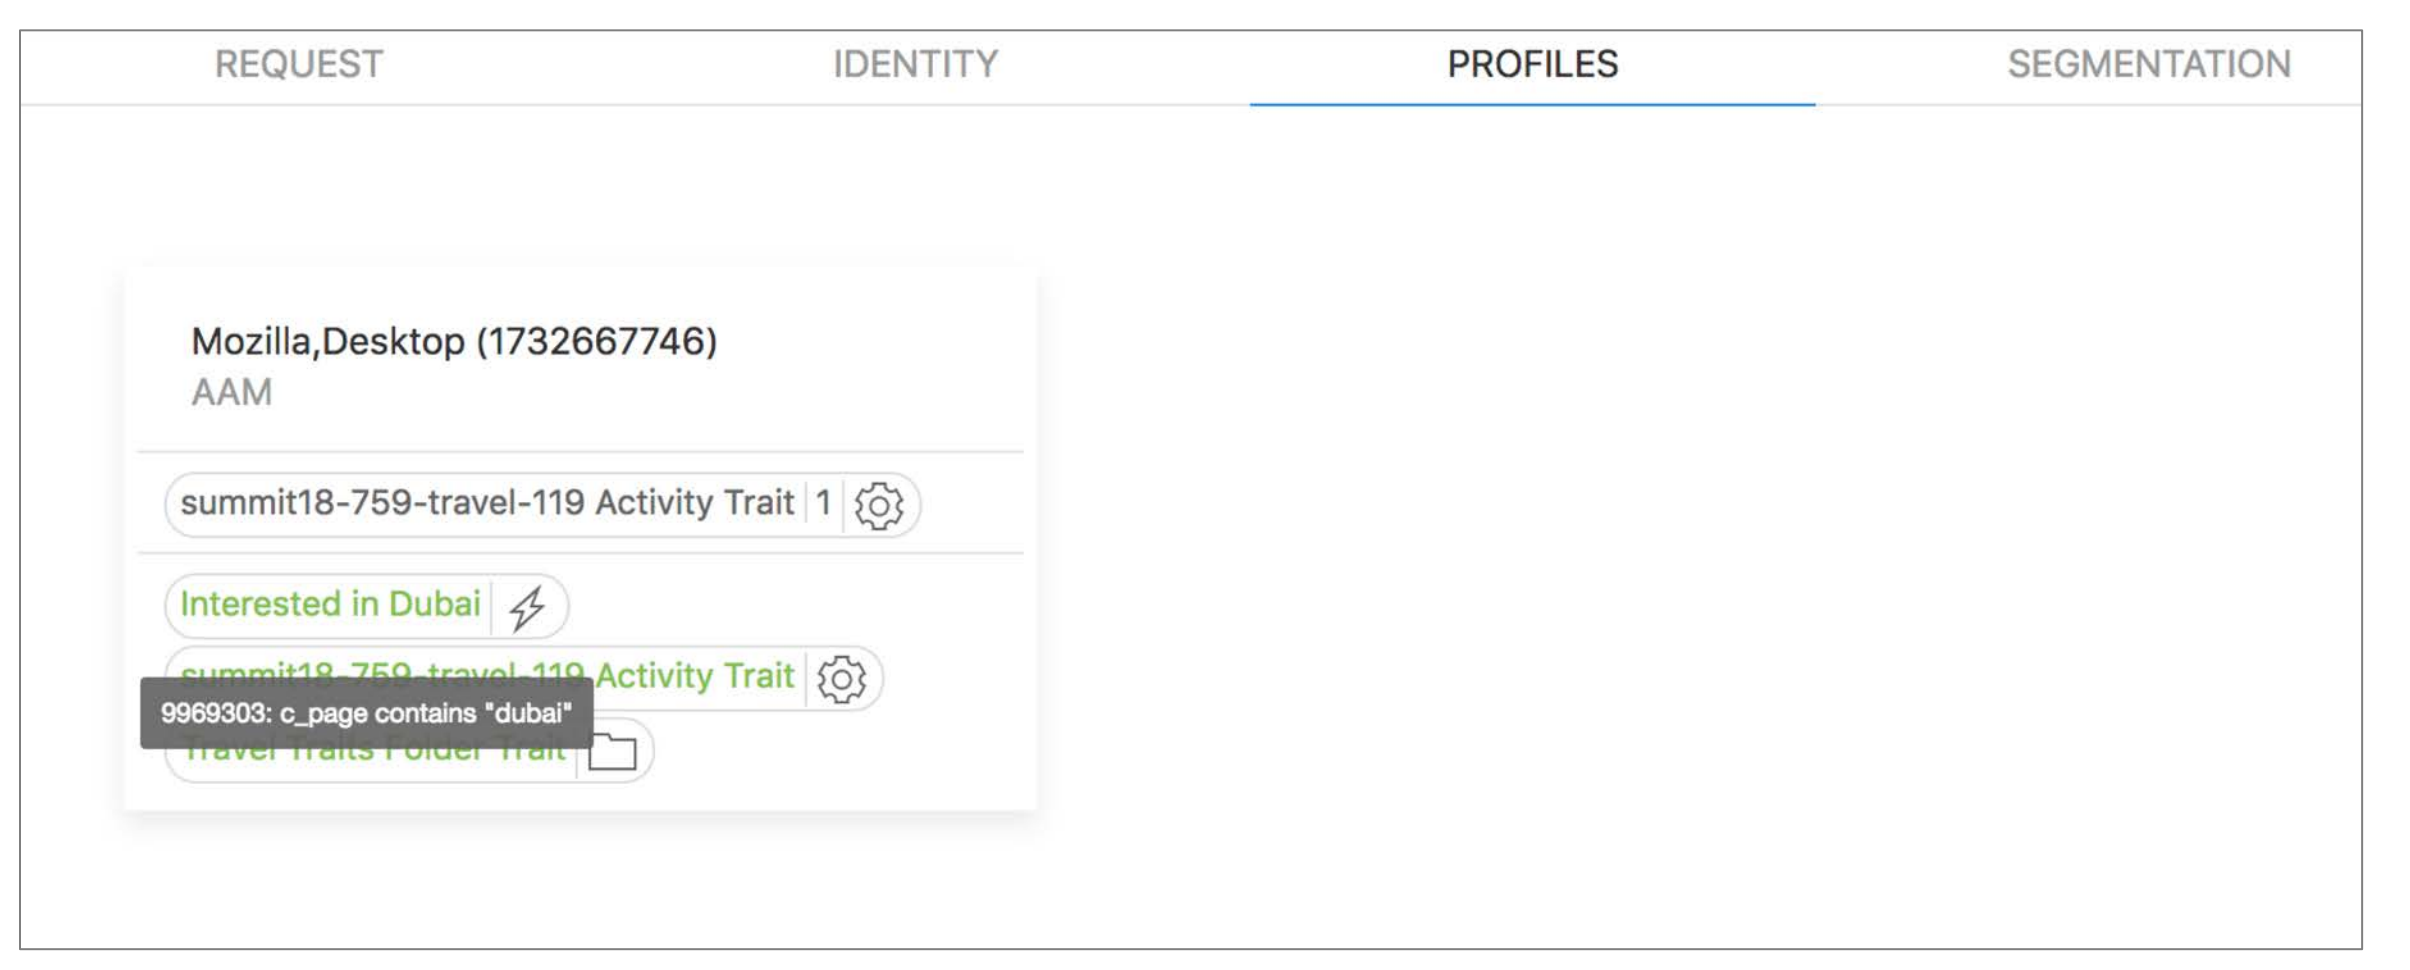
We have instrumented this PopularTravel page to send a signal to Audience Manager. The signal is: c_page = “Dubai - All Stunning Places” Based on this signal, your profile has been augmented with the "Interested in the Dubai" trait. This trait was pre-created in the UI for PopularTravel.
For the third browser (Mozilla Firefox), go to the Demo Companion app.
Figure 26: Demo companion - 3rd device
In order to boost PopularRetailer’s retention, let’s launch a simulated Ad Campaign. We will target known device graphs on 3rd party websites.
On the third browser (Mozilla Firefox), let's go to and open again the landing page: http://bit.ly/summit747
Open the Third Party publisher site
Figure 27: Publisher site

You should now see an ad for PopularRetailer. Remember, this third browser never visited PopularRetailer. It only visited PopularTravel. Even so, because this device is now in the device graph long with the other two, we are being targeted with products from PopularRetailer. As such, you should now see ads, from all three devices from both the PopularRetailer and PopularTravel advertisers. This is the power of the Adobe Device Co-op. It allows you to reach all the devices belonging to the person, even if those devices have never visited your brand’s properties.
Figure 28: Ad for Popular Retailer on the third device

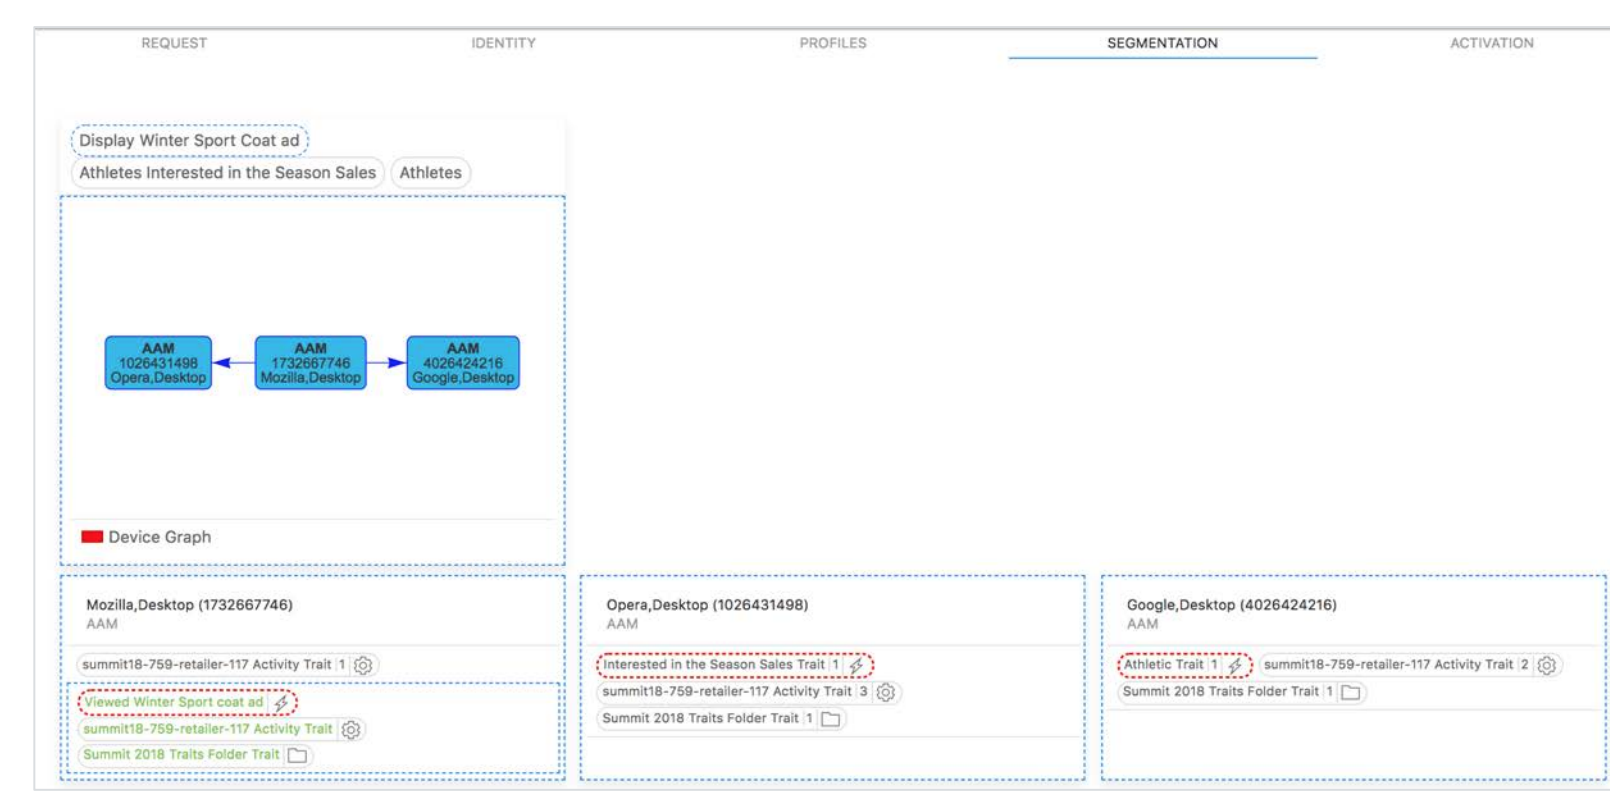
You should see that the 3 devices are now linked together. The segments get evaluated using data / traits from all 3 devices.
Adobe Audience Manager can:
Push an evaluated segment to all devices
Pull the segments from any of these devices
Figure 29: Demo Companion - 3 linked devices
Now that the ad campaign is running, we'd like to optimize it. What happens if the enduser views our ad, again and again, but manifests no interest and does not interact with it? First of all, it might be wise to stop showing the ad for that specific prospect, it order prevent annoying him or her. Secondly, we don't pay for these extra ad impressions that yield no result, so we'd to optimize our costs and stop showing the ad in this context. Here's the trick: we want to stop showing the ad for the prospect once a certain cap is reached, but we want to do it at once, on all devices belonging to that specific enduser.
In order to achieve this, we can leverage a feature in Adobe Audience Manager called recency-frequency segmentation (or unsegmentation in our case). We can create a segment that says "Show this ad if the enduser has seen it at most 5 times in the last 7 days, on all his known devices". Obviously, the cap and the interval are configurable. Once this cap is reached, the enduser will fall out of this segment. We can configure our ad campaign on the Demand Side Platform (DSP), so that the ad stops displaying for endusers that are no longer qualified for this segment.
For this lab, we have created a segment named: "Display Winter Sport Coat ad" with the following rule:
Once the ad impression cap is reached, we could just stop showing the ad. However, what we decided to do was to show a new ad, with a discounted offer that item. The discounted offer will appear after the ad was shown 3 times and we got no interaction from the enduser.
Go back to the publisher site (http://bit.ly/summit747 -> Go to publisher: the newspaper icon)
You should see the PopularRetailer ad, with no discount. Figure 30: Ad with no discount 
Refresh the publisher homepage 3 times (you can even do this across browsers/devices)
You should get qualified into a new, discounted offer, using the frequency capping rules we've defined, across devices.
Figure 31: Ad with discount 
How did we achieve this? First, we need to track each ad impression, so that we know when the cap is reached. In order to do this, we use a trait, which is called "Viewed Winter Sport coat ad". On each ad impression, the ad server sends an event back to Adobe Audience Manager, containing a signal. In this case the signal is "c_ad=winter-coat". You can view it in the tracer companion app. For real world scenarios, there would actually be multiple signals on this event, which would include the campaign id, creative id and so forth. Based on this ad impression trait, the "Display Winter Sport Coat ad" segment get disqualified when the impression count gets bigger than 2.
Open the Demo companion app. You can visualize how AAM merged data from all 3 devices, realtime and evaluates the segment. When the “Viewed Winter Coat ad” is realized 3 times across all devices, the segment will stop qualifying
Figure 32: Segment disqualified 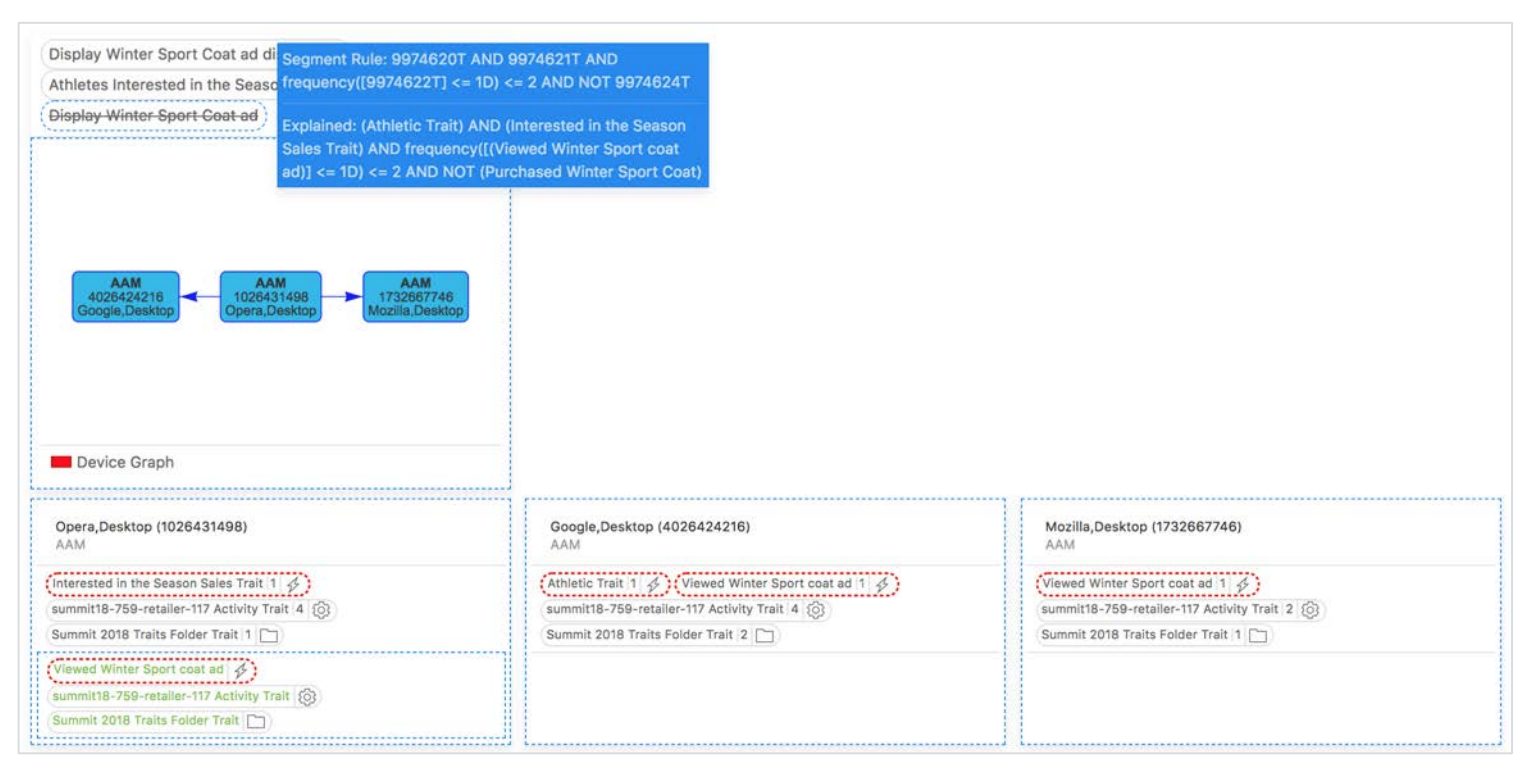
Let's see what happens when the enduser decides to actually purchase the item, we've shown the ad for.
On the news site (the publisher site), click on the Sport Coat Ad.
Figure 33: Click ad
You should now be redirected to the PopularRetailer website. Click Add to cart.
Figure 33: Click add to cart 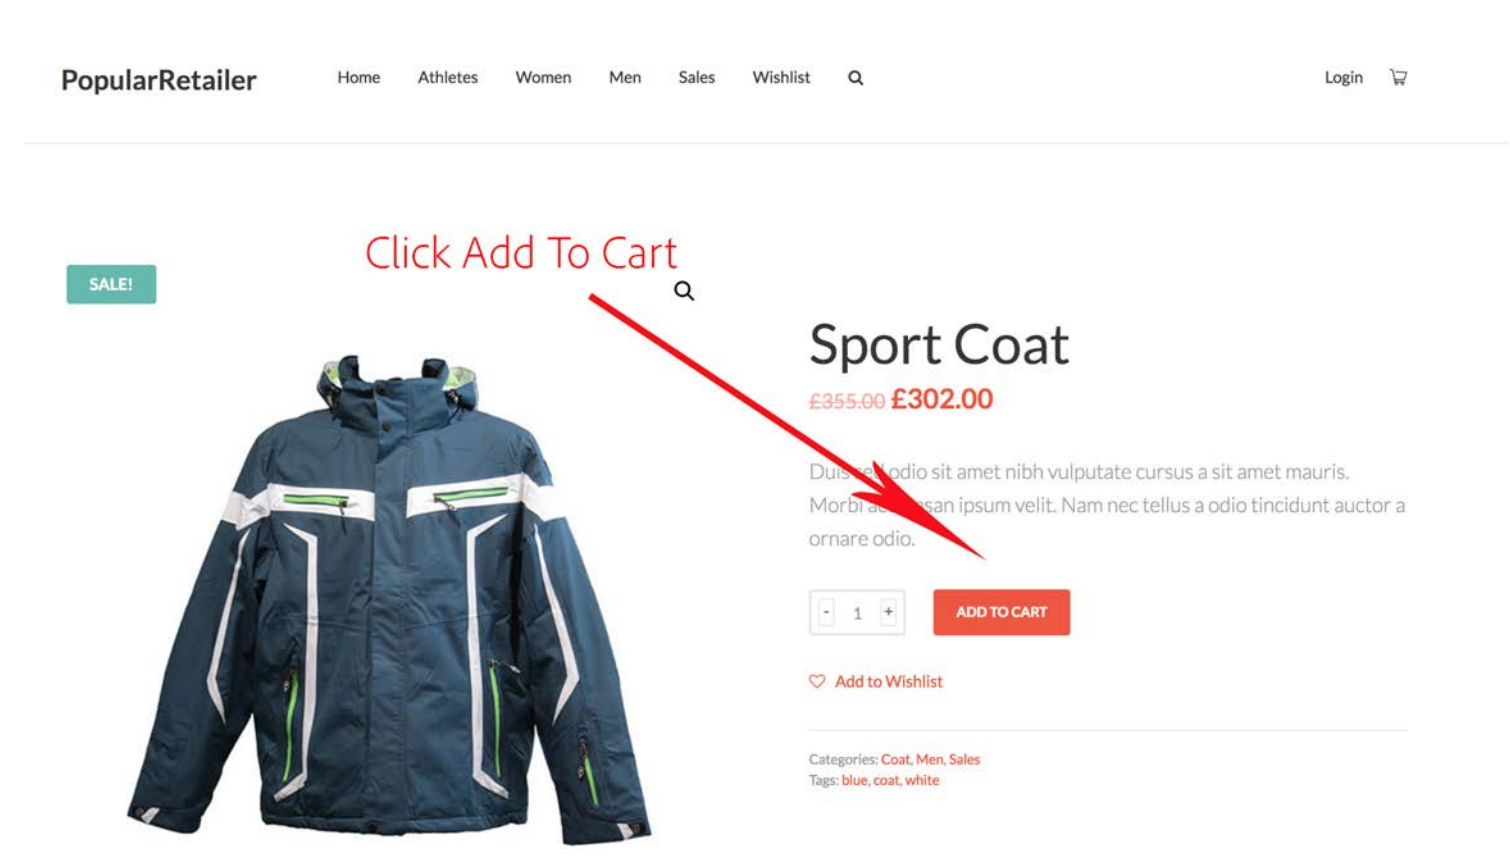
By adding the item to the cart, we assume for the sake of this demo, that the user has purchased this item. As such, we want to stop showing ads to him for this product. Let’s go on the News website and validate that the ad is not showing anymore.
When the user purchased the Winter Sport Coat item, we qualified for "Purchased Winter Sport Coat trait". This trait disqualified the user from the Ad Campaign. As such, the Winter Sport Coat ad is not showing anymore. However, the Dubai campaign is still showing on the publisher site. Keep refreshing the publisher site and you will see that at some point, the Dubai ad will stop displaying. This is because we want to limit the number of impressions / person. In this way we optimize our ad spending and we prevent upsetting the prospect with a product that he may not be interested in.
Note: Other useful use case for recency-frequency includes segmenting people that have seen an item at least X times. For instance, if our prospect checks once the latest sports car, but clicked through 15+ Sedans, we might to customize his experience based on his interest in Sedans.
Adobe Device Co-op is a powerful tool to have. As such, we take privacy seriously. To find out more you can visit the Adobe Device Co-op Privacy control: https://cross-device-privacy.adobe.com
Figure 34: Adobe Device Co-op privacy page 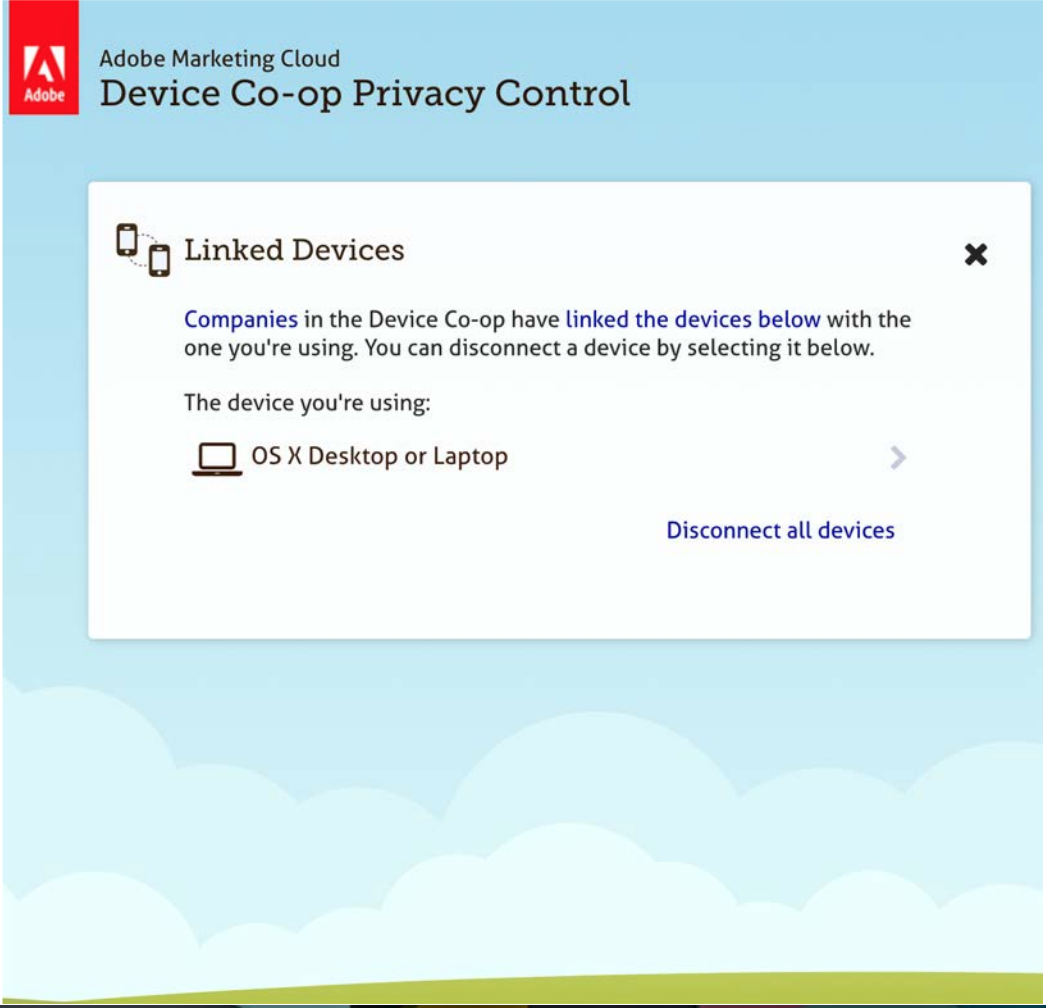
Thank you for participating in this Adobe Audience Manager lab. It is not perfect. We know that and we want to improve it. We know that and we want to make it better with your help. Therefore, we'd be deeply obligated to you, if you could find the time to offer us your ideas and feedback by taking the Adobe Summit survey.