
In this session, you will set up a cross-channel marketing campaign in Adobe Campaign Standard. Based on a use case, you will learn how to ensure that your messaging is consistent and personalized. You will leverage the latest Adobe Campaign capabilities such as the new Email Designer, Direct Mail, and the In-App messaging channel.
PLEASE NOTE: You should have a paper with your participant number at your workstation, e.g. “01”. This number gets used for many purposes during the lab (e.g., for login credentials, your demo site URL, delivery naming etc.). Wherever you see “XX” in this lab manual, replace it with your participant number.
Luma, a sports fashion and gear retail company, is introducing a new mobile app: The Luma App allows users to browse products and other information without having to login. Additional functionality becomes available when a user registers with the app. This also allows Luma to send targeted and personalized Push as well as In-App messages to the registered customers.
Luma is launching a marketing campaign to promote this new mobile app to their loyalty program members. The goal is to incentivize them to register with their member ID by offering 20% discount on their first purchase through the Luma App. The campaign will run until end of April 2019. The loyalty program members will be contacted through their preferred communication channel first.
In this lesson we will create the cross-channel workflow this campaign requires.
Before we get started, let's take a look at the workflow we will be creating:
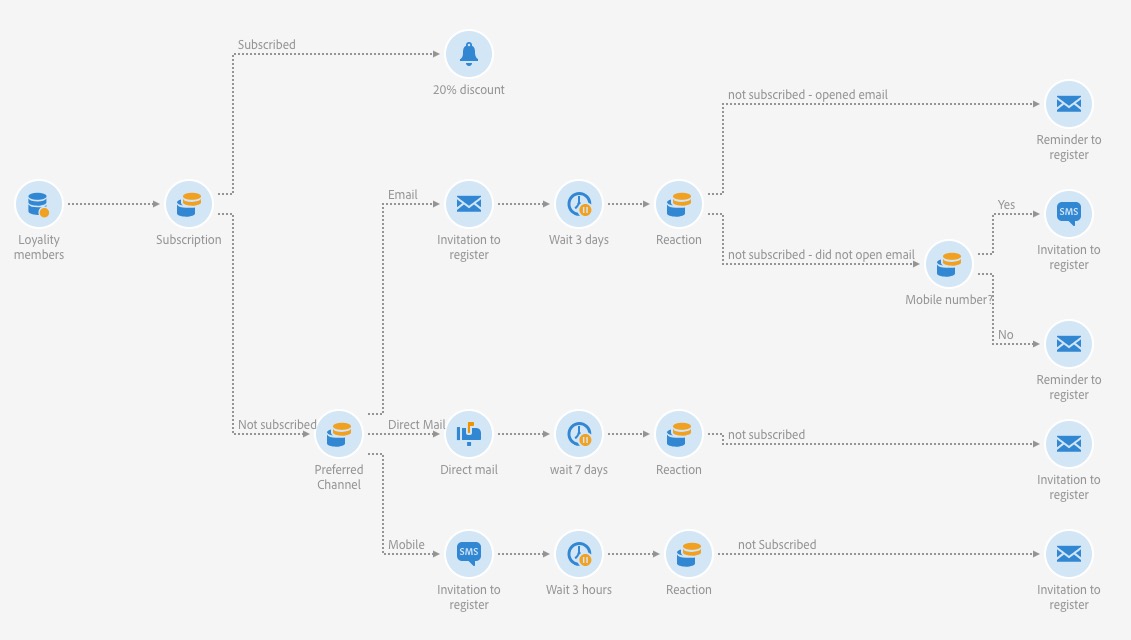
Figure 1: Cross-Channel Workflow
Luma is targeting loyalty members, so the workflow starts with a query, defining the target audience based on their membership.
The objective is to get these customers to subscribe to the Luma App, so we need to make sure that the deliveries only target members who are not yet subscribed to the application.
We have to assume that some loyalty members might have downloaded the Luma App from the app store and have already registered. We do not want to send these customers an invitation, but will also offer them a 20% discount as a thank you.
The loyalty member audience is therefore divided into two segments:
In this lesson, we will..
Create the workflow based on a template:
Create re-targeting activities based on the user's initial reaction to the email they received:
Configure the Email, Push, SMS, and Direct Mail channels:
Login to your lab machine with the following credentials
Open https://exc-home.experiencecloud.adobe.com/exc-home/home.html#/ to access the ACS instance you will be working with.
PLEASE NOTE: Check the appendix to find the instance number that has been assigned to you.
Login with
From the Home screen choose the tile Marketing activities
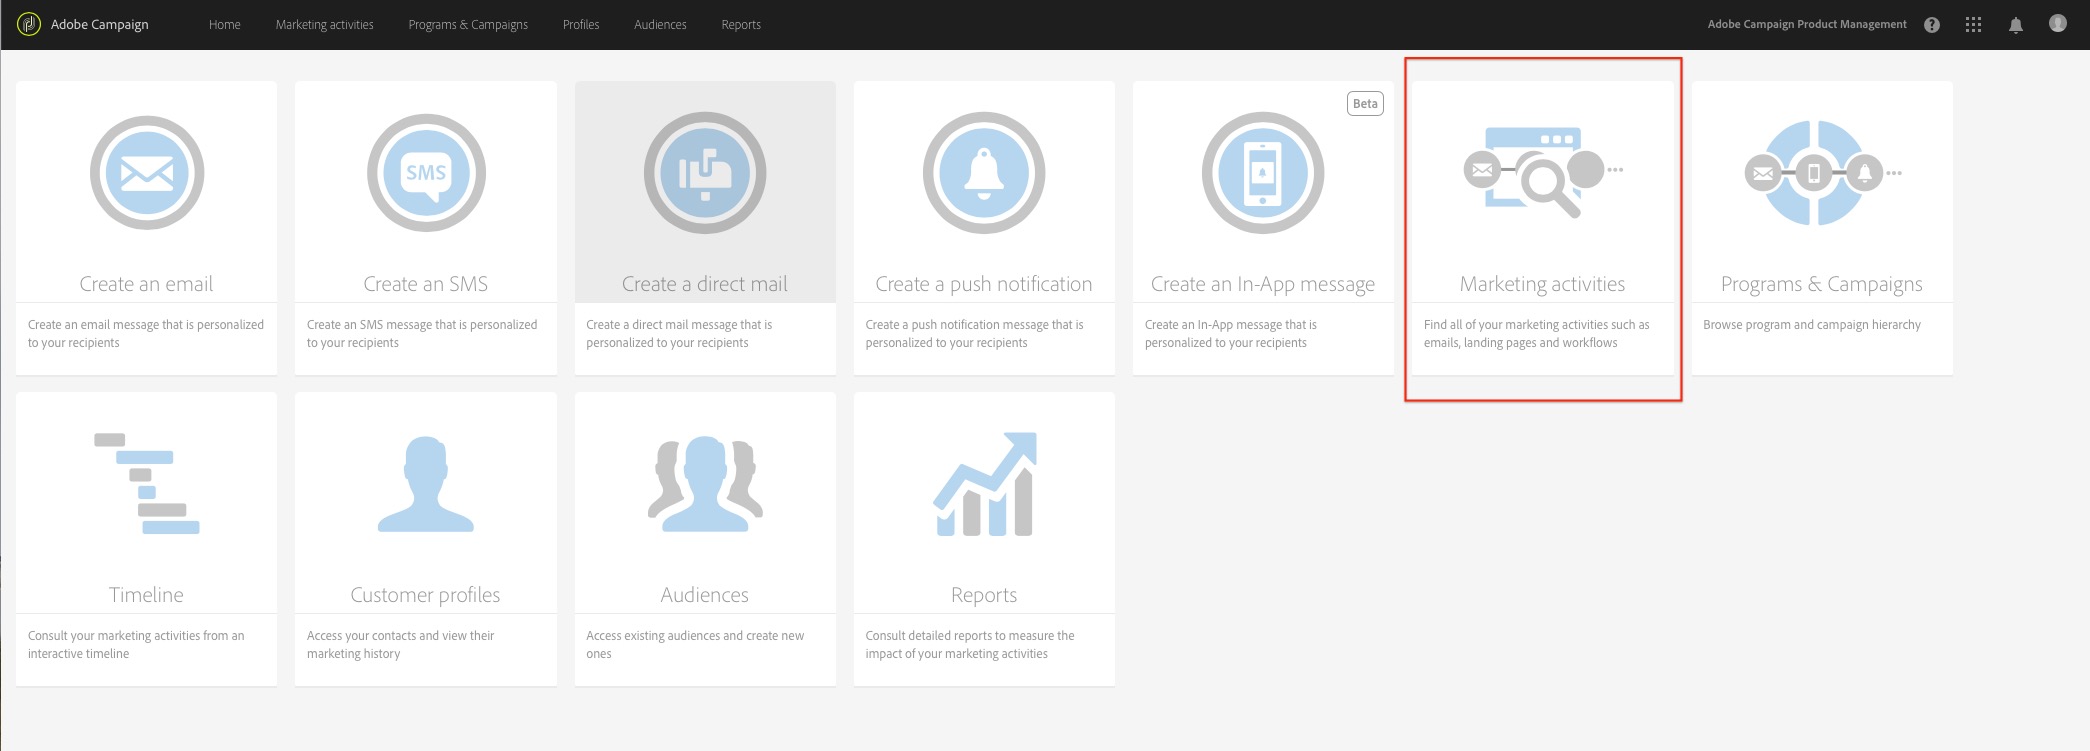
Figure 1.1.1: Home Screen
On the Marketing activities screen, click on Create to create a new workflow
On the next screen, double-click on Workflow

Figure 1.1.2: Choose the Workfow Marketing Activity
Choose the Template:
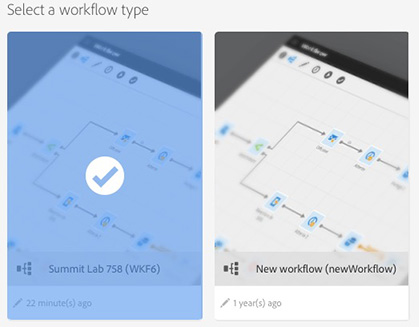
Figure 1.1.3: Choose Template
Click Next
On the Properties screen, change the label to:
Click Create.
You should now see the pre-configured workflow 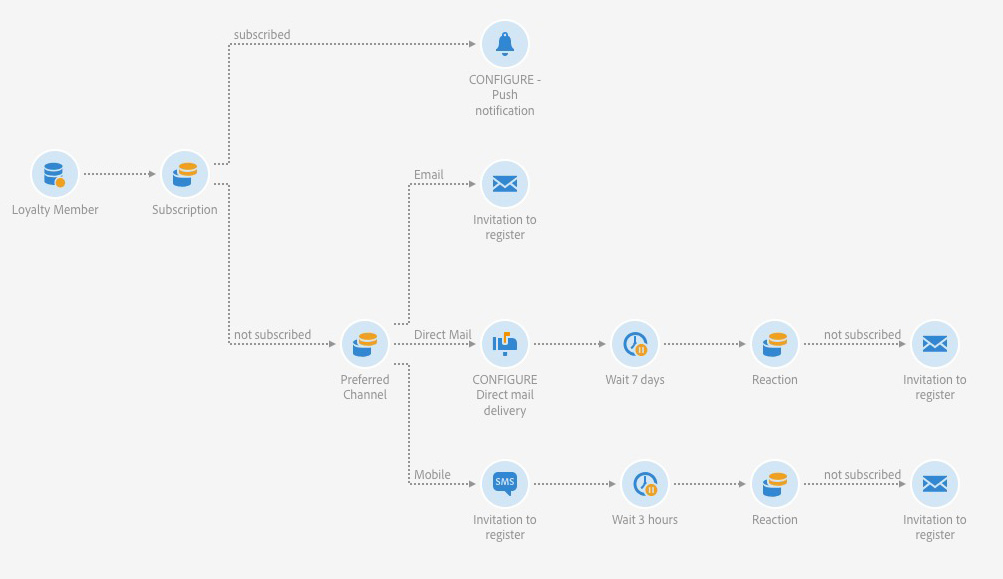
Figure 1.1.4: Pre-configured Workflow
We can now complete the configuration of the workflow. In the next exercises, you will enhance the workflow by adding a follow up delivery to the email delivery and configure the channels.
We need to give the customer time to react to the email, so we'll add a Wait activity
Click on the Invitation to register Email activity in the workflow
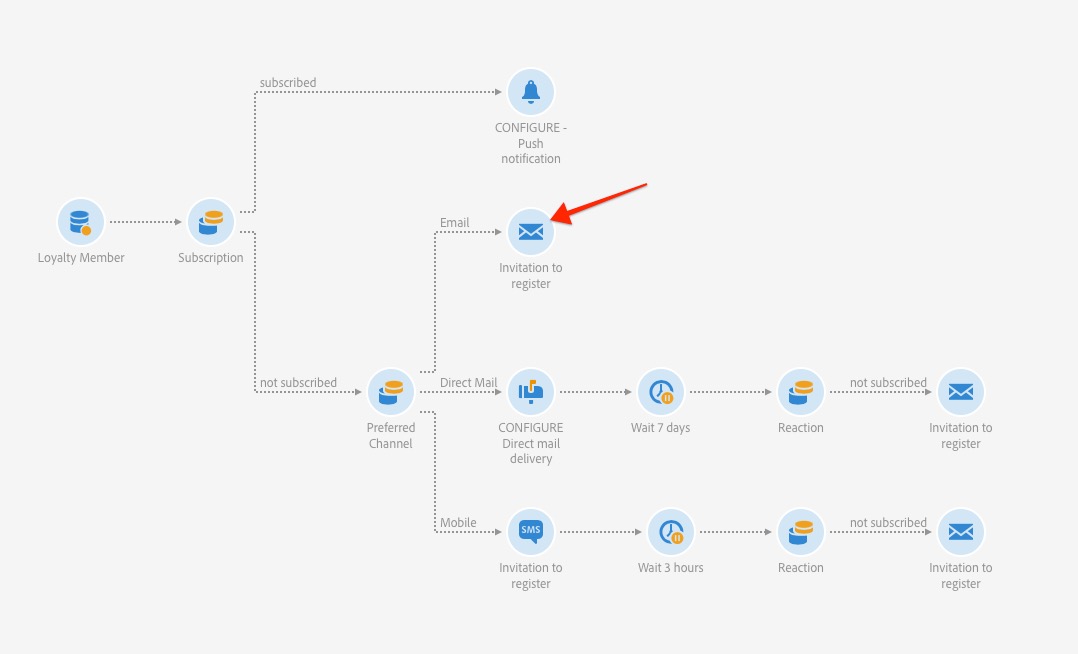
Figure 1.2.1: Email activity
Click on the settings icon

Under the General tab, choose:
Figure 1.2.3: Email activity settings
Click Confirm
The Email activity now has an outbound transition
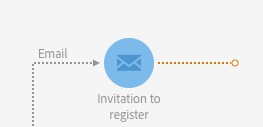
Figure 1.2.4: Email activity with outbound transition
From the Activities panel on the left, expand the Execution pallette, drag and drop the Wait activity onto the canvas and connect it with the transition you created in step 4.
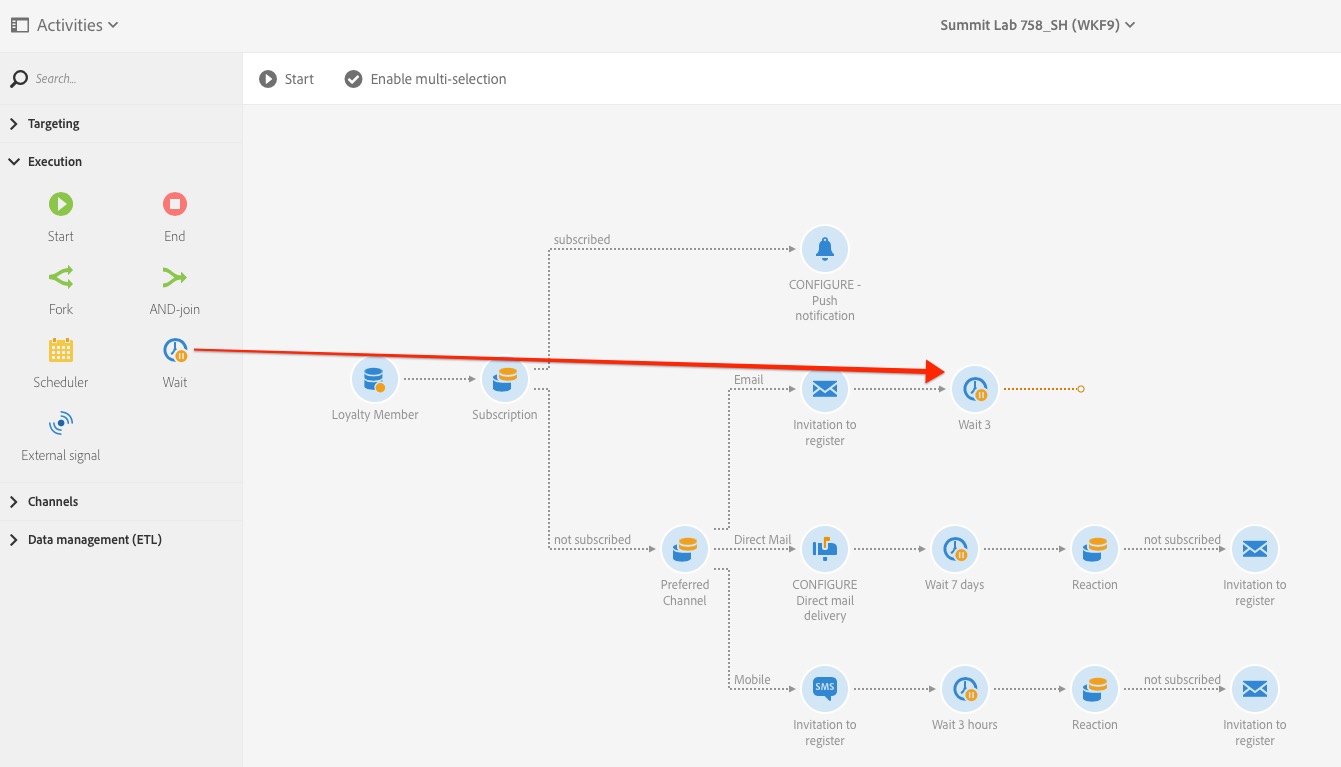
Figure 1.2.5: Add the Wait activity
Double-click on the Wait activity to configure it
Change the Label to:
Set the Duration to:
Click Confirm
The workflow will now wait 3 days before continuing this branch.
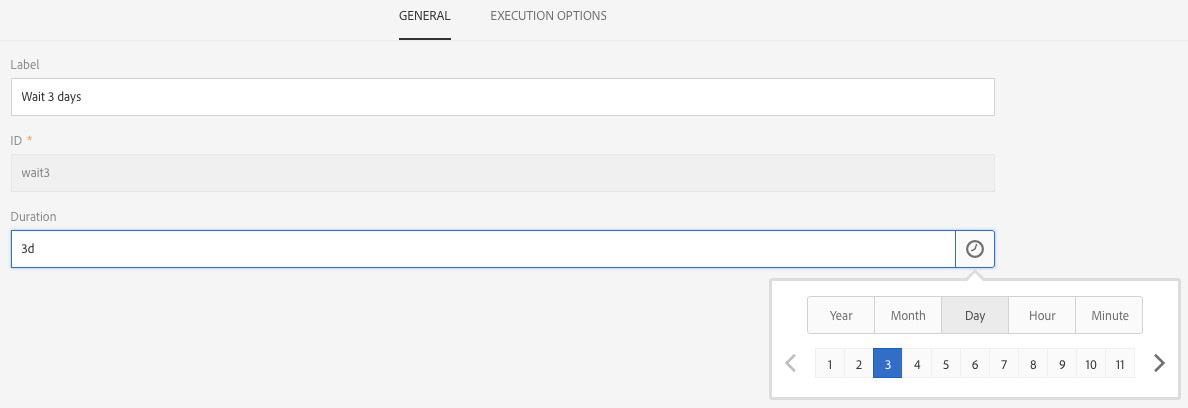
Figure 1.2.6: Configure Wait activity
After 3 days, we will contact the loyalty members, who have not subscribed to the app, a second time. We will send a reminder email to those who have opened the email, but have not subscribed. We will use another channel for those who have not reacted at all to the email.
From the Activities panel, expand the Targeting palette, and drag and drop the Segmentation activity onto the workflow.
Connect the Segmentation activity to the outbound transition of the Wait activity you created in the previous exercise. 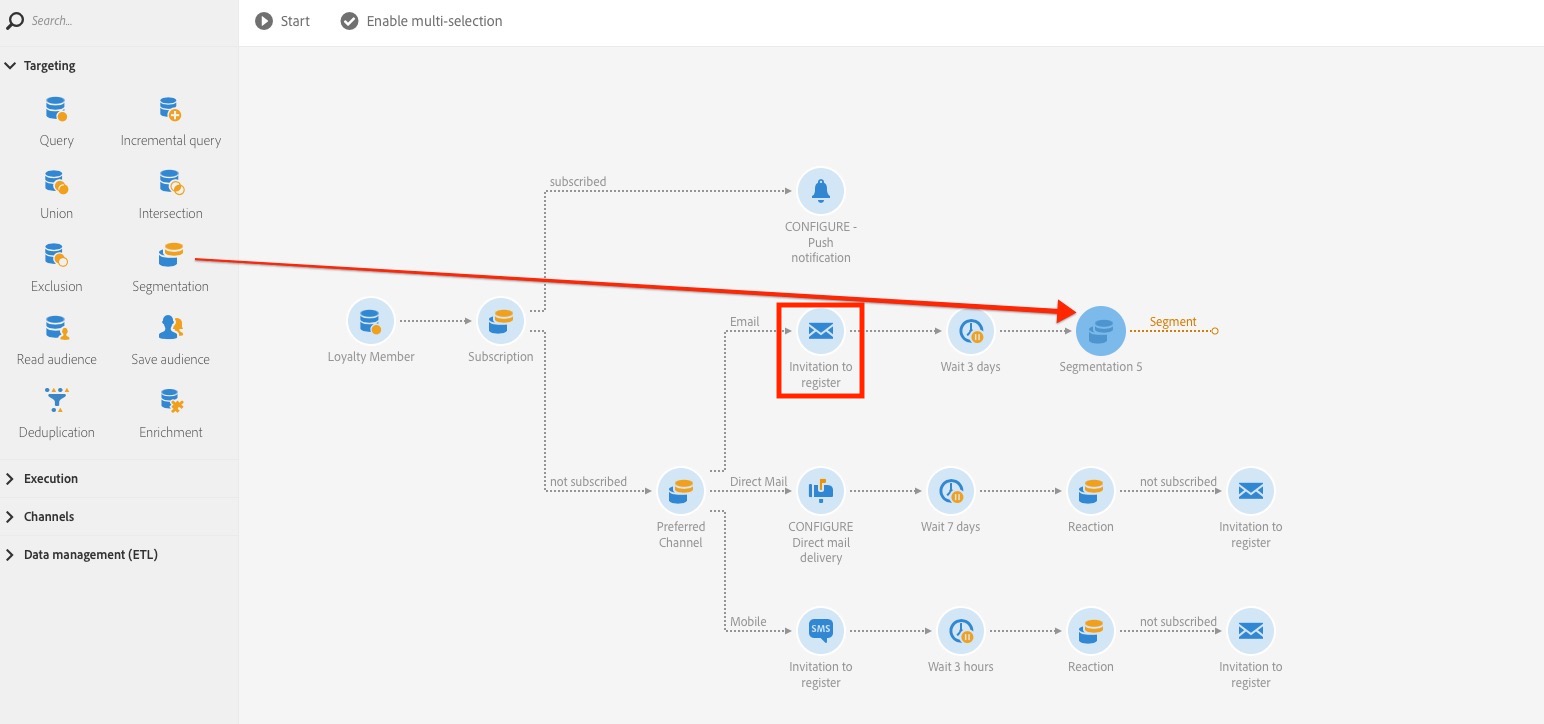
Figure 1.3.1: Add Segmentation activity
For the next step, we will need the email delivery name and ID.
 Figure 1.3.2: Email delivery ID
Double-click on the Segmentation activity to configure the segments.
We are now on the Segments tab, where we will add two segments
Segment 1: The user has not subscribed, but opened the email:
Click on the default segment and then click the pencil icon that appears on the right:
 Figure 1.3.3: Add a segment
From the Explorer menu, drag and drop the Subscriptions to an application onto the canvas
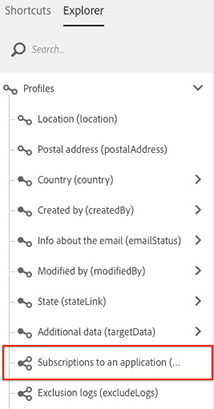
Figure 1.3.4: Add Subscriptions to an application filter
On the Add a rule screen, from the drop-down list, choose "Does not exist"
From the Explorer tab on the left, drag and drop Mobile application onto the canvas
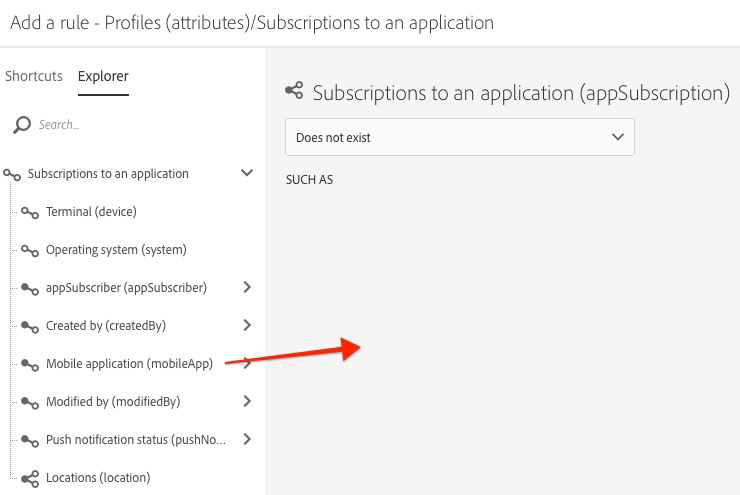
Figure 1.3.5: Add Mobile application filter
On the Add a rule screen, under the Filter conditions, choose the Luma_App_## from the Value drop-down and click Confirm.
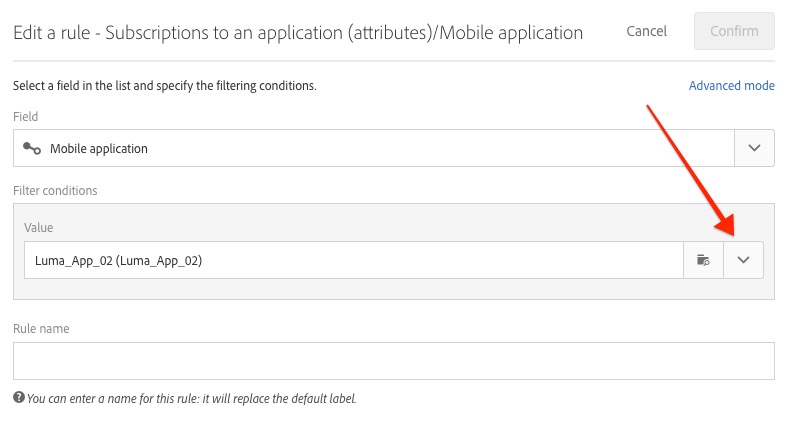
Figure 1.3.6: Add the app
From the Shortcuts tab on the left, expand Delivery, and drag and drop the Filter Opened to the canvas.
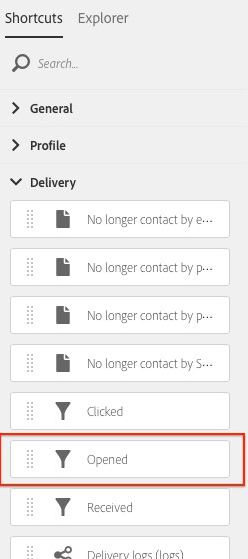
Figure 1.3.7: Add Opened filter to segment
Find the email delivery you identified in step 2 and double-click on it to add it.
You should now have both filter criteria for the first segment defined
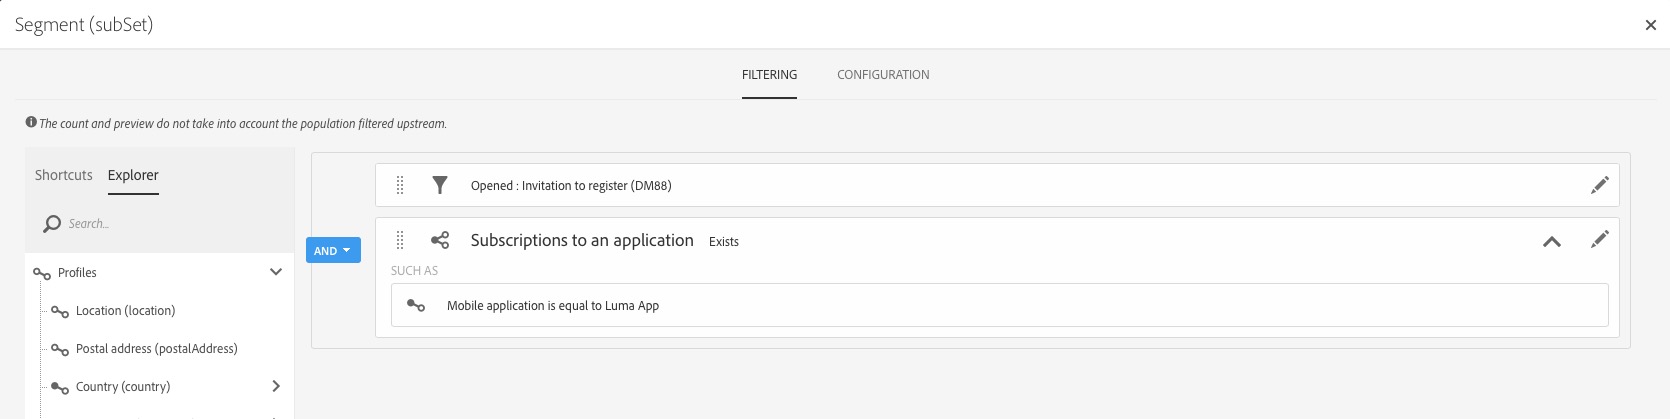
Figure 1.3.8: Segment 1
Click Confirm
Click on the Transition label of your first segment and click on the little pencil that appears to the left of the name.
Rename the Transition label to:
Segment 2: The user has not subscribed and has not opened the email
Click on the button Add an element
On the next screen, from the Explorer tab on the left, drag and drop the Subsriptions to an application onto the canvas
Figure 1.3.9: Add Subscriptions to an application filter
On the Add a rule screen, from the drop-down list, choose "Does not exist"
From the Explorer tab on the left, drag and drop Mobile application onto the canvas
Figure 1.3.10: Add Mobile application filter
On the Add a rule screen, under the Filter conditions, select the Luma_App_## from the Value drop-down list and click Confirm
Figure 1.3.11: Add the app
On the next screen, click Confirm.
On the Segment (subSet) screen, on the Shortcuts tab on the left, expand Delivery and drag and drop the Tracking logs filter onto the canvas.
On the Add a rule screen from the drop-down list, select:
Click Confirm
You should now have both filter criteria for the second segment defined
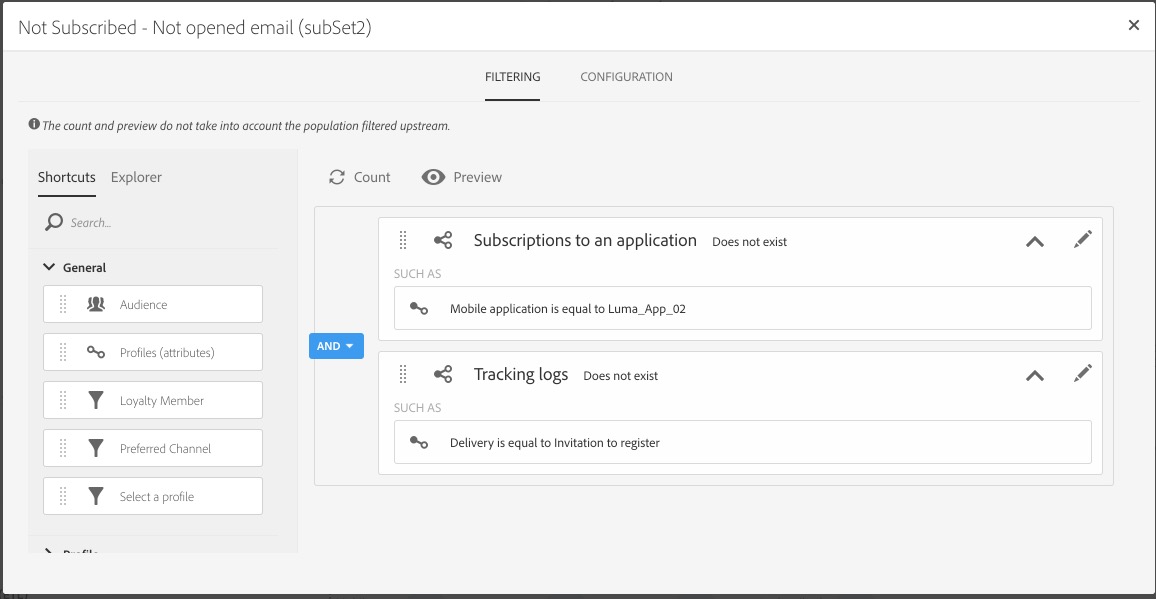
Figure 1.3.12: Segment 2
Click Confirm
Rename the Transition label for the transition you just created to:
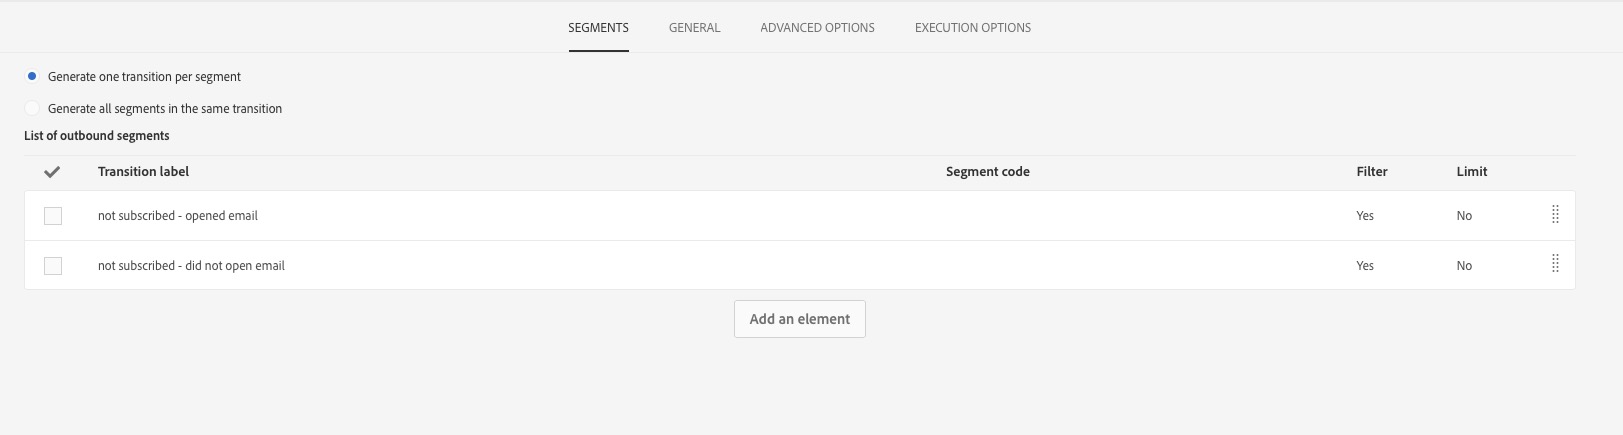
Figure 1.3.3: Segments
On the General tab, change the label to:
Click Confirm to apply the settings and return to the workflow.
We will send a reminder email to the customers who have opened the first email, but have not registered with the app.
Drag and drop an Email activity onto the canvas and connect it with the segmentation transition: not subscribed - opened email
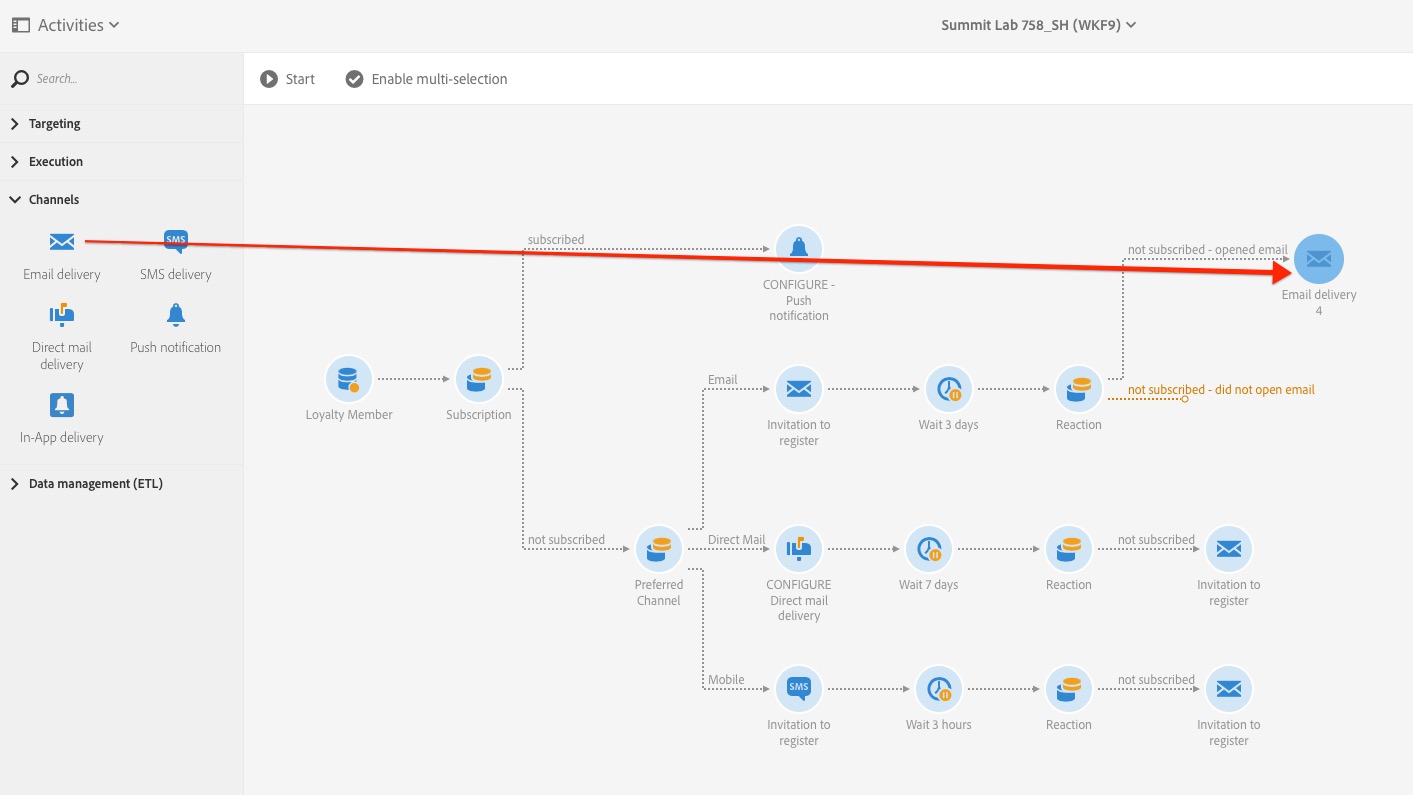 Figure 1.4.1: Email activity 2
Double-click on the Email activity you just added to configure it
Select Single send email, click Next
Select the email type: Send via email
Click next
Change the label to
PLEASE NOTE: Don't forget to replace the XX with your participant number
Click Next
Double-click on Use Email Designer
We will use a content template. To access the template, on the Email Designer Home screen, in the left navigation, click on Templates
In the Filter Templates field, type:
Hover over the LUMA - App Reminder template until the contextual toolbar appears and click on the pencil to apply the template.

Figure 1.4.3: Apply a template
On the next screen click the Choose Template button.
Let's add some personalization: Hover over the "Don't forget" heading, the text component will be highlighted in blue.
Click in the text field, and set the cursor in front of "Don't".
In the contextual toolbar, that appears on the top of the text component, click on the personalization icon.

Figure 1.4.4: Personalize the email
On the next screen, search for First Name, then select the field from the Context list below and click Confirm
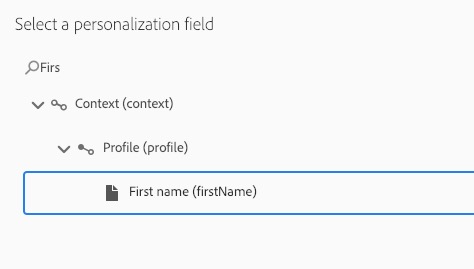
Figure 1.4.5: Choose personalization field
The personalization field has been added to the text component. You can now change the sentence to:
PLEASE NOTE: Do not modify the personalization field!

Figure 1.4.6: Personalization field
Click on the delivery name at the top of the page, then add the subject name:
Figure 1.4.7: Edit subject.
Pro Tip: You can add personalizaltion, content blocks and dynamic content to the subject line, by clicking on the pencil icon next to the subject field.
Figure 1.4.8: Return to workflow
We will contact those customers, who haven't opened the first email, a second time. If we have their mobile number, we will send the invitation via SMS, if not, we will send a reminder email.
Add a new segment
From the Activities panel expand the Targeting palette and drag and drop the Segmentation activity onto the workflow.
Connect the Segmentation activity to the outbound transition not subscribed - did not open email of the segmentation you created in exercise 1.3.
Double-click on the Segmentation activity to configure it.
Click on the default segment and then click the pencil icon that appears on the right.
From the Shortcuts panel, expand Profile and drag and drop the Mobile field onto the canvas
On the Add a rule screen from the Operator drop-down list, choose Is not empty and click Confirm
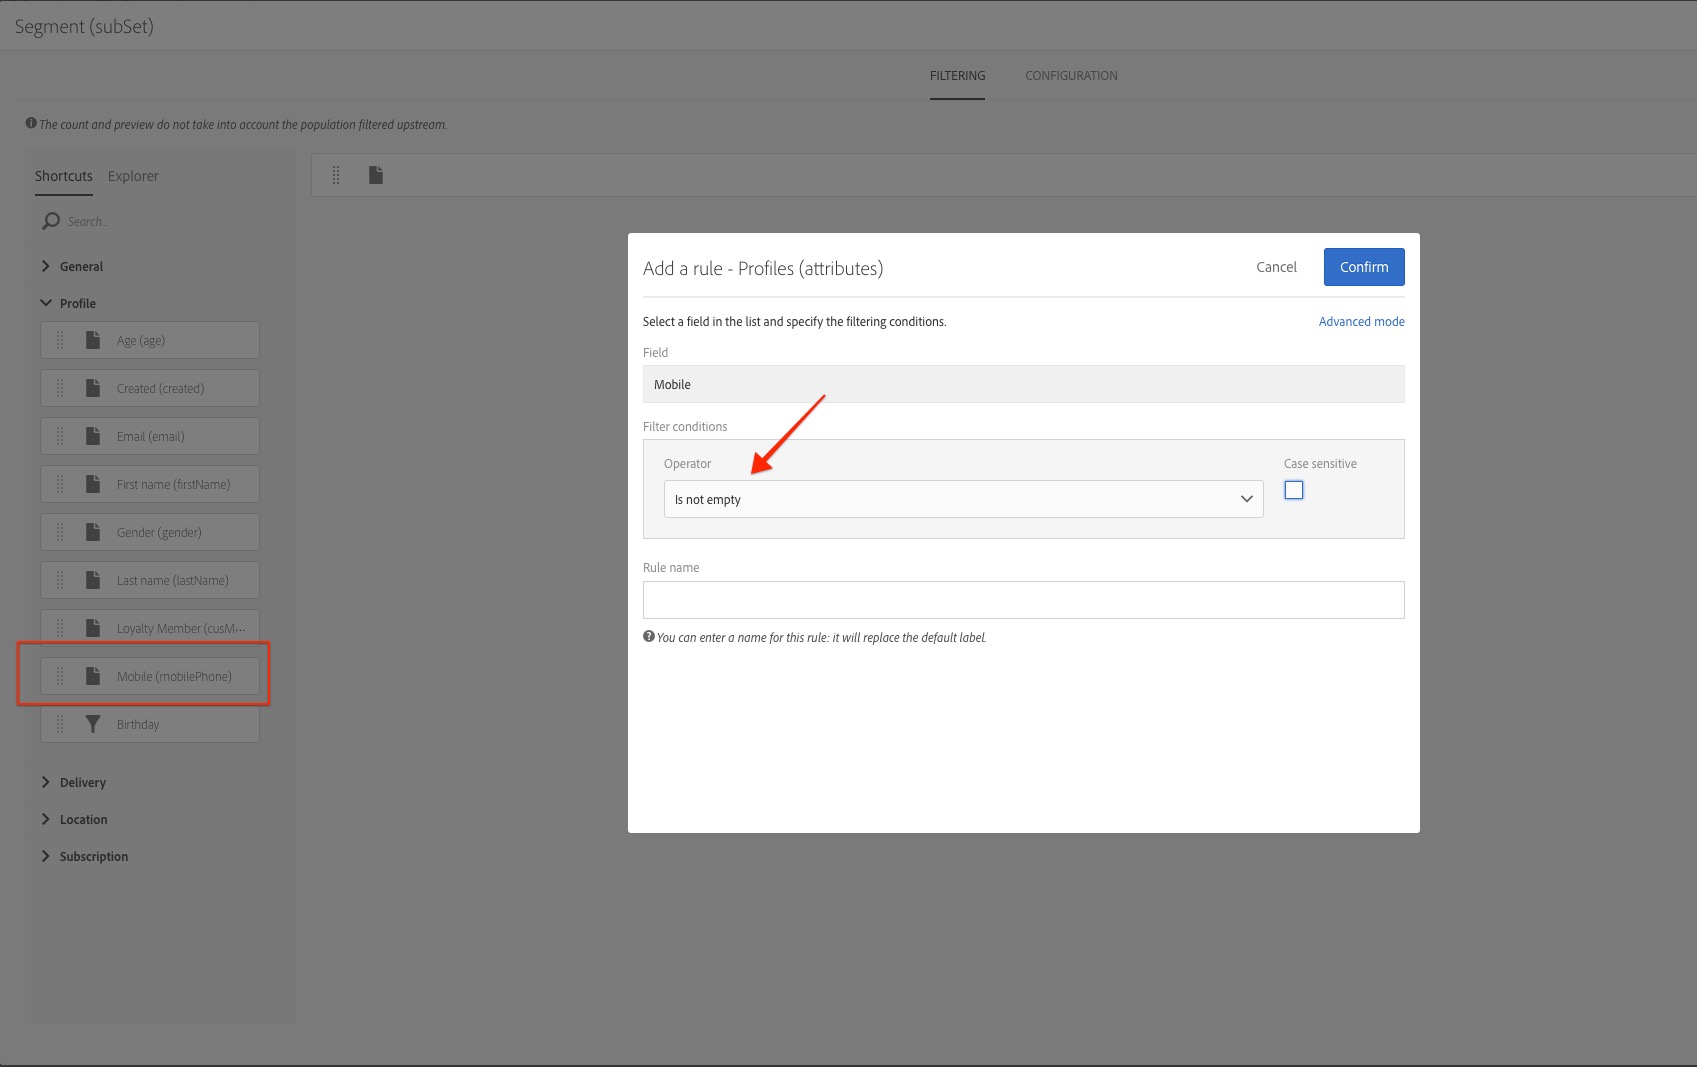
Figure 1.5.1: Segement configureation - mobile phone number is not empty
On the Segment screen, click Confirm
Rename the Transition label to: Yes
On the Advanced Options tab, in the Complement section, check Generate complement and change the Transition label to "No"
On the General tab, change the label to: Mobile number?
Click Confirm
Your new segment activity should look like this:
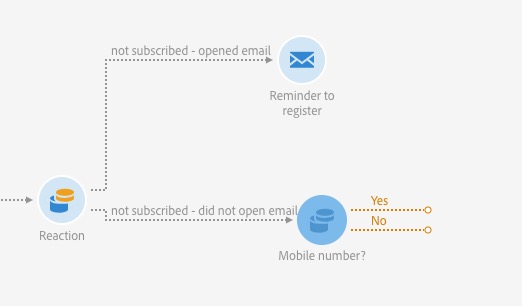
Figure 1.5.3: Segmentation by mobile number
On the workflow, select the Email activity Reminder to register XX that you created in exercise 1.4
On your keyboard, type Command + C to copy the Email activity, and then type Command + P to paste it onto the canvas.
Note: For PC users the commands are ctrl + c and ctrl + p
Connect the new Email activity to the No transition you just created.
Add the SMS channel
From the Activities panel expand the Channels palette, drag and drop a SMS delivery activity onto the canvas and connect it with the yes transition you just created.
Double-click on the activity to configure it.
On the next screen, select SMS and Do not add an outbound transition
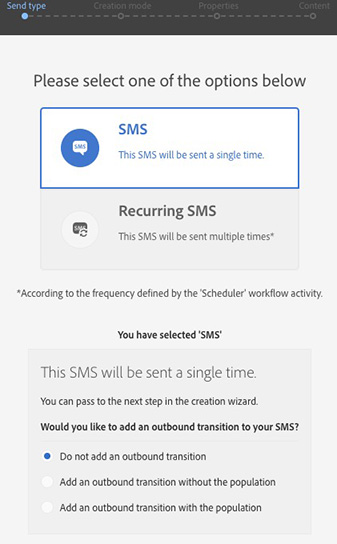
Figure 1.5.4: SMS send type
Click Next
On the Creation mode screen, select SMS type Send via SMS (sms) and click Next
On the Properties screen, change the Label to:
Click Next
On the next screen, in the From field, enter: * 28444
Let's create the message. We will start by adding personalization: Click on Insert personalization field from the top menu
Search for First Name, and double-click on the corresponding field below to add it to the SMS
The personalization field should have been added to the grey area on the phone. Set the cursor after the personalization field and add the following text:
First name , don't forget to register with the new Luma app! You'll get a 20% discount on your next purchase!
Find out more here: http://publish1034.adobedemo.com/content/luma/us/en.html
Pro Tip: Instead of adding a link to a landing page, you could also add a link to the app store (e.g https://itunes.apple.com/[countrycode]/app/[YOUR APP NAME]/[YOUR UNIQUE APP ID]?mt=8)
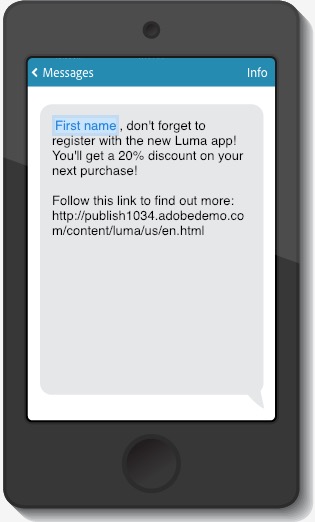
Figure 1.5.5: SMS content
Click Confirm
On the delivery summary page click on the link to the workflow on the left panel, to return to the workflow.
We have added a new branch to the workflow:
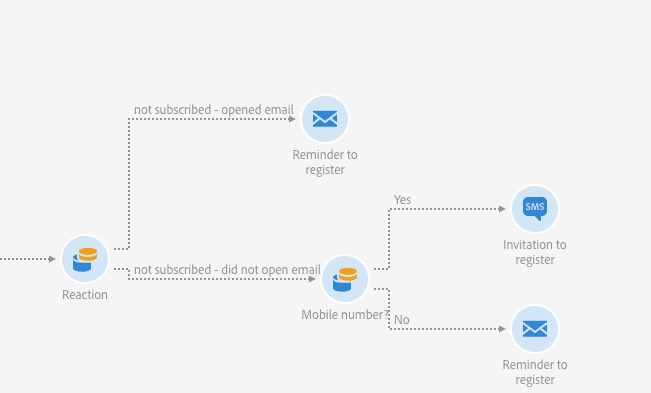
Figure 1.5.6: New branch
In this exercise, we will configure the Push delivery which will be sent to the loyalty members who have already registered with the app.
Double-click on the Push notification activity named CONFIGURE Push notification to edit it.
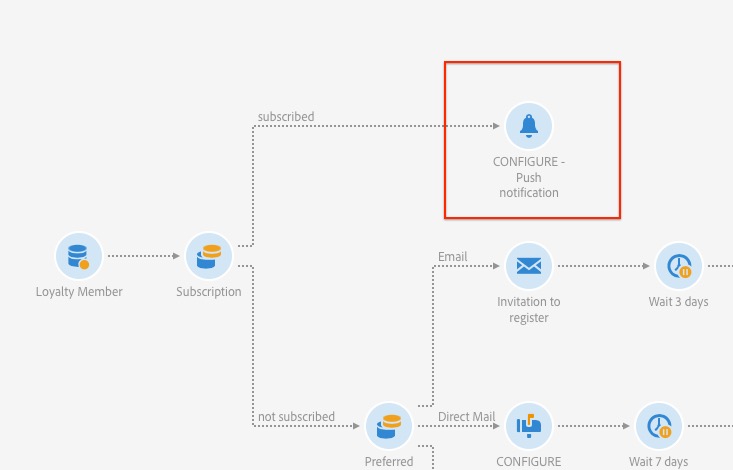
Figure 1.6.1: Push activity
On the Send type screen, select Single notification and Do not add an outbound transition and click Next
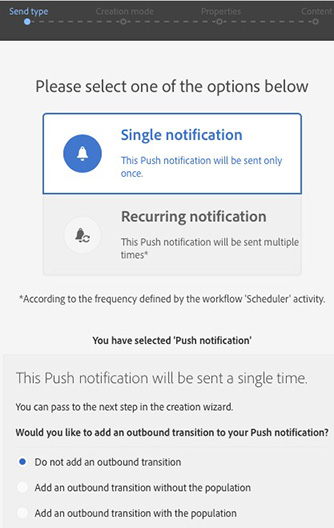
Figure 1.6.2: Push send type
On the Creation mode screen, select Push notification type L758-Send push to Campaign profile and click Next
On the properties screen, change the Label to:
From the Associate a Mobile App to a delivery drop-down list, select Luma_App_## and click Next 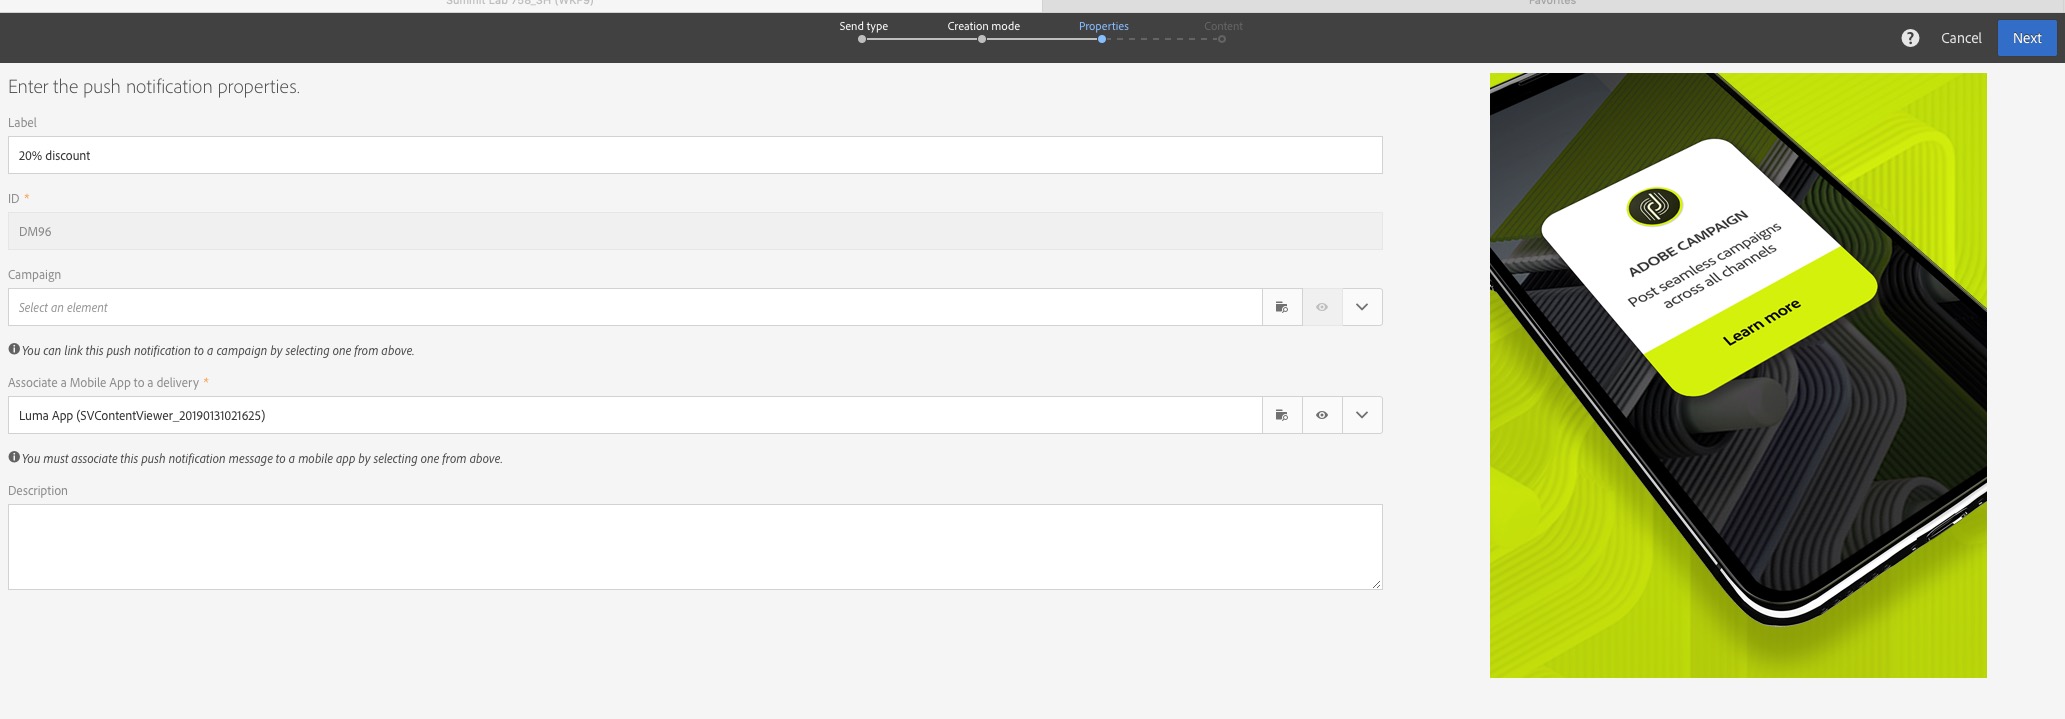
Figure 1.6.3: Push properties
We are now on the content configuration screen. Let's personalize the message title: Click in the pencil next to the Message title field to edit the field.
On the Message title screen, set the cursor in front of the sentence and click on Insert personalization field in the top navigation of this window.
In the context section, scroll down to Profile and expand, find First Name(firstName) and double-click to add the field to the text.
Modify the text as shown below
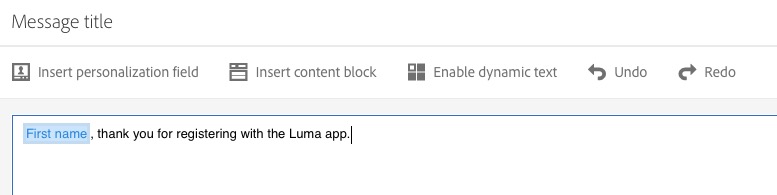
Figure 1.6.4: Message title
Click Confirm
On the content configuration screen, expand the >Advanced options section and in the Add a deeplink add:
Click Create to create the Push delivery
On the delivery summary page click on the link to the workflow on the left panel, to return to the workflow.
In this exercise we will configure a Direct mail delivery.
Note: In the Direct mail delivery, we will not be configuring the actual creative, but the list of recipients with all required attributes. This is the information Luma will provide to the provider who will prepare and mail the marketing material to the customers.
Double-click on the Direct mail delivery activity named CONFIGURE Direct mail delivery to edit it.
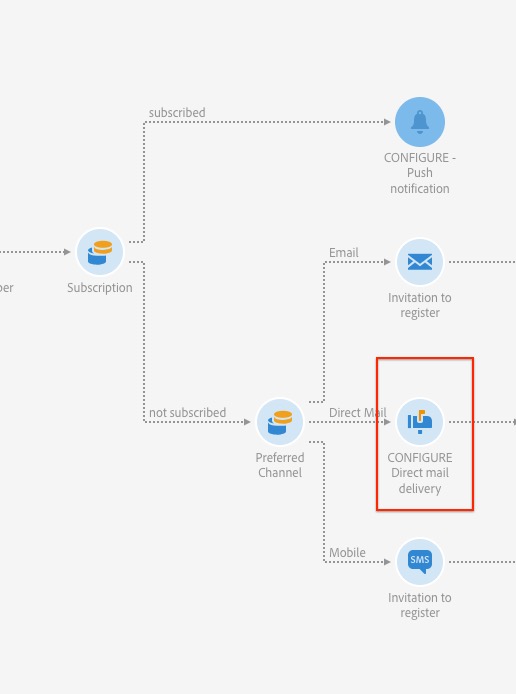
Figure 1.7.1: Direct mail delivery activity
On the Send type screen, select Direct Mail and Add an outbound transition with the population then click Next
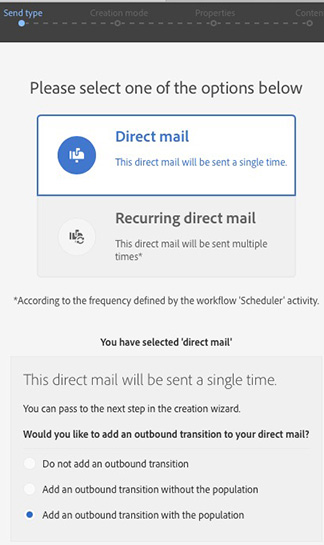
Figure 1.7.2: Direct mail send type
On the Creation mode screen, select direct mail type Deliver by direct mail
On the properties screen, change the Label to:
Click Next
Configure the File name and the columns that need to be added to the output file (recipients' names and addresses)
On the properties screen, on the Extraction tab, enter the file name for your output file: Direct Mail XX
Click on the default output column and click on the trash can icon to remove it
Click on Create element
On the New output column dialogue box, click on the folder icon next to the expression field
Under Profile, find First Name and double-click on it to add it.
Click Add
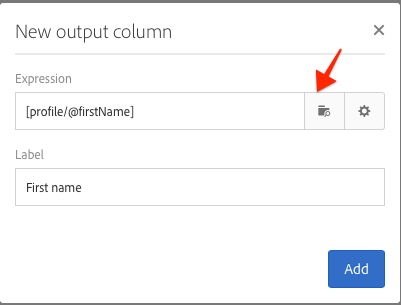
Figure 1.7.3 Direct mail add new column
Repeat steps 3.- 7. to add the following columns:
We have now defined the file name and the output colummns:
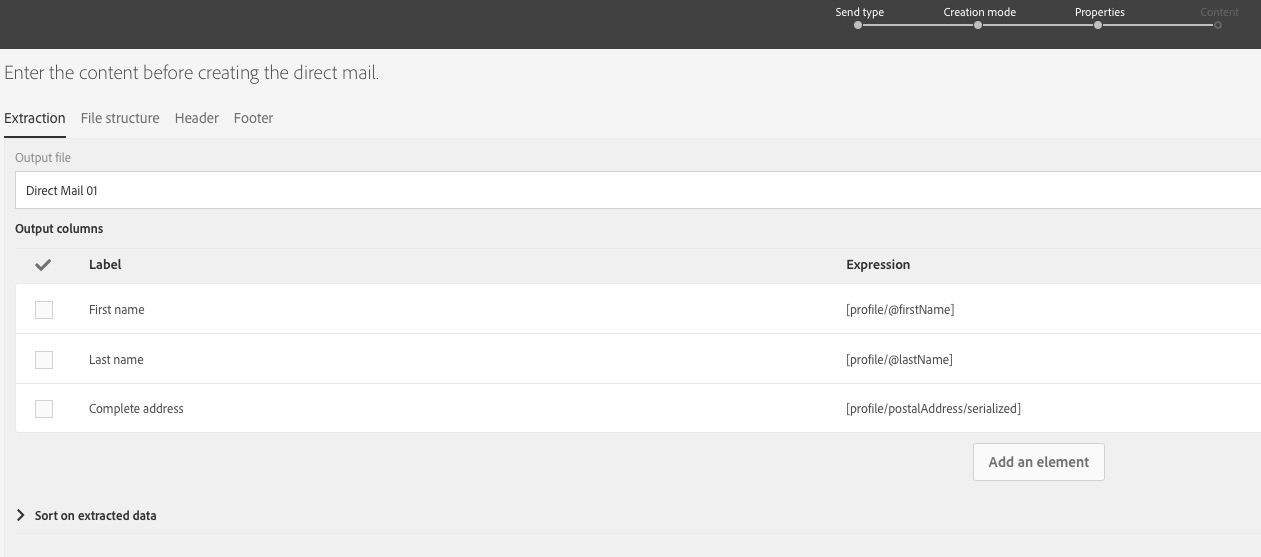
Figure 1.7.4: Direct mail - Extraction tab
Click on the File Structure tab to Review the File structure settings
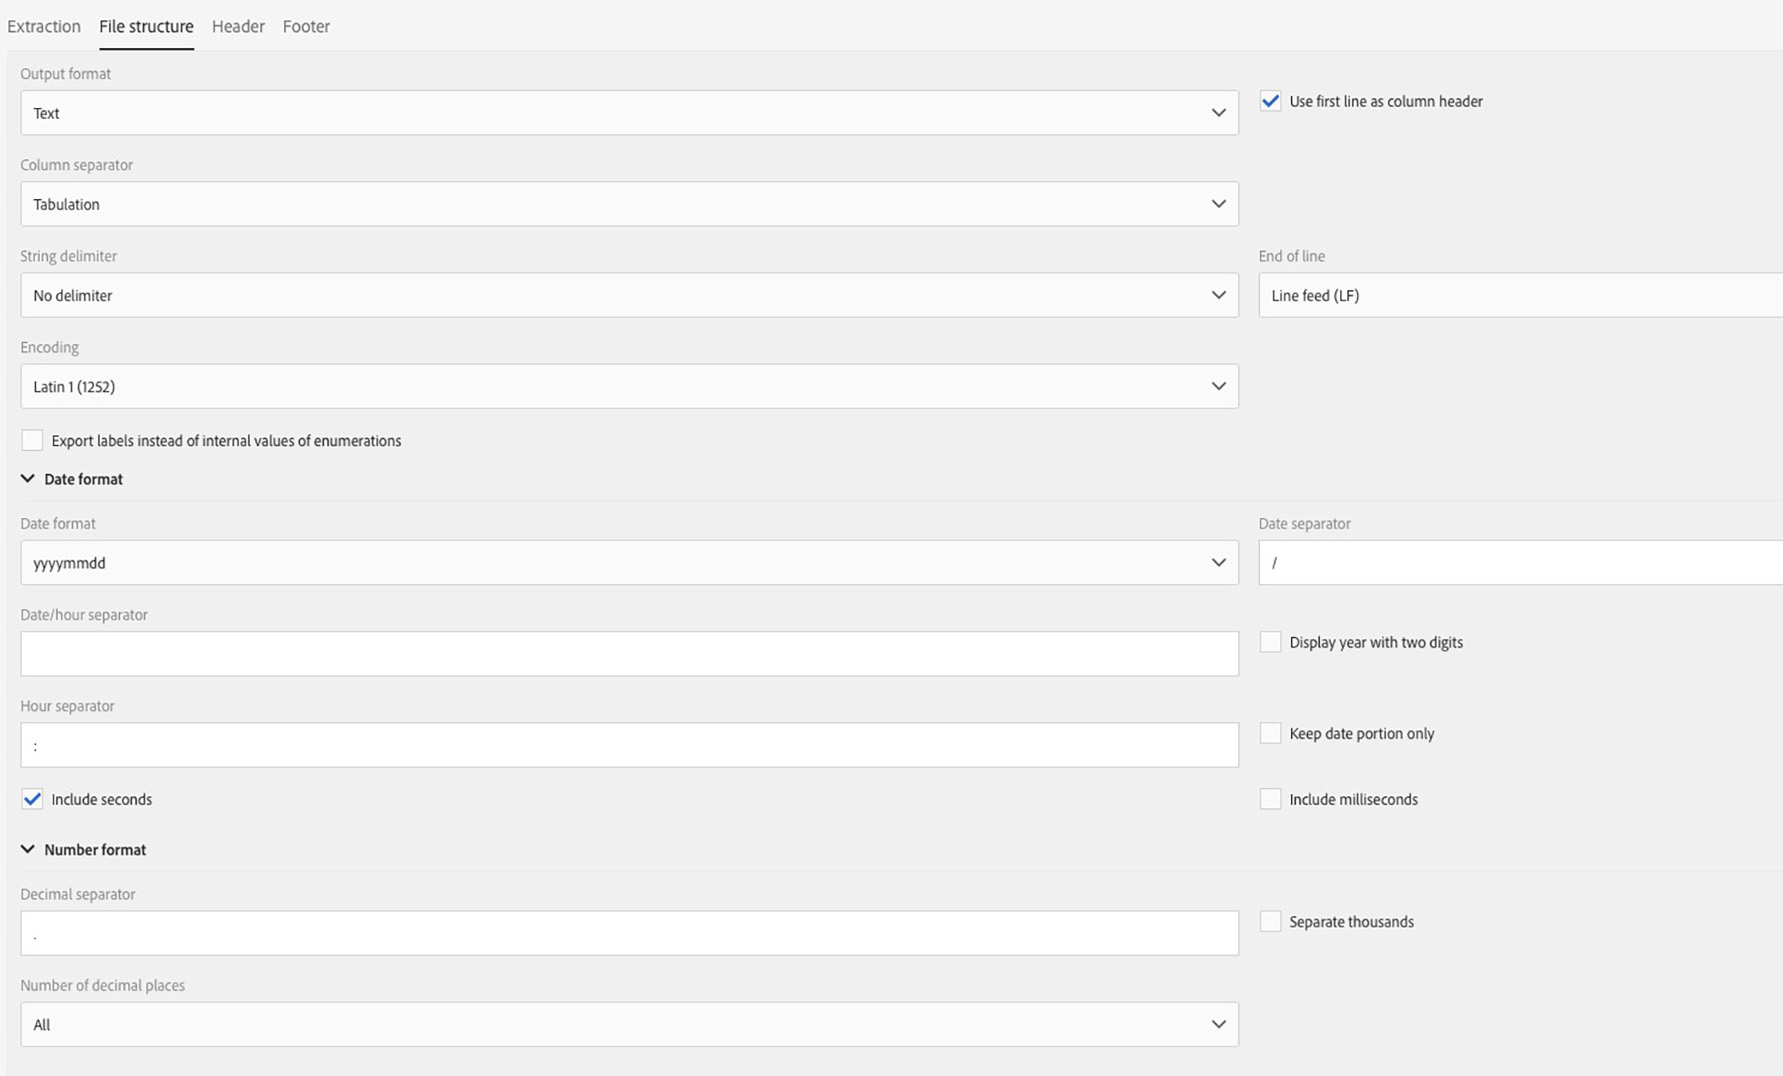
Figure 1.7.5: Direct mail - File structure
Click Create to create the Direct mail delivery
On the delivery summary page click on the schedule section
In the Start Sending from field, add select tomorrow's date.
Click confirm.
On the delivery summary page, click on the link to the workflow on the left panel, to return to the workflow.
Info: By default, each delivery will require a confirmation before it is sent. To exectue a delivery immediately, without prior confirmation: On the delivery summary pages, go to the Schedule section and uncheck Request confirmation before sending messages .
Luma would like the loyalty members who registered with the app to receive an In-App message informing them of the 20% discount. The offer will be valid until April 30, 2019.
This requires an event-triggered workflow that triggers the In-App messages which will appear when the user opens the app the next time after registering their account.
The workflow will look like this:
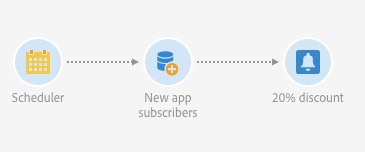
Figure 2.1: Event-triggered workflow
We will configure a Scheduler activity that will trigger the workflow every 10 minutes. We will also configure an **Incremental Query ** activity, that will check for new users who have registered with the app since the last execution of the workflow.
On the workflow screen, from the Activities panel on the left, extend the >Execution palette and drag and drop the Scheduler activity onto the canvas
Double-click on the Scheduler activity to configure it.
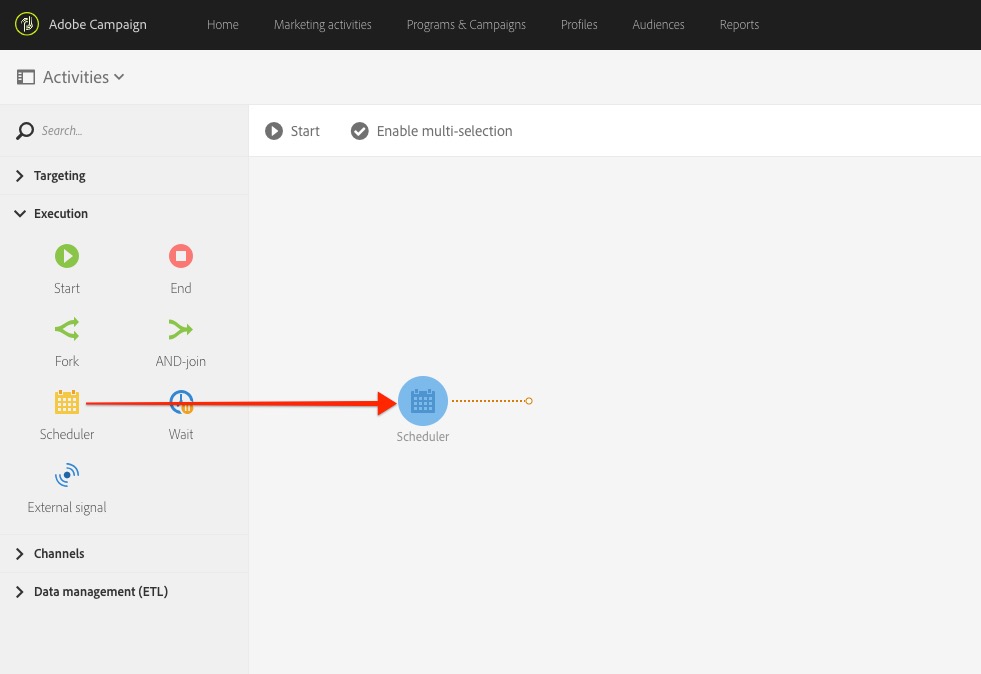
Figure 2.1.1: Scheduler activity
On the General tab
From the Execution frequency drop-down list, select: Several times a day
Set the radio button to: Periodic
Under Repeat processing according to the following frequency, click on the clock symbol.
Select Minute and 10
Please note: The Repetition frequency of the activity cannot be less than 10 minutes. It means that a workflow cannot be automatically executed more than once every 10 minutes.
Set the Expiration to On a specific date
In the date field, enter: 04/30/2019
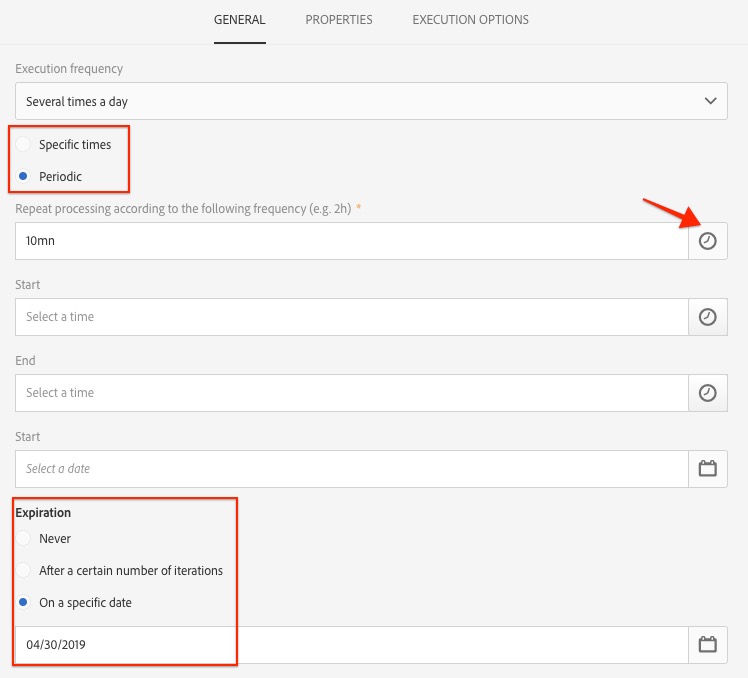
Figure 2.1.2: Scheduler activity - General tab
Click Confirm
On the Activities panel, expand the Targeting palette, drag and drop the Incremental Query activity onto the workflow and connect it to the outbound transition of the Scheduler activity you created in the previous exercise.
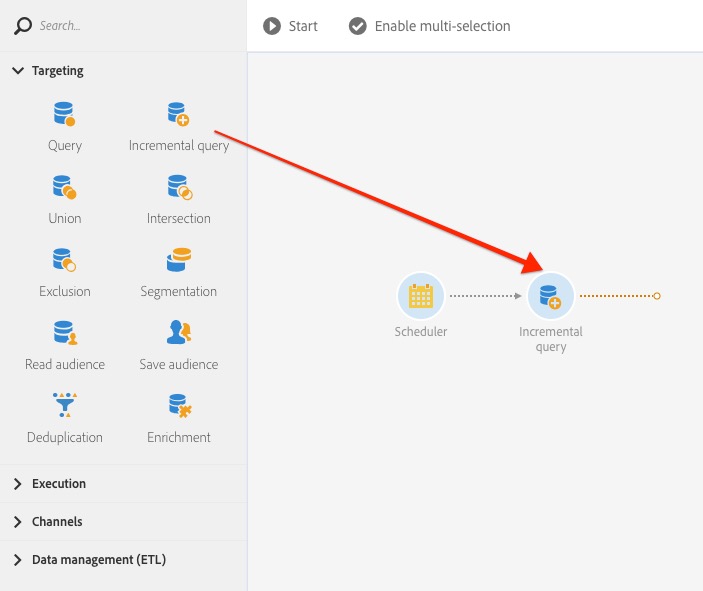
Figure:2.2.1: Incremental query
Double-click on the Incremental query activity to customize it.
On the Target tab, from the Explorer menu, drag and drop the Subsription to an application onto the canvas
On the Add a rule screen, from the drop-down list, choose Exists
From the Explorer menu drag and drop Mobile application onto the canvas
On the Add a rule screen, under the Filter conditions, choose the Luma_App_## as Value and click Confirm
Figure 2.2.2: Add the app
Your rule should look like this:
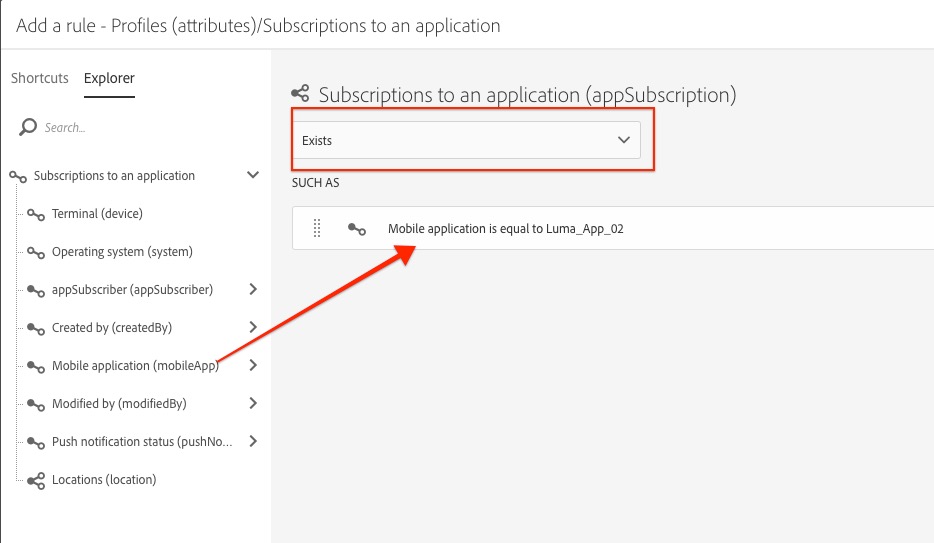
Figure 2.3.3: Subscription filter
Click confirm
On the Target tab, from the Shortcuts menu, drag and drop the Loyalty Member onto the canvas
On the Add a rule screen, under Filter Conditions, choose Value Yes
Click Confirm

Figure 2.2.4: Incremental query
On the Properties tab, change the label to: New app subscribers
Click Confirm
On the Activities panel, expand the Channels palette and drag and drop the In-App delivery activity onto the workflow.
Connect it to the outbound transition of the Incremental query activity you created in the previous exercise.
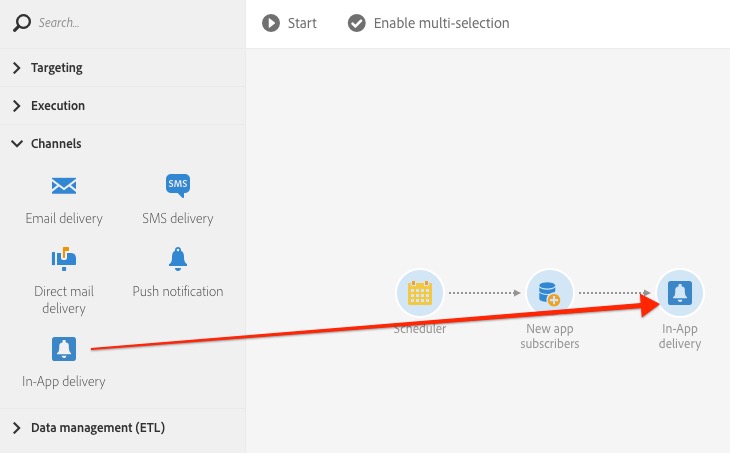 Figure 2.3.1: In-App delivery
Double-click on the In-App delivery activity to customize it.
Select Send type Single notification and the radio button Do not add an outbound transition
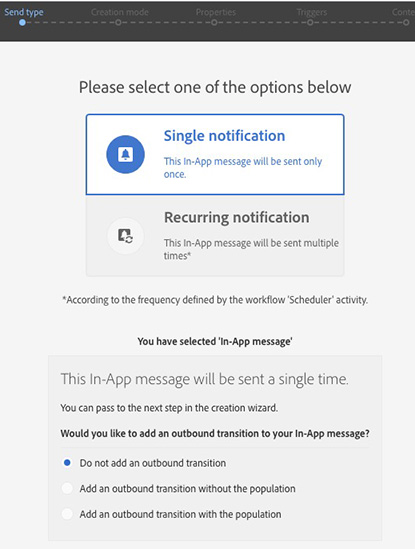
Figure 2.3.2: In-App - Send type
On the Creation mode screen, select message type: Target users based on their Campaign profile
Figure 2.3.3: In-App - Message type
Click Next
On the Properties screen, change the label to:
From the Associate a Mobil App to a delivery drop-down, select the Luma_App_## and click Confirm
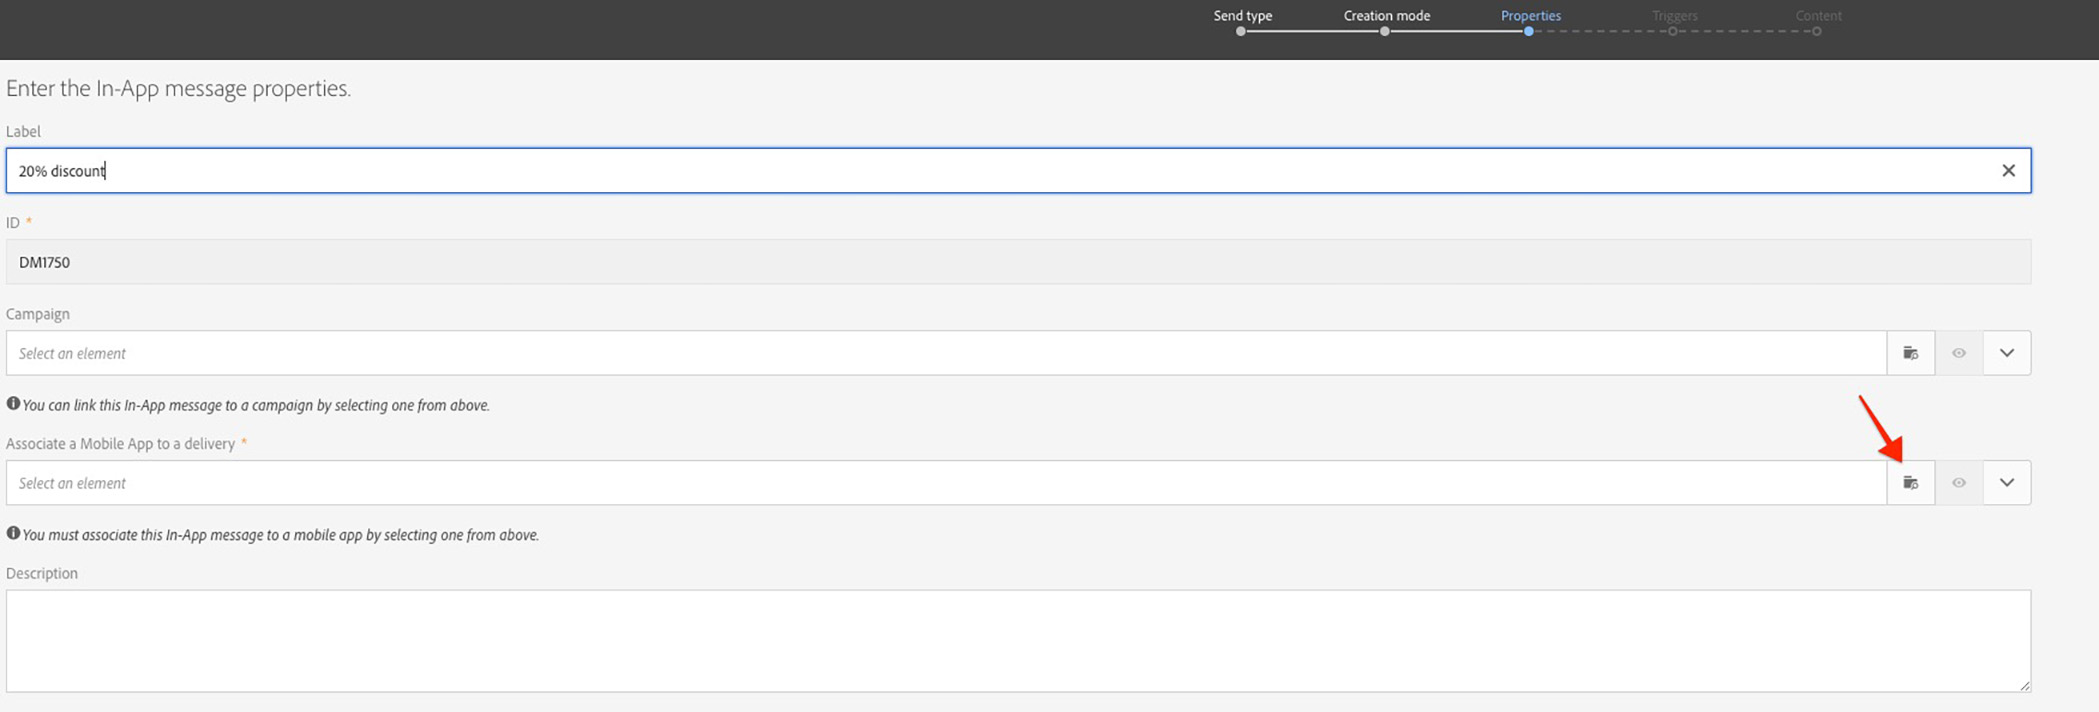
Figure 2.3.4 In-App properties
Click Next
On the Triggers screen, from the Shortcuts menu, expand >Life Cycle Events and drag and drop the Life Cycle Events filter onto the canvas
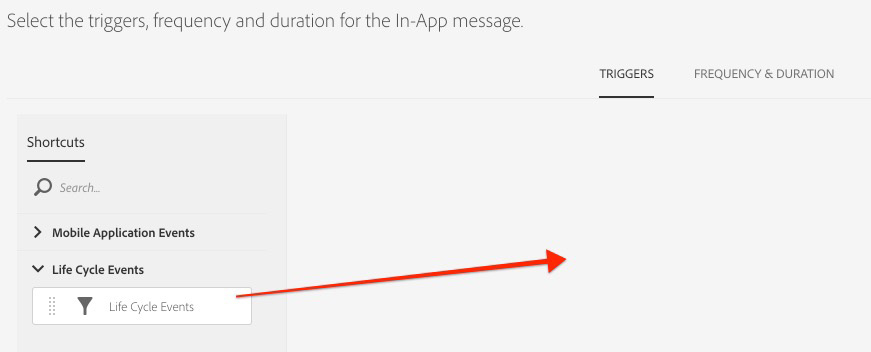 Figure 2.3.5 In-App triggers
On the rule configuration screen, select Launched from the Life Cycle Events drop-down list, and click Confirm
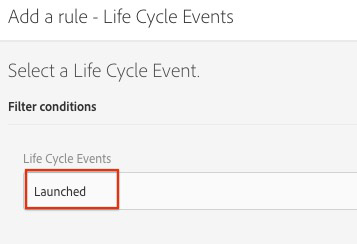
Figure 2.3.6 In-App configure rule
On the Frequency & Duration tab, from the Choose a frequency for this trigger drop-down list, select Once-only the first time the trigger criteria is met.
Set the start date to today, select the end date: 04/30/2019
Make sure Every day and All day are checked
Click Next
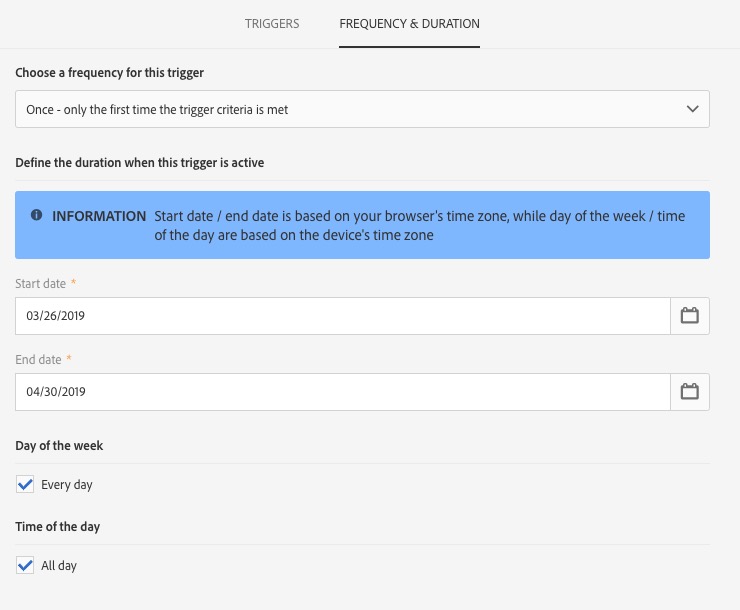
Figure 2.3.7: In-App - frequency & duration
We will configure the In-App message on the Content page:
In the Mode section, select message Template
In the Layout section, select Large Modal
In the Media section, select Media Type Image
Copy and paste the following URL into the Media URL field: http://publish1034.adobedemo.com/content/luma/us/en/equipment/_jcr_content/root/responsivegrid/category_teaser_2082536754.coreimg.1024.jpeg/1542688176051.jpeg
In the Text section, add the Message title: , claim your 20% discount.
To add personalization, click on the pencil icon
Set the cursor in front of the sentence and click on Insert personalization field.
Scroll down to Profile and expand it, then enter First Name into the search field.
Double-click on First Name (firstName) to add it to the Message title
Click Confirm.
Add the Message Content: As a Luma loyalty member you are eligible for a 20% discount on your first purchase with the app.
In the Buttons section, under Primary:
Add the Button Text: ok
Action: Dismiss the message
Pro tip: You can also redirect the user to a page within your app. For this you would need to set the Action to: Redirect to destination URL and add a deep link. You could personalize the link, e.g., based on the gender, to redrict to the womens' or the mens' apparel section of the app.
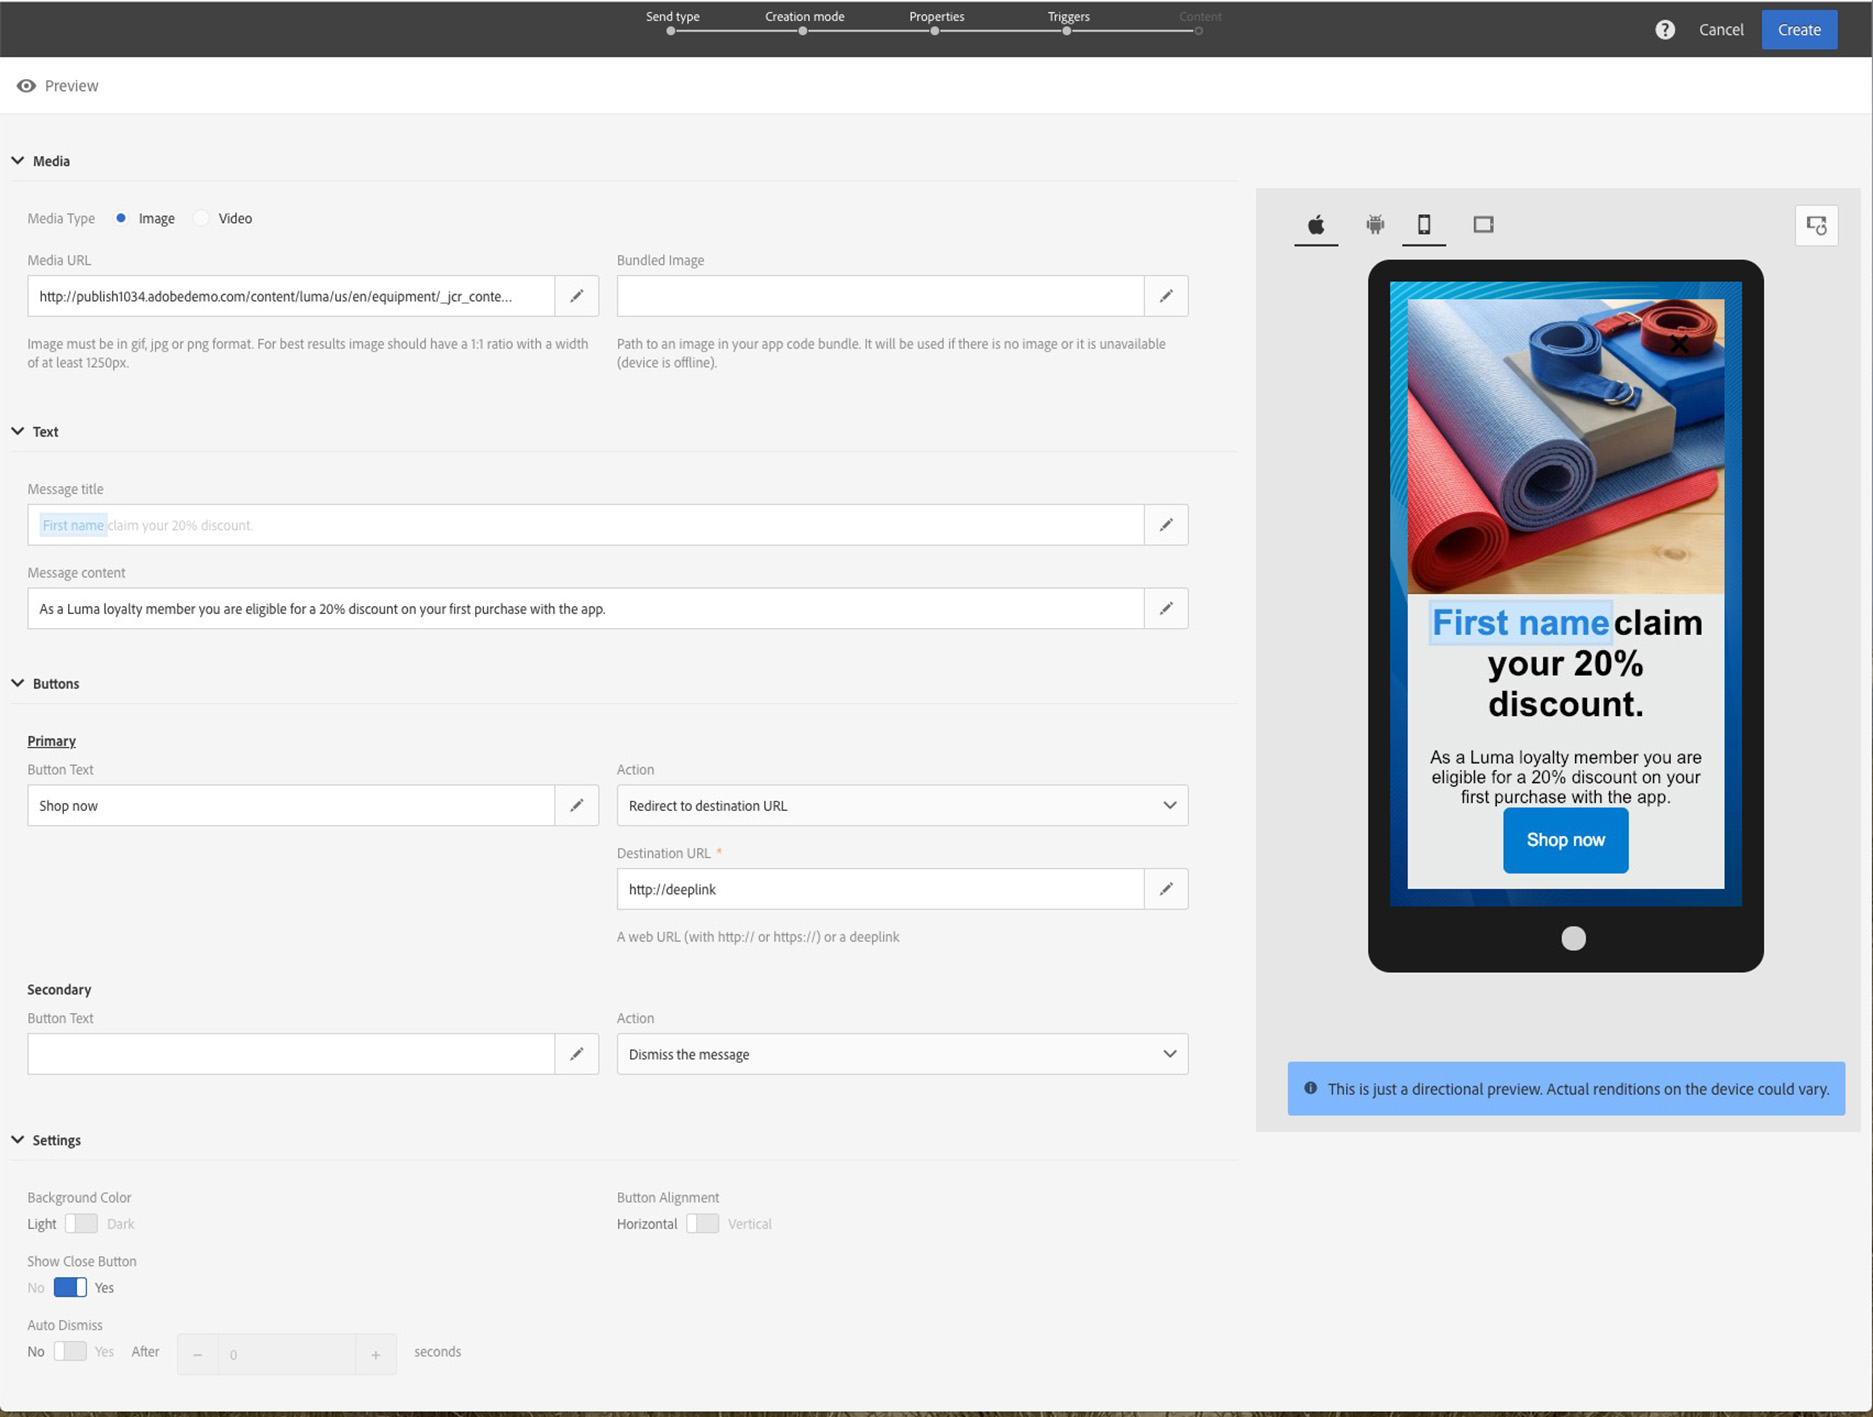
Figure 2.3.7: In-App - Settings with redirect
Click Preview in the top-left corner, to preview the message and check that personalization is applied correctly.
Click on Create to create the delivery
You can review all settings on the Summary page
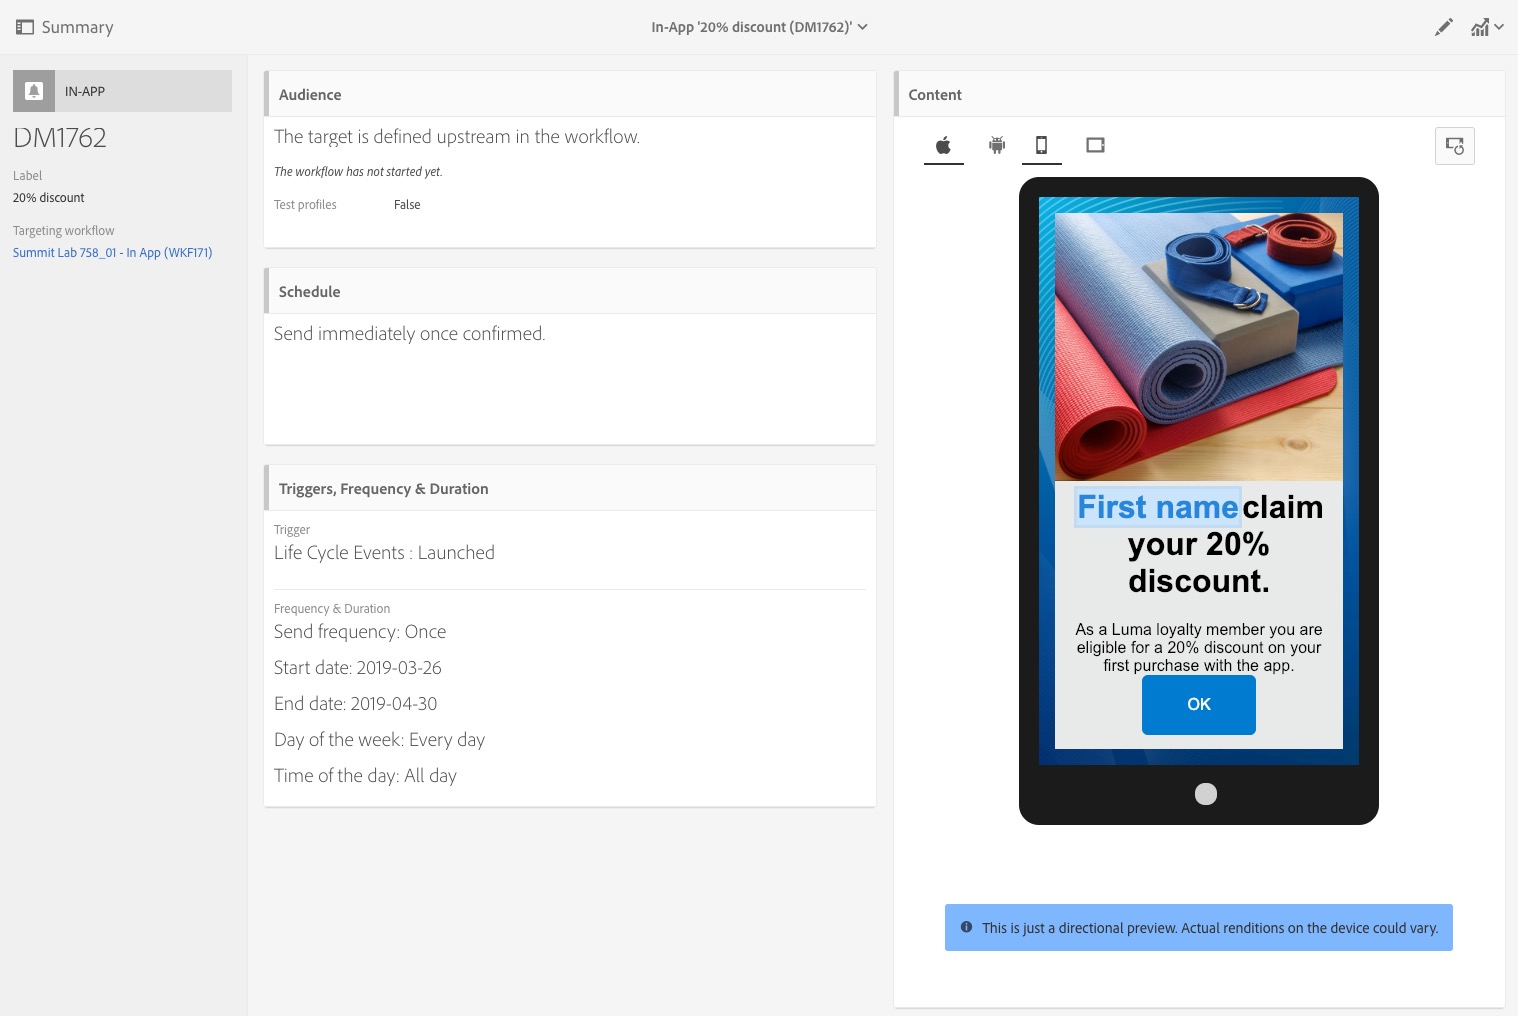
Figure 2.3.8: In-App - Summary
To return to the workflow, click on the link in the left panel.
Visit the additional resources listed below to learn more about the delivery channels.
Feature videos and tutorials: