
Location data is the most personalized context when designing and delivering personalized and relevant user experiences. In this session the Adobe Experience Platform (AEP) Location Service engineering team will show you how to configure Places in your mobile app so that you can use this valuable data across your Experience Cloud workflows.
Learn how to:
For this lab, you will be using a test company where each of the prerequisites have already been completed. To enable this functionality for your organization, you will need to work with your account representative to complete them.
Adobe Experience Cloud solutions required:
(Places and Launch are available by default to all Adobe Experience Cloud customers)
3rd party software or environments required for iOS development:
3rd party software required for Adobe Campaign Standard (extra credit lesson):
We will be using an iOS application in Xcode to demonstrate the Places integration. You can download the sample application here:
In this lesson we will login to the Places UI using the lab user credentials and learn about the various elements of the UI. We will then create a library to hold the POIs that we create. Finally, we will create a POI with a geo-fence around the Sands Convention Center.
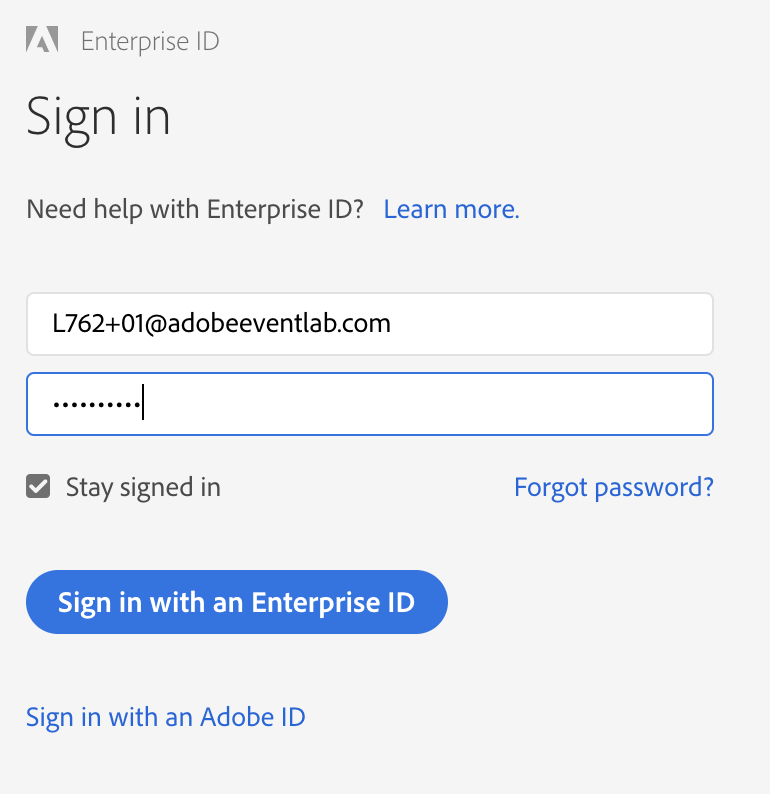
Open the Chrome browser. Browse to https://places.adobe.com . You will be redirected to a login screen. Use your lab user credentials to login. Make sure you are logging in with an Enterprise ID.
Figure 1.1: Login screen
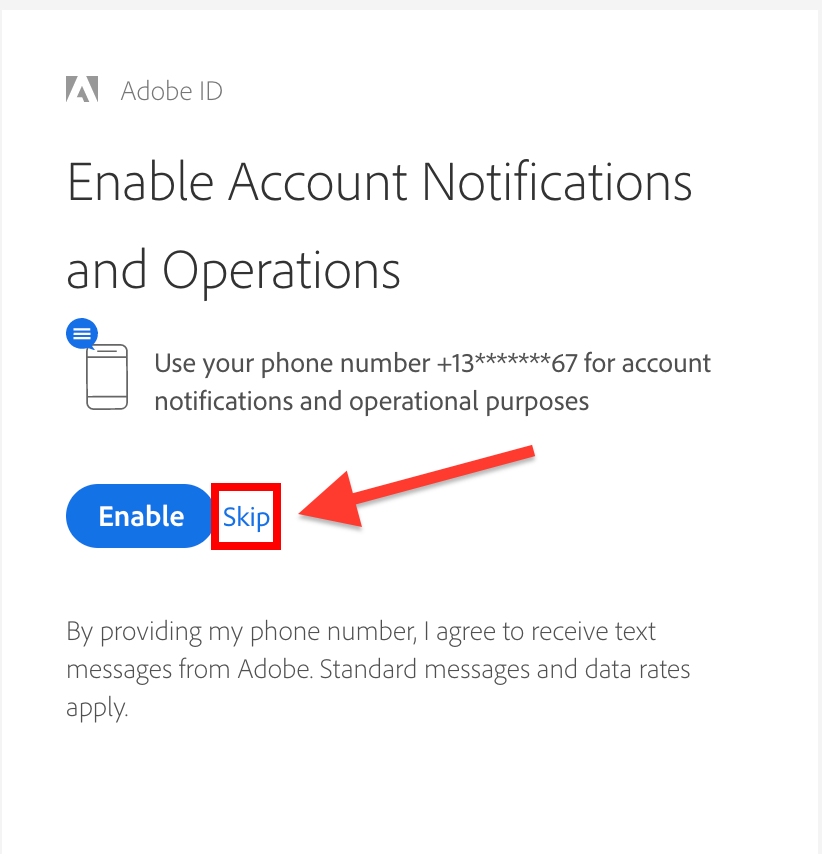
If you see a screen asking you to enable account notifications and operations, click Skip.
Figure 1.2: Skip this dialog
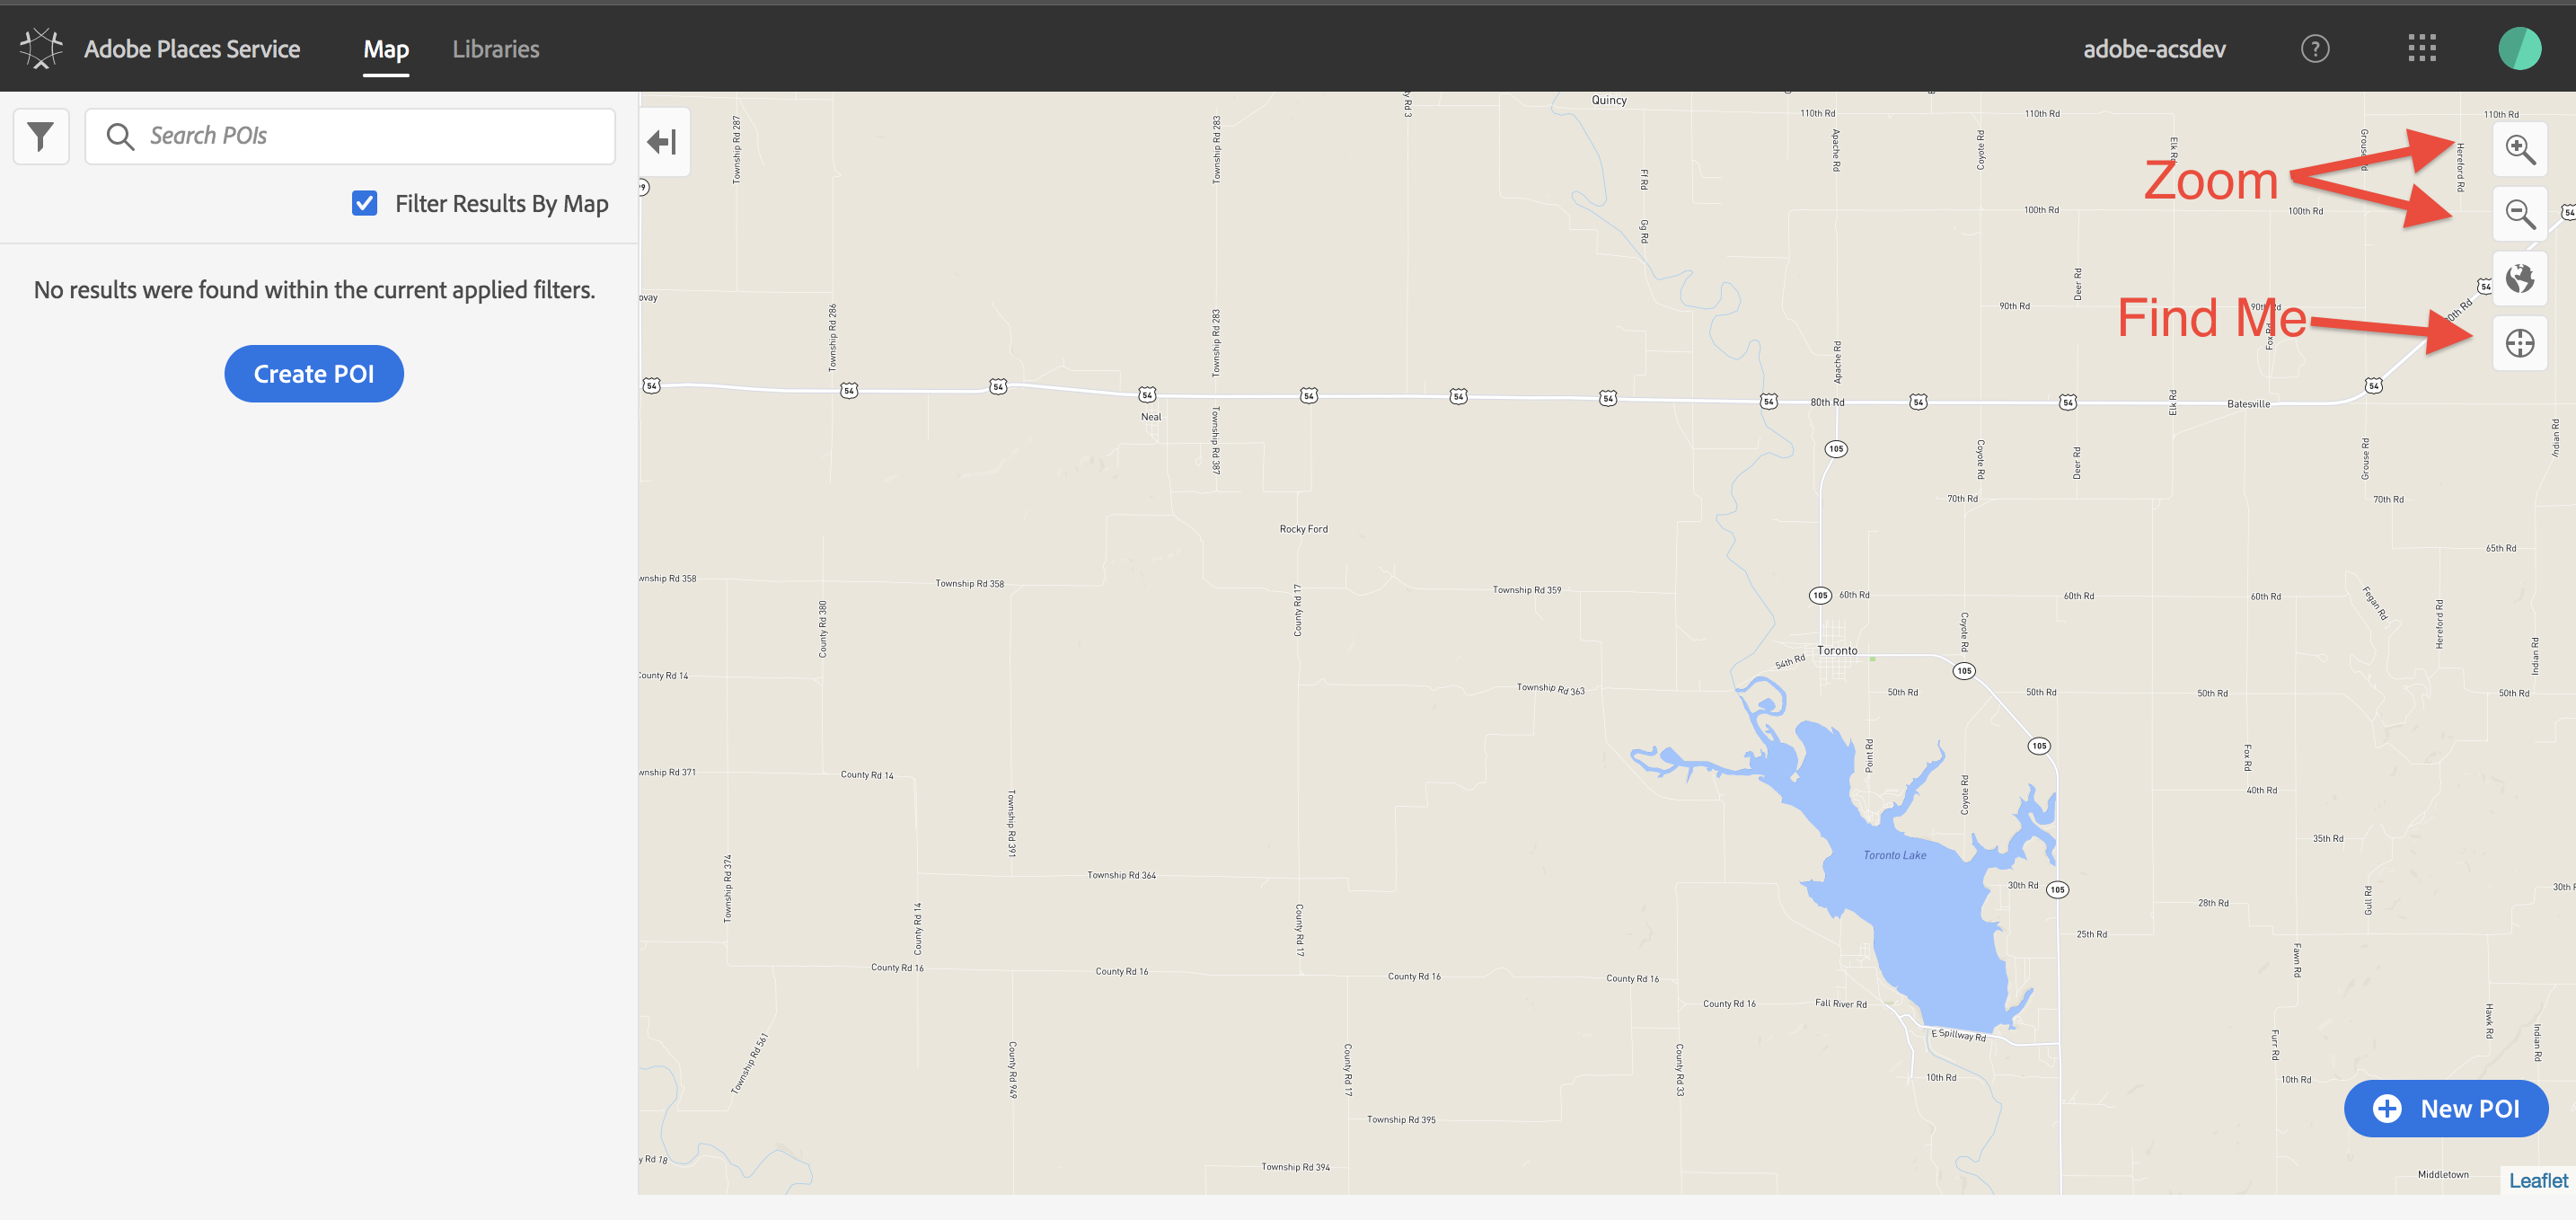
You should be redirected to the main Places screen. See Figure 1.3 below to familiarize yourself with the various components of the UI.
Find Me), and switching between Map View and Satellite View.Figure 1.3: Places main screen
Click on the Libraries tab. You will be redirected to a list of libraries. If you do not have any libraries created yet, you will see an empty screen as shown in Figure 1.4.
Figure 1.4: Places Libraries (empty)
![]()
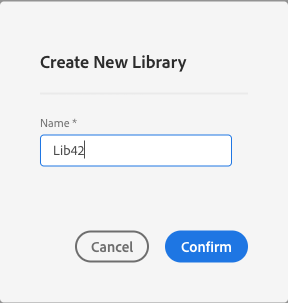
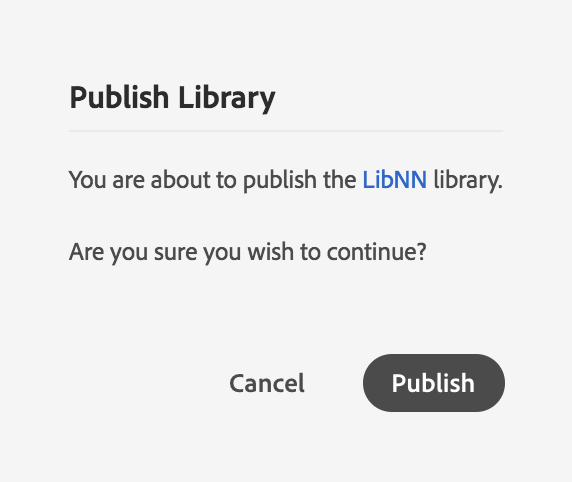
Click the Create Library button, and enter LibNN, substituting your user number for NN in the Name field. Then click Confirm. You should briefly see a message indicating that the library was created successfully.
Figure 1.5: Create Library
A Places Library is a group of Points of Interest (POIs). POIs are also referred to as Places.
Figure 1.6: Places Libraries (populated)

You may need to refresh the page to see the list of libraries. You may also need to scroll the window after refreshing the page to find your library.
Now let's add a POI to your library.
Click the Map tab to return to the original Places screen.
Figure 1.7: Places main screen
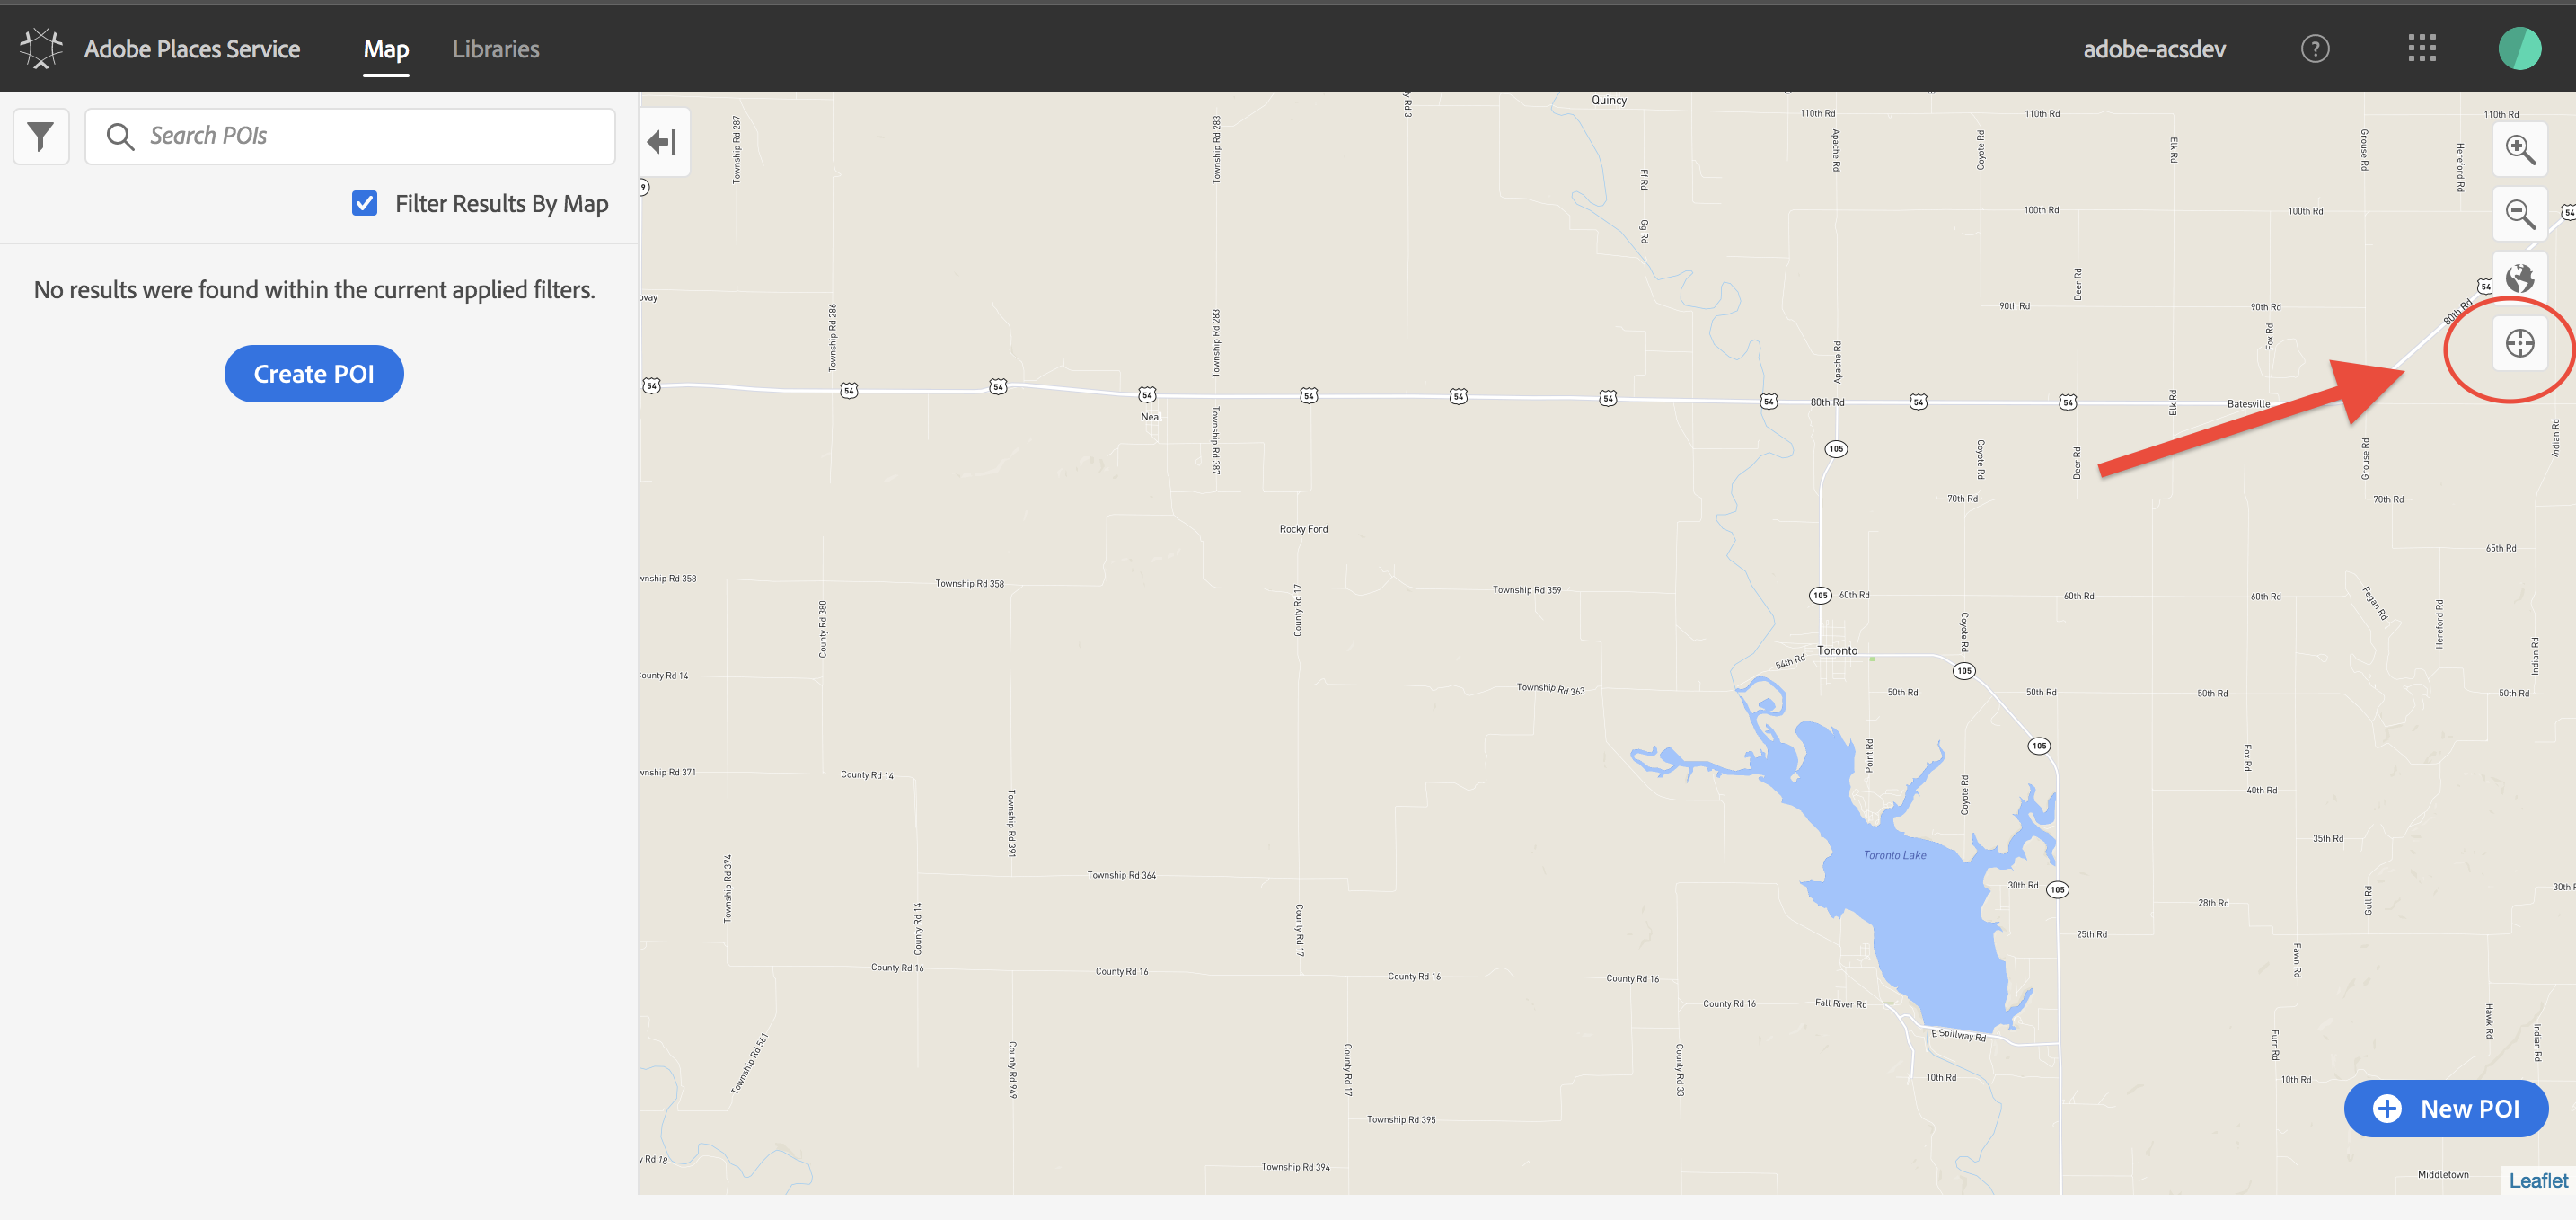
The first thing you will want to do is click the Find Me button. The map defaults to the middle of the U.S., and so the Find Me button should get us closer to our actual location. You may be prompted to allow your location to be used by the Places service. Click Allow.
Note: Certain network configurations, such as VPNs, may cause a different location to be reported. If this is the case, you may need to zoom out, then pan/scroll to Nevada, then zoom in on Las Vegas.
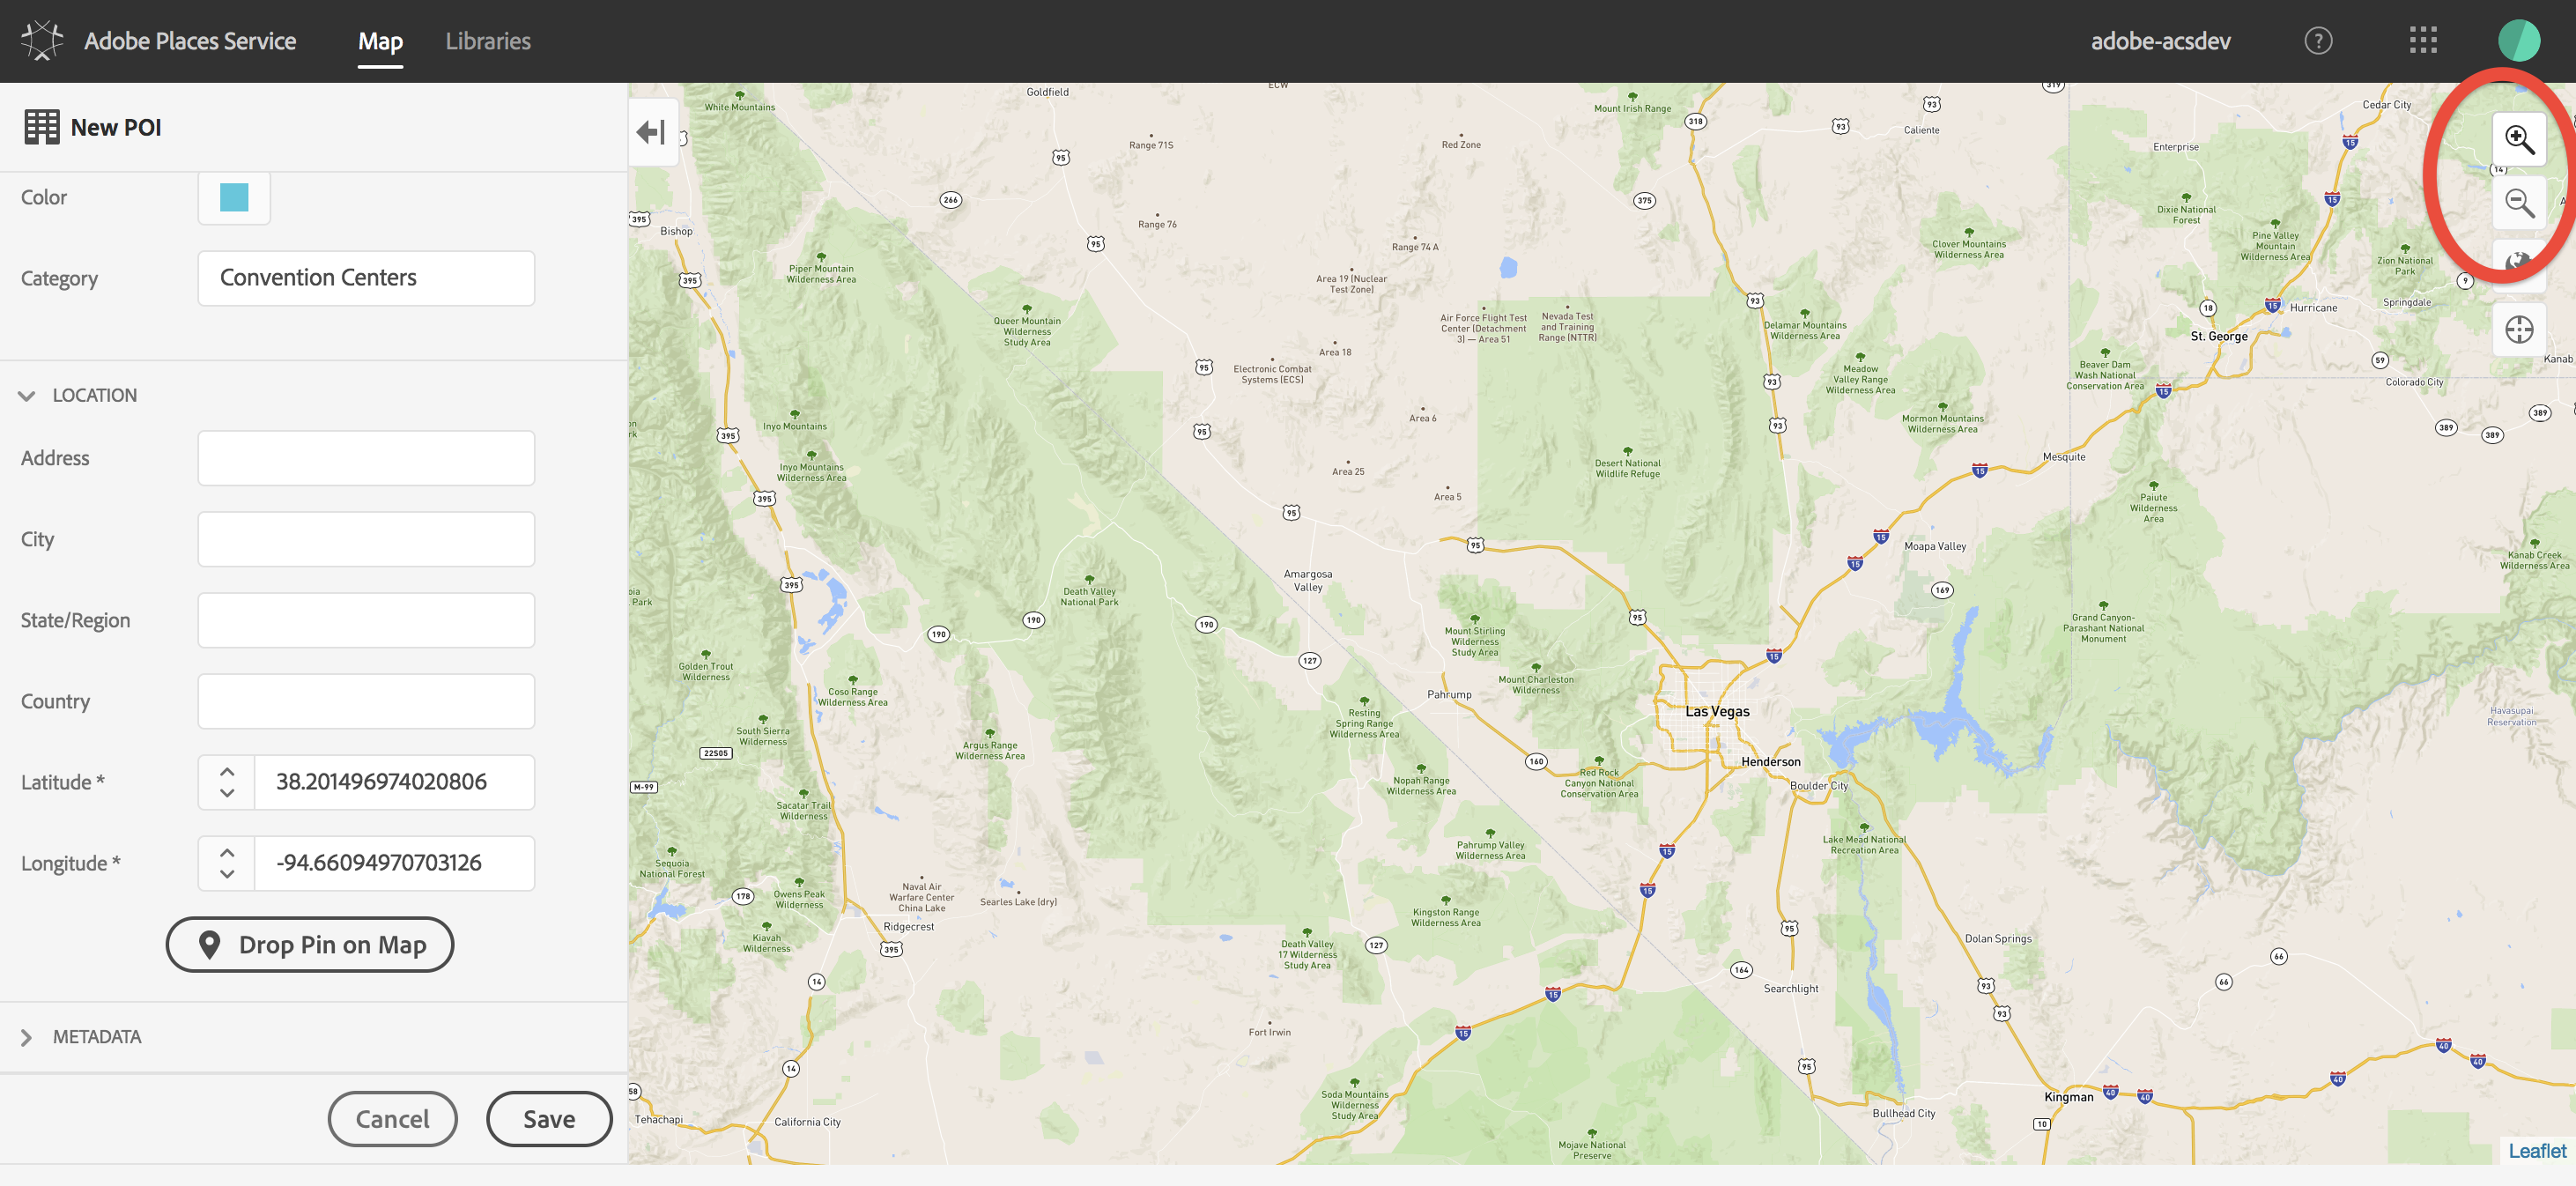
Figure 1.8: Zoom buttons
Once you have Las Vegas visible, zoom in, looking for the Venetian and the Sands Convention Center at the north end of the Strip.
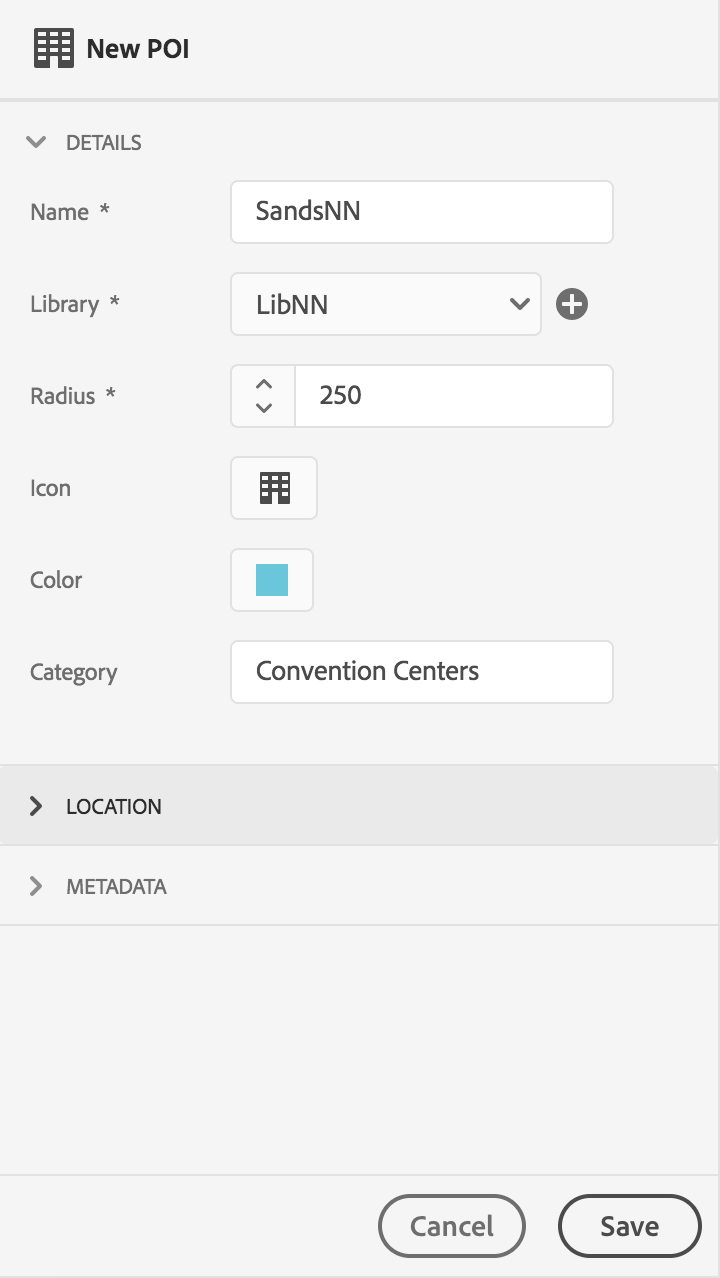
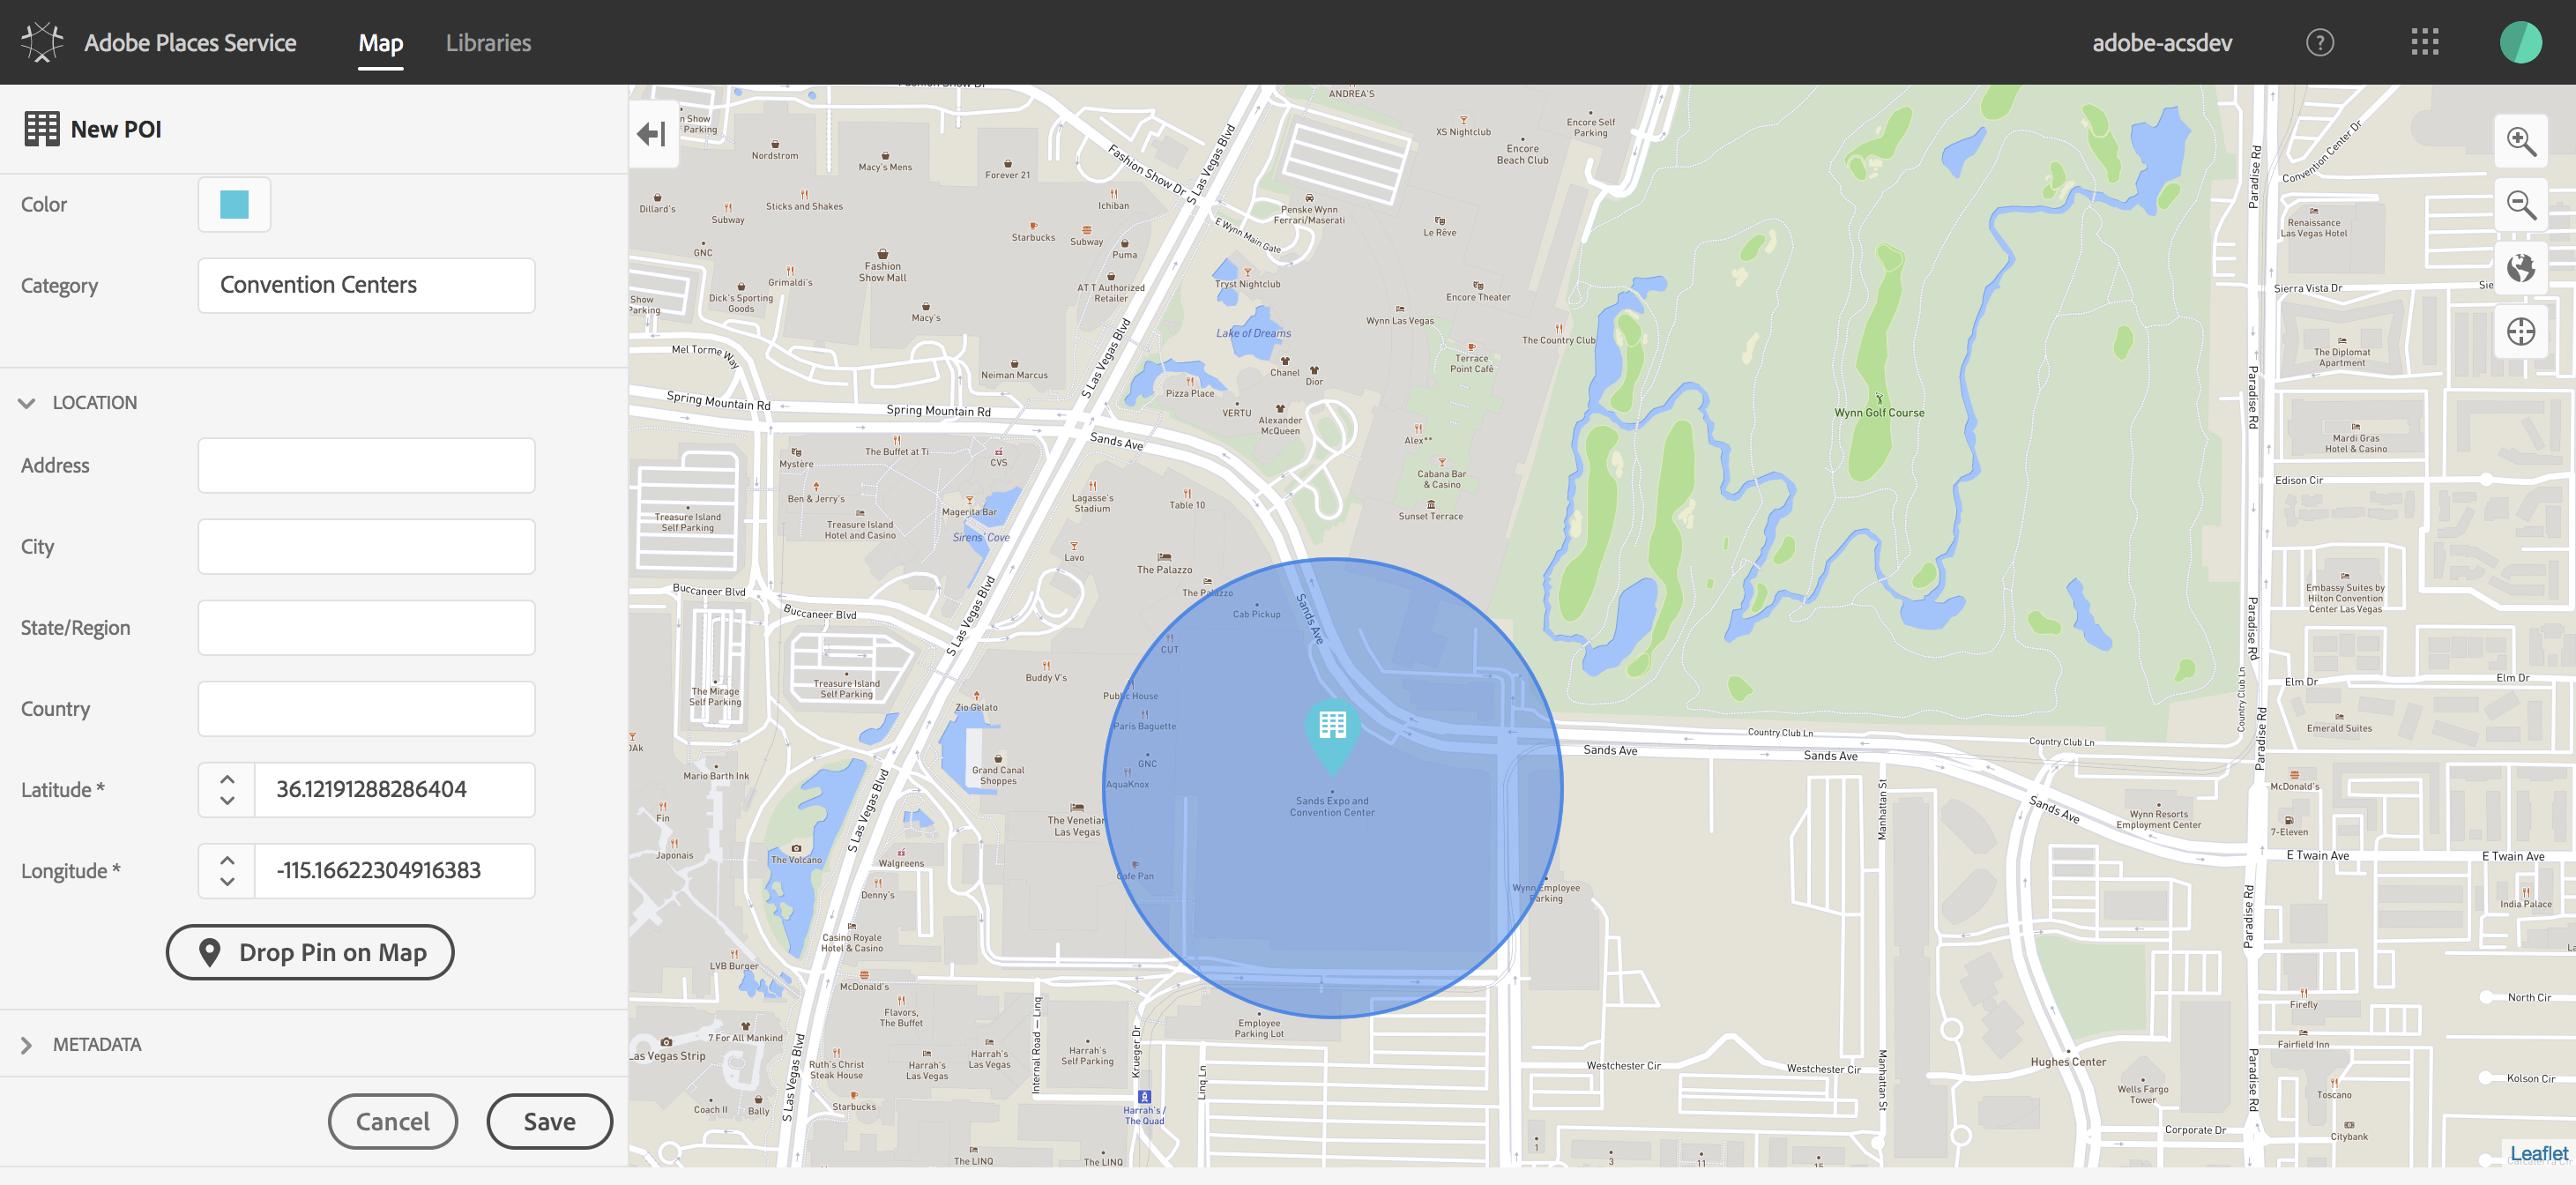
Click the New POI button in the lower right corner. The New POI form will be displayed. Enter the values as shown in the screenshot below. Be sure to use your user number in place of the NN.
Figure 1.9: New POI Form
Close the Details header, and click on the Location header to expand the location form fields. You may need to scroll to see all of the fields. Click the Drop Pin on Map button to use the map to define the POI.
Figure 1.10: Location Form
You can also enter latitude and longitude values manually to define a POI.
If you accidentally drop the pin in the wrong place, you can just click the
Drop Pin on Mapbutton again to reposition it.
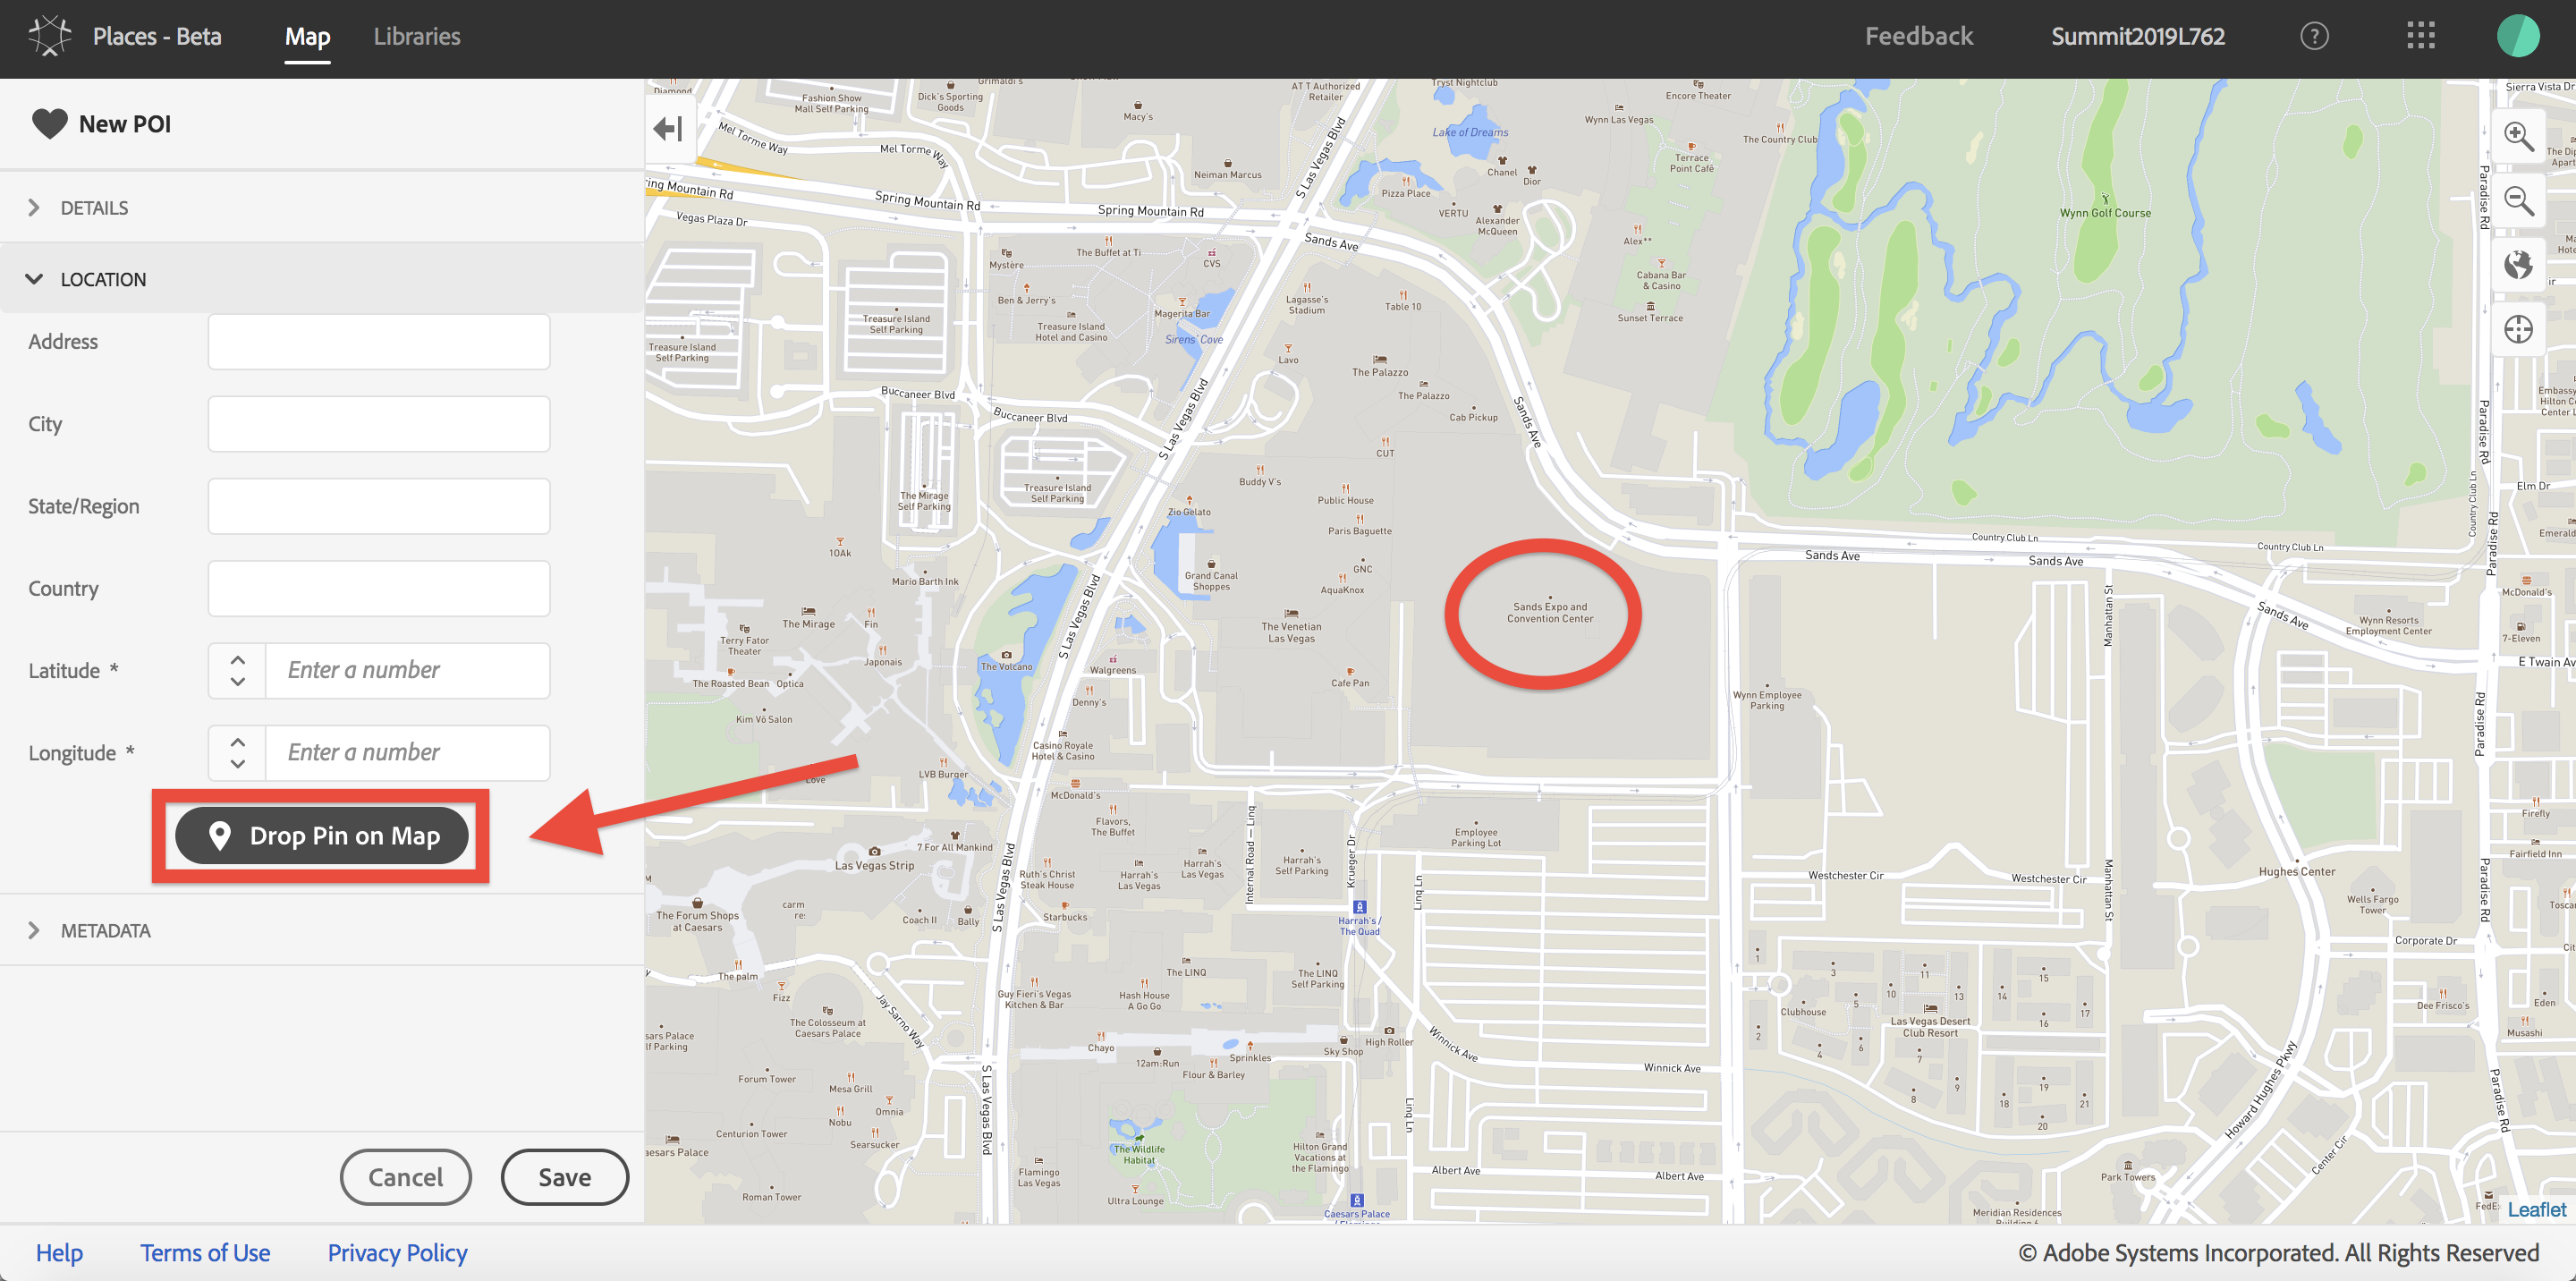
Drop the pin as close to the small dot indicating the location of the Sands Expo and Convention Center. The radius of 250 meters should enclose the entire building.
Figure 1.11: Sands Expo and Convention Center
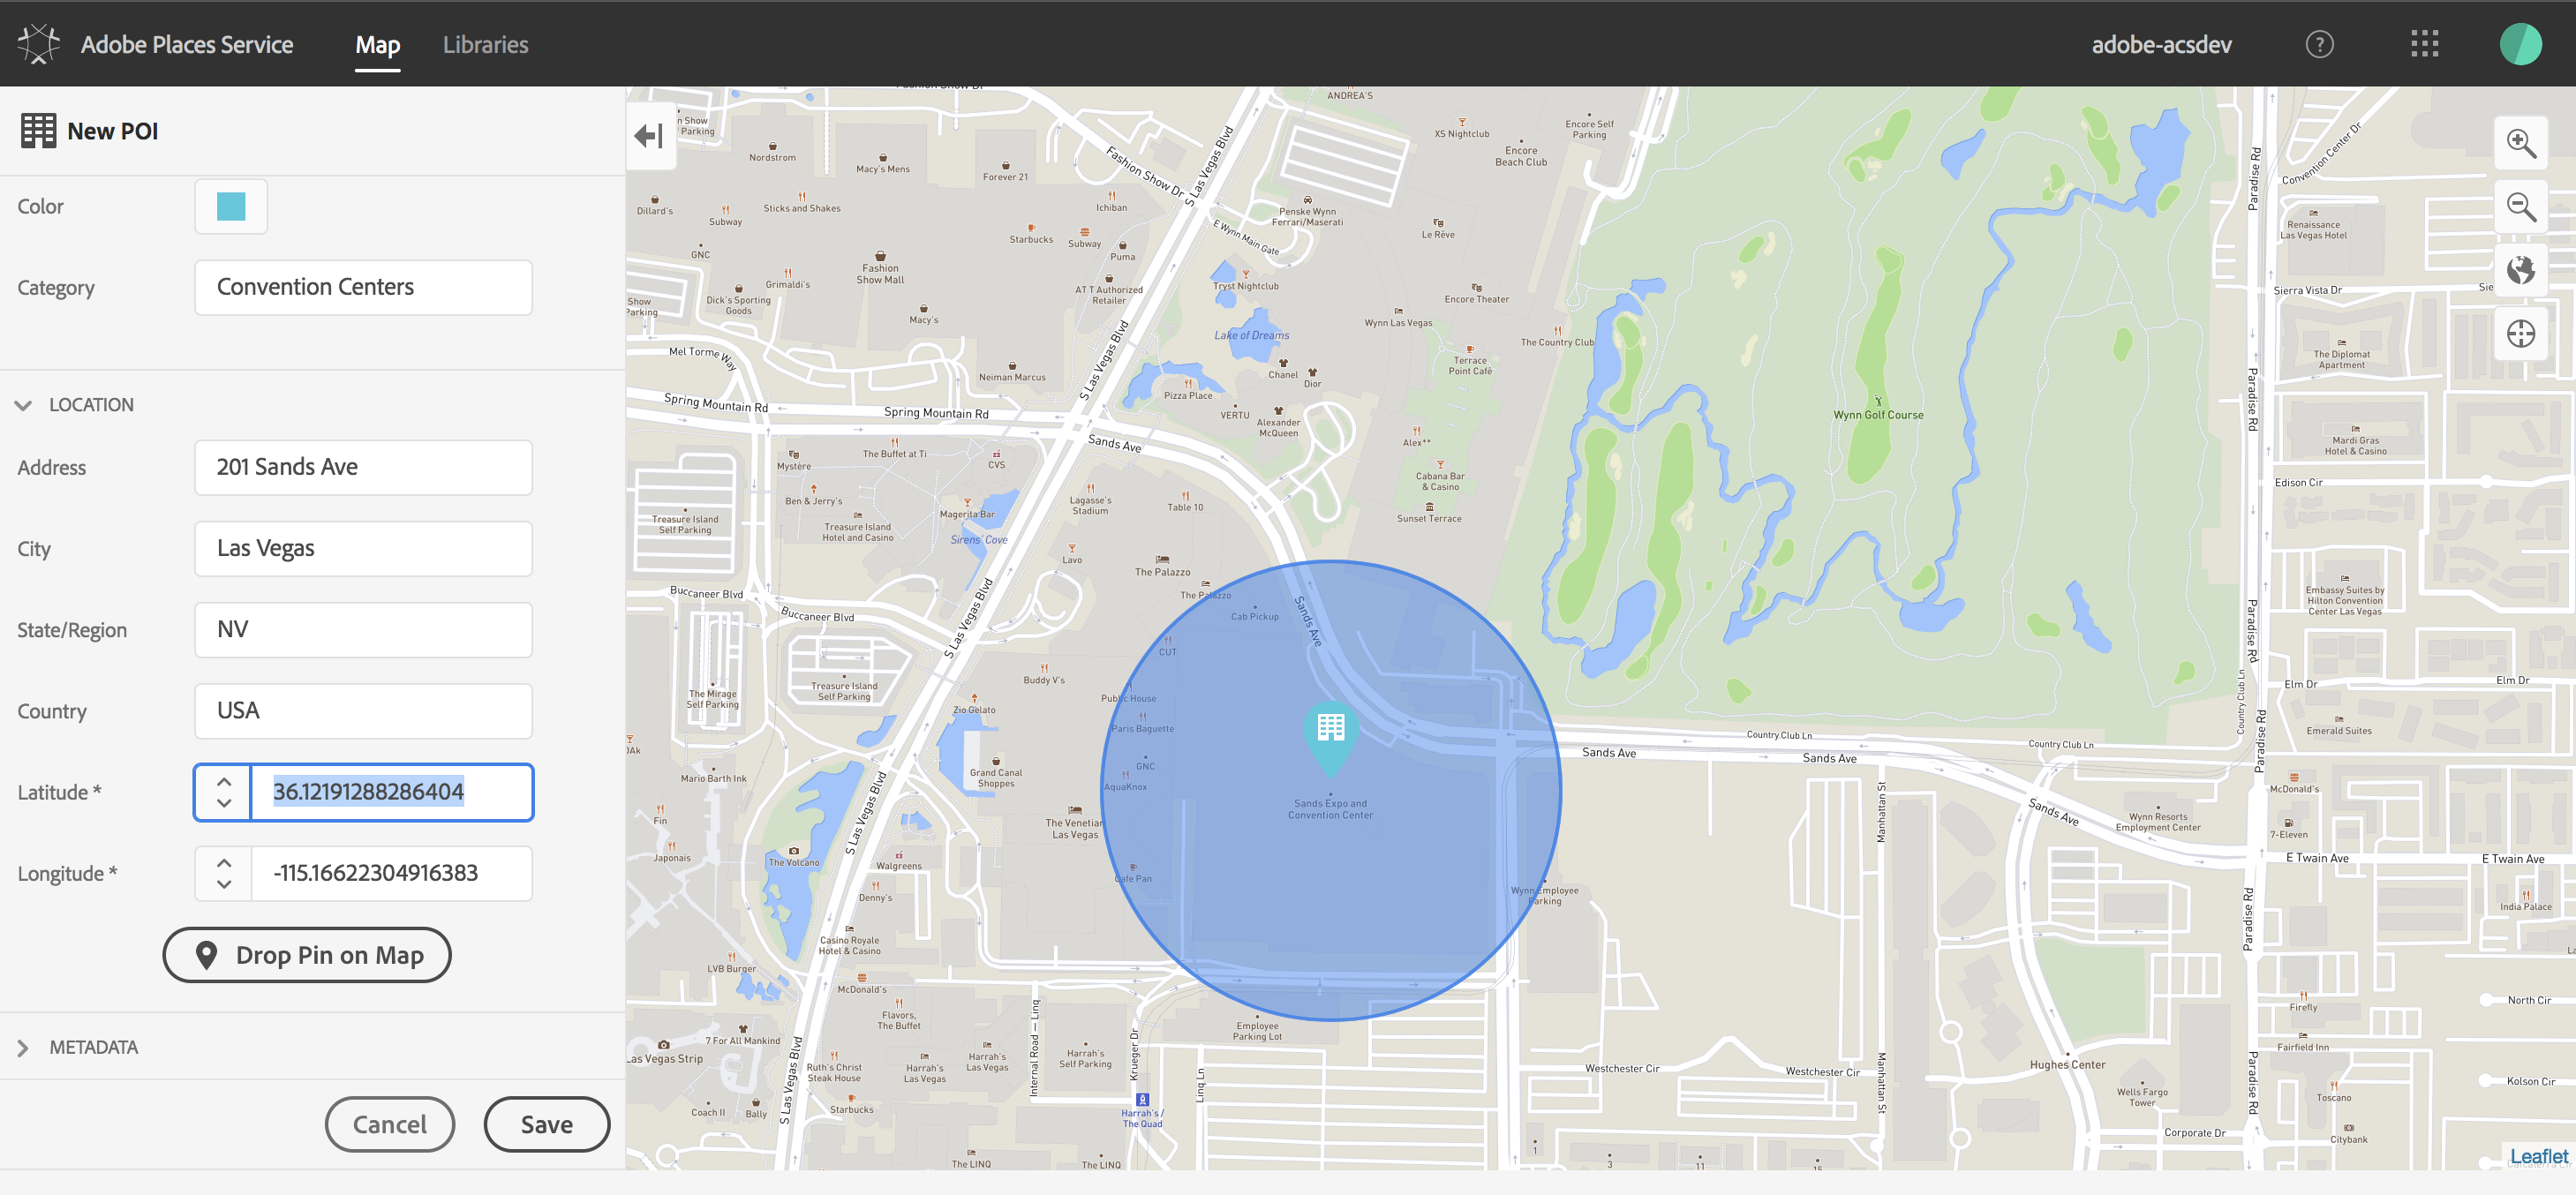
Once you have dropped the pin, the latitude and longitude values are automatically populated. Enter the address as shown in the following table and Figure 1.12:
Table 1.1: Sands Convention Center address
| Field | Value |
|---|---|
| Address | 201 Sands Ave. |
| City | Las Vegas |
| State/Region | NV |
| Country | USA |
Figure 1.12: Adding the address
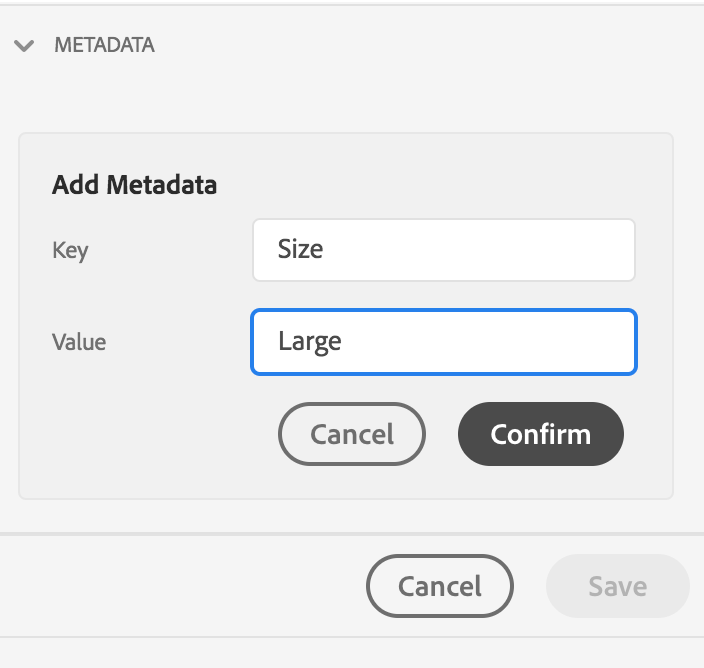
Now we can enter metadata about our POI. Close the Location header, and click the Metadata header to expose the Add Metadata button. Then click the Add Metadata button.
Metadata can be be any name value pair, and can be used to group POIs within a library.
Figure 1.13: Metadata Button

Enter the values as shown in the Add Metadata form, and click Confirm.
Figure 1.14: Metadata Form
We are done creating the POI, so click Save. A green confirmation banner should appear briefly, and the POI should then appear in the list.
Figure 1.15: POI list
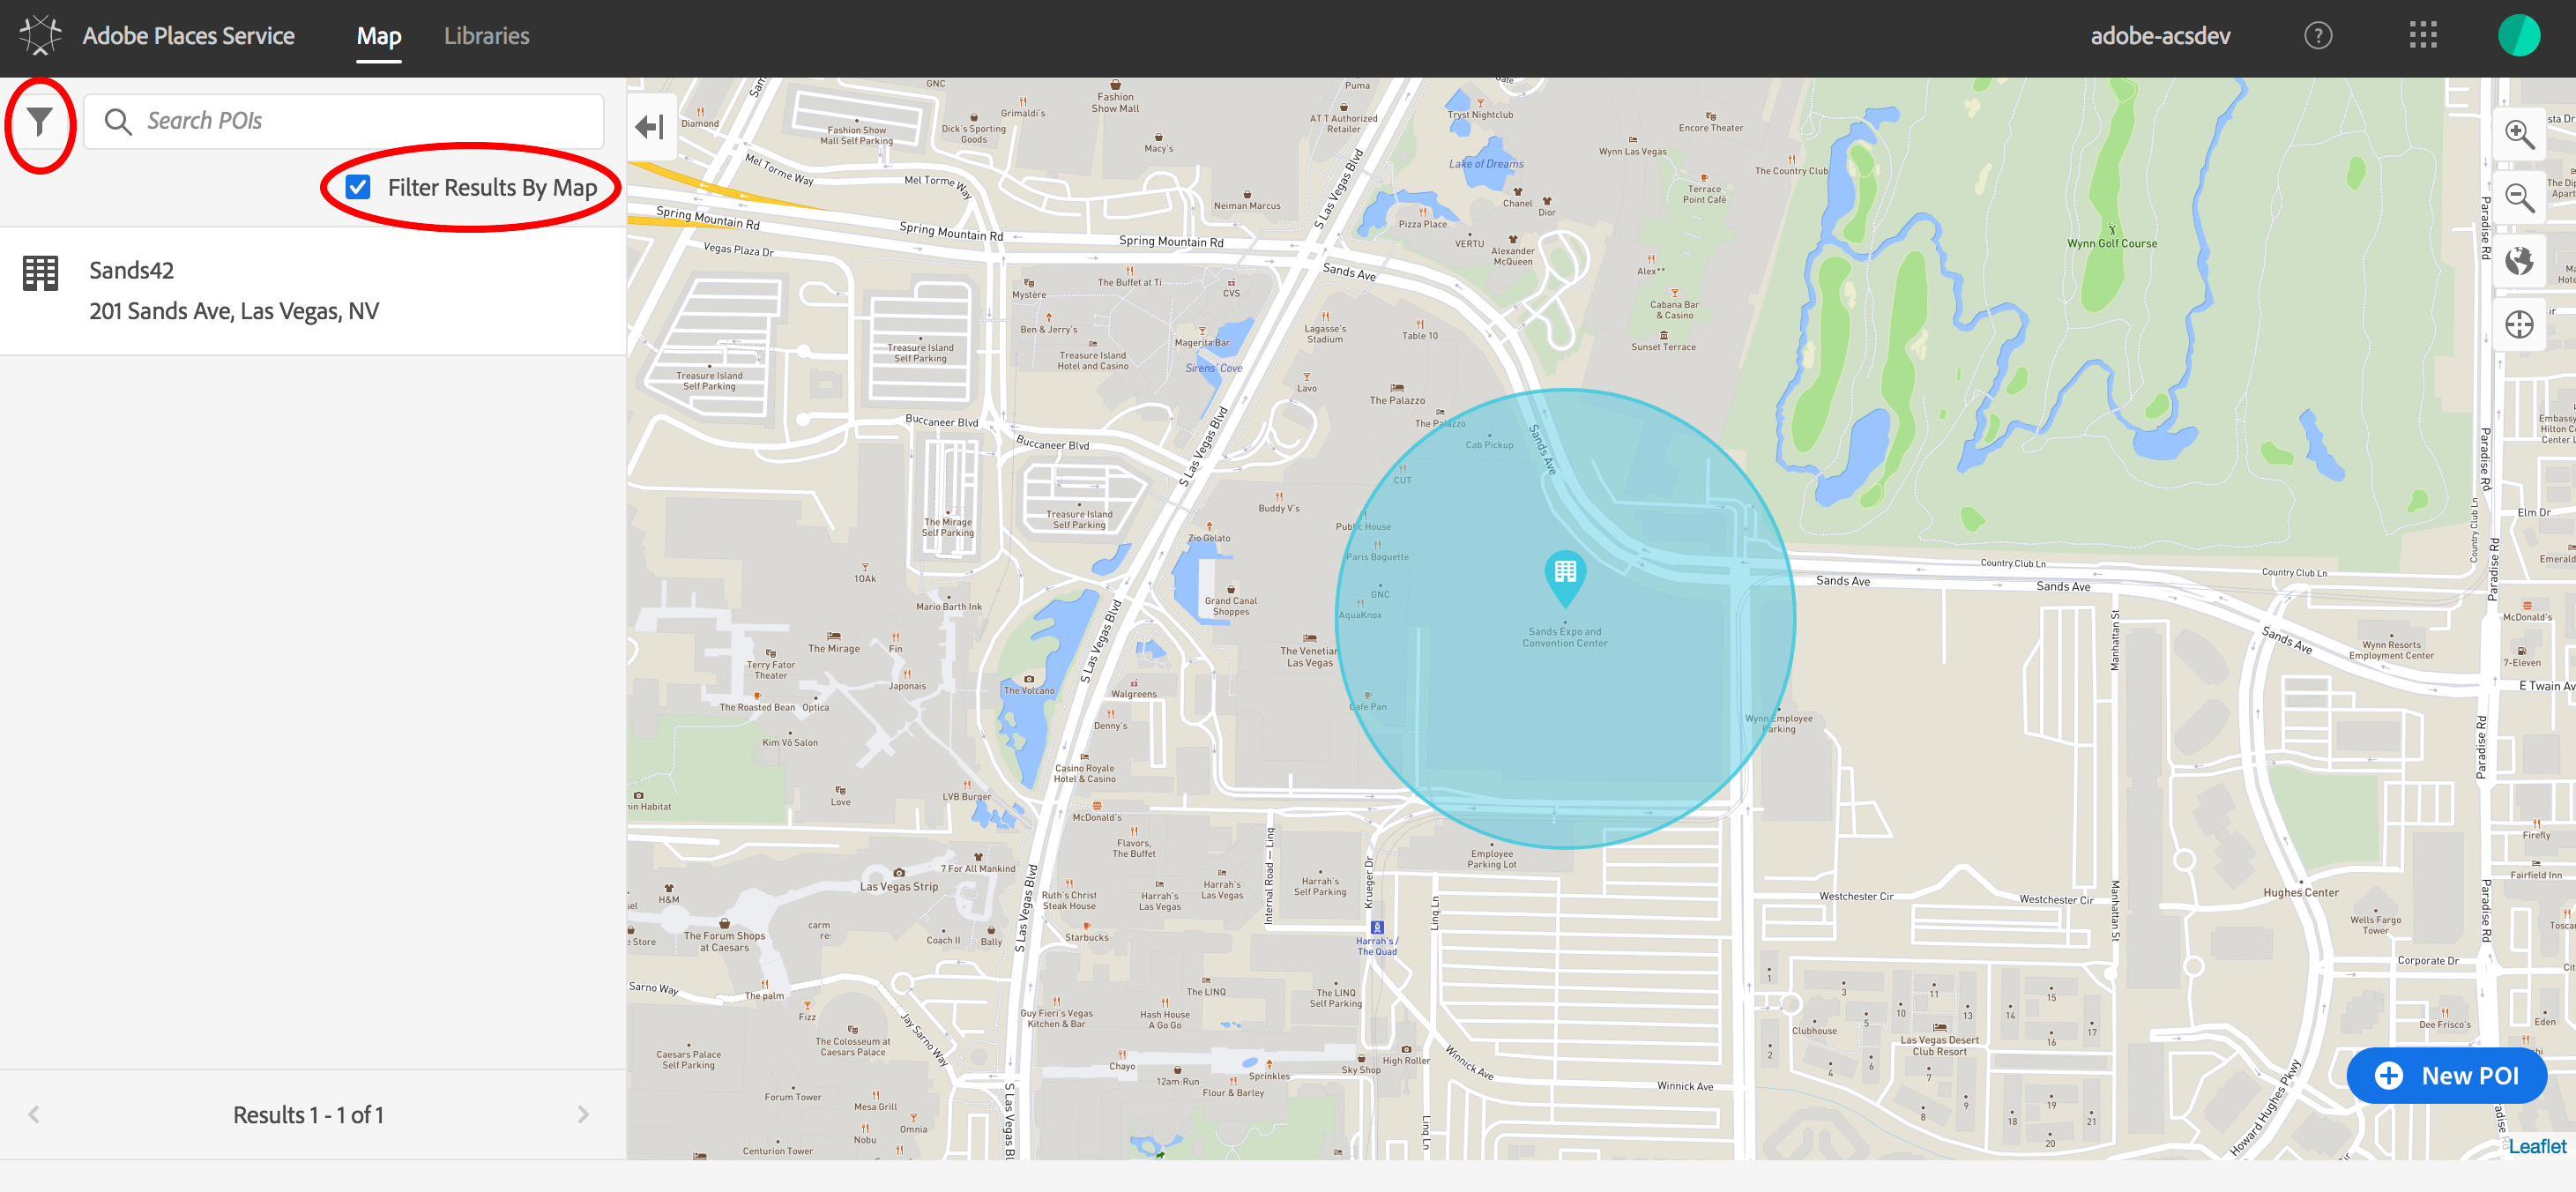
If the
Filter Results by Mapcheckbox is checked, only POIs that are visible on the map will be displayed. You can test this by panning or zooming until the POI is no longer visible.
You can click on the filter icon in the upper left corner of the screen to select only your library.
If you have time, you can add more POIs using latitude/longitude field for POI definition.
Now that we have a library containing a POI, we can use the library in an application built with the AEP SDK. To do this, we will use Launch by Adobe to create a mobile property, then configure the property with the appropriate extensions. Next, we will create a rule using our previously created POI, and finally, build and download the library that will be linked into the mobile application.
Login to Launch. Use your lab user credentials to login. Make sure you are logging in with an Enterprise ID.
Figure 2.1: Launch Login
You may be asked for your mobile number again. If so, click Skip:
Figure 2.2: Skip this

You should see a screen similar to one in Figure 2.3. There may be some properties that have been created already, in which case, you will see a list of properties. If there are no properties created, a tutorial video is offered.
Figure 2.3: Launch Properties Overview
To access tutorial videos at any time, go to the Launch Quick Start Guide
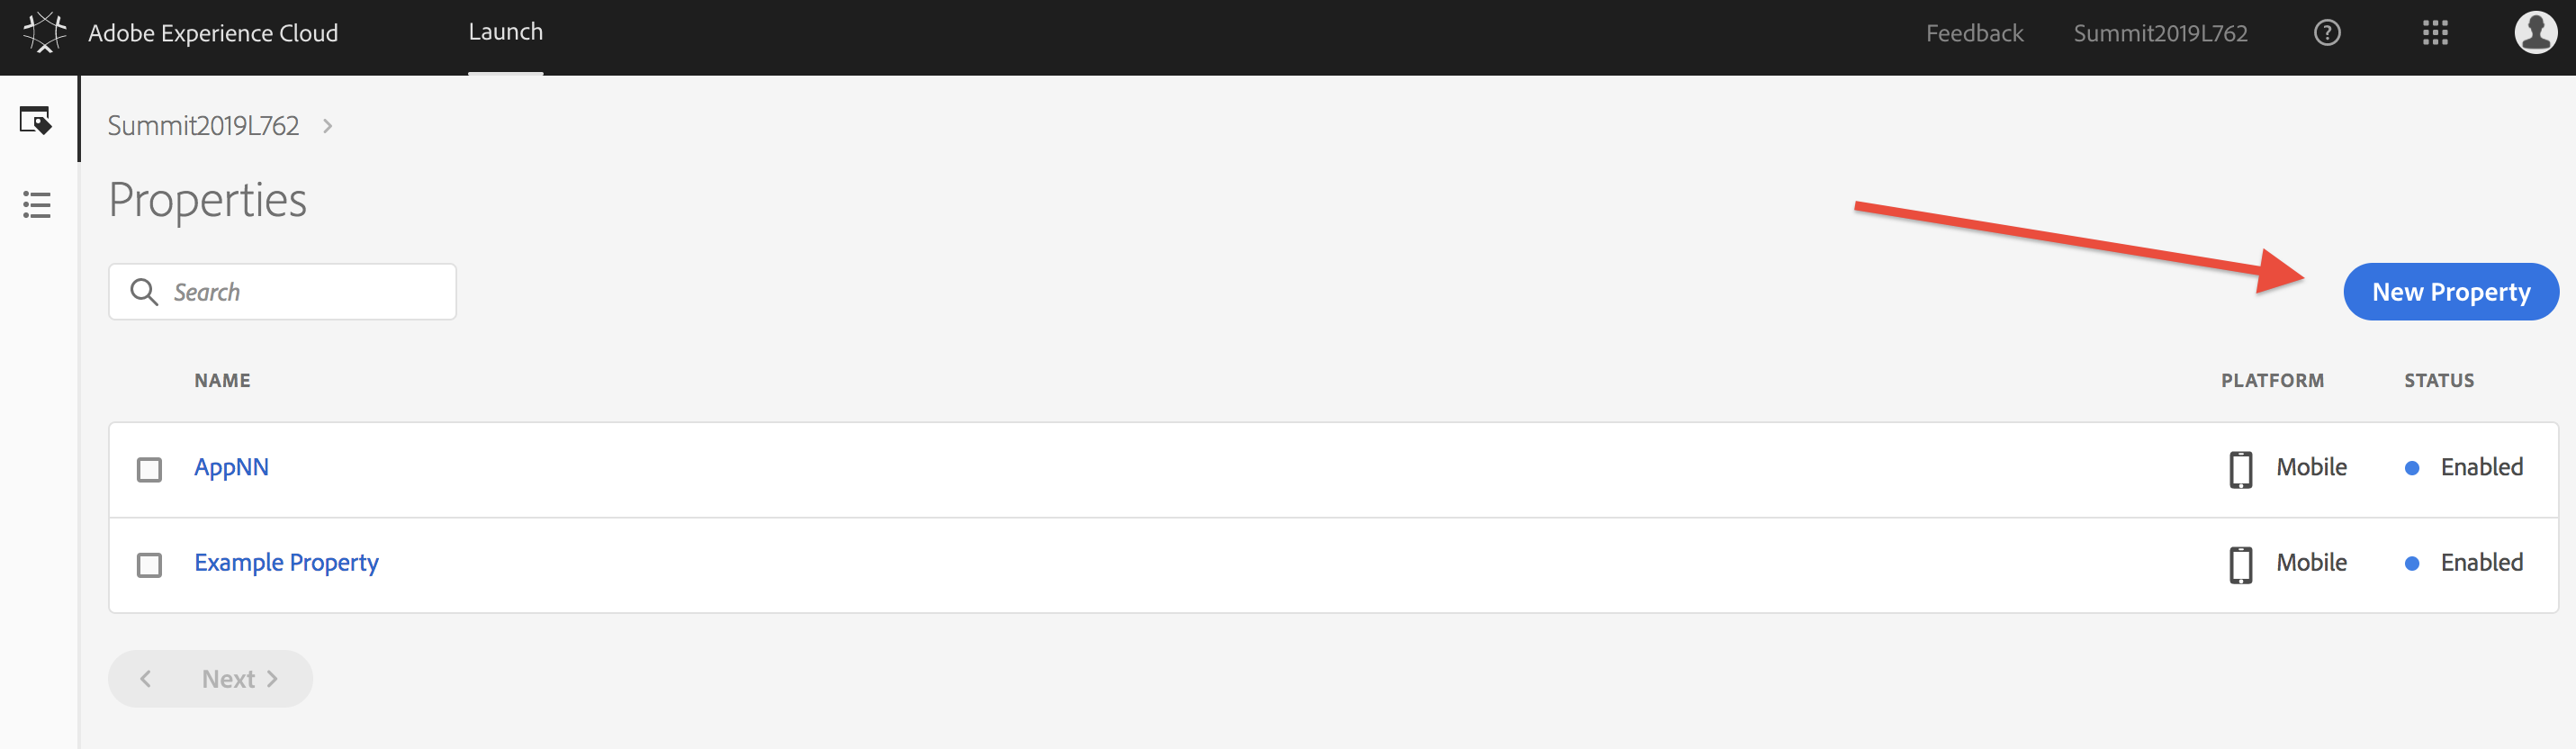
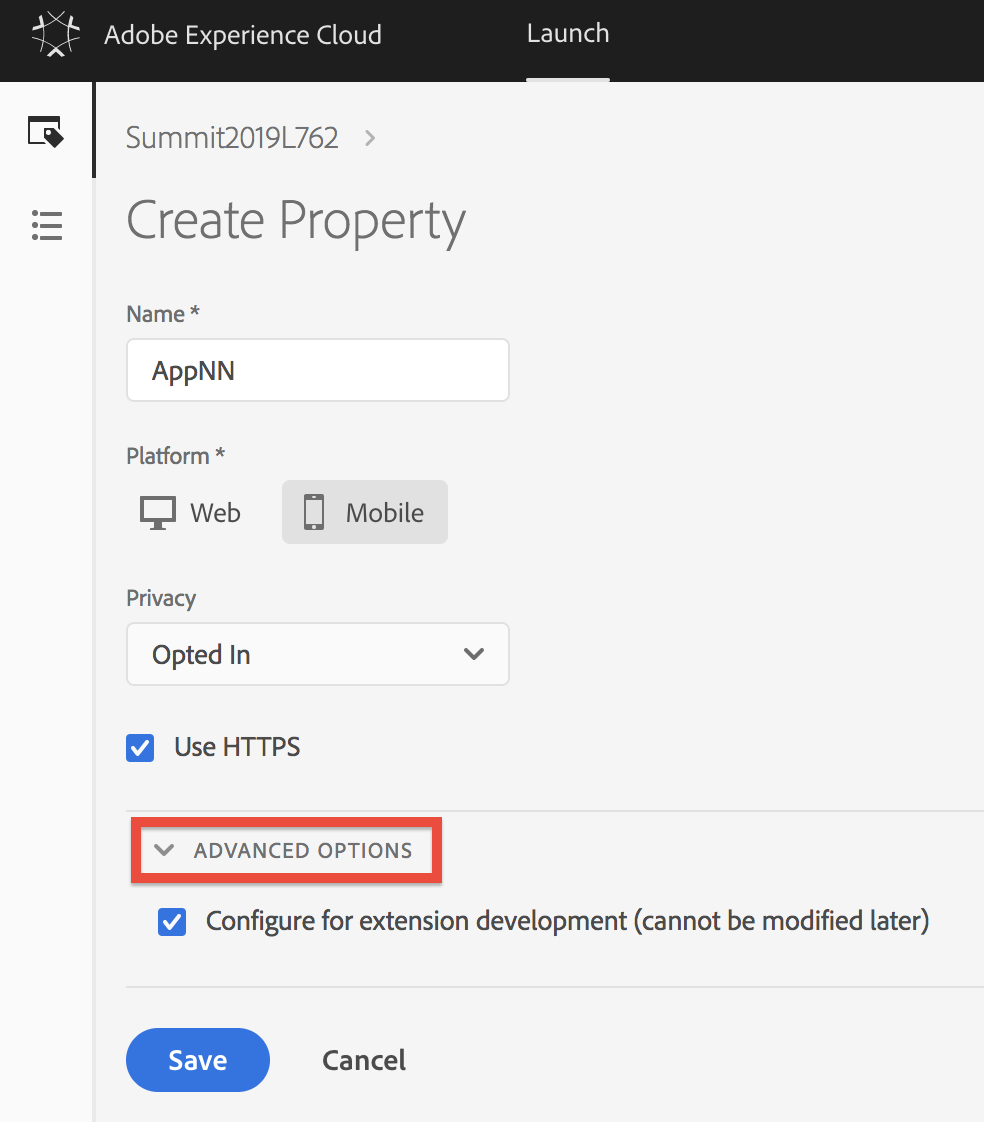
Click New Property. Enter AppNN, being sure to replace NN with your user number. Select Mobile as the Platform, Privacy as Opted In, Use HTTPS box should be checked, and check the box under Advanced Options titled Configure for extension development. Once your property looks like the one shown in Figure 2.4, click Save.
These settings cannot be modified later. If you missed a property setting, delete your property, and try adding a new one.
Figure 2.4: Create Property
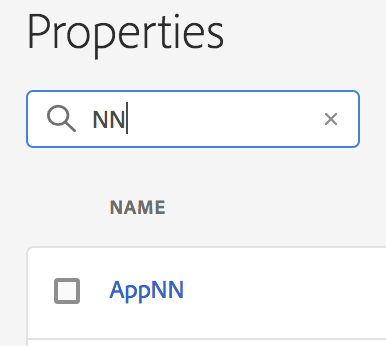
Back on the Properties screen, you will see a list of all the properties. Find your property and click on its name.
Tip: You can enter your user number in the Search box to find your property more easily.
Figure 2.5: Search Properties
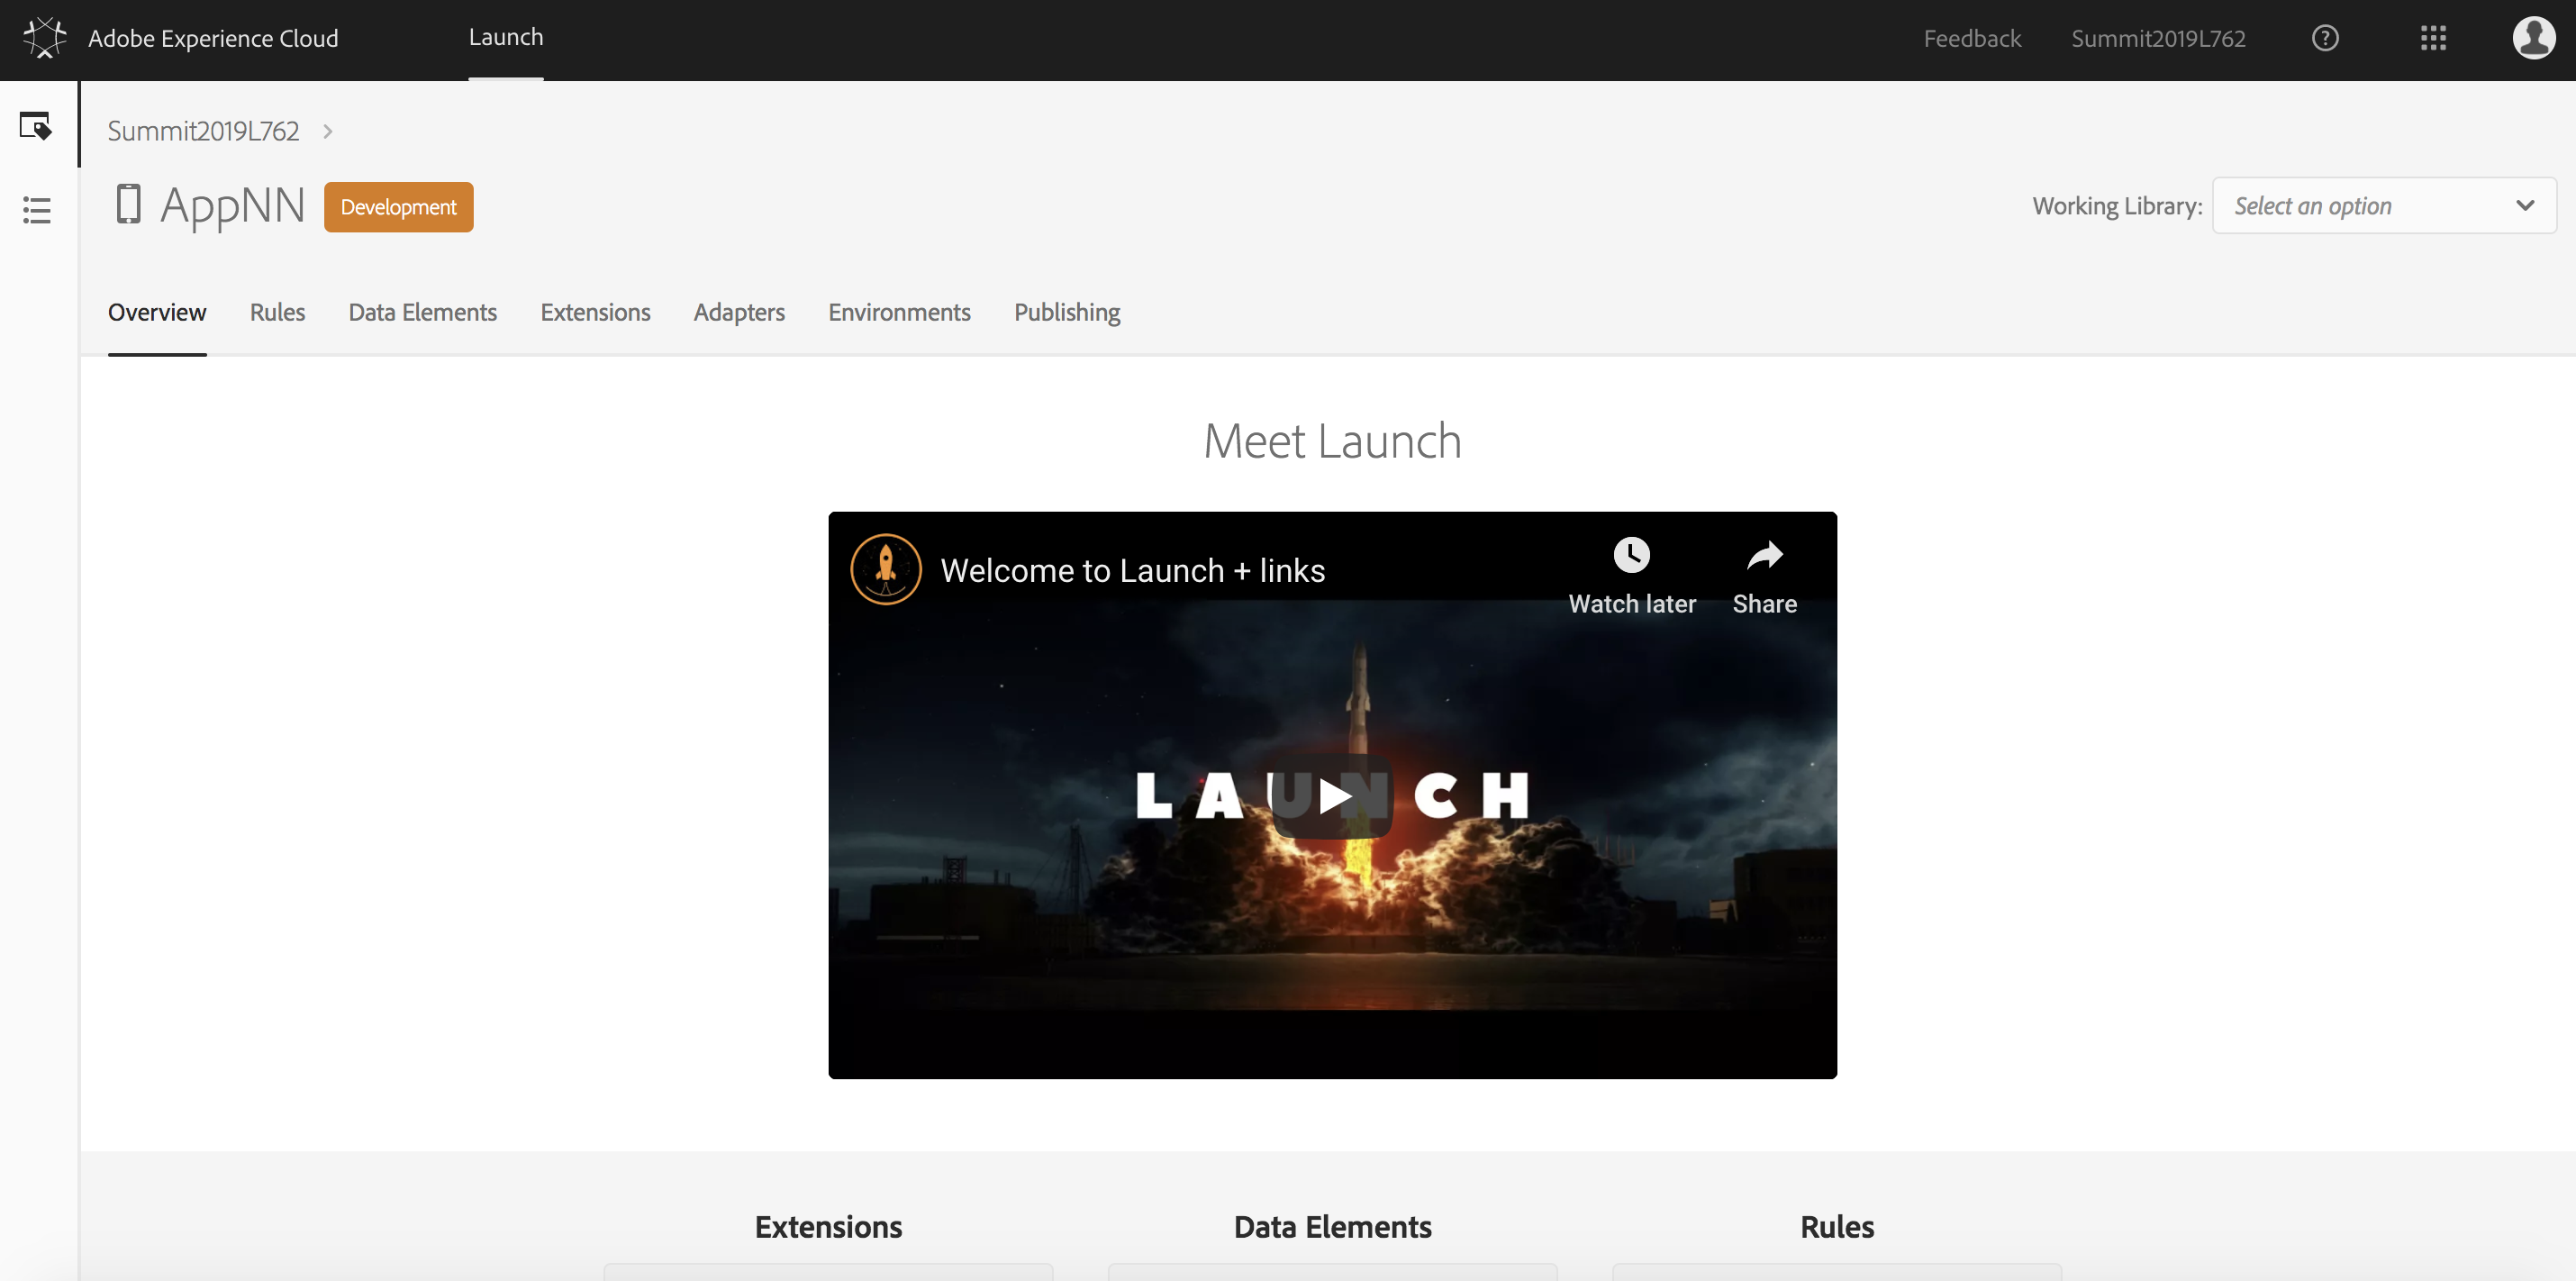
We are now on the Property Overview screen as shown in Figure 2.6.
Figure 2.6: Property Overview
We can now work on adding the Places extension to the new property. Click the Extensions tab, and then click Catalog.
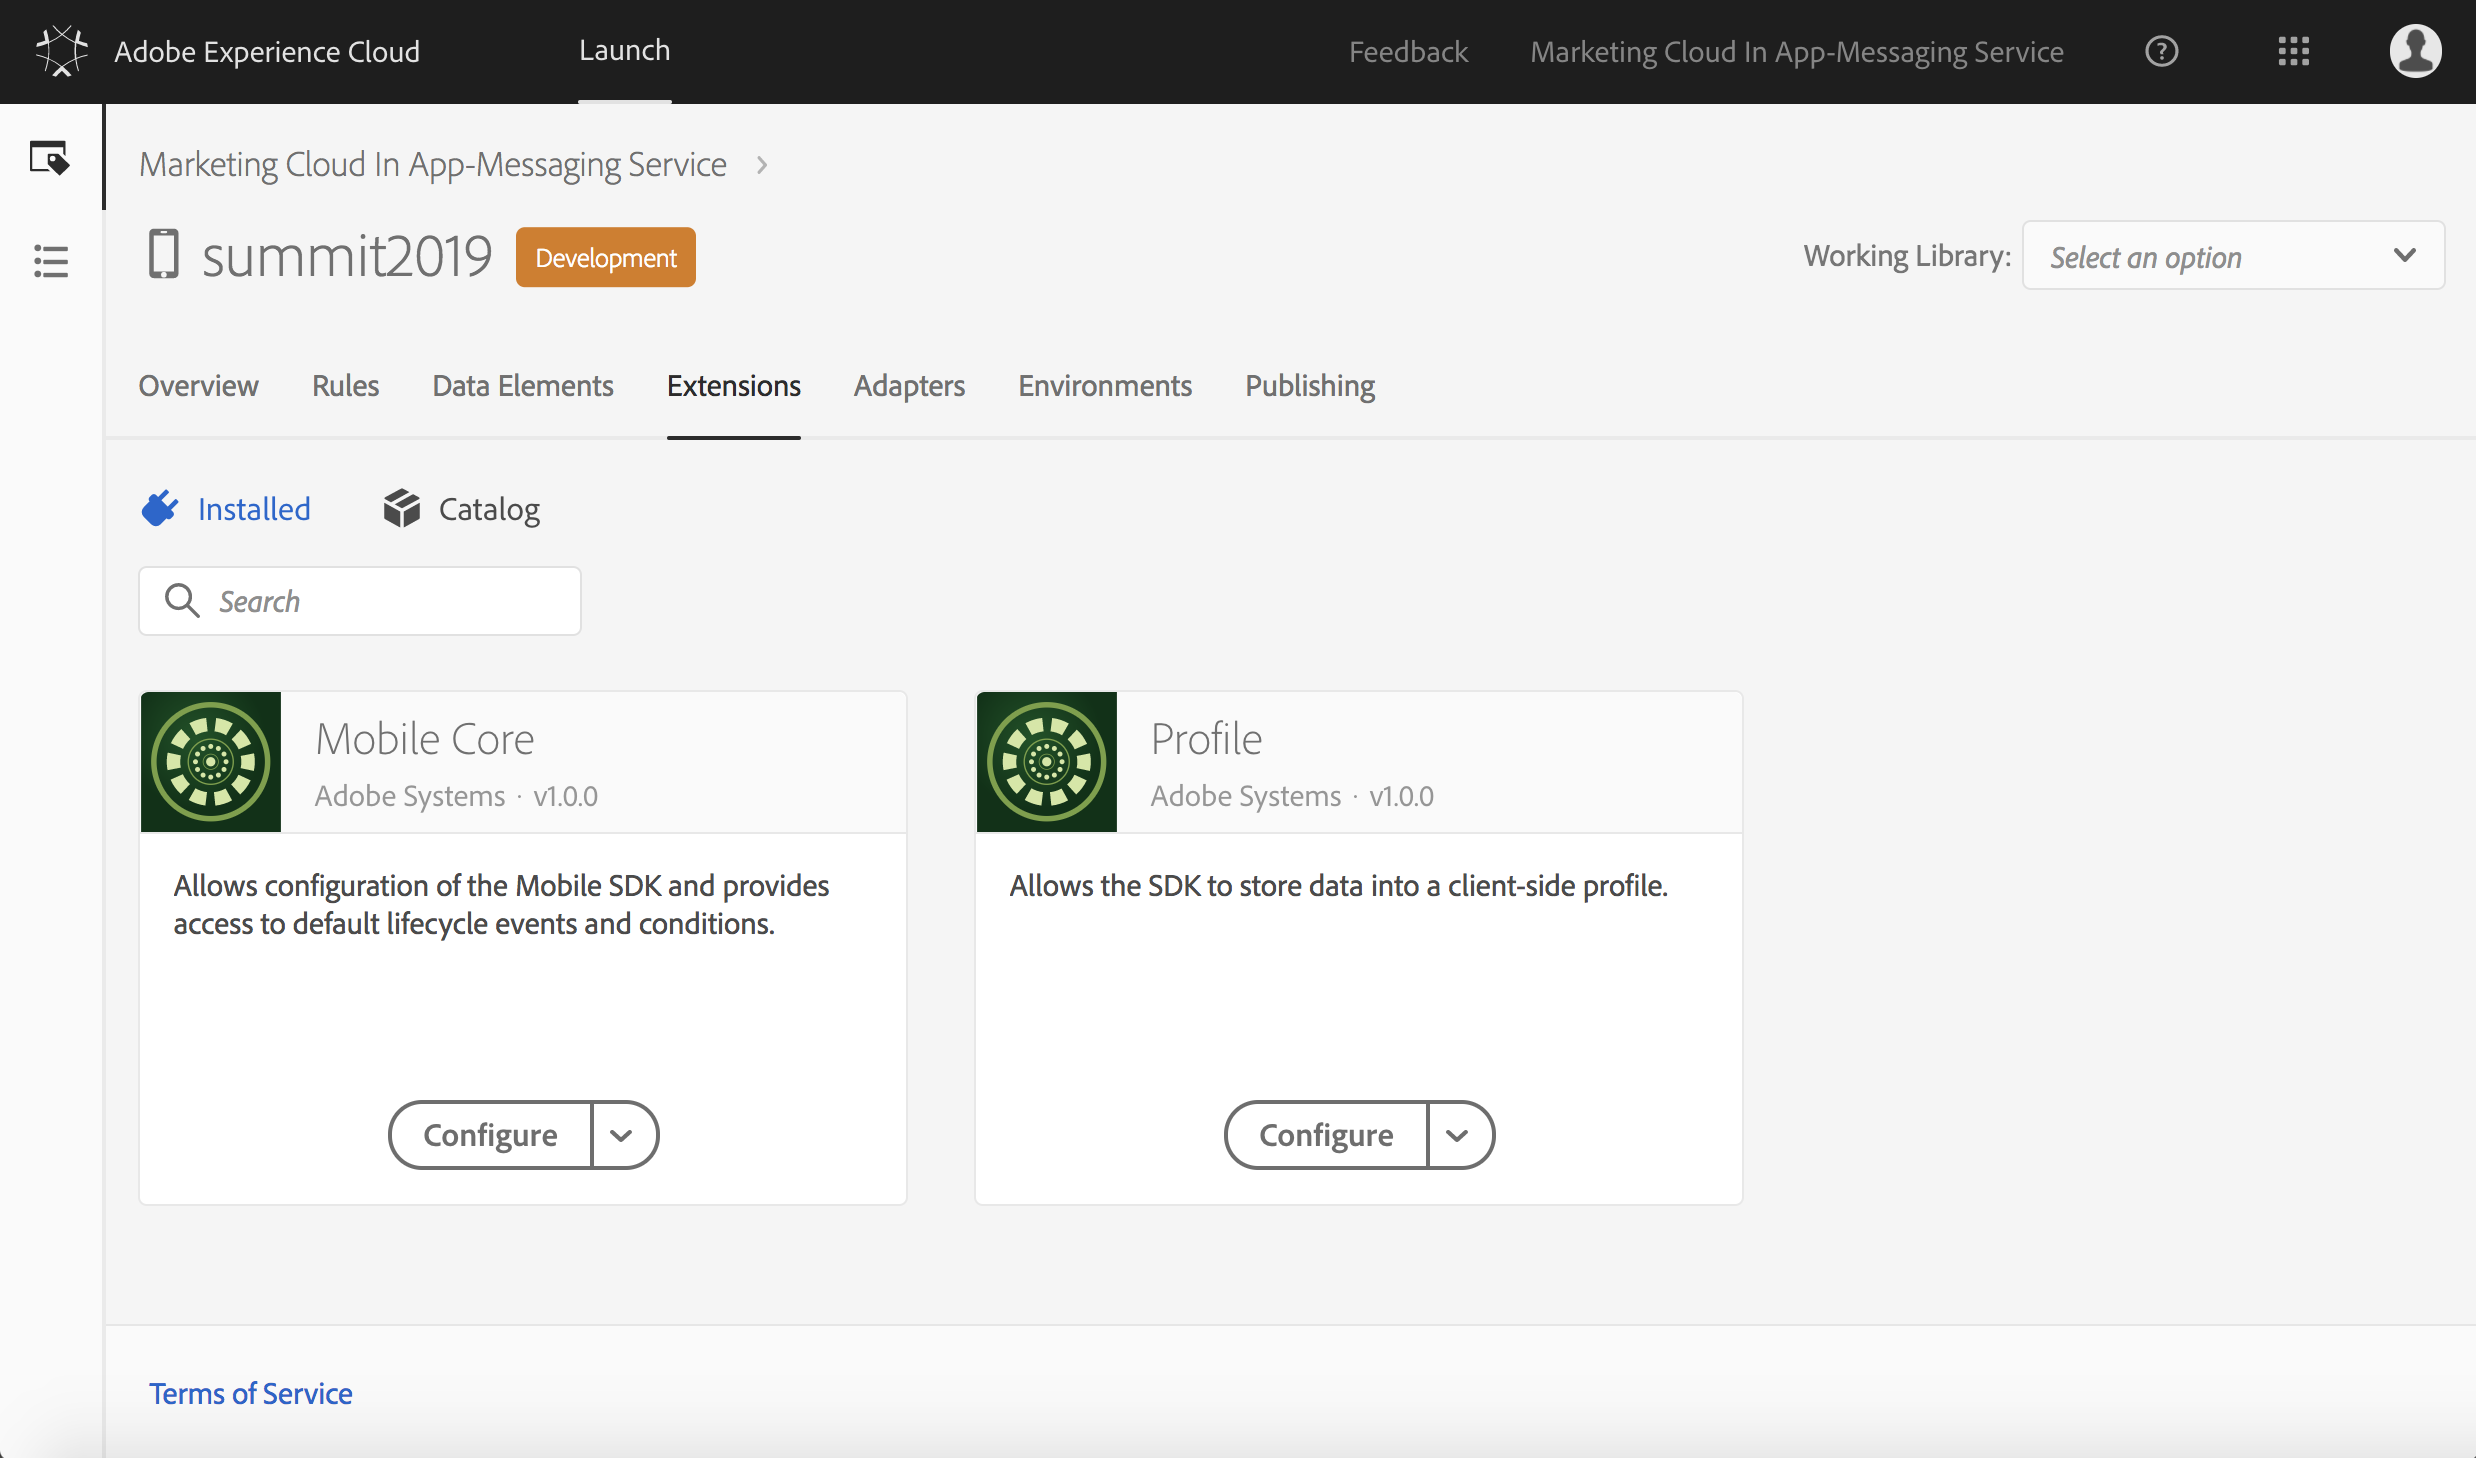
Note: There are two extensions required for all mobile applications,
Mobile CoreandProfile. These two extensions are installed and configured automatically, and should not be removed.
Figure 2.7: Installed Extensions
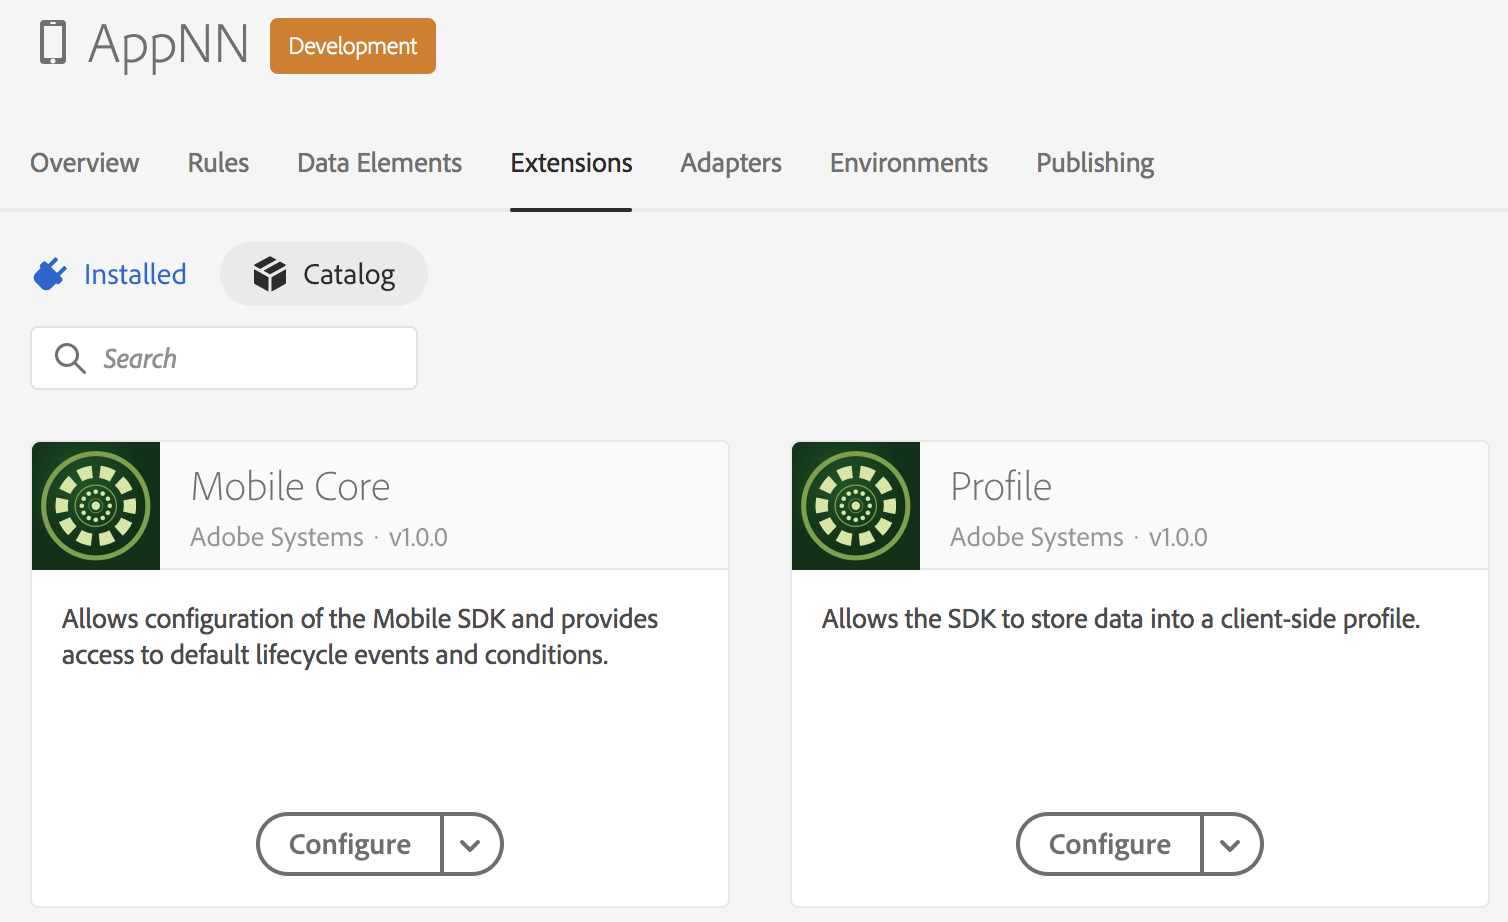
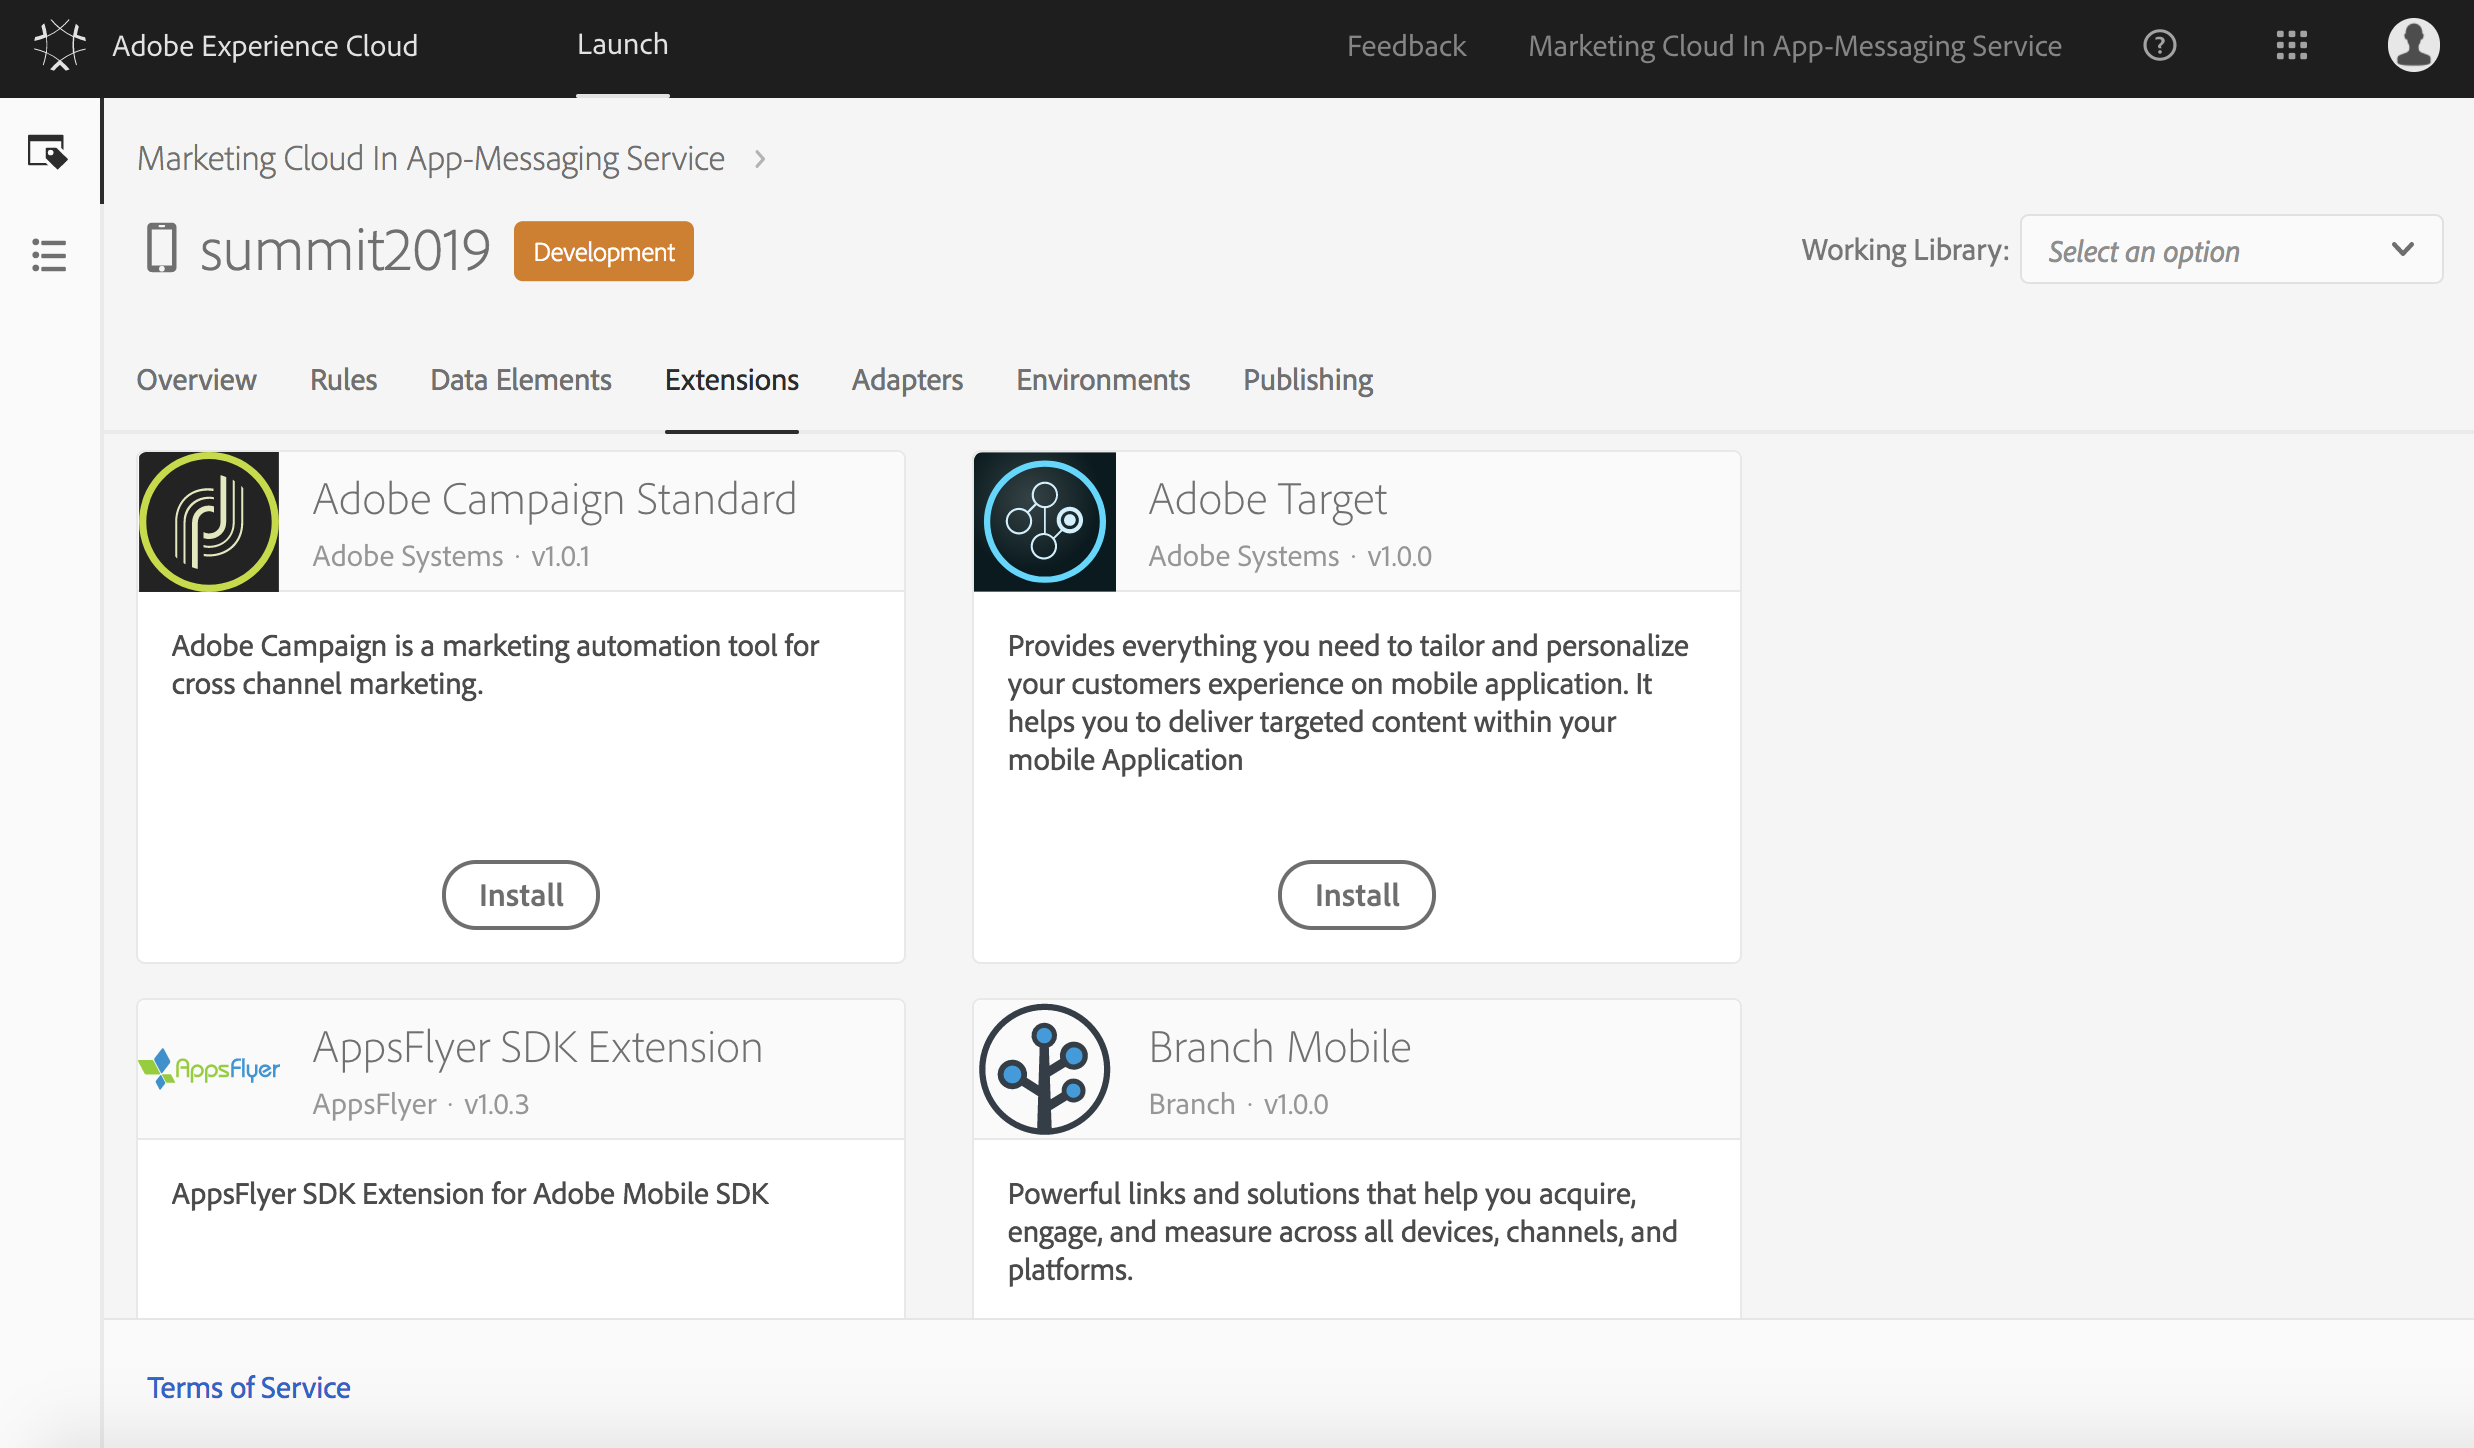
In the catalog view, you will see various available mobile extensions. Each one allows the mobile application to integrate with a different Adobe or third-party solution. We will install the Places extension, which is required for location-based actions. Find the Places extension and click the Install button.
Figure 2.8: Extensions Catalog

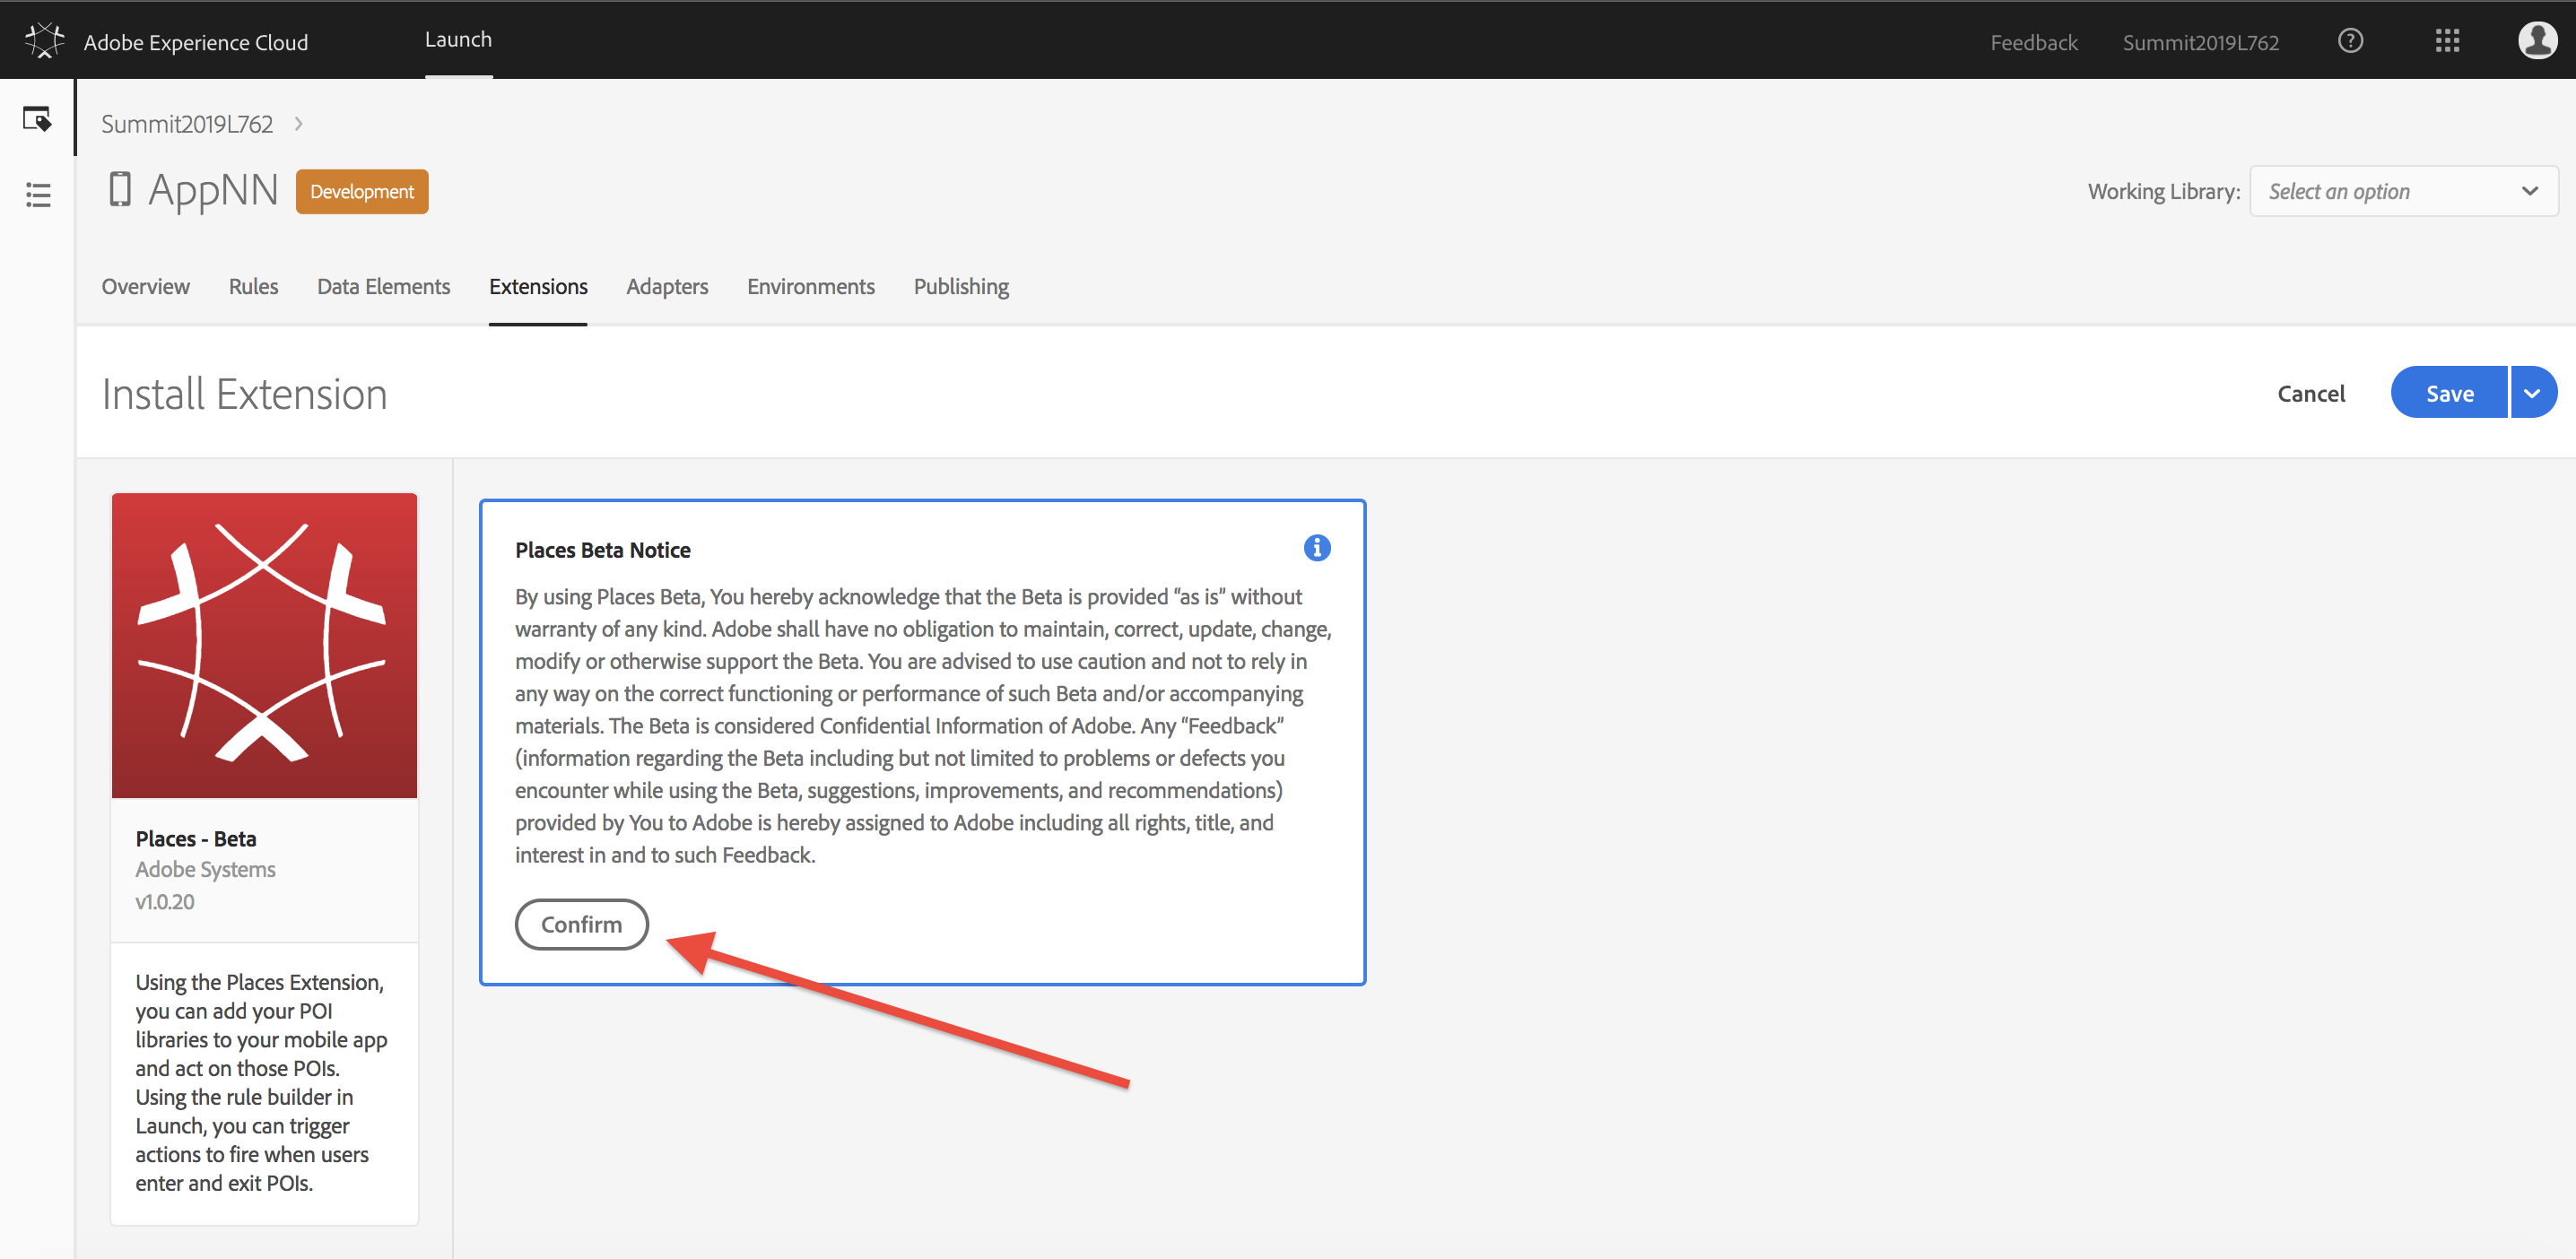
You will see a notice as shown in Figure 2.9 that the Places extension is currently in Beta. Click Confirm to continue after reading and agreeing to the Beta warning.
Figure 2.9: Places Beta Warning
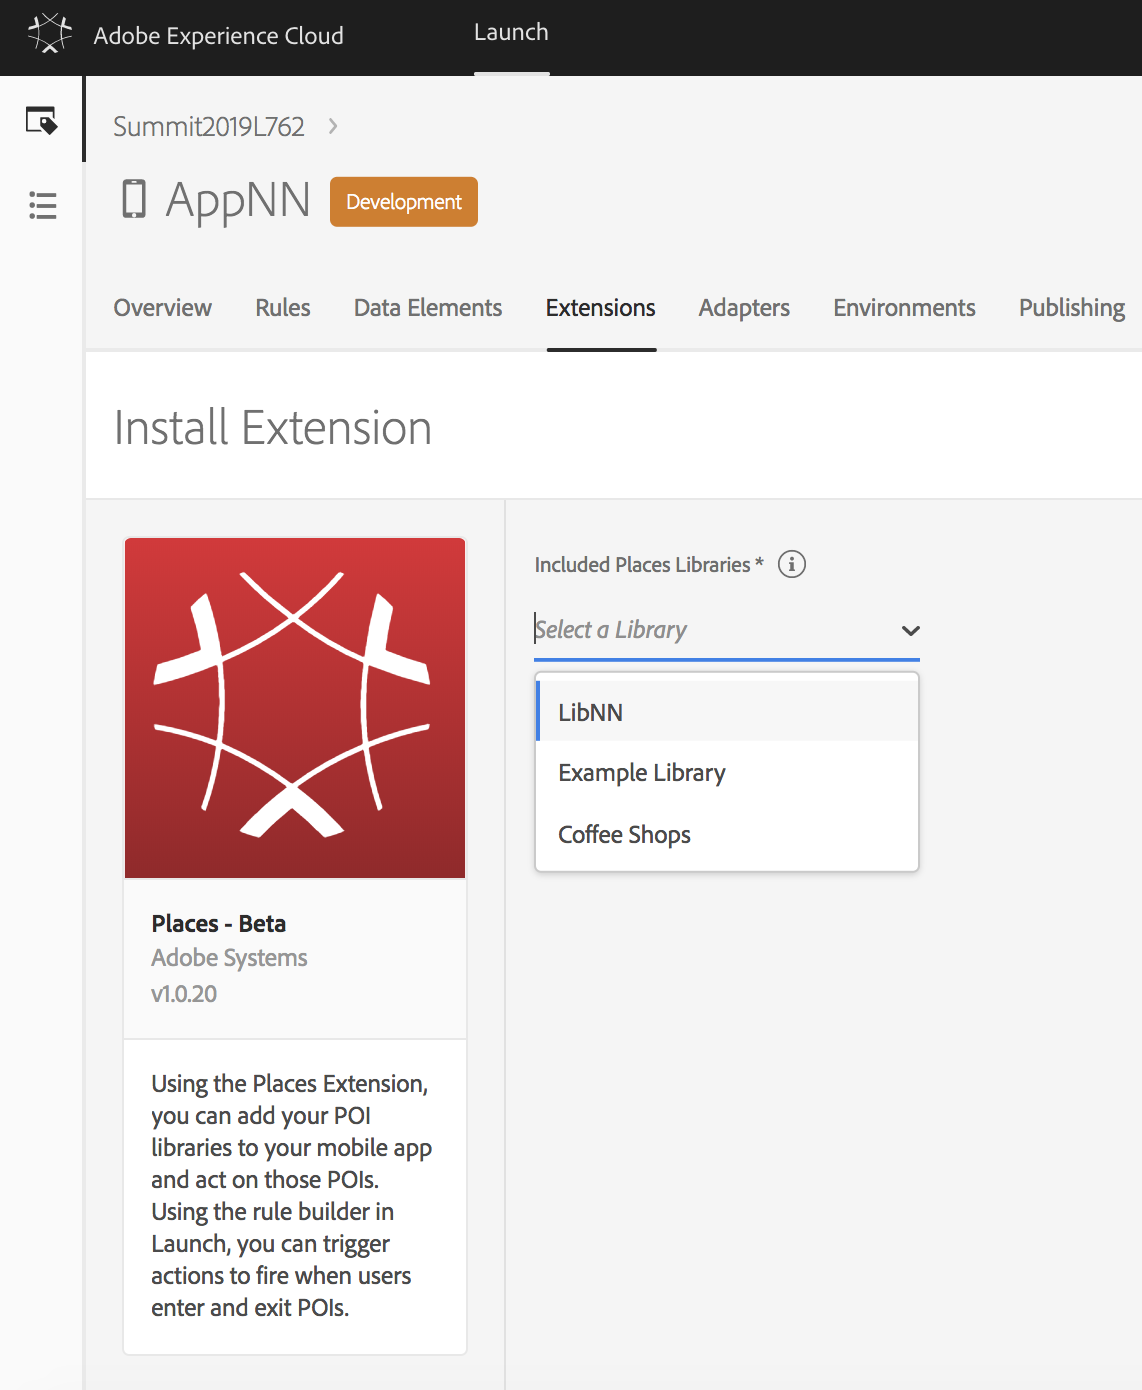
Use the Select a Library dropdown to select your LibNN, and then click Save. This action informs the AEP SDK to search the Places Service for POIs in LibNN. The POI data is not included in the download of the library when building the app, but a location-based subset of POIs is downloaded to the end user's device at runtime, based on the user's GPS coordinates.
Figure 2.10: Select your library
In the next exercise, we'll explore creating a Rule to leverage the Places library in our app.
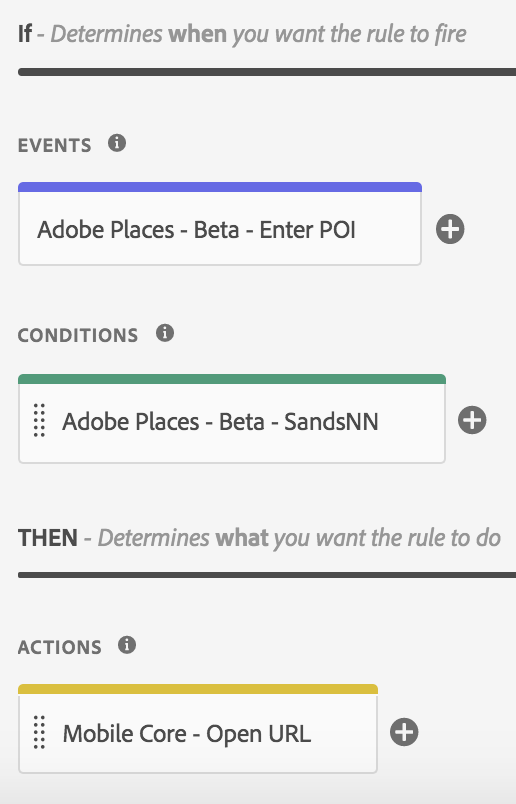
In Launch, we can define Rules which allow the SDK to make decisions at runtime depending on who is using your app and how they are using it. Each Rule is composed of one or more Events, zero or more Conditions, and one or more Actions. Events can be defined by the app developer, or be configured based on the installed extensions. Conditions define the criteria that data associated with the event must meet in order for the event to fire. Finally, Actions define what the application will do in response to the fired event. In our use case, we will use the event associated with Enter POI event, with the condition that the POI is the one we just created, and an action of opening a deep link URL within the app.
Now we will create a rule based on the POI data that we have previously entered. Click on the Rules tab, then click Create New Rule button.
Figure 2.11: Rules Overview

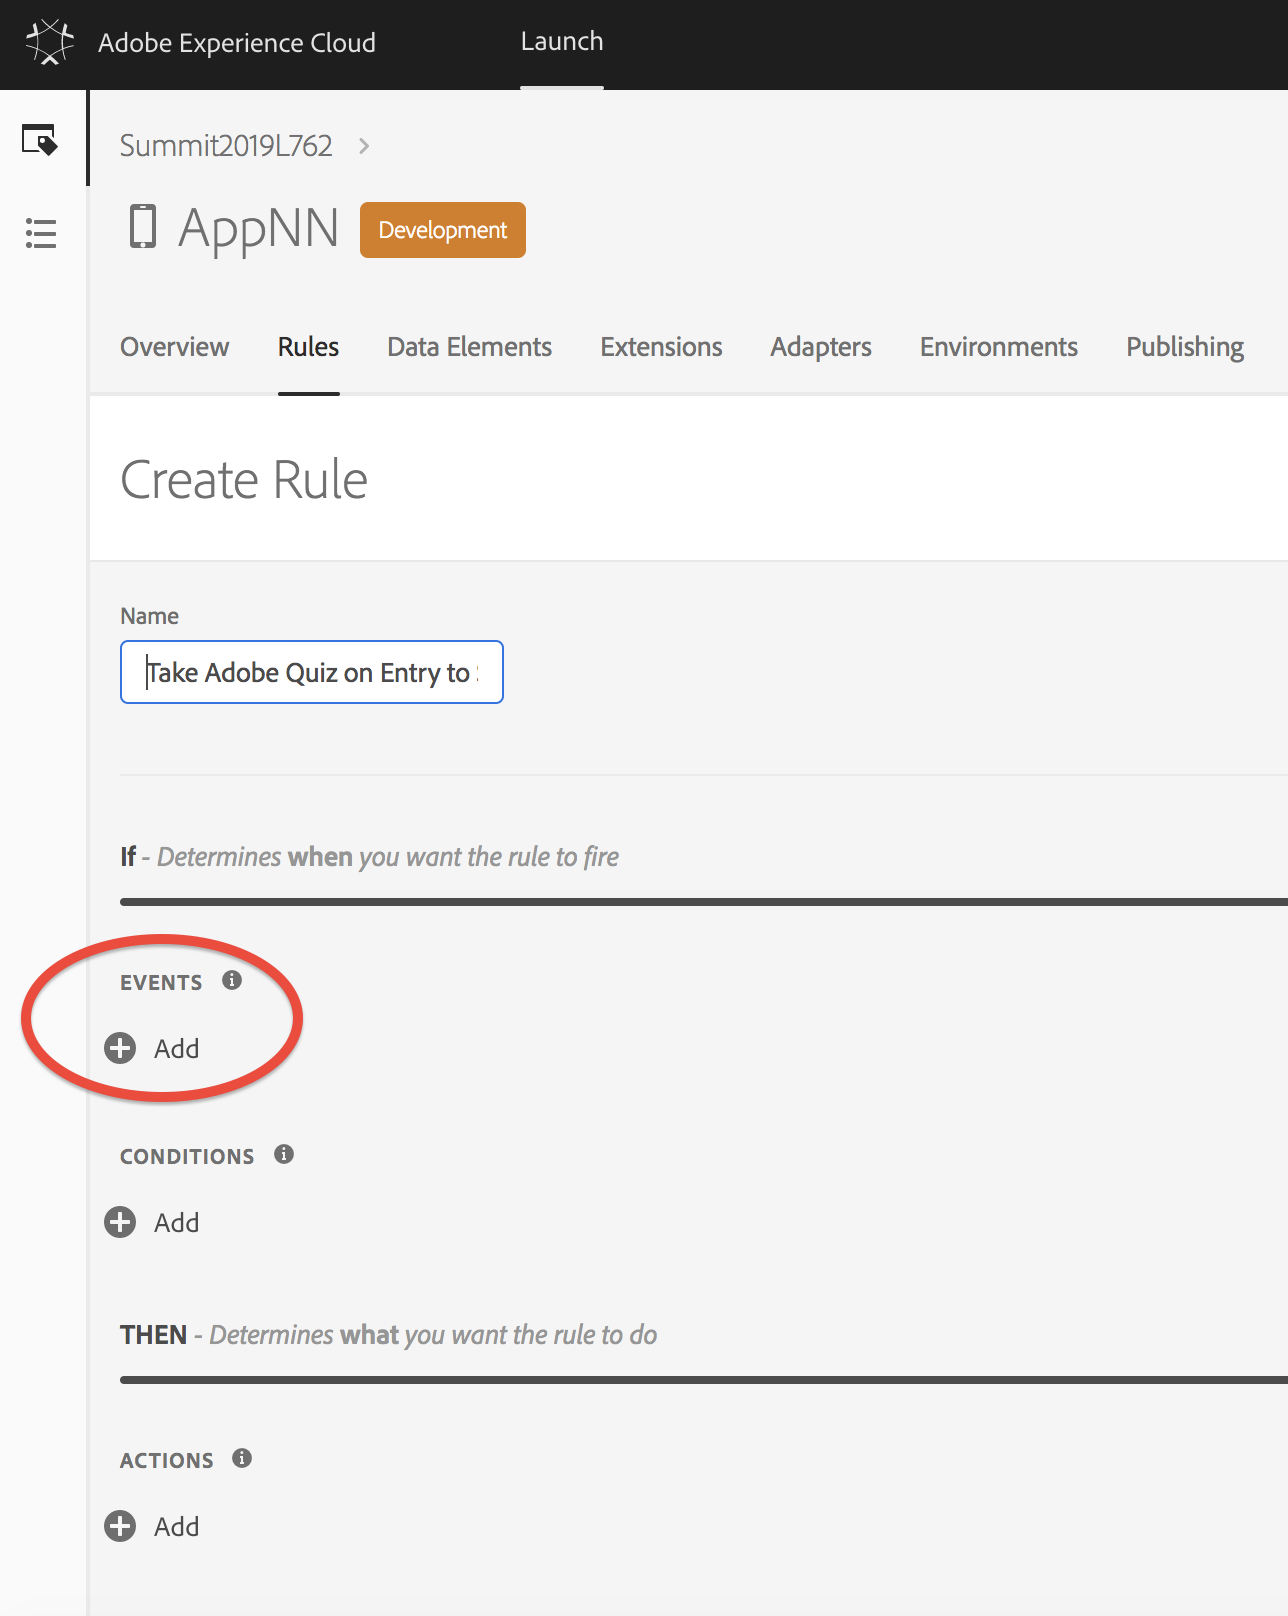
In the Create Rule screen, enter the name of the new rule to create. Use Take Adobe Quiz on Entry to Sands. Under the Events section, click the + button to add an event.
Figure 2.12: Create Rule
Additional extensions also have configurable events. To learn more about these and other features of the AEP SDK, please refer to the
Using Mobile Extensionssection of the online guide: https://aep-sdks.gitbook.io/docs/.
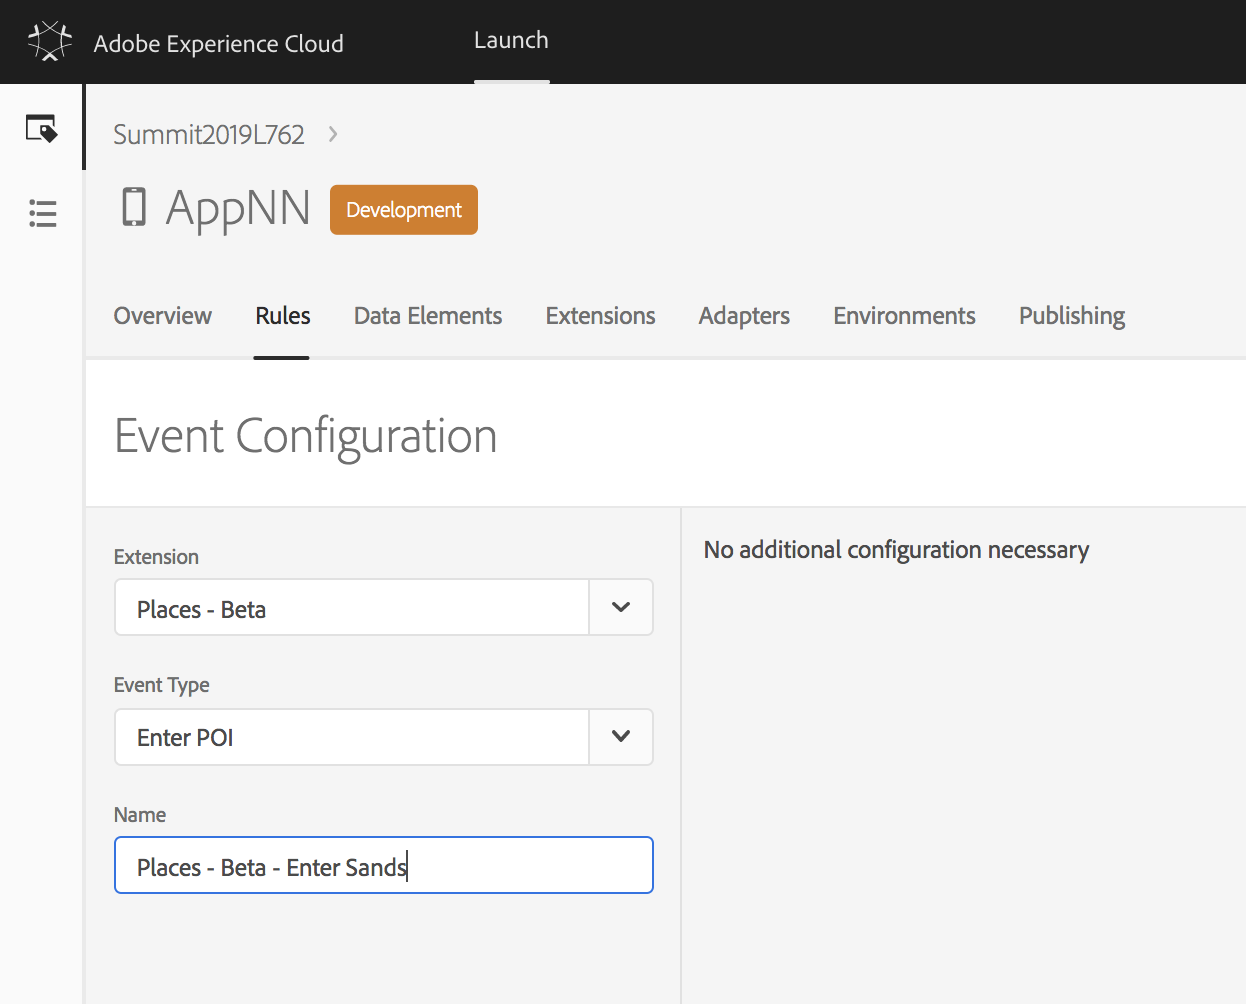
In the Event Configuration dialog, select the Places - Beta extension, and select Enter POI as the event type. Modify the name as shown in Figure 2.13, and then click Keep Changes.
Figure 2.13: Event Configuration
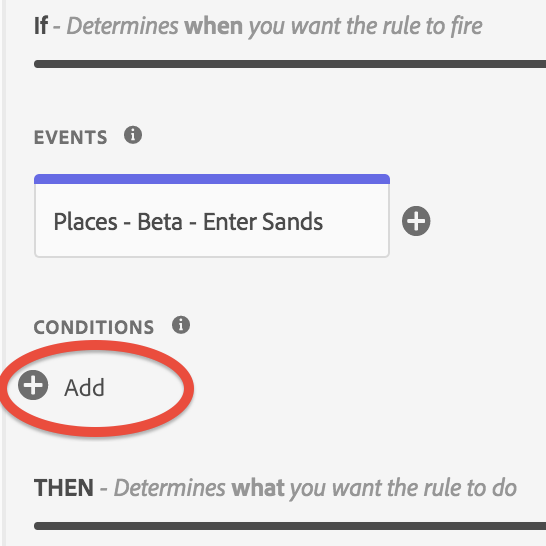
Back on the Create Rule screen, you should now see your event under the Events section. Click on the + under the Conditions section to add a condition to the event.
Figure 2.14: Event Created
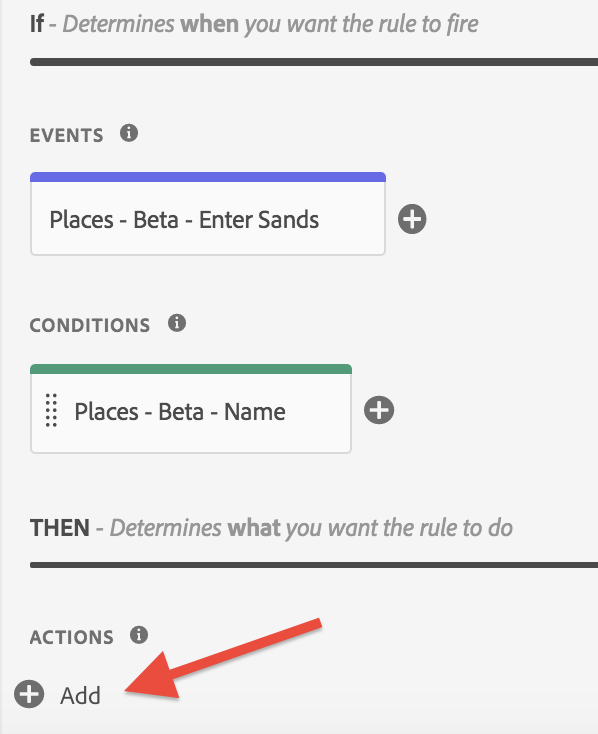
Fill in the fields as shown in Figure 2.15. Use a condition type of Name, and choose the Last Entered POI option. Set the name condition to contains and enter Sands to match the POI created in the first lesson. Since we have already configured the Places extension with the library you created, any location-based conditions refer only to POIs in that library. Click Keep Changes to save the condition.
Figure 2.15: Condition Configuration

Now you will see both an event and a condition in the Create Rule screen. The final step in creating our rule is to add the action to take when the event occurs. In our case, we will cause the mobile application to open a deep link URL. In the Create Rule screen, click the + icon below the Actions heading to add the action.
Figure 2.16: Condition Created
Fill in the fields as shown in Figure 2.17, selecting Open URL as the Action Type. Enter the following URL into the URL text box: com.adobe.quizzer://adobequiz. Click Keep Changes when done.
The URL can be an external URL or a deep link within the mobile application.
Figure 2.17: Action Configuration

Now we have an event, a condition, and an action configured for this rule. Click Save to save the new rule.
Figure 2.18: Action Created
So far, we have created a new property, added the Places extension, and created a rule. We are ready to add the AEP SDK code to our mobile application. To do that, we will publish a library that contains all of the property's configured extensions and enabled rules. Make sure you are logged in to Launch and have your property selected. Click on the Publishing tab, and click Add New Library.
Figure 2.19: Add Library
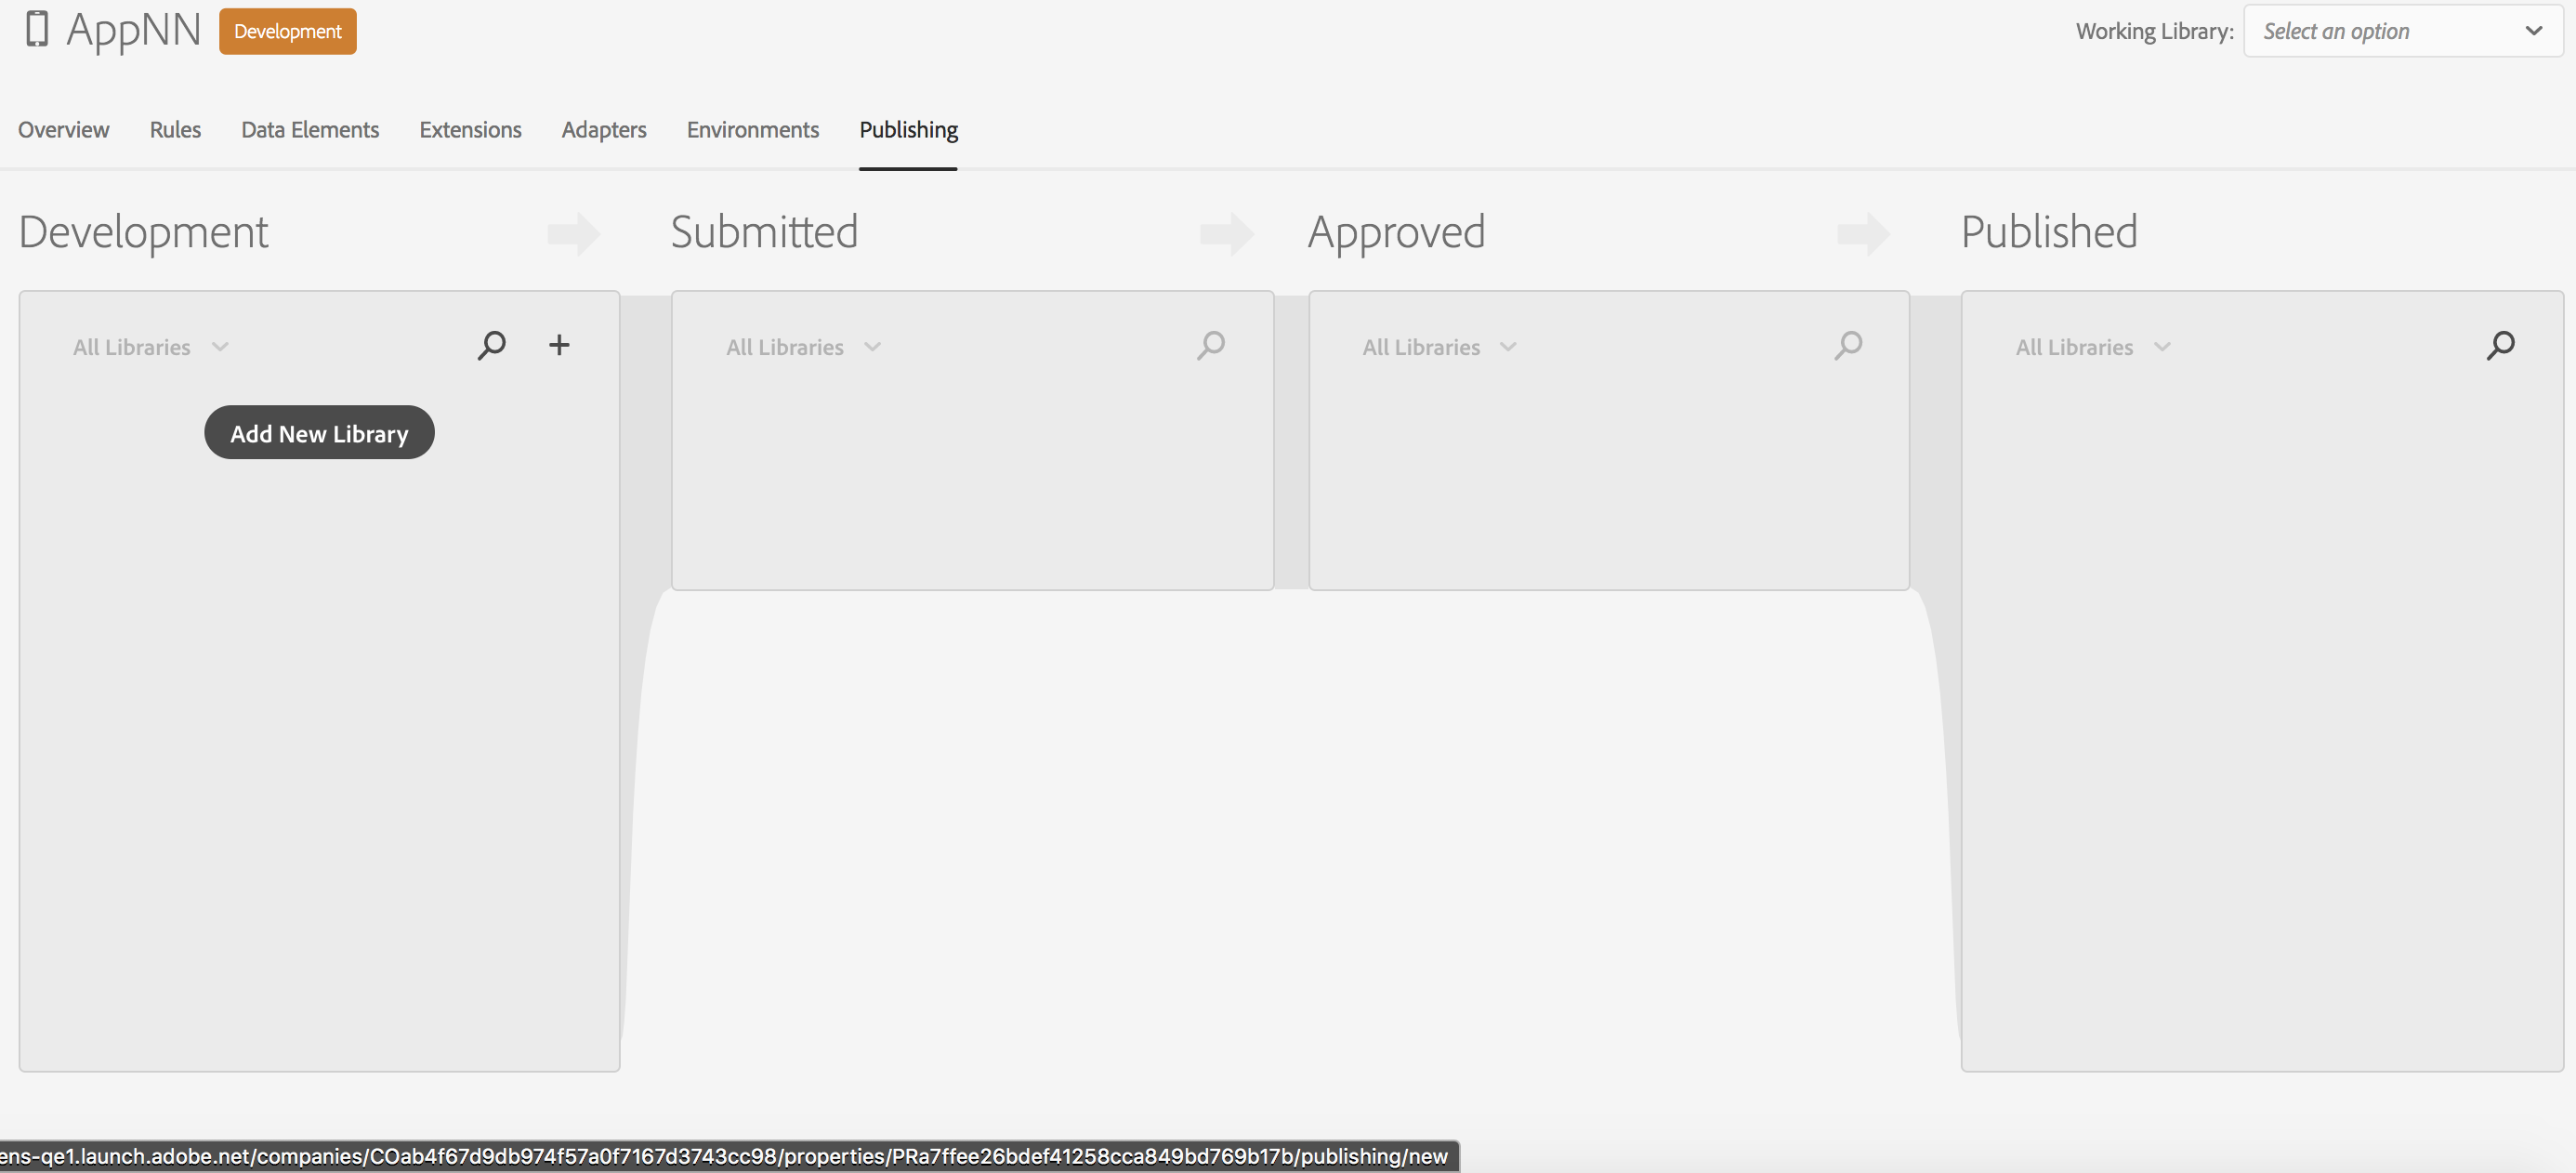
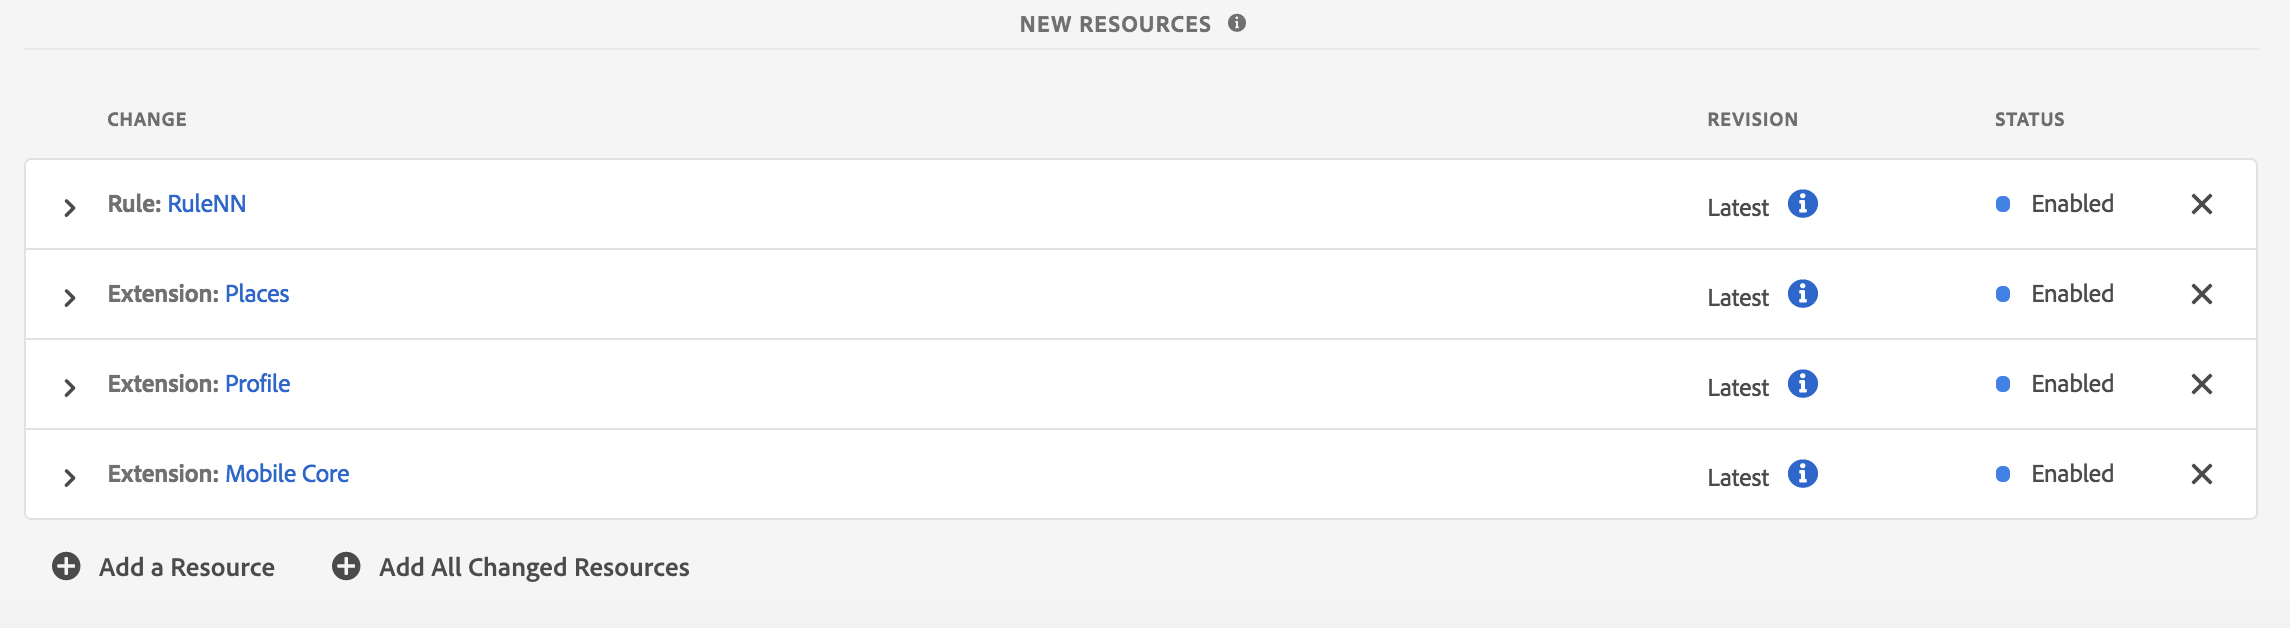
Enter a name of LibNN, replacing the NN with your user number. Select the Development environment. In the Library Contents section, click the + button next to Add All Changed Resources. The dialog will expand to show the changes we have made. Click Save & Build for Development.
For more information on the publishing workflow, refer to the Launch documentation: https://docs.adobelaunch.com/launch-reference/publishing.
Figure 2.20: Add Resources
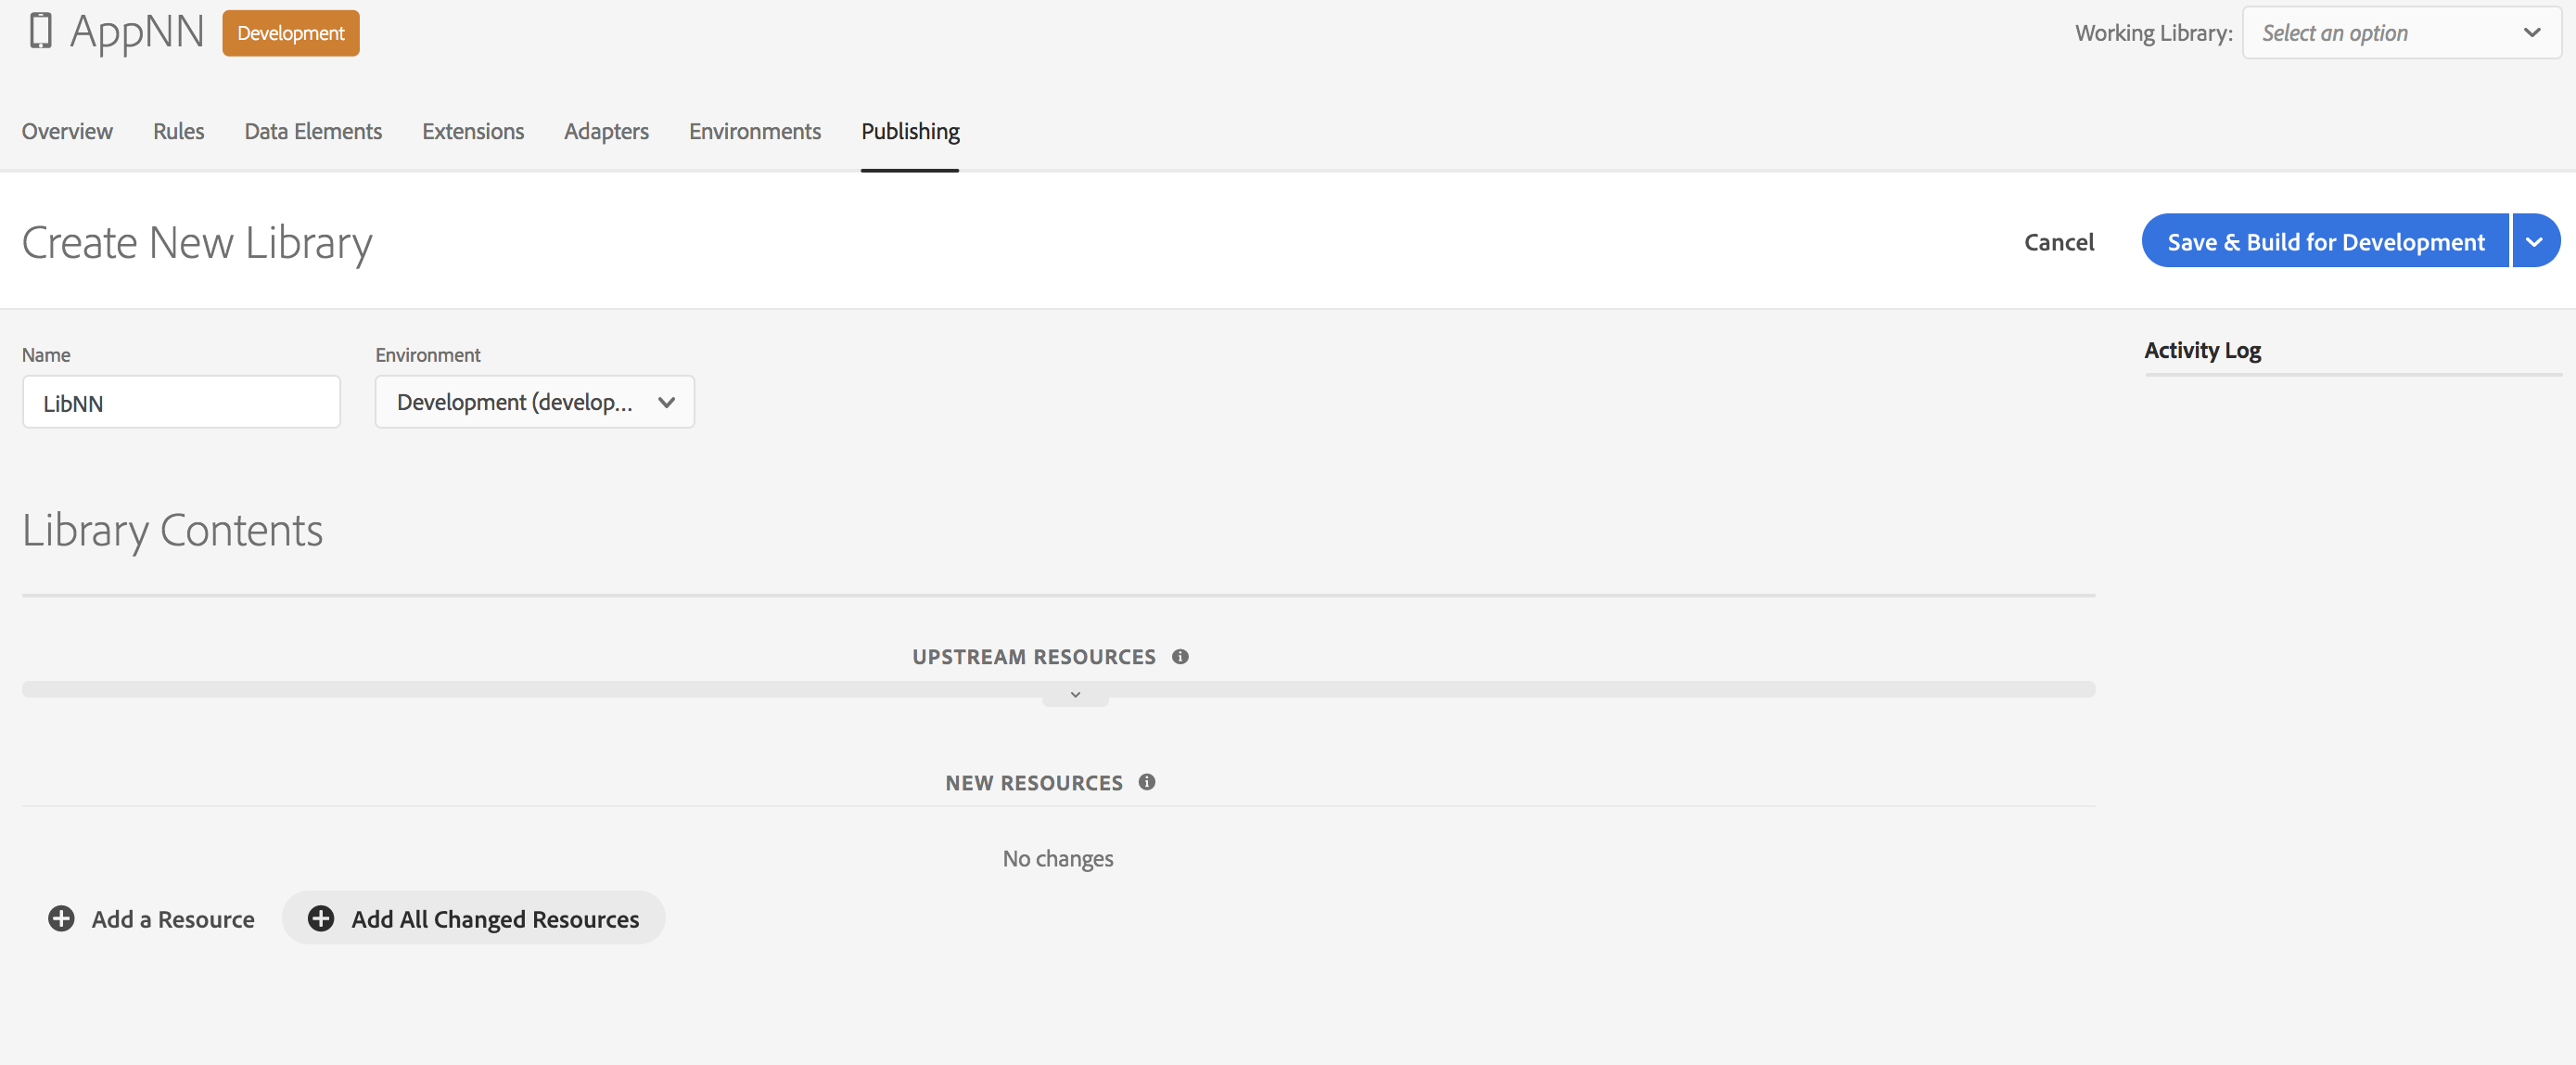
You can discover more information about the resources to be added by expanding the individual headings of the resources.
Figure 2.21: New Resources
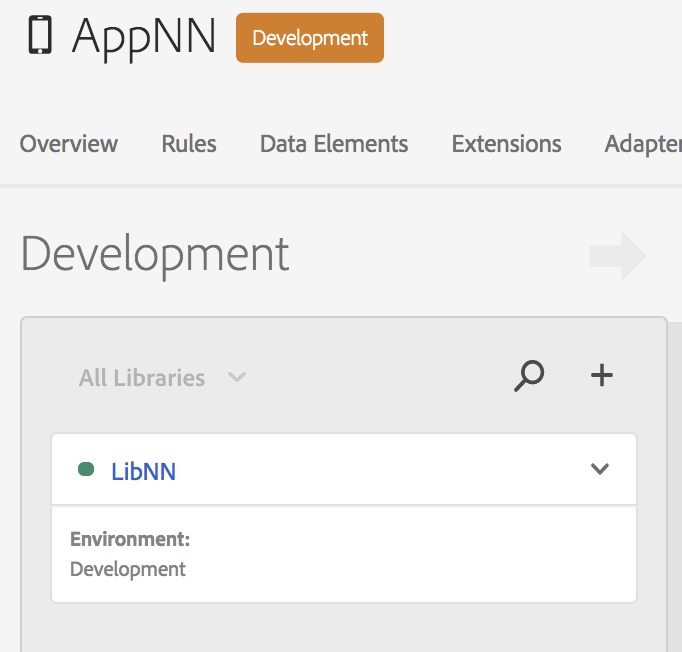
After the build is complete, the spinning indicator next to the library name should turn green. This indicates a successful build.
Figure 2.22: Development Build Complete
At this point, we have created a library that can be downloaded and included in the mobile application. To use the library in Development mode, skip to the next lesson: Lesson 3 - Configuring the AEP SDK in your mobile application. If you want to learn how to publish the library all the way to production, continue with the remaining steps in this lesson.
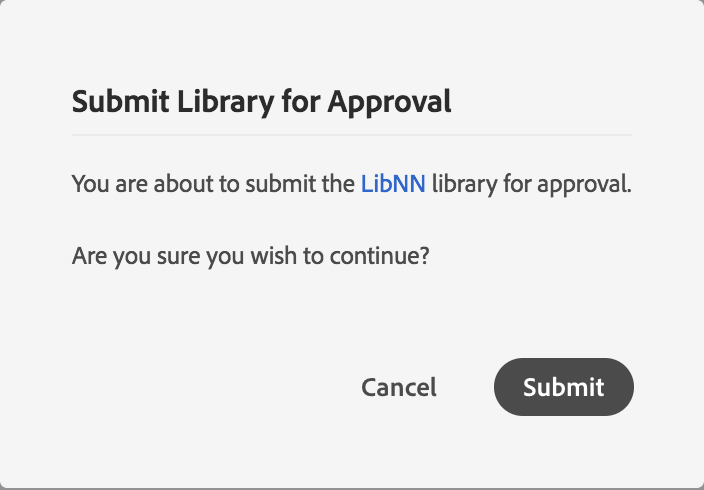
The next step is to click on the dropdown arrow and select Submit for Approval. On the resulting dialog, click the Submit button on the resulting dialog to confirm.
Figure 2.23: Submit for Approval
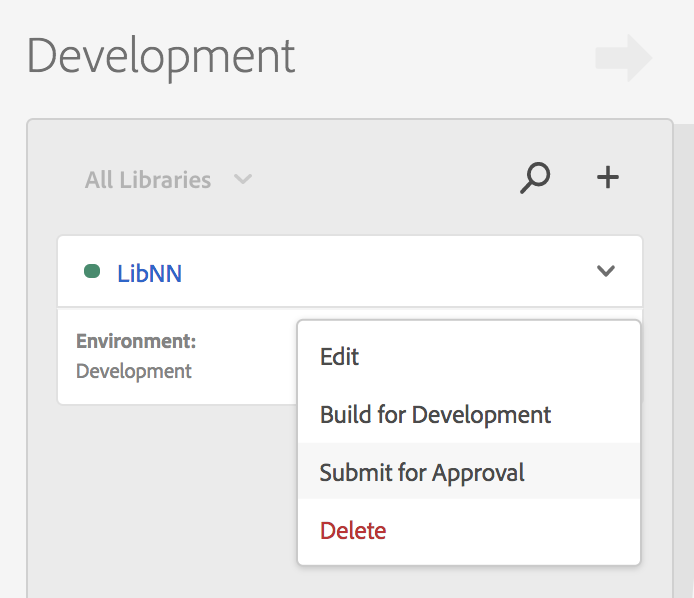
Figure 2.24: Confirm Submit for Approval
The library will now be in the Submitted column, with a yellow indicator. From the dropdown, you can select Open to examine the contents of the library, or Build for Staging if you are satisfied with its contents. In our case, select Build for Staging.
Figure 2.25: Build for Staging
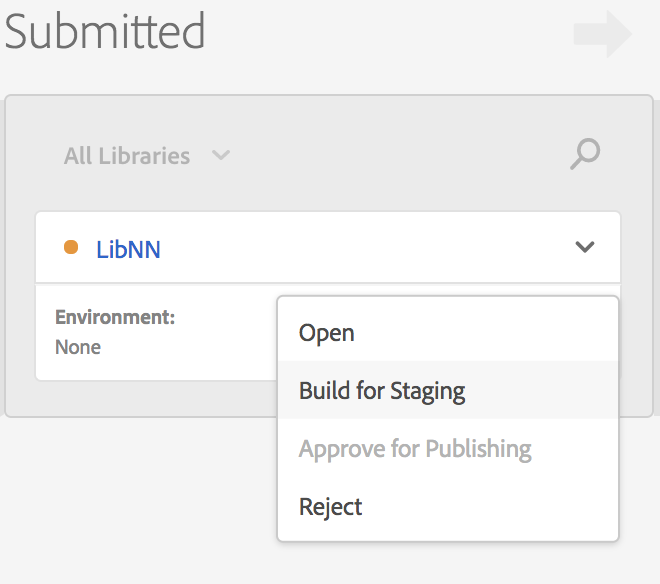
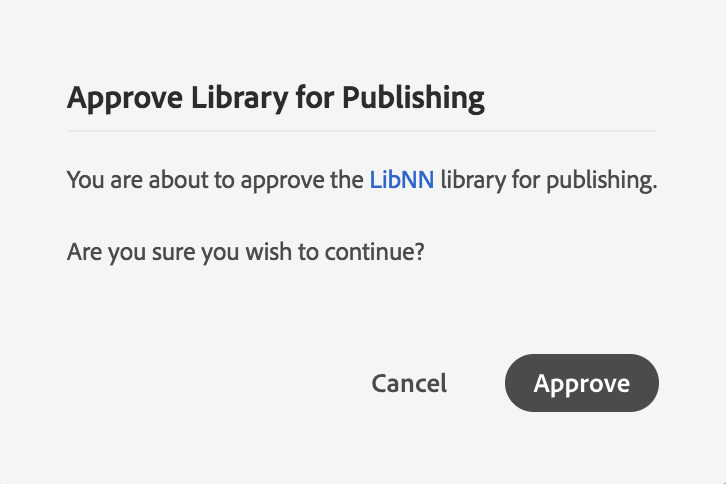
As with the Development build, the indicator will turn green after a successful build. The Approve for Publishing menu choice will now be available from the dropdown. Select this item to move to the next step. Click the Approve button on the resulting dialog to confirm.
Figure 2.26: Approve for Publishing

Figure 2.27: Confirm Approve for Publishing
The library is now in the Approved column, and ready for publication to production. From the dropdown, select Build & Publish to Production. Click the Publish button on the resulting dialog to confirm.
Figure 2.28: Build and Publish

Figure 2.29: Confirm Build and Publish
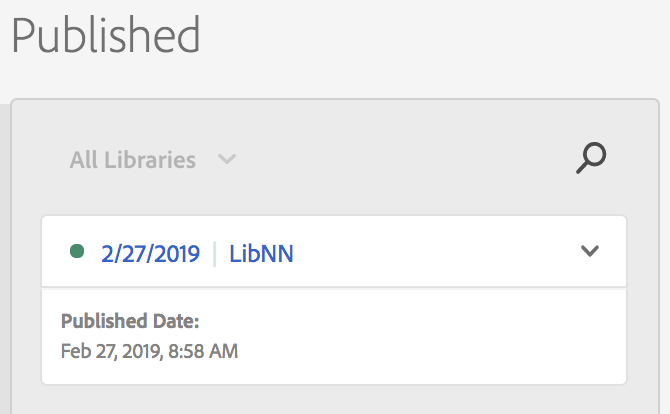
When the publication step is complete, the library will appear in the Published column with a green indicator and a publication date.
Figure 2.30: Published
With the app property created in Launch, it's time to get the AEP SDK and put it in the application. In order to achieve this, we will follow the install instructions provided in Launch. For iOS, we use a tool called Cocoapods to manage the dependencies of the SDK. This ensures that your app has all it needs to complete the tasks you've configured in Launch. We will also make a few changes necessary that allow us to use the device's location in an iOS app. Once fully integrated, we will use .gpx files to spoof location in the iOS simulator to test our Launch Rule. When our Launch rule triggers, the SDK will fire a deeplink. The Trivia App will handle the deeplink and ask the user if they would like to take the Adobe Quiz (more on that later). If they agree, the user will be navigated to take the Adobe Quiz.
In case you missed it prior to lesson 1, here's the link to the sample app we will be using: Trivia App for L762
In the lab, we will walk through this exercise for the purposes of demonstration only. Due to our time constraint and the amount of time it requires to download the Cocoapods trunk (GitHub repository), all of Exercise 3.1 has already been completed for you. If you were integrating the AEP SDK into your app for the first time, all of these steps would apply.
Any step with a
*beside it should not be completed by the lab user.
Open the Terminal application by holding command (⌘), pressing the space bar, typing Terminal, and hitting return.
Navigate your Terminal window to the directory containing the sample app:
cd Downloads/trivia-ios/triviaSample
Figure 3.1: Navigate to the Directory Containing the Application in Terminal

* Enter the command pod init in the Terminal app. This will create a file named Podfile in the same directory. The Podfile is used to define the configuration for Cocoapods integration in the app. For more information, see here.
Open the Podfile for editing by executing open Podfile in Terminal. The results of running this command will be that a new application, TextEdit, has launched. The Podfile is now open and ready for editing. Let's go back to Launch now so we can copy the configuration code to paste into the Podfile.
Figure 3.2: Open Podfile for Editing

In Launch, verify your property is still selected, then click on the "Environments" link. Then click the icon in the "Install" column for the "Development" environment.
Figure 3.3: Install Instructions in Launch

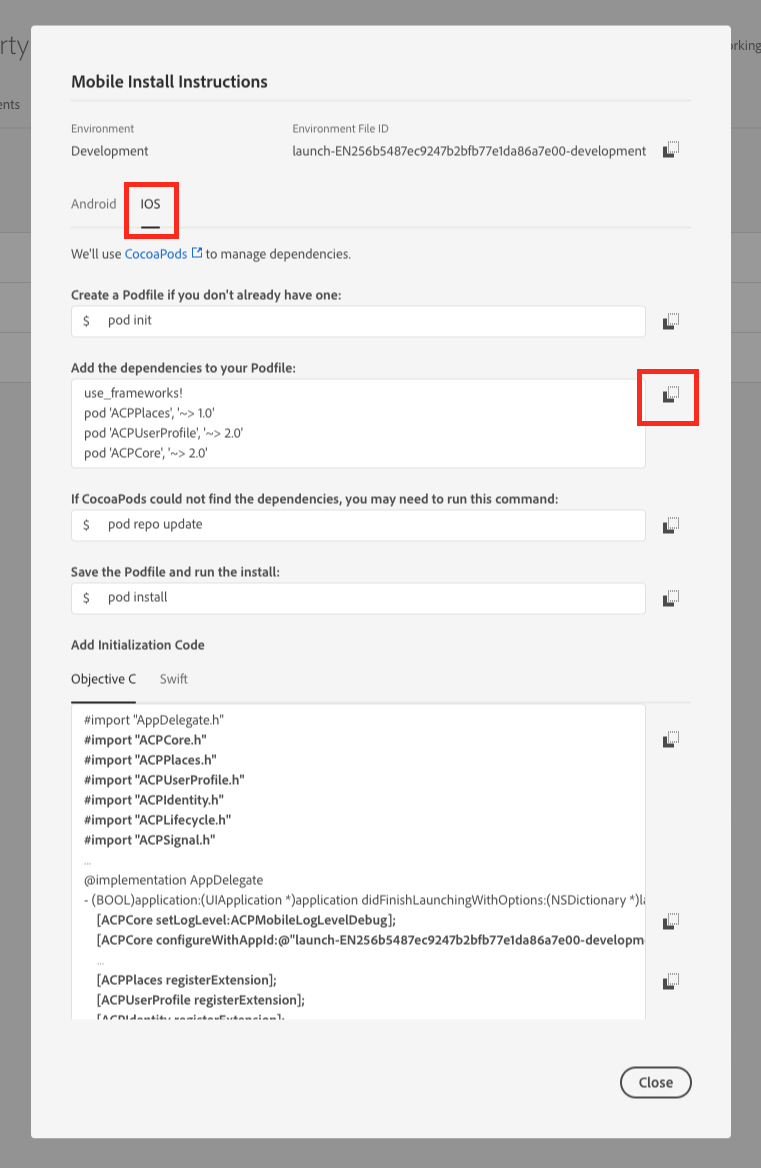
Click on the "iOS" tab at the top. This page provides instructions on how to integrate the AEP SDKs into an app via Cocoapods. We've already done the first step, so now we need to copy in the code from the "Add the dependencies to your Podfile" text box. Click the icon to the right of the box to copy the dependencies to the clipboard.
Figure 3.4: Podfile Dependencies
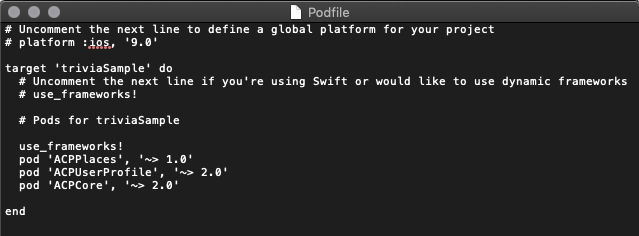
In the TextEdit window, paste in the Cocoapod dependencies into the Podfile under the line # Pods for triviaSample. You can paste by either right-clicking and selecting paste, or by holding command (⌘) and pressing v. Save the file by either selecting File > Save from the menu, or by holding command and pressing s.
Indentation is not important in the Podfile.
Figure 3.5: Updated Podfile
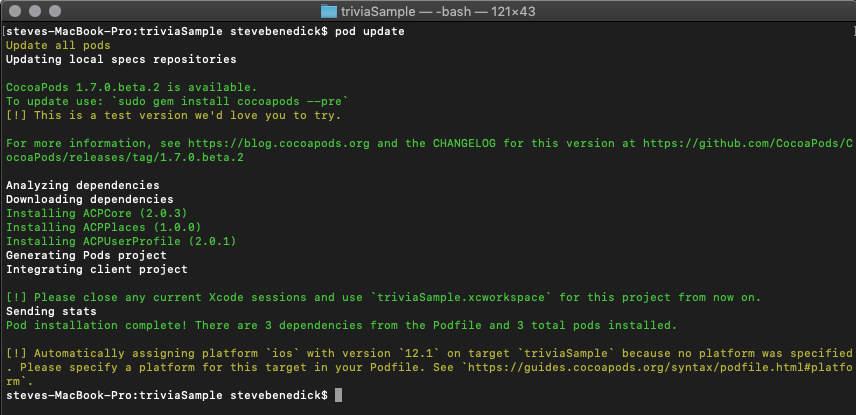
* In the Terminal window, run the pod update command to download the SDKs needed for the app. Sometimes this step will result with an error saying that the named Cocoapods could not be found. In that case, run the command pod repo update to update your local repository, then run pod update again. Once successfully updated you will notice messages saying that the SDKs have been installed, and that we should use triviaSample.xcworkspace from now on.
The 'pod repo update' command can take a minute to execute.
Figure 3.6: Pod Update in Terminal
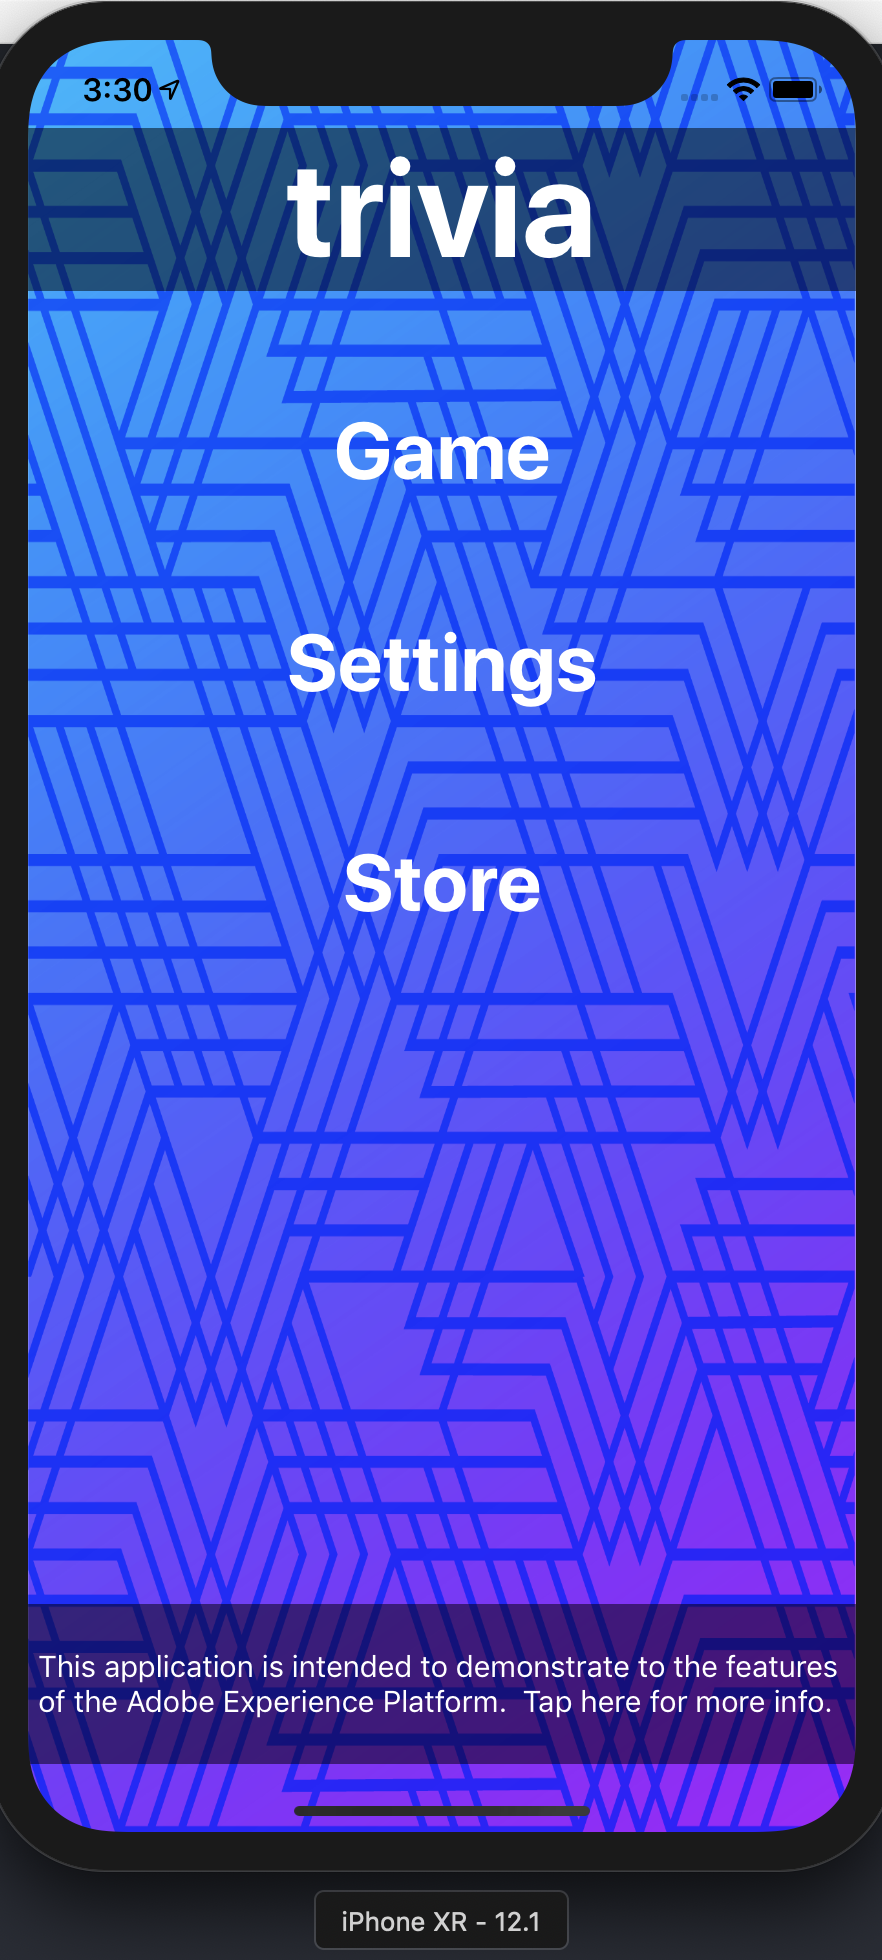
In Terminal, run open triviaSample.xcworkspace. This will cause Xcode to launch and open our Trivia Sample application. Hit "Run" at the top of the screen and get familiar with the app.
Figure 3.7: Run the App from Xcode

Figure 3.8: Main Page of the App
Now that we have the SDK installed, we need to go back to launch and copy the install instructions. We will be copying three different parts of initialization code:
#import statementsIn Launch, copy the #import statements to your clipboard:
Figure 3.9: Import Statements
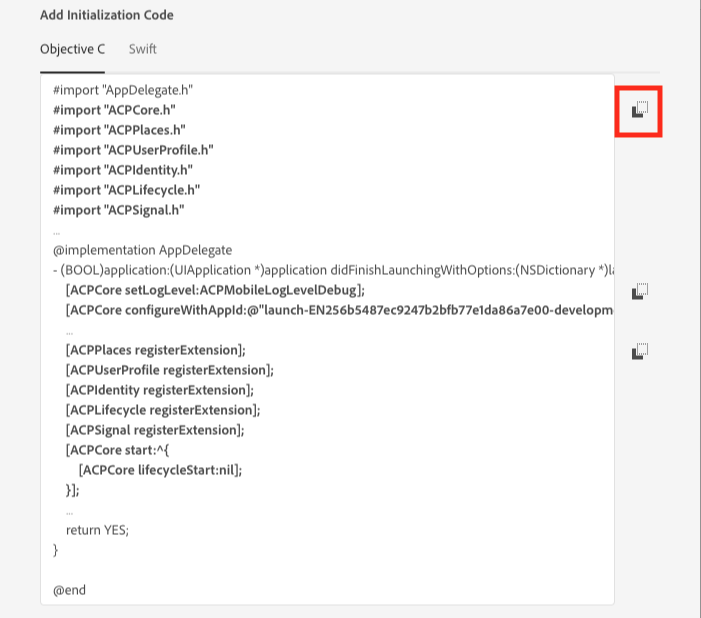
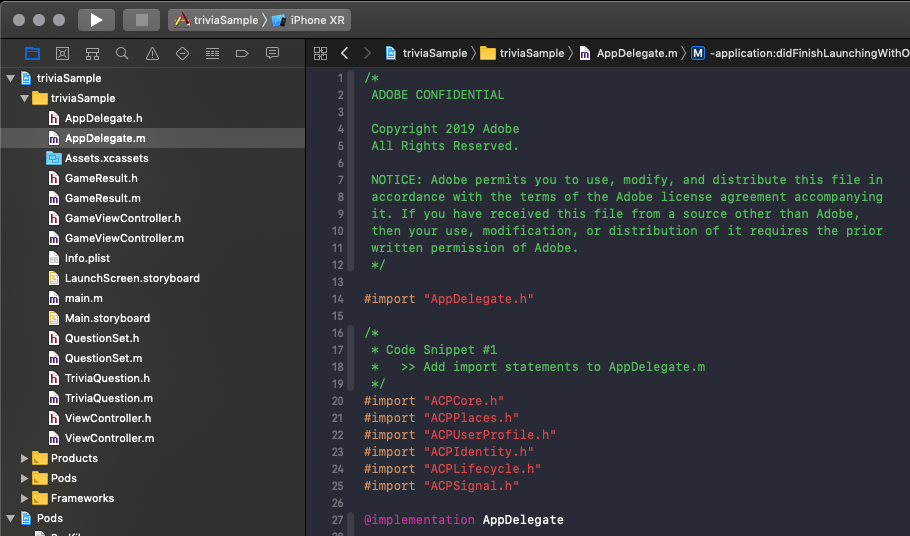
In Xcode, select the AppDelegate.m file, paste the #import statements under the Code Snippet #1 comment:
Figure 3.10: Import Code
Launch generates a unique Application ID for each of the Environments in our Property. Each App ID has its own endpoint from which the SDK can use to dynamically pull configuration. In Launch, copy the configuration statements to your clipboard:
Figure 3.11: Configuration Statements
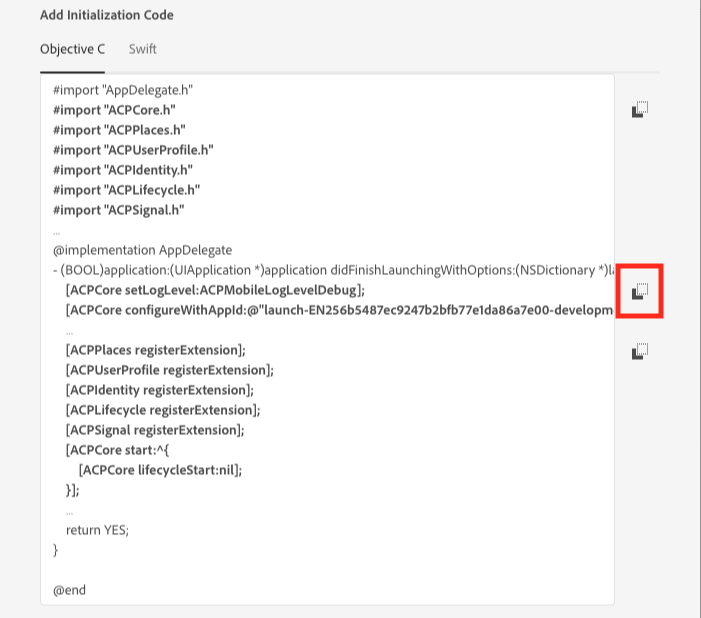
In Xcode, in the AppDelegate.m file, paste the configuration statements under the Code Snippet #2 comment:
Figure 3.12: Configuration Code

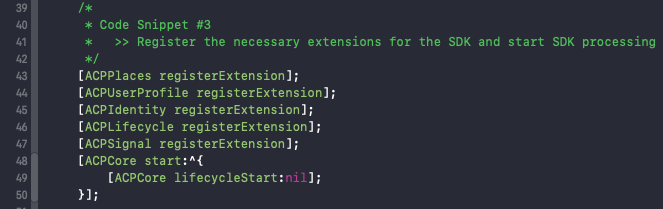
In Launch, copy the registration statements to your clipboard:
Figure 3.13: Registration Statements

In Xcode, in the AppDelegate.m file, paste the registration statements under the Code Snippet #3 comment:
Figure 3.14: Registration Code
In Xcode, run the app. We can review the logs now to see that the SDK is generating events for the application.
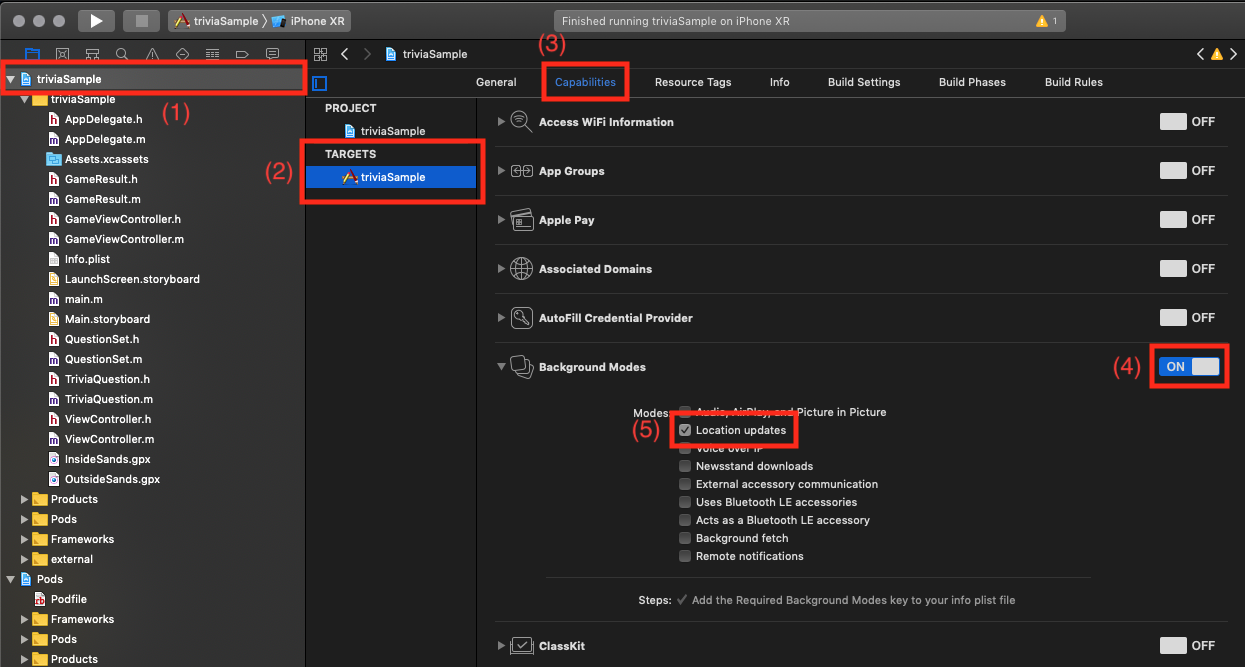
In order to use location in the app, we have to make a few changes to the app settings. First, in order to do region monitoring, we need to enable location updates from the background. Select the project file from the Solution Explorer, select the triviaSample target, click the Capabilities tab at the top, toggle Background Modes to on, and check the box next to Location updates
Figure 3.15: Enable Background Location Updates
When iOS asks a user for permission to use their location in an app, a description from the app developer is required to explain why the device location is needed and how it will be used. We must provide that description in two special properties in the app's Information Property List. Select Info.plist from the Solution Explorer, then the Information Property List row, then click the + button to add a new item. Add the following key-value items to the Property List.
| Key | Type | Value |
|---|---|---|
| Privacy - Location When in Use Usage Description | String | Help us integrate Places in the Summit Lab when in use! |
| Privacy - Location Always and When In Use Usage Description | String | Help us integrate Places in the Summit Lab! |
If you want to, you can use different descriptions. The Settings app will show the user the correct description based on the level of permission the app has been granted.
When complete, the Information Property List will look similar to this:
Figure 3.16: Request for Location Description

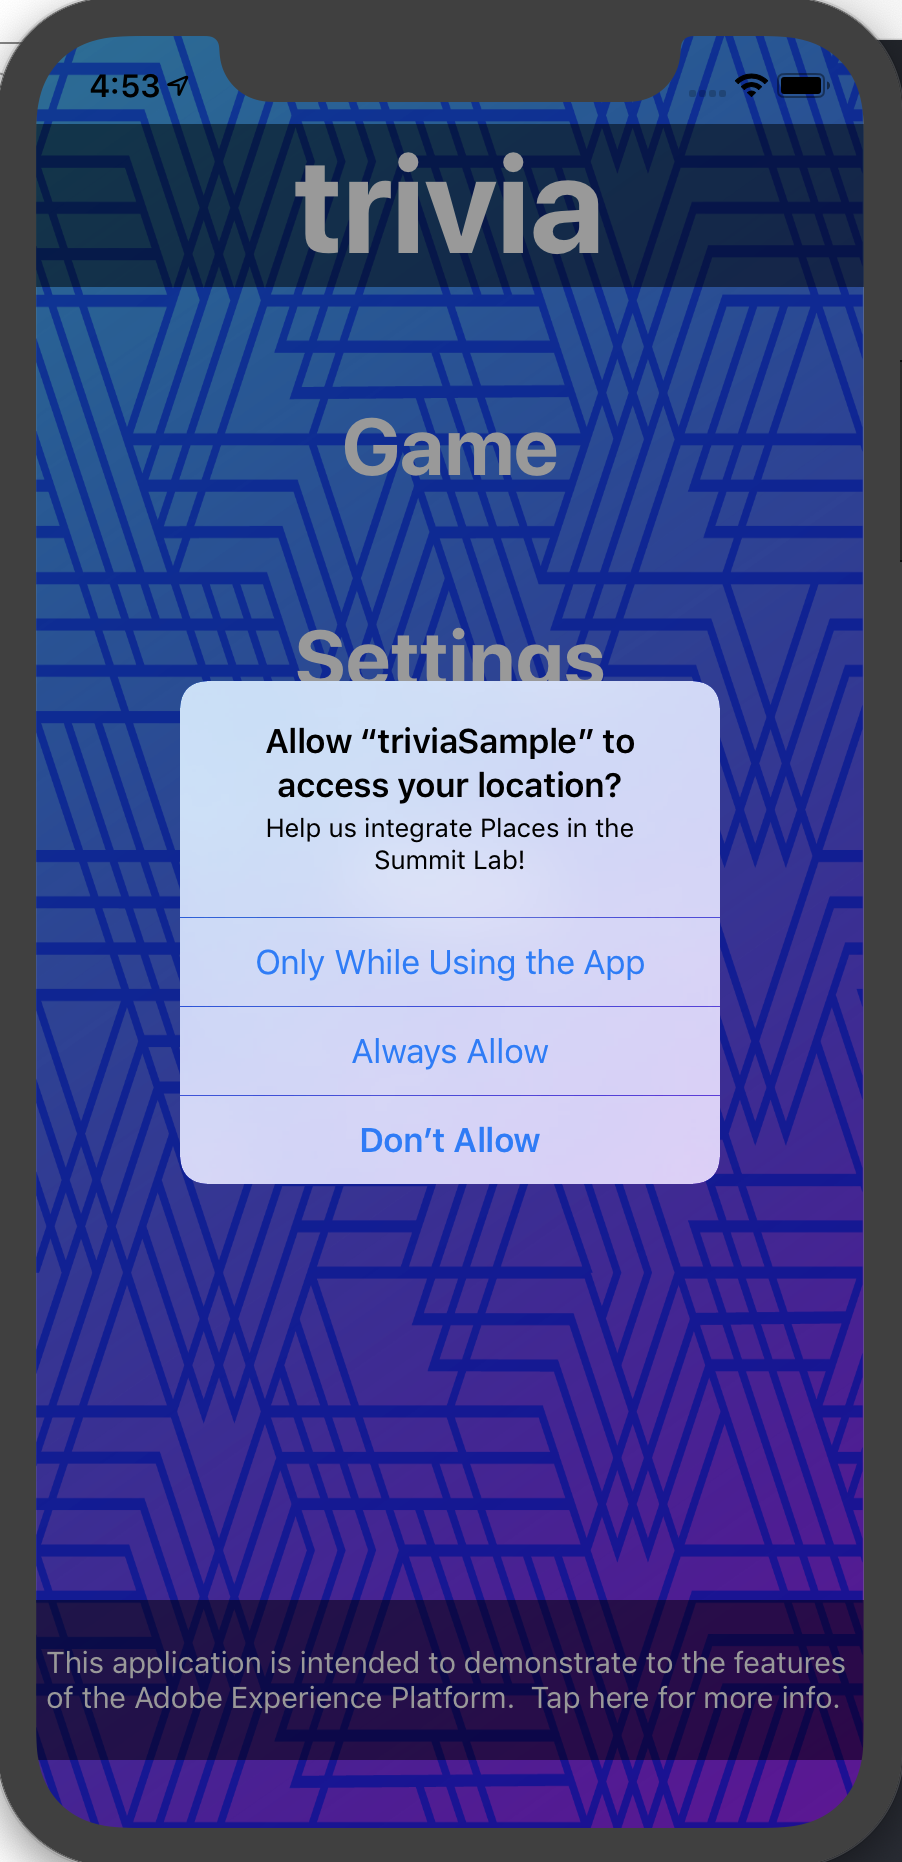
Time to launch the app by hitting the Run button in Xcode. Now that we have met all the pre-requisites required by Apple, we should see a dialog asking us to give permission to use location monitoring in the app. Please select Always Allow.
In the trivia app, we are using an unreleased version of another component of Places called the "Places Monitor". This extension will handle all the interactions necessary between the platform's geo-location APIs and the Places extension. It will be released in open beta soon after Summit.
Figure 3.17: Location Permission
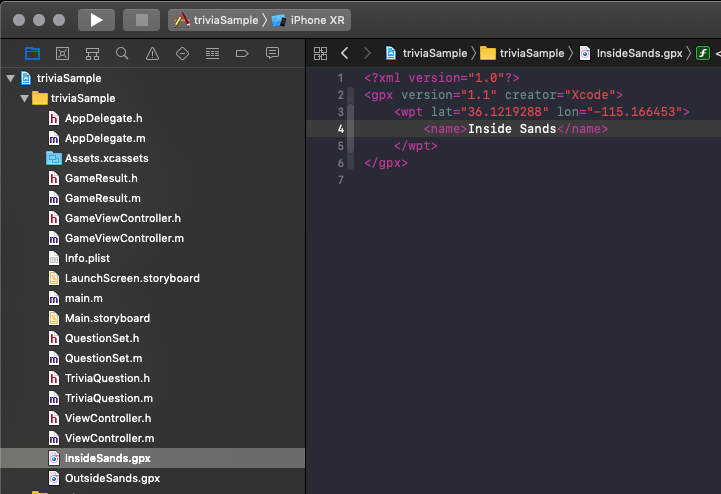
To test our Places integration, we are going to use .gpx files which allow us to fake the location of the simulator. For our sample app, we have two different files, and each represents a location. The first is InsideSands.gpx, which has coordinates that place the simulator inside of the Sands Expo and Convention Center. The second is OutsideSands.gpx, which has coordinates that place the simulator in the Mandalay Bay Conference Center (but more importantly, not inside of Sands). Let's take a closer look at our .gpx file by clicking on InsideSands.gpx.
Figure 3.18: InsideSands.gpx
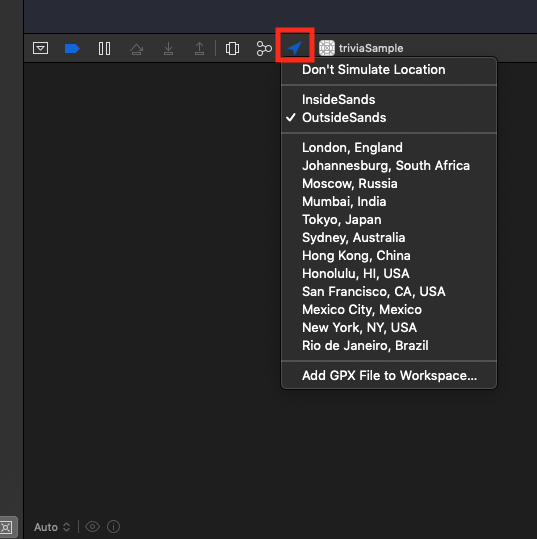
By default, our app will place us in the location defined by OutsideSands.gpx. Let's run the app and verify the current spoofed location of the device by clicking on the Simulate Location icon in the toolbar above the Debug Area.
Sometimes the
Simulate Locationicon does not appear the first time you launch the app. If it is not visible for you, try re-launching the app from Xcode.
Figure 3.19: Simulate Location - OutsideSands
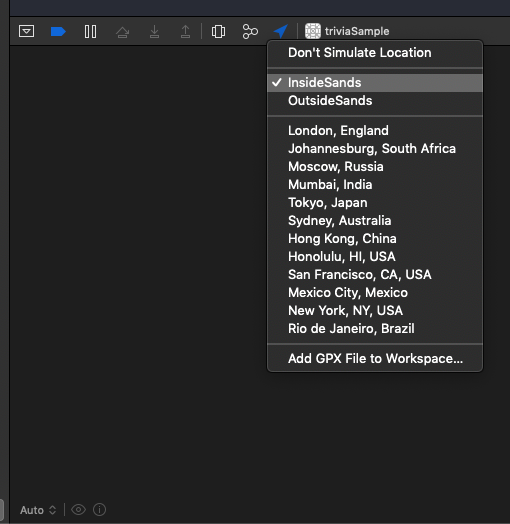
Next, we are going to simulate moving the device into the POI we defined in our Places Library. To do that, click on the Simulate Location icon and select InsideSands.
Figure 3.20: Simulate Location - InsideSands
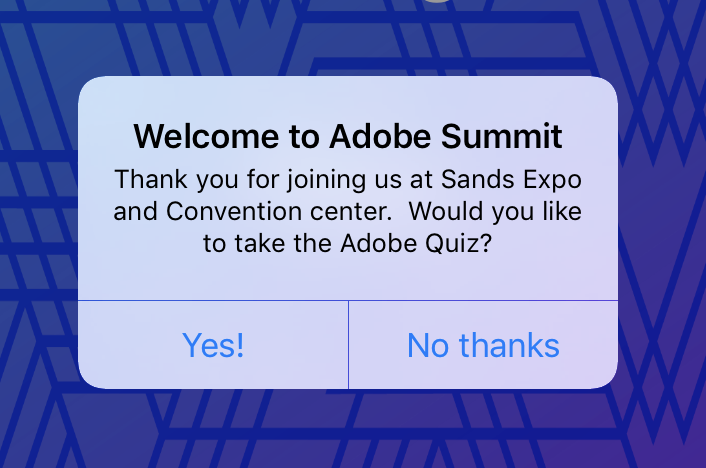
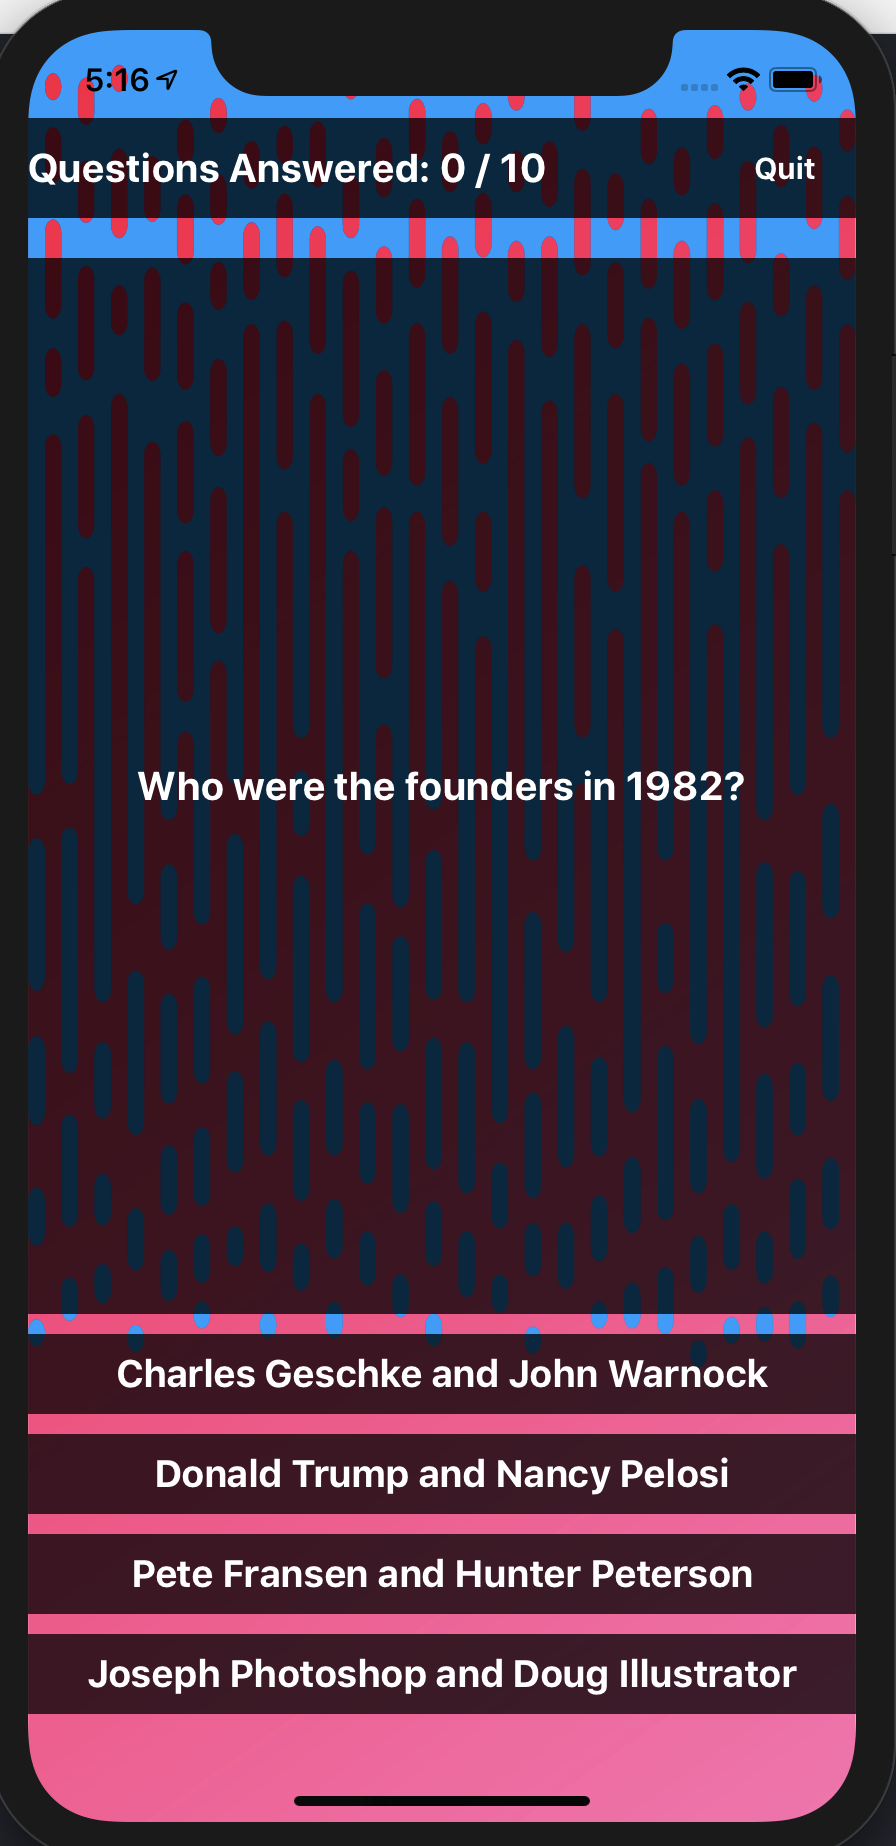
Once the app has detected that we have entered into a POI, and that the name of the POI contains Sands, our Launch rule will trigger. The Action we set up in Launch will cause the SDK to open a deeplink URL, which will be handled by the Trivia App. The user is greeted with an alert welcoming them to Adobe Summit in the Sands Expo and Conference center, and asks them if they would like to take the Adobe-themed quiz. Hit the Yes! button.
Figure 3.21: Take the quiz!
We've successfully driven our user who entered Sands Expo Center to the take the Adobe Quiz. What score can you get?
Figure 3.22: Adobe quiz
Launch documentation: https://docs.adobelaunch.com/
Trivia App with lab steps completed: Completed Trivia App for L762
The Adobe Places services open up a lot of interesting use cases for your application, but that's only the beginning. Places becomes even more powerful when you integrate it with other Adobe Products. Below is a sneak peek at a Places integration with the in-app messaging capabilities provided by the ACS extension for the AEP SDK.
Browse to Adobe Launch and click on your app.
Figure A.1: Launch Property Overview
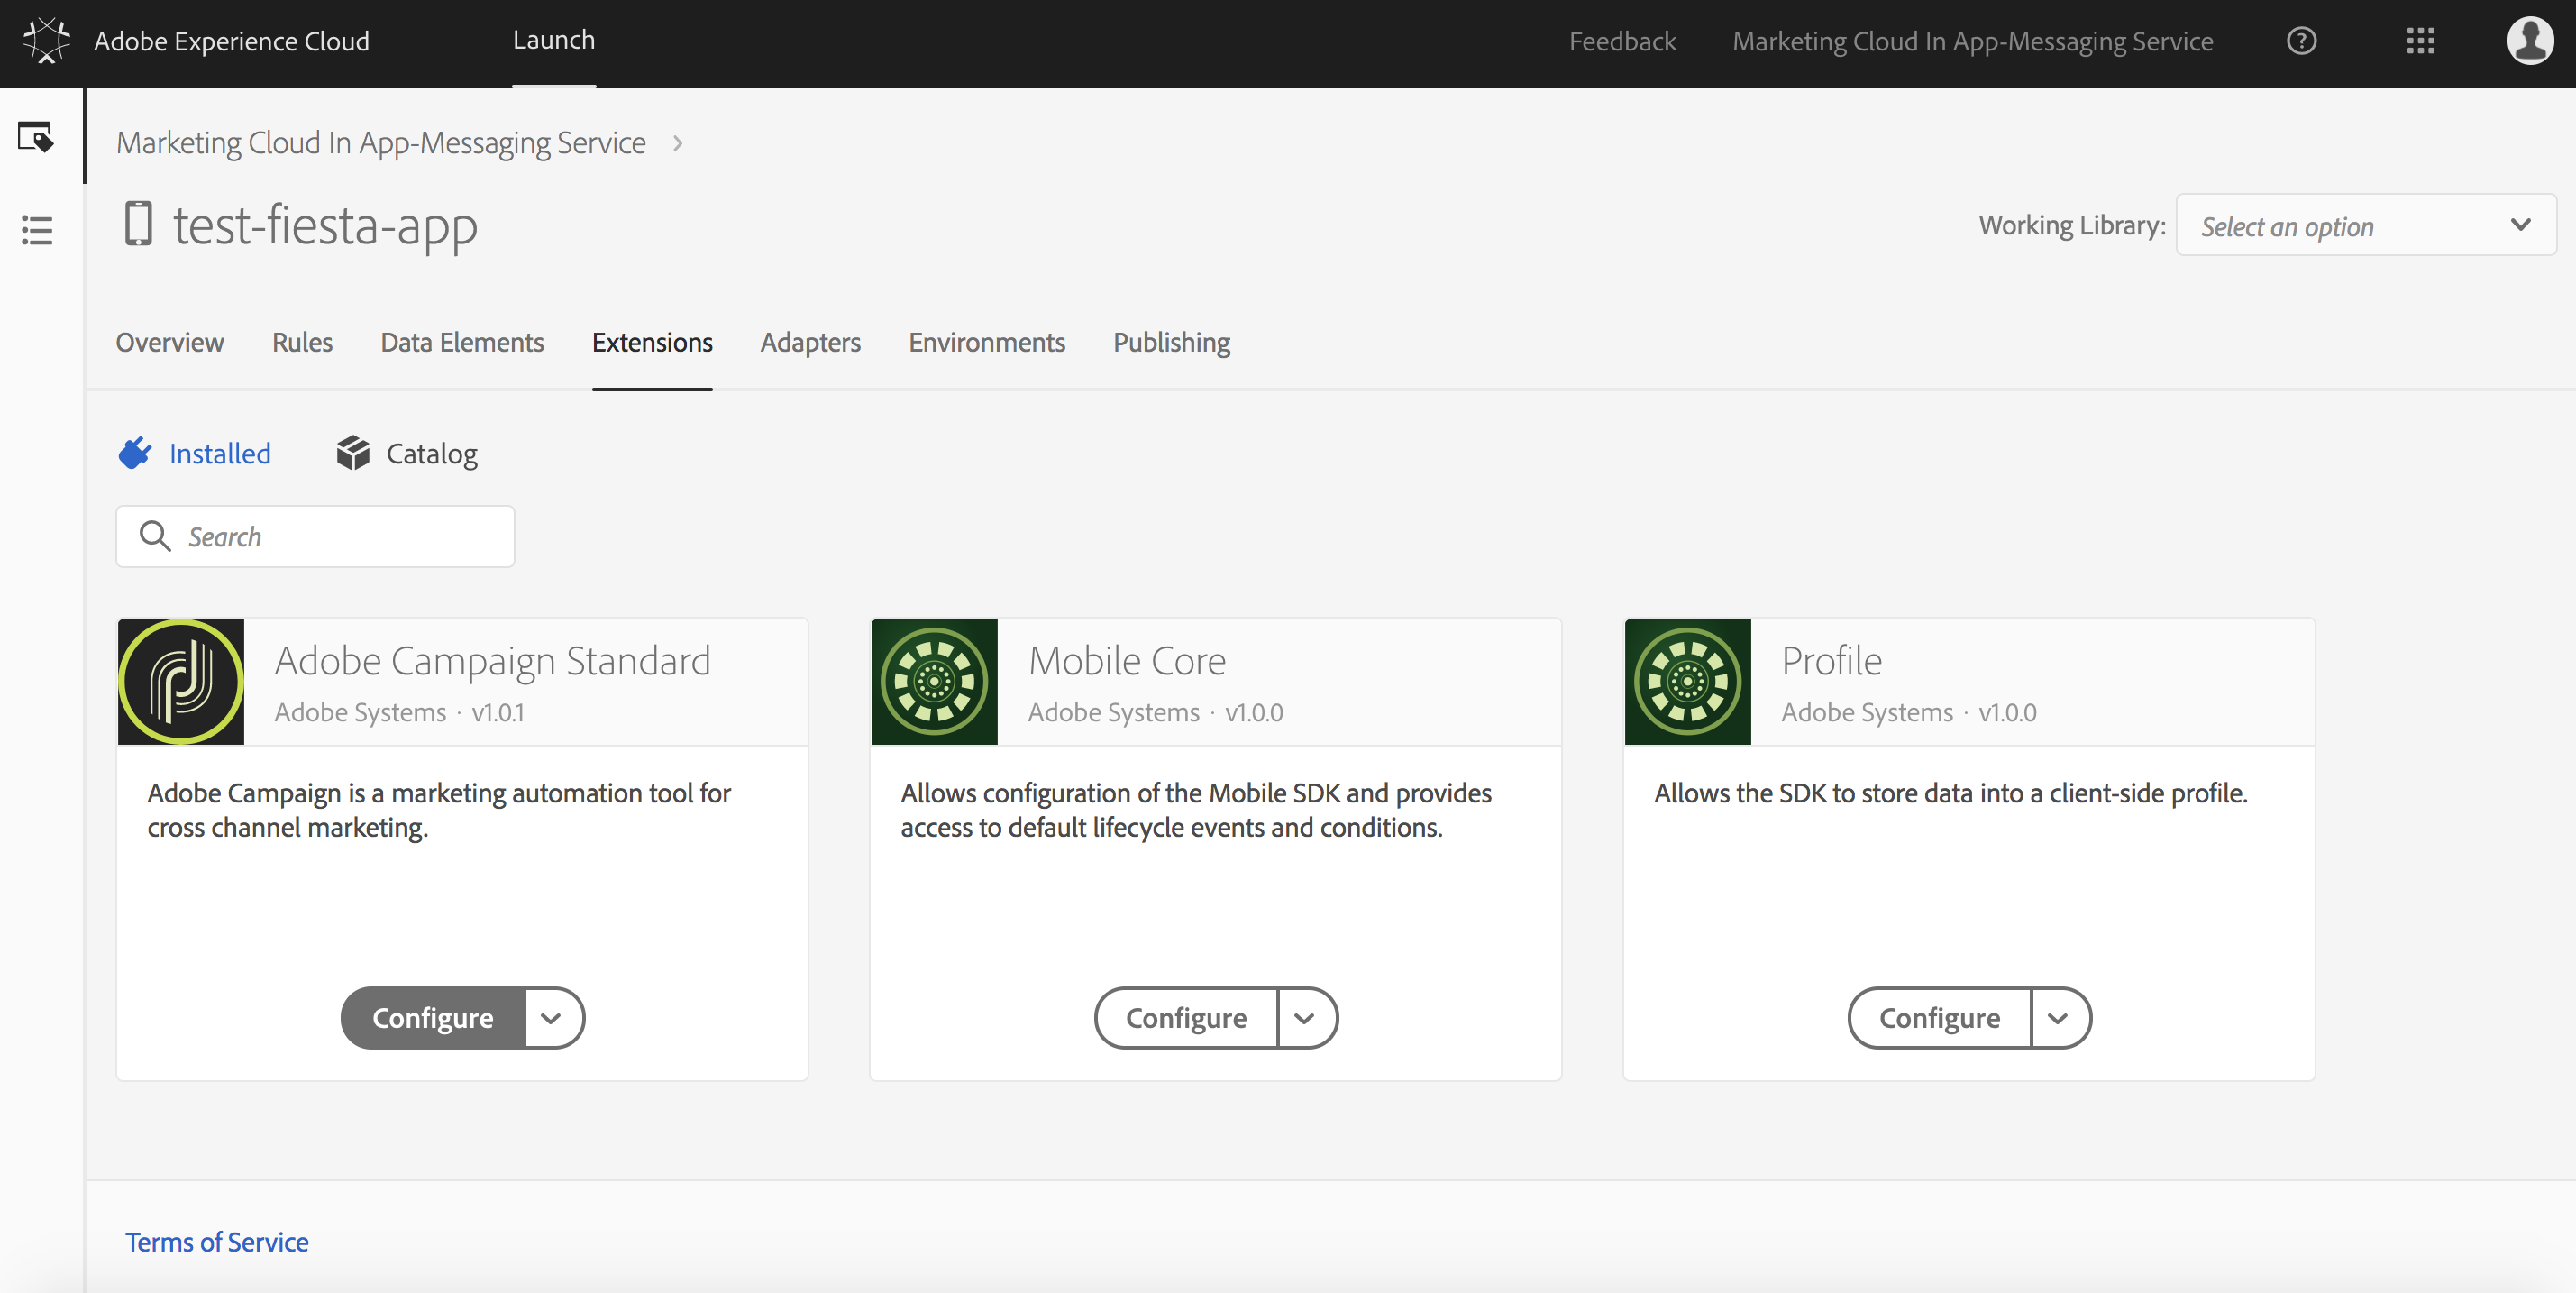
Click on the Extensions tab.
Figure A.2: Launch Extensions
Click on the Catalog link, and scroll until you find the Adobe Campaign Standard extension. Click Install to install the ACS extension in your app.
Figure A.3: Launch ACS Extension
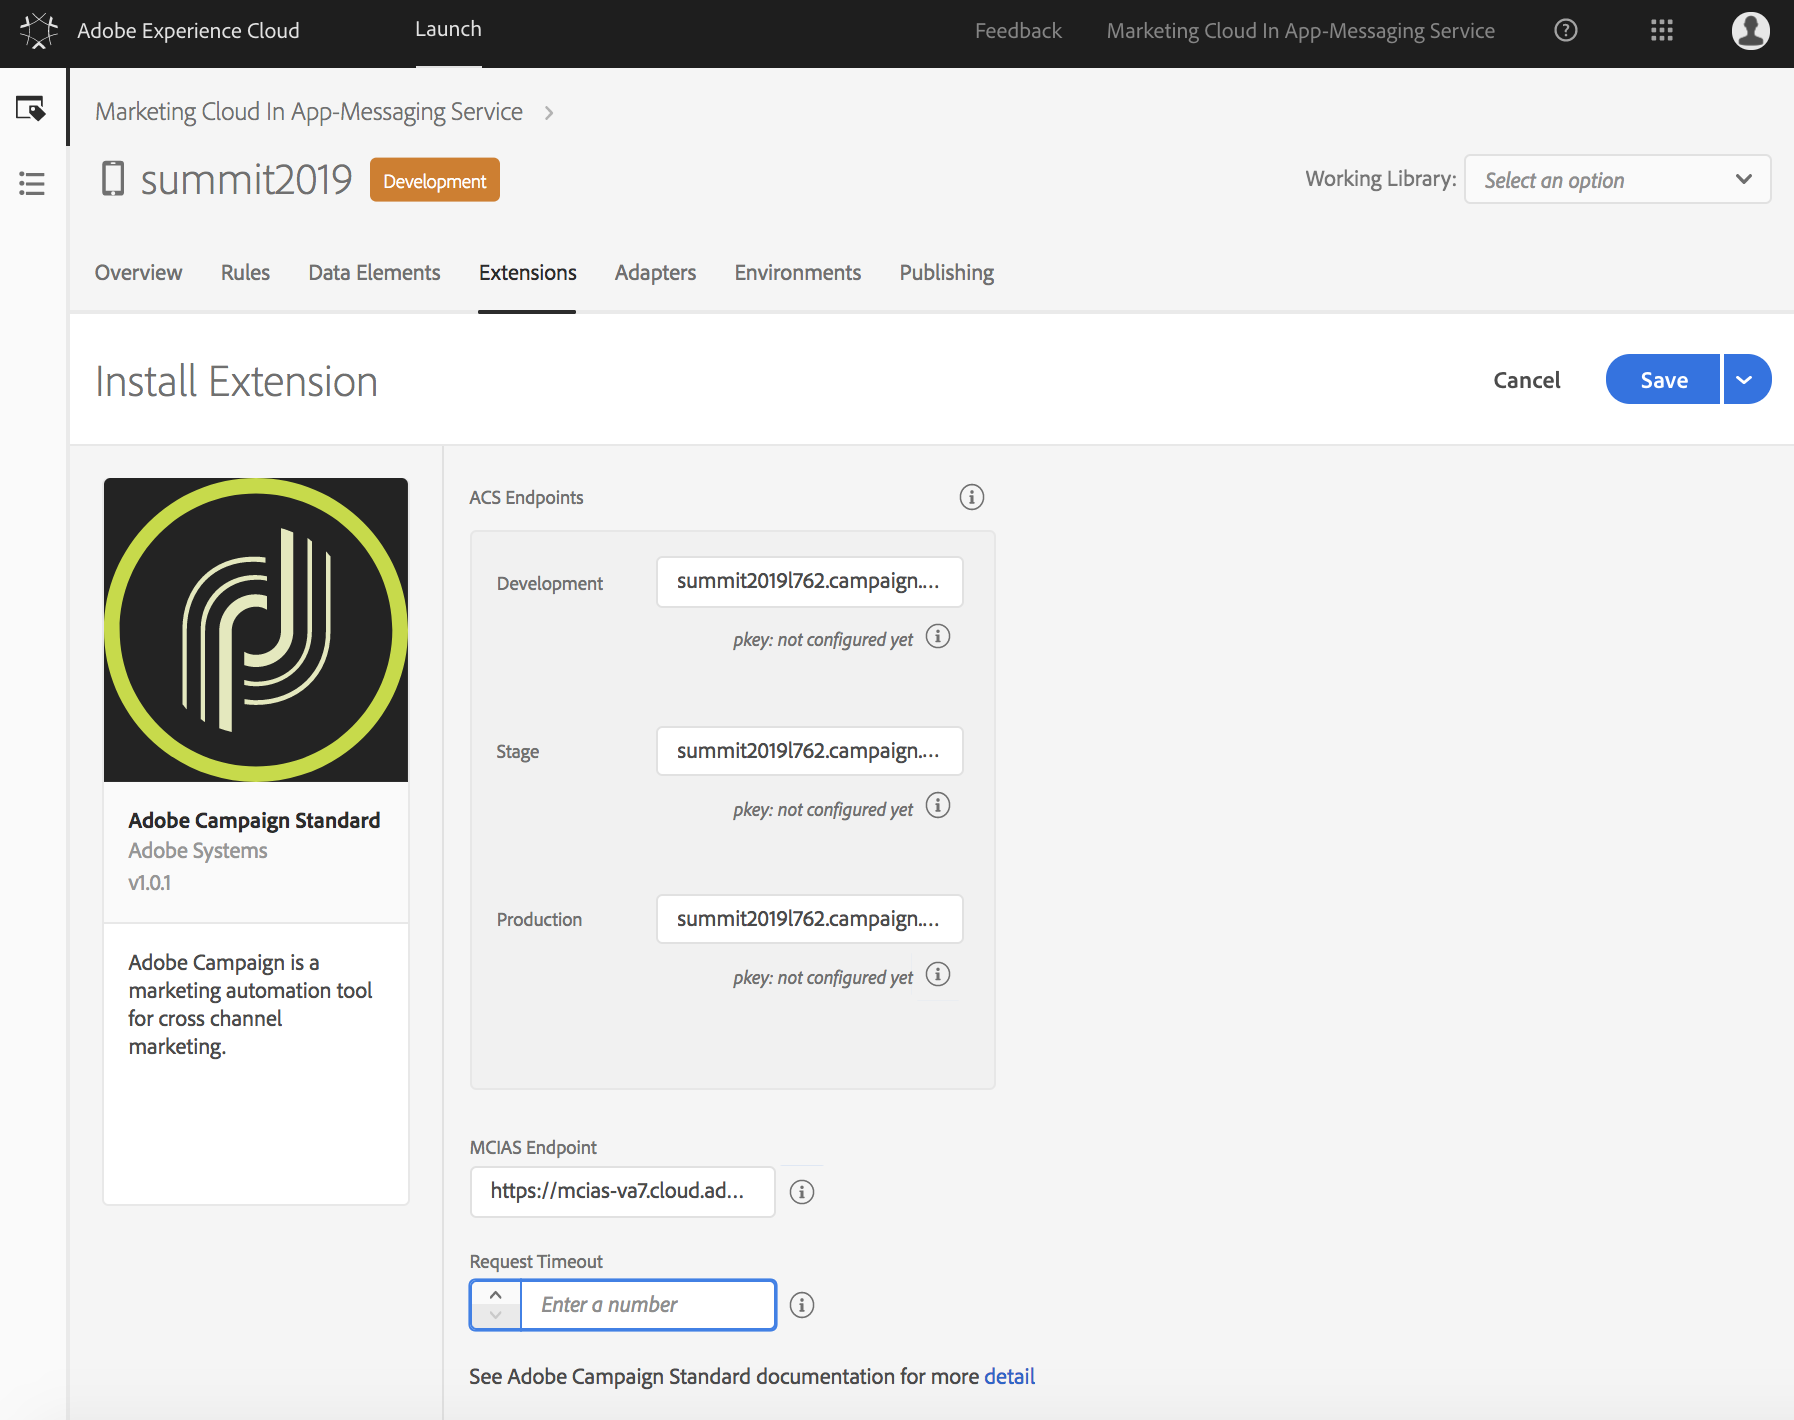
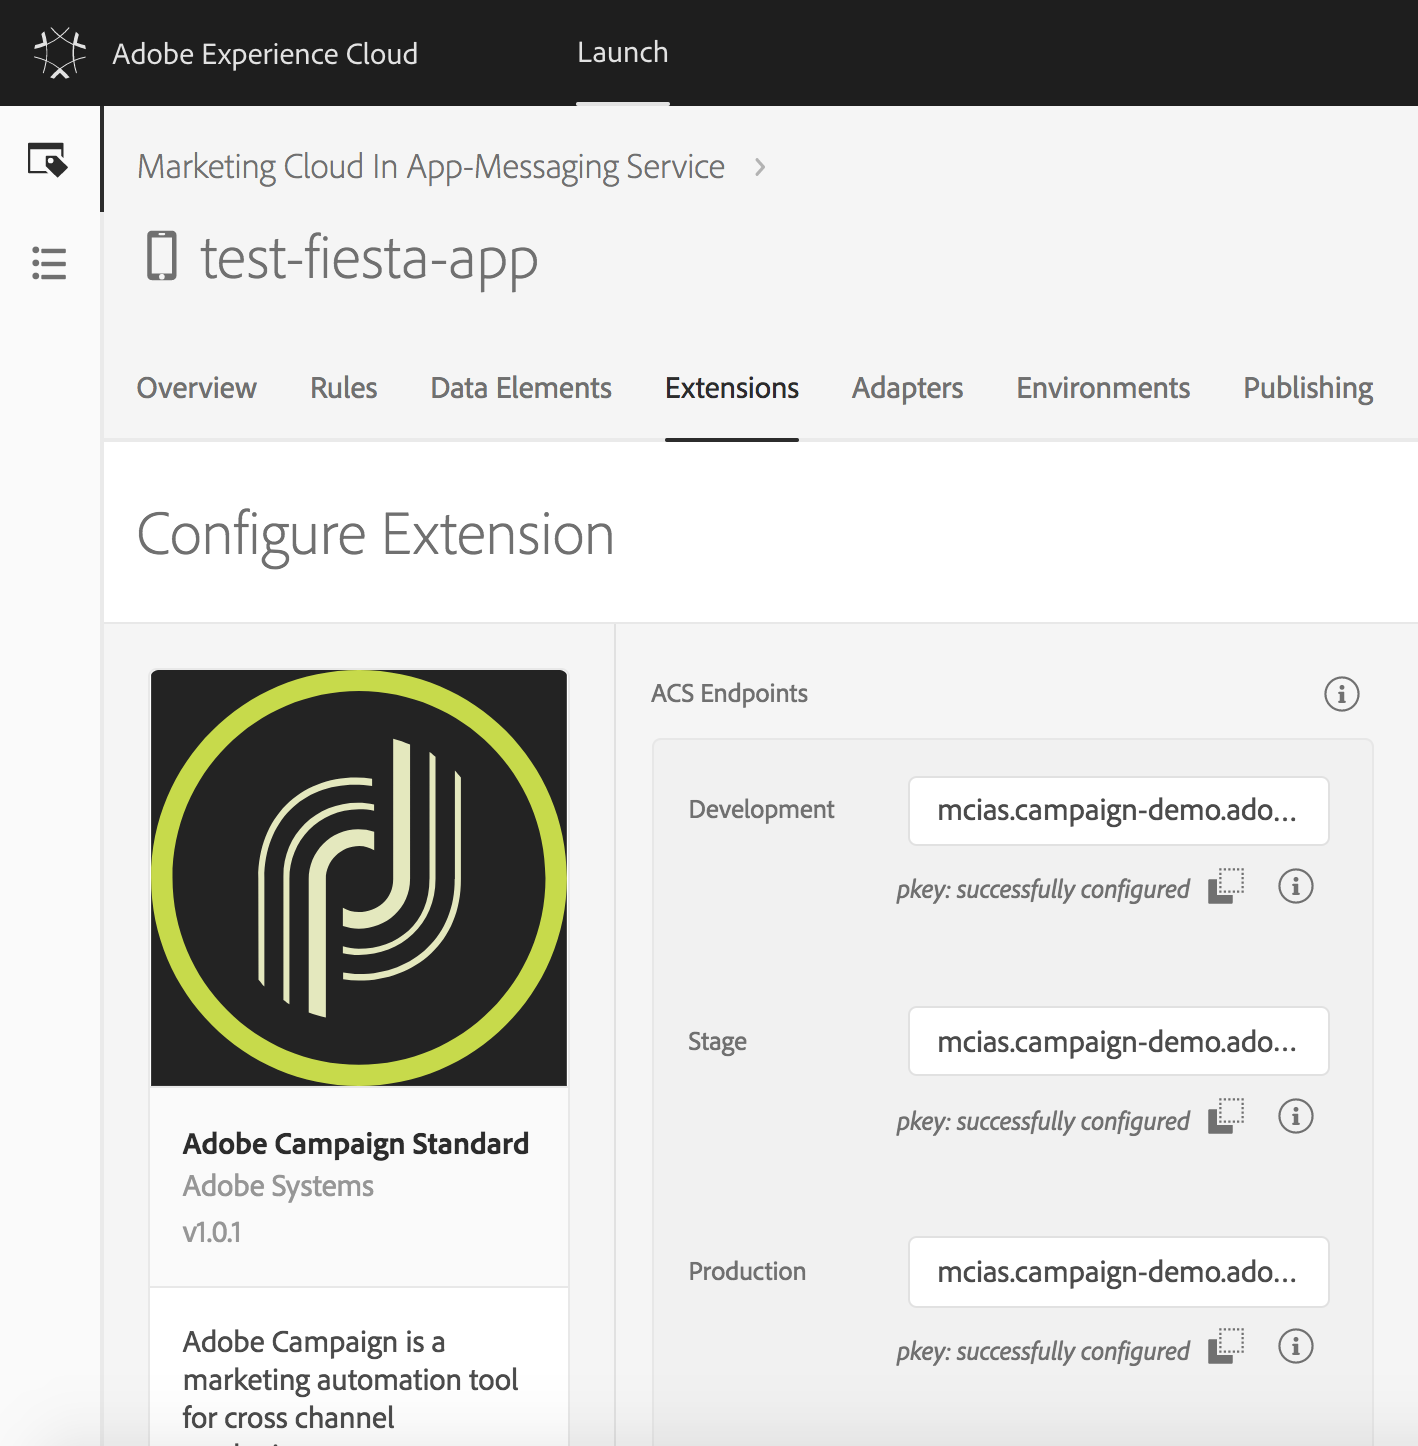
Enter the same ACS endpoint for all 3 environments: Development, Stage, and Production. In the lab environment, use summit2019l762.campaign.adobe.com.
Do not use
http://orhttps://
Enter the in-app messaging server in the MCIAS Endpoint. For the lab, use mcias-va7.cloud.adobe.io/mcias/.
Do not use
http://orhttps://
Click Save.
Figure A.4: Configure Campaign Extension
Browse to the Campaign home page: https://summit2019l762.campaign.adobe.com. If the application has not already been synced to Campaign, perform the following steps. If the application is already synced, you can skip to the next exercise.
Figure A.5: Campaign Home Page
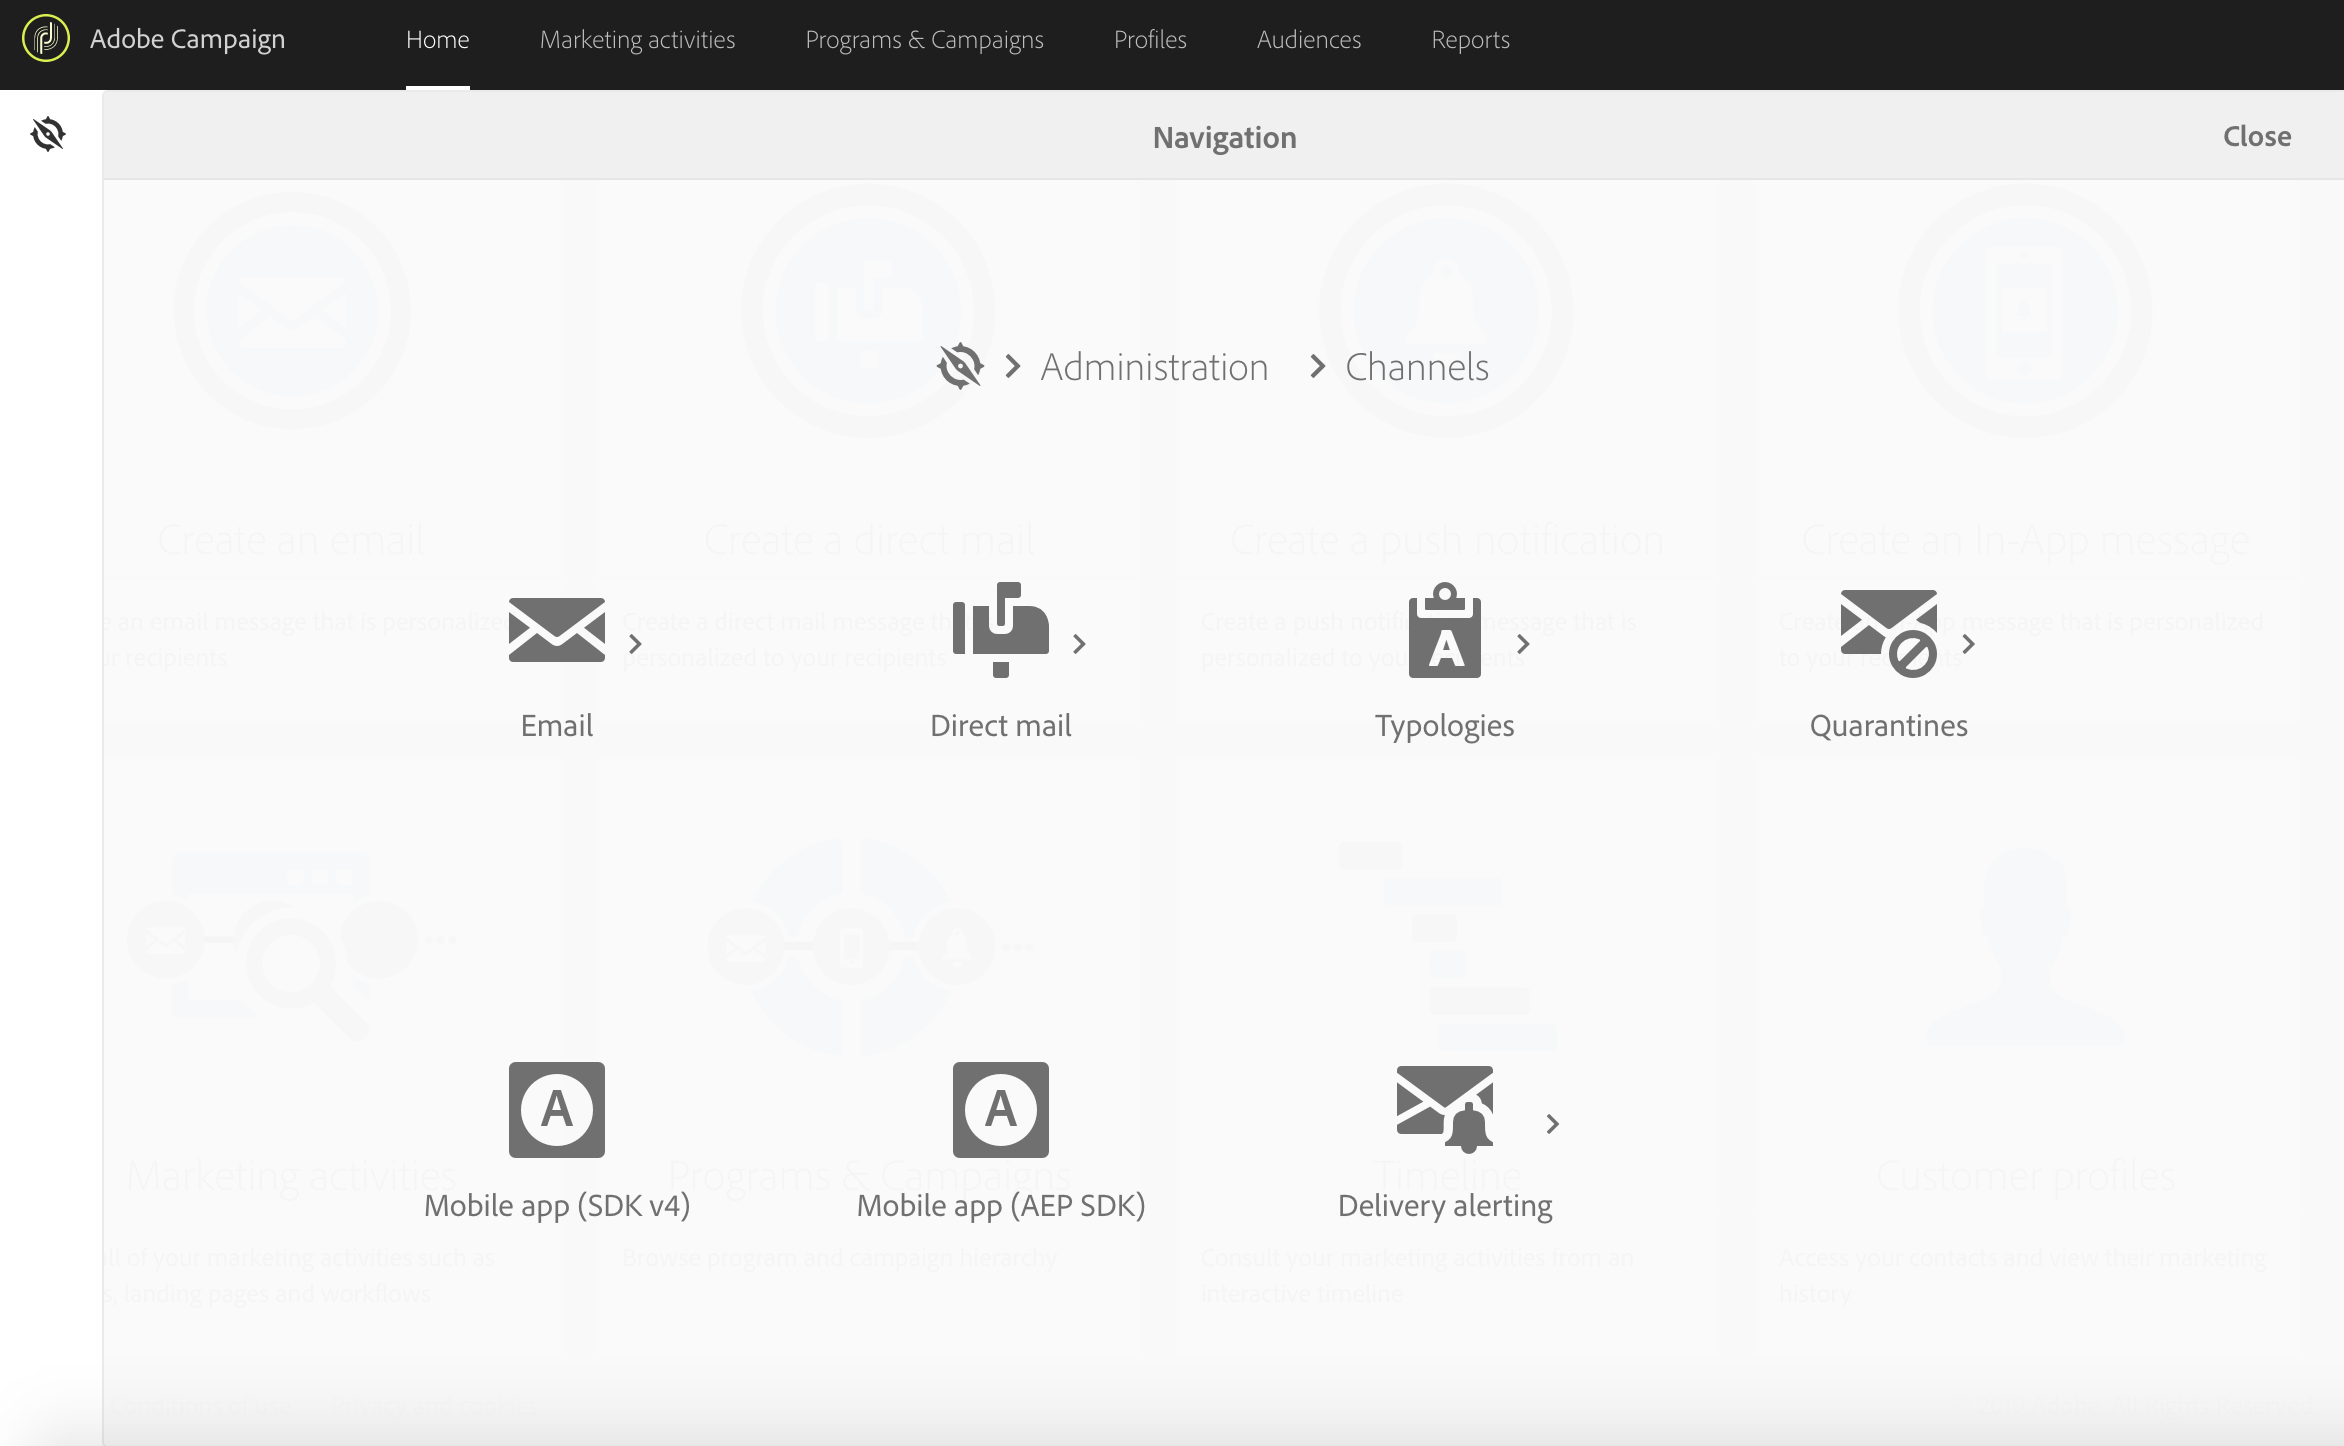
Click on the Adobe Campaign link in the upper left corner of the window. Then click Administration, followed by Channels, and finally In-app Messaging. See the following screenshots.
Figure A.6: Campaign Navigation

Figure A.7: Campaign Administration
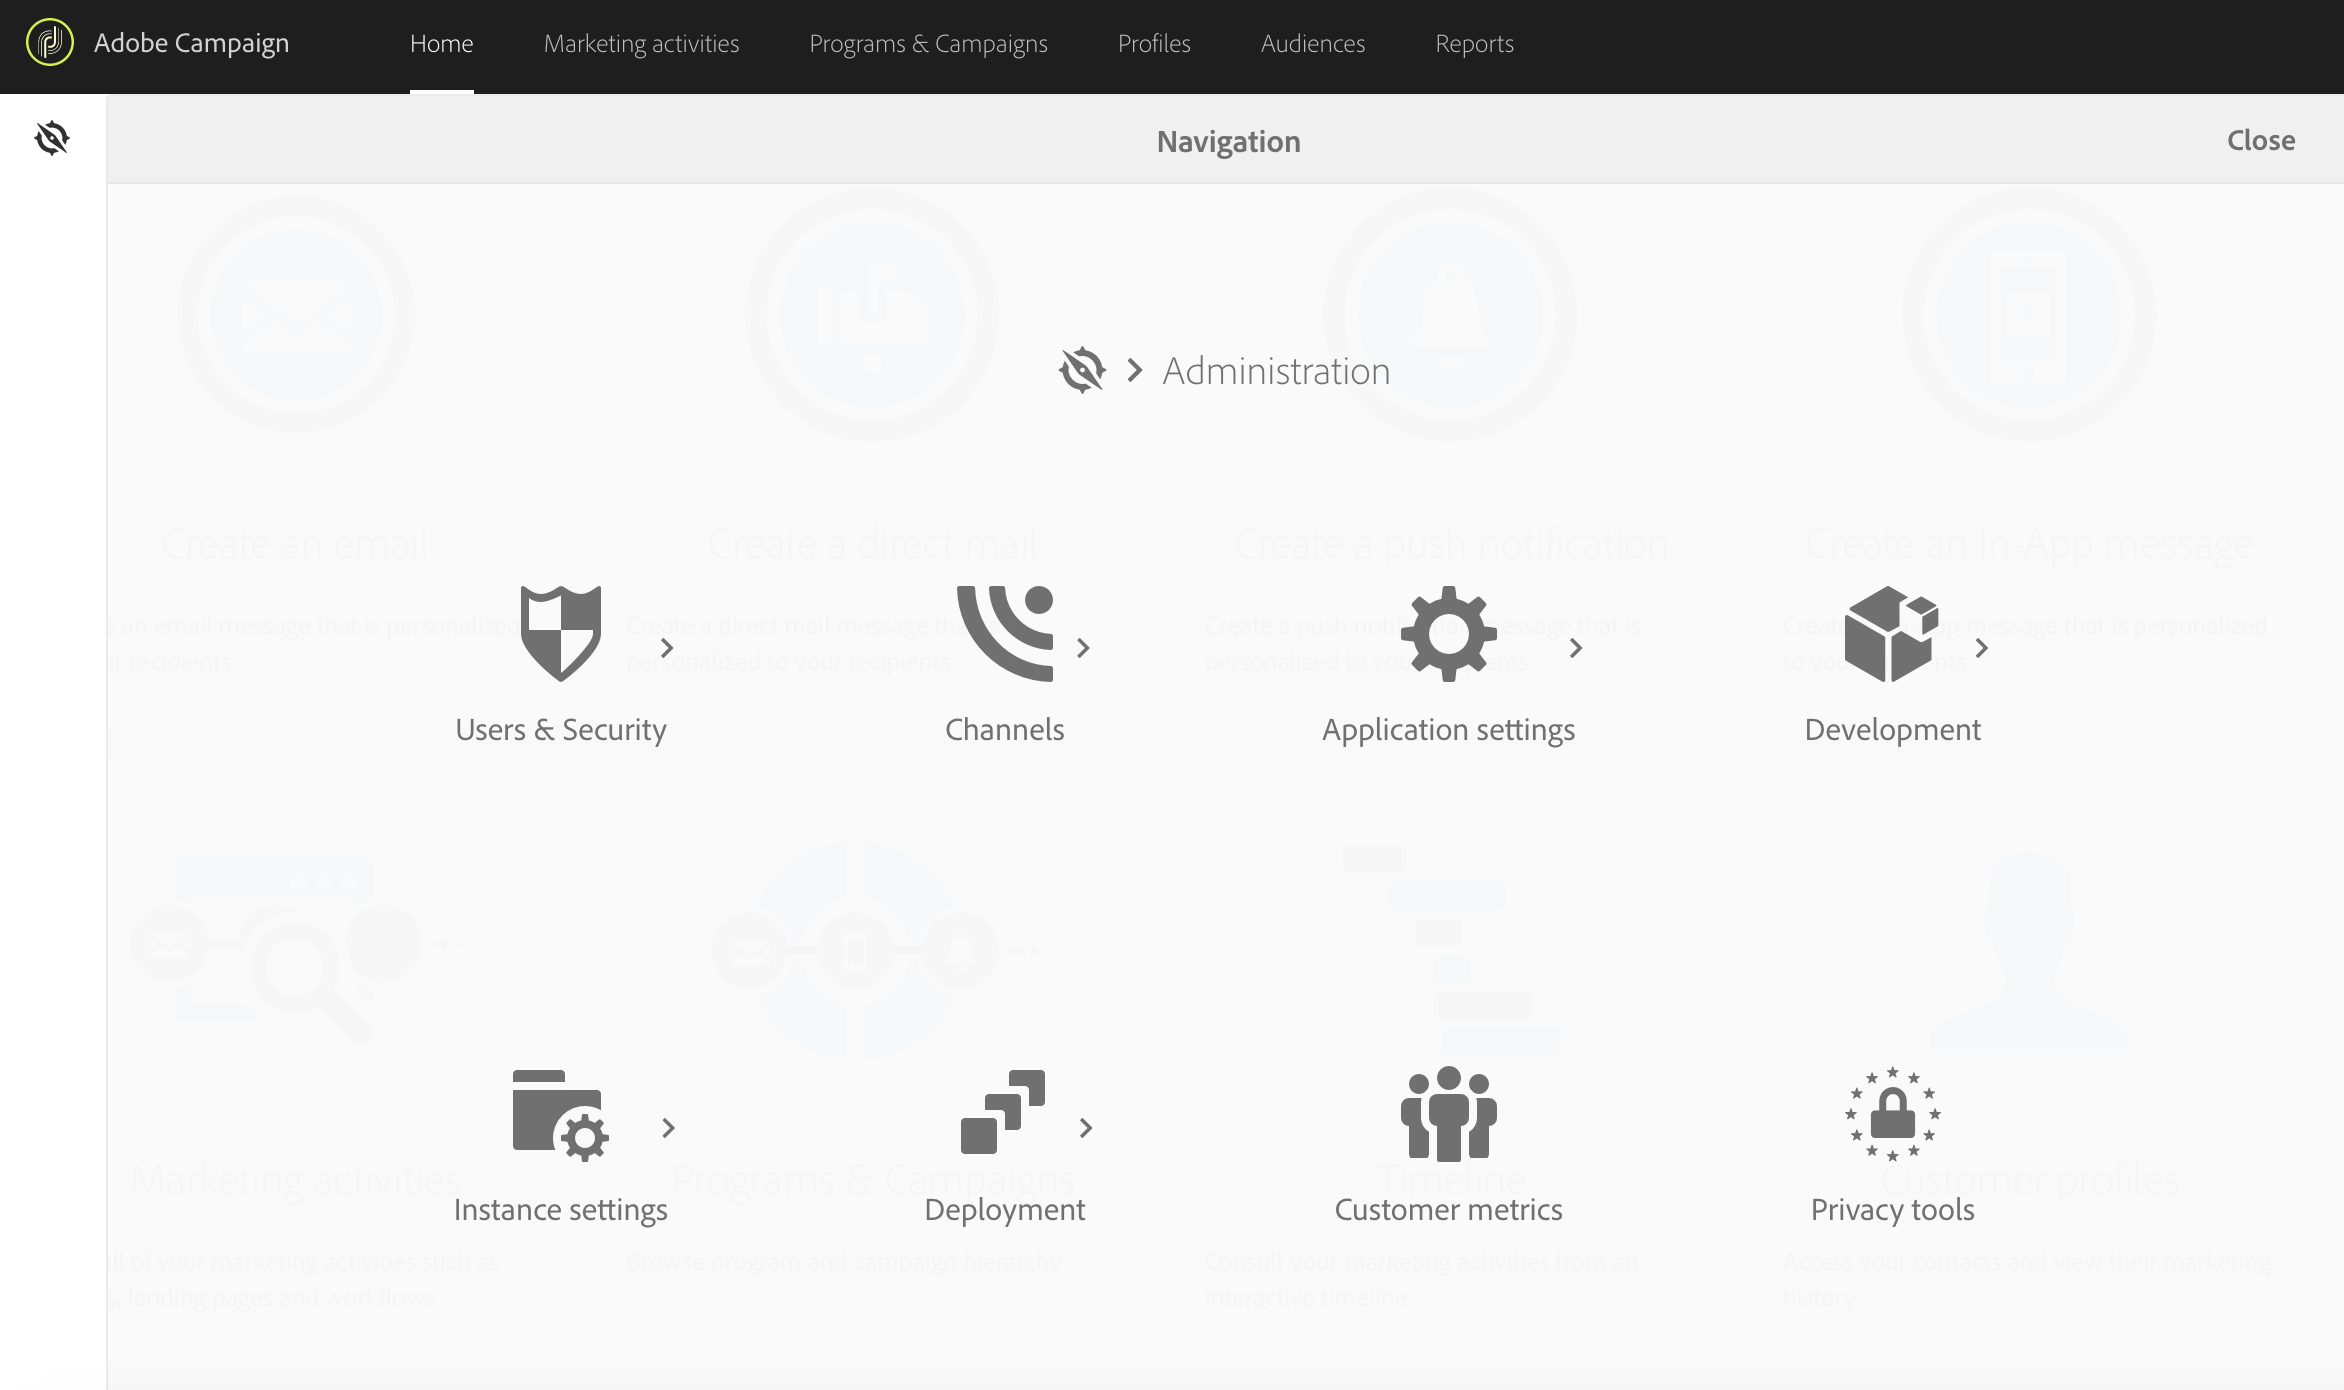
Figure A.8: Campaign Channels
You should see a list of applications synced from Launch. If your app list listed with a Configured status, you can skip to the next lesson. If you do not see your app in the list, it could be a configuration problem in Campaign or an incorrect ACS Endpoint entered in the ACS Extension in Launch. If you do not see the list of apps, but instead receive an error like the following, then you may not have the correct permissions to access Launch. Ask your Adobe Experience Cloud Organization Administrator to add your ID to the Launch group in the Admin Console.
Figure A.10: Campaign Launch Sync Error

Click on your application, and you will reach the Mobile App Configuration screen. Simply click Save, and Campaign will sync the necessary information with Launch.
Figure A.11: Campaign Mobile App Configuration
Return to Adobe Launch and click on your app. Click on Extensions, and click Configure on the Campaign Standard extension.
Figure A.12: Launch Extensions
You should now see pkey successfully configured below each of the ACS Endpoints.
Figure A.13: Launch Configuration
Republish and download the library from Lesson 2. It will now include both the Places and ACS extensions, with the correct identifier to allow the app to communicate with your Campaign instance.
Rebuild the app with the updated library.
We will now create a delivery in Campaign using the In-app Messaging Channel to deliver a location-based message to the application.
Note: Your property must be configured in Launch, have the Campaign Standard Extension installed, and be synced with your Campaign instance.
Browse to the Campaign home page: https://summit2019l762.campaign.adobe.com. If the application has not already been synced to Campaign, return to the previous exercise and complete the steps to configure the application in Campaign.
Figure A.20: Campaign Home Page
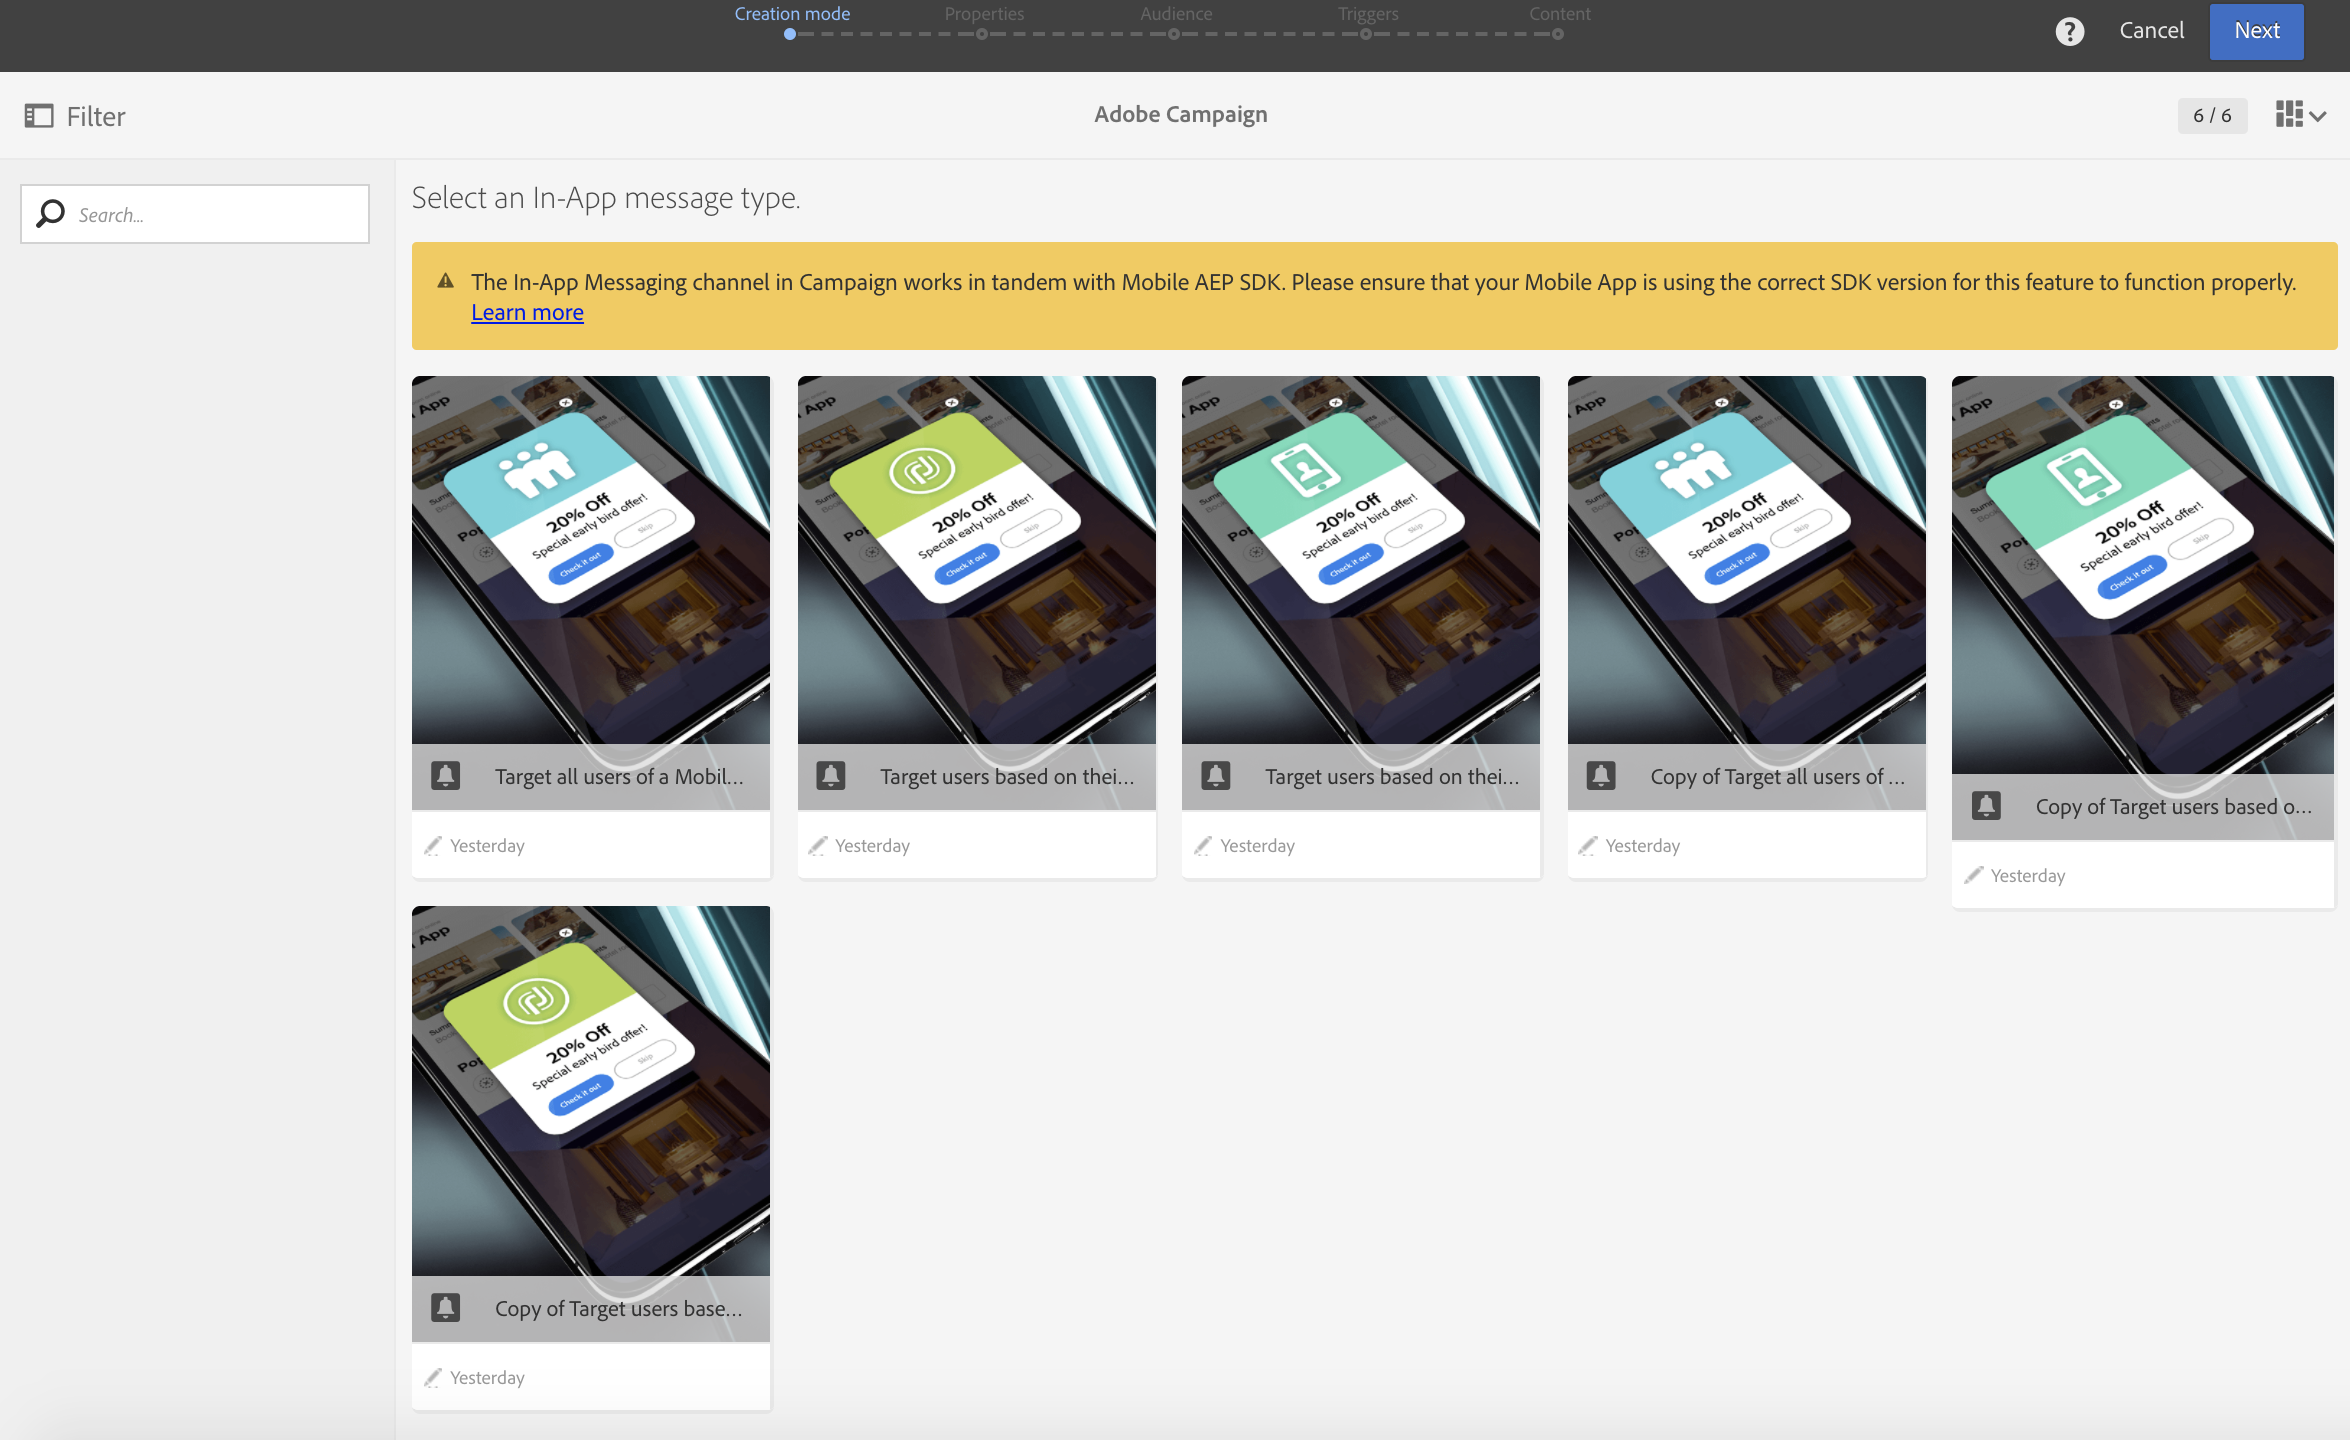
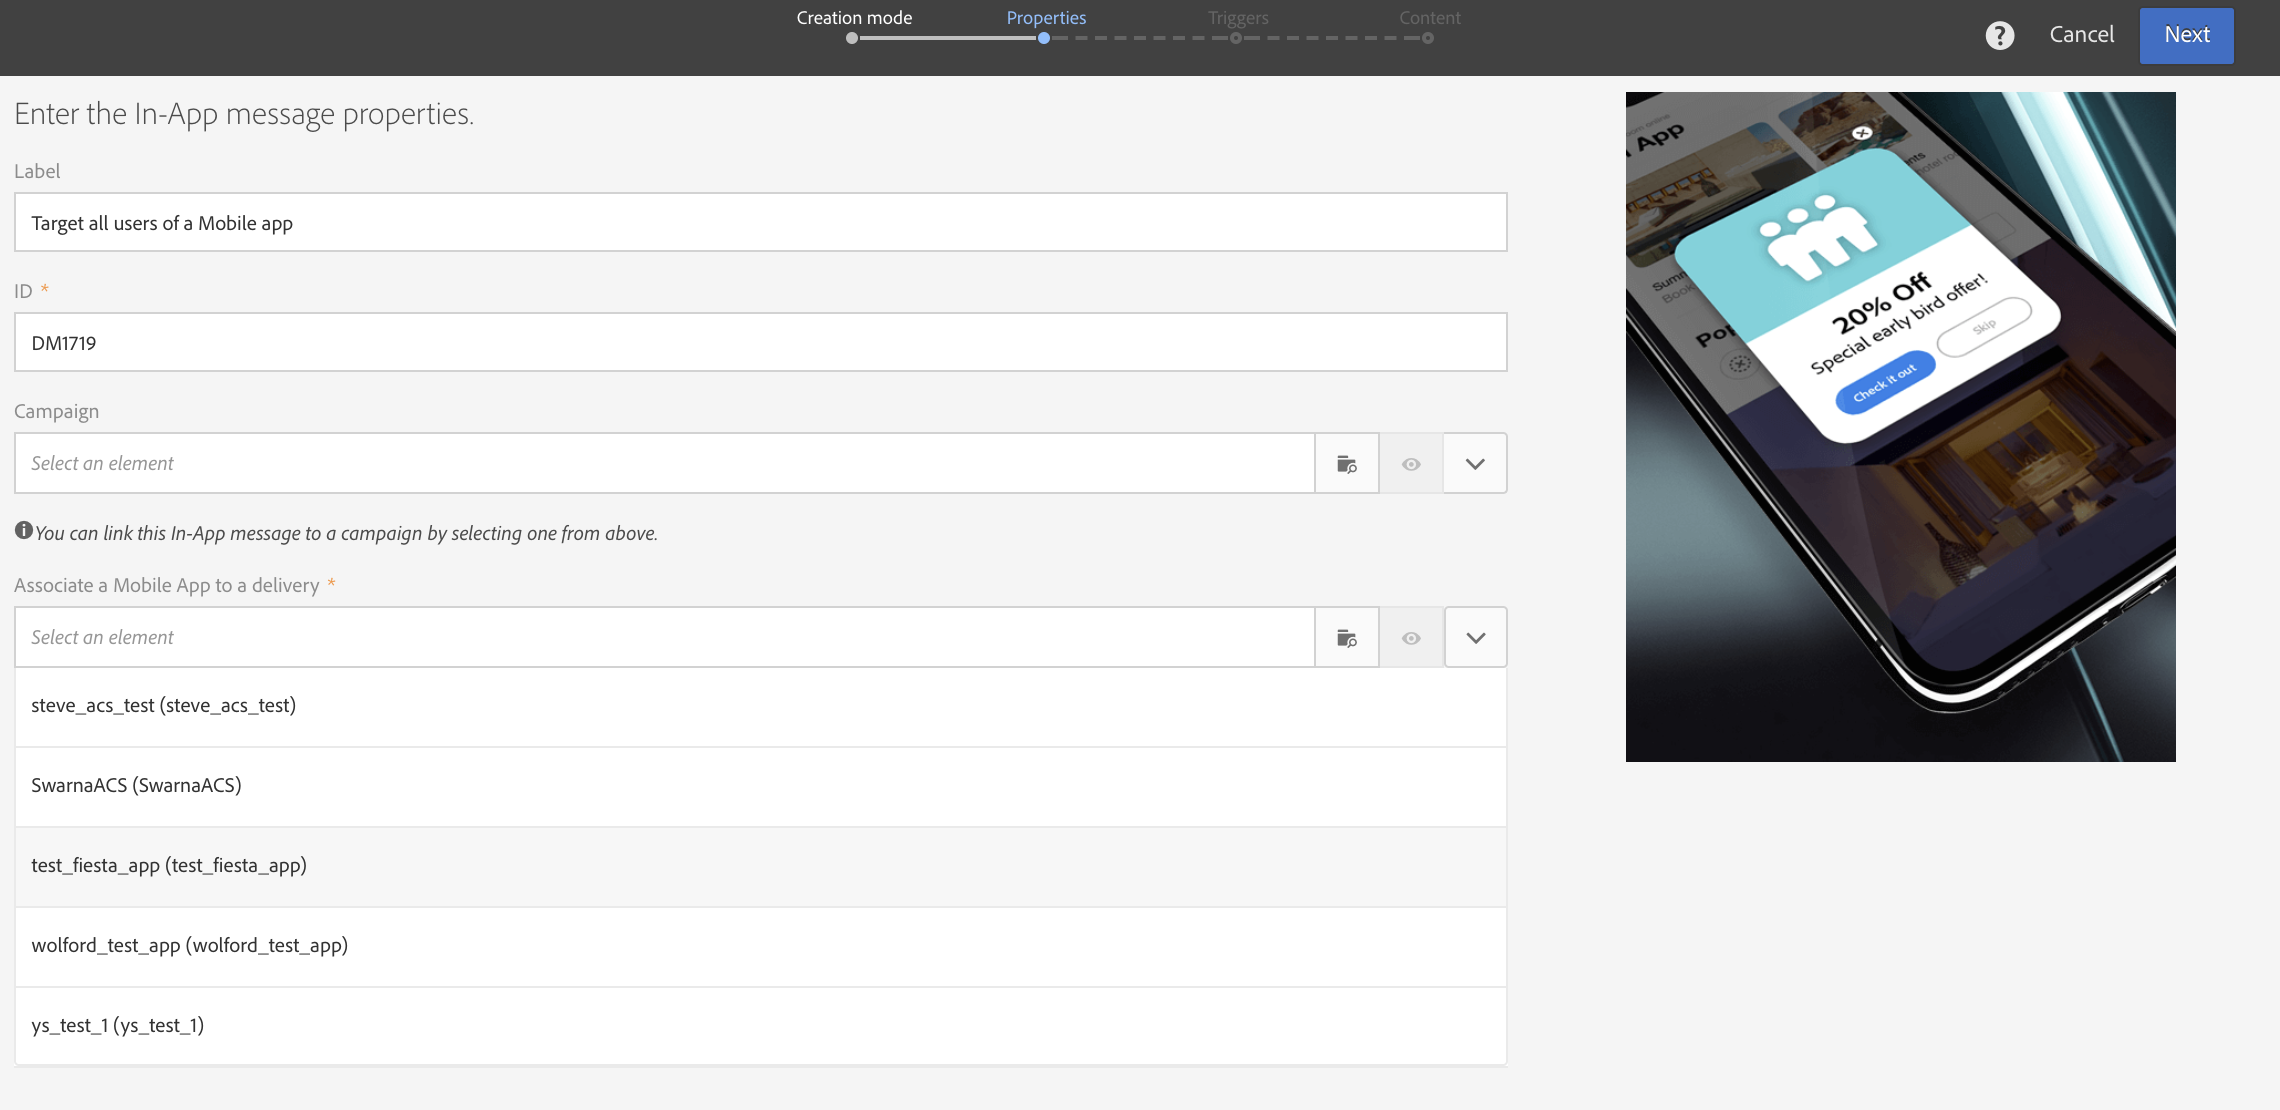
Click on the Create an In-App message tile. You will see the In-App message type selection page. Click on the tile that reads Target all users .... Click next.
Note: you can also display the message types in a list format by clicking the icon in the upper right of the window, and selecting
List Format.
Figure A.21: Campaign In-App message type
You will see the In-App Properties page, where you can select the application where the In-App message will be displayed. Select your app from the dropdown menu, and click Next.
Figure A.22: In-App Properties Page
The next screen is where you can configure the various events that will trigger the In-App message to be displayed to the user. For the lab, we will be using the Analytics Context Data trigger, and we will enter the location data previously stored in Places.
Figure A.23: In-App message trigger selection
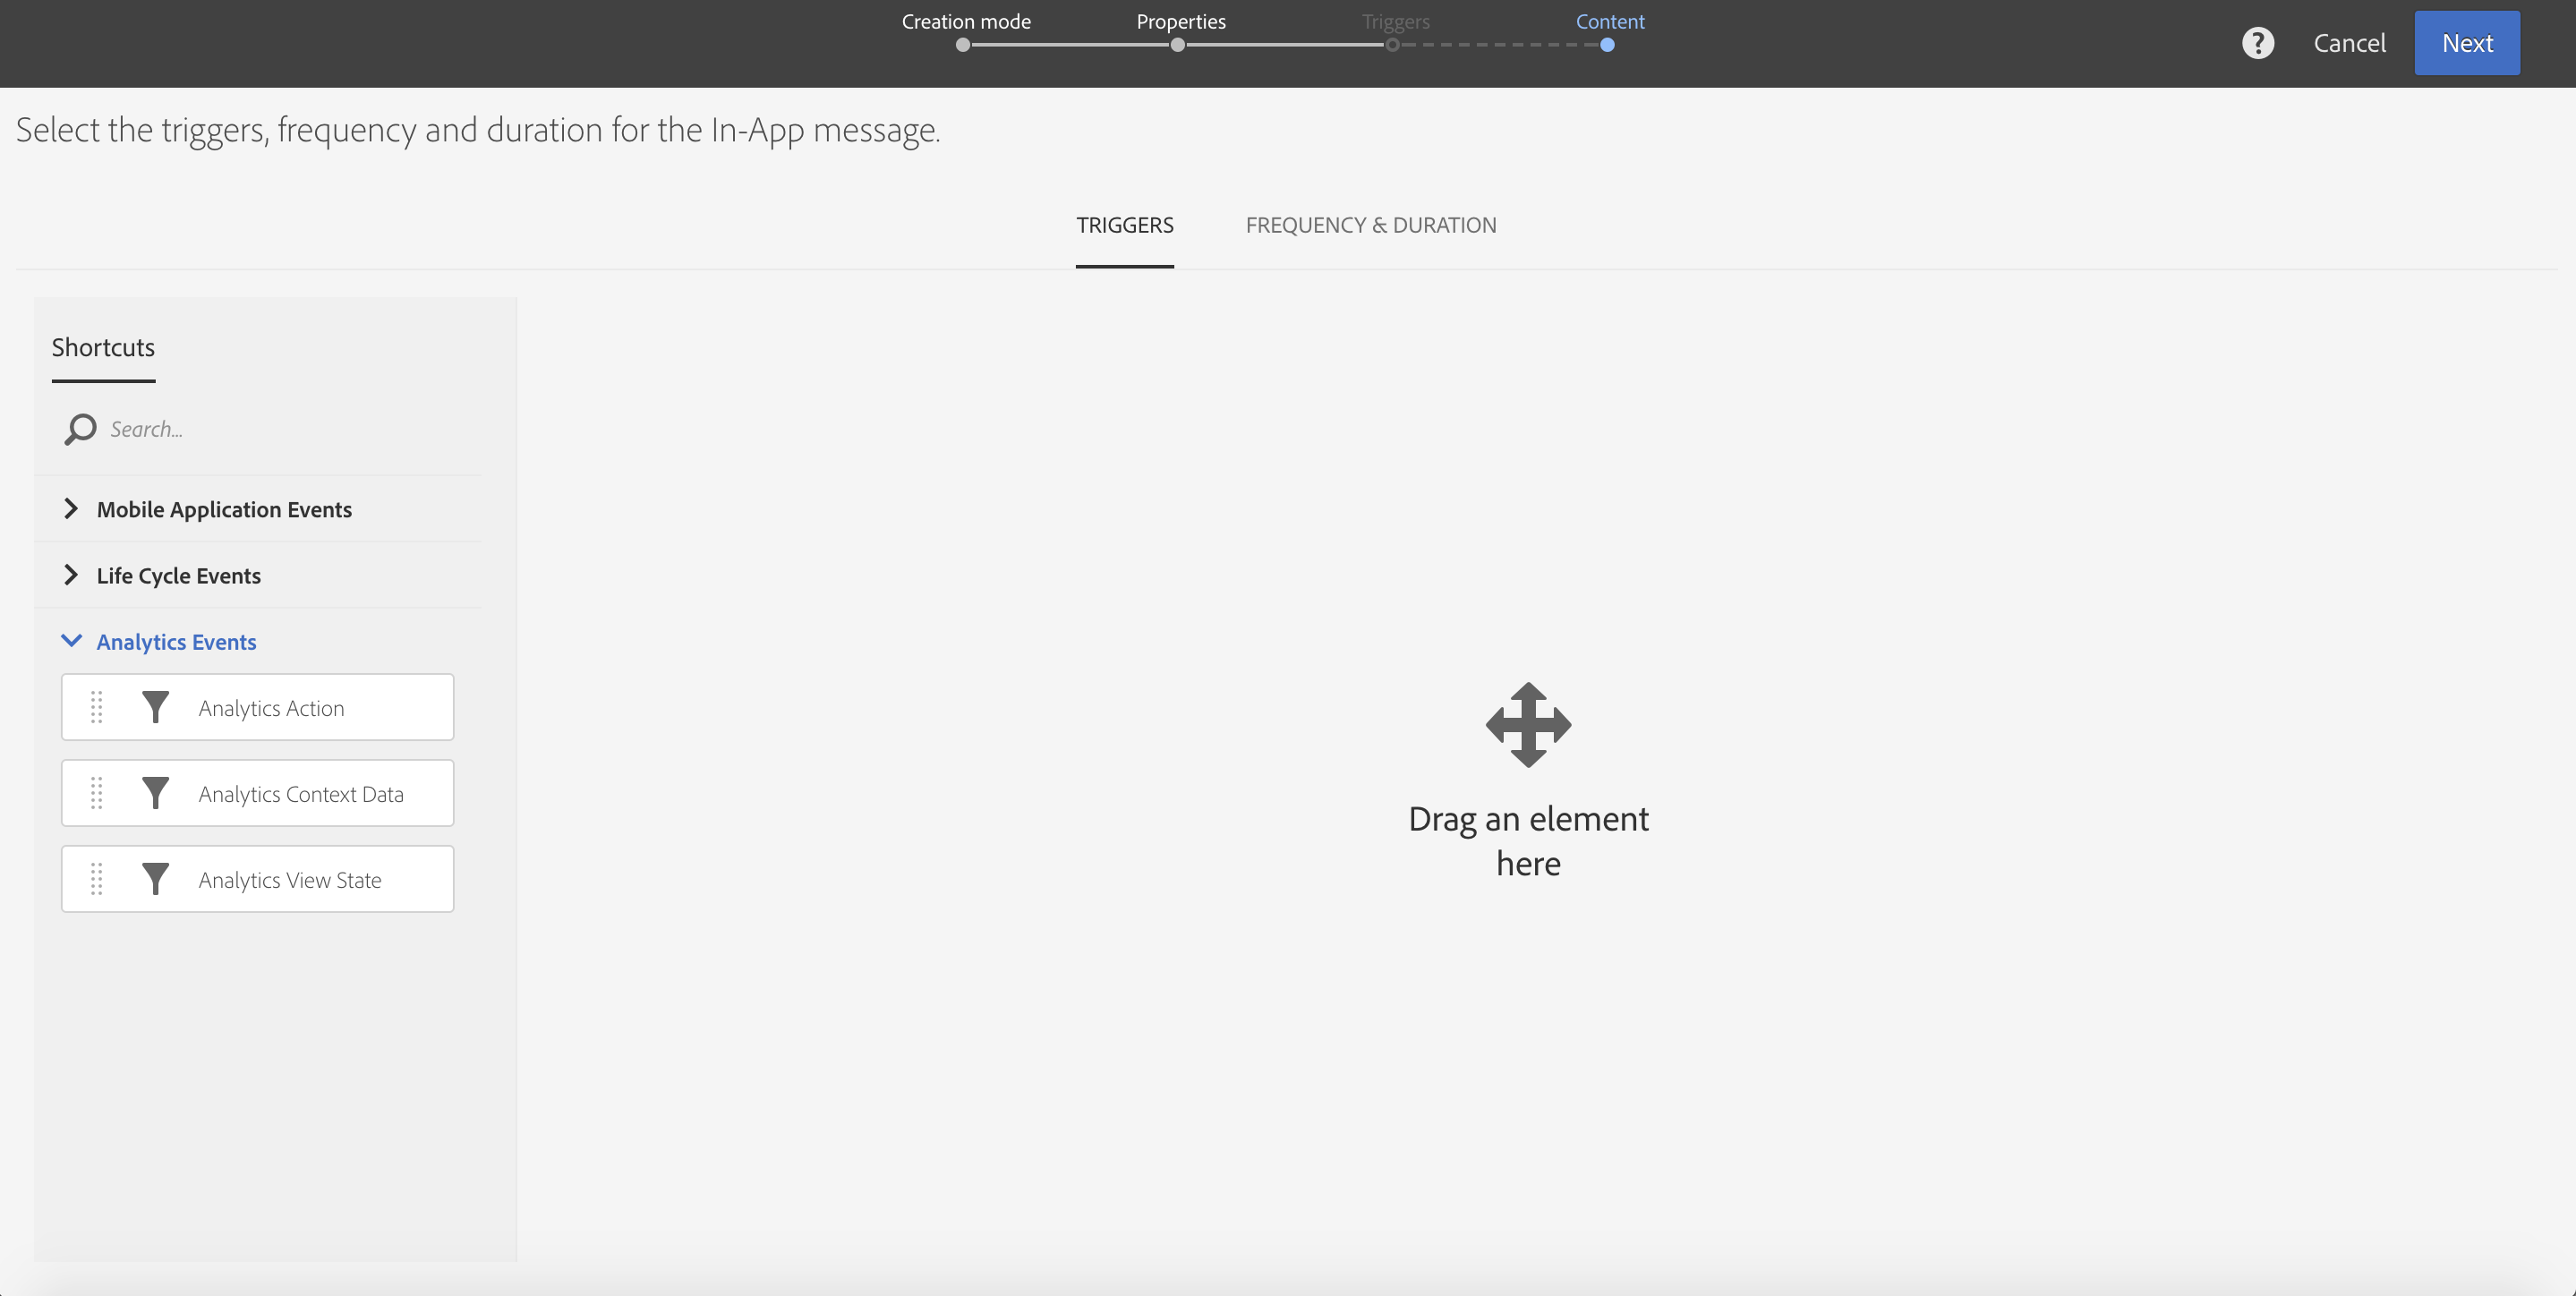
Click and drag the Analytics Context Data element to the canvas, and it will open the trigger selection dialog.
Figure A.24: Rule creation

Enter the following data in the appropriate text boxes, and then click Confirm:
| Field | Value |
|---|---|
~type |
com.adobe.eventType.places |
Repeat the click and drag of the Analytics Context Data element to the canvas, to enter three more elements of the trigger. When dragging, try to drop the new element directly under the existing element(s), so that they are automatically grouped together in an AND grouping. The values to enter are as follows for the lab:
| Field | Value |
|---|---|
~source |
com.adobe.eventSource.responseContent |
regioneventtype |
entry |
~state.com.adobe.module.places/lastenteredpoi.name |
Sands |
When you are done, the trigger selection page should look like this:
Figure A.25: Completed trigger
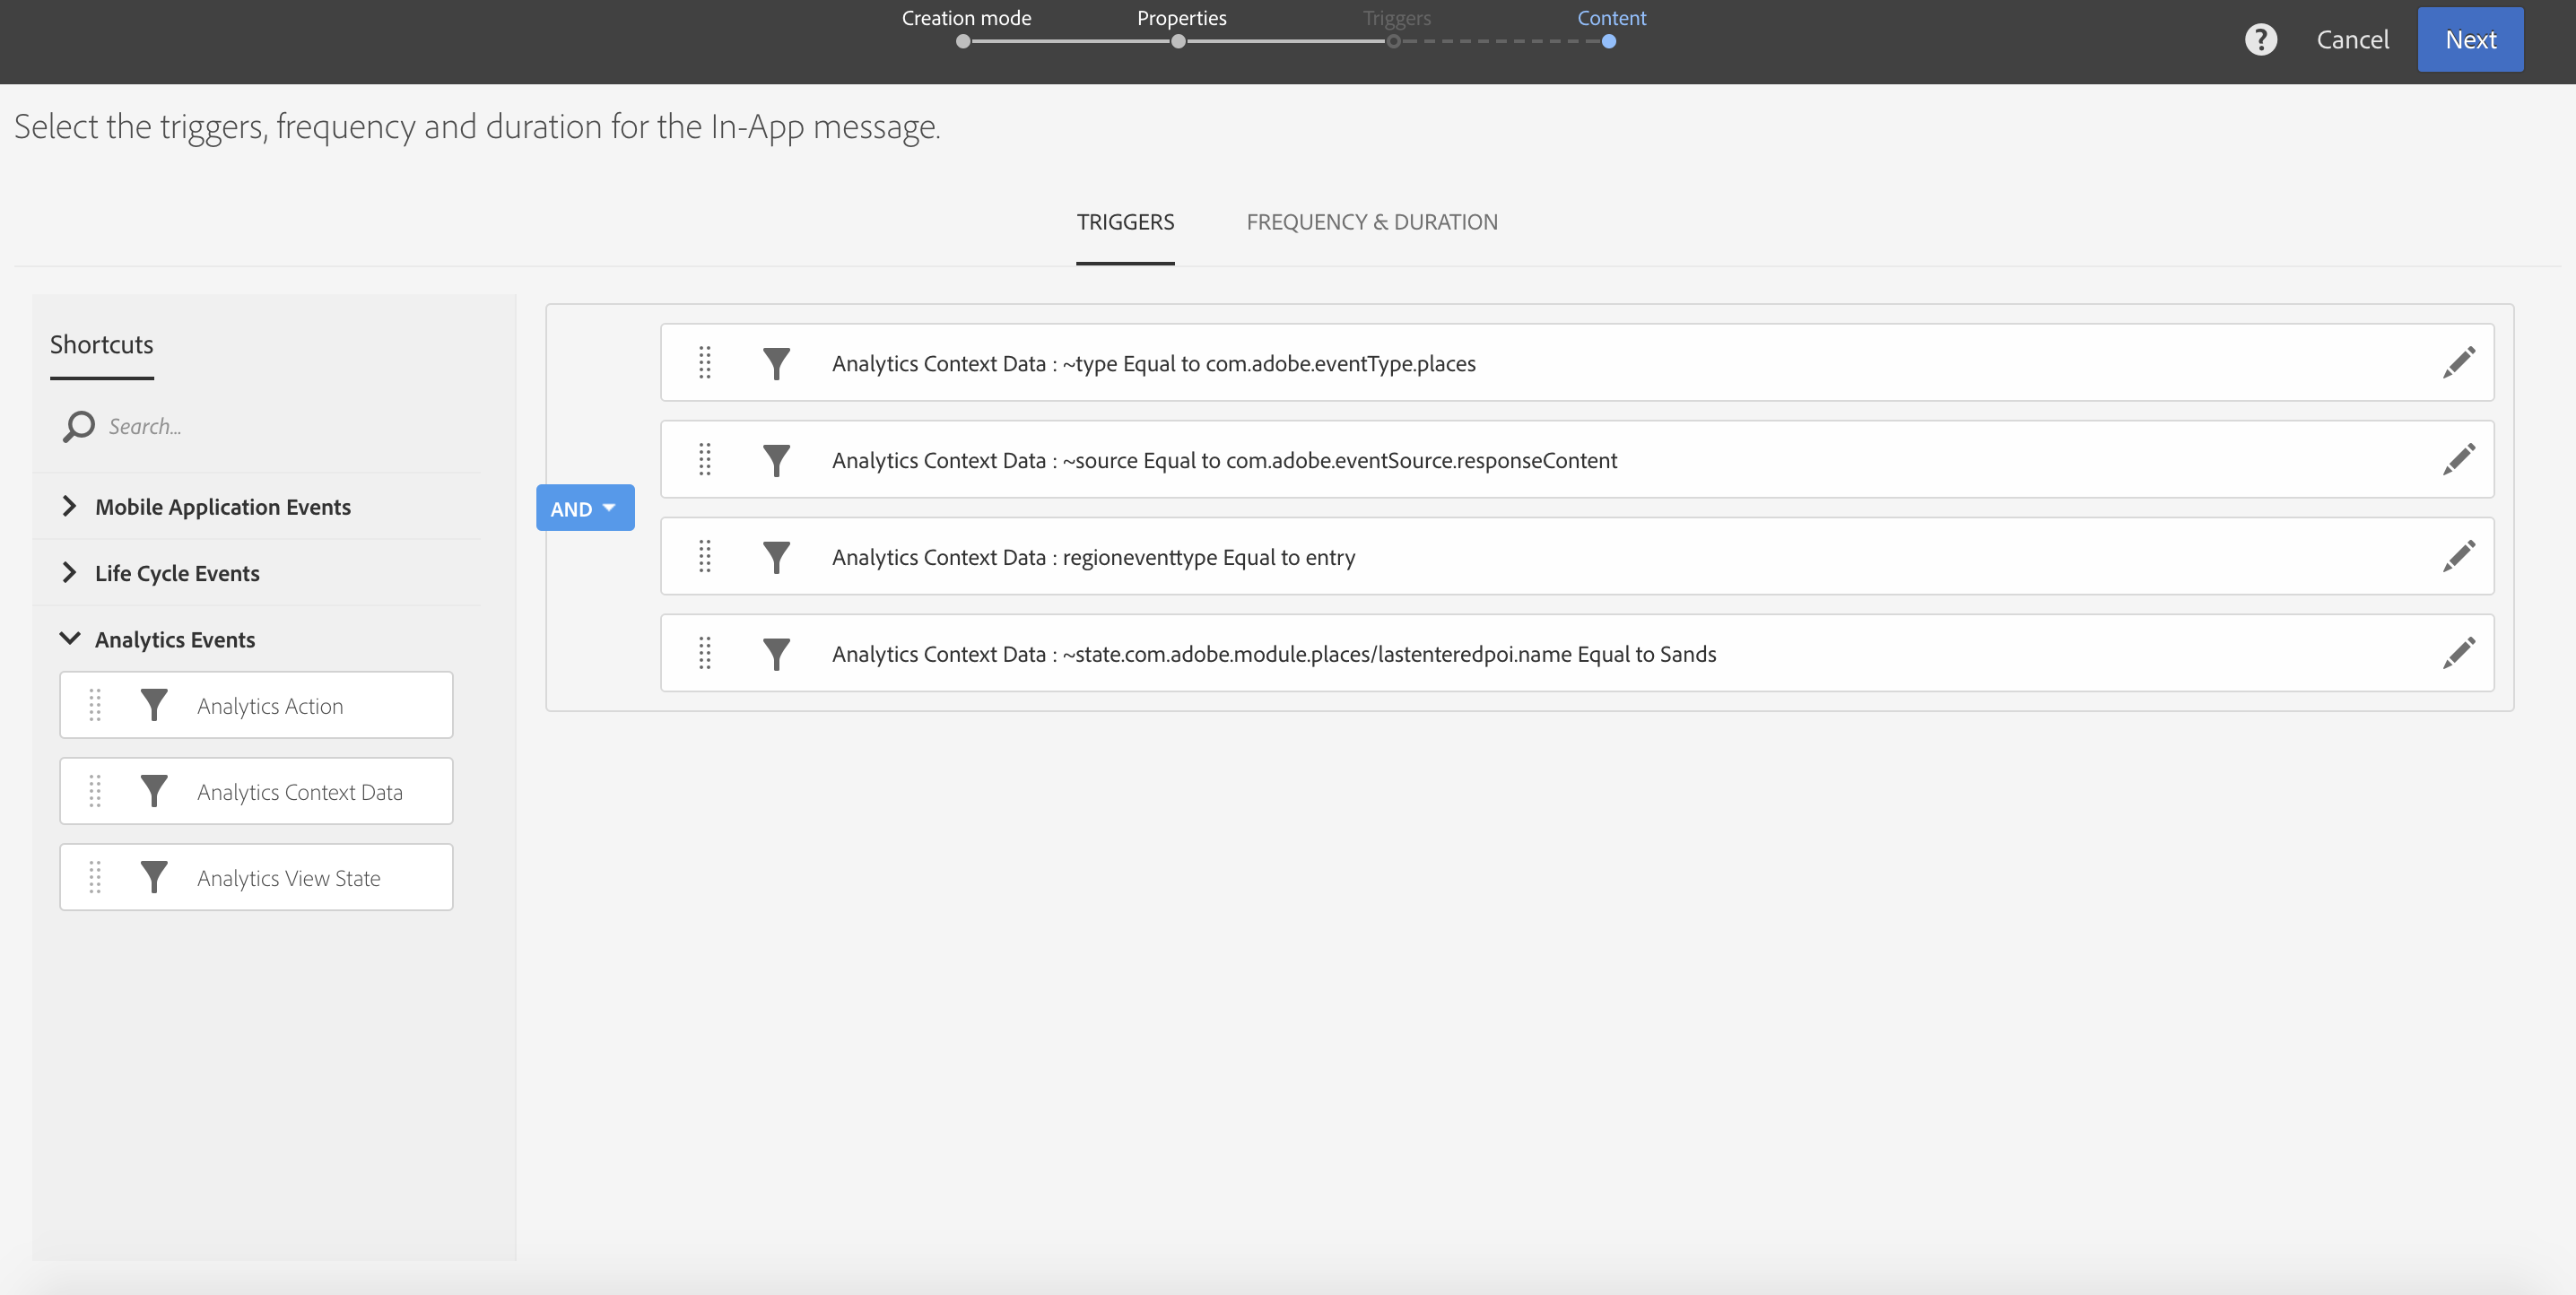
Note: The four elements of the trigger are all grouped in a single
ANDgrouping. If that is not true for your trigger, you must drag the individual elements to rearrange them until only a single grouping remains.
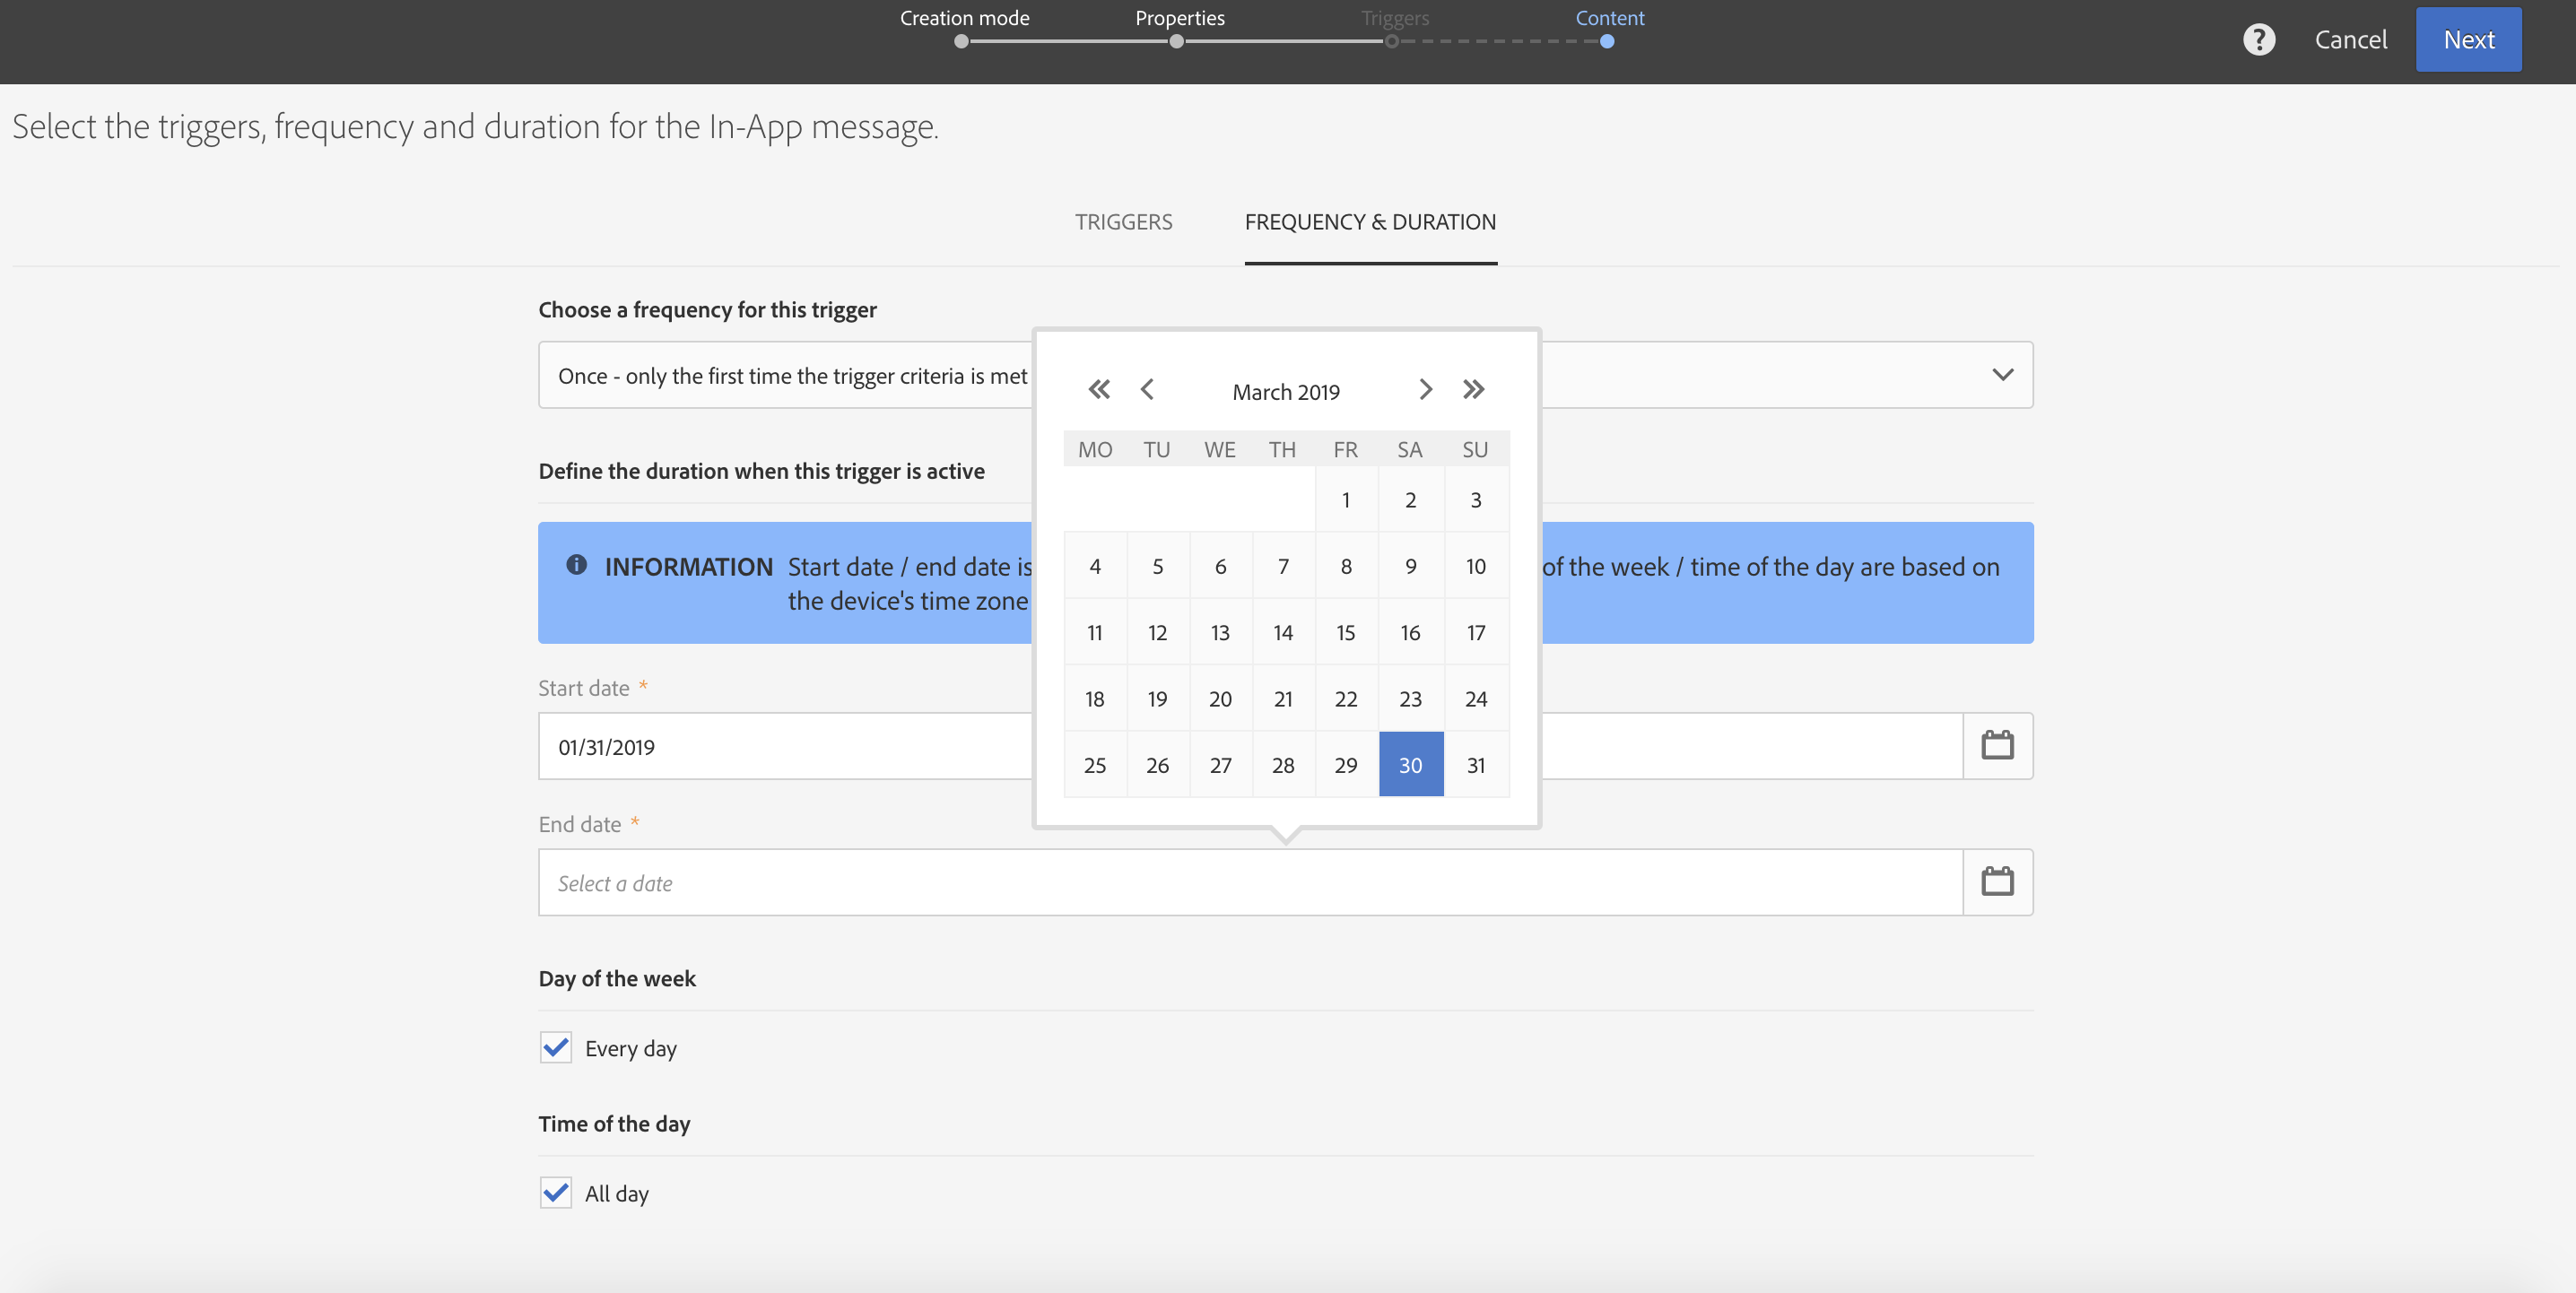
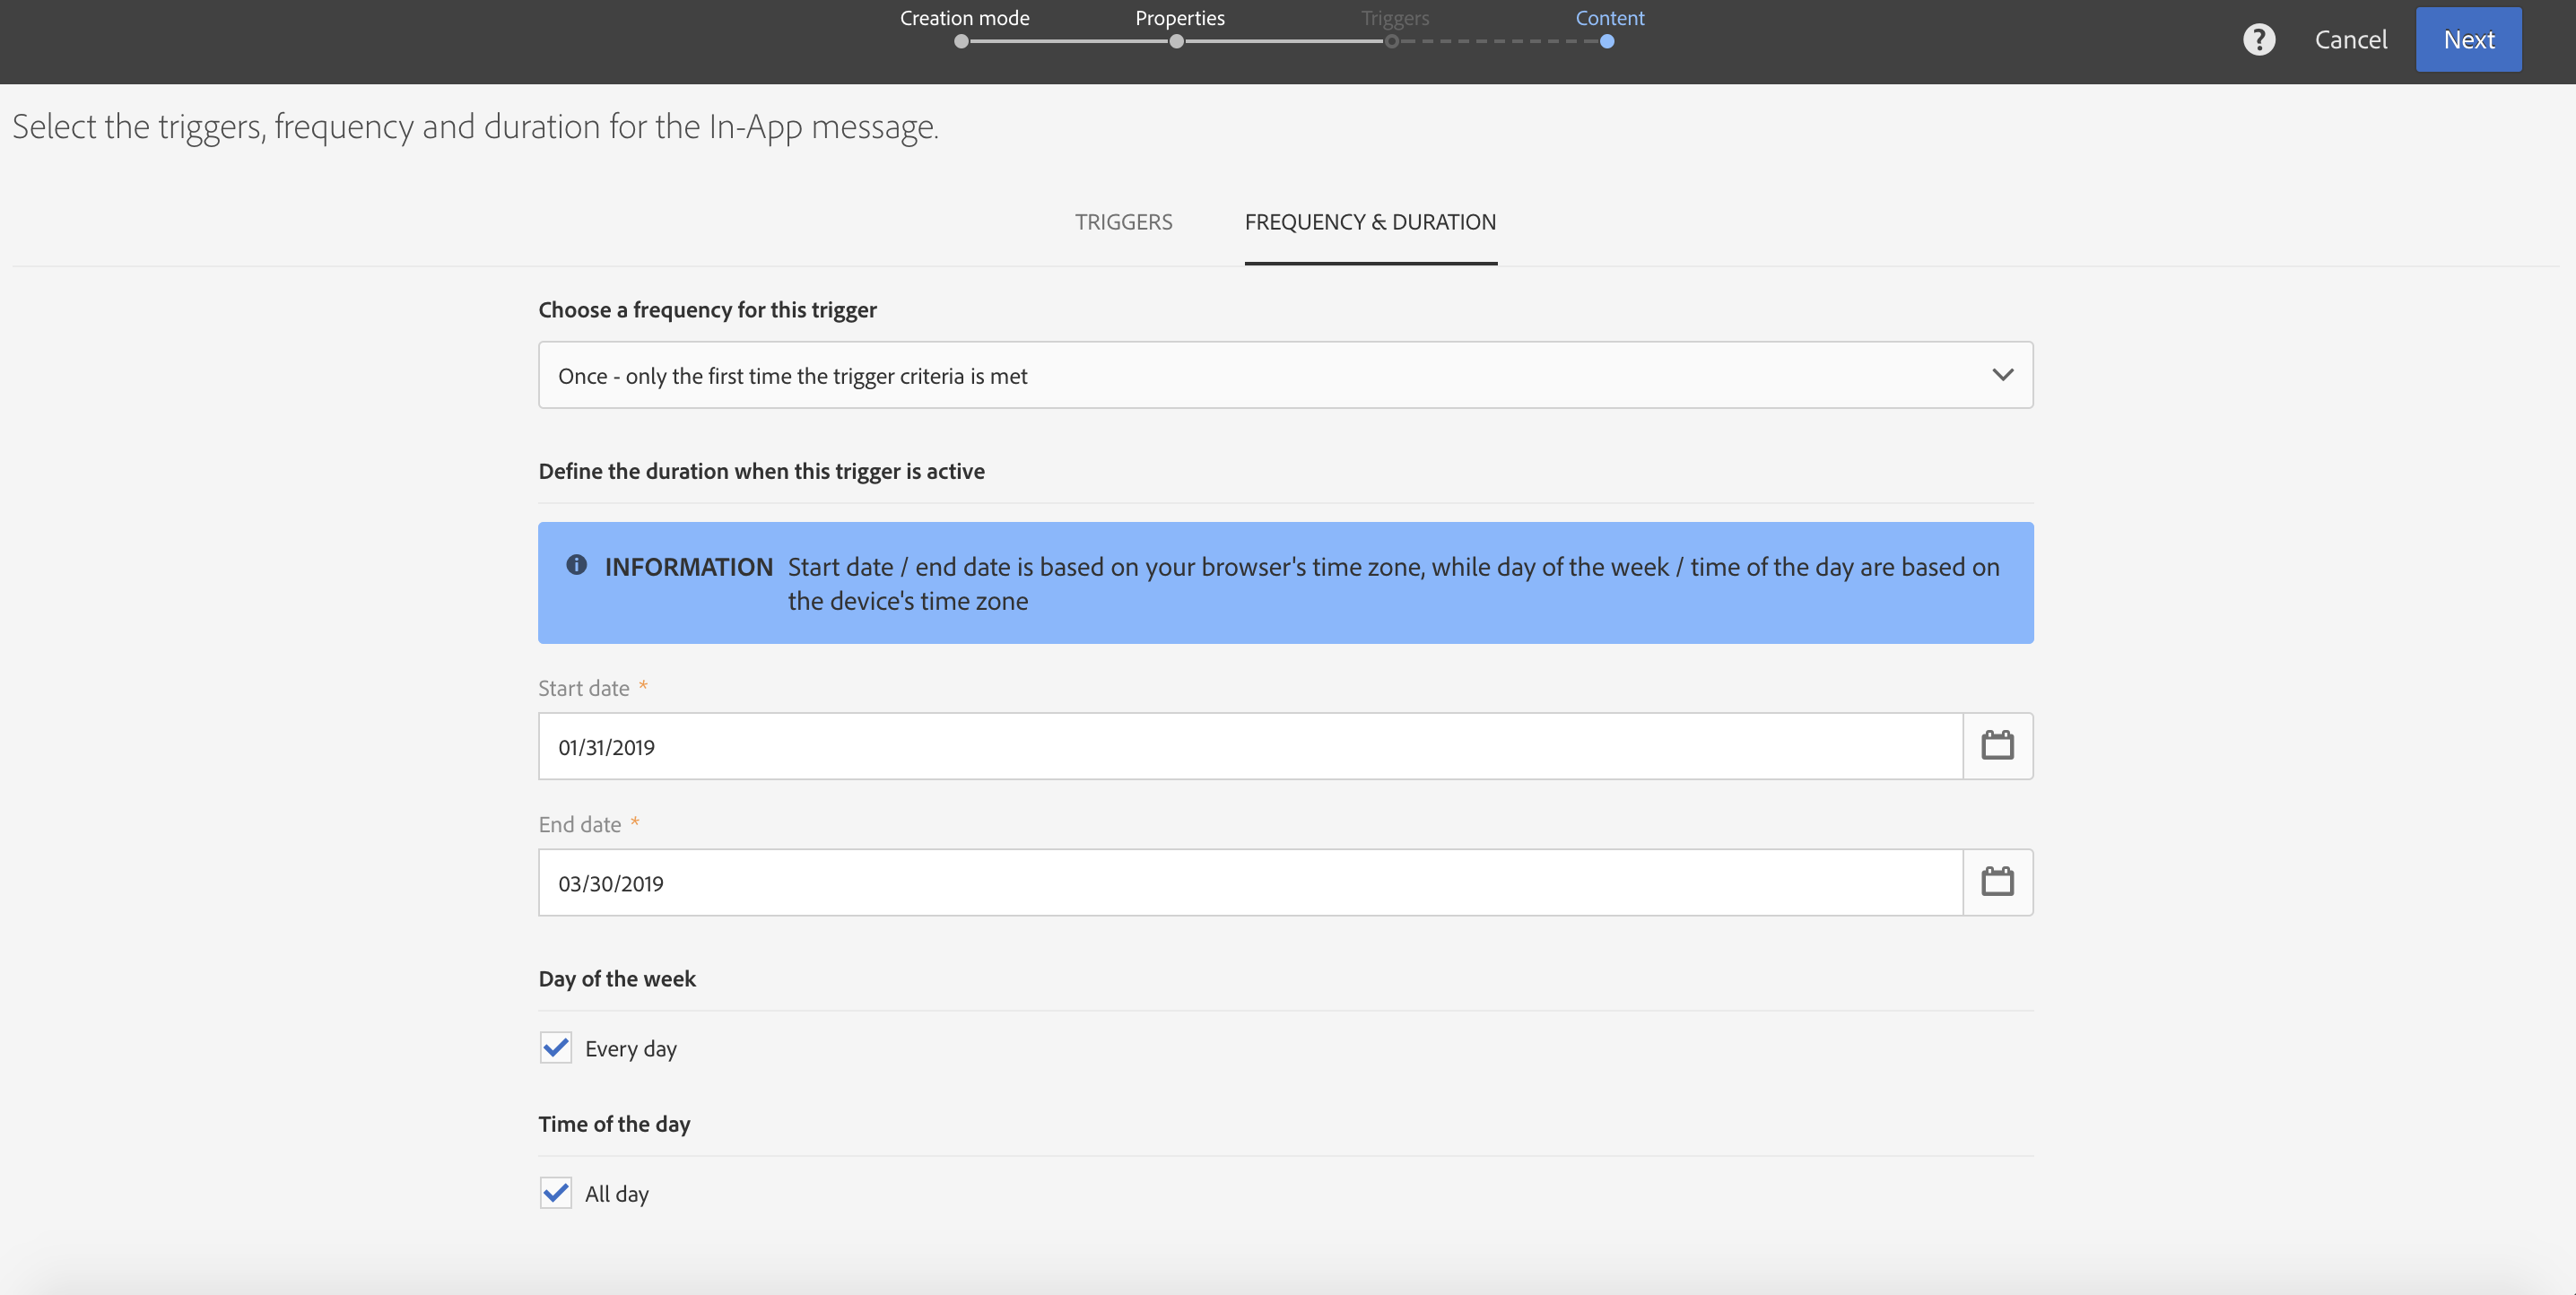
Click the Frequency and Duration tab to select the end data for the delivery. Select a date later than the current date. Click Next to continue with the delivery creation wizard.
Figure A.26: Select End Date
Note: if you forget to enter an end date, you will see the following error. Dismiss the error, and then select an end date, and click
Next.
Figure A.27 Missing End Date
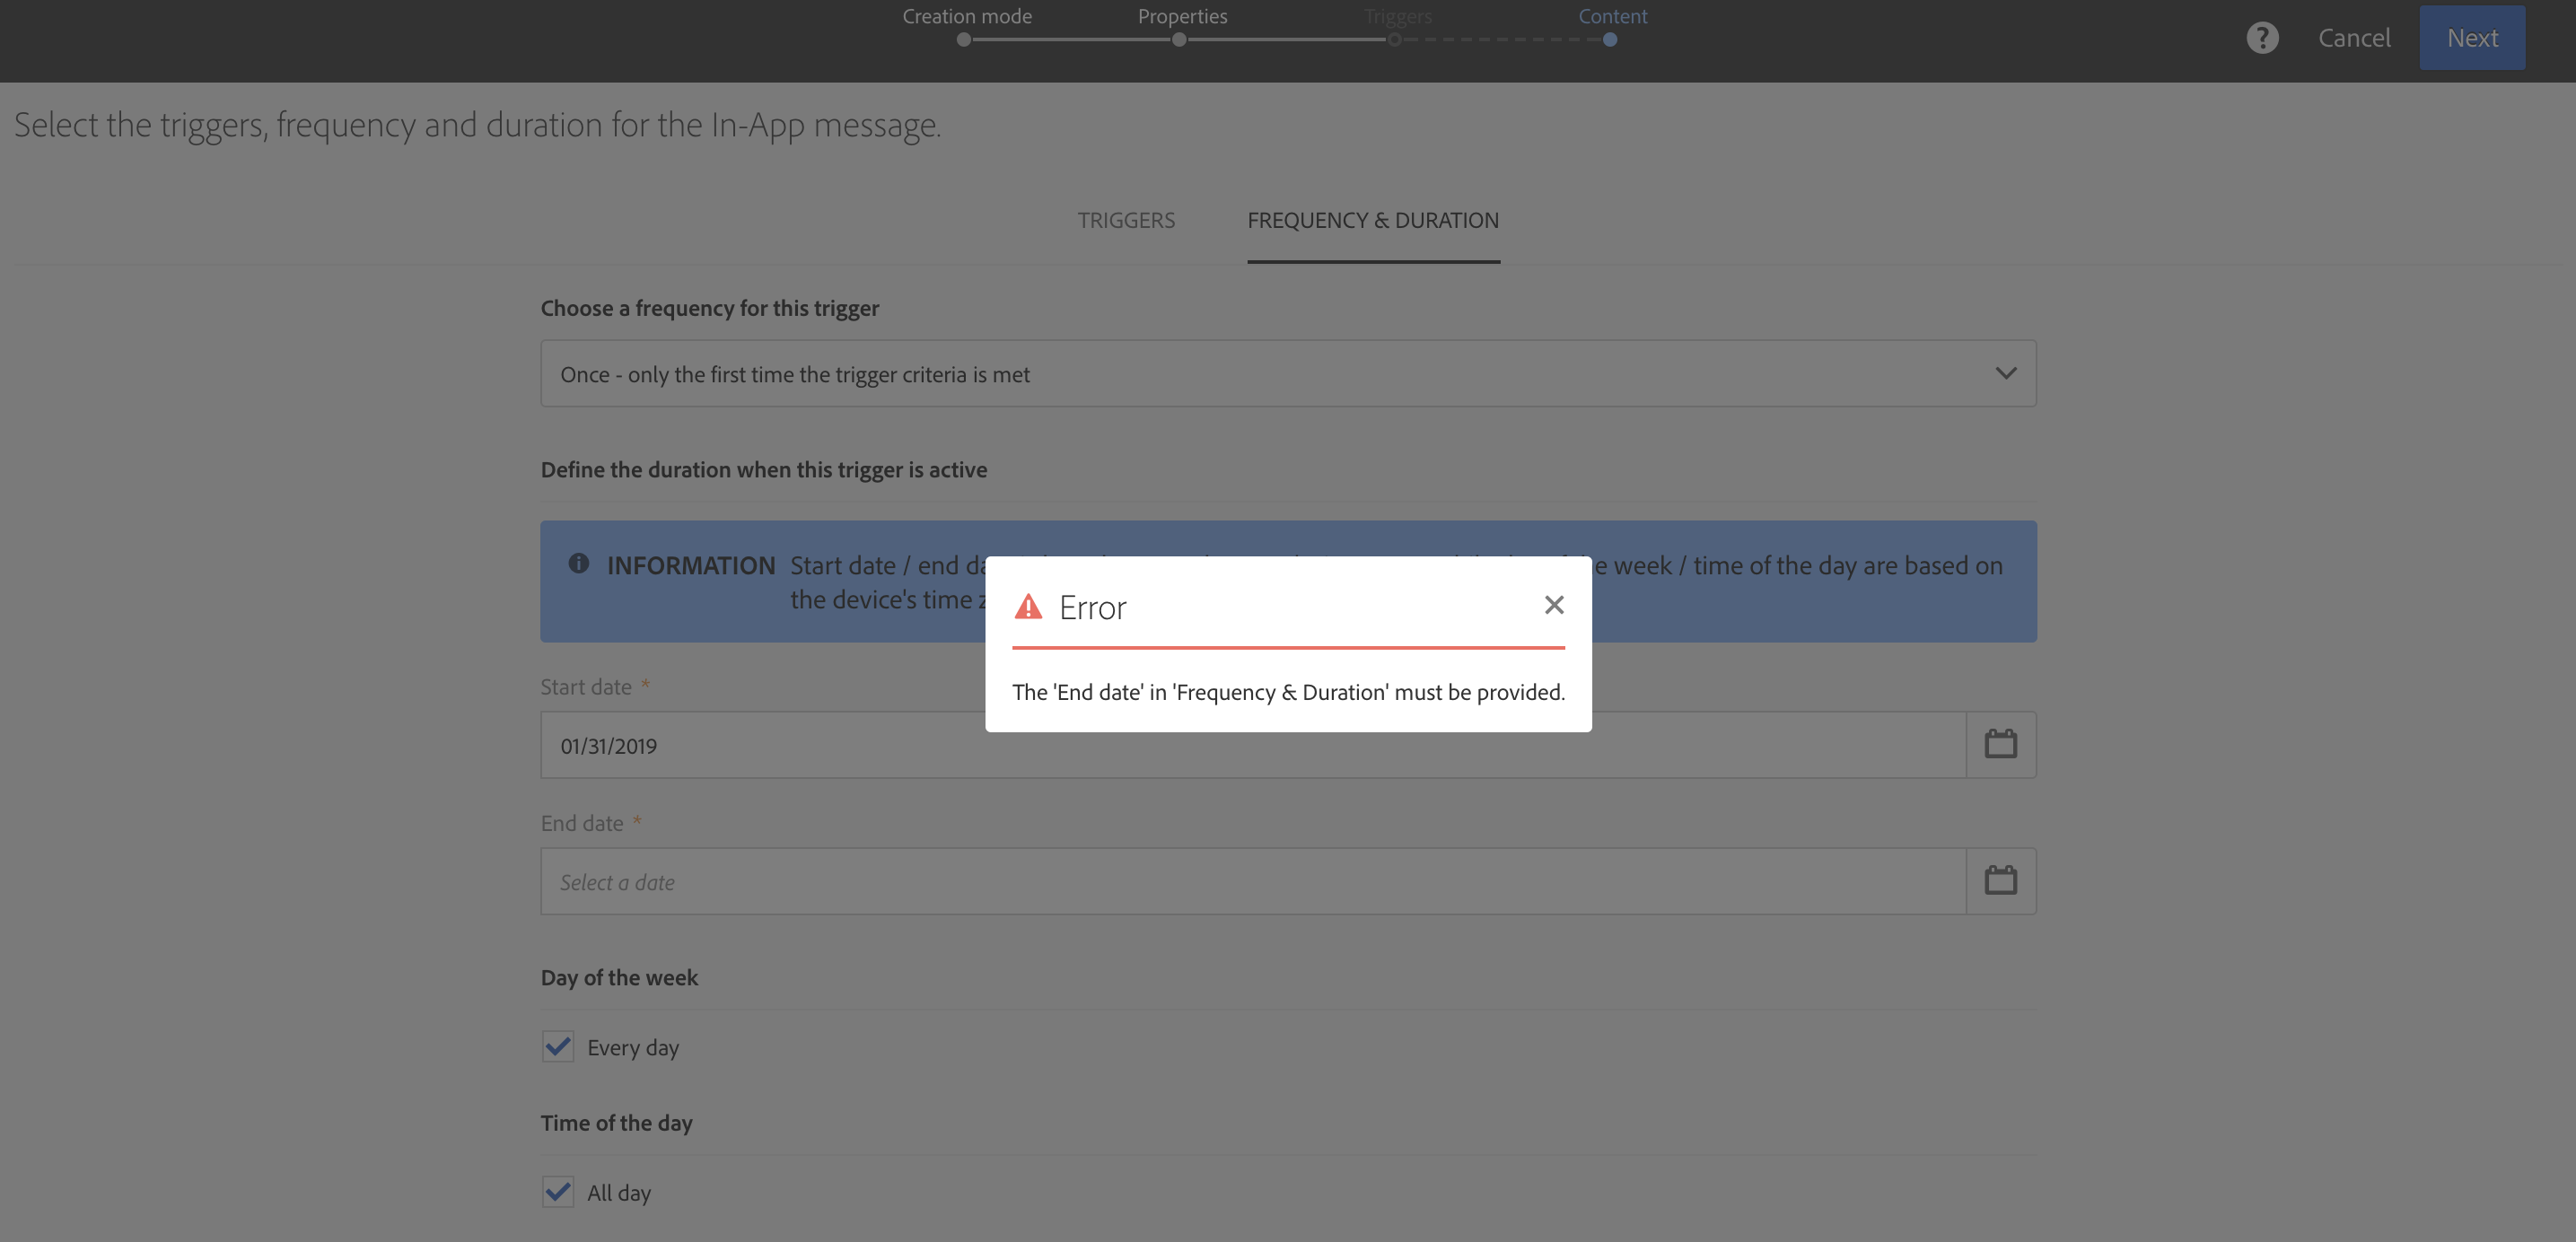
Figure A.28: Completed End Date
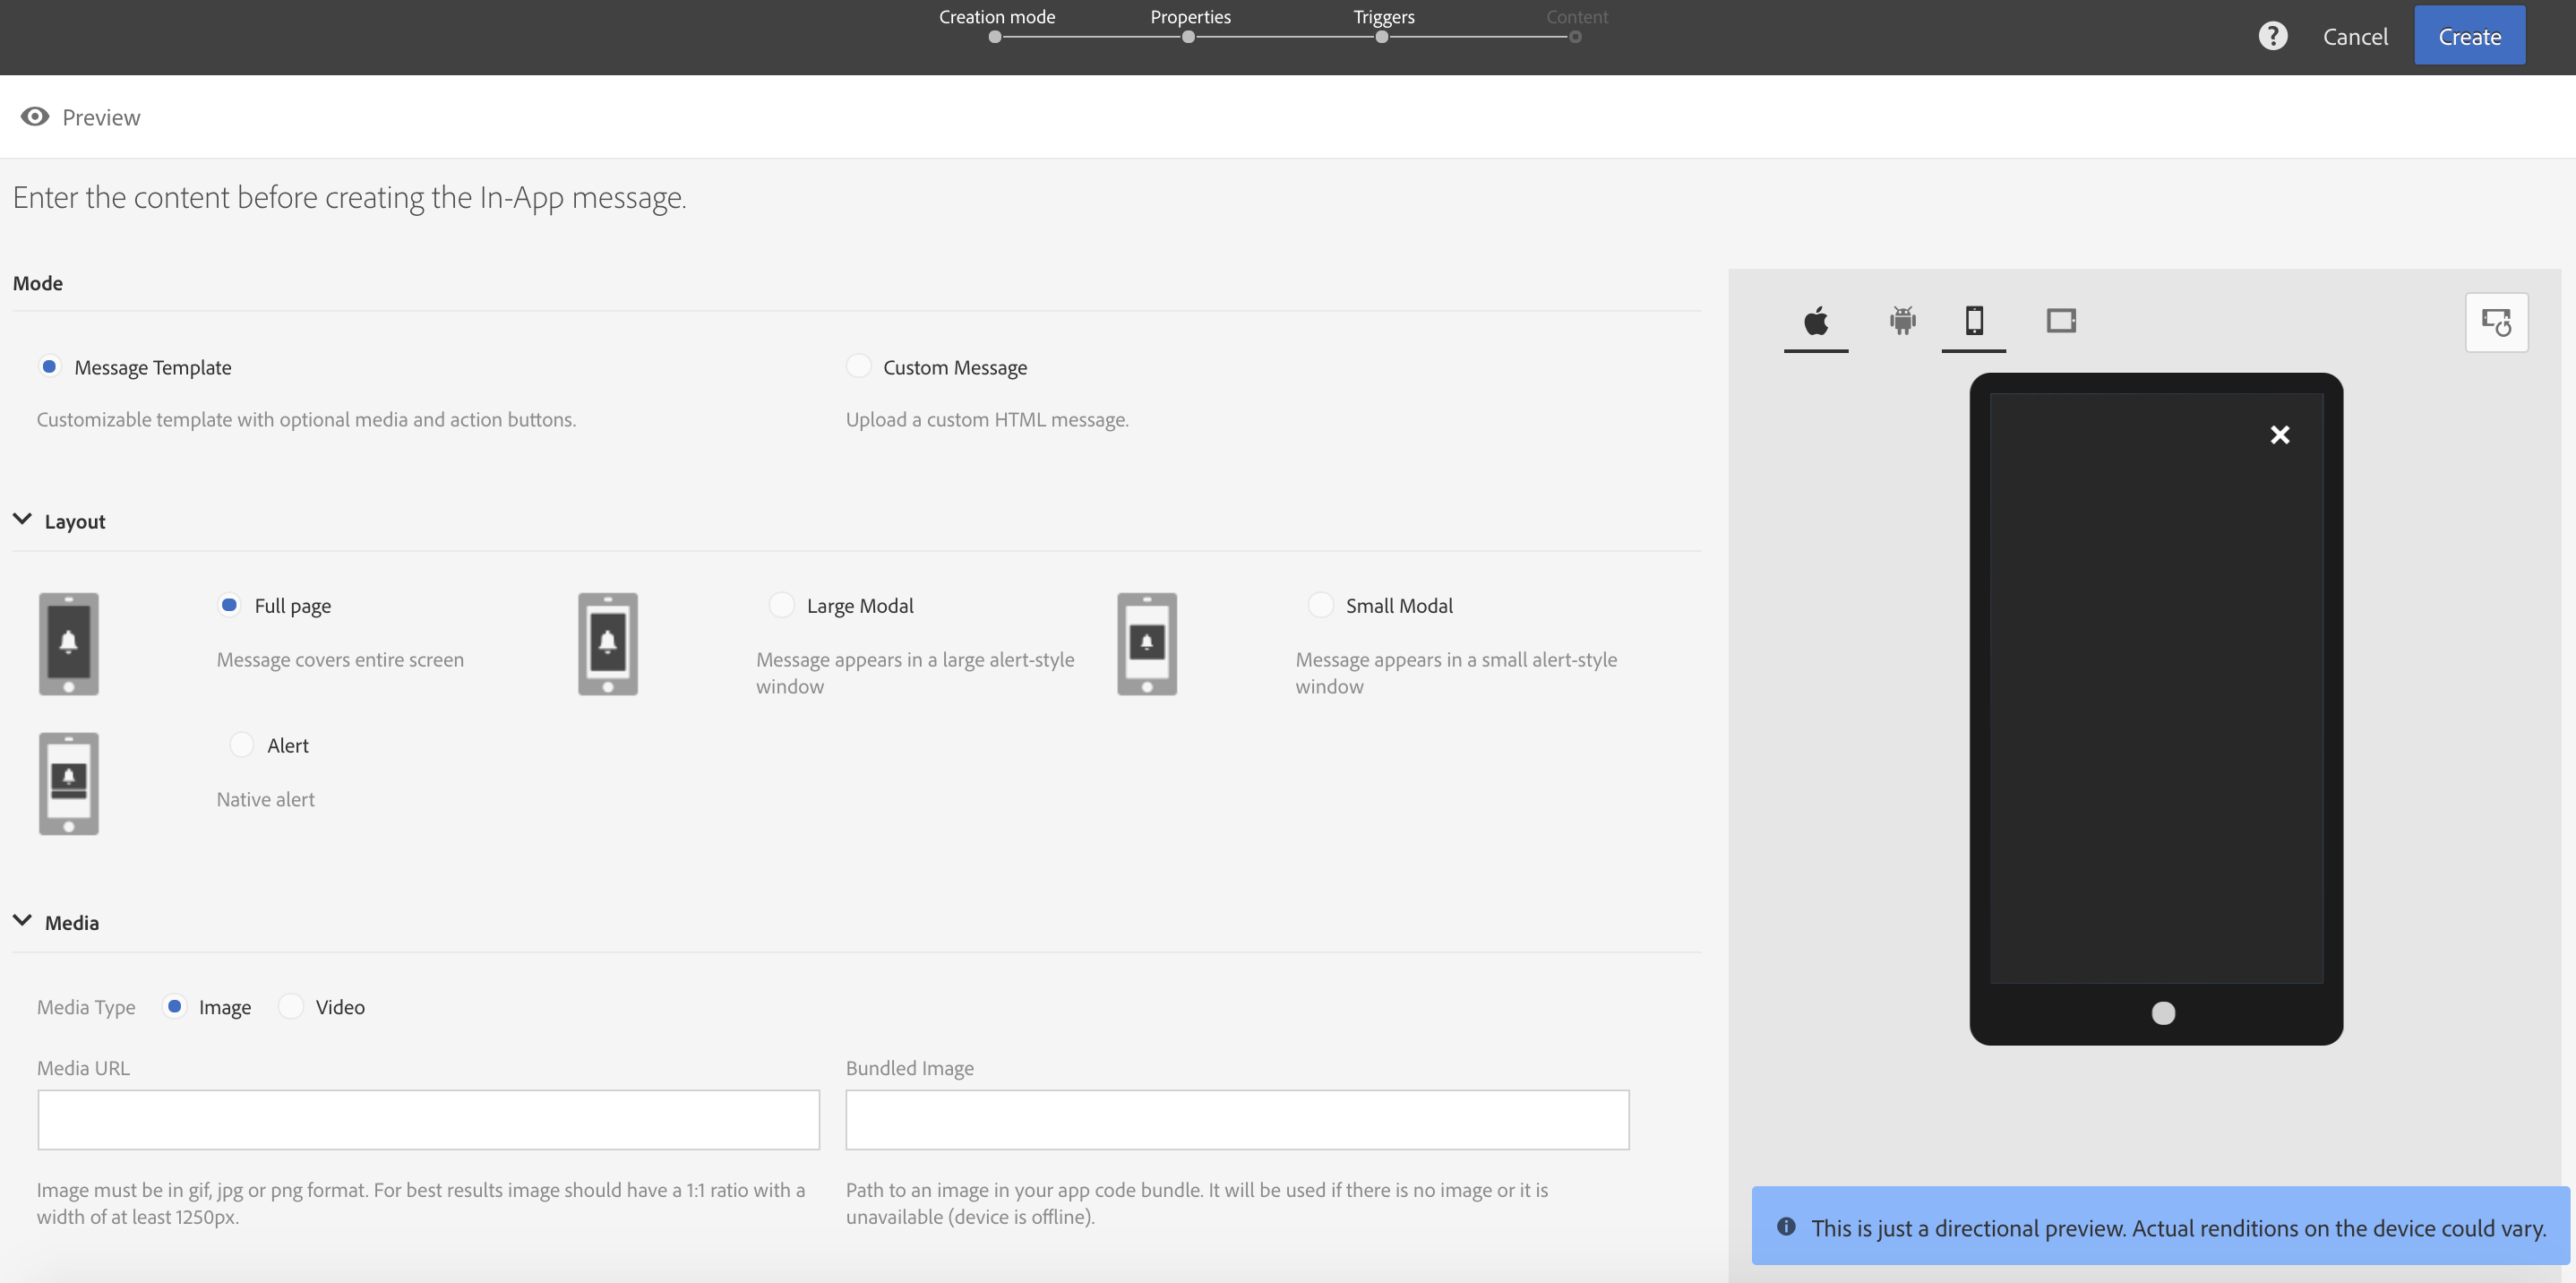
We are now ready to create the content for the In-App message. For simplicity, we will use the template provided by the wizard. For more complex messages, you can author your own HTML page, with codes embedded for handling communication with the ACS server. See [https://link.goes.here.adobe.com] for more details. For the lab, select Message Template mode, Full page layout. For the Media option, select Image, and enter the following URL: https://github.com/Adobe/ExperienceCloudYadda/Summit2019/L762/images/LessonA/AdobeStock_29653848.jpeg.
Note: you can also use a video, or create your own custom HTML page.
Figure A.29: In-App Content Authoring
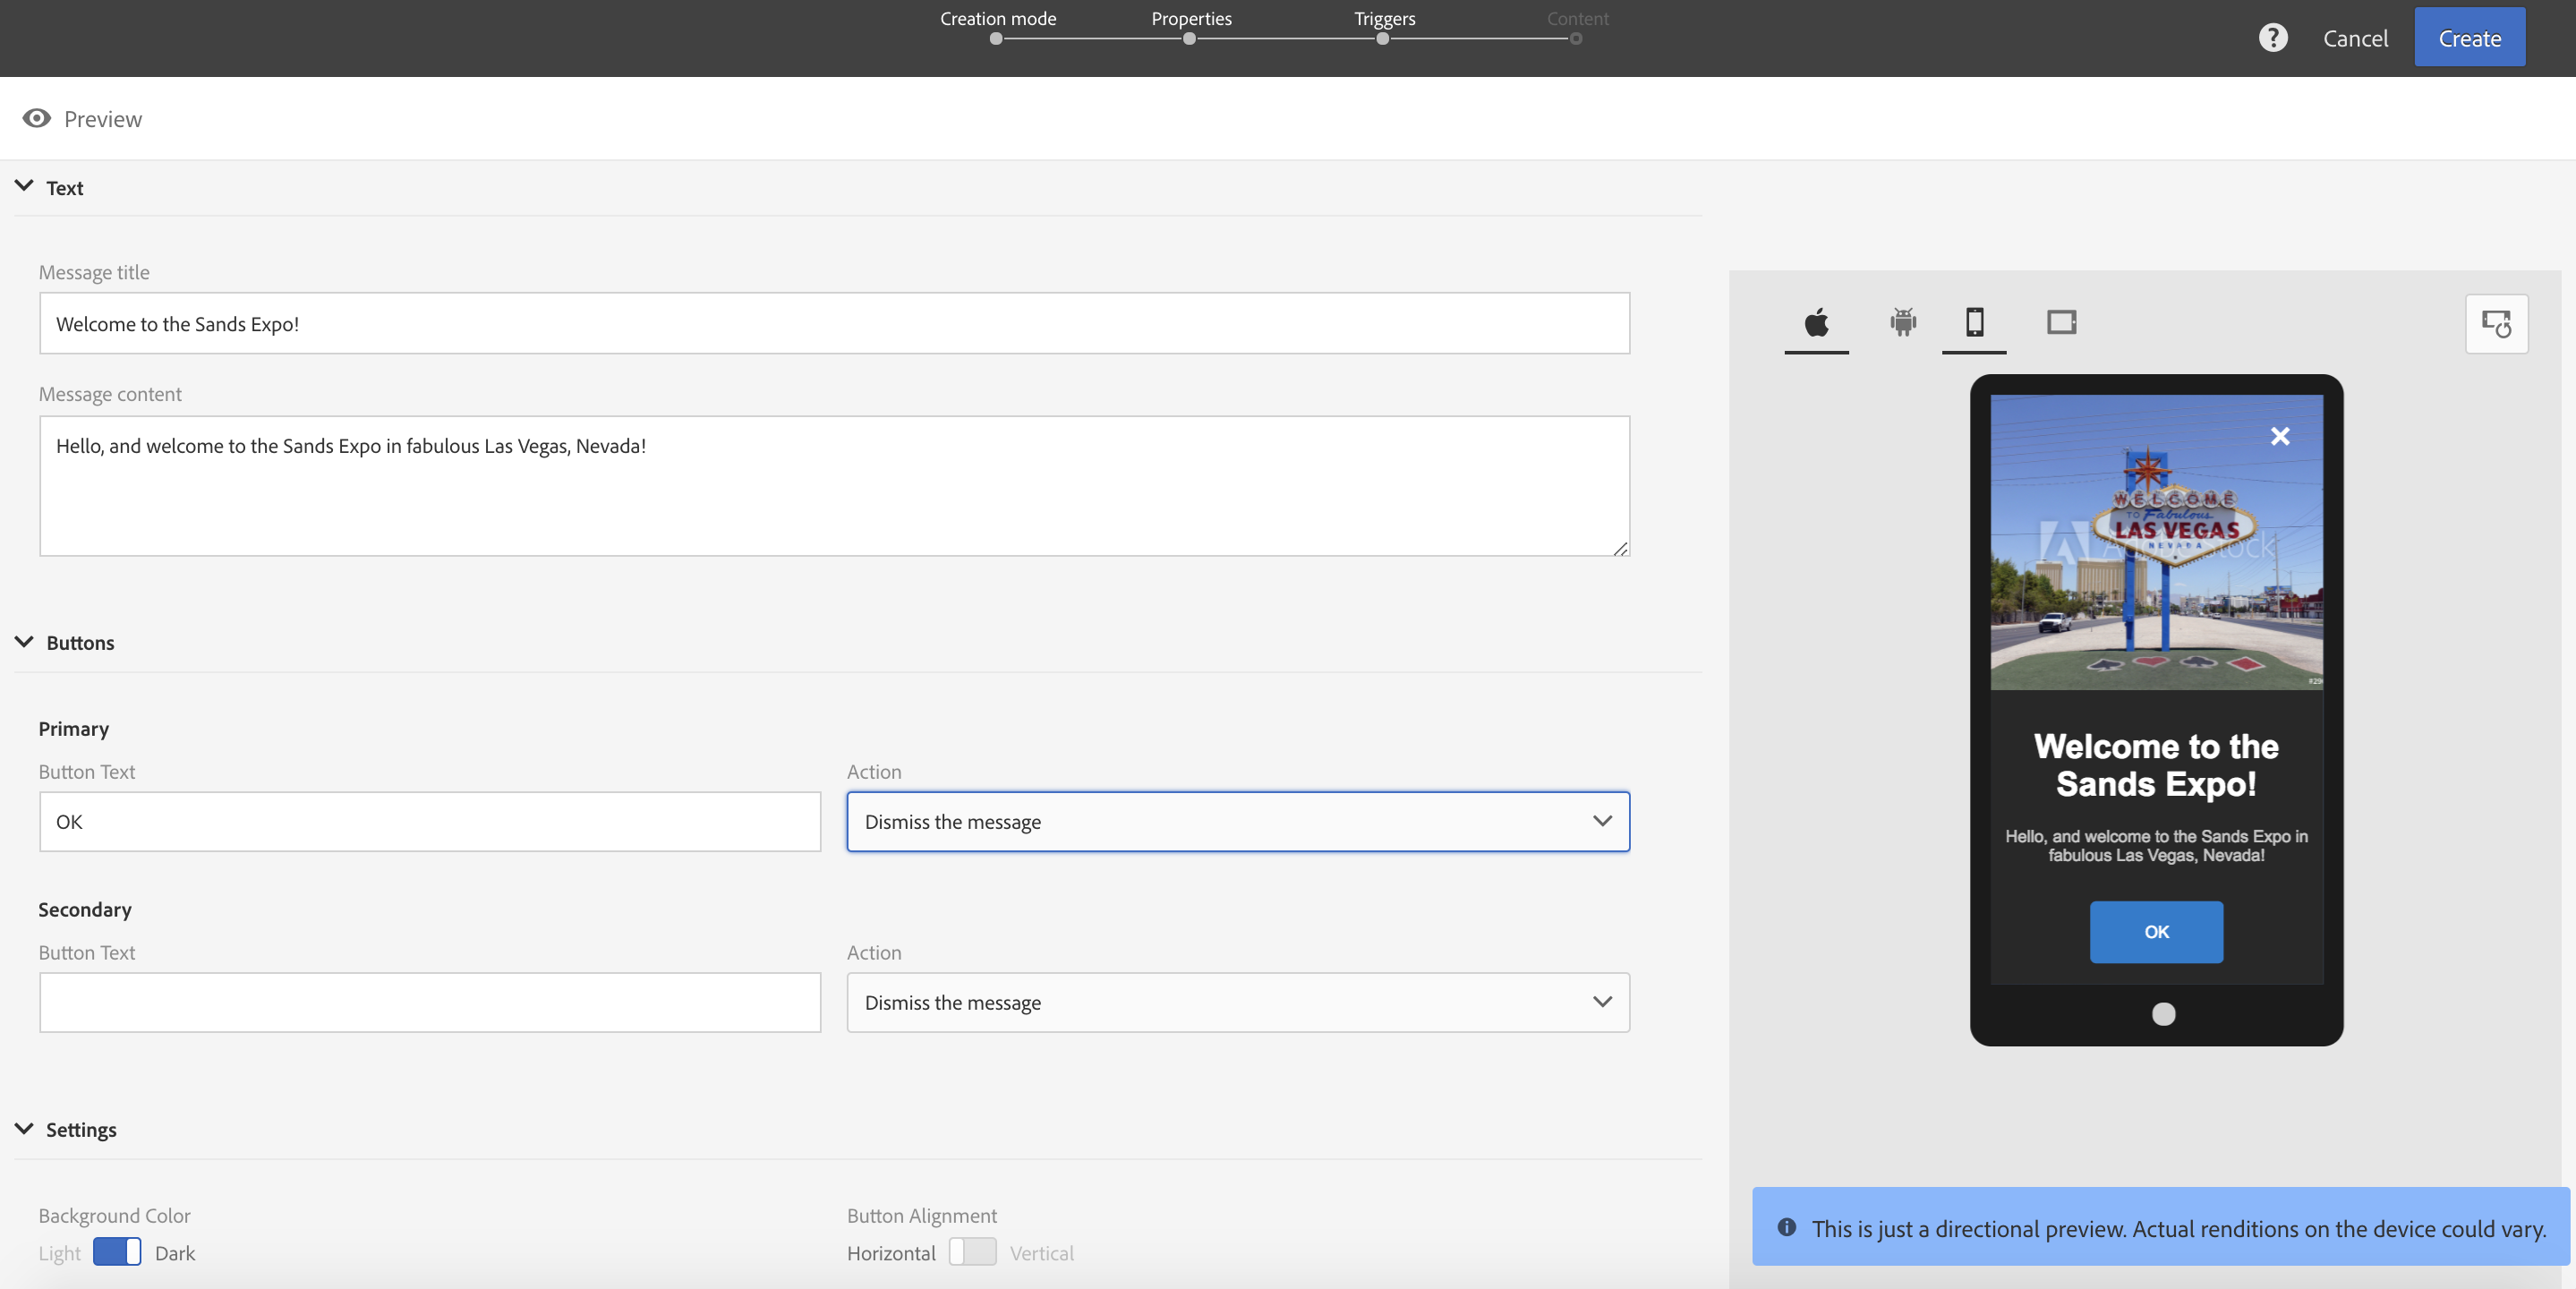
Continuing with the In-App content authoring, scroll down until you see the Text field. Enter the values as shown below:
| Field name | Value |
|---|---|
| Text | Welcome to the Sands Expo! |
| Message content | Hello, and welcome to the Sands Expo in fabulous Las Vegas, Nevada! |
| Primary button | OK |
| Primary button action | Dismiss dialog |
| Secondary button | No thanks |
| Secondary button action | Dismiss dialog |
Figure A.30: In-App Content Authoring
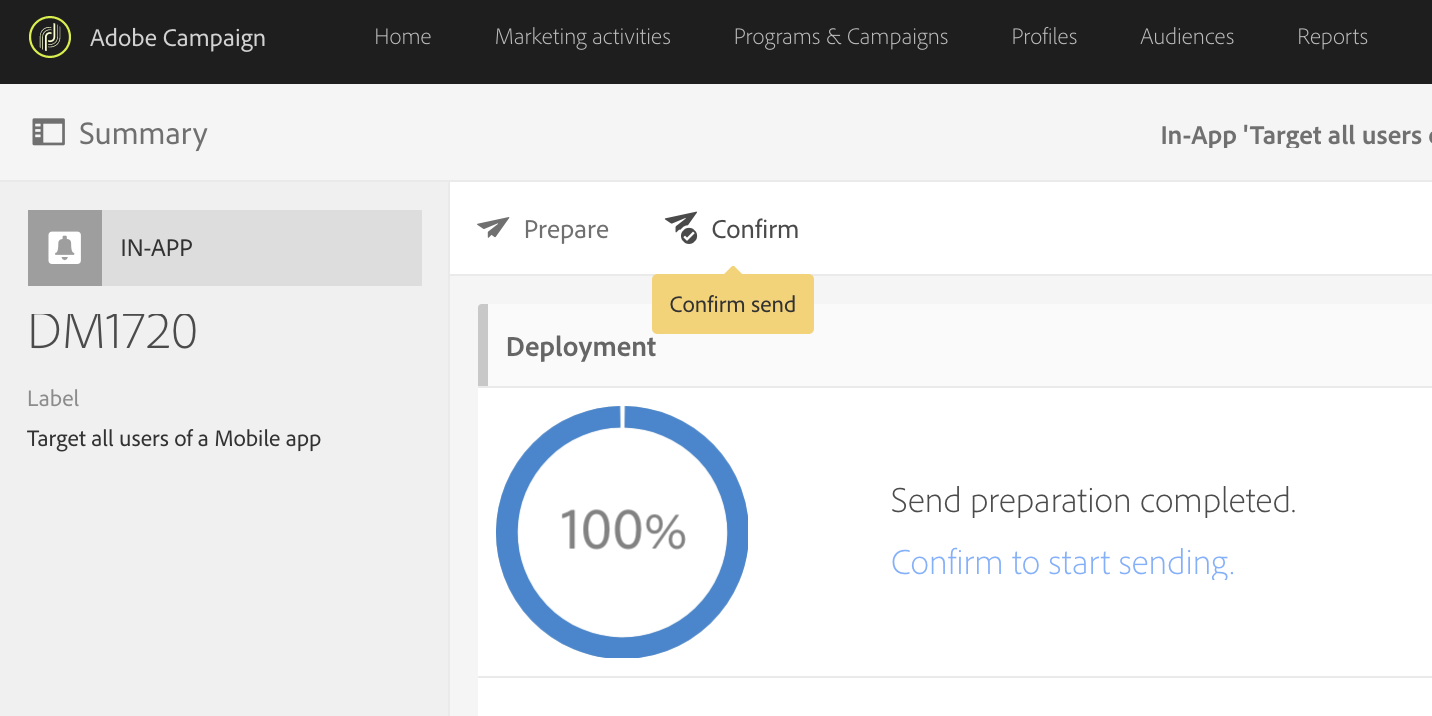
Leave the remaining fields at the default values. We have now completed the authoring of the In-App content -- scroll up to the top of the page, then click Next. You will then see the Delivery Summary page. On this page, you have the opportunity to review and edit the settings for the In-App delivery. For In-App deliveries, the schedule is typically set to immediate delivery, which will download messages to the end users' devices, ready for the triggering event. For the lab, leave the schedule as immediate delivery. When you are satisfied with the settings, click Prepare, and the click OK to confirm.
Figure A.31: In-App Delivery Preparation

When the delivery has completed the preparation step, it should say 100% complete, with 1 recipient (representing the single message that applies to all end user devices). On the next screen, click Confirm to start the delivery of the message. In this step, the message is sent from ACS to the In-App Messaging Service (MCIAS). End user devices connect to MCIAS and download broadcast or personalized messages and store them in device storage until the trigger conditions are met.
Figure A.32: In-App Delivery Confirmation
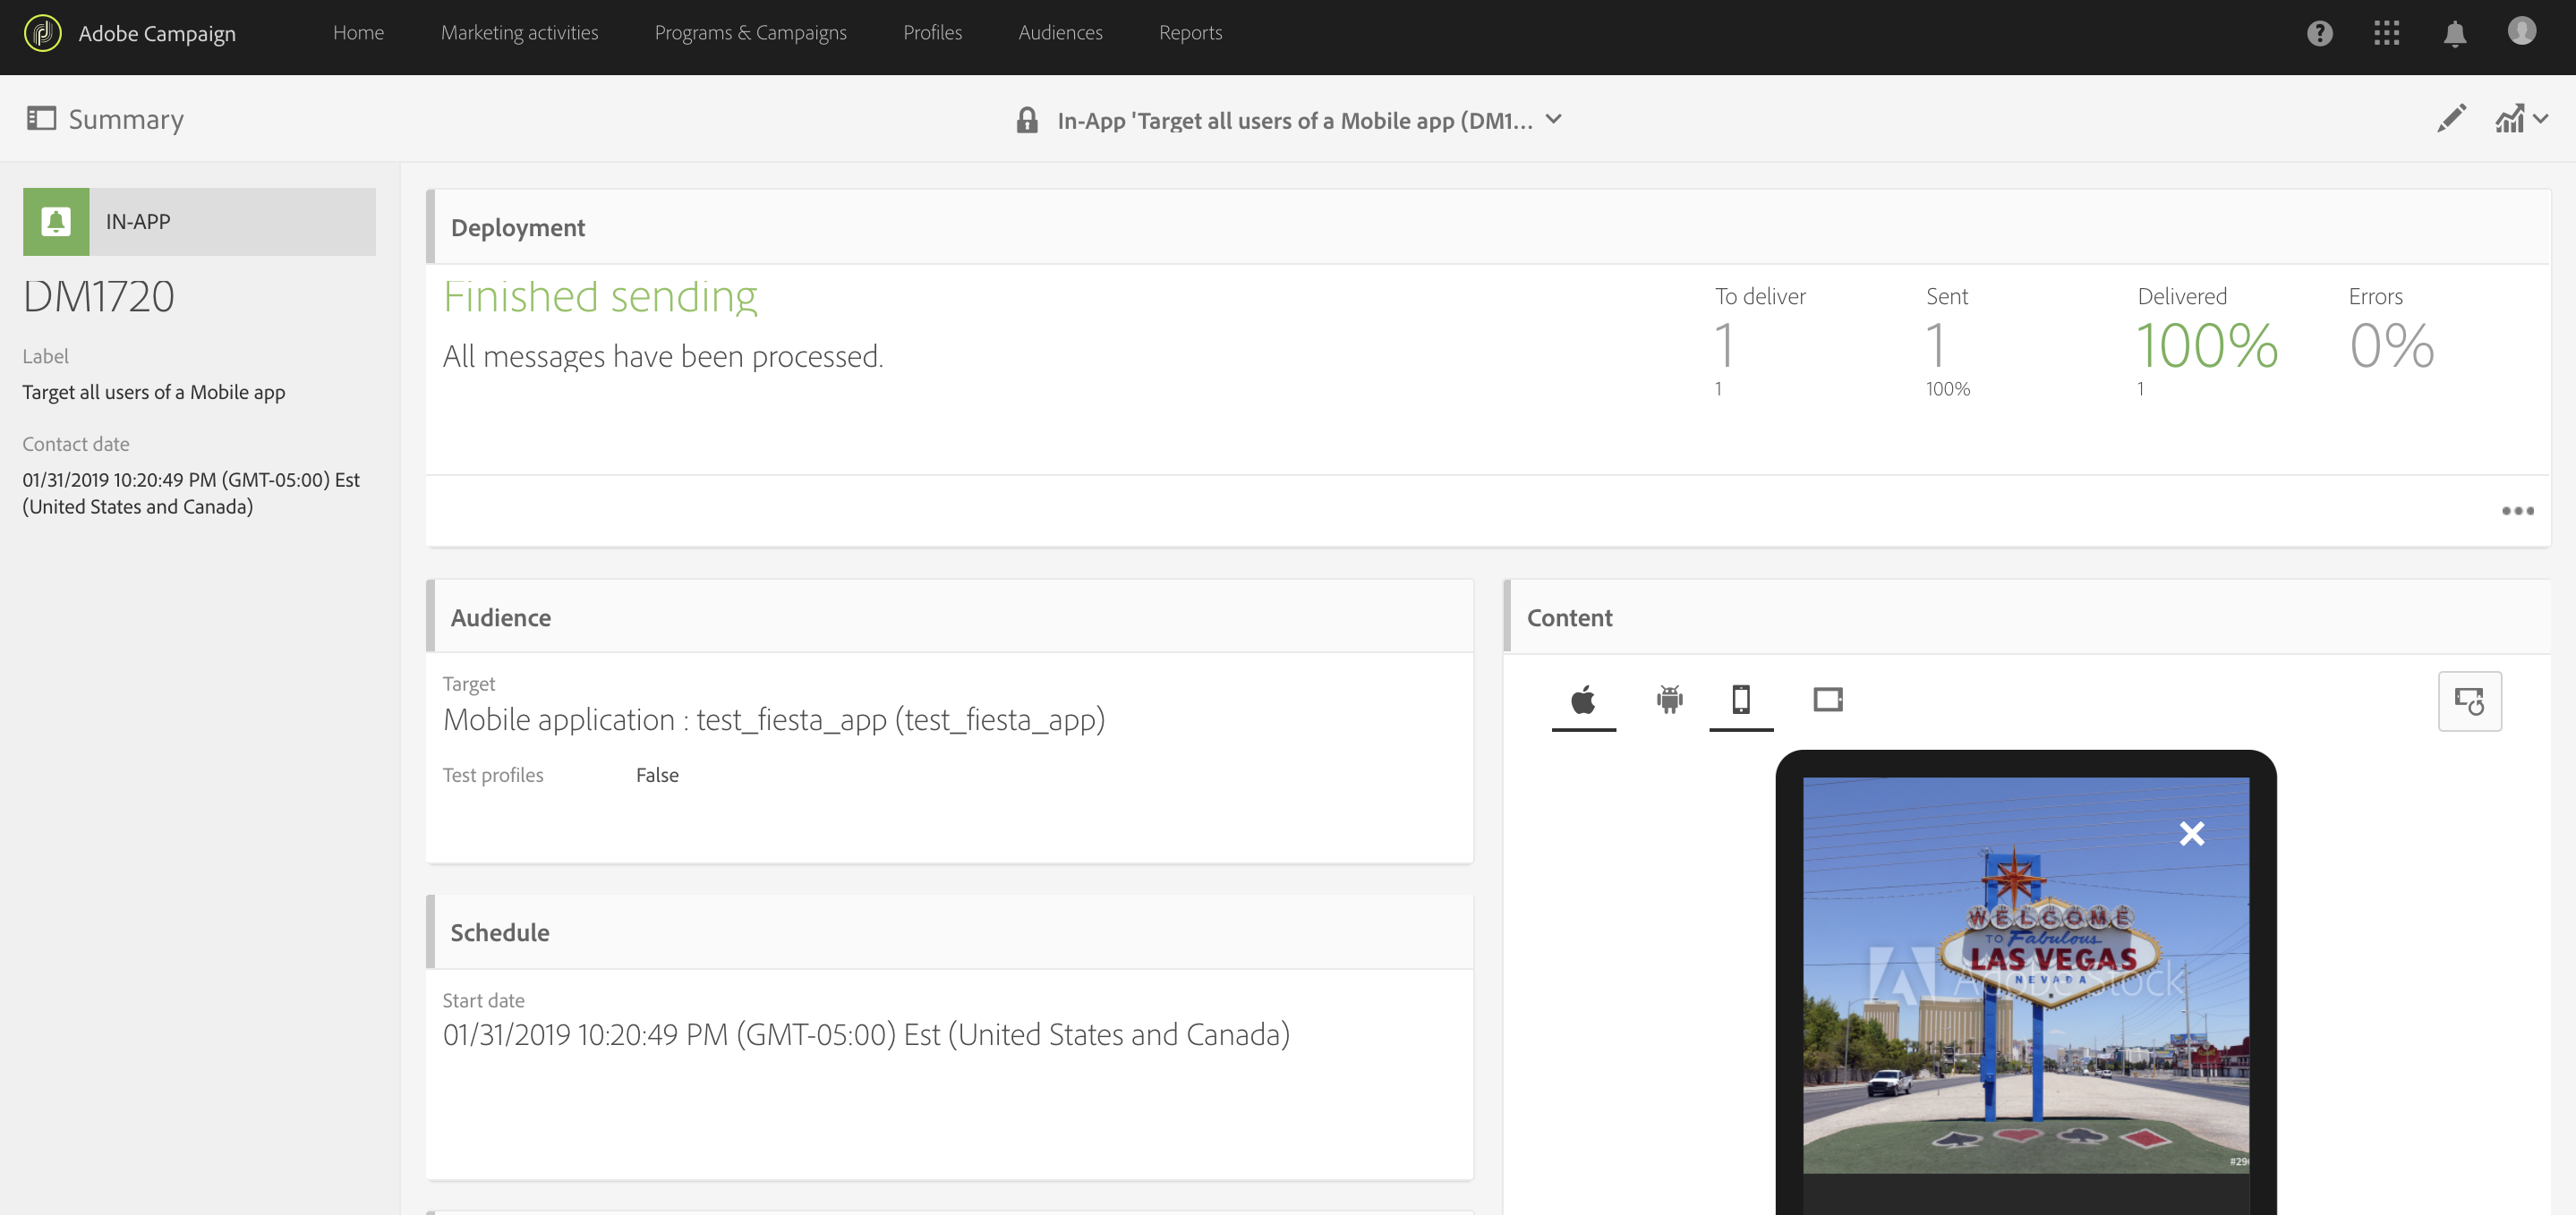
Once the delivery has been sent to MCIAS, the following screen will appear, indicating a successful delivery.
Figure A.33: In-App Delivery Summary
Now we are ready to trigger the display of the message on the device. Back in Xcode, run the application. You should see a console message that the application is downloading new messages from the MCIAS endpoint configured in the Launch ACS extension.