
Implementing the Experience Cloud in Websites with Launch is the perfect starting point for front-end developers or technical marketers who want to learn how to implement the Adobe Experience Cloud solutions on their website.
Each lesson contains how-to exercises and foundational information to help you implement the Experience Cloud and understand its value. Callouts are provided to highlight information which might be useful to customers migrating from our older tag manager - Dynamic Tag Management. Demo sites are provided for you to complete the tutorial, so you can learn the underlying techniques in a safe environment. After completing this tutorial, you should be ready to start implementing all of your marketing solutions through Launch on your own website.
In these lessons, it is assumed that you have an Adobe Id and the required permissions to complete the exercises. If not, you may need to reach out to your Experience Cloud Administrator to request access.
In this lesson, you will create your first Launch property.
A property is basically a container that you fill with extensions, rules, data elements, and libraries as you deploy tags to your site.
At the end of this lesson, you will be able to:
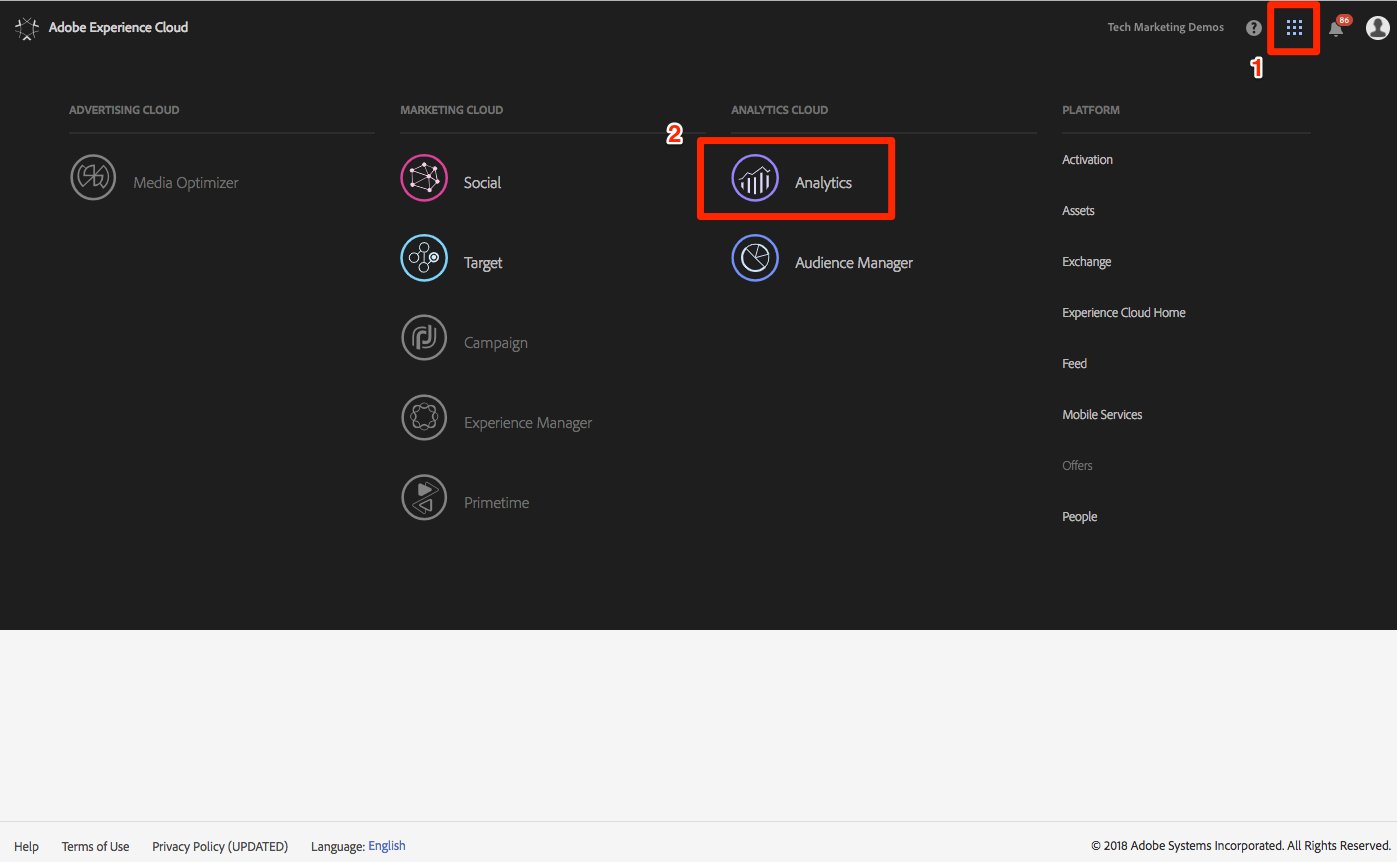
Log into the Adobe Experience Cloud
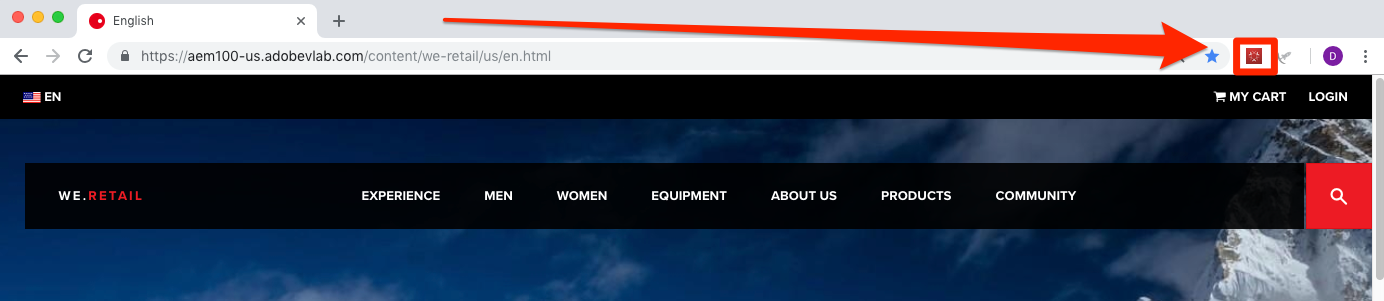
Click the  icon to open the solution switcher
Select [Activation] from the menu 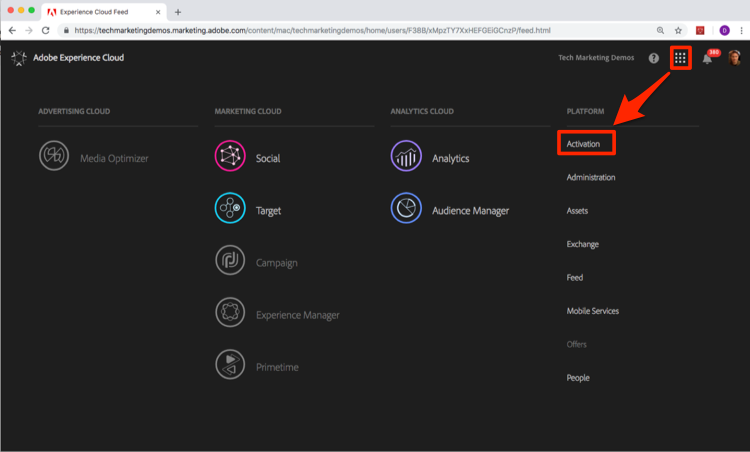
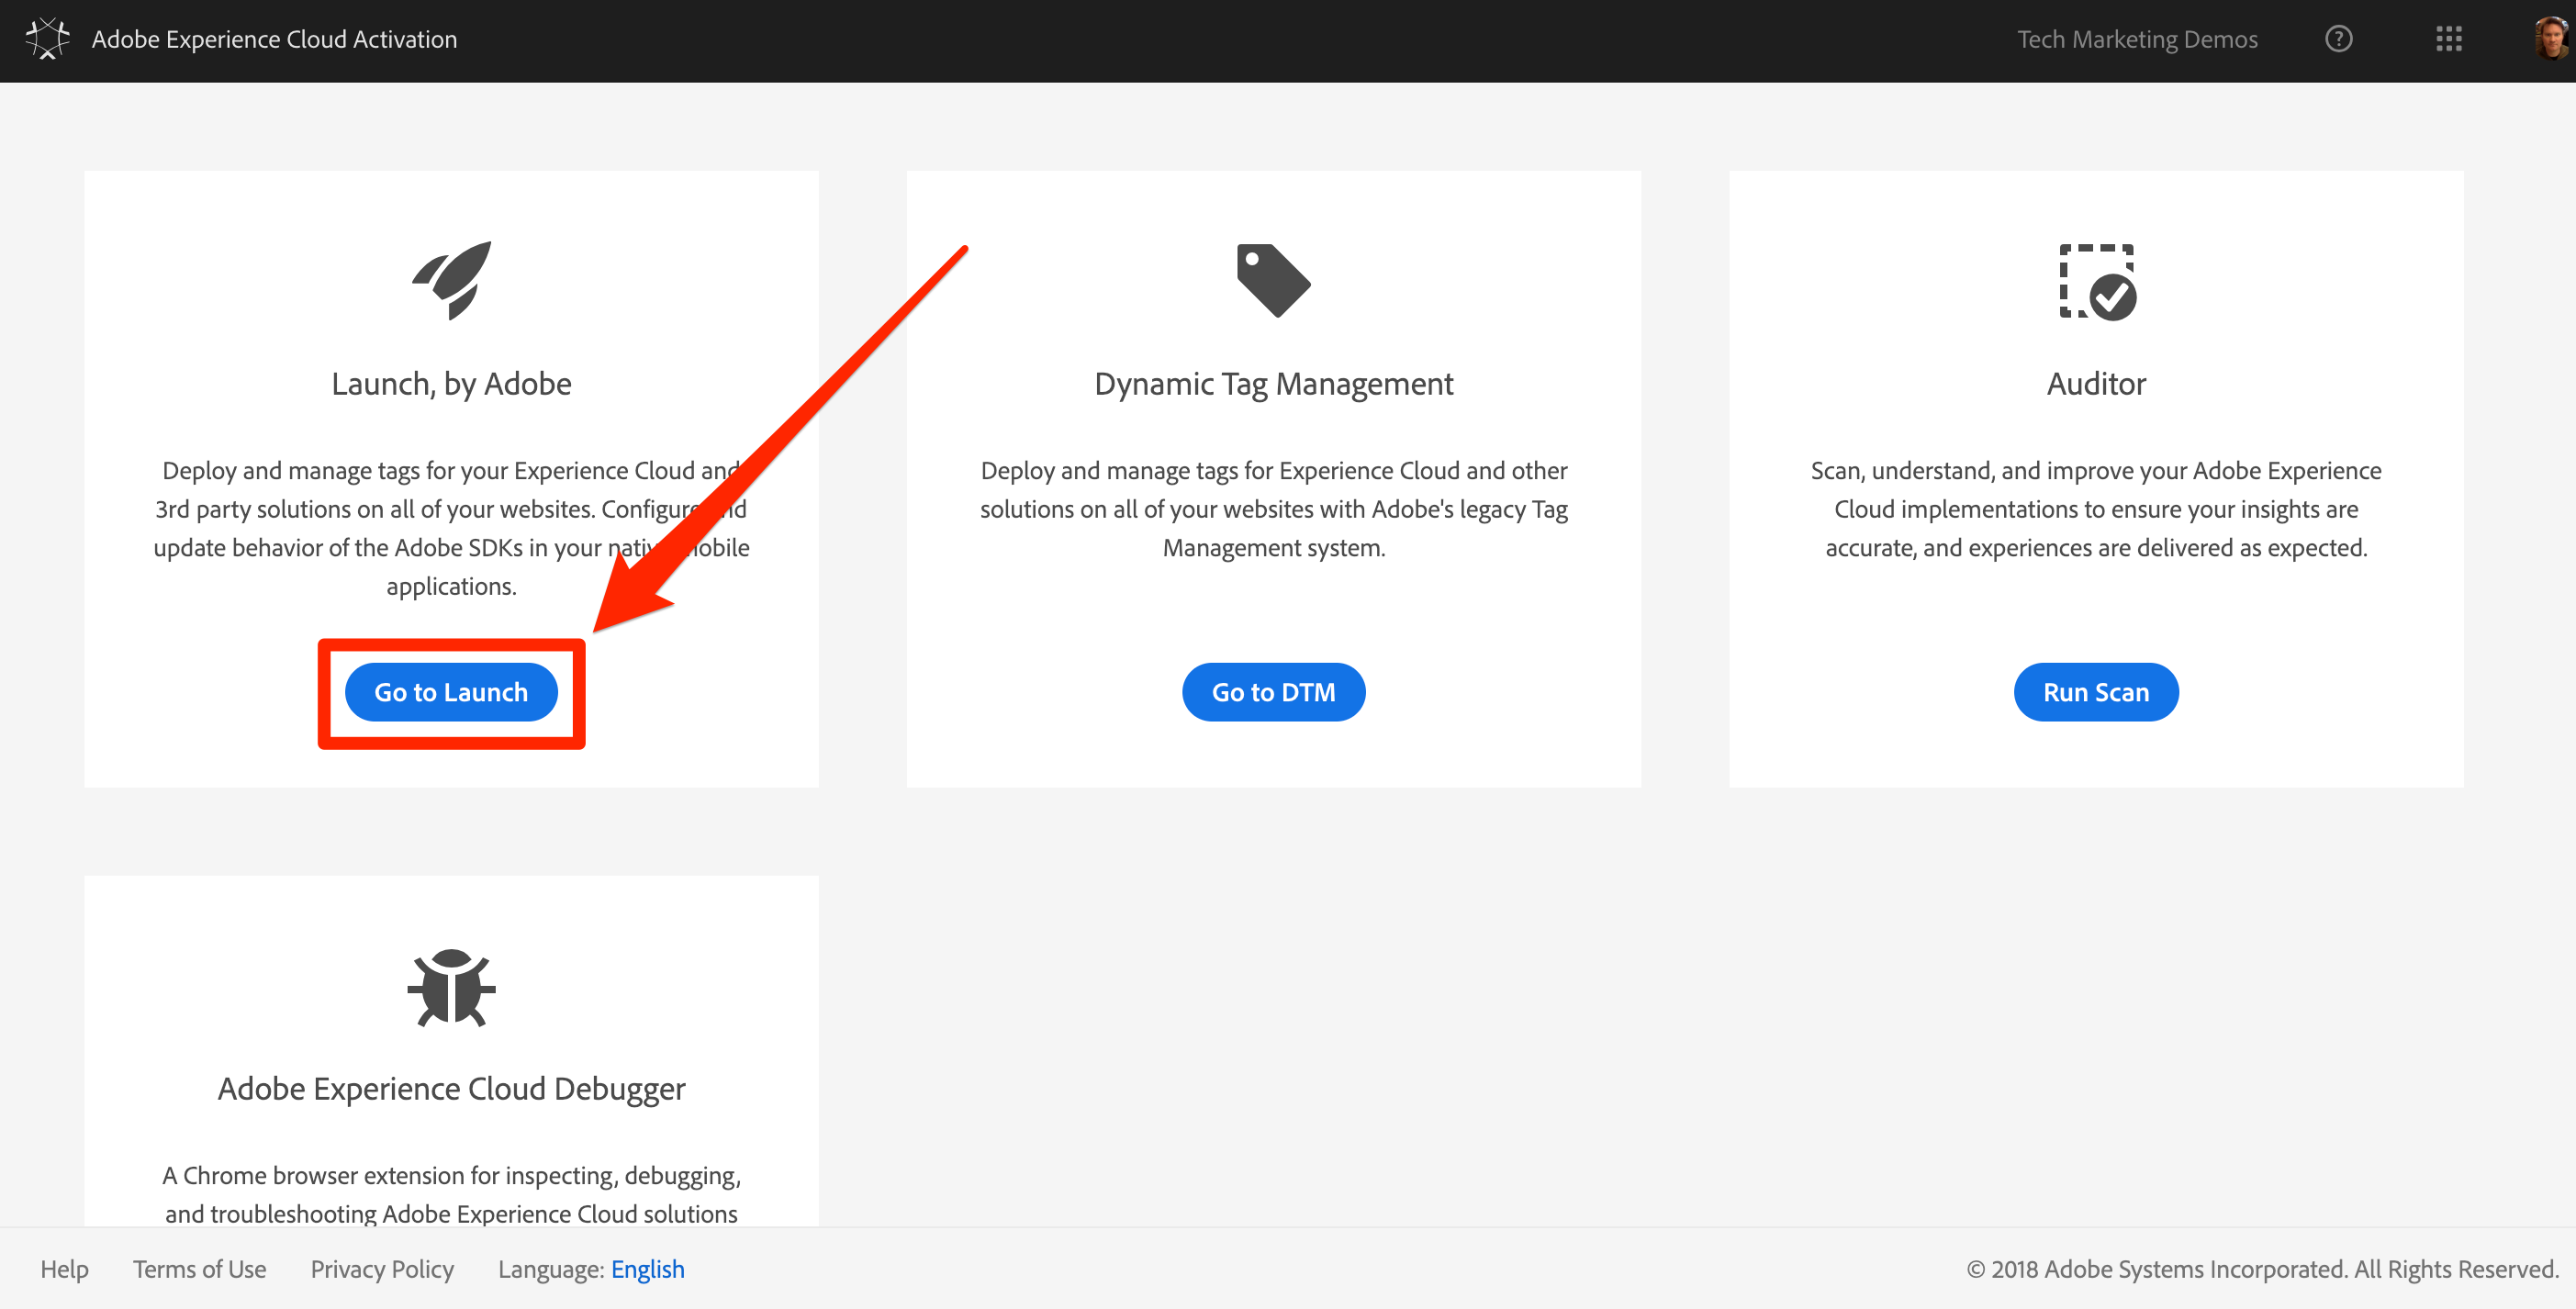
Under [Launch, by Adobe], click the [Go to Launch] button
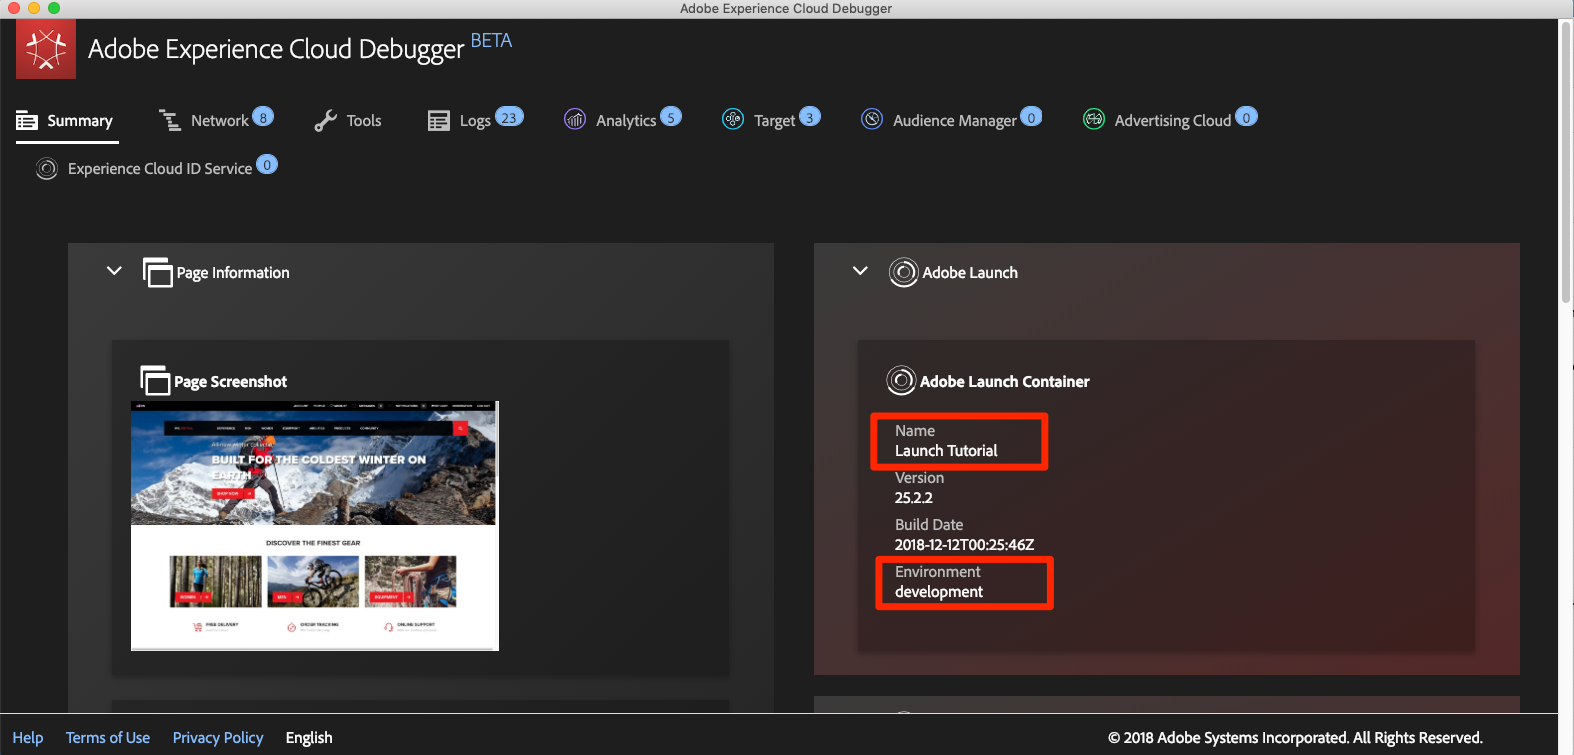
You should now see the Properties screen (if no properties have ever been created in the account, this screen might be empty): 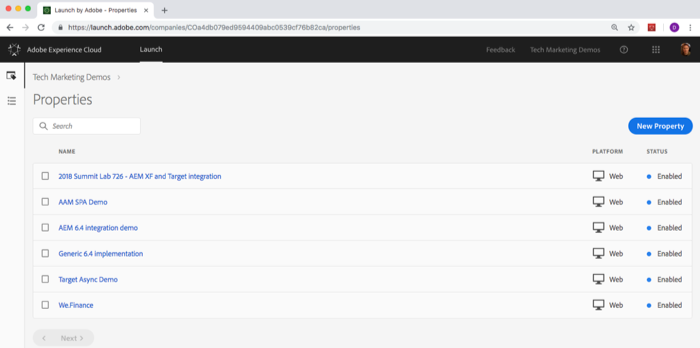
If you use Launch frequently, you can also bookmark the following URL and log in directly https://launch.adobe.com
A property is basically a container that you fill with extensions, rules, data elements, and libraries as you deploy tags to your site. A property can be any grouping of one or more domains and subdomains. You can manage and track these assets similarly. For example, suppose that you have multiple websites based on one template, and you want to track the same assets on all of them. You can apply one property to multiple domains. For more information on creating properties, see "Create a Property" in the product documentation.
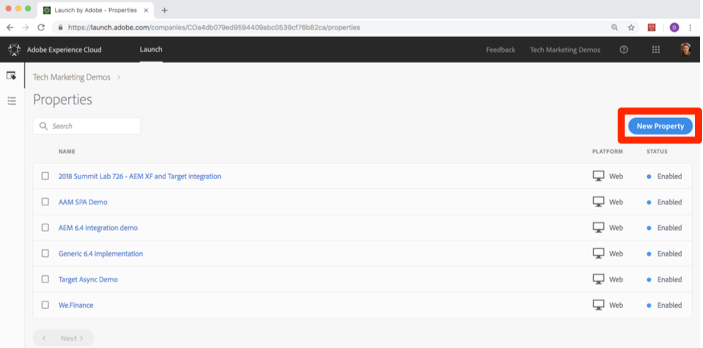
Click the [New Property] button:
Name your property (e.g. Launch Tutorial or Daniel's Launch Tutorial)
As the domain, enter enablementadobe.com since you will be using this property in conjunction with the We.Retail demo site which is hosted on this domain
Click the [Save] button 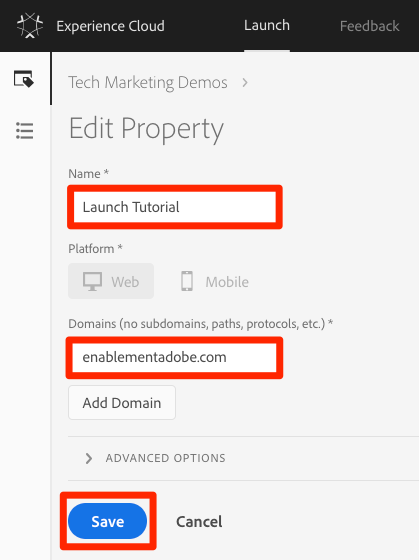
Your new property should display on the Properties page. Note that if you check the box next to the property name, options to [Configure] or [Delete] the property appear above the property list. Click on the name of your property (e.g. Launch Tutorial) to open the Overview screen. 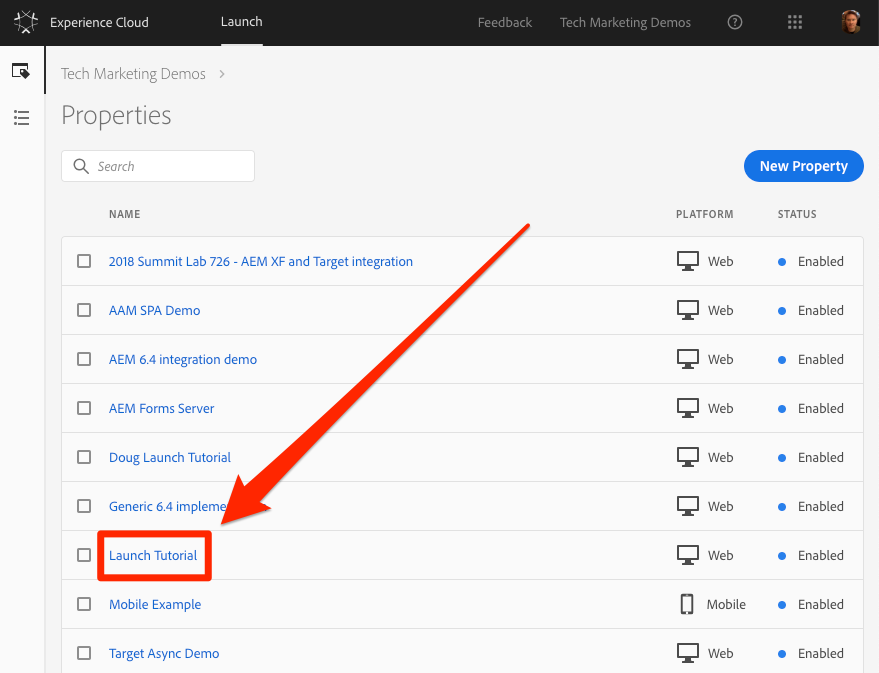
In this lesson, you will implement the asynchronous embed code of your Launch property's Development environment. Along the way, you will learn about two main concepts of Launch - Environments and Embed Codes.
At the end of this lesson, you will be able to:
<head> of an html documentThe embed code is a <script> tag that you put on your webpages to load and execute the logic you build in Launch. If you load the library asynchronously, the browser continues to load the page, retrieves the Launch library, and executes it in parallel. In this case, there is only one embed code, which you put in the <head>. (When Launch is deployed synchronously, there are two embed codes, one which you put in the <head> and another which you put before the </body>).
From the property Overview screen, click on the Environments tab to go to the environments page. Note that Development, Staging, and Production environments have been pre-created for you.
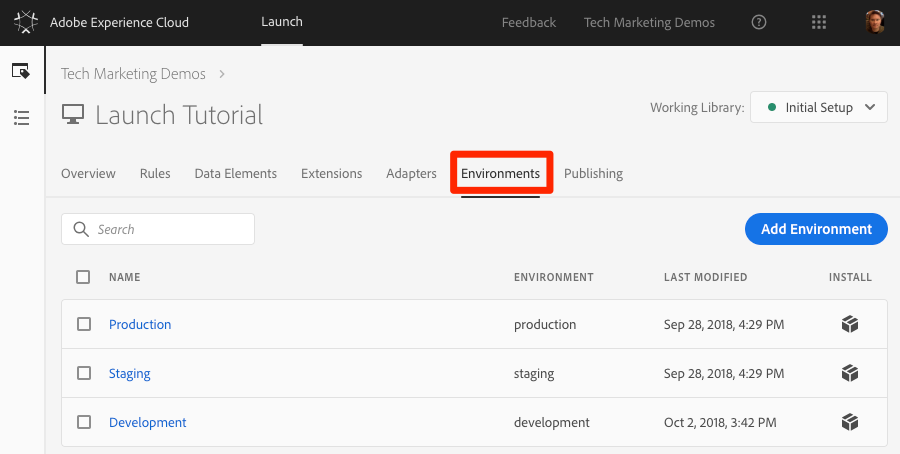
Development, Staging, and Production environments correspond to the typical environments in the code development and release process. Code is first written by a developer in a Development environment. When they have completed their work, they send it to a Staging environment for QA and other teams to review. Once the QA and other teams are satisfied, the code is then published to the Production environment, which is the public-facing environment which your visitors experience when they come to your website.
Launch permits additional Development environments, which is useful in large organizations in which multiple developers are working on different projects at the same time.
These are the only environments we need to complete the tutorial. Environments allow you to have different working versions of your Launch libraries hosted at different URLs, so you can safely add new features and make them available to the right users (e.g. developers, QA engineers, the public, etc.) at the right time.
Now let's copy the embed code:
In the [Development] row, click the Install icon  to open the modal.
Note that Launch will default to the asynchronous embed codes
Click the Copy icon  to copy the embed code to your clipboard.
Click [Close] to close the modal. 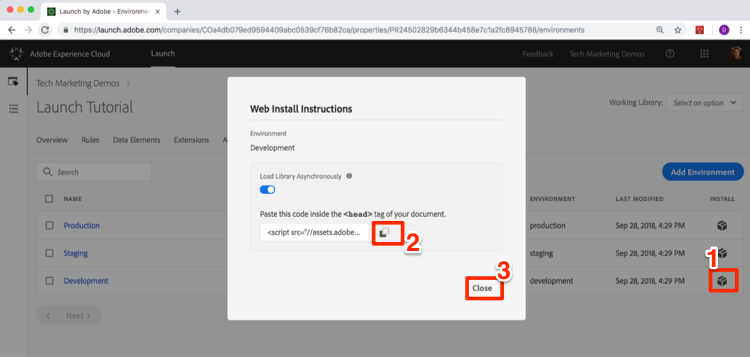
<head> of the Sample HTML PageThe embed code should be implemented in the <head> element of all HTML pages that will share the property. You might have one or several template files which control the <head> globally across the site, making it a straightforward process to add Launch.
In this lesson, you will create your first Data Element, Rule, and Library.
Data Elements and Rules are the basic building blocks of Launch. Data Elements store the attributes you want to send to your marketing and advertising solutions, while Rules fire the requests to those solutions under the right conditions. Libraries are the JavaScript files that load on the page to do all of the work. In this lesson, you will use all three to make our sample page do something.
At the end of this lesson, you will be able to:
Data elements are Launch’s version of a data layer. They can store values from your own data layer object, cookies, local storage objects, query string parameters, page elements, meta tags, etc. In this exercise, you will create a data element for Page Name, which you will use later in your Target and Analytics implementations.
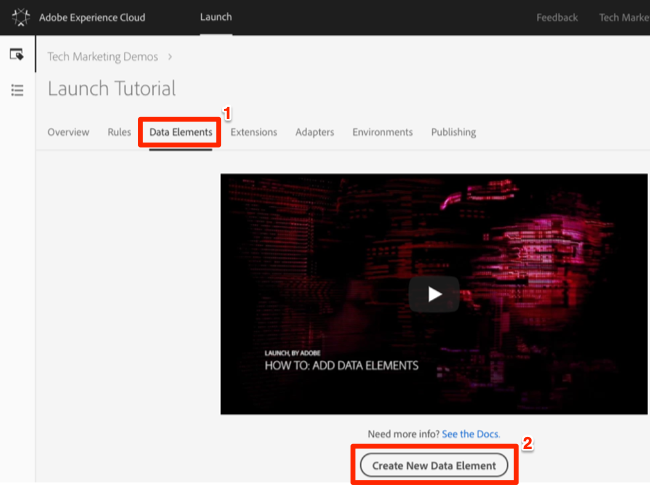
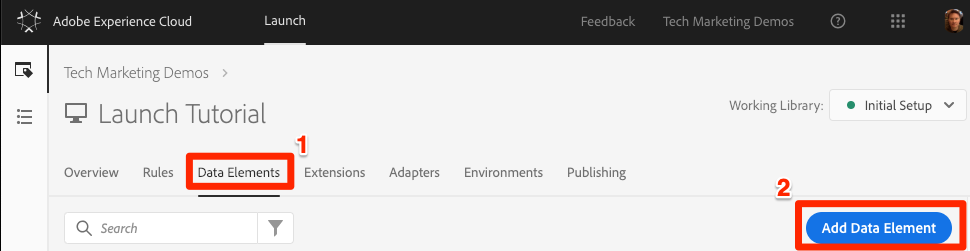
In the top navigation, click [Data Elements]
Since you haven't created any data elements yet in this property, a brief video appears with additional information on this topic. Watch this video, if you like.
Click the [Create New Data Element] button:
Name the data element, e.g. Page Name
Use the [JavaScript Variable] Data Element type to point to a value in your sample page's data layer: digitalData.page.pageInfo.pageName
Use "not available" as the [Default Value]. The [Default Value] tells Launch what value to use for the data element if your JavaScript Variable specified above is not found.
Check the boxes for [Force lowercase value] and [Clean text] to standardize the case and remove extraneous spaces
Leave [None] as the [Storage Duration] setting since this value will typically be different on every page
Click the [Save] button to save the data element 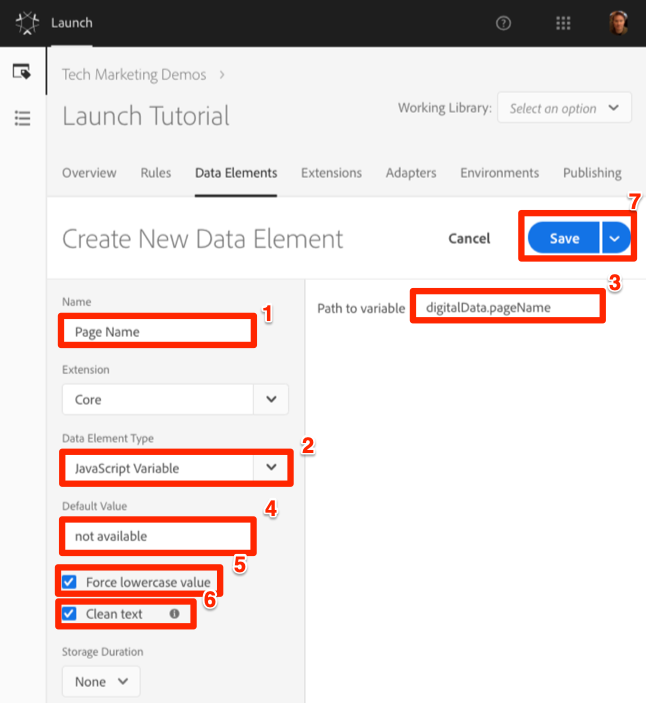
DTM Migrators: New data element types have been added to Launch, which did not exist in DTM. Some of the new data element types include Local Storage, Session Storage, Page Info, and Random Number.
Data element capabilities can be extended with Extensions. For example, the ContextHub extension allows you to add data elements using features of the extension.
Next you will use this data element in a simple rule. Rules are one of the most powerful features in Launch and allow you to specify what should happen as the visitor interacts with your website. When the criteria outlined in your rules are met, the rule triggers the action you have specified.
You are going to create a rule that outputs the Page Name data element value to the browser console.
To create a rule
In the top navigation, click [Rules]
Since you haven't created any rules yet in this property, a brief video appears with additional information on the topic. Watch this video, if you like.
Click the [Create New Rule] button:

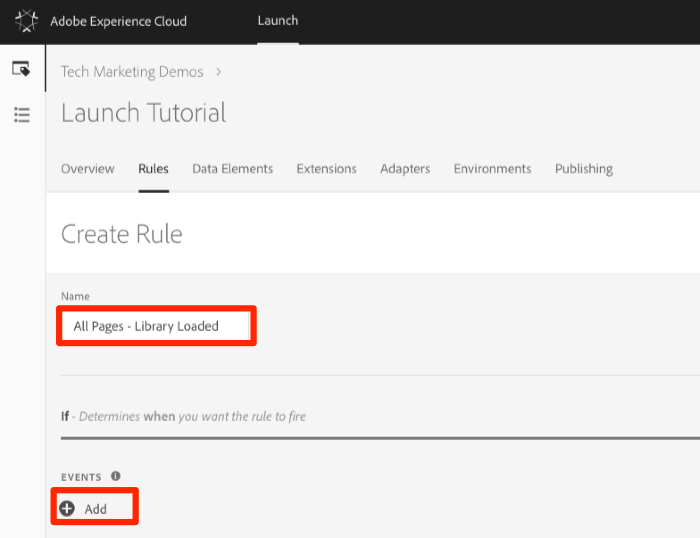
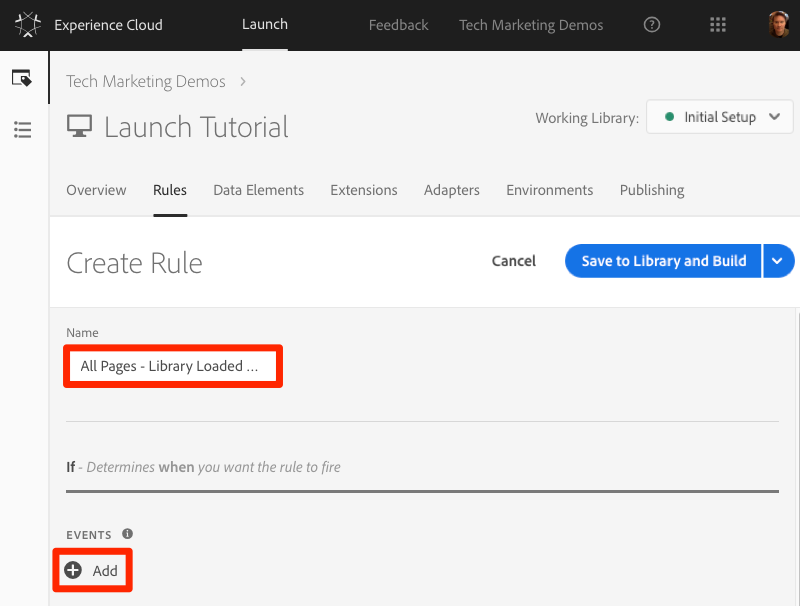
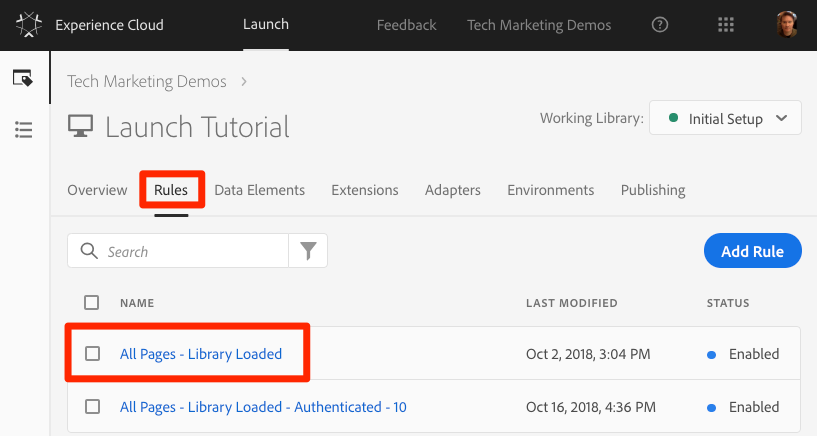
Name the Rule All Pages - Library Loaded. This naming convention indicates where and when the rule will fire, making it easier to identify and re-use as your Launch property matures.
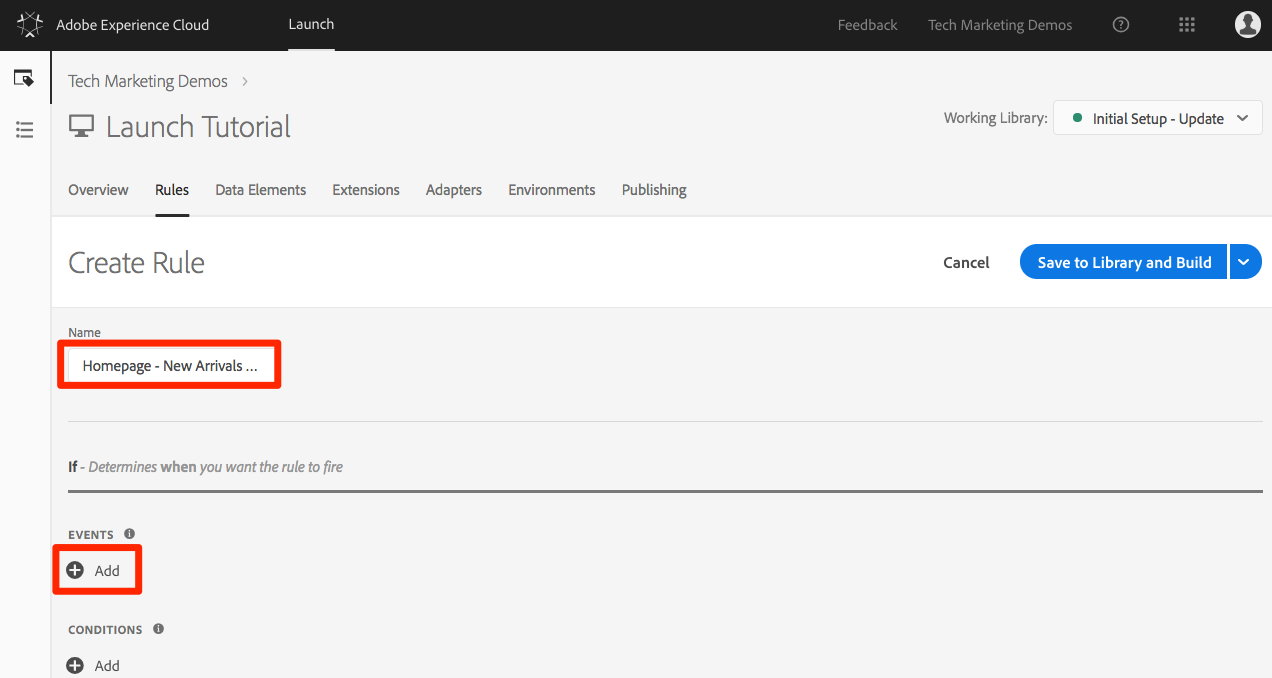
Under Events, click [Add]. The Event tells Launch when the rule should fire and can be many things, including a page load, a click, a custom JavaScript event, etc.
As the Event Type, select [Library Loaded (Page Top)]. Note that when you select the Event Type, Launch pre-populates a name for the event using your selection. Also note that the default order for the event is 50. Ordering is a powerful feature in Launch which gives you precise control over the sequence of actions when you have multiple rules that are triggered by the same event. You will use this feature later in the tutorial.
Click the [Keep Changes] button 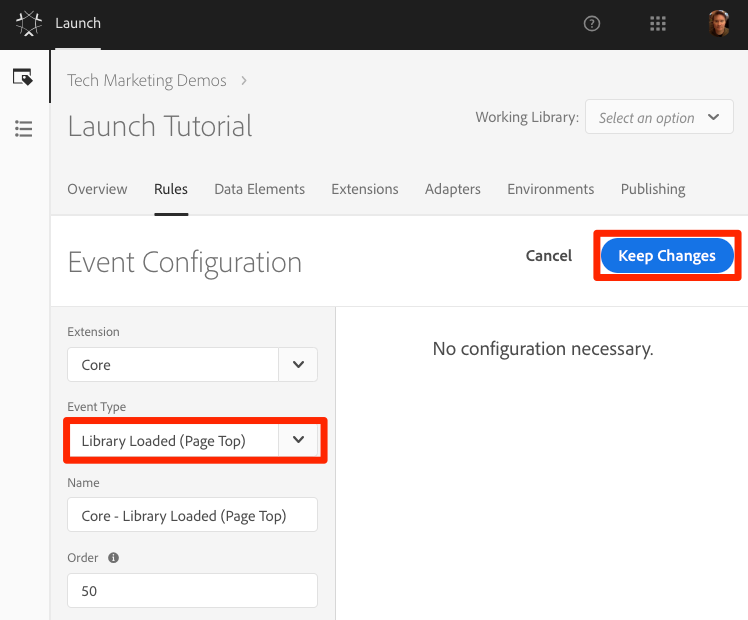
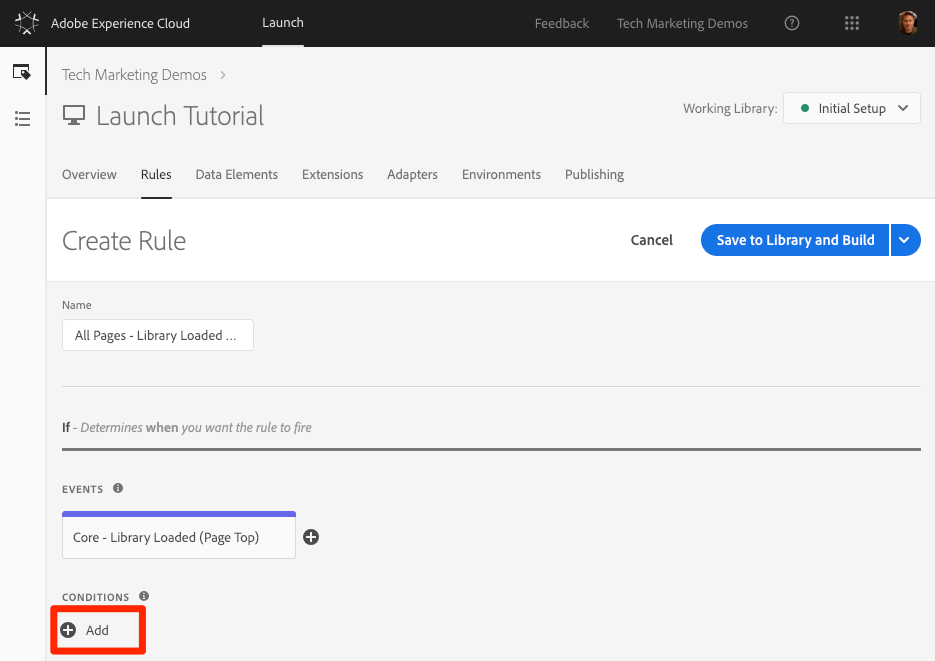
Since this rule should fire on all pages, leave [Conditions] blank. If you open the Conditions modal, you will see that conditions can add both restrictions and exclusions based on a large variety of options, including URLs, data element values, date ranges, and more.
Click [Save] to save the rule
After configuring a collection of extensions, data elements, and rules in the Launch interface, you need to package these capabilities and logic into a set of JavaScript code that you can deploy on your website so that marketing tags will fire when visitors come to the site. A library is the set of JavaScript code that will do this.
Go to the [Publishing] tab
Click [Add New Library] 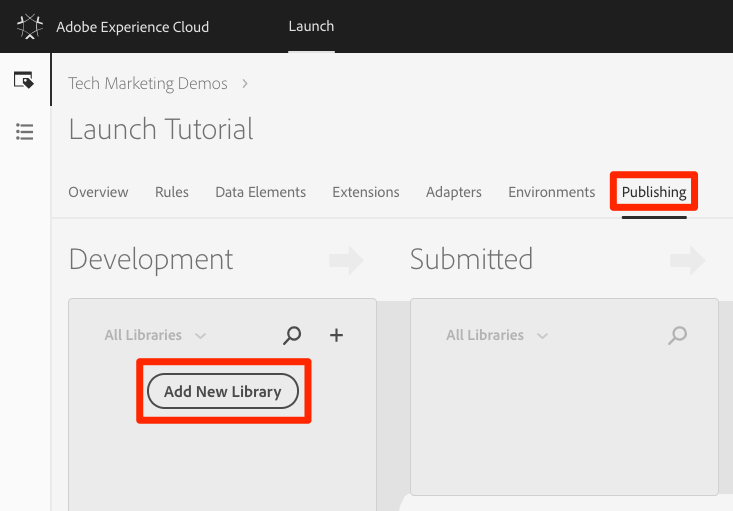
Name the Library "Initial Setup"
Select [Environment > Development]
Click [Add All Changed Resources] 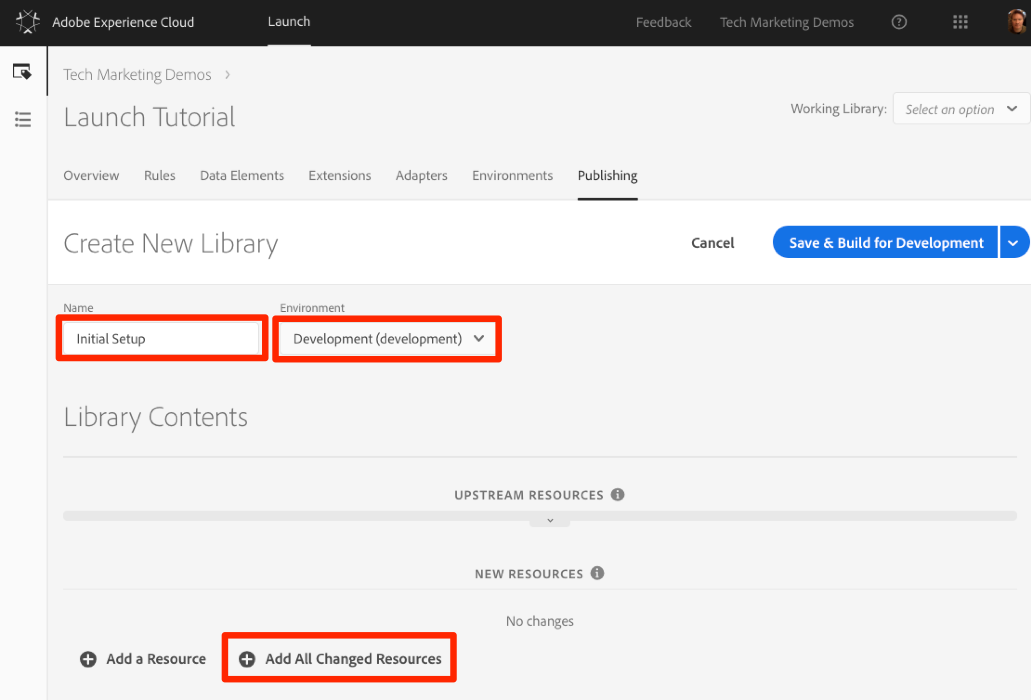
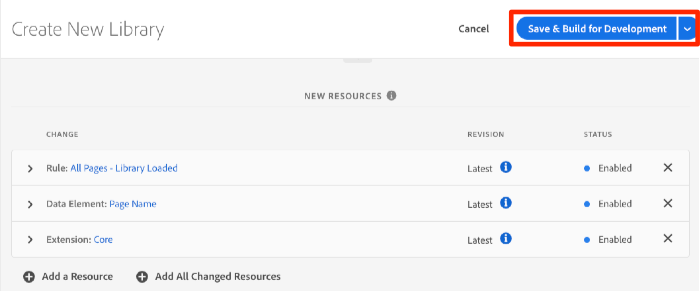
Note that after clicking [Add All Changed Resources] Launch summarizes the changes you just made.
Click [Save & Build for Development]
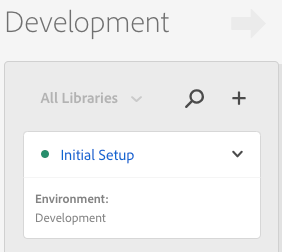
After a few moments, the status dot will turn green indicating the library successfully built.
In this lesson you will use the Adobe Experience Cloud Debugger extension to replace the Launch property hardcoded on the We.Retail demo site with your own property.
This technique is called environment switching and will be helpful later, when you work with Launch on your own website. You will be able to load your production website in your browser, but with your development Launch environment. This enables you to confidently make and validate Launch changes independently from your regular code releases. After all, this separation of marketing tag releases from your regular code releases is one of the main reasons customers use Launch in the first place!
At the end of this lesson, you will be able to:
In your Launch property, open the Environments page
In the [Development] row, click the Install icon to open the modal
Click the Copy icon to copy the embed code to your clipboard
Click [Close] to close the modal
Open the We.Retail demo site in your Chrome browser
Open the Experience Cloud Debugger extension by clicking the ![]() icon
icon
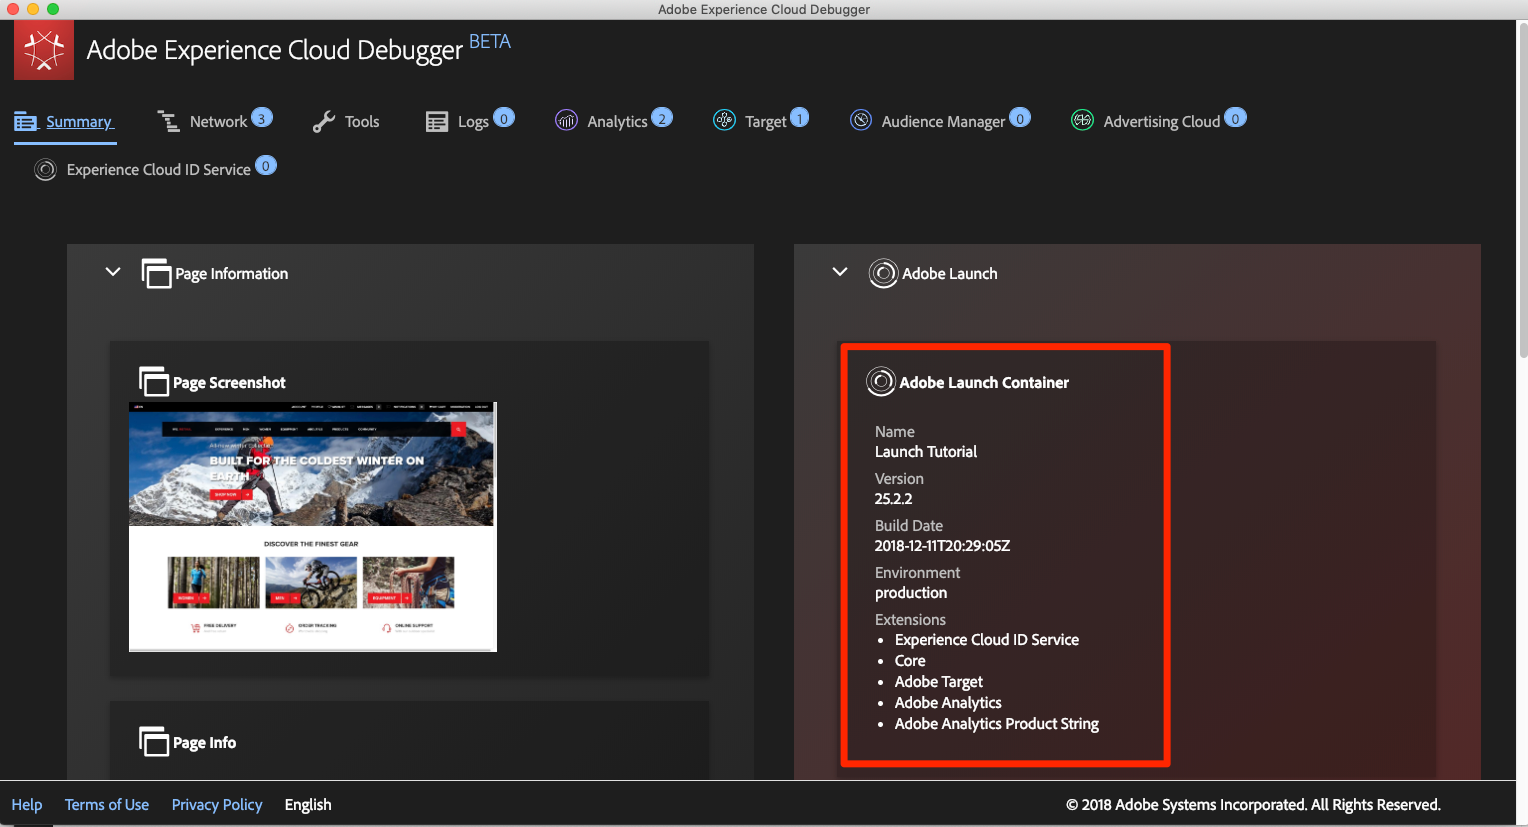
Note that the currently implemented Launch property is shown on the Summary tab
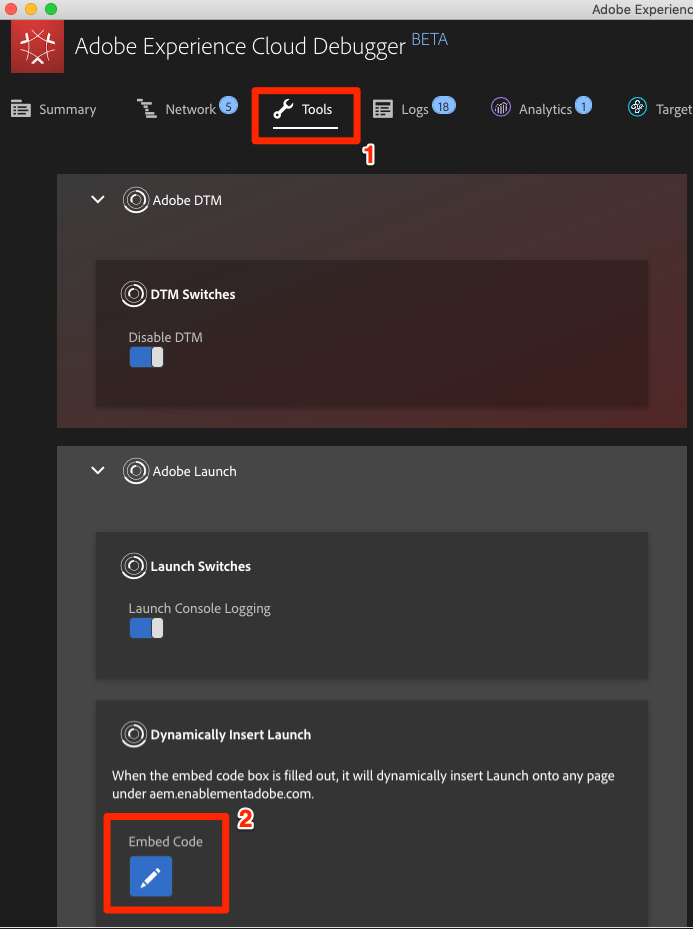
Go to the Tools tab
Click [Adobe Launch > Dynamically Insert Launch > Embed Code] button to open the text input field:
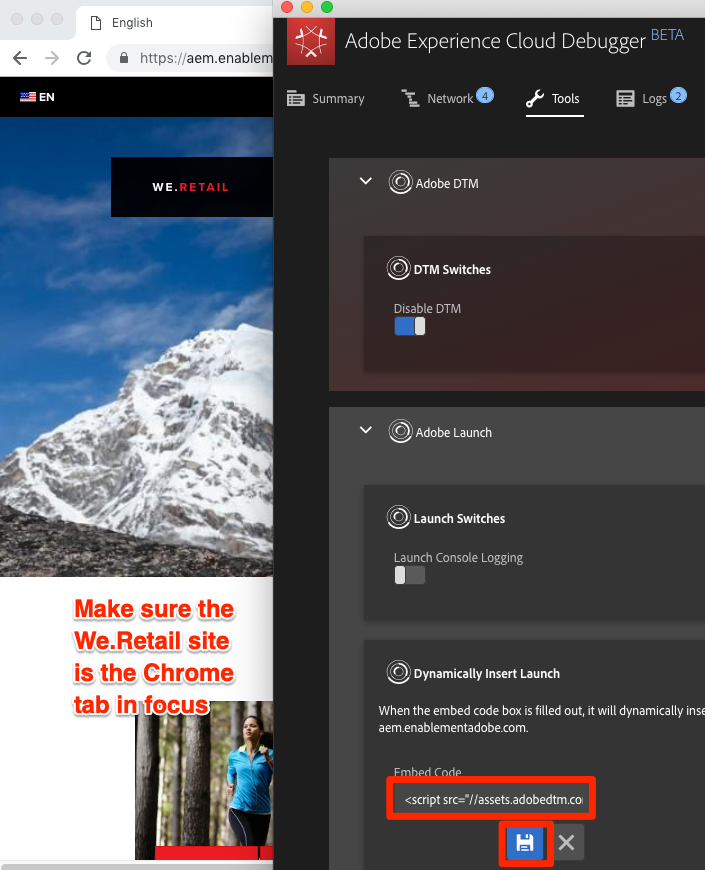
Before you paste your embed code, make sure the Chrome tab with the We.Retail site the one in focus behind the Debugger (not the tab with this tutorial or the tab with the Launch interface)
Paste the embed code that is in your clipboard into the input field
Click the disk icon to save
Reload the We.Retail site and check the Summary tab of the Debugger. Under the Launch section, you should now see your Development Property is being used. Confirm that both the Name of the property matches yours and that the Environment says "development."
The Debugger will save this configuration and replace the Launch embed codes whenever you come back to the We.Retail site. It will not impact other sites you visit in other open tabs. To stop the Debugger from replacing the embed code, click the "X" next to the embed code in the Tools tab of the Debugger.
As you continue the tutorial, you will use this technique of mapping the We.Retail site to your own Launch property to validate your Launch implementation. When you start using Launch on your production website, you can use this same technique to validate changes you make to your Development and Staging Environments before you publish them to Production.
This lesson will guide your through the steps required to implement the Experience Cloud ID Service extension and send customer ids.
The Experience Cloud ID Service sets a common visitor id across all Adobe solutions in order to power Experience Cloud capabilities such as audience-sharing between solutions. You can also send your own customer ids to the Service to enable cross-device targeting and integrations with your Customer Relationship Management (CRM) system.
At the end of this lesson, you will be able to:
Since this is the first extension you are adding, here is a quick overview of extensions. Extensions are one of the core features of Launch. An extension is an integration built by Adobe, an Adobe partner, or any Adobe customer that adds new and endless options for the tags that you can deploy to your website. If you think of Launch as an operating system, extensions are the apps that you install so Launch can do the things you need it to do.
In the top navigation, click [Extensions]
Click [Catalog] to go to the Extensions Catalog page
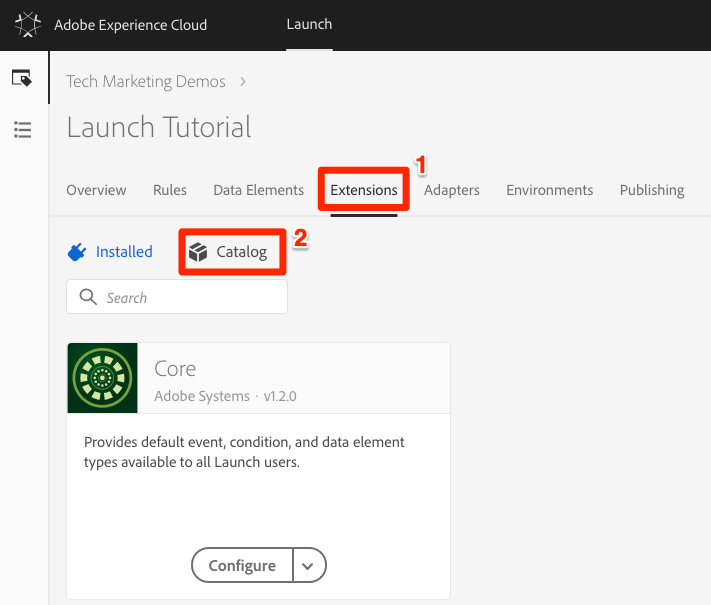
Note the variety of extensions that are available in the Catalog
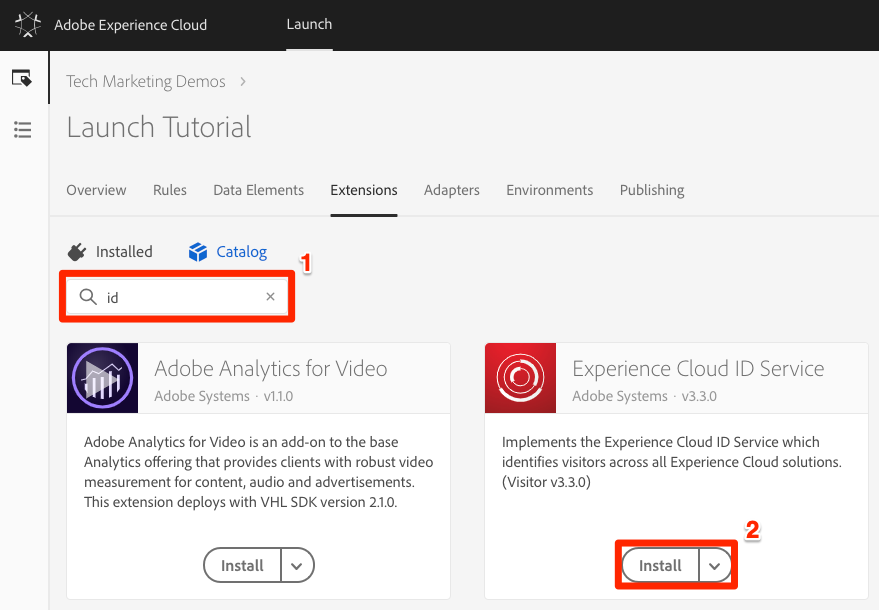
In the filter at the top, type "id" to filter the Catalog
On the card for the Experience Cloud ID Service, click [Install]
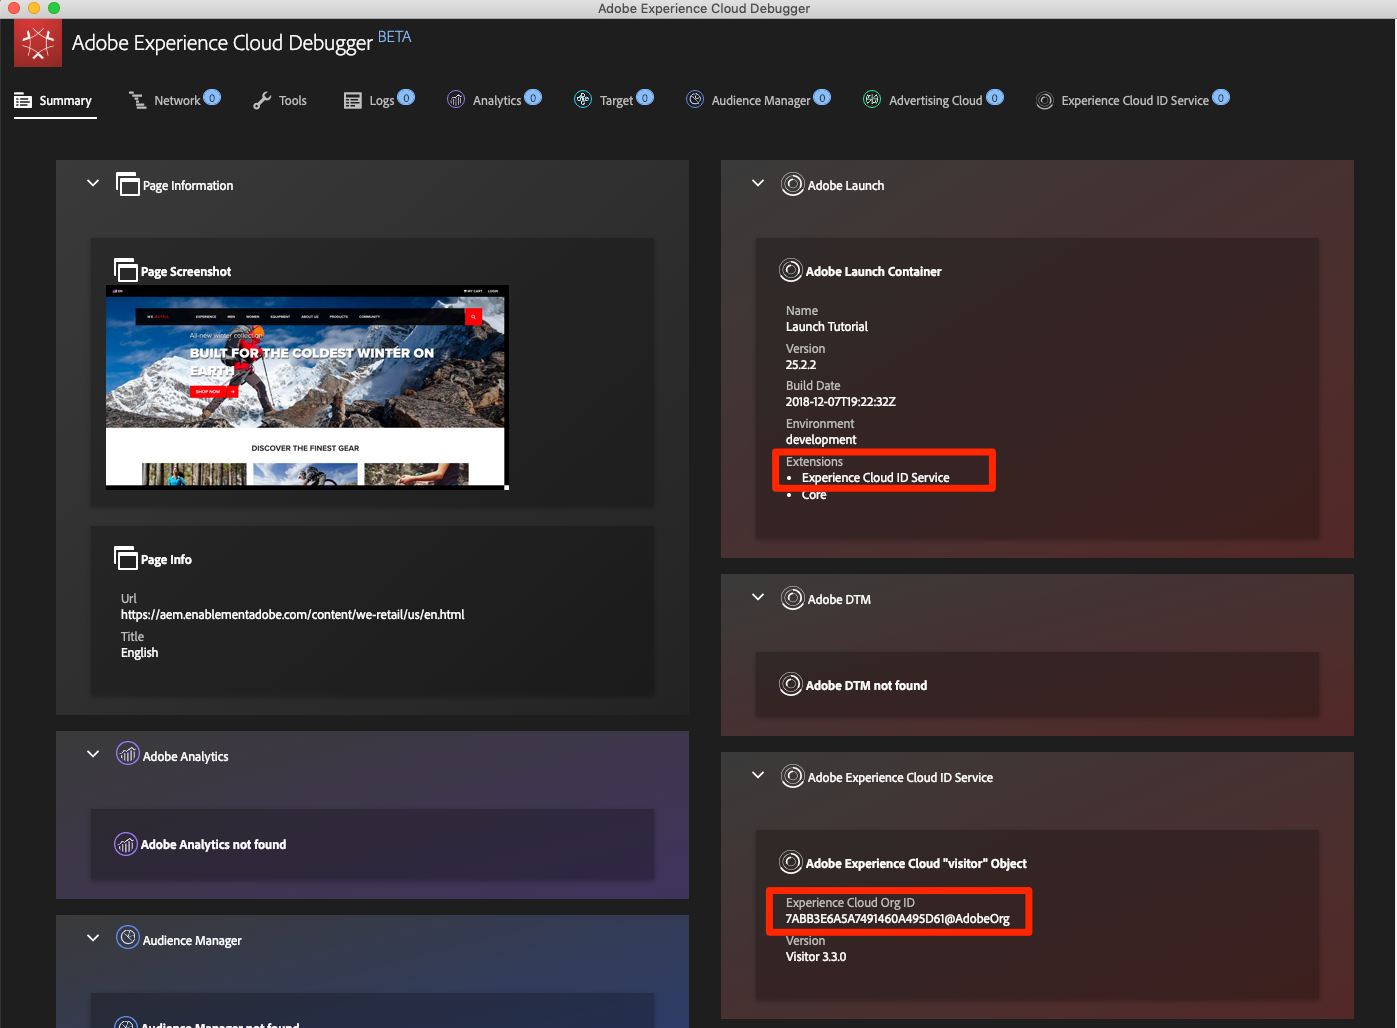
Note that your Experience Cloud Organization ID has been auto-detected for you.
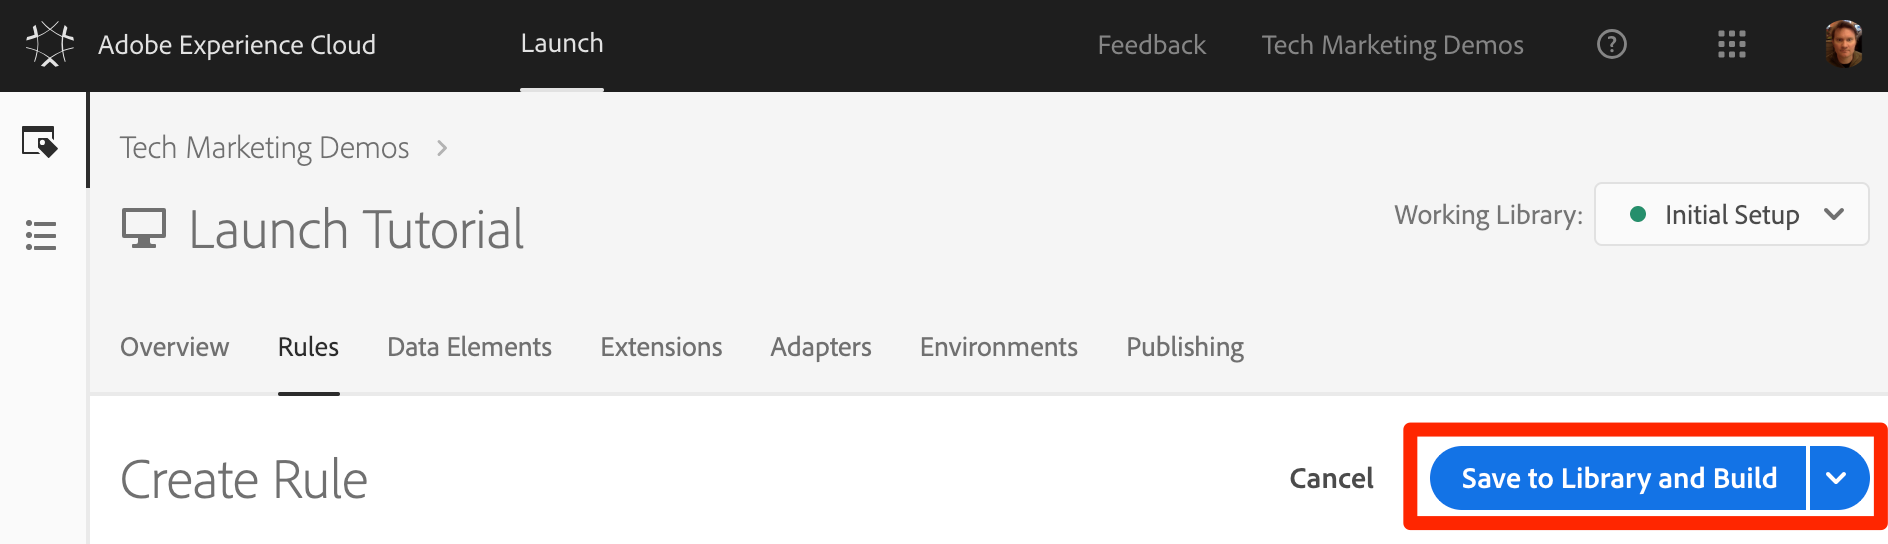
Leave all of the default settings and click [Save to Library and Build]

Each version of the ID Service extension comes with a specific version of VisitorAPI.js which is noted in the extension description. You update the VisitorAPI.js version by updating the ID Service extension.
The ID Service extension is one of the few Launch extensions that makes a request without having to use a rule action. The extension will automatically make a request to the ID Service on the first page load of the first visit to a website. Once the ID has been requested, it will be stored in a first party cookie beginning with "AMCV_".
Open the We.Retail site
Make sure the Debugger is mapping the Launch property to your Development environment, as described in the earlier lesson.
On the Summary tab of the Debugger, the Launch section should indicate that the Experience Cloud ID Service extension is implemented.
Also, on the Summary tab, the ID Service section should populate with the same Org ID that was on your extension configuration screen in the Launch interface:
The initial request to retrieve the Visitor ID might appear in the ID Service tab of the Debugger. It might have already been requested, though, so don't worry if you don't see it: 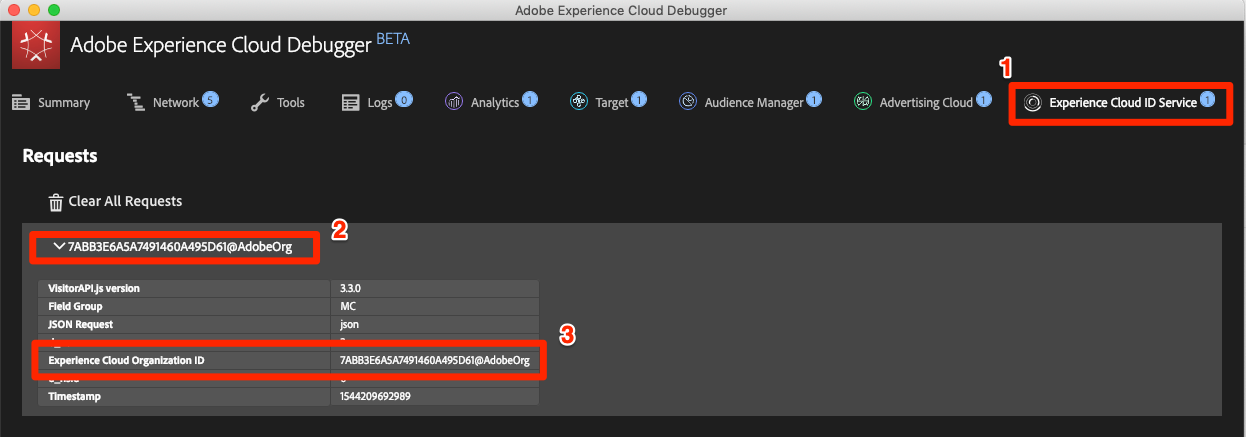
Next, you will send a Customer ID to the ID Service. This will allow you to integrate your CRM with the Experience Cloud as well as track visitors across devices.
In the earlier lesson, Add Data Elements, Rules, and Libraries you created a data element and used it in a rule. Now, you will use those same techniques to send a Customer ID when the visitor is authenticated.
Start by creating two data elements:
Authentication State—to capture whether or not the visitor is logged inEmail (Hashed)—to capture the hashed version of the email address (used as the customer ID) from the data layerTo create the data element for Authentication State
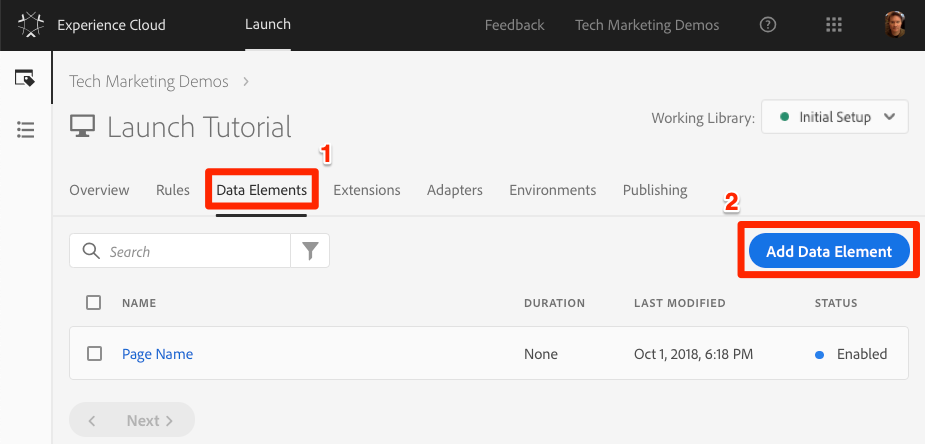
Click [Data Elements] in the top navigation
Click the [Add Data Element] button
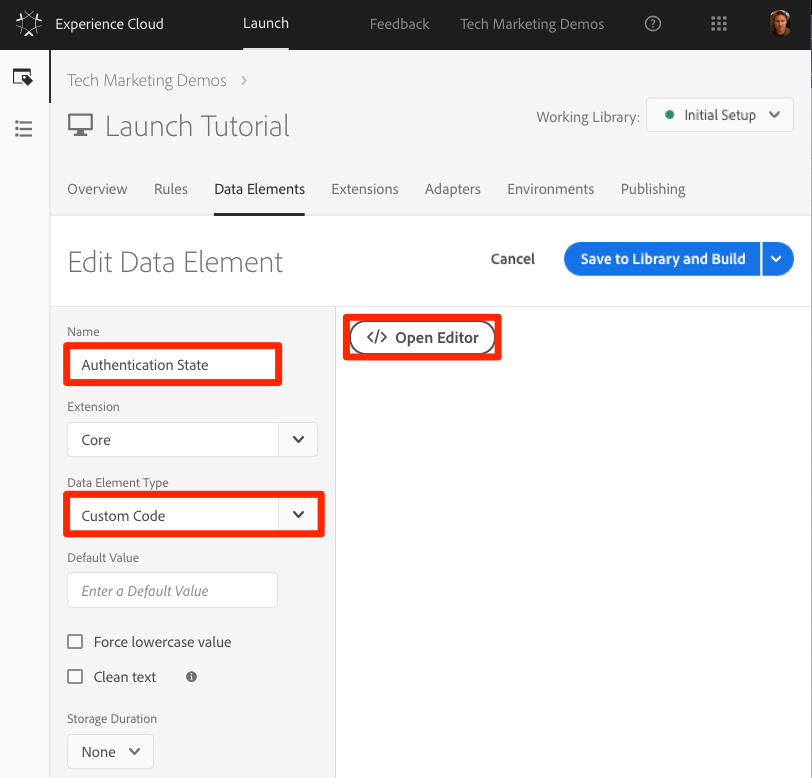
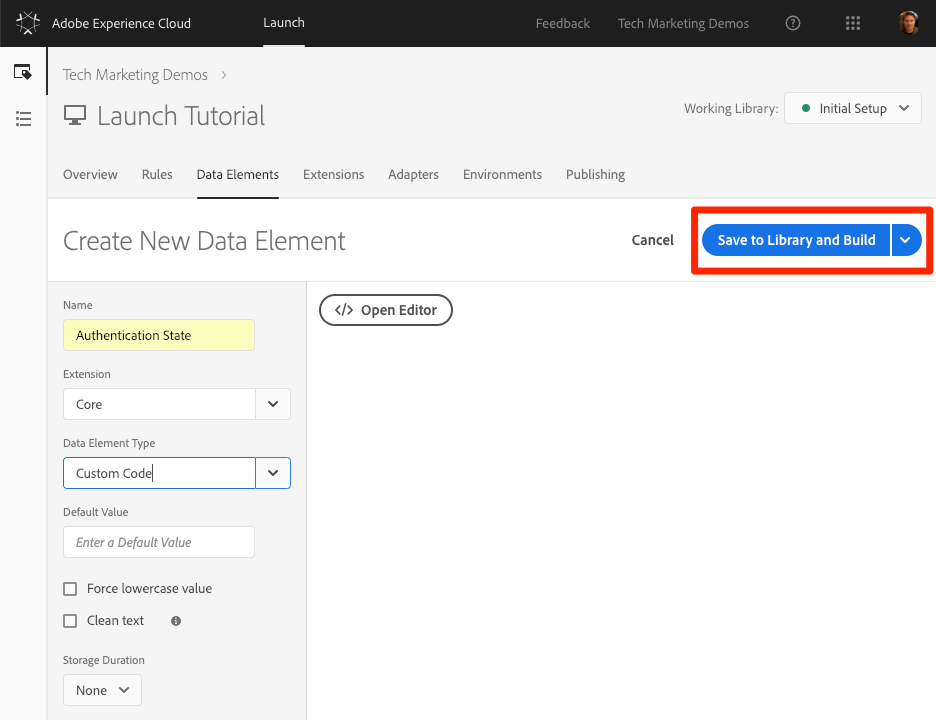
Name the data element Authentication State
For the [Data Element Type], select [Custom Code]
Click the [Open Editor] button
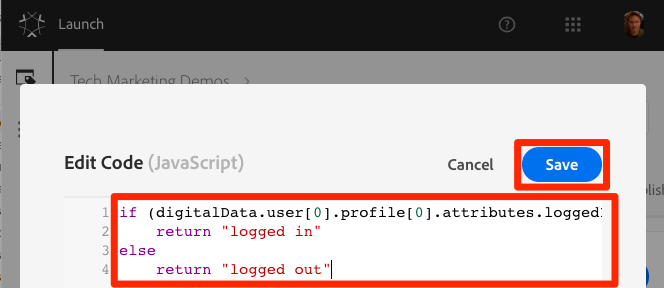
In the [Edit Code] window, use the following code to return values of "logged in" or "logged out" based on an attribute in the We.Retail site's data layer:
Click [Save] to save the custom code
Leave all of the other settings on their default values
Click [Save to Library and Build] to save the data element and return to the data elements page
By knowing the authentication state of the user, you know when a customer id should exist on the page to send to the ID Service. The next step is to create a data element for the customer id itself. On the We.Retail demo site, you will use the hashed version of the visitor's email address.
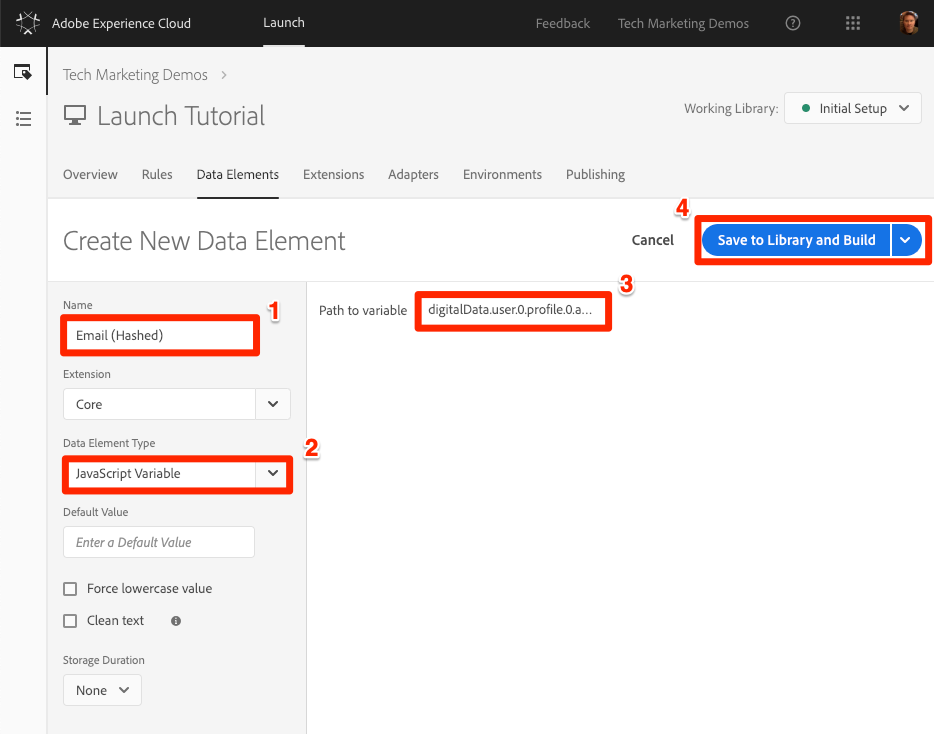
Click the [Add Data Element] button
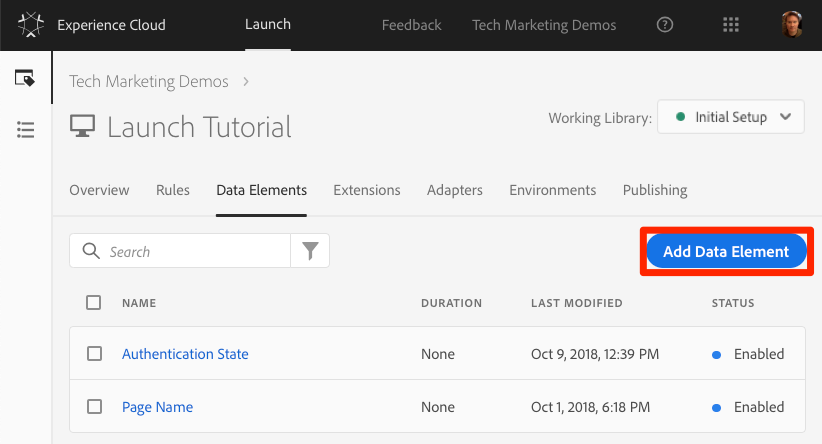
Name the data element Email (Hashed)
For the [Data Element Type], select [JavaScript Variable]
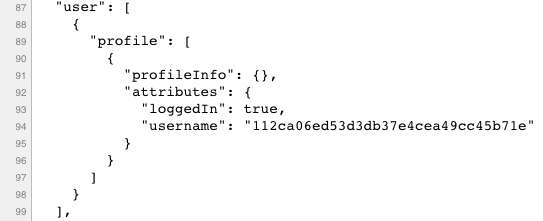
As the [Path to variable], use the following pointer to a variable in the We.Retail site's data layer: digitalData.user.0.profile.0.attributes.username
Leave all of the other settings on their default values
Click [Save to Library and Build] to save the data element
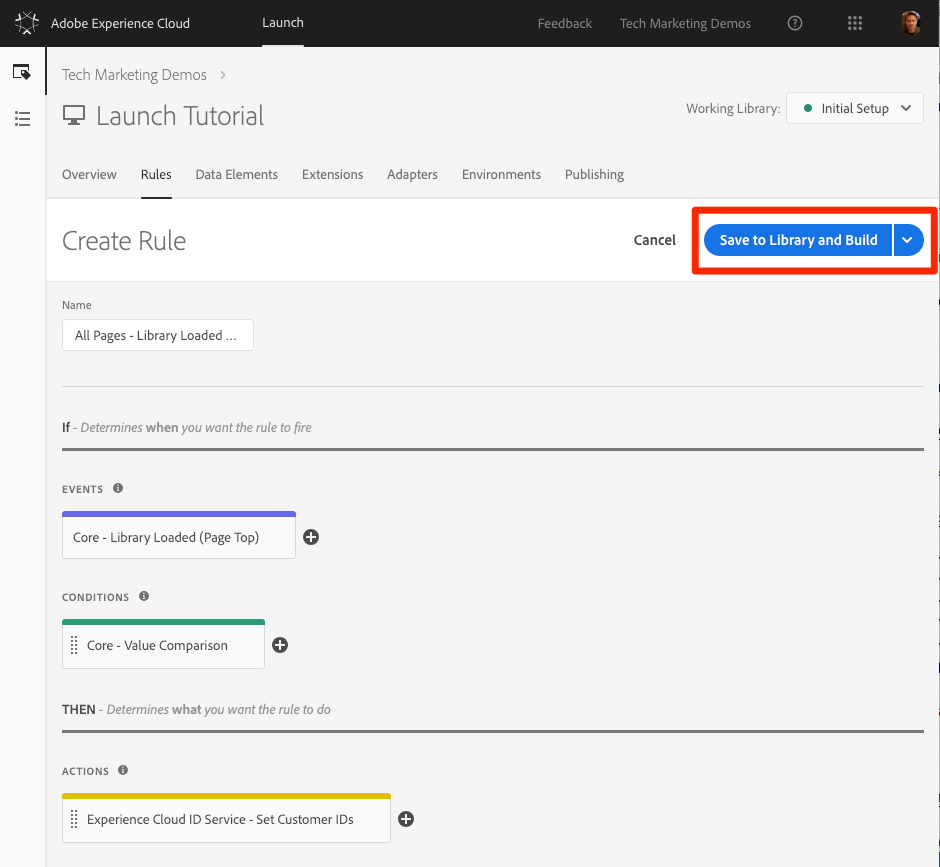
The Experience Cloud ID Service passes the Customer IDs in rules using an action called “Set Customer IDs.” You will now create a rule to trigger this action when the visitor is authenticated.
In the top navigation, click [Rules]
Click [Add Rule] to open the Rule Builder
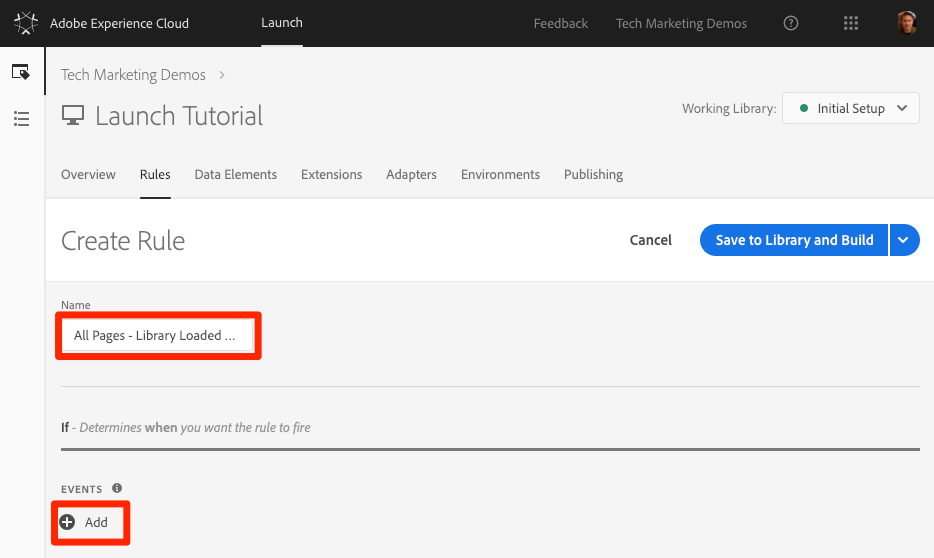
Name the rule All Pages - Library Loaded - Authenticated - 10
This naming convention indicates you are firing this rule at the top of all pages when the user is authenticated and it will have an order of “10”. Using a naming convention like this - instead of naming it for the solutions triggered in the actions - will allow you to minimize the overall number of rules needed by your implementation.
Under [Events] click [Add]
10. The Order controls the sequence of rules that are triggered by the same event. Rules with a lower order will fire before rules with a higher order. In this case, you want to set the customer ID before you fire the Target request, which you will do in the next lesson with a rule with an order of 50 .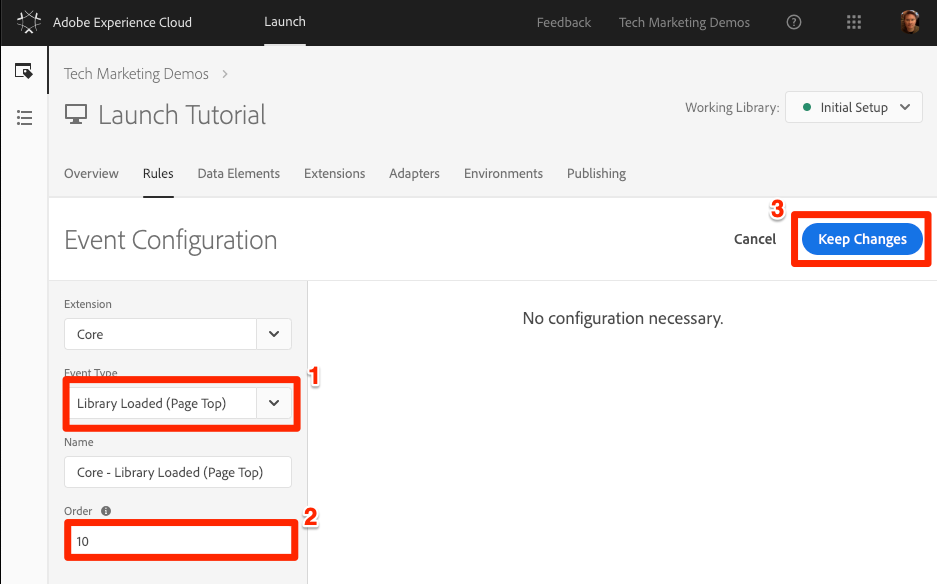
Under [Conditions] click [Add]
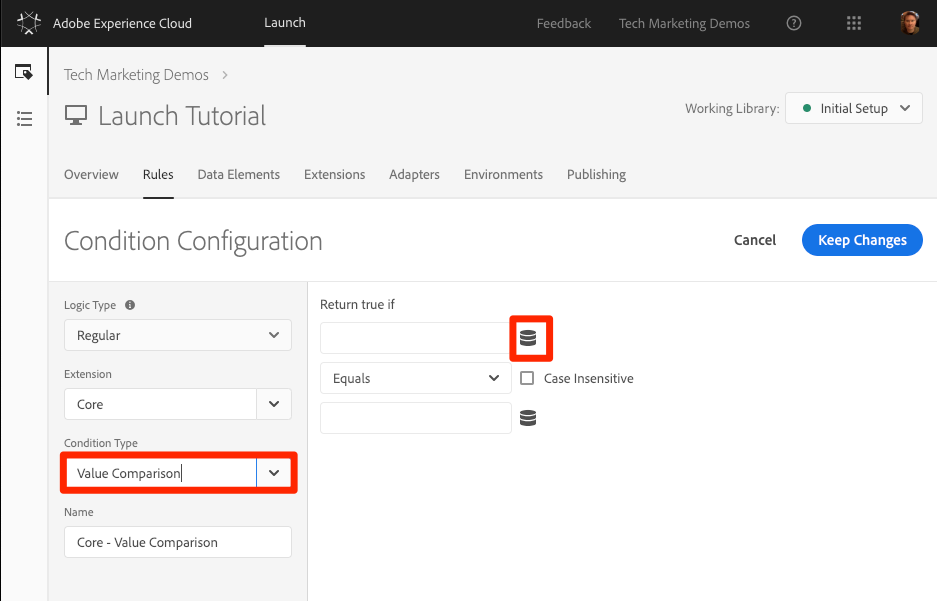
For the [Condition Type] select [Value Comparison]
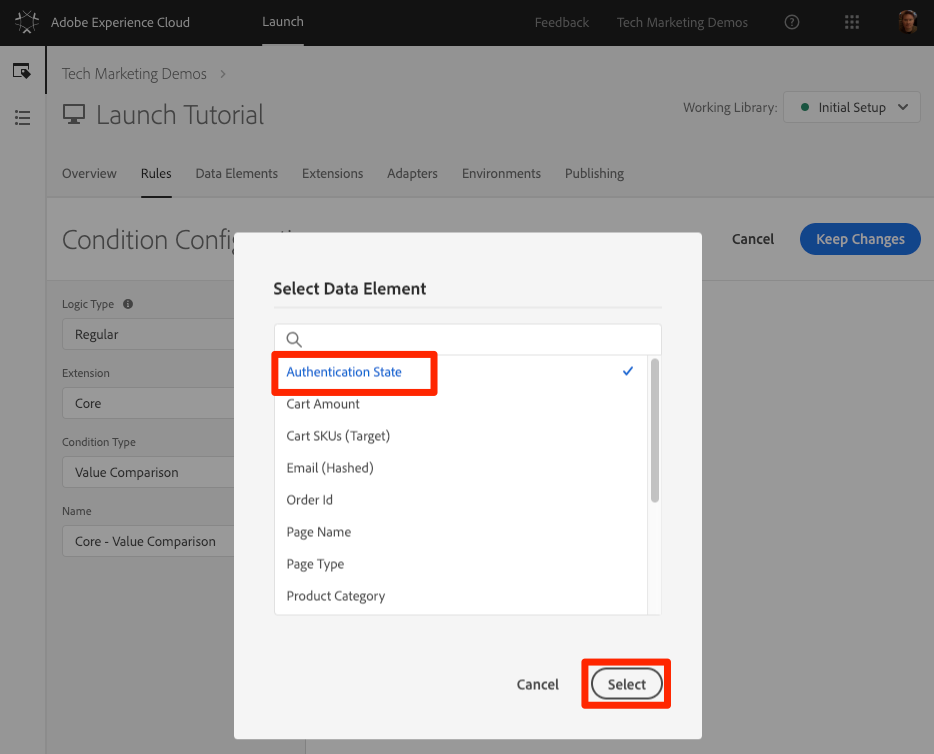
Click the ![]() icon to open the Data Element modal
icon to open the Data Element modal
In the Data Element Modal, click on [Authentication State] and then click [Select]
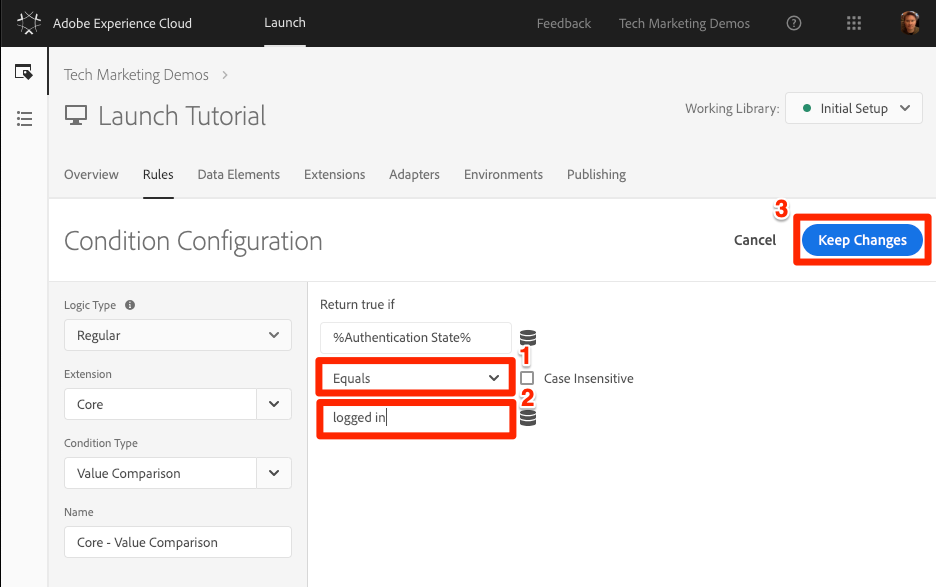
Make sure Equals is the operator
Type "logged in" in the text field, causing the rule to fire whenever the Data Element “Authentication State” has a value of “logged in”
Click [Keep Changes]
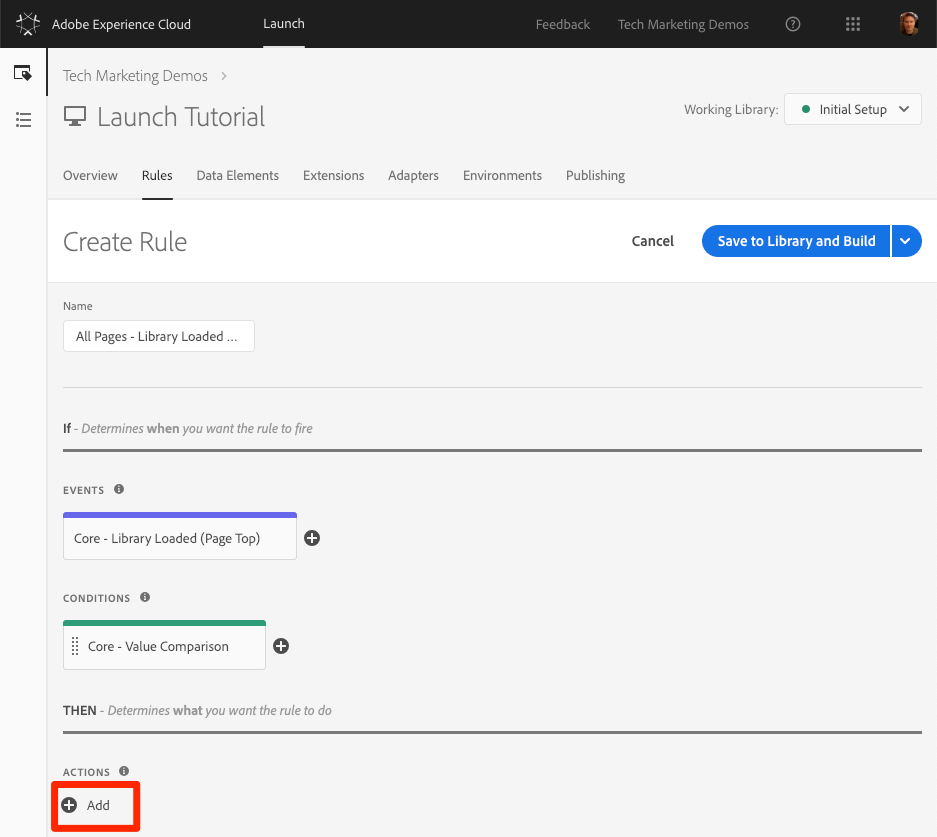
Under [Actions] click [Add]
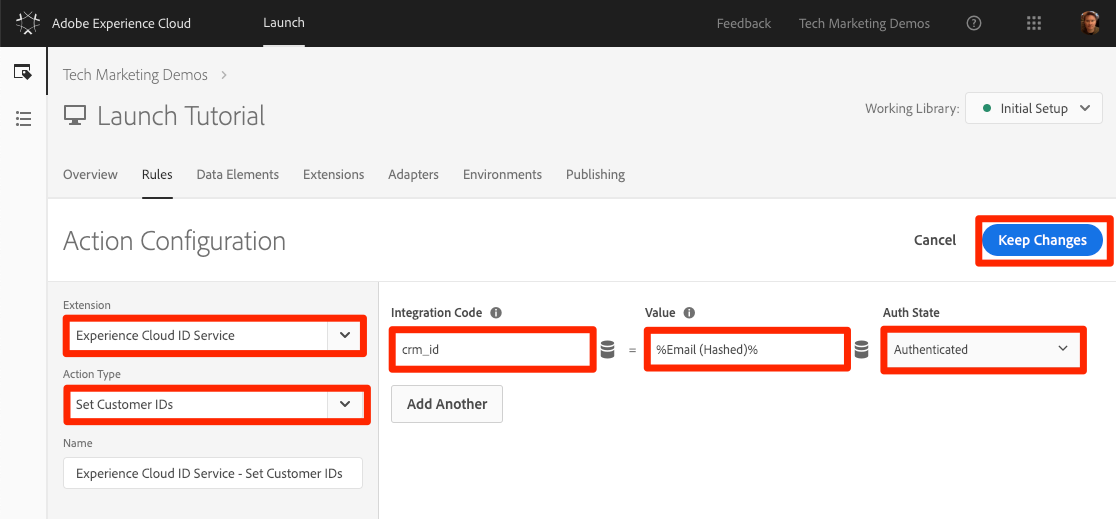
For the [Extension] select [Experience Cloud ID Service]
For the [Action Type] select [Set Customer IDs]
For the [Integration Code] enter crm_id
For the [Value] enter open the Data Element selector modal and select the Email (Hashed)
For the [Auth State] select [Authenticated]
Click the [Keep Changes] button to save the action and return to the Rule Builder
Click the [Save to Library and Build] button to save the rule
You've now created a rule that will send the Customer ID as a variable crm_id when the visitor is Authenticated. Since you specified the Order as 10 this rule will fire before your All Pages - Library Loaded rule created in the Add Data Elements, Rules and Libraries lesson which uses the default Order value of 50.
To validate your work, you will log into the We.Retail site to confirm the behavior of the new rule.
To log into the We.Retail site
Open the We.Retail site
Make sure the Debugger is mapping the Launch property to your Development environment, as described in the earlier lesson
Click the [LOGIN] link in the top right corner of the We.Retail site
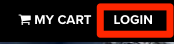
Enter test@adobe.com as the username
Enter test as the password
Click the [LOGIN] button
Return to the Homepage
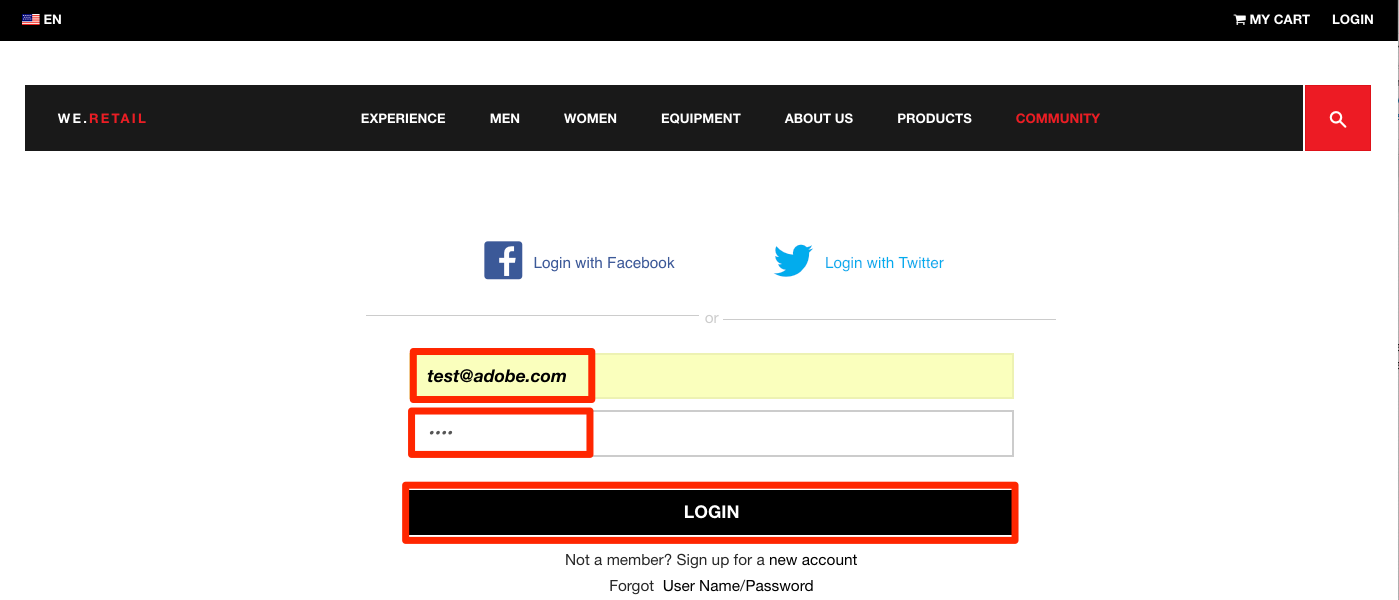
Now, confirm the customer id is sent to the Service using the Debugger extension.
Make sure the tab with the We.Retail site is in focus
In the Debugger, go to the Experience Cloud ID Service tab
Expand your Org ID
Click on the cell with the Customer ID - crm_id value
In the modal, note the customer id value and that the AUTHENTICATED state is reflected:
Note that you can confirm the hashed email value by viewing the source code of the We.Retail page and looking at the username property. It should match the value you see in the Debugger:
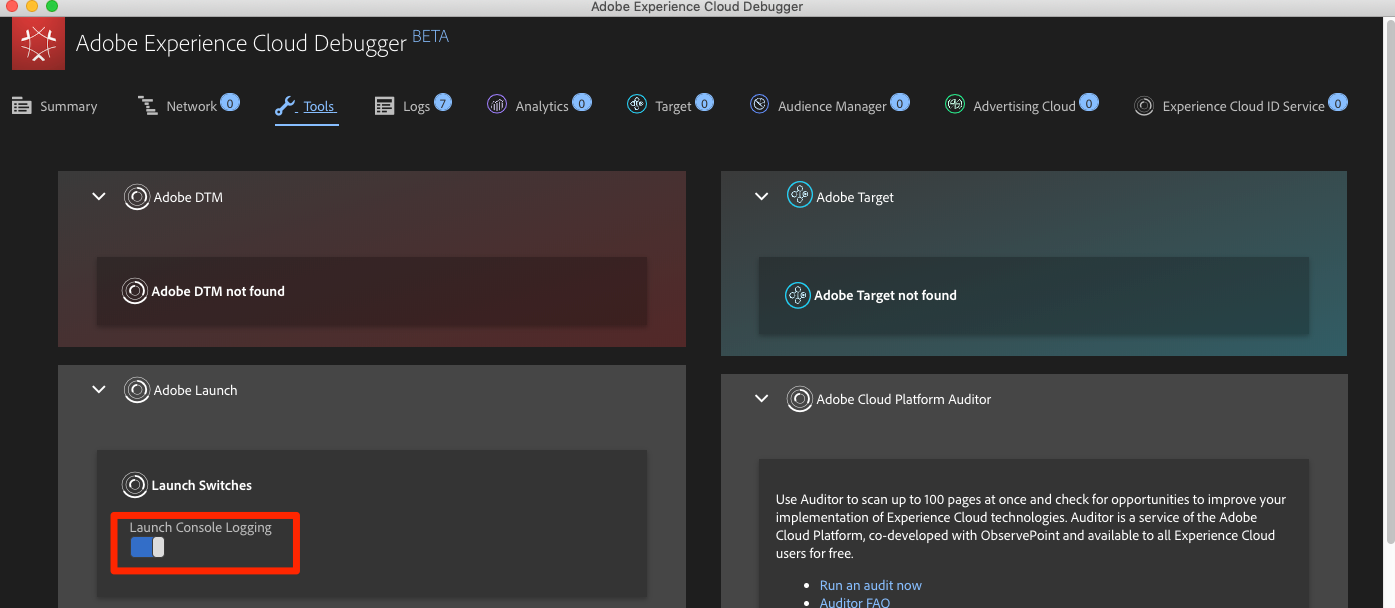
Launch also has rich console logging features. To turn them on, go to the [Tools] tab in the Debugger and turn on the [Launch Console Logging] toggle.
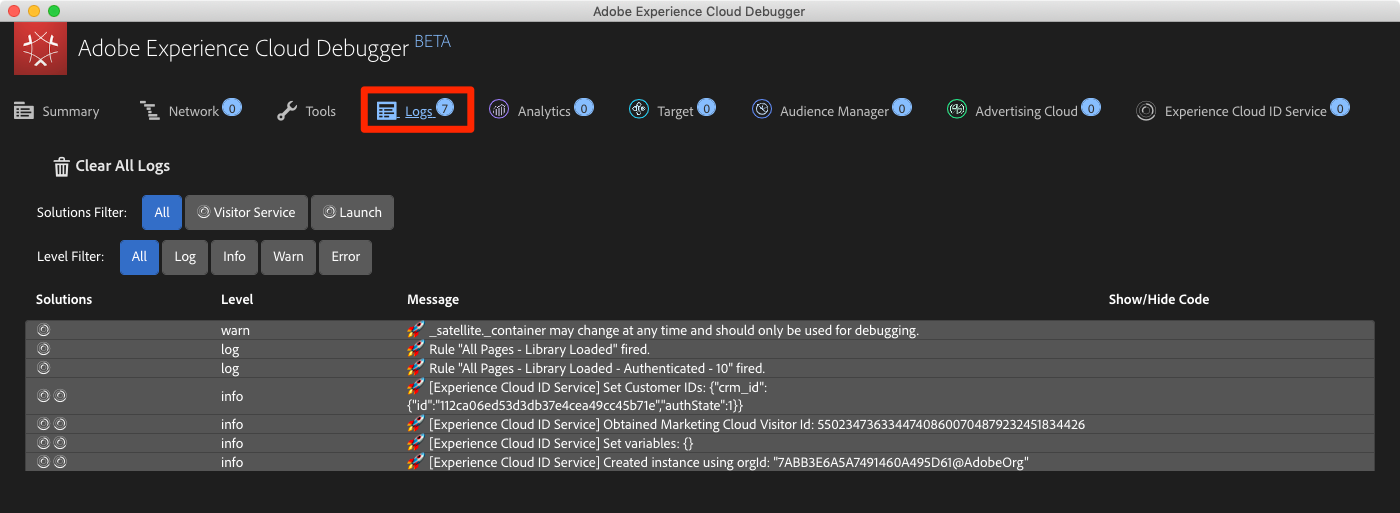
This will turn on console logging both in your browser console and in the Logs tab of the Debugger. You should see the logging of all of the rules you have created so far! Note that new log entries are added to the top of the list, so your rule "All Pages - Library Loaded - Authenticated - 10" should fire before the "All Pages - Library Loaded" rule and appear below it in the Debugger's Console Logging:
In this lesson, we will implement the Adobe Target extension with a global request and custom parameters.
Adobe Target is the Adobe Marketing Cloud solution that provides everything you need to tailor and personalize your customers' experience, so you can maximize revenue on your web and mobile sites, apps, social media, and other digital channels.
At the end of this lesson, you will be able to:
Before we get started, we need to make a slight update to the Launch embed codes. When the Launch embed codes are loaded asynchronously, the page may finish rendering before the Target library is fully loaded and has performed its content swap. This can lead to what is known as "flicker" where default content briefly displays before being replaced by the personalized content specified by Target. If you want to avoid this flicker, we strongly recommend hardcoding a special pre-hiding snippet immediately before Launch's asynchronous embed codes.
This has already been done on the We.Retail site, but let's go ahead and do this on the sample page so you understand the implementation. Copy the following lines of code:
<script>
    //prehiding snippet for Adobe Target with asynchronous Launch deployment
    (function(g,b,d,f){(function(a,c,d){if(a){var e=b.createElement("style");e.id=c;e.innerHTML=d;a.appendChild(e)}})(b.getElementsByTagName("head")[0],"at-body-style",d);setTimeout(function(){var a=b.getElementsByTagName("head")[0];if(a){var c=b.getElementById("at-body-style");c&&a.removeChild(c)}},f)})(window,document,"body {opacity: 0 !important}",3E3);
</script>
Open the sample page and paste it just before your Launch embed code as pictured below (don't worry if the line numbers are different): 
Reload your sample page. You will notice that the page will be hidden for three seconds before it shown. This behavior is temporary and will go away after you have deployed Target. This pre-hiding behavior is controlled by two configurations at the very end of the snippet, which can be customized but are usually best left on the default settings:
body {opacity: 0 !important} specifies the css definition to use for the pre-hiding until Target loads. By default, the entire body will be hidden. If you have a consistent DOM structure with an easily identifiable container element wrapping all of the content below your navigation, for example, and you never wanted to test or personalize your navigation, you could use this setting to limit the pre-hiding to that container element.3E3 which specifies the timeout setting for the pre-hiding. By default, if Target hasn't loaded in three seconds the page will be shown. This should be extremely rare.For more details and to obtain the un-minified pre-hiding snippet, please see the Adobe Target extension with an asynchronous deployment
The Adobe Target extension supports client-side implementations using Target's JavaScript SDK for the modern web, at.js. Customers still using Target's older library, mbox.js, should upgrade to at.js in order to use Launch.
The Target extension consists of two main parts:
In this first exercise we will add the extension and look at the configurations. In later exercises we will use the actions.
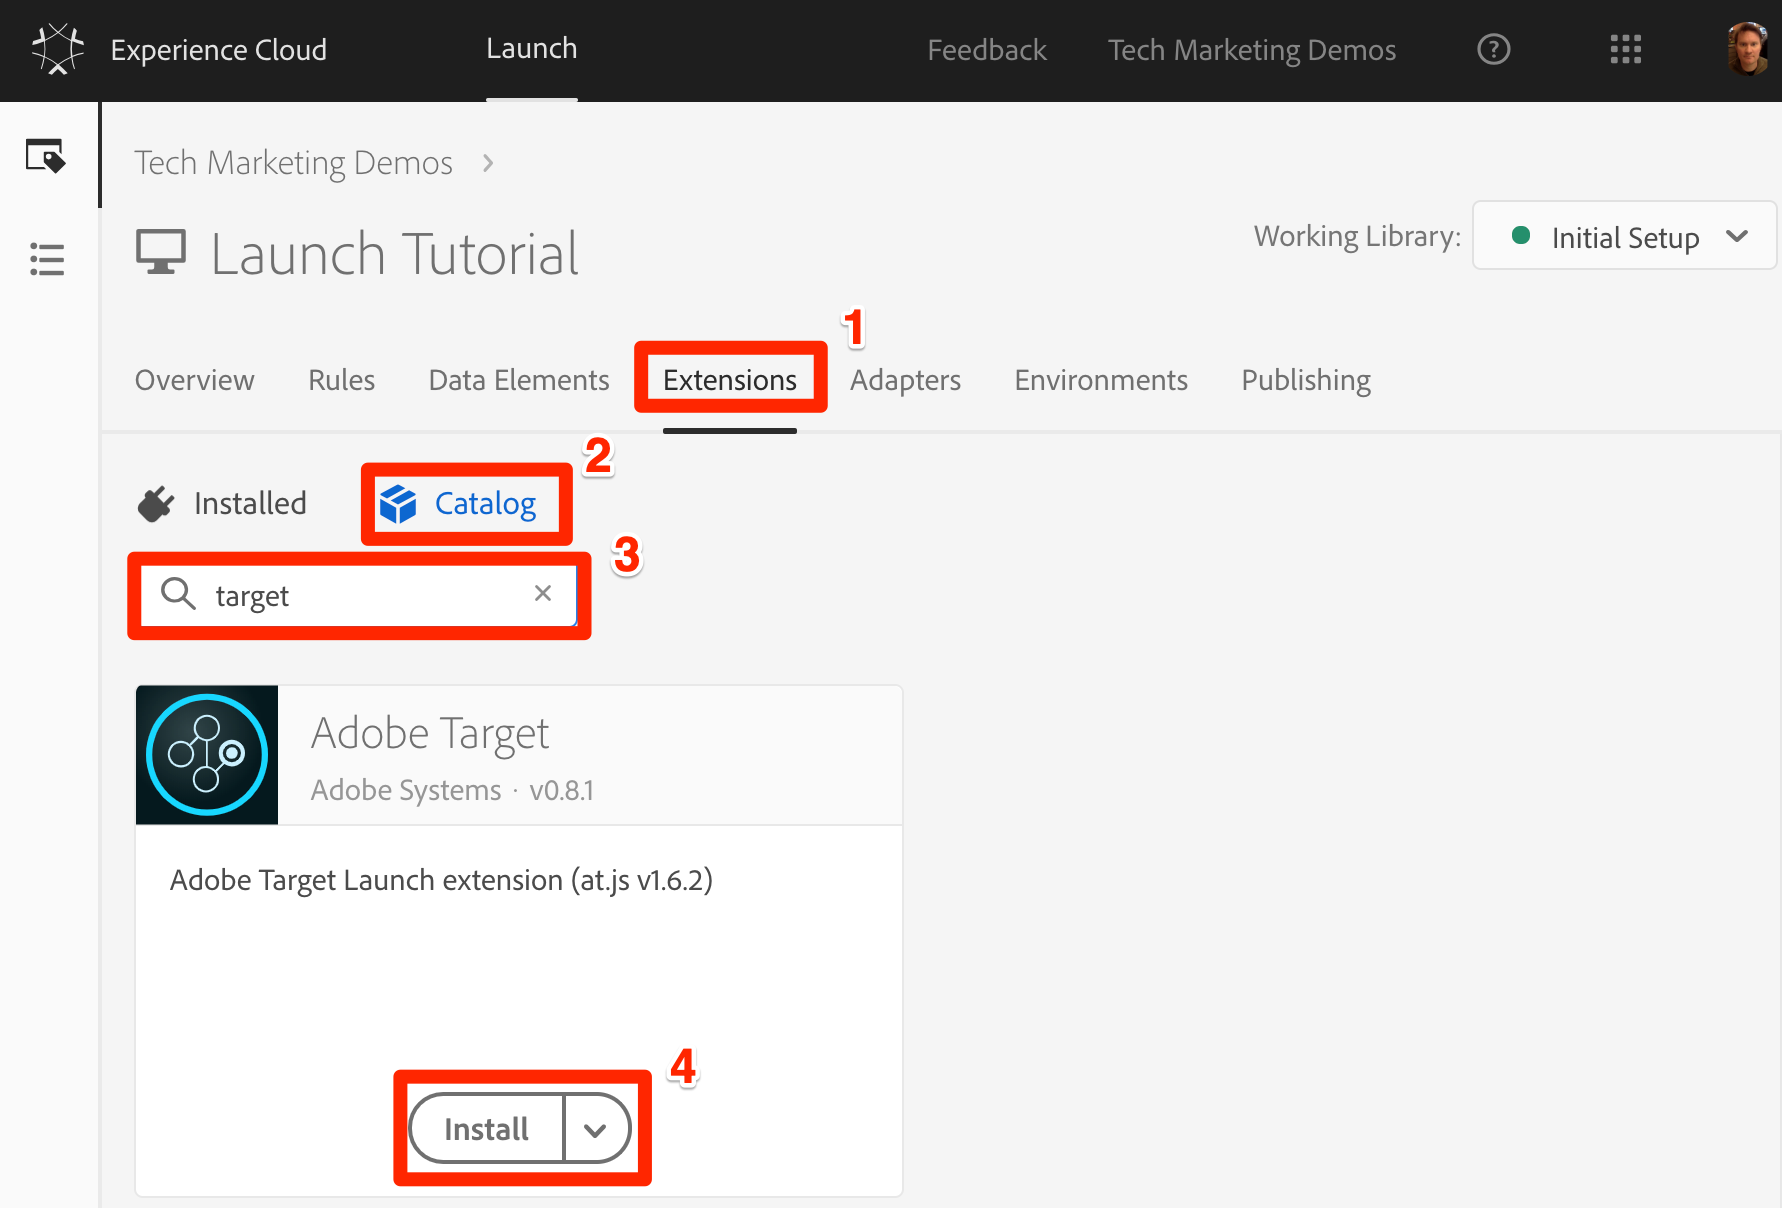
Go to [Extensions > Catalog]
Type target in the filter to quickly locate the Adobe Target extension
Click [Install]
When you add the extension, it will import many, but not all of your at.js settings from the Target interface, as pictured below. One setting that will not be imported is the Timeout, which will always be 3000ms after adding the extension. For the tutorial, leave the default settings. Note, that on the left hand side it will show the at.js version that ships with the current version of the extension.
Click [Save to Library and Build] 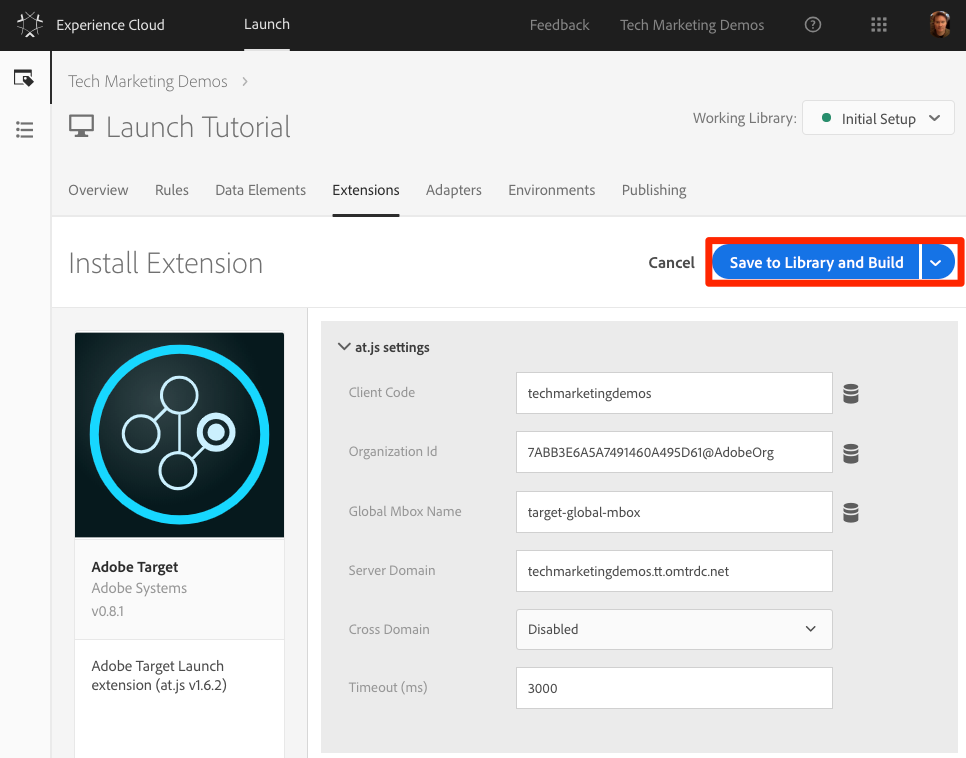
At this point, Target isn't really doing anything, so there is nothing to validate.
Each version of the Target extension comes with a specific version of at.js, which is listed in the extension description. You update the at.js version by updating the Target extension.
Marketers use Target to control the visitor experience on the page when testing and targeting content. Because of this important role in the display of the page, you should load Target as early as possible to minimize the impact on page visibility. In this section, we will load the Target JavaScript library - at.js - as well as fire the global mbox.
You can use the All Pages - Library Loaded rule you created in the lesson "Add Data Elements, Rules and Libraries" to implement Target because it is already triggered on the first event that will fire on a page load - the Library Loaded event.
Go to the [Rules] in the top navigation and then click on All Pages - Library Loaded to open the rule editor
Under Actions, click the ![]() to add a new action
to add a new action
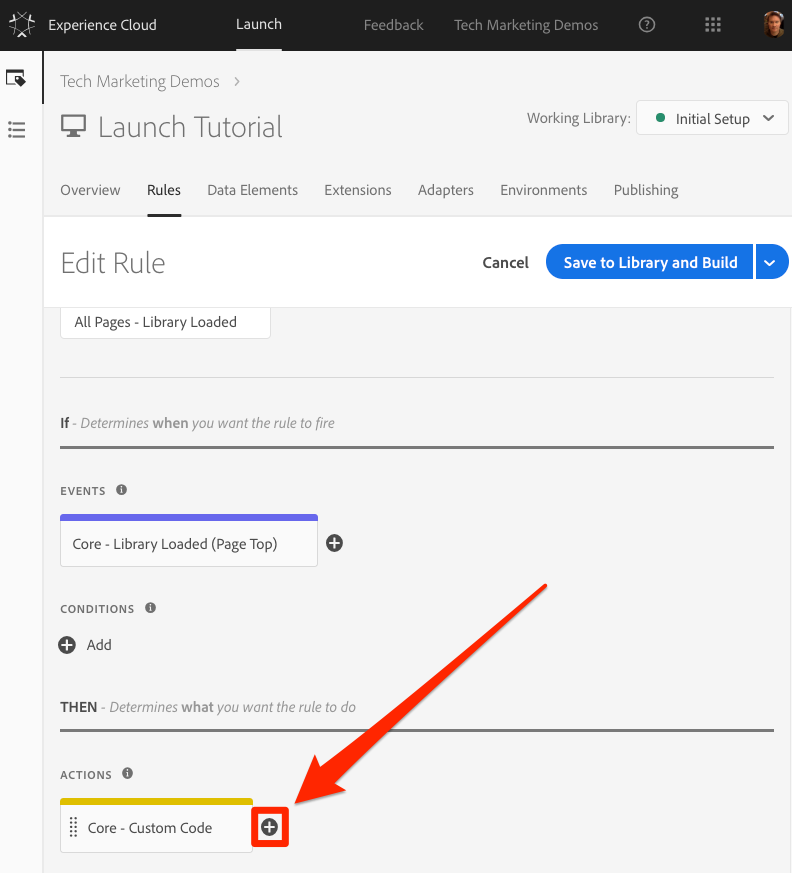
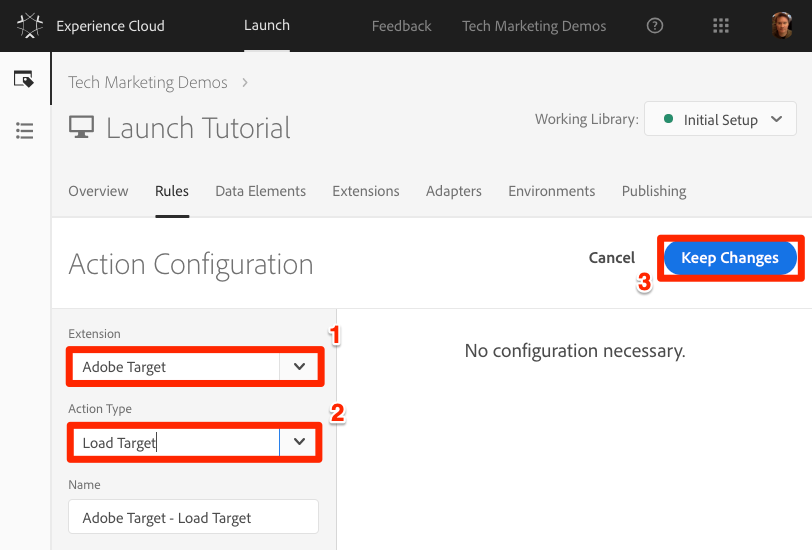
Select [Extension > Adobe Target]
Select [Action Type > Load Target]
Click [Keep Changes]
With the Load Target action added, at.js will load on the page. However, no Target requests will fire until we add the Fire Global Mbox action.
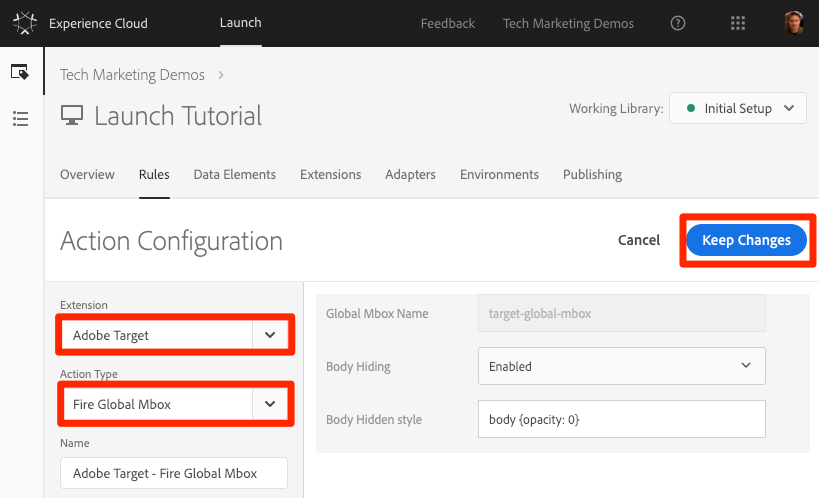
To add the Fire Global Mbox action
Under Actions, click the ![]() again to add another action
again to add another action
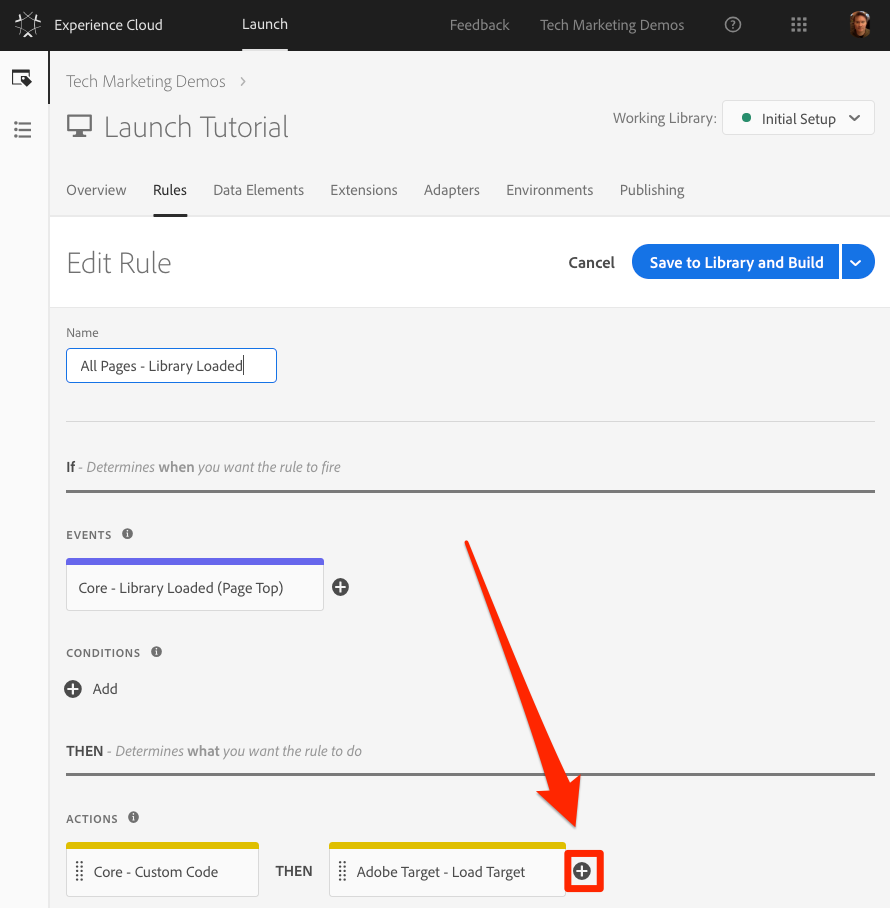
Select [Extension > Adobe Target]
Select [Action Type > Fire Global Mbox]
There are some configurations available for the global mbox related to whether or not to hide the page and CSS selector to use for pre-hiding. These settings work in conjunction with the pre-hiding snippet hardcoded on the page. Leave the default settings.
Click [Keep Changes]
The new action is added in sequence after the Load Target action and the actions will execute in this order. You can drag-and-drop the actions to rearrange the order, but in this scenario, Load Target needs fire before the Fire Global Mbox.
Click [Save to Library and Build]

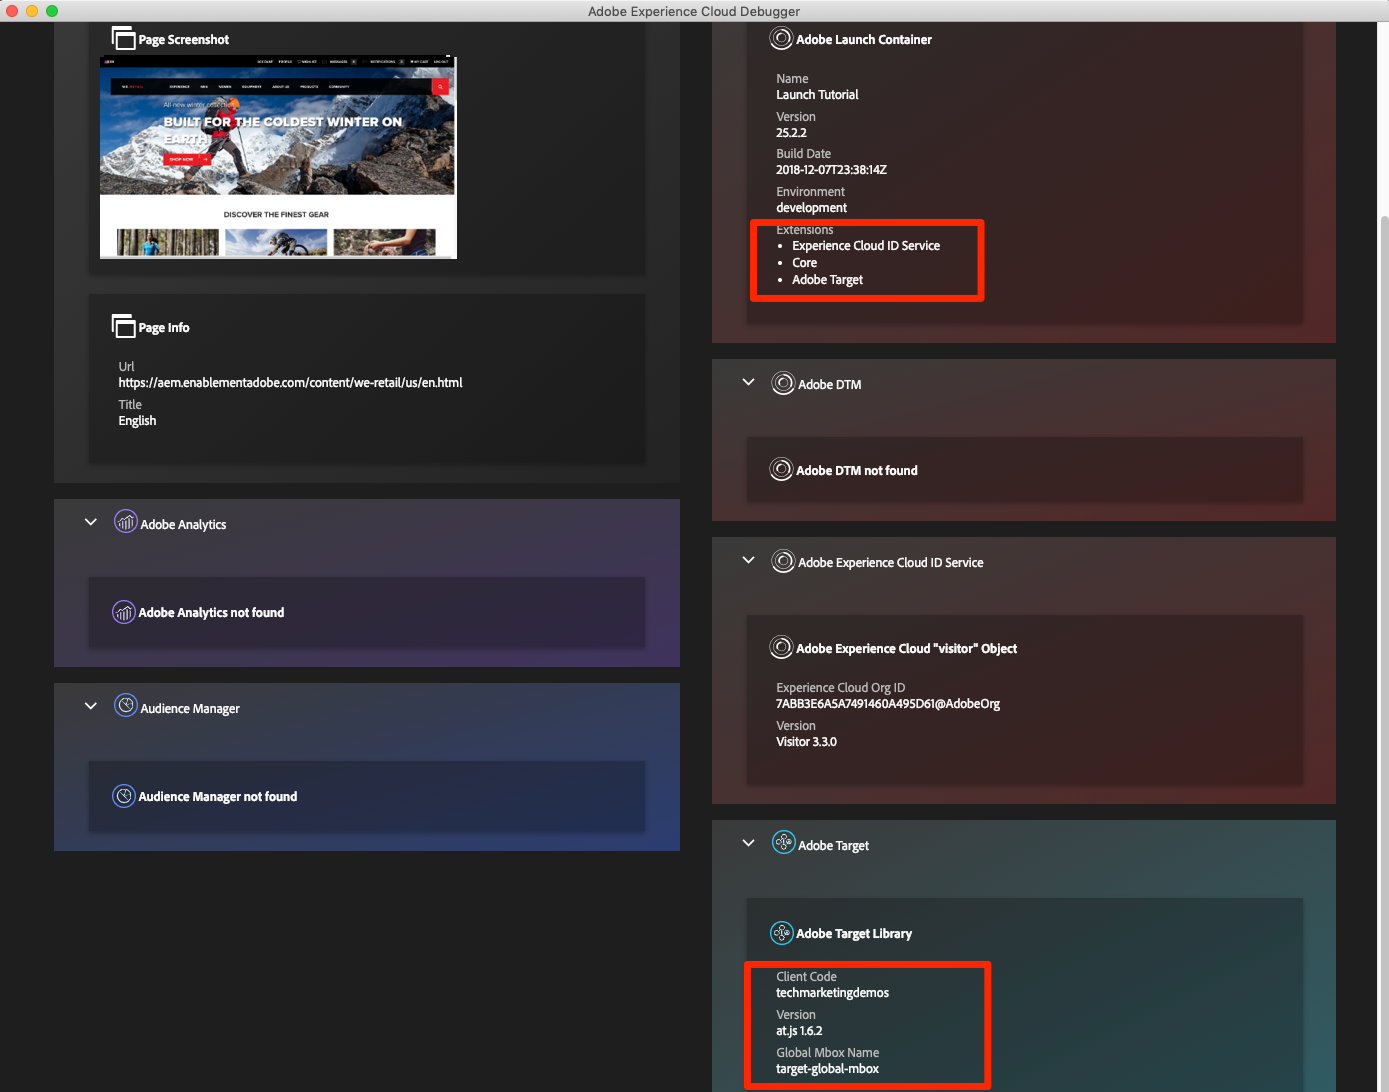
Now that you have added the Target extension and fired the Load Target and Fire Global Mbox actions, there should be a global mbox request made on all pages where your Launch property is used.
Reload your sample page. You should no longer see a delay of three seconds before the page is visible. If you are loading the sample page using the file:// protocol, you should do this step in Firefox or Safari browsers since Chrome will not fire a Target request when using the file:// protocol.
Open the We.Retail site
Make sure the Debugger is mapping the Launch property to your Development environment, as described in the earlier lesson
Go to the Summary Tab of the Debugger
In the Launch section, confirm that Target appears under the Extensions heading
In the Target section, confirm that your client code, at.js library version, and your global mbox name appear
Finally, go to the Target tab, expand your client code, and confirm that the request for your global mbox appears:
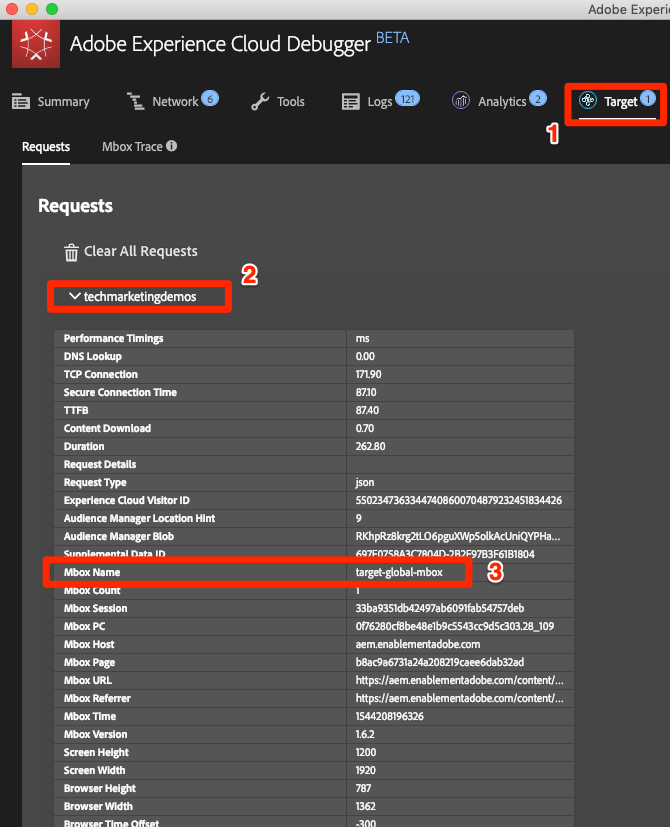
Congratulations! You've implemented the global mbox!
Passing parameters in the Target request adds powerful capabilities to your targeting, testing, and personalization activities. The Launch extension provides two actions to pass parameters:
Add Params to Global Mbox, which adds parameters to global mbox requests (equivalent to the targetPageParams() method)
Add Params to All Mboxes, which adds parameters in all mbox requests, e.g. the global mbox plus additional mbox requests made from Custom Code actions or hardcoded on your site (equivalent to the targetPageParamsAll() method)
These actions can be used before the Load Target action and can set different parameters on different pages based on your rule configurations. Use the rule ordering feature you used when setting Customer IDs with the ID Service to set additional parameters on the Library Loaded event before the rule firing the global mbox.
[!TIP] Since most implementations use the global mbox for activity delivery, it usually sufficient to just use the
Add Params to Global Mboxaction.
Mbox parameters are used to pass custom data to Target, enriching your personalization capabilities. They are ideal for attributes that change frequently during a browsing session such as the page name, template, etc. and do not persist.
Let's add the Page Name data element that we created earlier in the Add Data Elements, Rules and Libraries lesson as an mbox parameter.
Go to the [Rules] in the top navigation and then click on All Pages - Library Loaded to open the rule editor.
Under Actions, click the ![]() to add a new action
to add a new action

Select [Extension > Adobe Target]
Select [Action Type > Add Params to Global Mbox]
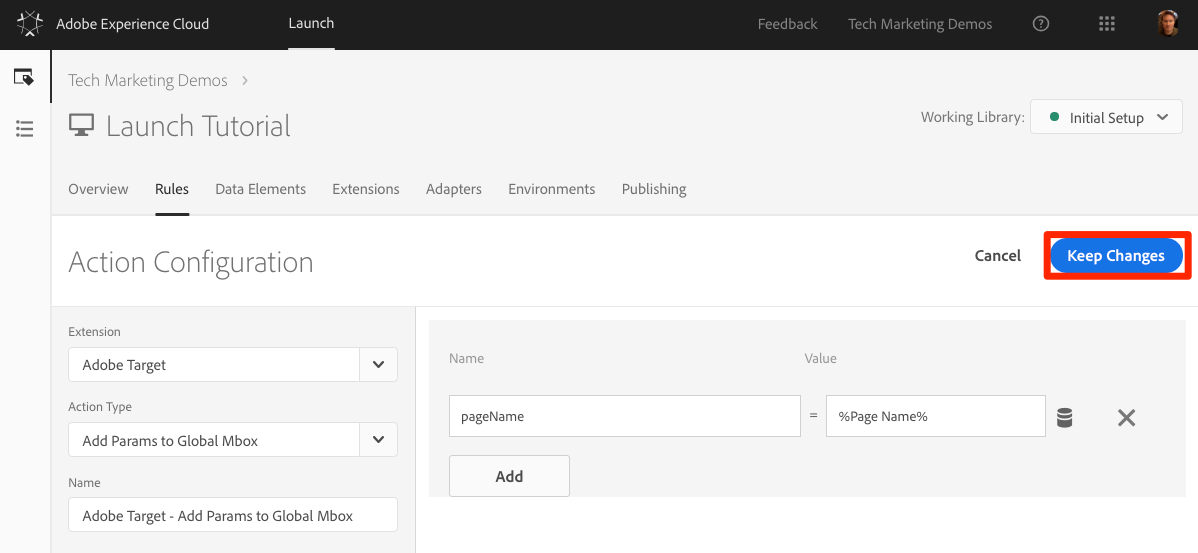
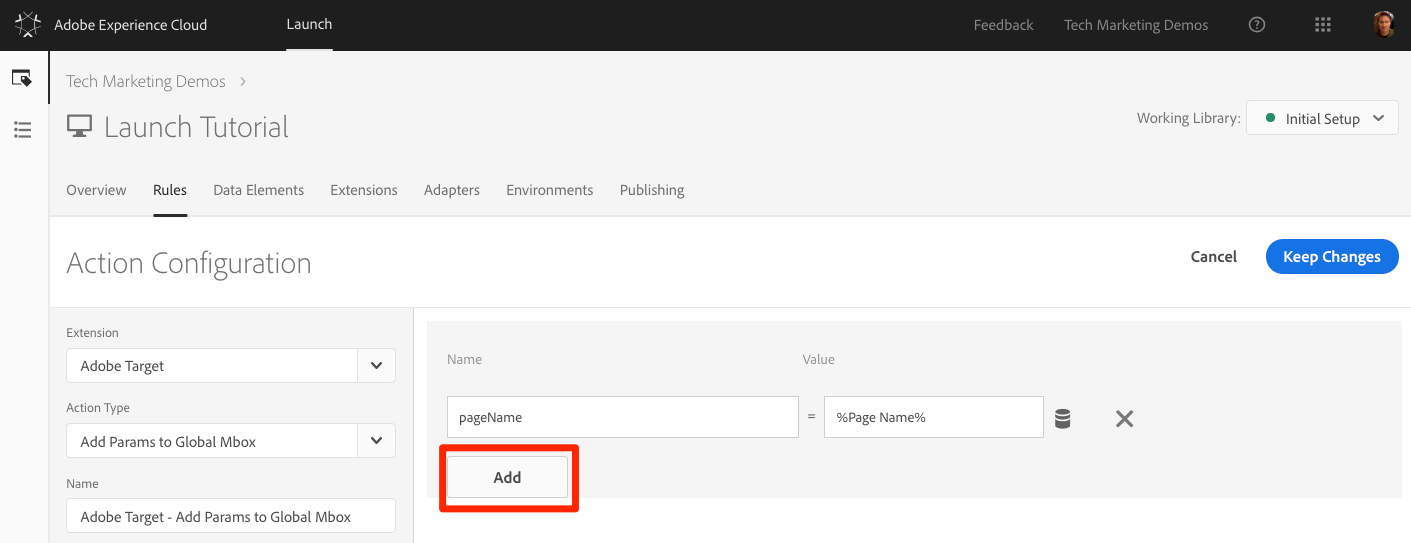
Enter pageName as the [Name]
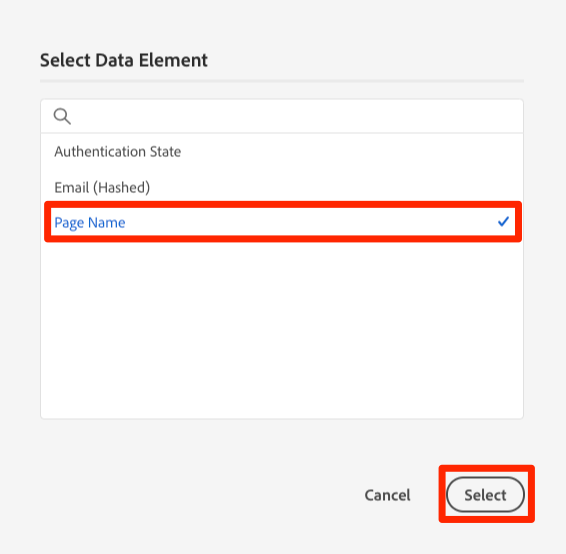
Click the ![]() to open the data element modal
to open the data element modal
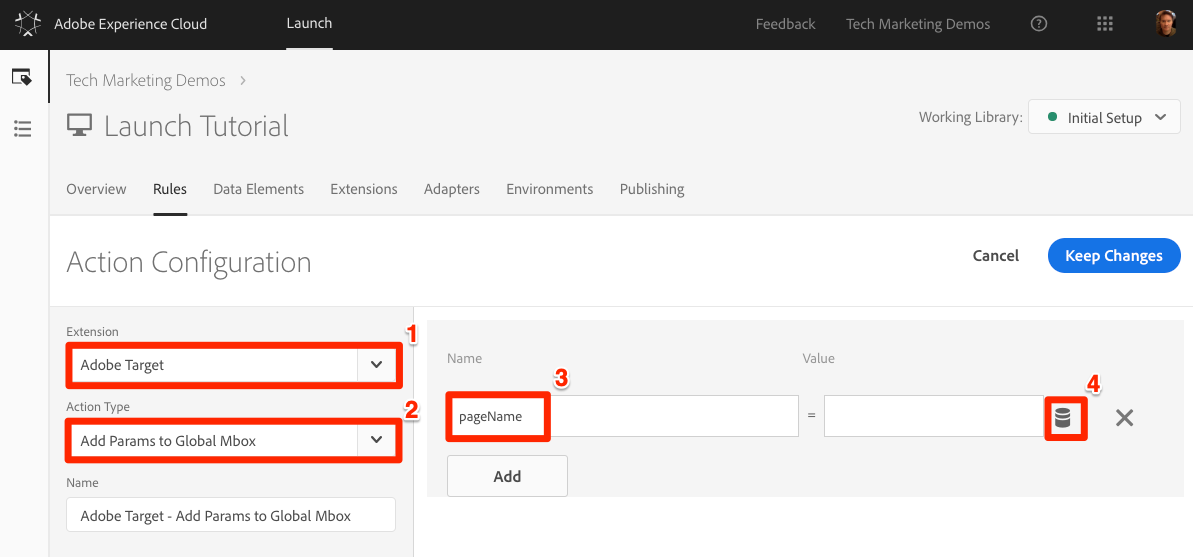
Click the Page Name data element
Click the [Select] button
Click [Keep Changes]
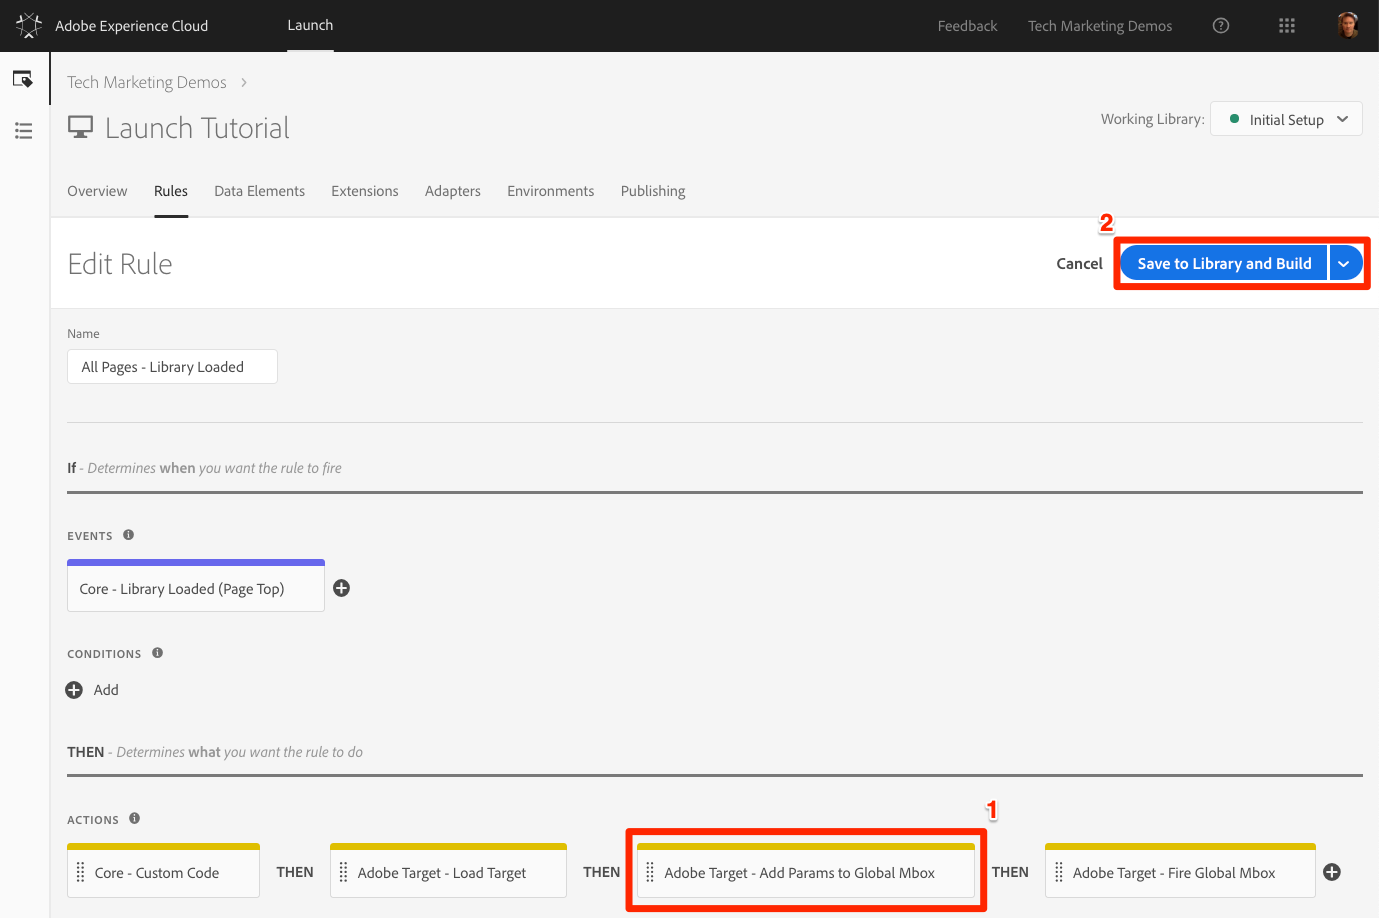
Click-and-drag on the left edge of the Add Params to Global Mbox action to rearrange the actions so that Add Params to Global Mbox is before the Fire Global Mbox action (it can be before or after Load Target)
Click [Save to Library and Build]
Reload the We.Retail site with it mapped to your property with Experience Cloud Debugger. Now go to the [Target] tab in the Debugger. Expand your client code and look at the requests. You should see the new pageName parameter passed in the request:
Similar to mbox parameters, profile parameters are also passed through the Target request. However, profile parameters get stored in Target's visitor profile database and will persist for the duration of the visitor's profile. You can set them on one page of your site and use them in Target activities on another page. Here is an example from an automobile website. When a visitor goes to a vehicle page, you could pass a profile parameter "profile.lastViewed=sportscar" to record their interest in that particular vehicle. When the visitor browses to other, non-vehicle pages you can target content based on their last vehicle viewed. Profile parameters are ideal for attributes that rarely change or are only available on certain pages
You won't pass any profile parameters in this tutorial, but the workflow is almost identical to what you just did when passing the pageName mbox parameter. The one difference is you need to give profile parameter names a profile. prefix. This is what a profile parameter called "userType" would look like in the Pass Parameters to Global Mbox action:

Entity parameters are special parameters used in Recommendations implementations for three main reasons:
entity.id) or category (entity.categoryId) that the visitor is currently viewing.entity.name) and image (entity.thumbnailUrl). Some customers populate their catalog using backend feeds, but they can also be populated using entity parameters in Target requests.You don't need to pass any profile parameters in this tutorial, but the workflow is identical to what you did earlier when passing the pageName mbox parameter - just give the parameter a name prefixed with "entity." and map it to the relevant data element. Note that some common entities have reserved names that must be used (e.g. entity.id for the product sku). This is what it would look like to set entity parameters in the Pass Parameters to Global Mbox action:
The collection of customer ids with the Experience Cloud ID Service makes it easy to import CRM data into Target using the Customer Attributes feature of the Adobe Experience Cloud. It also enables cross-device visitor stitching, allowing you to maintain a consistent user experience as your customers switch between say a laptop and their mobile device.
It is imperative that the Customer ID is set in the ID Service's Set Customer IDs action before firing the global mbox. To that end, make sure you have the following capabilities on your site:
In the previous lesson, Add the Experience Cloud ID Service, you created the All Pages - Library Loaded - Authenticated - 10 rule to fire the "Set Customer ID" action. Because this rule has an Order setting of 10, the customer ids are set before our our global mbox fires from the All Pages - Library Loaded rule with its Order setting of 50. So, you have already implemented the collection of customer ids for Target!
Open the We.Retail site
Make sure the Debugger is mapping the Launch property to your Development environment, as described in the earlier lesson
Log into the We.Retail site using the credentials test@adobe.com/test
Return to the We.Retail homepage
Open the Debugger
Go to the Target tab
Expand your client code
You should see parameters in the latest Target request for vst.crm_id.id and vst.crm_id.authState. vst.crm_id.id should have a value of the hashed email address and vst.crm_id.authState should have a value of 1 to represent authenticated. Note that crm_id is the Integration Code you specified in the ID Service configuration and must align with the key you use in your Customer Attributes data file:
Warning: The Experience Cloud ID Service will allow you to send multiple ids to the Service, however, only the first one will be sent to Target.
This is an optional exercise for Target Premium customers.
The property token is a reserved parameter used with the Target Premium Enterprise User Permissions feature. It is used to define different digital properties so that different members of an Experience Cloud Organization can be assigned different permissions on each property. For example, you might want one group of users to be able to set up Target activities on your web site, but not in your mobile application.
Target properties are analogous to Launch properties and Analytics report suites. An enterprise with multiple brands, websites, and marketing teams might use a different Target property, Launch property and Analytics report suite for each website or mobile app. Launch properties are differentiated by their embed codes, Analytics report suites are differentiated by their report suite id, and Target properties are differentiated by their property token parameter.
The property token is implemented just like an mbox parameter. Just name the parameter "at_property" and paste in the value provided in the Target interface. If you are implementing multiple sites with a single Launch property, you could manage the at_property value via a data element.
Here is an optional exercise, if you are a Target Premium customer and would like to implement a property token in your Tutorial property:
In a separate tab, open the Target user interface
Go to [Setup > Properties ]
Identify the Property that you want to use and click the [</> ] (or create a new property)
Copy the at_property value to your clipboard

In your Launch tab, go to the [Rules] in the top navigation and then click on All Pages - Library Loaded to open the rule editor.
Under Actions, click the Adobe Target - Add Params to Global Mbox action to open the Action Configuration
Under the pageName parameter, click the [Add] button
Name the parameter at_property and paste in the value you copied from the Target interface
Click [Keep Changes]
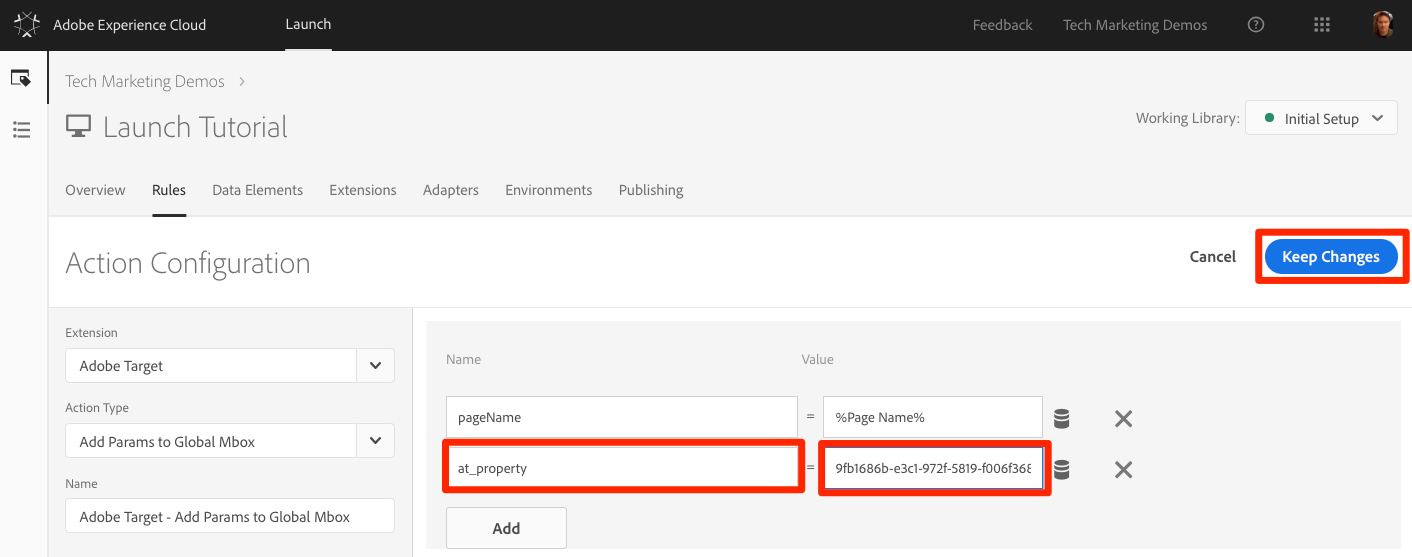
Click [Save to Library and Build] 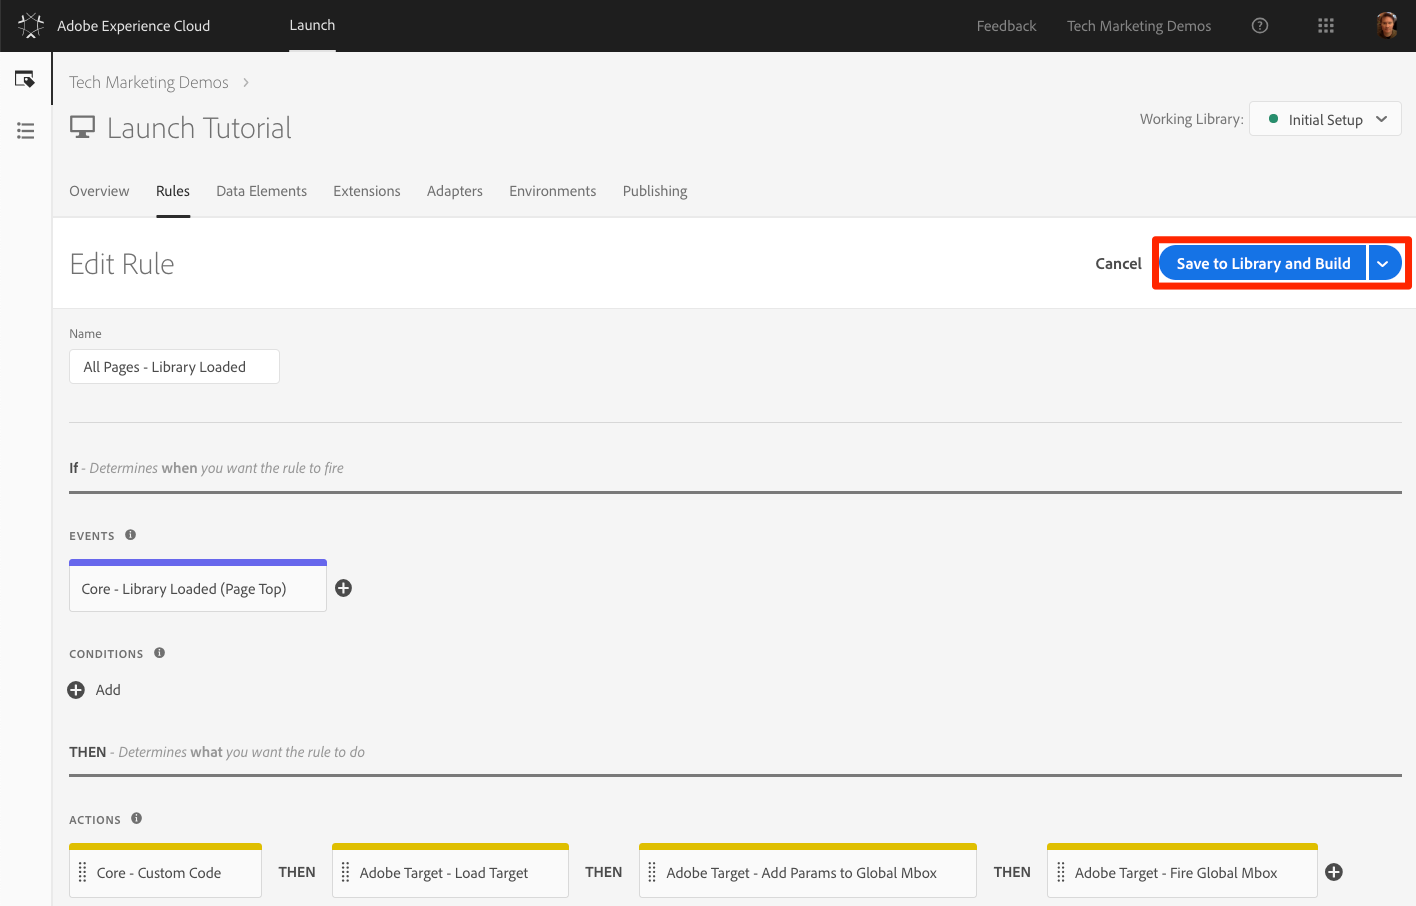
Open the We.Retail site
Make sure the Debugger is mapping the Launch property to your Development environment, as described in the earlier lesson
Open the Debugger
Go to the Target tab
Expand your client code
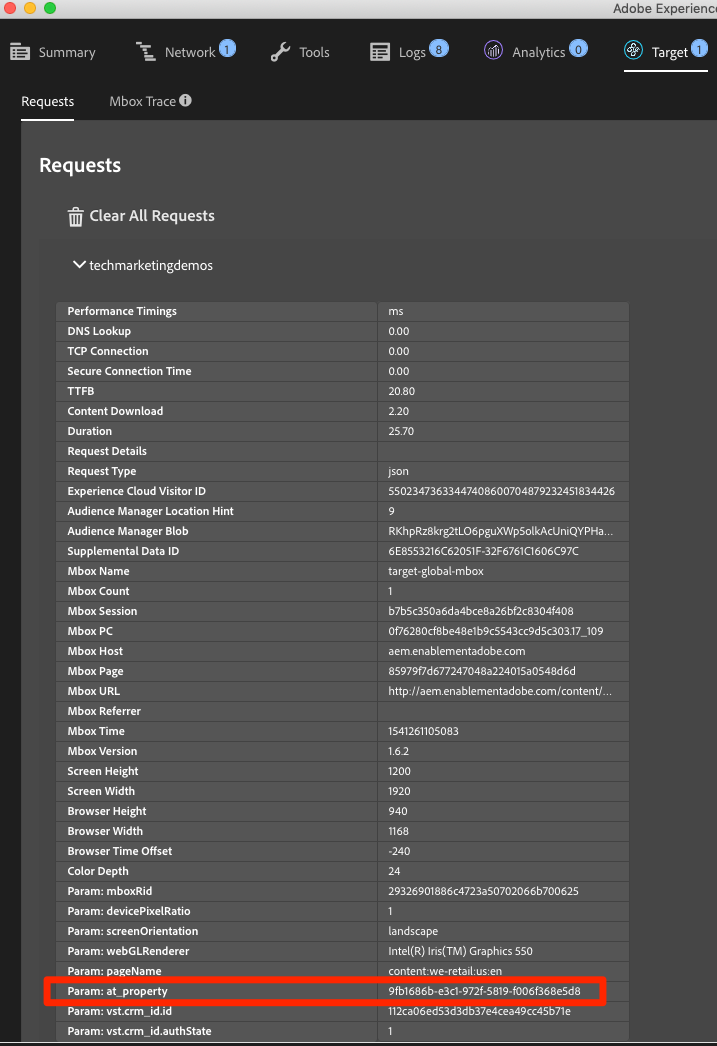
You should see the parameter for "at_property" in every global mbox request as you browse the site:
The order confirmation mbox is a special type of mbox used to define order submissions in Target. The inclusion of three specific mbox parameters - orderId, orderTotal, and productPurchasedId - is what turns an mbox into an order mbox. In addition to reporting revenue, the order mbox also does the following:
The best practice is to use and order confirmation mbox in all order funnels, even on non-retail sites. For example, lead generation sites usually have lead funnels with a unique "lead id" generated at the end. These sites should implement an order mbox, using a static value (e.g. "1") for the orderTotal.
Customers using the Analytics for Target (A4T) integration for most of their reporting should also implement the order mbox, since A4T is not yet compatible with activity types like Auto Allocate, Automated Personalization and Auto Target. Additionally, the order mbox is a critical element in Recommendations implementations, powering algorithms based on purchase behavior.
The order confirmation mbox should fire from a rule that is only triggered on your order confirmation page or event. Often, it can be combined with a rule setting the Adobe Analytics purchase event. It must be configured using the Custom Code action of the Core extension, using the appropriate data elements to set the orderId, orderTotal, and productPurchasedId parameters.
Let's add the data elements and rule we need to fire an order confirmation mbox on the We.Retail site. Since you have already created several data elements, these instructions will be abbreviated.
To create the data element for Order Id
Order IddigitalData.cart.orderId as the Path to VariableClean text optionTo create the data element for the Cart Amount
Cart AmountdigitalData.cart.cartAmount as the Path to VariableClean text optionTo create the data element for Cart SKUs (Target)
Click [Add Data Element]
Name the data element Cart SKUs (Target)
Select [Data Element Type > Custom Code]
For Target, the skus must be a comma separated list. This custom code will reformat the data layer array into the proper format. In the custom code editor, paste the following:
Check the Force lowercase value option
Check the Clean text option
Click [Save to Library and Build]
Now we need to create a rule to fire the global mbox with the order parameters on the order confirmation page.
To create the rule for Order Confirmation page
Order Confirmation Page - Library Loaded - 60Order to 60 so that it will fire after the Load Target action (which is in our All Pages - Library Loaded rule where Order is set to 50)Select [Condition Type > Path Without Query String]
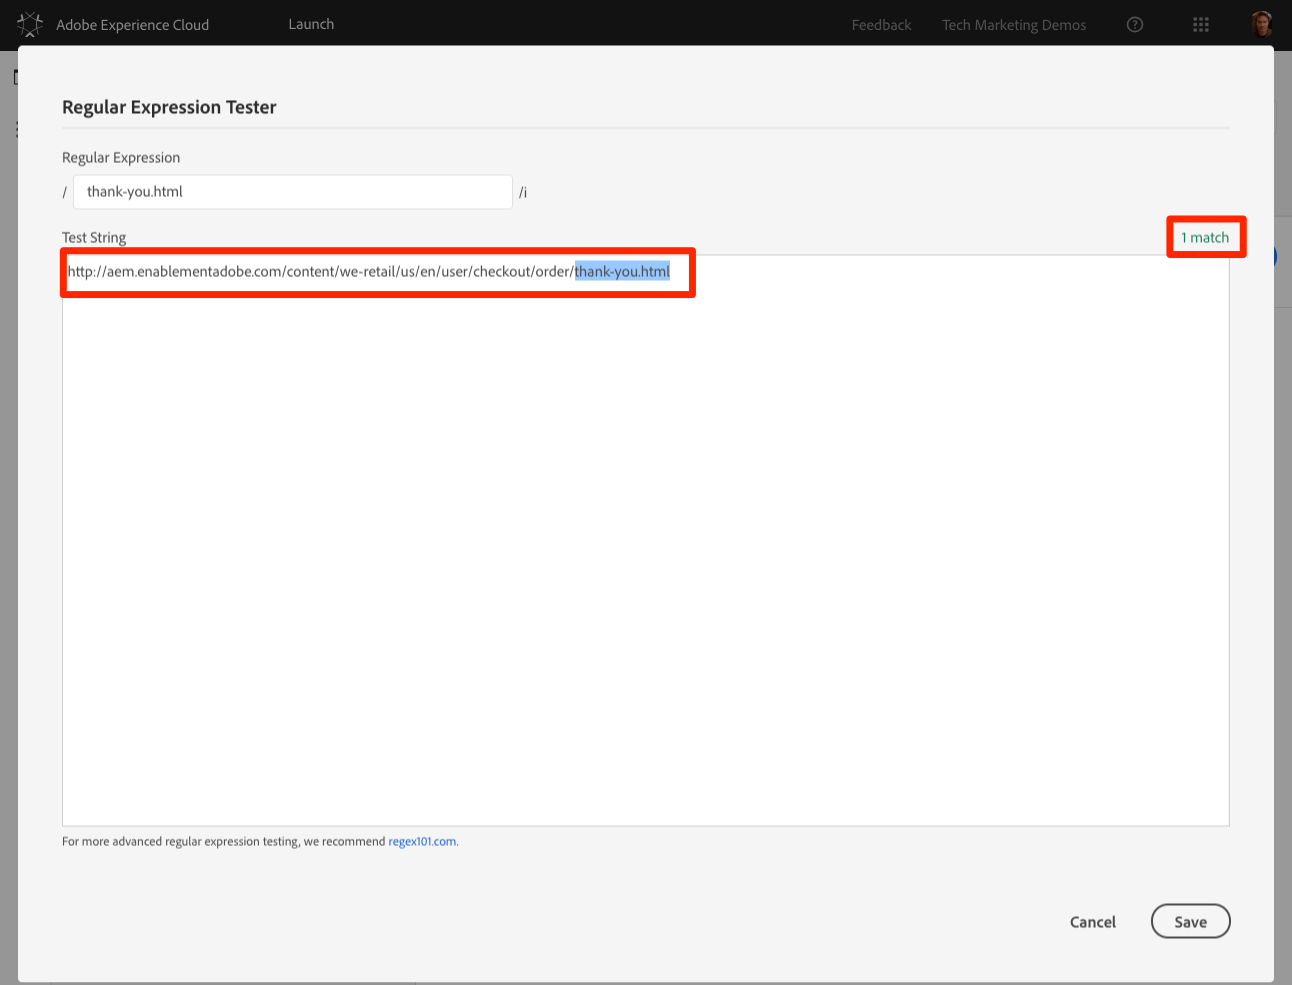
For Path equals enter thank-you.html
Toggle on the Regex option to change the logic from equals to contains (you can use the Test feature to confirm the test will pass with the URL https://aem.enablementadobe.com/content/we-retail/us/en/user/checkout/order/thank-you.html
Click [Keep Changes]
Select [Action Type > Custom Code]
Click [Open Editor]
Paste the following code into the Edit Code modal
adobe.target.getOffer({
  "mbox": "orderConfirmPage",
  "params":{
     "orderId": _satellite.getVar('Order Id'),
     "orderTotal": _satellite.getVar('Cart Amount'),
    "productPurchasedId": _satellite.getVar('Cart SKUs (Target)')
  },
  "success": function(offer) {
    adobe.target.applyOffer({
      "mbox": "orderConfirmPage",
      "offer": offer
    });
  },
  "error": function(status, error) {
    console.log('Error', status, error);
  }
});
Click [Save] to save the custom code
Click [Keep Changes] to keep the action
Open the We.Retail site
Make sure the Debugger is mapping the Launch property to your Development environment, as described in the earlier lesson
Browse the site and add several products to your cart
Continue to checkout
During the checkout process the only required fields are First Name and Last Name
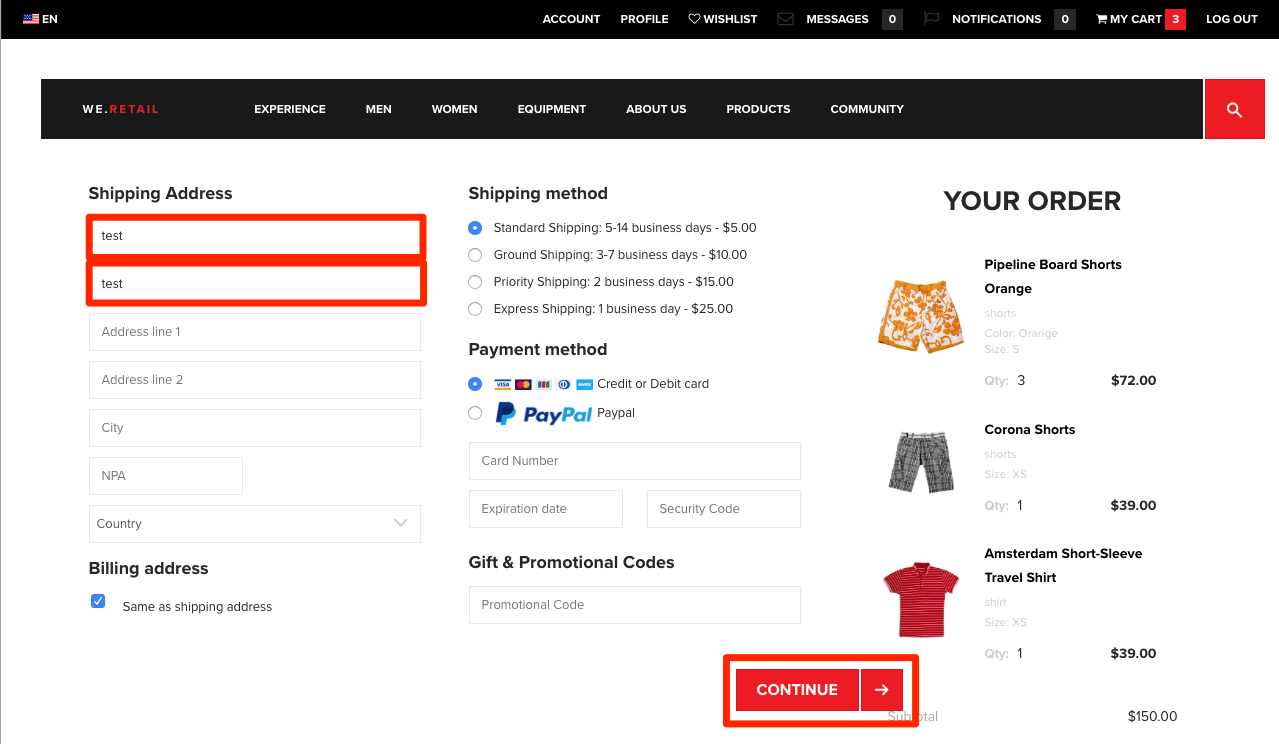
On the Review Order page, be sure to click the Place Order button
Look in the Debugger
Go to the Target tab
Expand your client code
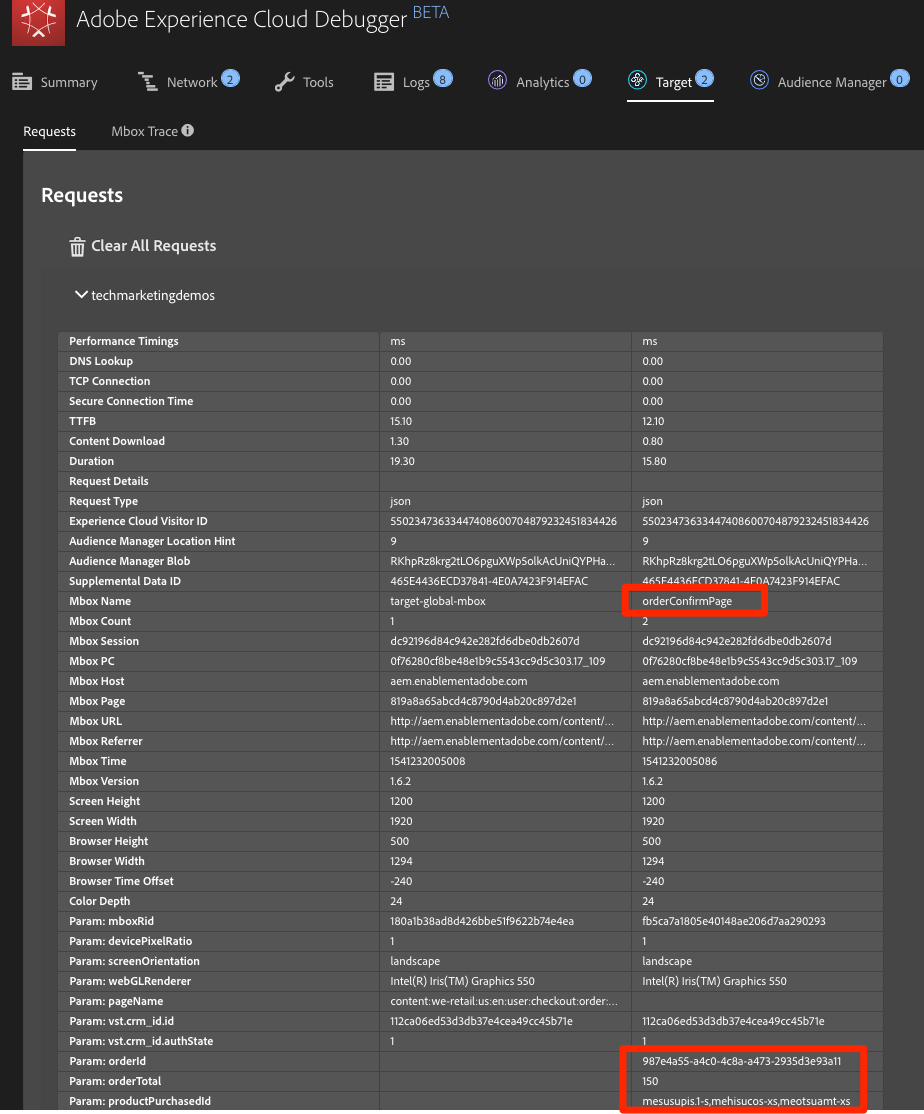
You should see the orderConfirmPage request as the latest Target request with the orderId, orderTotal, and productPurchasedId parameters populated with the details of your order
There rare instances when you need to make Target requests other than the global and order confirmation mbox. For example, sometimes important data you would like to use for personalization is not defined on the page before the Launch embed codes - it might be hardcoded on the bottom of the page or get returned from an asynchronous API request. This data can still be sent to Target using an additional request, although it will not be optimal to use this request for content delivery since the page will already visible. It can be used to enrich the visitor profile for later use (using profile parameters) or to populate the Recommendations catalog.
In these circumstances, use the Custom Code action in the Core extension to fire an mbox using the getOffer()/applyOffer() and trackEvent() methods. This is very similar to what you just did in the Order Confirmation mbox exercise, but you will just use a different mbox name and will not use the special order parameters. Be sure to use the [Load Target] action before making mbox calls from custom code.
The Edit at.js screen in the Target user interface has locations in which you can paste custom JavaScript that will execute immediately before or after the at.js file.
The Library Header is sometimes used to override at.js settings via the targetGlobalSettings() function or pass data from third parties using the Data Providers feature
The Library Footer is sometimes used to add at.js library extensions or at.js custom event listeners.
To replicate this capability in Launch, just use the Custom Code action in the Core extension and sequence the action before (Library Header) or after (Library Footer) the Load Target action. This can be done in the same rule as the Load Target action (as pictured below) or in separate rules with events or order settings that will reliably fire before or after the rule containing Load Target:

To learn more about use cases for custom headers and footers see the following resources:
In this lesson, you will implement the Adobe Analytics extension and create rules to send data to Adobe Analytics.
Adobe Analytics is an industry-leading solution that empowers you to understand your customers as people and steer your business with customer intelligence.
At the end of this lesson, you will be able to:
There are many things that could be implemented for Analytics in Launch. This lesson is not exhaustive, but should give you a solid overview of the main techniques you will need for implementing in your own site.
You should have already completed the lessons in Configure Launch and Add the ID Service.
Additionally, you will need at least one report suite ID and your tracking server. If you don't have a test/dev report suite that you can use for this tutorial, please create one. If you are unsure how to do that, see the documentation. You can retrieve your tracking server from your current implementation, Adobe Consultant or Customer Care representative.
The Analytics extension consists of two main parts:
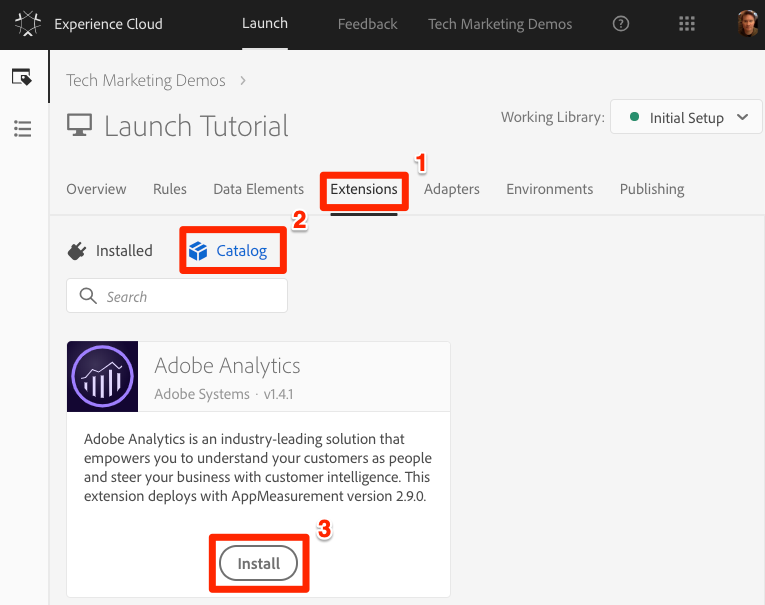
To add the Analytics extension
Go to [Extensions > Catalog]
Locate the Adobe Analytics extension
Click [Install]
Under [Library Management > Report Suites], enter the report suite ids you would like to use with each Launch environment (It's okay to use one report suite for all environments in this tutorial, but in real life you would want to use separate report suites, as shown in the image below)
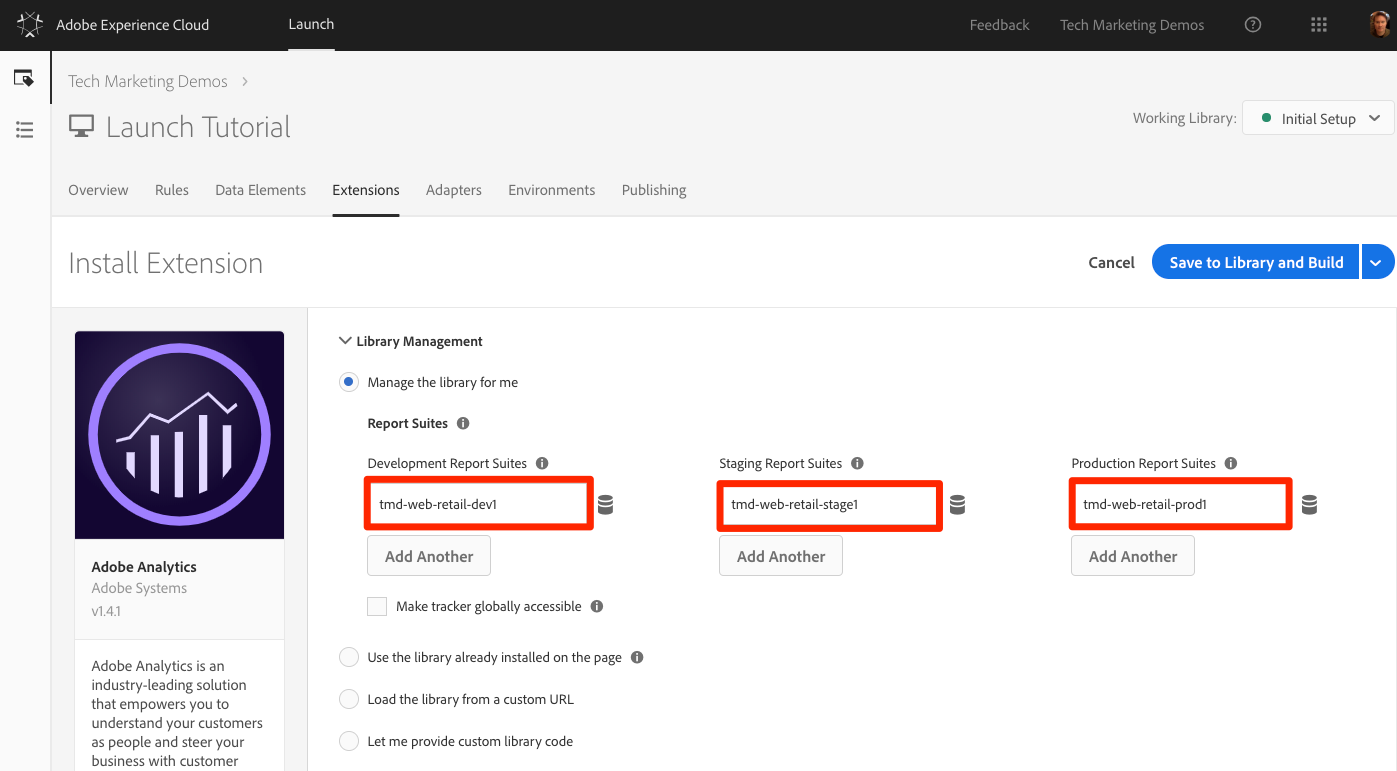
We recommend using the [Manage the library for me option] as the [Library Management] setting as it makes it much easier to keep the
AppMeasurement.jslibrary up-to-date.
Under [General > Tracking Server], enter your tracking server, e.g. "tmd.sc.omtrdc.net." Enter your SSL Tracking Server if your site supports https://
![]()
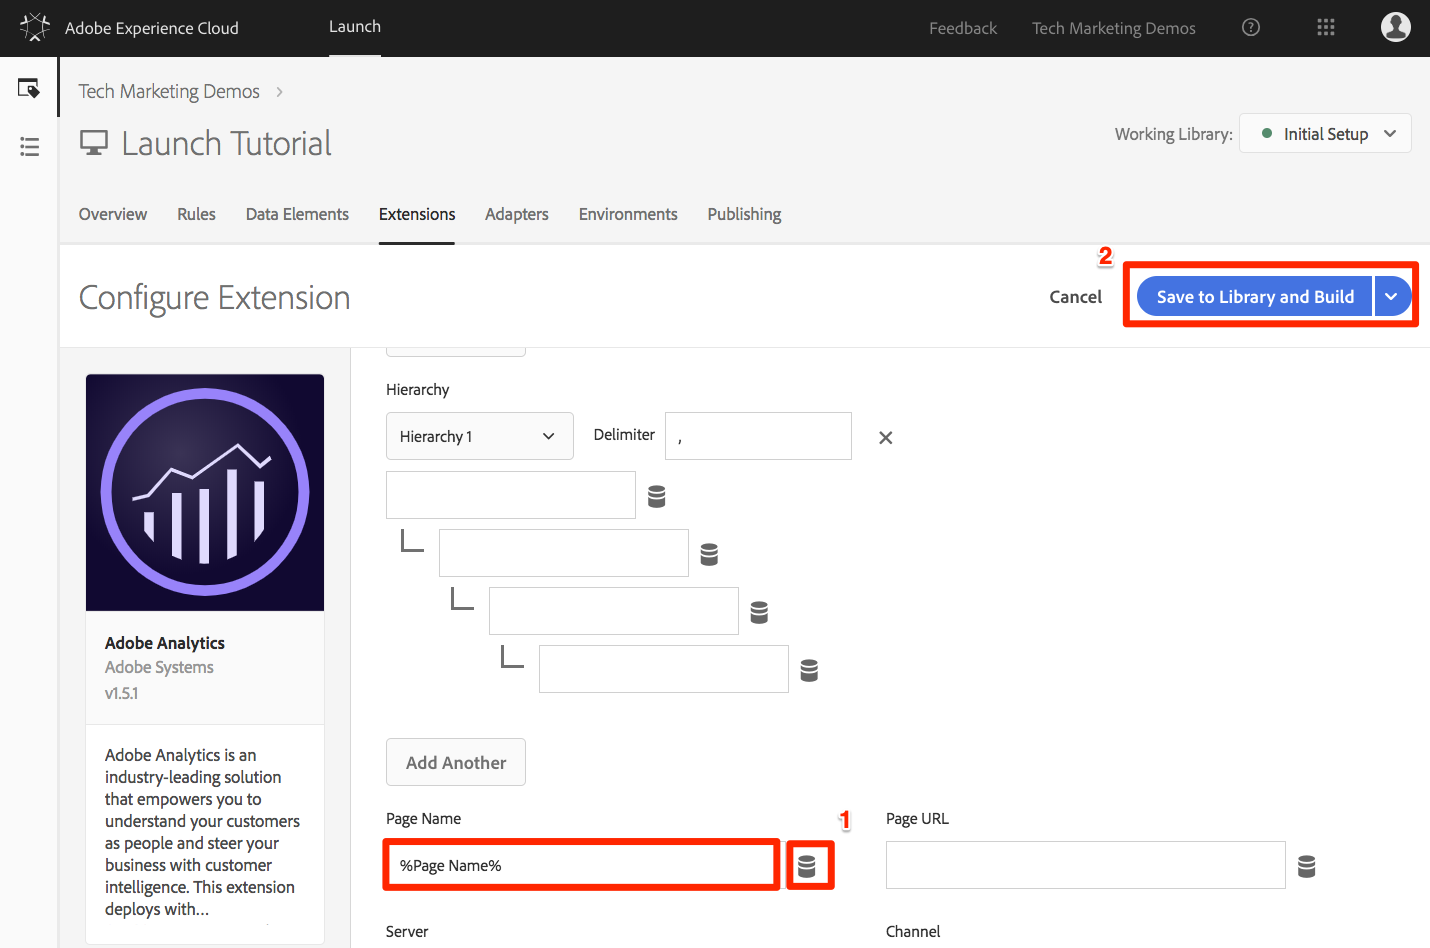
In the [Global Variables section], set the [Page Name] variable using your Page Name data element. Click the ![]() icon to open the modal and choose the page
icon to open the modal and choose the page Page Name data element)
Click [Save to Library and Build]
Global variables can be set in the extension configuration or in rule actions. Be aware that when setting variables in the extension configuration, the data layer must be defined before the Launch embed codes.
Now you will create a rule to fire the Analytics beacon, which will send the [Page Name] variable set in the extension configuration.
You have already created an "All Pages - Library Loaded" rule in the Add a Data Element, a Rule and a Library lesson of this tutorial, which is triggered on every page when the Launch library loads. You could use this rule for Analytics as well, however this setup requires all data layer attributes used in the Analytics beacon to be defined before the Launch embed codes. To allow more flexibility with the data collection, you will create a new "all pages" rule triggered on DOM Ready to fire the Analytics beacon.
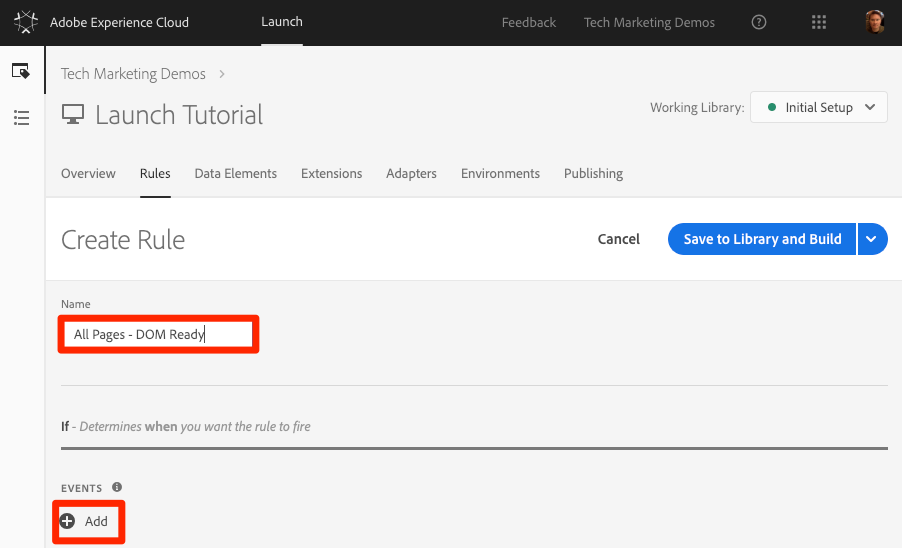
Go to the [Rules] section in the top navigation and then and then click [Add Rule]
Name the rule All Pages - DOM Ready
Click [Events > Add] to open the Event Configuration screen
Select [Event Type > DOM Ready] (Note that the order of the rule is "50")
Click [Keep Changes] 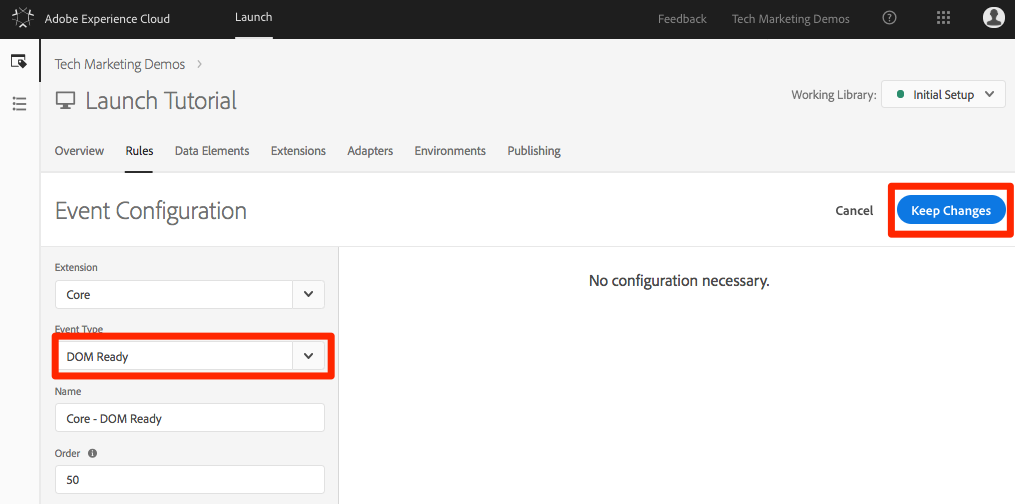
Under Actions, click the ![]() to add a new action
to add a new action
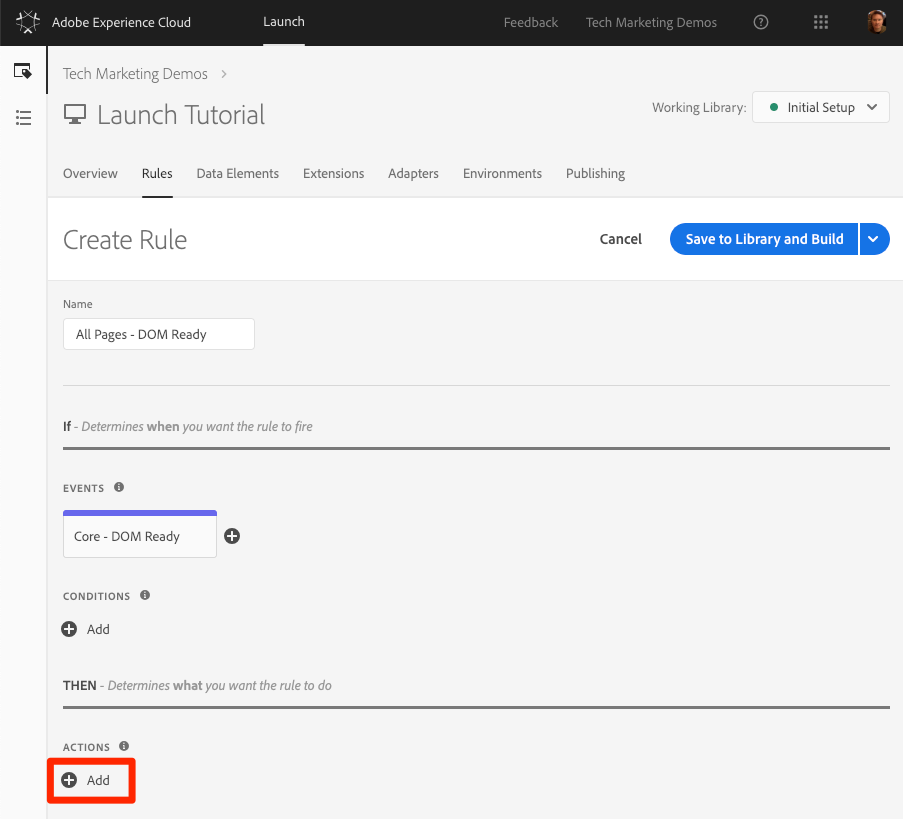
Select [Extension > Adobe Analytics]
Select [Action Type > Send Beacon]
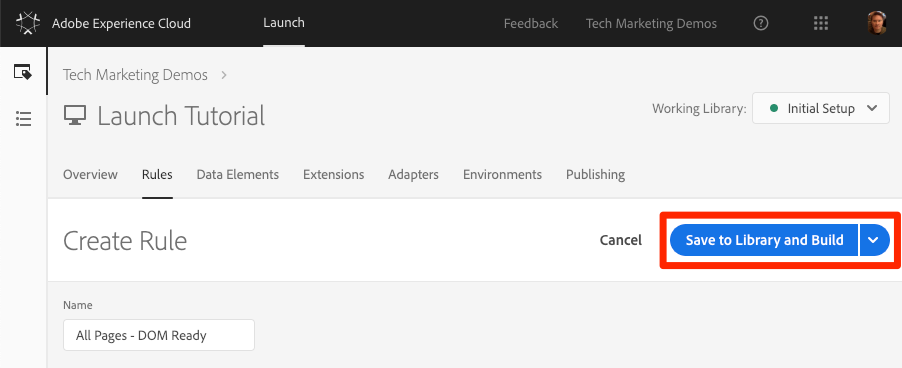
Leave Tracking set to s.t(). Note that if you wanted to make an s.tl() call in a click-event rule you could do that using the Send Beacon action, as well.
Click the [Keep Changes] button
![]()
Click [Save to Library and Build]
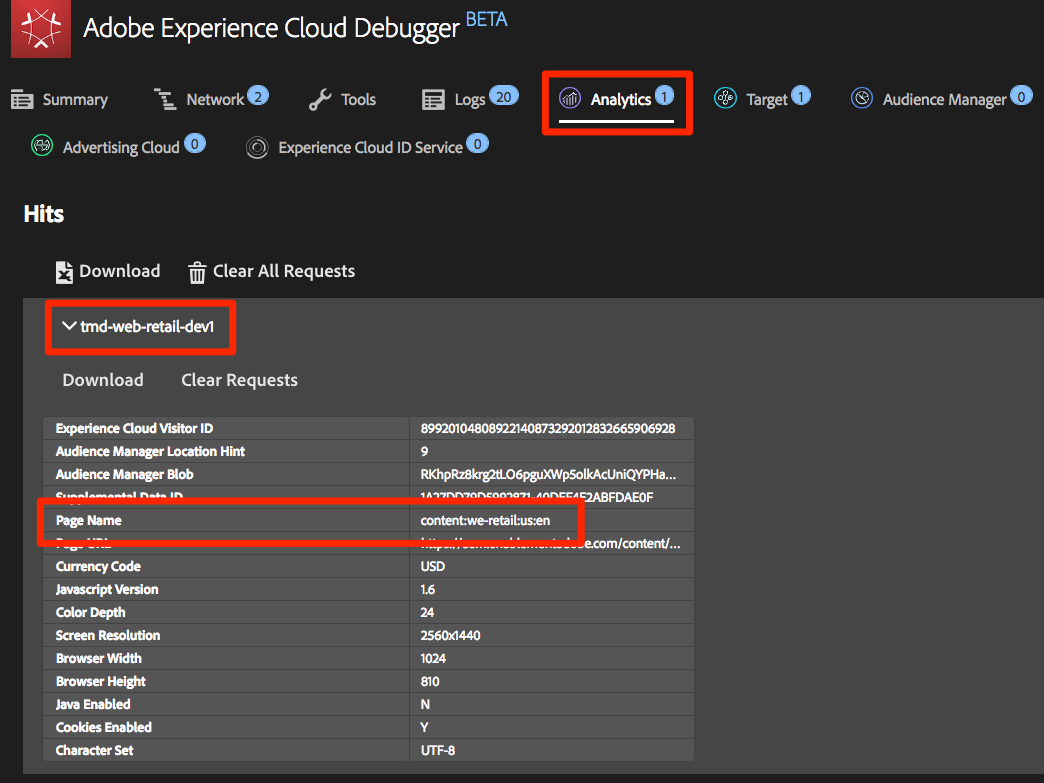
Now that you have created a rule to send an Analytics beacon, you should be able to see the request in the Experience Cloud Debugger.
Open the We.Retail site in your Chrome browser
Click the Debugger icon  to open the [Adobe Experience Cloud Debugger]
Make sure the Debugger is mapping the Launch property to your Development environment, as described in the earlier lesson
Click to open the Analytics tab
Expand your Report Suite name to show all of the requests made to it
Confirm the request has fired with the Page Name variable and value
If the Page Name is not showing up for you, go back through the steps in this page to make sure that you haven't missed anything.
When you configured the Analytics Extension, you populated the pageName variable in the extension configuration. This is a fine location to populate other global variables such as eVars and props, provided the value is available on the page before the Launch embed code loads.
A more flexible location to set variables - as well as events - is in rules using the Set Variables action. Rules allow you to set different Analytics variables and events under different conditions. For example, you could set the prodView only on product detail pages and the purchase event only on order confirmation pages. This section will teach you how to set variables using rules.
Product Detail Pages (PDP) are important points for data collection on retail sites. Typically, you want Analytics to register that a product view occurred and which product was viewed. This is helpful in understanding which products are popular with your customers. On a media site, article or video pages could use similar tracking techniques to the ones you will use in this section. When you load a Product Detail Page, you might want to put that value into a "Page Type" eVar, as well as set some events and the product id. This will allow us to see the following in our analysis:
First you need to identify which pages are the Product Detail pages. You will do that with a Data Element.
Click [Data Elements] in the top navigation
Click [Add Data Element]
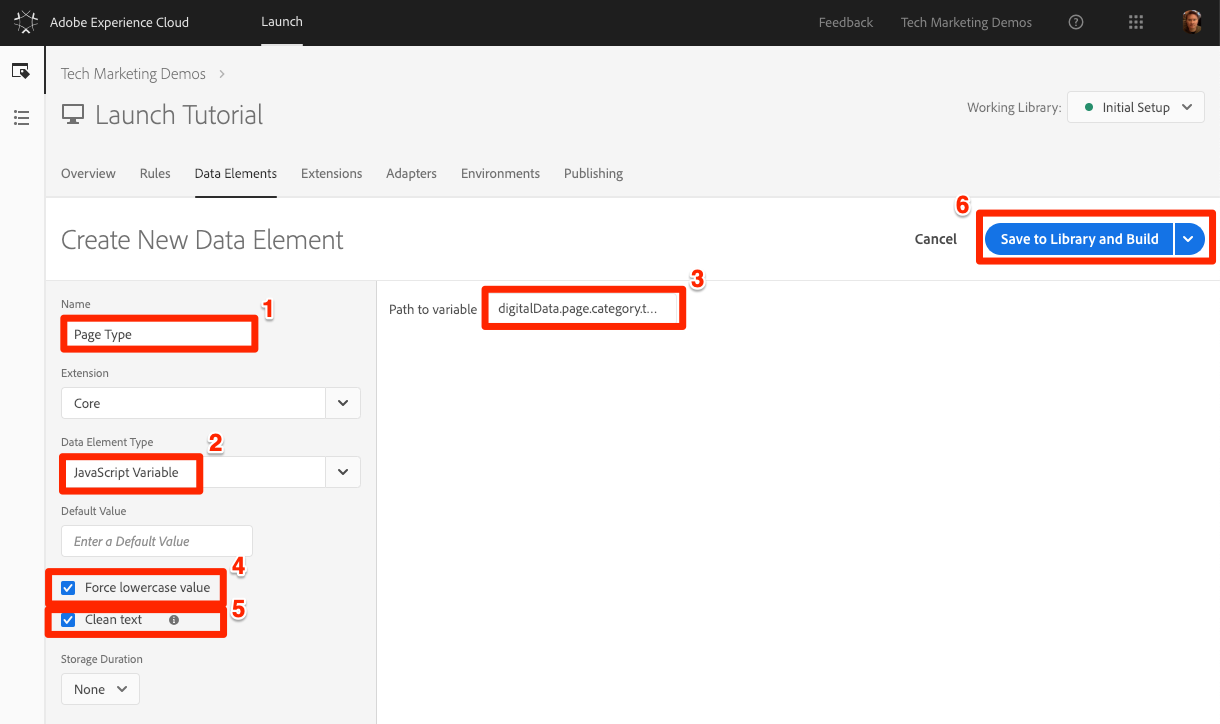
Name the data element Page Type
Select [Data Element Type > JavaScript Variable]
Use digitalData.page.category.type as the Path to Variable
Check the Clean text and Force Lower Case options
Click [Save to Library and Build]
Next, you will collect the product id of the current Product Detail page with a Data Element
Click [Data Elements] in the top navigation
Click [Add Data Element]
Name the data element Product Id
Select [Data Element Type > JavaScript Variable]
Use digitalData.product.0.productInfo.sku as the Path to Variable
Check the Force lowercase value option
Check the Clean text option
Click [Save to Library and Build]

If you are already familiar with Adobe Analytics implementations, you are probably familiar with the products variable. The products variable has a very specific syntax and gets used slightly different ways depending on the context. To help make the population of the products variable easier in Launch, three additional extensions have already been created in the Launch extension marketplace! In this section you will add an extension created by Adobe Consulting to use on the Product Detail page.
Go to the [Extensions > Catalog] page
Find the Adobe Analytics Product String extension by Adobe Consulting Services and click [Install] 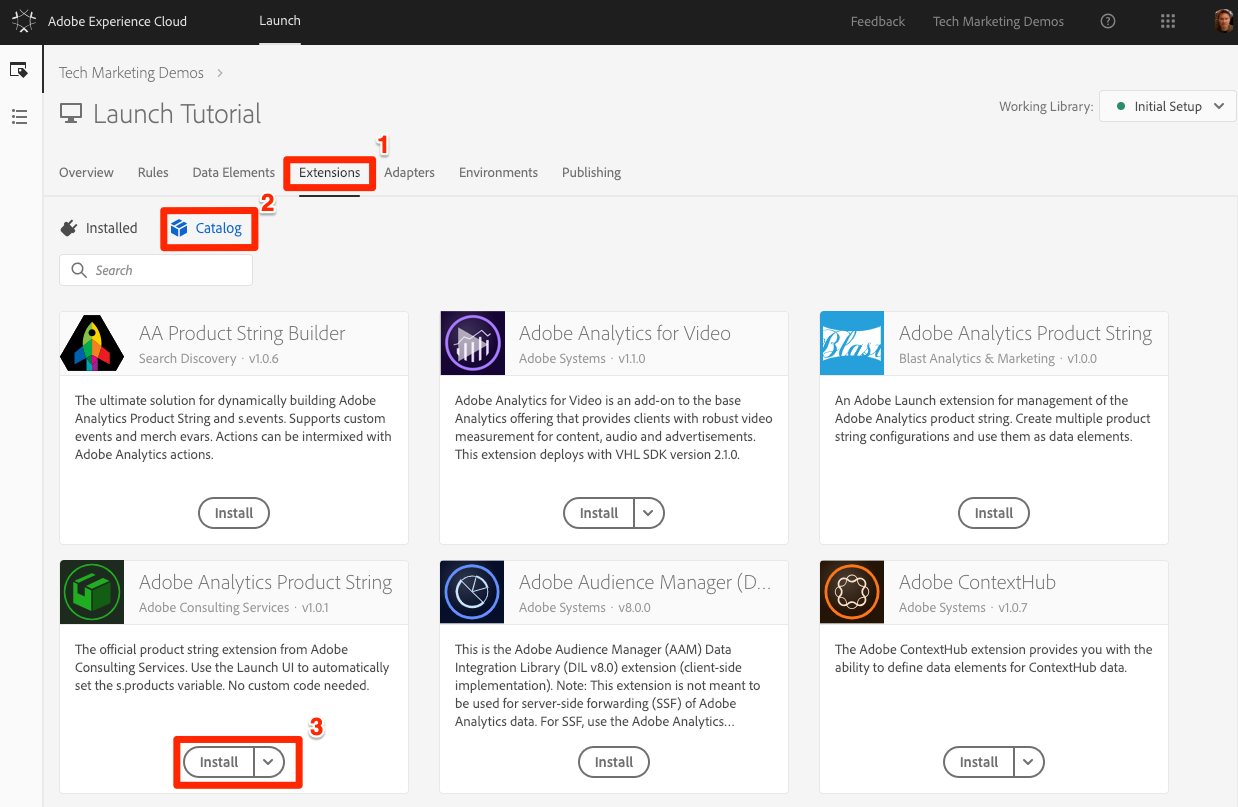
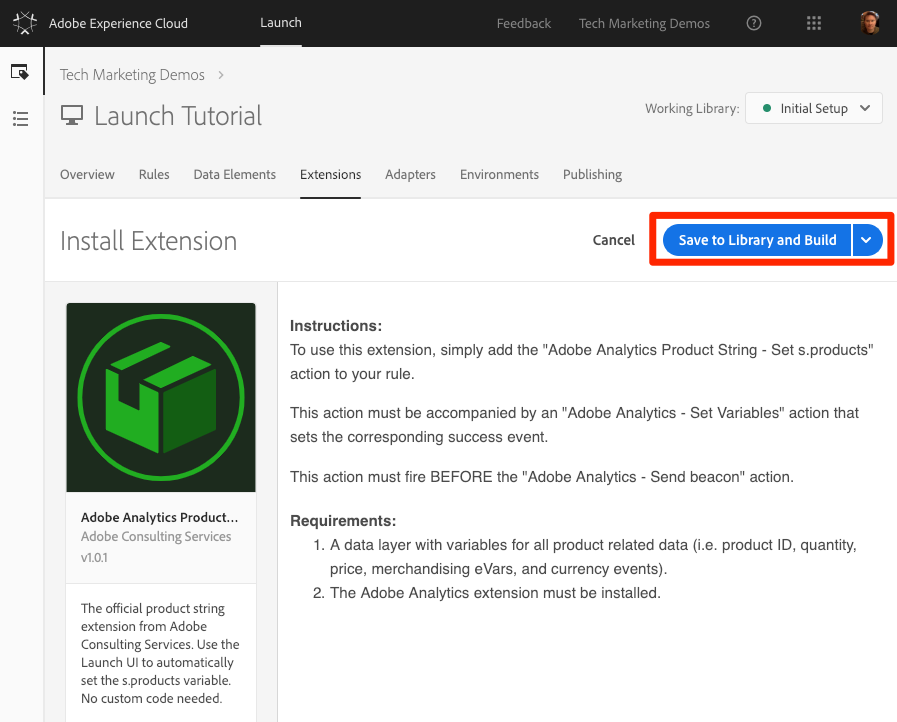
Take a moment to read the instructions
Click [Save to Library and Build]
Now, you will use your new data elements and extension to build your Product Detail page rule. For this functionality, you will create another page load rule, triggered by DOM Ready. However, you will use a condition so that it only fires on the Product Detail pages and the order setting so that it fires before the rule that sends the beacon.
Go to the [Rules] section in the top navigation and then and then click [Add Rule]
Name the rule Product Details - DOM Ready
Click [Events > Add] to open the Event Configuration screen
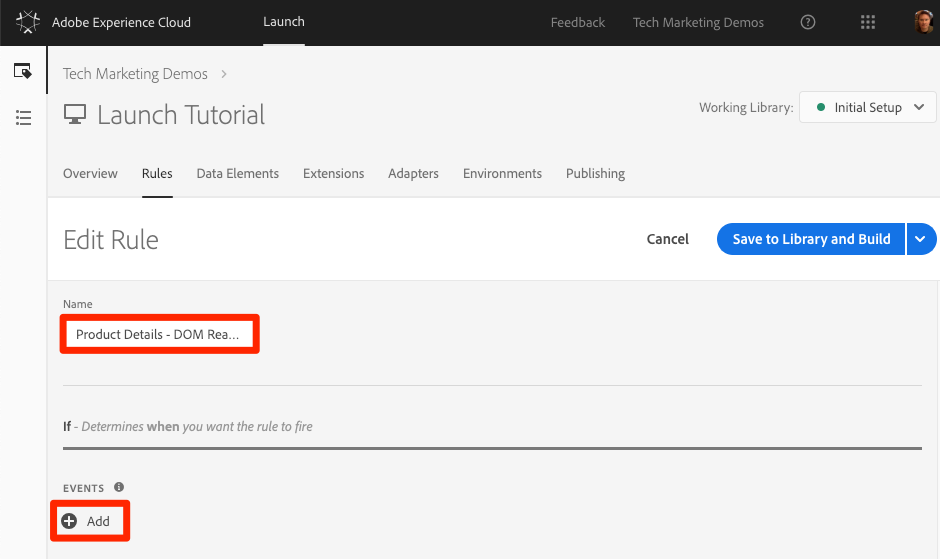
Select [Event Type > DOM Ready]
Set the [Order] to 40, so that the rule will run before the rule containing the Analytics > Send Beacon action
Click [Keep Changes] 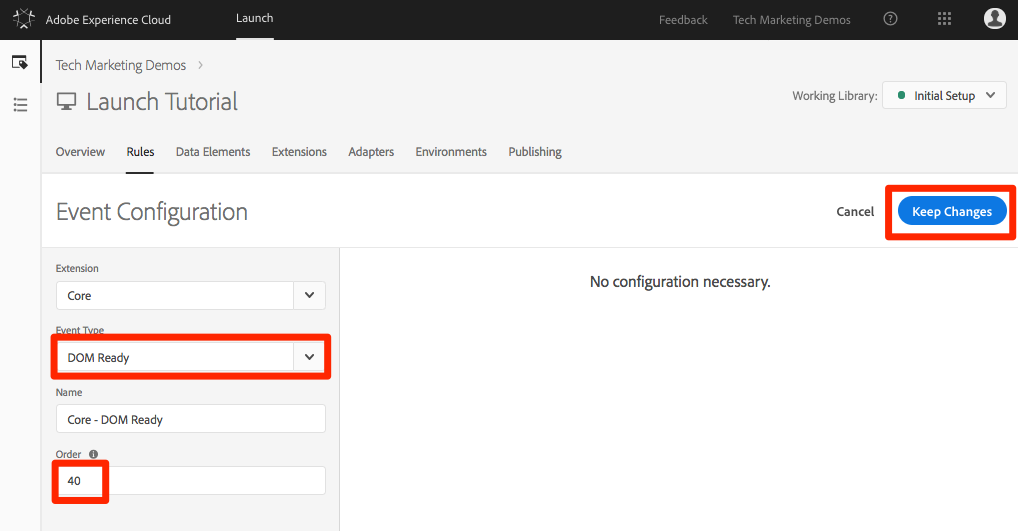
Under [Conditions], click the ![]() to open the
to open the Condition Configuration screen 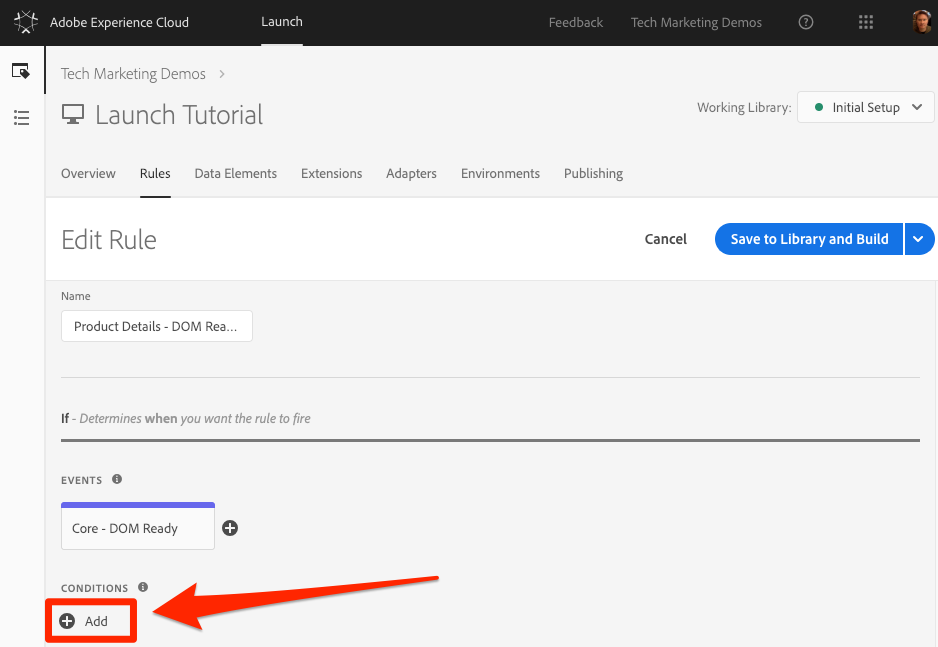
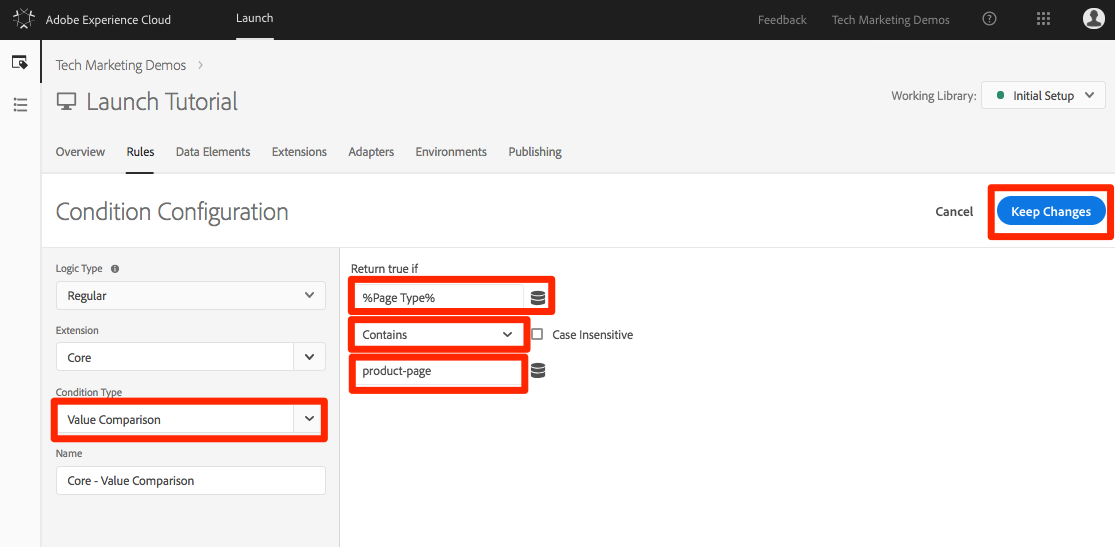
Select [Condition Type > Value Comparison]
Use the data element picker, choose Page Type in the first field
Select [Contains] from the comparison operator dropdown
In the next field type product-page (this is the unique part of the page type value pulled from the data layer on PDP's)
Click [Keep Changes]
Under Actions, click the ![]() to add a new action
to add a new action
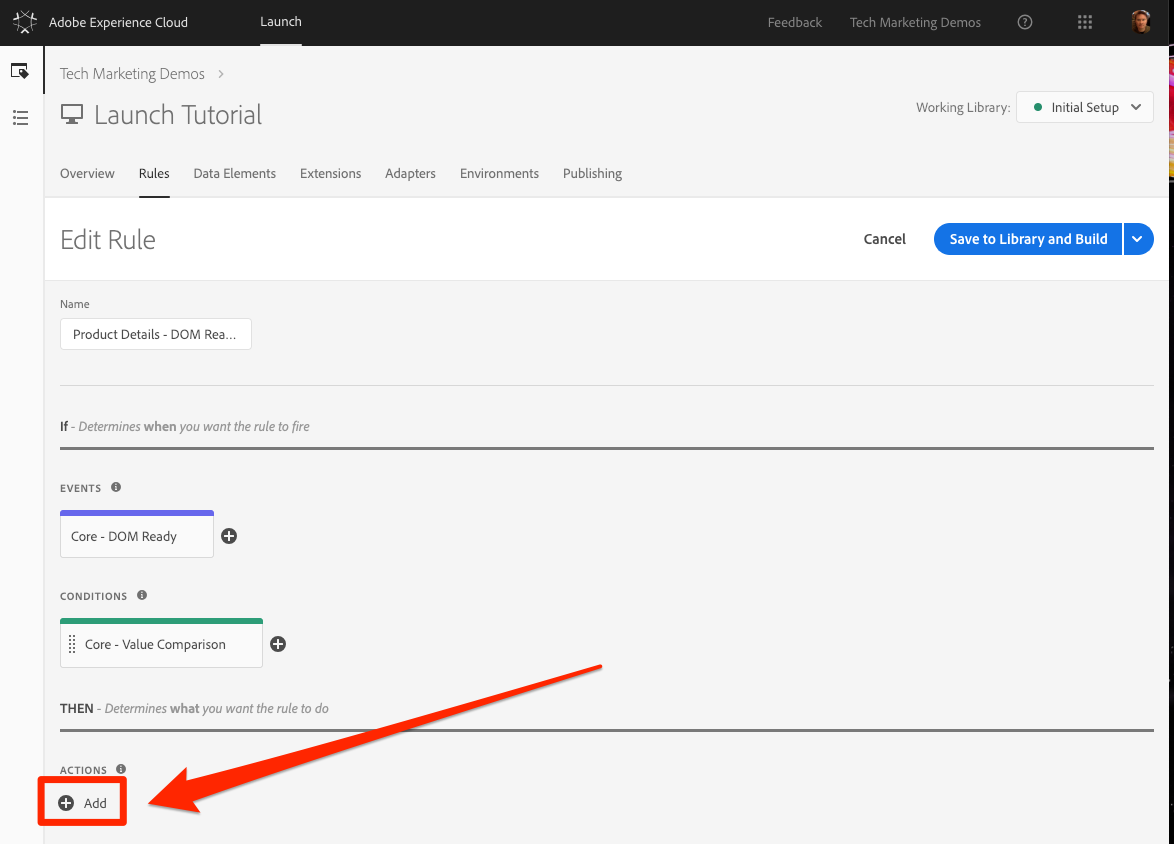
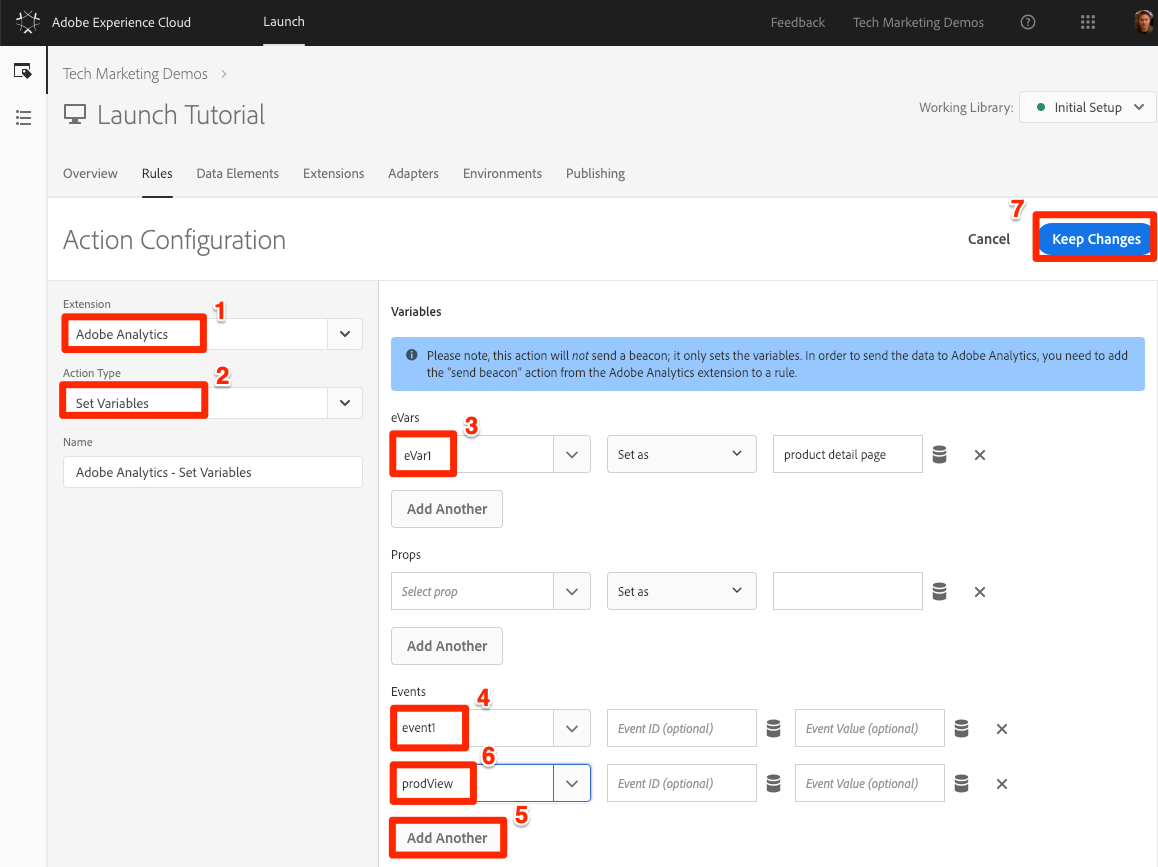
Select [Extension > Adobe Analytics]
Select [Action Type > Set Variables]
Select [eVar1 > Set as] and enter product detail page
Set [event1], leaving the optional values blank
Under Events, click the [Add Another] button
Set the [prodView] event, leaving the optional values blank
Click [Keep Changes]
Under Actions, click the ![]() to add a new action
to add a new action
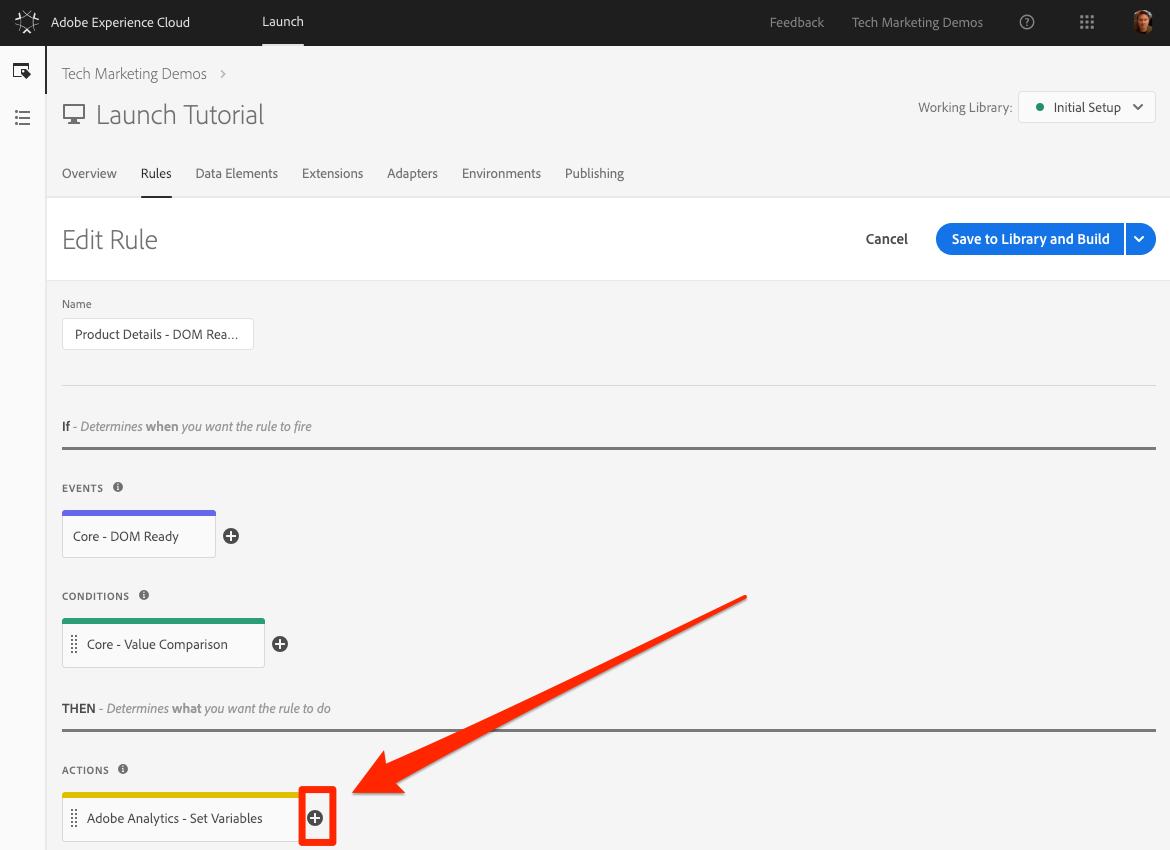
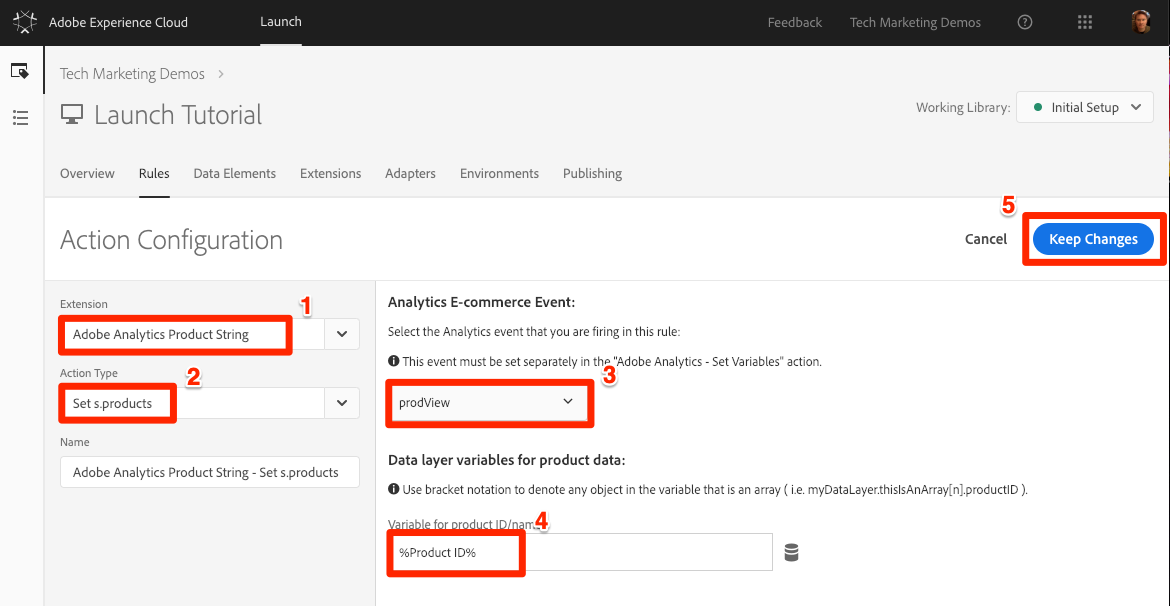
Select [Extension > Adobe Analytics Product String]
Select [Action Type > Set s.products]
In the [Analytics E-commerce Event] section, select [prodView]
In the [Data layer variables for product data] section, use the Data Element picker to choose the Product Id data element
Click [Keep Changes]
Click [Save to Library and Build]
You just created a rule that sets variables before the beacon is sent. You should now be able to see the new data going out in the hit in the Experience Cloud Debugger.
Open the We.Retail site in your Chrome browser
Navigate to any product detail page
Click the Debugger icon to open your [Adobe Experience Cloud Debugger]
Click to the Analytics tab
Expand your Report Suite
Notice the Product Detail Variables that are now in the debugger, namely that eVar1 has been set to "product detail page", that the Events variable has been set to "event1" and "prodView", that the products variable is set with the product id of the product you are viewing, and that your Page Name is still set by the Analytics extension
When a page loads, you typically fire a page load beacon triggered by the s.t() function. This automatically increments a page view metric for the page listed in the pageName variable.
However, sometimes you don't want to increment page views on your site, because the action that is taking place is "smaller" (or maybe just different) than a page view. In this case, you will use the s.tl() function, which is commonly referred to as a "track link" request. Even though it is referred to as a track link request, it doesn't have to be triggered on a link click. It can be triggered by any of the events that are available to you in the Launch rule builder, including your own custom JavaScript.
In this tutorial, you will trigger an s.tl() call using one of the coolest JavaScript events, an Enters Viewport event.
For this use case, you want to know if people are scrolling down on our We.Retail home page far enough to see the New Arrivals section of our page. There is some internal discord at our company about whether people are even seeing that section or not, so you want to use Analytics to determine the truth.
Go to the [Rules] section in the top navigation and then click [Add Rule]
Name the rule Homepage - New Arrivals enters Viewport
Click [Events > Add] to open the Event Configuration screen
Select [Event Type > Enters Viewport]. This will bring up a field where you need to enter the CSS selector that will identify the item on your page that should trigger the rule when it enters view in the browser.
Go back to the home page of We.Retail and scroll down to the New Arrivals section.
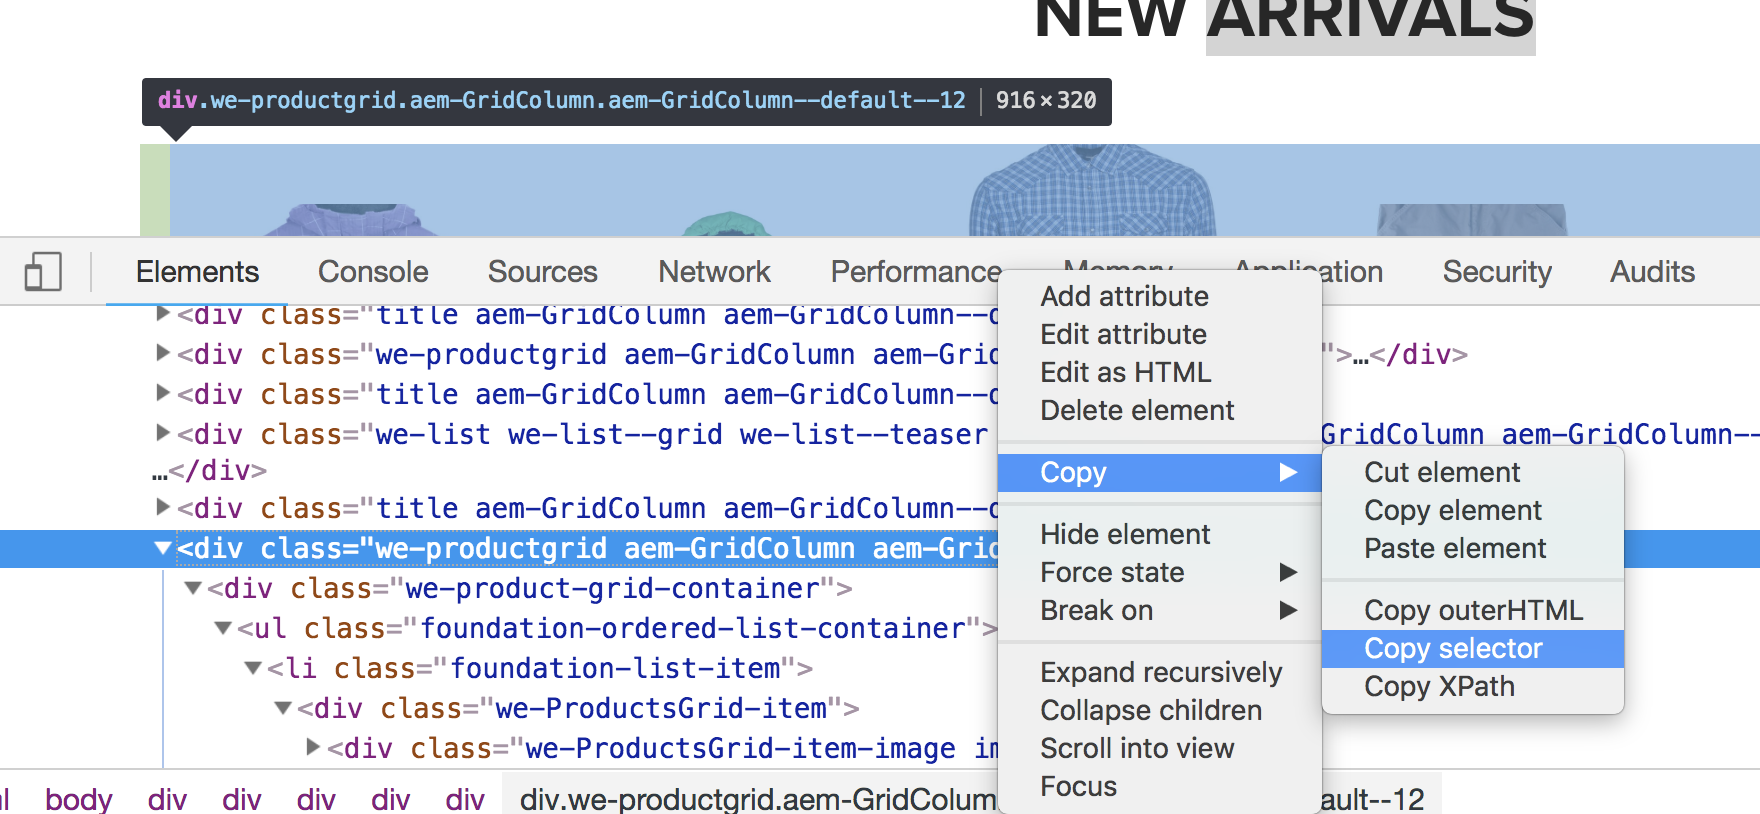
Right-click on the space between the "NEW ARRIVALS" title and the items in this section, and select Inspect from the right-click menu. This will get you close to what you want.
Right around there, possibly right under the selected section, you are looking for a div with class="we-productgrid aem-GridColumn aem-GridColumn--default--12". Locate this element.
Right-click on this element and select [Copy > Copy Selector]
Go back to Launch, and paste this value from the clipboard into the field labeled Elements matching the CSS selector.
Click [Keep Changes] 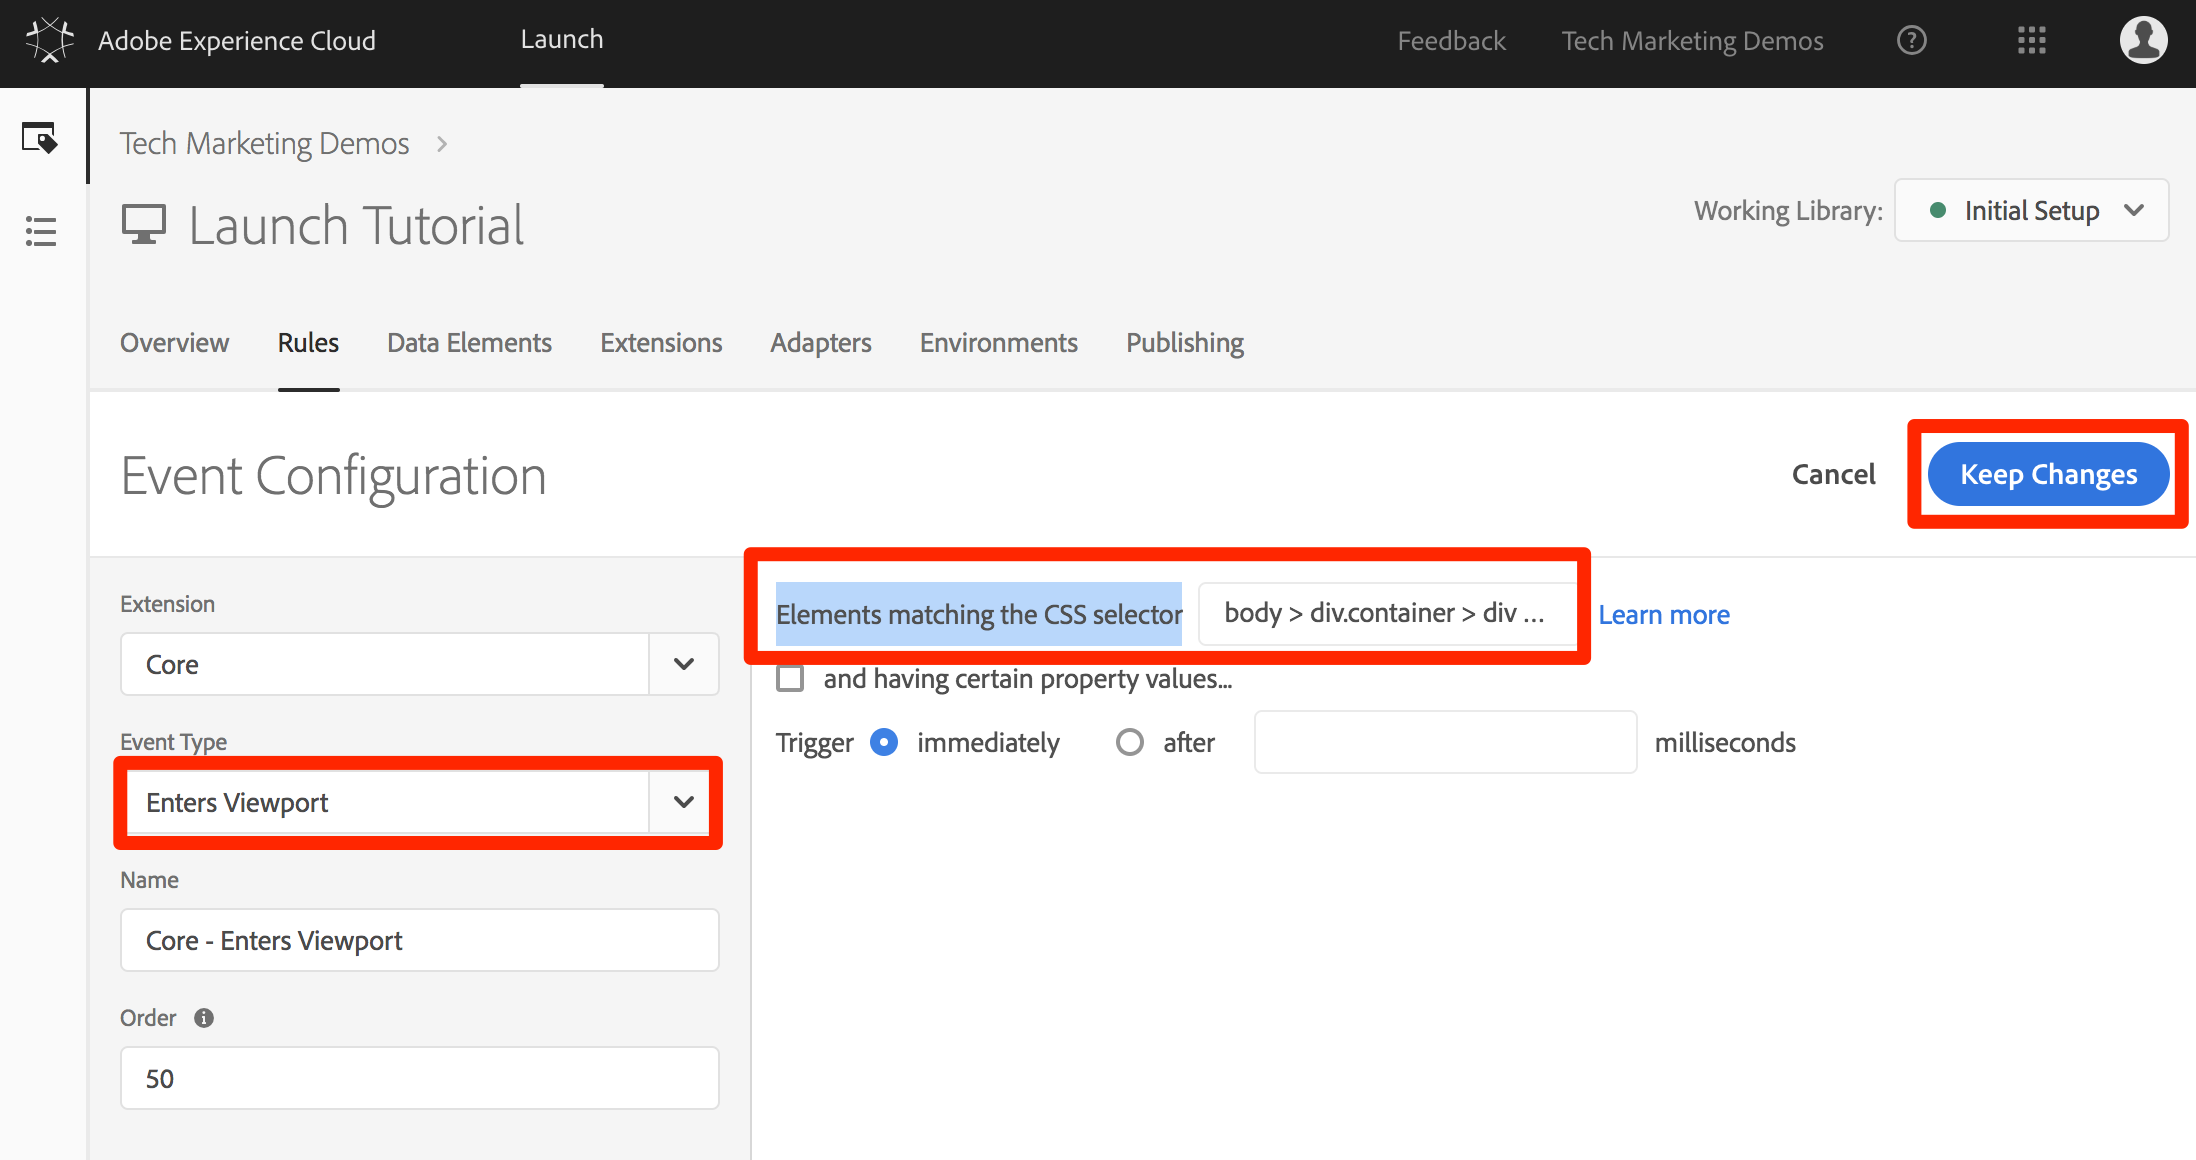
Under Conditions, click the ![]() to add a new condition
to add a new condition
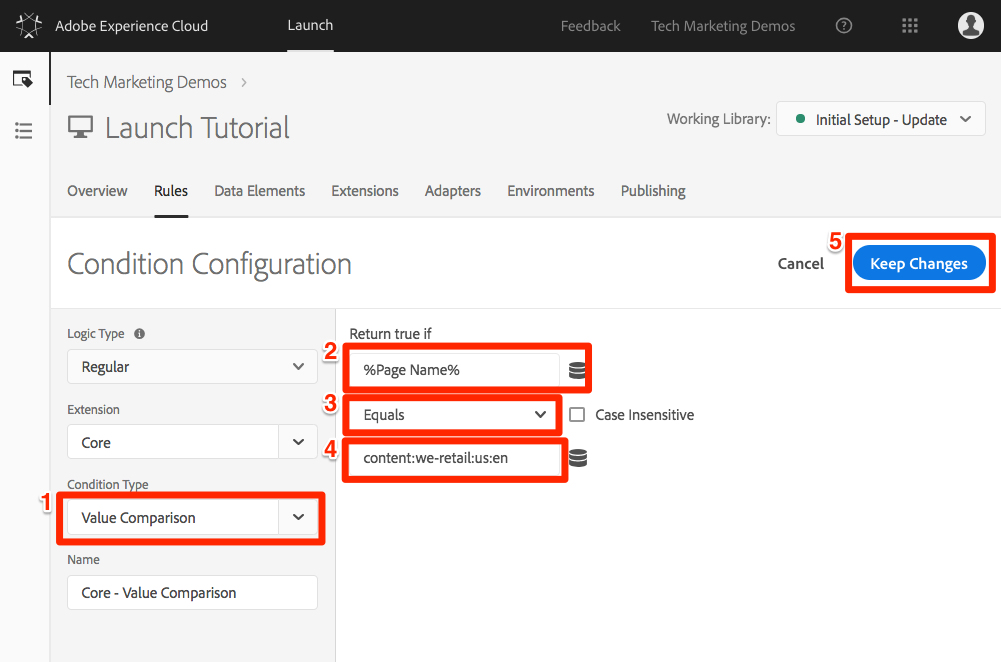
Select [Condition Type > Value Comparison]
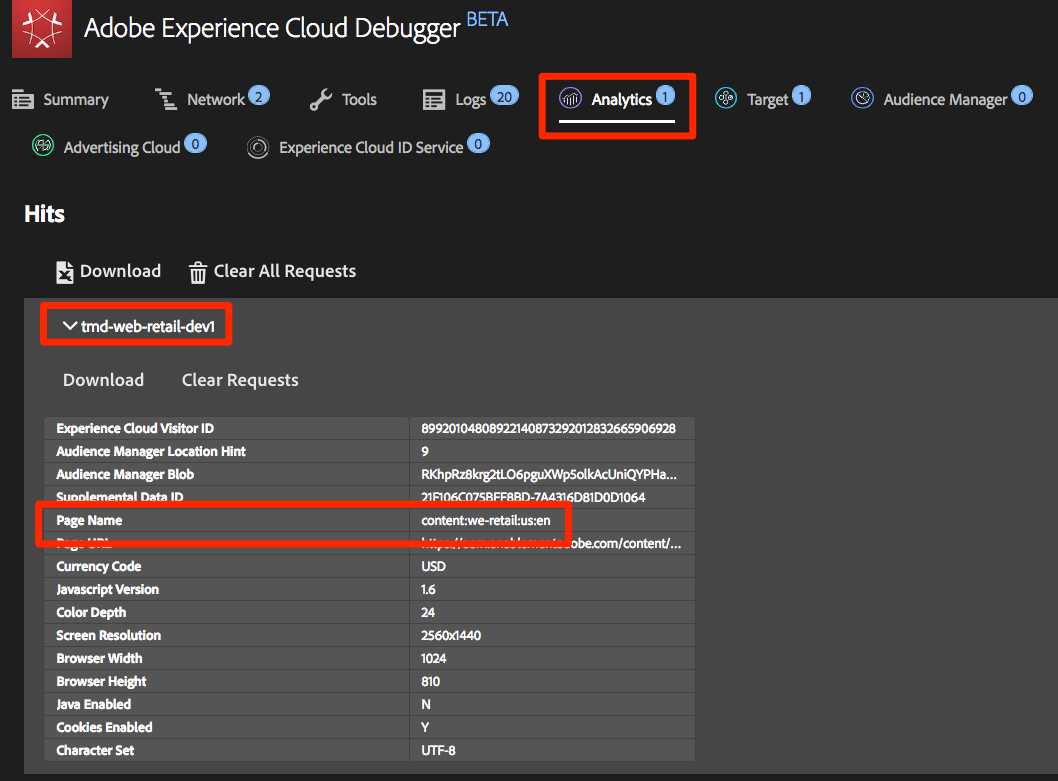
Use the data element picker, choose Page Name in the first field
Select [Equals] from the comparison operator dropdown
In the next field type content:we-retail:us:en (this is the page name of the home page as pulled from the data layer - we only want this rule to run on the home page)
Click [Keep Changes]
Under Actions, click the ![]() to add a new action
to add a new action
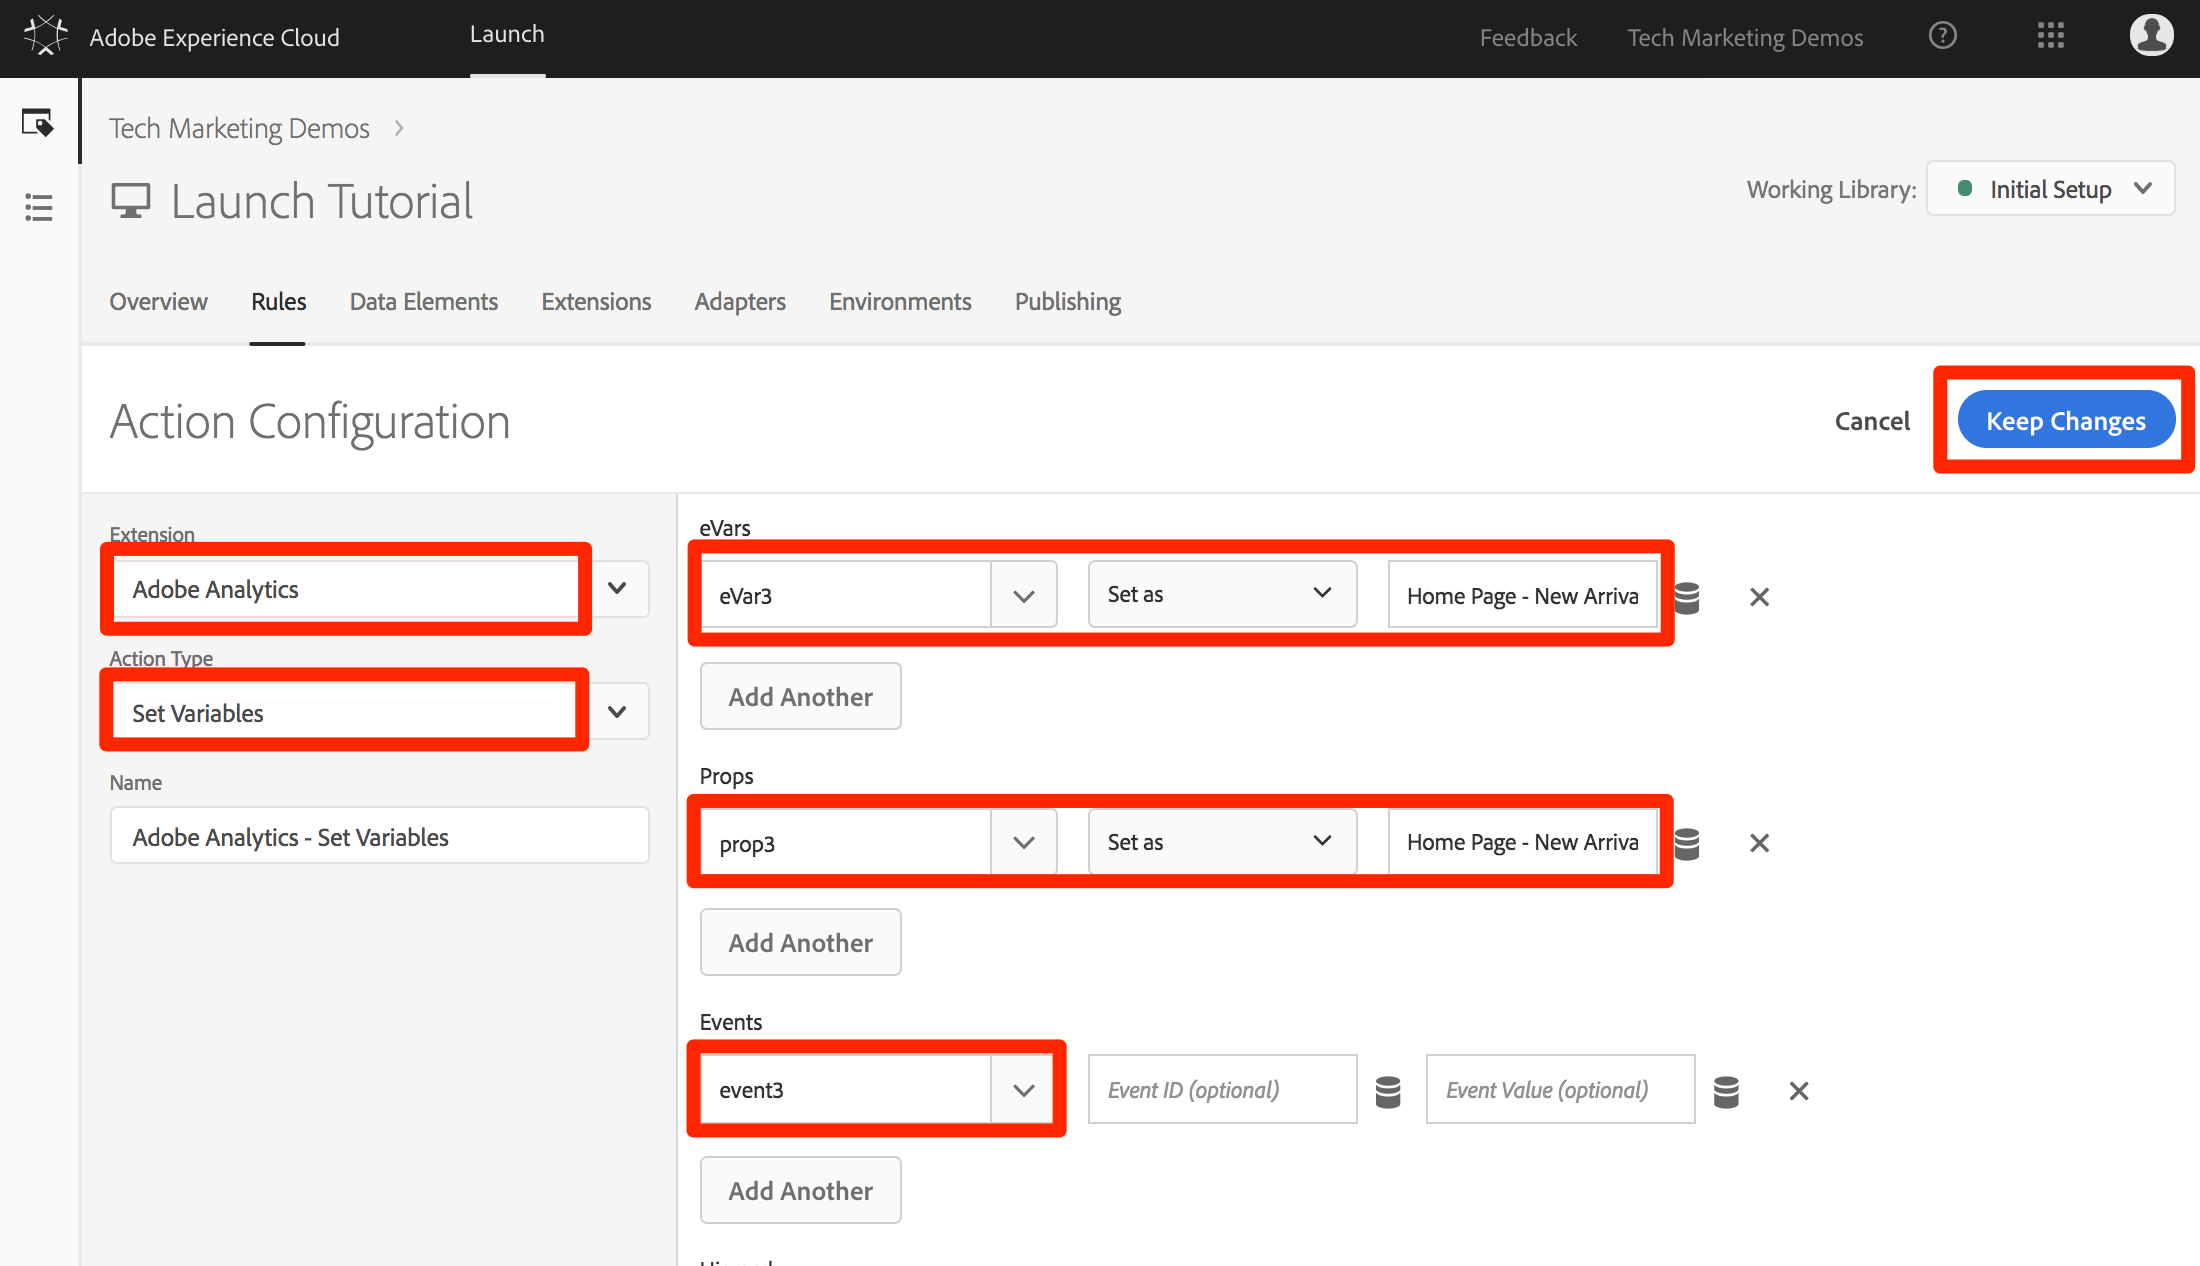
Select [Extension > Adobe Analytics]
Select [Action Type > Set Variables]
Set eVar3 to Home Page - New Arrivals
Set prop3 to Home Page - New Arrivals
Set the Events variable to event3
Click [Keep Changes]
Under Actions, click the ![]() to add another new action
to add another new action
![]()
Select [Extension > Adobe Analytics]
Select [Action Type > Send Beacon]
Choose the [s.tl()] tracking option
In the [Link Name] field, enter Scrolled down to New Arrivals. This value will be placed into the Custom Links report in Analytics.
Click [Keep Changes]
![]()
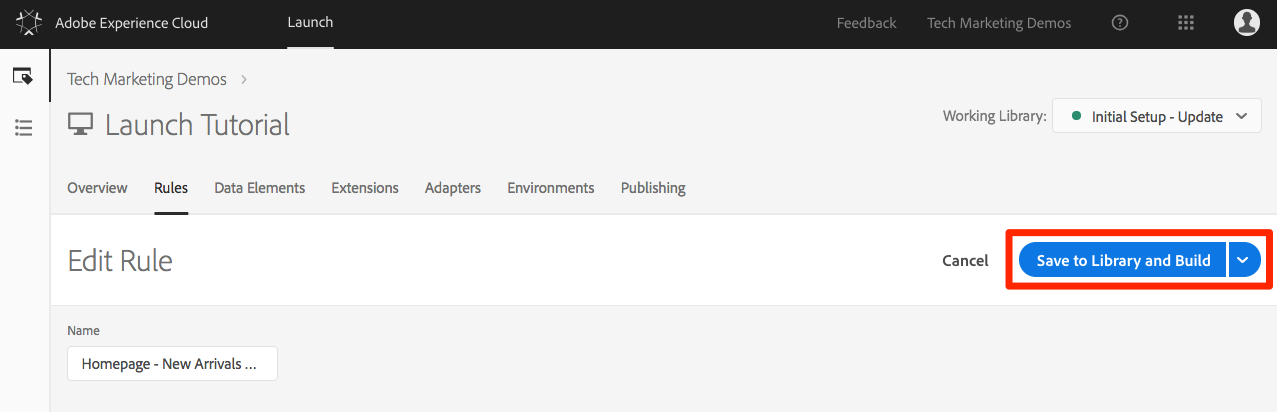
Click [Save to Library and Build]
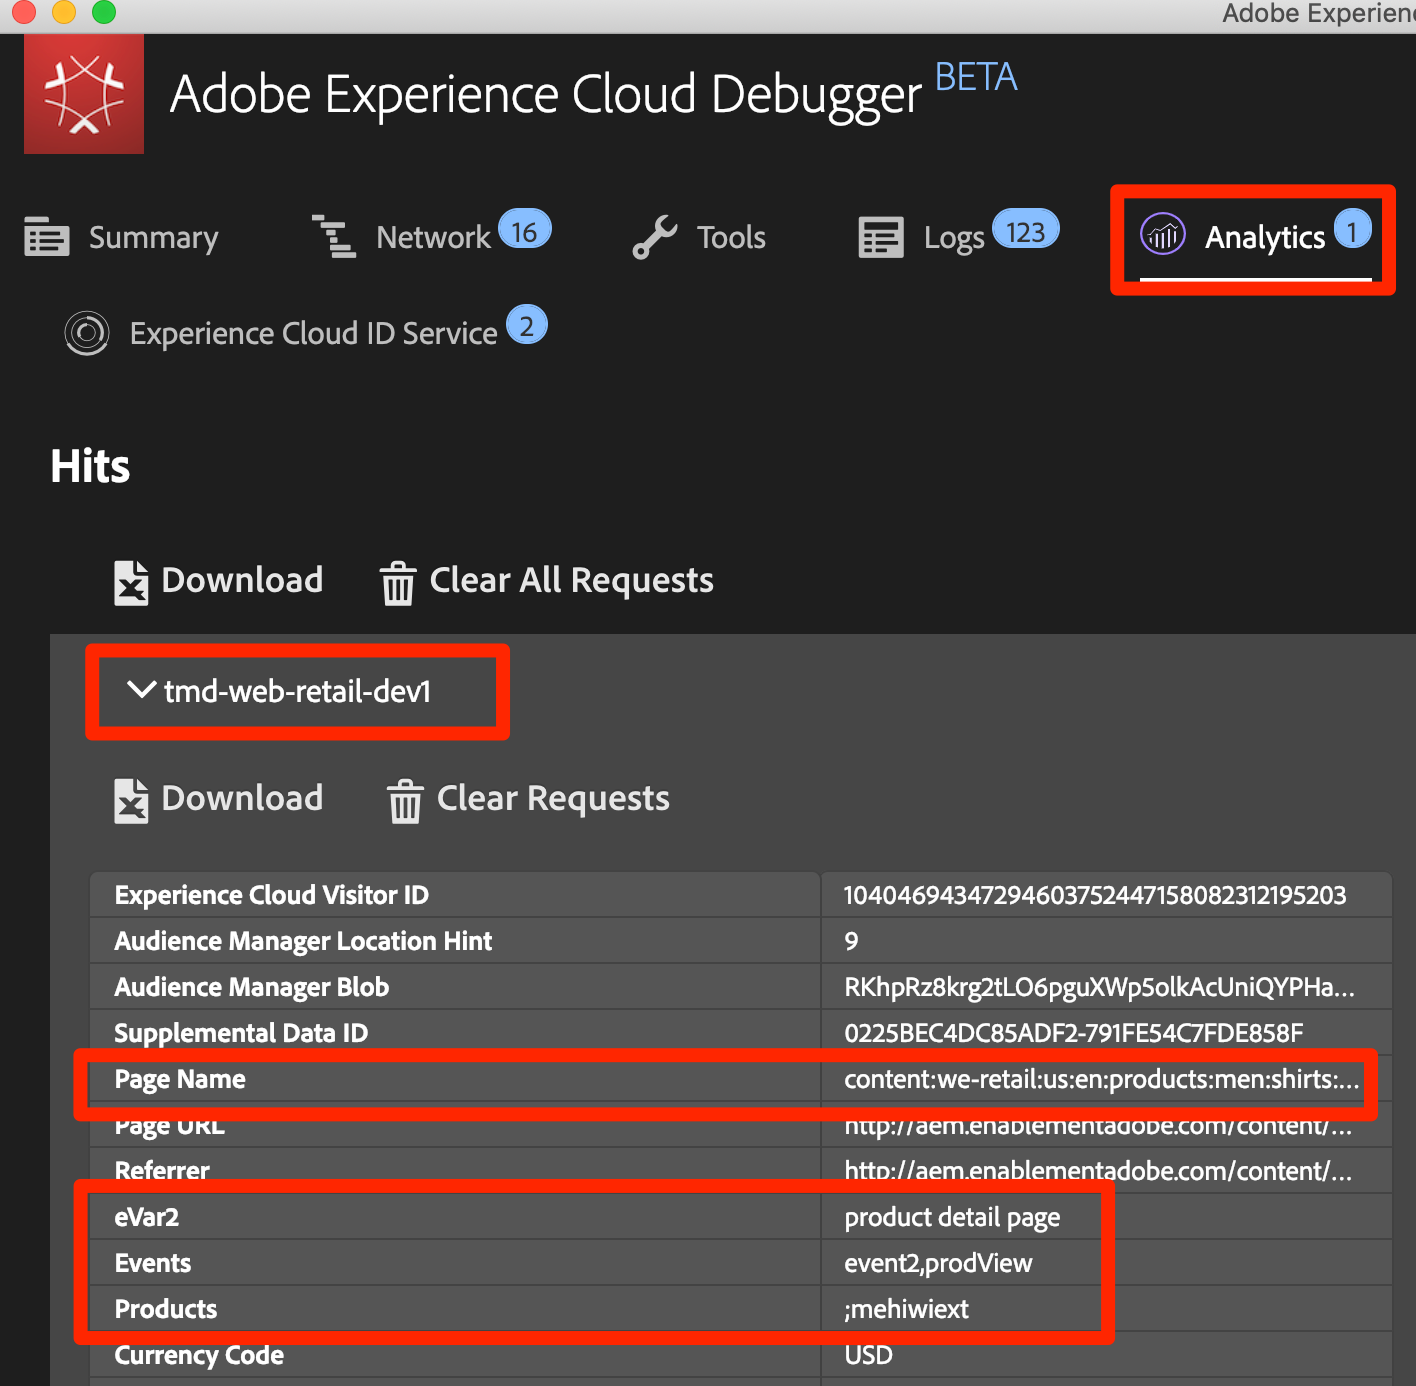
Now you will want to make sure that this hit goes in when you scroll down to the New Arrivals section of the Home Page of our site. When you first load the homepage, the request shouldn't be made, but as you scroll down and the section comes into view, the hit should fire with our new values.
Open the We.Retail site in your Chrome browser and make sure you are at the top of the home page.
Click the [debugger icon] to open your [Adobe Experience Cloud Debugger]
Click to the Analytics tab
Expand your Report Suite's hit
Notice the normal page view hit for the home page with the page name, etc. (but nothing in eVar3 or prop3).
Leaving the Debugger open, scroll down on your site until you can see the New Arrivals section
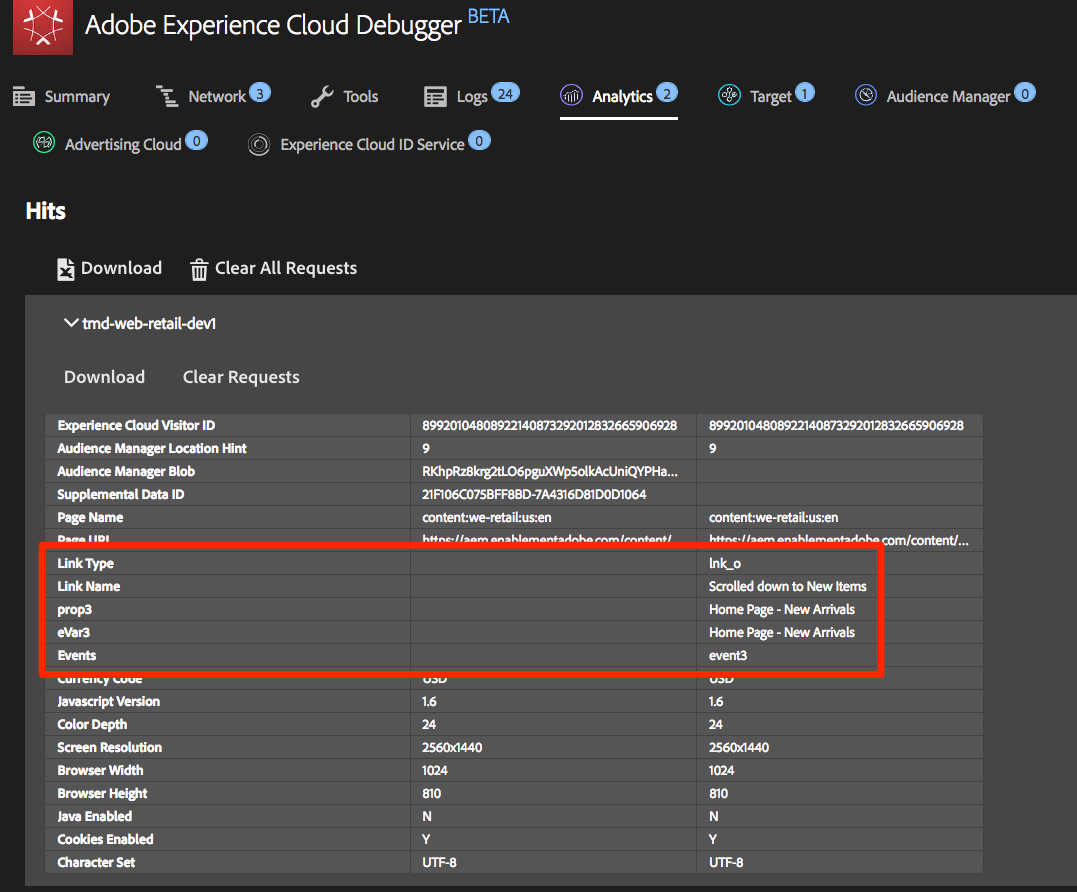
View the Debugger again, and another Analytics hit should have appeared. This hit should have the params associated with the s.tl() hit that you set up, namely:
LinkType = "link_o" (this means that the hit is a custom link hit, not a page view hit)
LinkName = "Scrolled down to New Arrivals"
prop3 = "Home Page - New Arrivals"
eVar3 = "Home Page - New Arrivals"
Events = "event3"
A Plug-in is a piece of JavaScript code that you can add to your implementation to perform a specific function that is not built into the product. Plug-ins can be built by you, by other Adobe Customers/Partners, or by Adobe Consulting.
To implement plug-ins, there are basically three steps:
If you are going to add the doPlugins function (below) and use plug-ins, you need to check a box to make the Analytics "s" object available globally in the Analytics implementation.
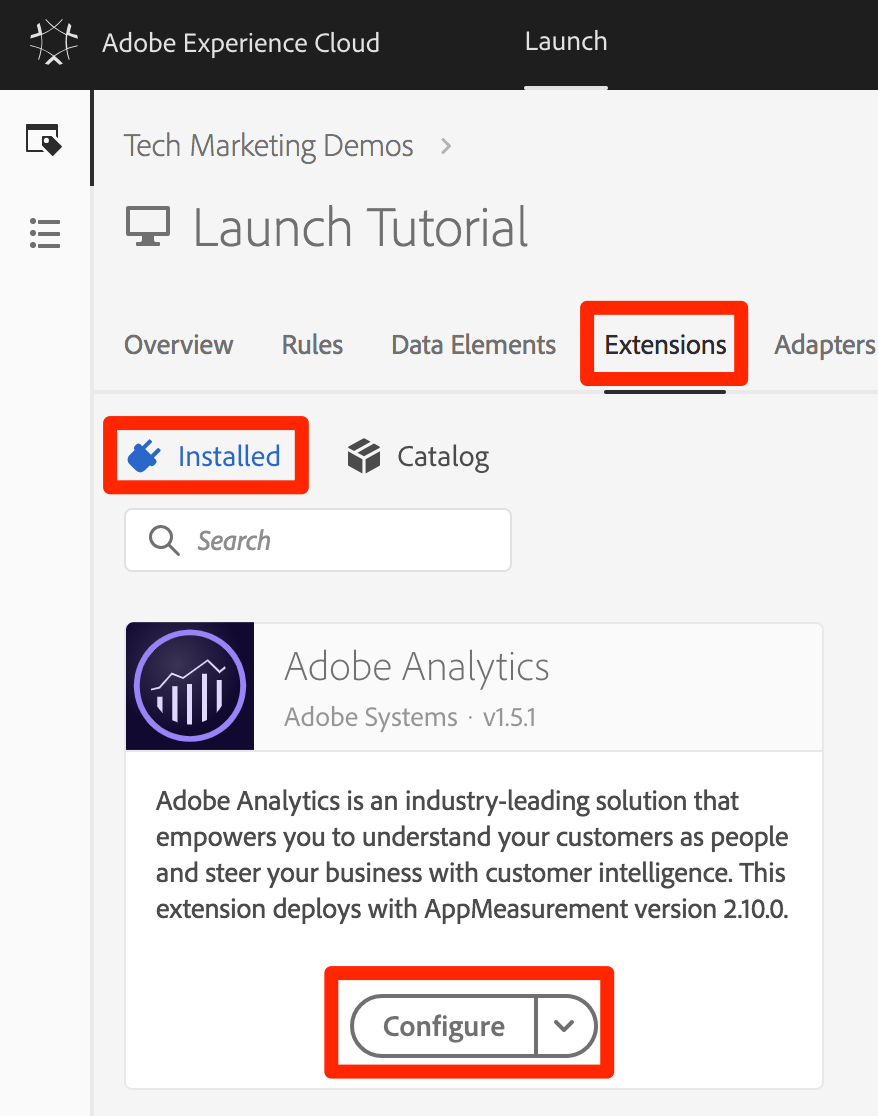
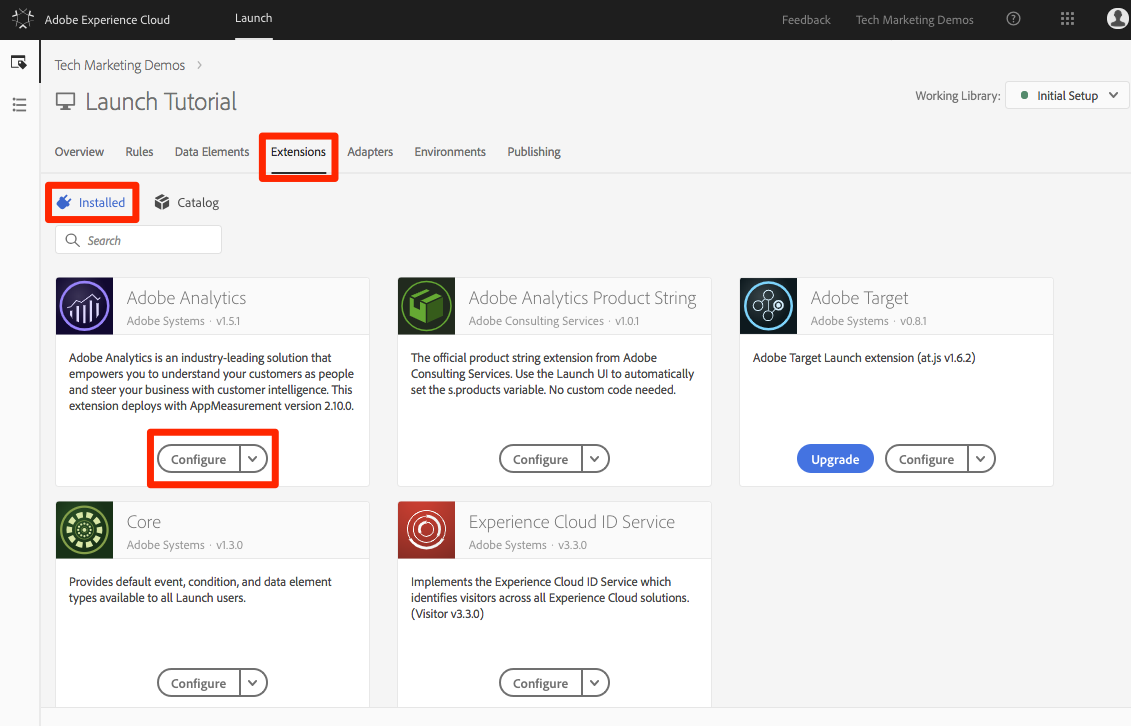
Go to [Extensions > Installed]
In the Adobe Analytics extension, Click [Configure]
Under [Library Management], select the box labeled Make tracker globally accessible. As you can see in the help bubble, this will make the tracker be scoped globally under window.s, which will be important as you refer to it in your customer JavaScript.
To add plug-ins, you need to add a function called doPlugins. This function is not added by default, but once added, is handled by the AppMeasurement library, and is called last when a hit is being sent into Adobe Analytics. Therefore, you can use this function to run some JavaScript to set variables that are easier set this way.
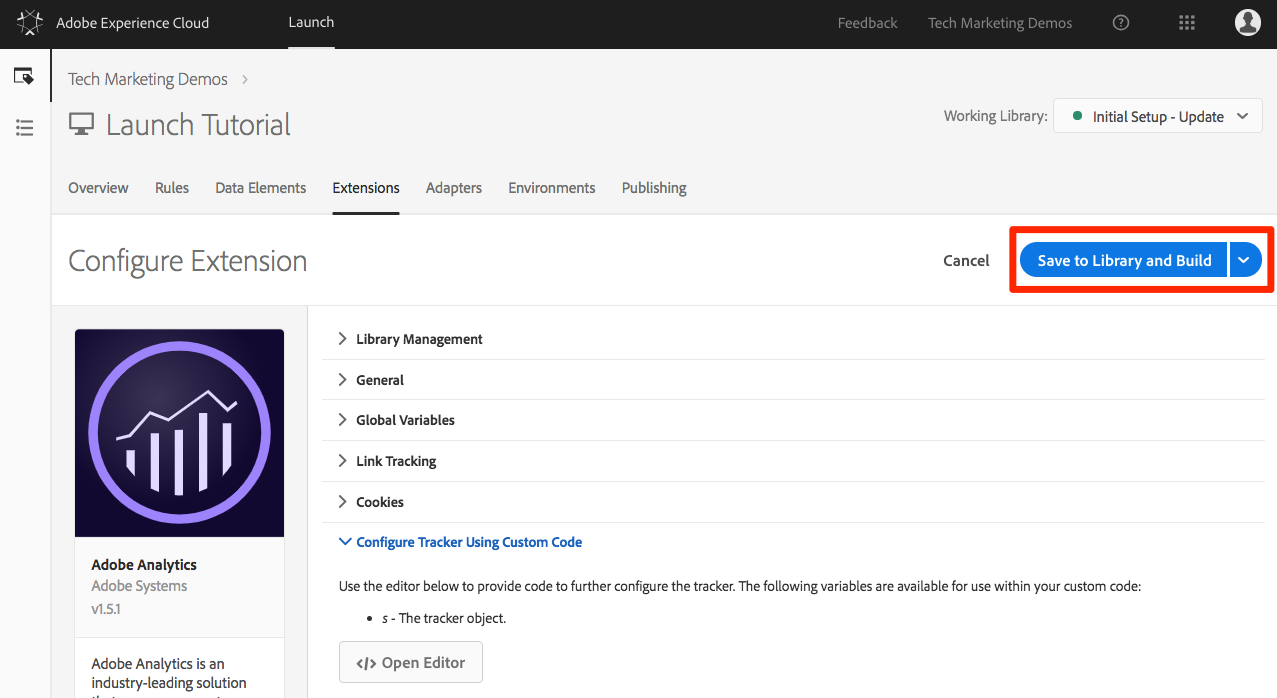
While still in the Analytics extension, scroll down and expand the section titled Configure Tracker Using Custom Code.
Click [Open Editor]
Paste the following code into the code editor:
Keep this window open for the next step
You are actually going to call two plug-ins in this code, but one of them is built into the AppMeasurement library, so for that one you do not need to add the function to call. However, for the second one, you do need to add the function code as well. This function is called getValOnce().
The purpose of this plug-in is to keep values from getting falsely duplicated in the code when a visitor refreshes a page or uses the browser's back button to go back to a page where a value was set. In this lesson, you will use it to keep the clickthrough event from being duplicated.
The code for this plug-in is available in the Analytics Documentation, but it is included here for your ease of copy/paste.
Copy the following code
Paste it into the code window in the Analytics extension (if you don't still have it open, re-open it as per the previous step), completely below the doPlugins function (not inside of it).

You can now call this plug-in from within doPlugins.
Now that the code is there and can be referenced, you can make the calls to plug-ins within the doPlugins function.
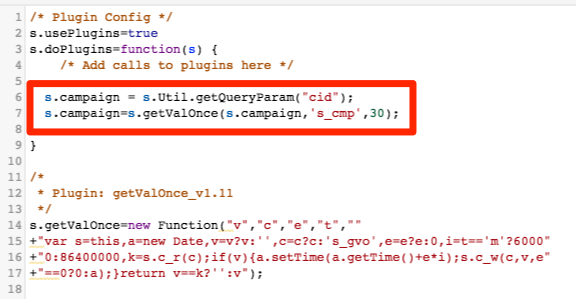
First you will call a plug-in which has been incorporated into the AppMeasurement library, and so is known as a "utility." It is referred to as s.Util.getQueryParam, because it is part of the s object, is a built-in utility, and will grab values (based on a parameter) from the query string in the URL.
Copy the following code:
Paste it into the doPlugins function. This will look for a parameter called cid in the current page URL and place it into the s.campaign variable.
Now call the getValOnce function by copying the following code and pasting it in right below the call to getQueryParam:
This code will make sure that the same value is not sent in more than once in a row for 30 days (see the documentation for ways to customize this code to your needs).
Save the code window
Click [Save to Library and Build]
Now you can make sure that the plug-ins are working.
Open the We.Retail site in your Chrome browser
Click the Debugger icon to open the [Adobe Experience Cloud Debugger]
Click to the Analytics tab
Expand your Report Suite
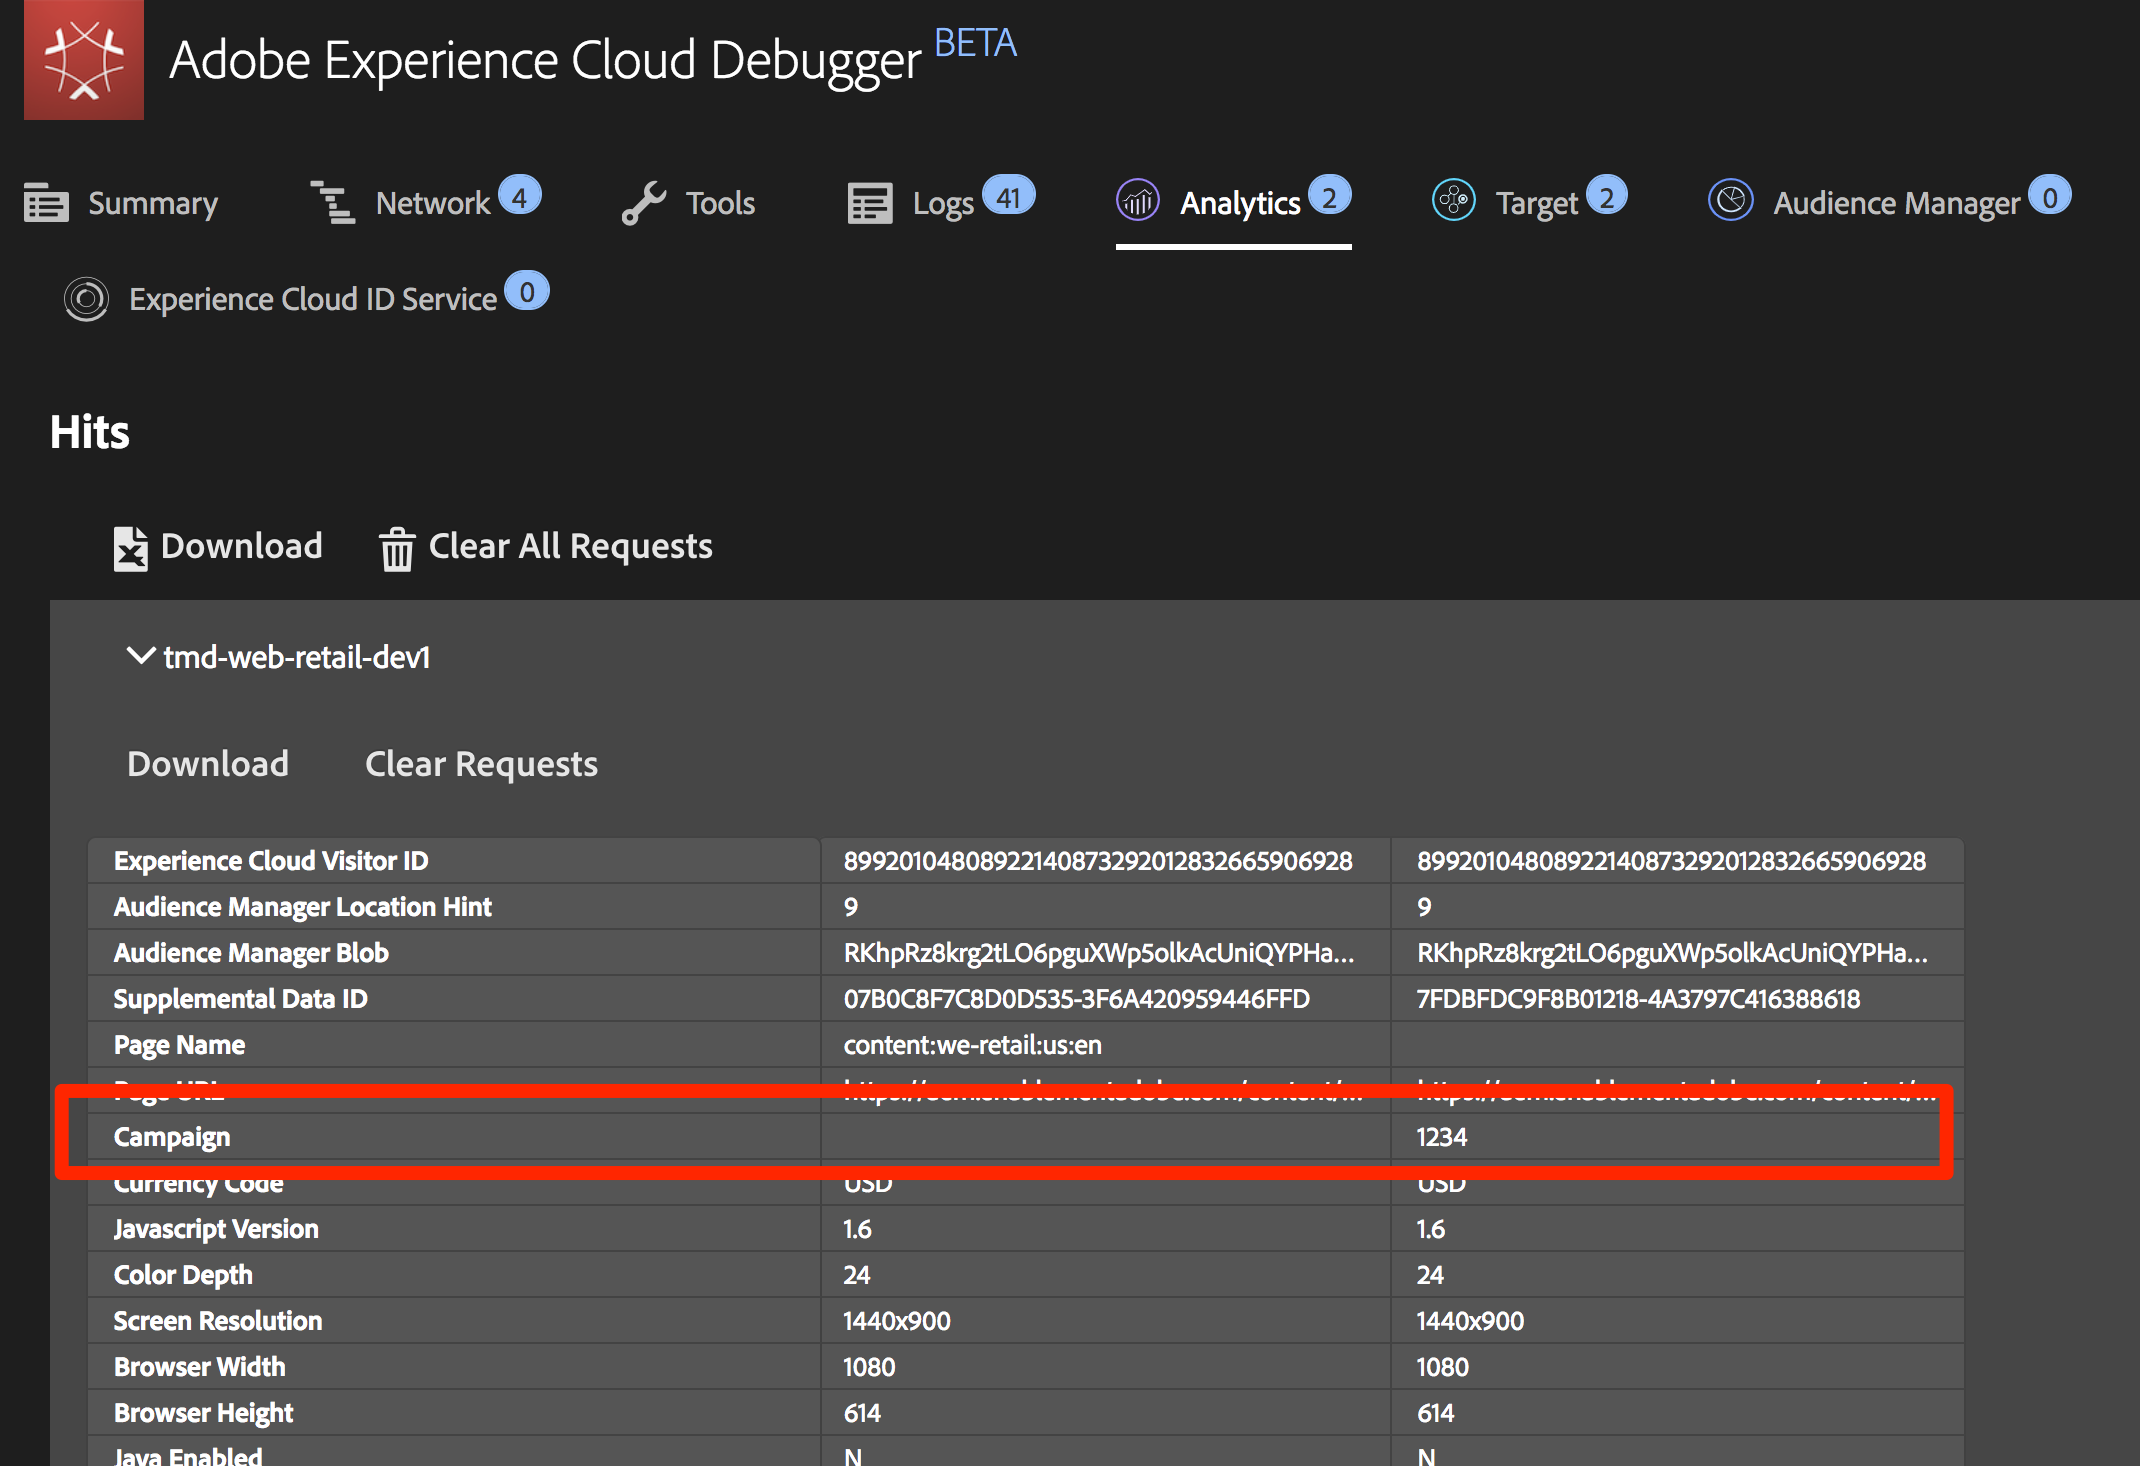
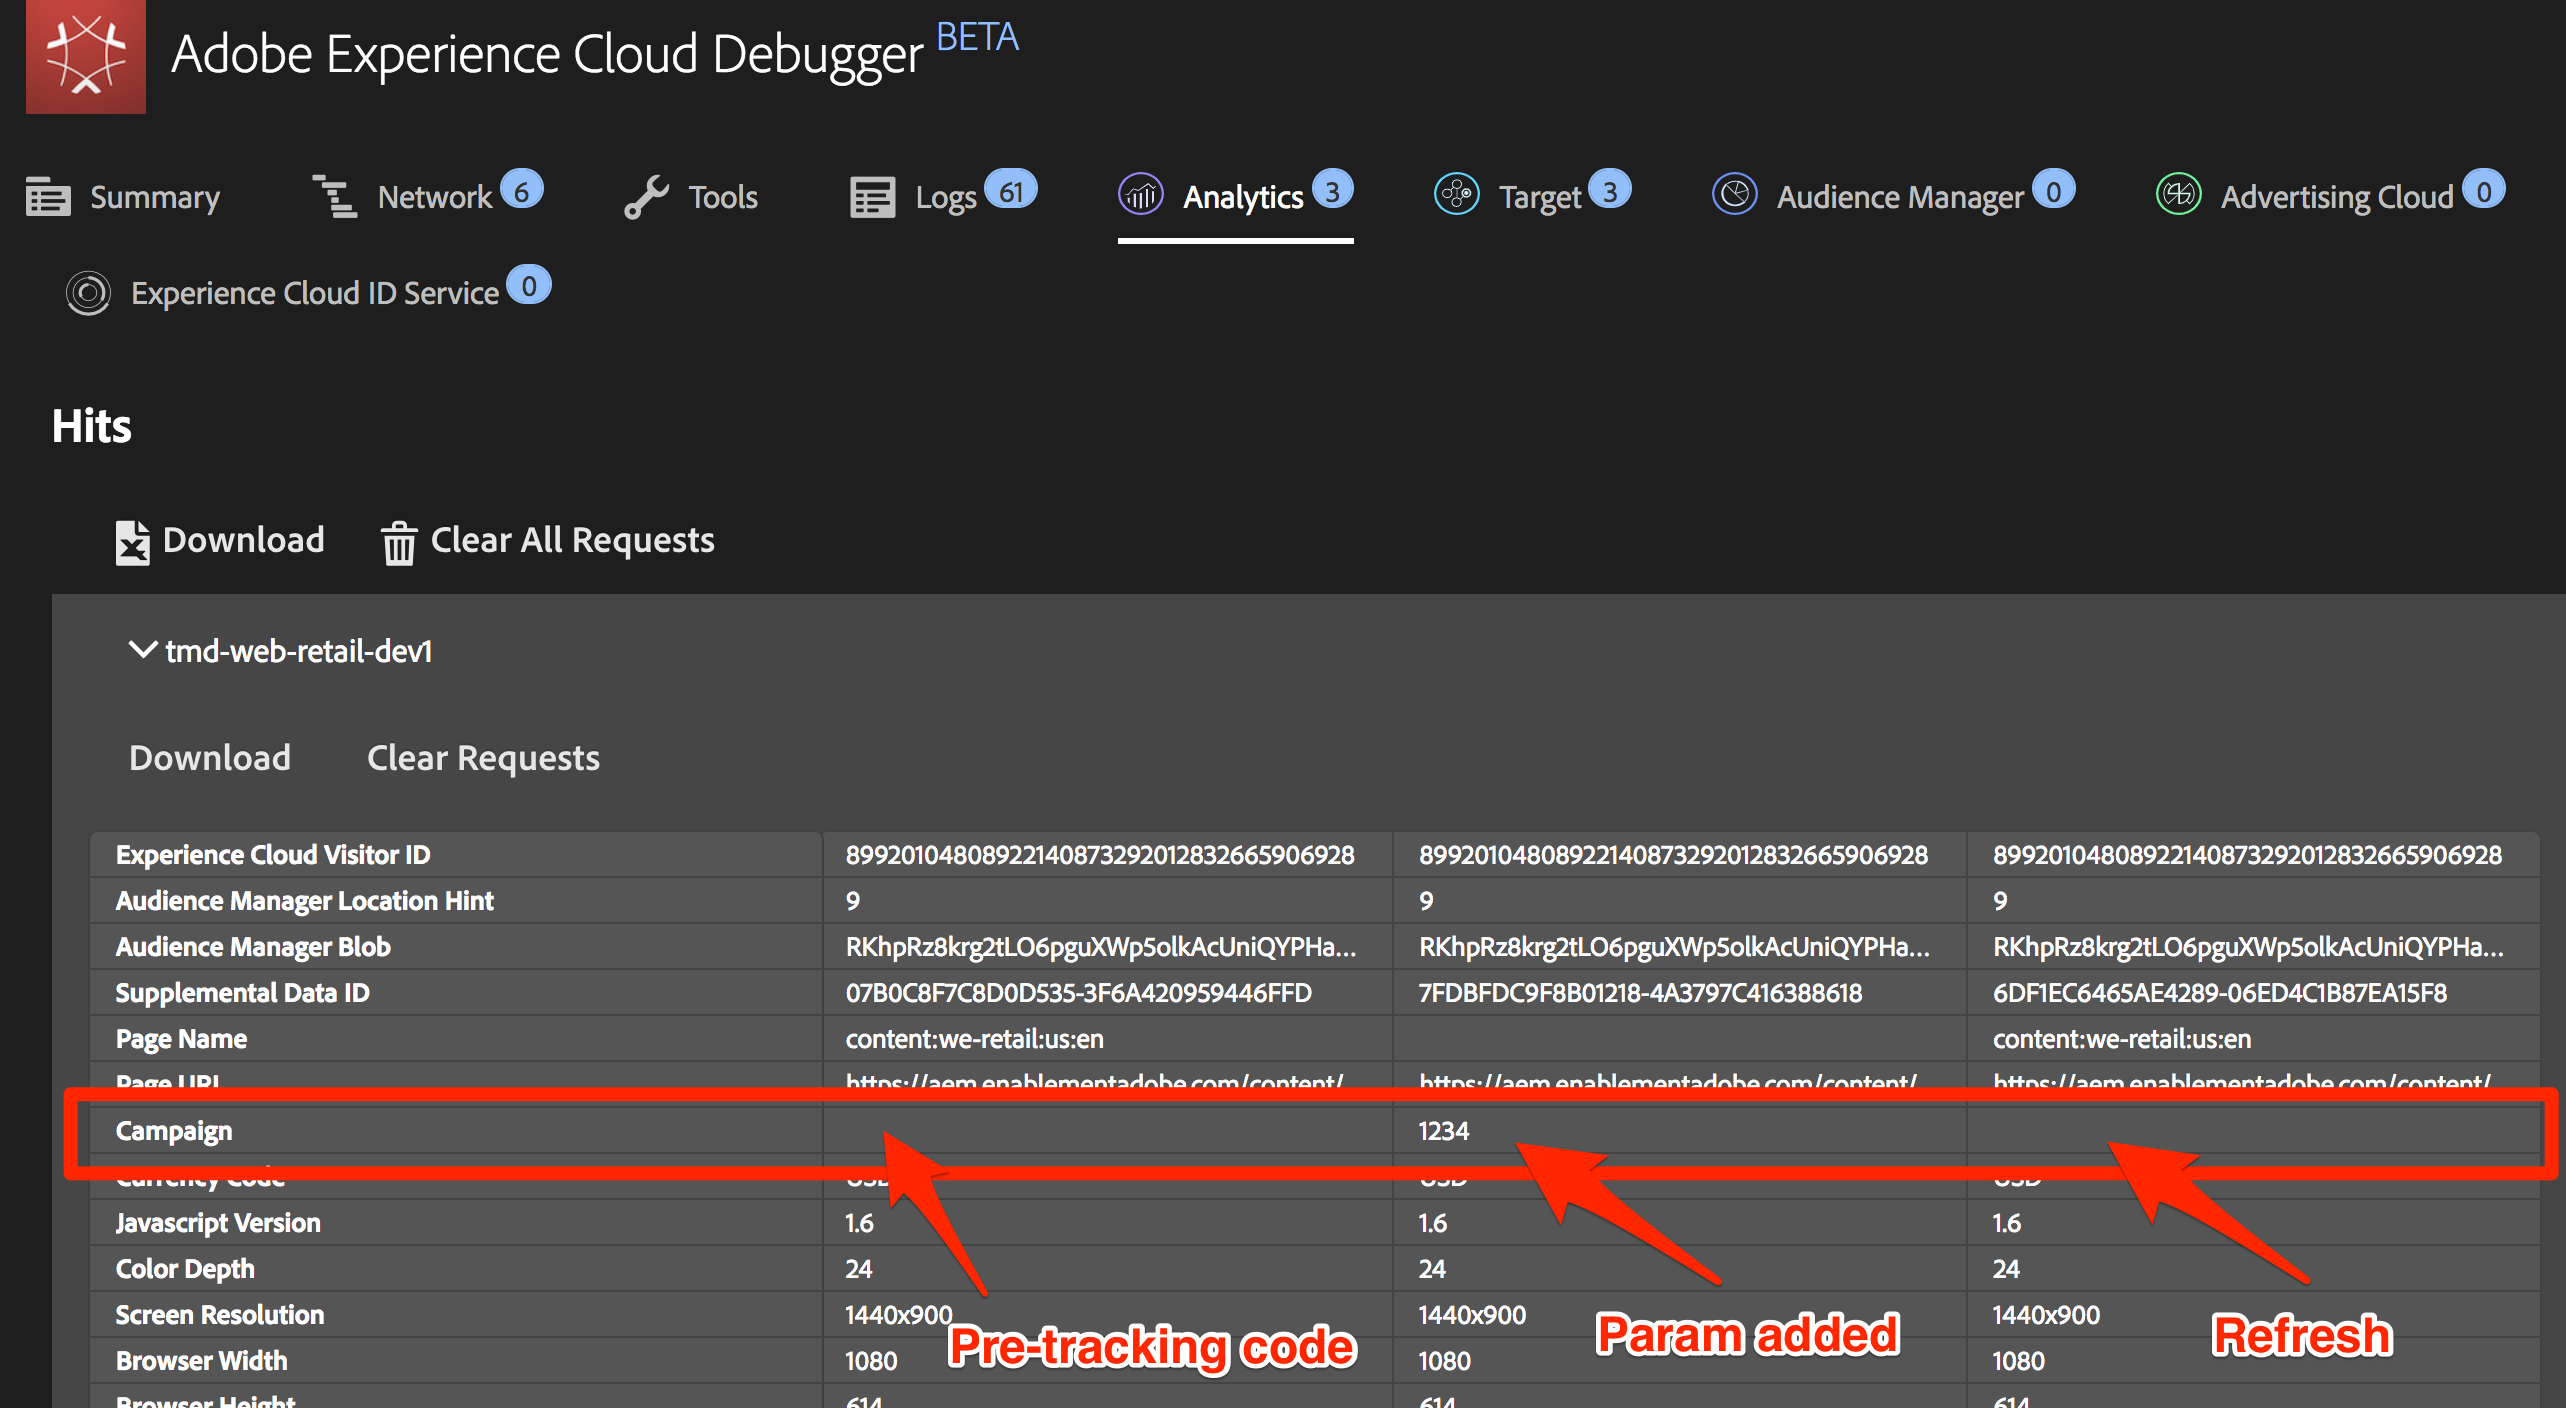
Notice the Analytics hit does not have a Campaign variable
Leaving the Debugger open, go back to the We.Retail site and add ?cid=1234 to the URL and hit Enter to refresh the page with that query string included

Check the Debugger and confirm that there is a second Analytics request with a Campaign variable set to 1234
Go back and refresh the We.Retail page again, with the query string still in the URL
Check the next hit in the Debugger, and the Campaign variable should not be present, because the getValOnce plug-in has made sure that it doesn't get duplicated and look like another person came in from the campaign tracking code.
BONUS: You can test this over and over by changing the value of the cid parameter in the query string. The Campaign variable should only be there if it is the first time you run the page with the value. If you are not seeing the Campaign value in the debugger, simply change the value of the cid in the query string of the URL, hit enter, and you should see it again in the debugger.
There are actually a few different ways to grab a parameter out of the query string of the URL, including in the Analytics extension configuration. However, in these other non-plug-in options, they don't provide the ability to stop unnecessary duplication, as you have done here with the getValOnce plug-in. This is the author's favorite method, but you should determine which method works best for you and your needs.
Nice work! You have completed the Analytics section. Of course, there are many other things that you can do to enhance our Analytics implementation, but hopefully this has given you some of the core skills you will need to tackle the rest of your needs.
This lesson will guide you through the steps to enable Adobe Audience Manager using Server-Side Forwarding.
Adobe Audience Manager (AAM) provides industry-leading services for online audience data management, giving digital advertisers and publishers the tools they need to control and leverage their data assets to help drive sales success.
At the end of this lesson, you will be able to:
In order to complete this lesson, you will need:
To have completed the lessons in Configure Launch, Add Adobe Analytics, and Add the ID Service.
Admin access to Adobe Analytics so that you can enable Server-Side Forwarding for the report suite you are using for this tutorial. Alternatively, you can ask an existing admin at your organization to do this for you, following the instructions below.
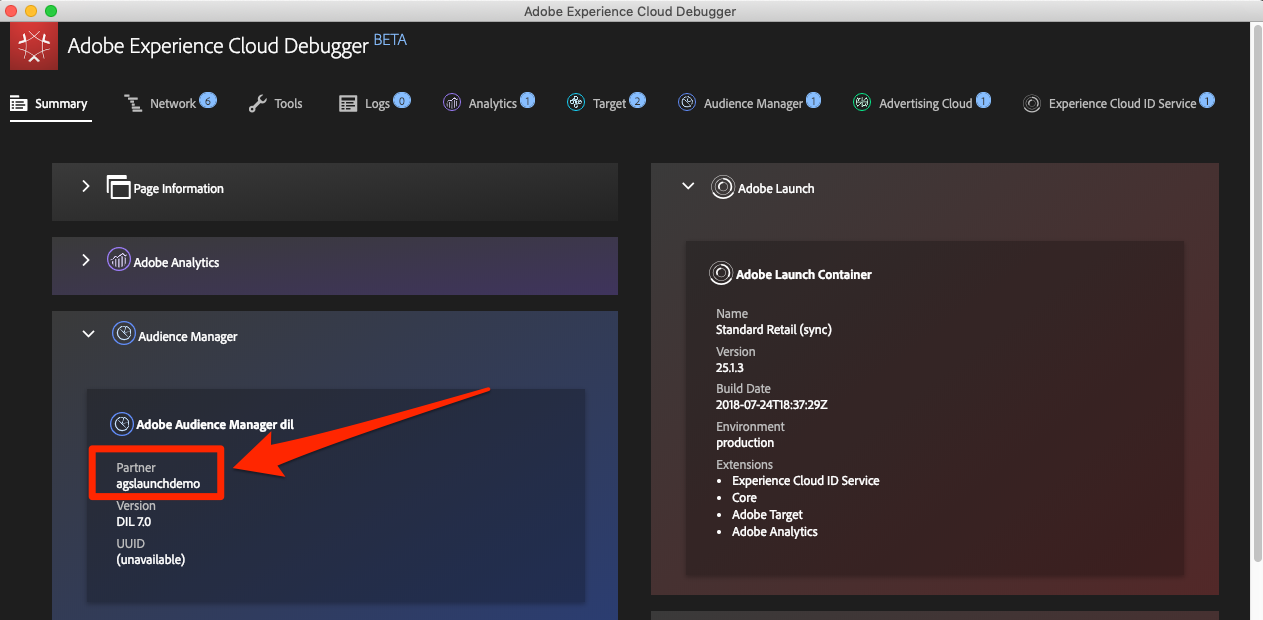
Your “Audience Manager Subdomain” (also known as the “Partner Name” “Partner ID,” or “Partner Subdomain”). If you already have Audience Manager implemented on your actual website, the easiest way to obtain it is to go to your actual website and open the Debugger. The subdomain is available on the Summary tab, in the Audience Manager section:
If you don't already have Audience Manager implemented, please follow these instructions to obtain your Audience Manager Subdomain.
There are two ways to implement Audience Manager in a website:
Server-Side Forwarding (SSF) - for customers with Adobe Analytics, this is the easiest and recommended way to implement. Adobe Analytics forwards data to AAM on Adobe's backend, allowing for one less request on the page. This also enables key integration features and conforms with our best practices for Audience Manager code implementation and deployment.
Client-Side DIL - This approach is for customers who do not have Adobe Analytics. DIL code (Data Integration Library Code, the AAM JavaScript configuration code) sends data directly from the web page into Audience Manager.
Since you have already deployed Adobe Analytics in this tutorial, you will deploy Audience Manager using Server-Side Forwarding. For a complete description and requirements list for Server-Side forwarding, please review the documentation, so that you are familiar with how it works, what is required, and how to validate.
There are two main steps in doing a SSF implementation:
A configuration in the Adobe Analytics Admin Console is required to start forwarding data from Adobe Analytics to Adobe Audience Manager. Since it can take up to four hours to start forwarding the data, you should do this step first.
Log into Analytics via the Experience Cloud UI. If you don't have Admin access to Analytics, you will need to talk to your Experience Cloud or Analytics admin to assign you access or complete these steps for you.
From the top navigation in Analytics, choose [Admin > Report Suites], and from the list, select (multi-select) the report suite(s) that you want to forward to Audience Manager.
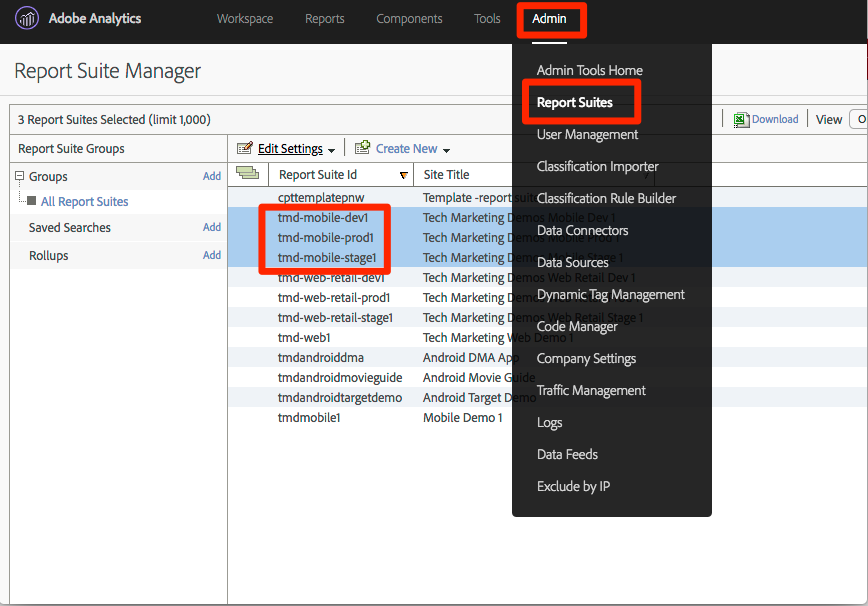
From the Report Suites screen and with the report suite(s) selected, choose [Edit Settings > General > Server-Side Forwarding].
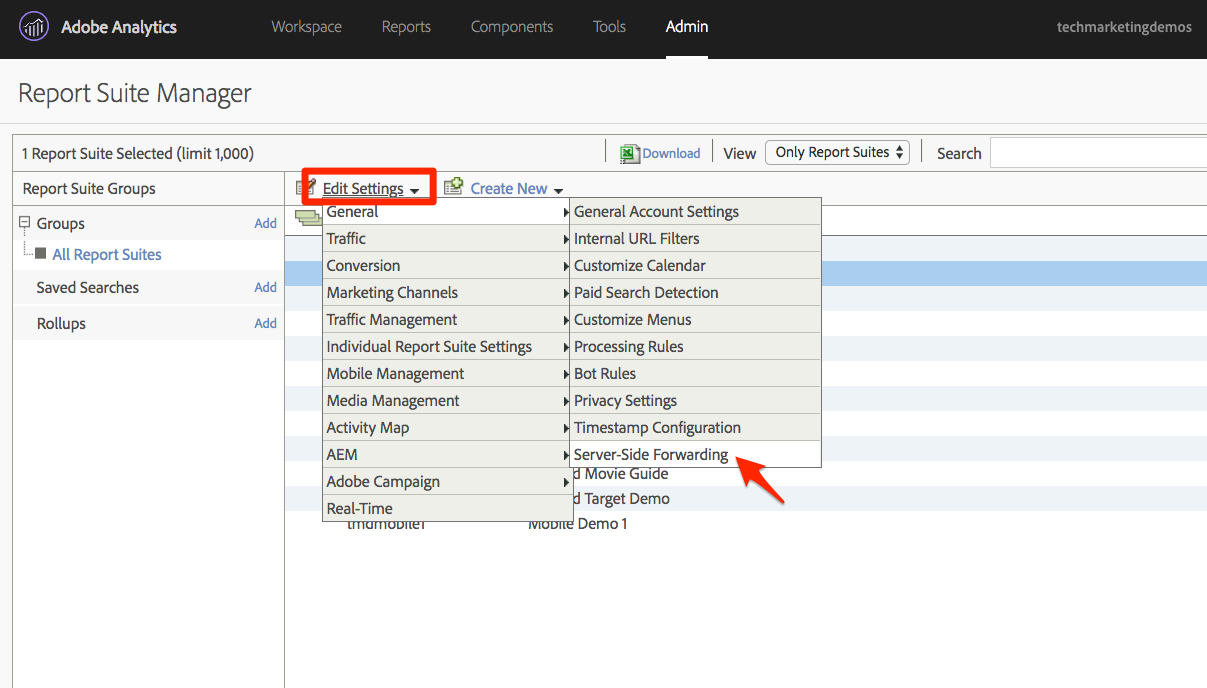
Warning: As stated above, you will need to have administrator privileges to see this menu item.
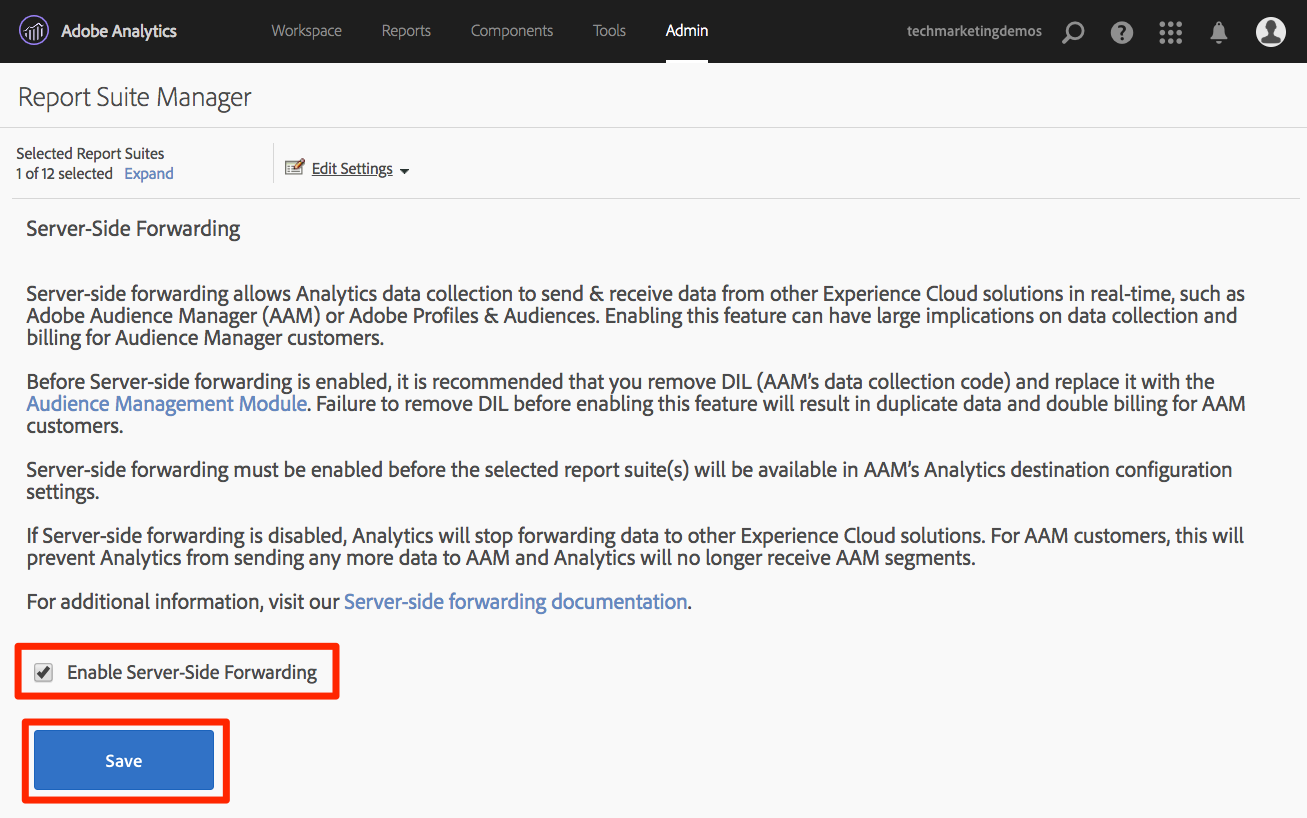
Once on the Server-Side Forwarding page, read the info and check the box to [Enable Server-Side Forwarding] for the report suite(s).
Click [Save]
Since SSF needs to be enabled per report suite, don't forget to repeat this step for your real report suites when you are deploying SSF on your actual site's report suite.
Also, if the SSF option is grayed out, you will need to "map the report suite(s) to your Experience Cloud Org in order to enable the option. This is explained in the documentation.
Once this step has been completed, and if you have the Experience Cloud ID Service enabled, data will be forwarded from Analytics to AAM. However, to complete the process so that the response comes back correctly from AAM to the page (and also to Analytics via the Audience Analytics feature), you must complete the following step in Launch as well. Don't worry, it's super easy.
This is the second of two steps for enabling SSF. You have already flipped the switch in the Analytics Admin Console, and now you just need to add the code, which Launch will do for you if you simply check the right box.
[!NOTE] To implement Server-Side Forwarding of Analytics data into AAM, we will actually edit/configure the Analytics extension in Launch, not the AAM extension. The AAM extension is used exclusively for Client-Side DIL implementations, for those who do not have Adobe Analytics. So the following steps are correct when they send you into the Analytics extension to set this up.
Go to [Extensions > Installed] and click to configure the Analytics extension.
Expand the Adobe Audience Manager section
Check the box to [Automatically share Analytics Data with Audience Manager]. This will add the Audience Manager "Module" (code) to the Analytics AppMeasurement.js implementation.
Add your “Audience Manager Subdomain” (also known as the “Partner Name,” “Partner ID,” or “Partner Subdomain”). Follow these instructions to obtain your Audience Manager Subdomain.
Click [Save to Library and Build]
Server-Side Forwarding code is now implemented!
The main way to validate that the Server-Side Forwarding is up and running is by looking at the response to any of your Adobe Analytics hits. We'll get to that in a minute. In the mean time, let's check a couple of other things that can help us make sure that it is working the way we want it to.
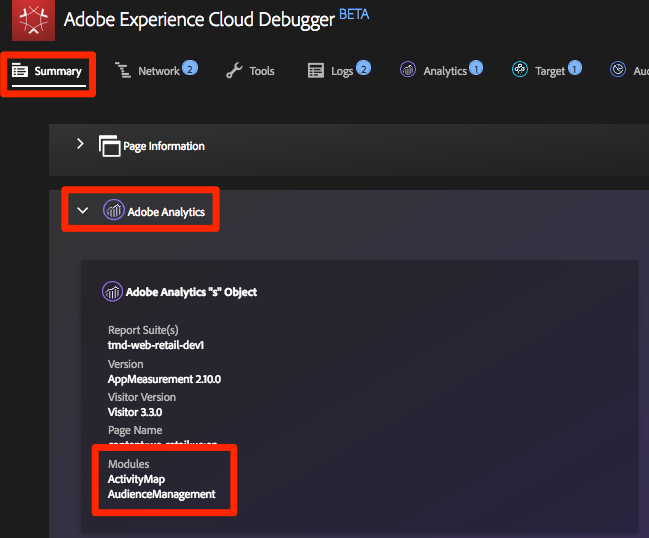
The code that Adobe Launch installs to handle the forwarding, and especially the response from AAM to the page, is called the Audience Manager "Module." We can use the Experience Cloud Debugger to ensure that it has loaded.
Open the We.Retail site
Click the debugger icon in your browser to open the Experience Cloud debugger
Staying on the Summary tab, scroll down to the Analytics section
Verify that AudienceManagement is listed under the Modules section
Next, we can also verify that the debugger is picking up the right "partner ID" (AKA Partner subdomain, etc.) from the code.
While still in the debugger, and still on the Summary tab, scroll down to the Audience Manager section
Verify your Partner ID/Subdomain under "Partner"
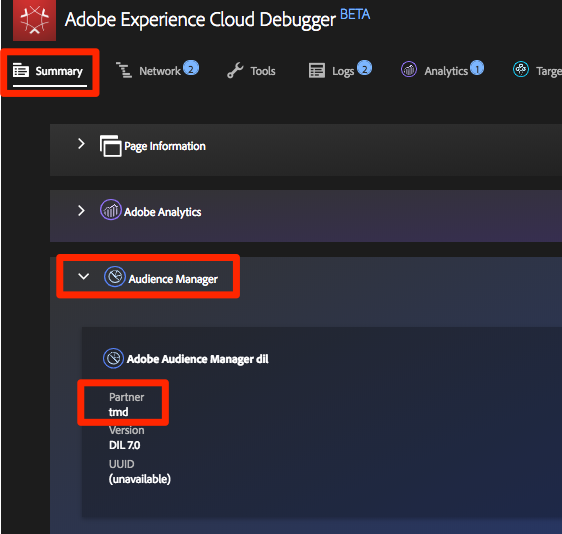
Warning: You may notice that the Audience Manager section of the debugger refers to "DIL", which is the "Data Integration Library," and typically refers to a client-side implementation, as opposed to the server-side approach that we have implemented here. The truth is that the AAM "Module" (used in this SSF approach) uses a lot of the same code as the client-side DIL library, and so this debugger is currently reporting it as such. If you have followed the steps in this tutorial, and the rest of the items in this validation section are correct, you may rest assured that server-side forwarding is working.
In this lesson, you will review the key integrations between the solutions you just implemented. The good news is that by completing the earlier lessons, you have already implemented the code-aspects of the integrations! You don't need to do any additional work in this lesson besides reading and validating.
At the end of this lesson, you will be able to:
You should complete all of the previous lessons in this tutorial before following the instructions in this lesson.
There are many user-permissions requirements, account configurations, and provisioning steps that are required to fully use these integrations and which are beyond the scope of this tutorial. If you are not already using these integrations in your current implementation of the Experience Cloud, you should consider the following:
- Review the full requirements of the Core Services integrations
- Review the full requirements of the Analytics for Target integration
- Have an Administrator of your Experience Cloud Organization request provisioning of these integrations
Audiences is part of the People Core Service and allows you to share audiences between solutions. For example you can create an audience in Audience Manager and use it to deliver personalized content with Target.
The main requirements to implement A4T - which you have already done - are to:
The best way to validate the Audiences integration is to actually build an audience, share it to another solution, and then fully use it in the other solution (e.g. confirm that a visitor who qualifies for an AAM segment can qualify for a Target activity targeted to that segment). However, this is beyond the scope of this tutorial.
These validation steps will focus on the critical part visible in the client-side implementation--the Visitor ID.
Open the We.Retail site
Make sure the Debugger is mapping the Launch property to your Development environment, as described in the earlier lesson
Go to the Network tab of the Debugger
Click [Clear All Requests] just to clean things up
Reload the We.Retail page, making sure that you see both the Target and Analytics requests in the Debugger
Reload the We.Retail page again
You should now see four requests in the Network tab of the Debugger - two for Target and two for Analytics
Look in the row labeled "Experience Cloud Visitor ID." The IDs in every request by every solution should always be the same.
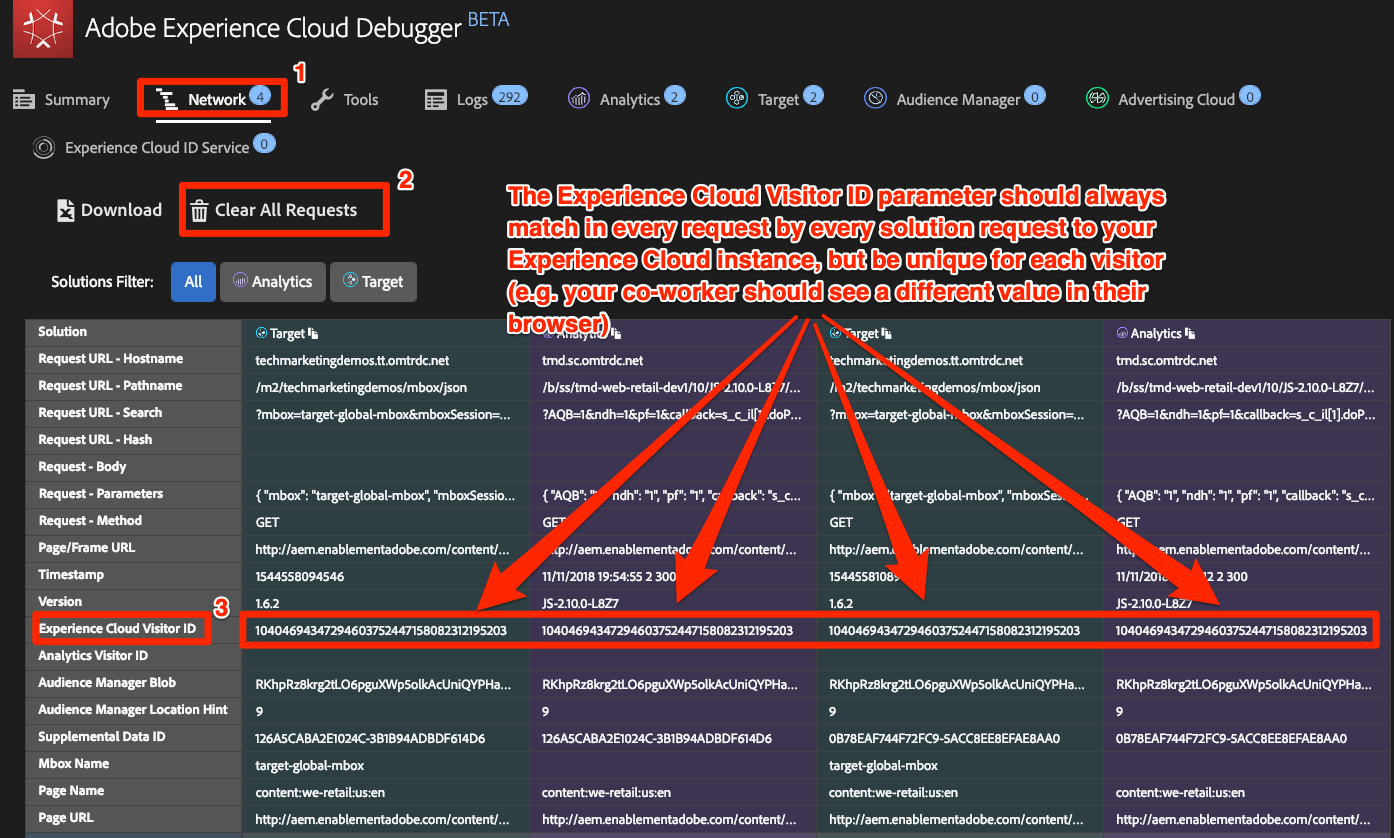
The IDs are unique per visitor, which you can confirm by asking a co-worker to repeat these steps.
The Analytics for Target (A4T) integration allows you to leverage your Analytics data as the source for reporting metrics in Target.
The main requirements to implement A4T - which you have already done - are to:
A4T works by stitching together a server-side request from Target to Analytics with the Analytics page view beacon, which we call "hit-stitching." Hit-stitching requires that the Target request which delivers the activity (or increments a Target-based goal metric) have a parameter which matches a parameter in the Analytics page view beacon. This parameter is called the supplemental data id (SDIDs).
The best way to validate the A4T integration is to actually build a Target activity using A4T and validate the reporting data, however this is beyond the scope of this tutorial. This tutorial will show you how to confirm that the supplemental data ids match between the solution calls.
Open the We.Retail site
Make sure the Debugger is mapping the Launch property to your Development environment, as described in the earlier lesson
Go to the Network tab of the Debugger
Click [Clear All Requests] just to clean things up
Reload the We.Retail page, making sure that you see both the Target and Analytics requests in the Debugger
Reload the We.Retail page again
You should now see four requests in the Network tab of the Debugger - two for Target and two for Analytics
Look in the row labeled "Supplemental Data ID." The IDs from the first page load should match between Target and Analytics. The IDs from the second page load should also match, but be different from the first page load.
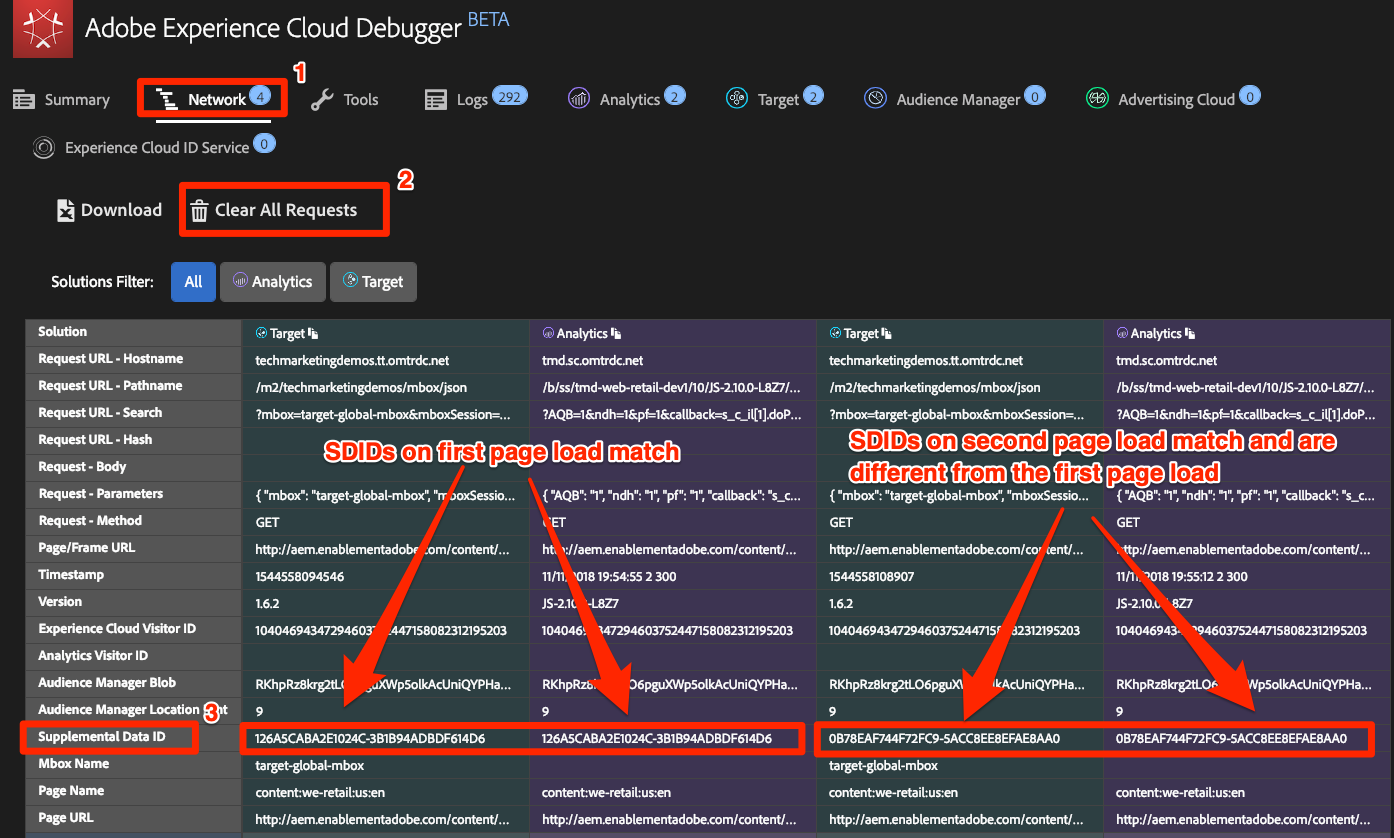
If you make additional Target requests in the scope of a page load (not including single-page apps) that are part of A4T activities, it's good to give them unique names (not target-global-mbox) so that they will continue to have the same SDIDs of the initial Target and Analytics requests.
Customer Attributes is a part of the People Core Service that allows you to upload data from your customer relationship management (CRM) database and leverage it in Adobe Analytics and Adobe Target.
The main requirements to implement Customer Attributes - which you have already done - are to:
You have already validated that the Customer IDs are passed to both the ID Service and to Target in earlier lessons. You can also validate the Customer ID in the Analytics hit as well. At this time, the Customer ID is one of the few parameters that does not show up in the Experience Cloud Debugger, so you will use the browser's JavaScript Console to view it.
Open the We.Retail site
Open your browser's Developer Tools
Go to the Network tab
In the filter field, type b/ss which will limit what you see to the Adobe Analytics requests
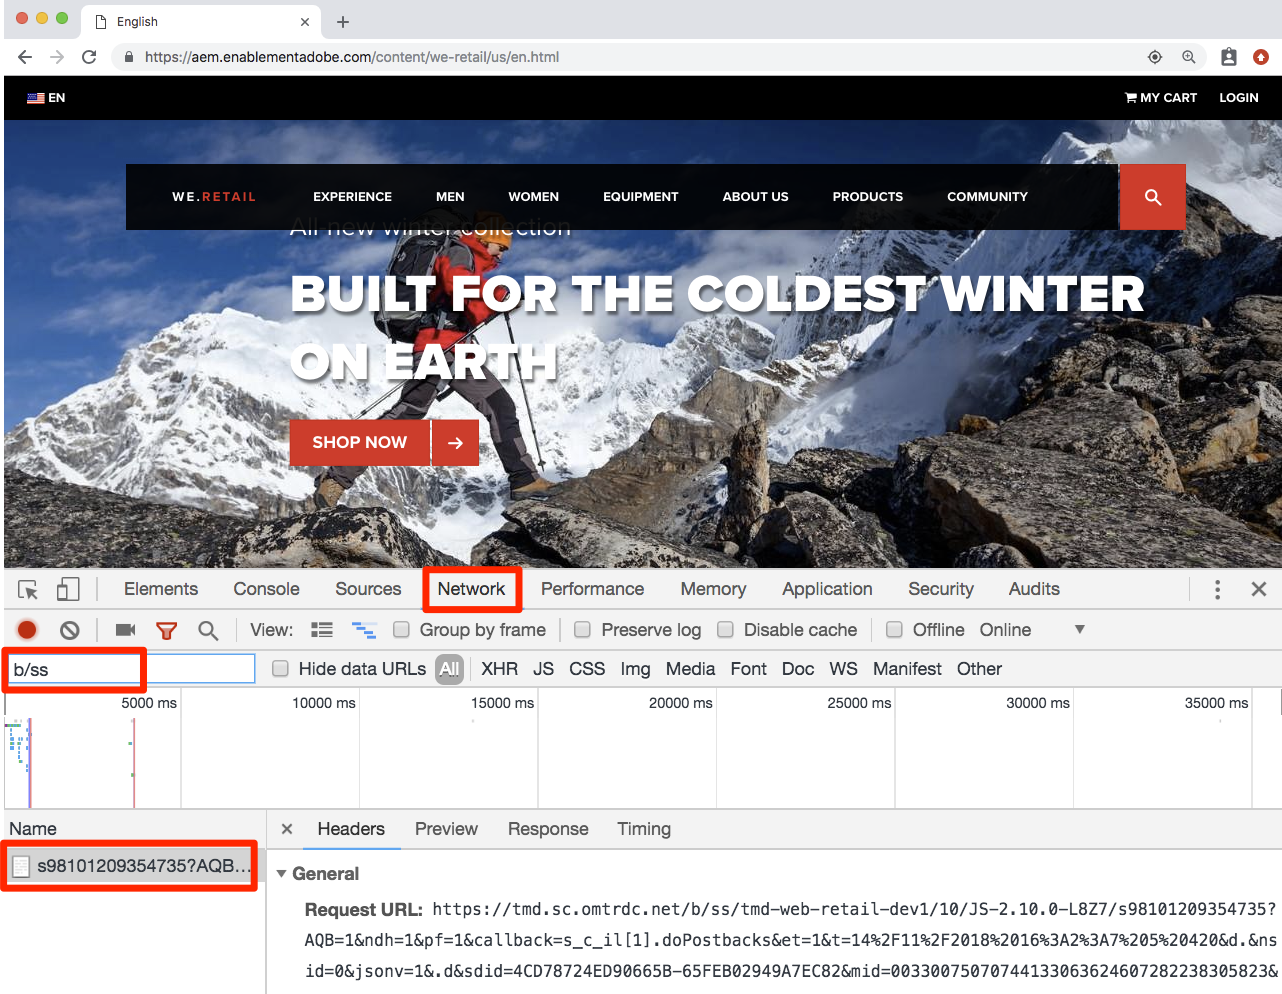
Click the [LOGIN] link in the top right corner of the site
Enter test@adobe.com as the username
Enter test as the password
Click the [LOGIN] button
It should return you to the Homepage, which will also trigger a beacon that you can see in the Developer Tools. If you are taken to the account info page, click on the WE.RETAIL logo to return to the homepage.
Click on the request and select the Headers tab
Scroll down until you see some nested parameters
Email (Hashed) data element
Now that you have implemented some key solutions of the Adobe Experience Cloud in your Development environment, it's time to learn the publishing workflow.
At the end of this lesson, you will be able to:
Now that you have created and validated your library in the Development environment, it is time to publish it to Staging.
Go to the [Publishing] page
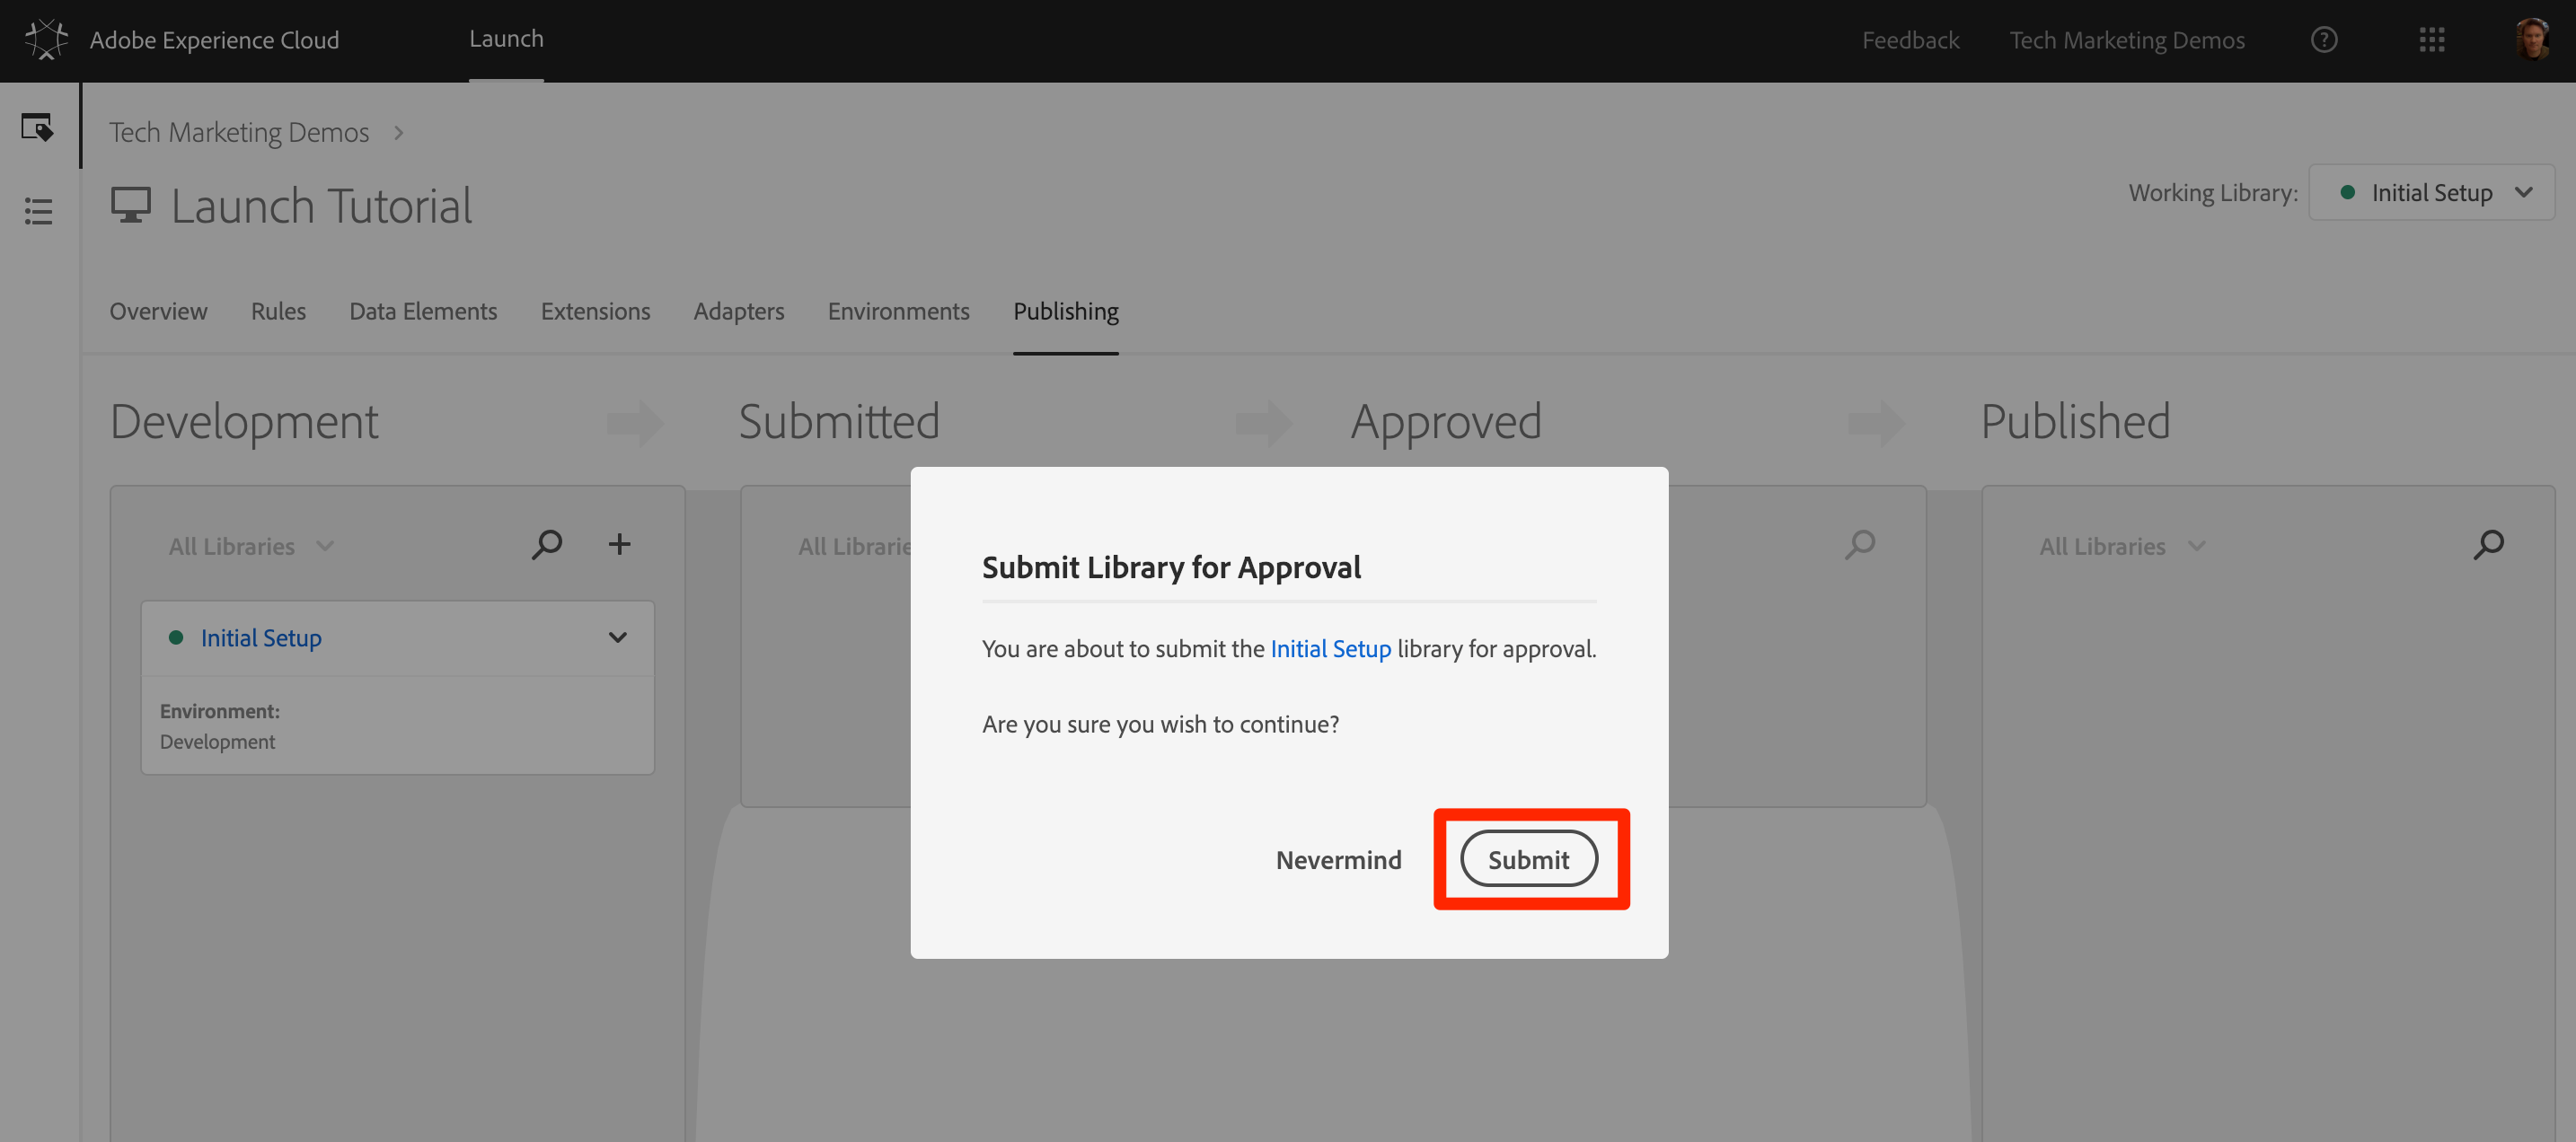
Open the dropdown next to your library and select [Submit for Approval]
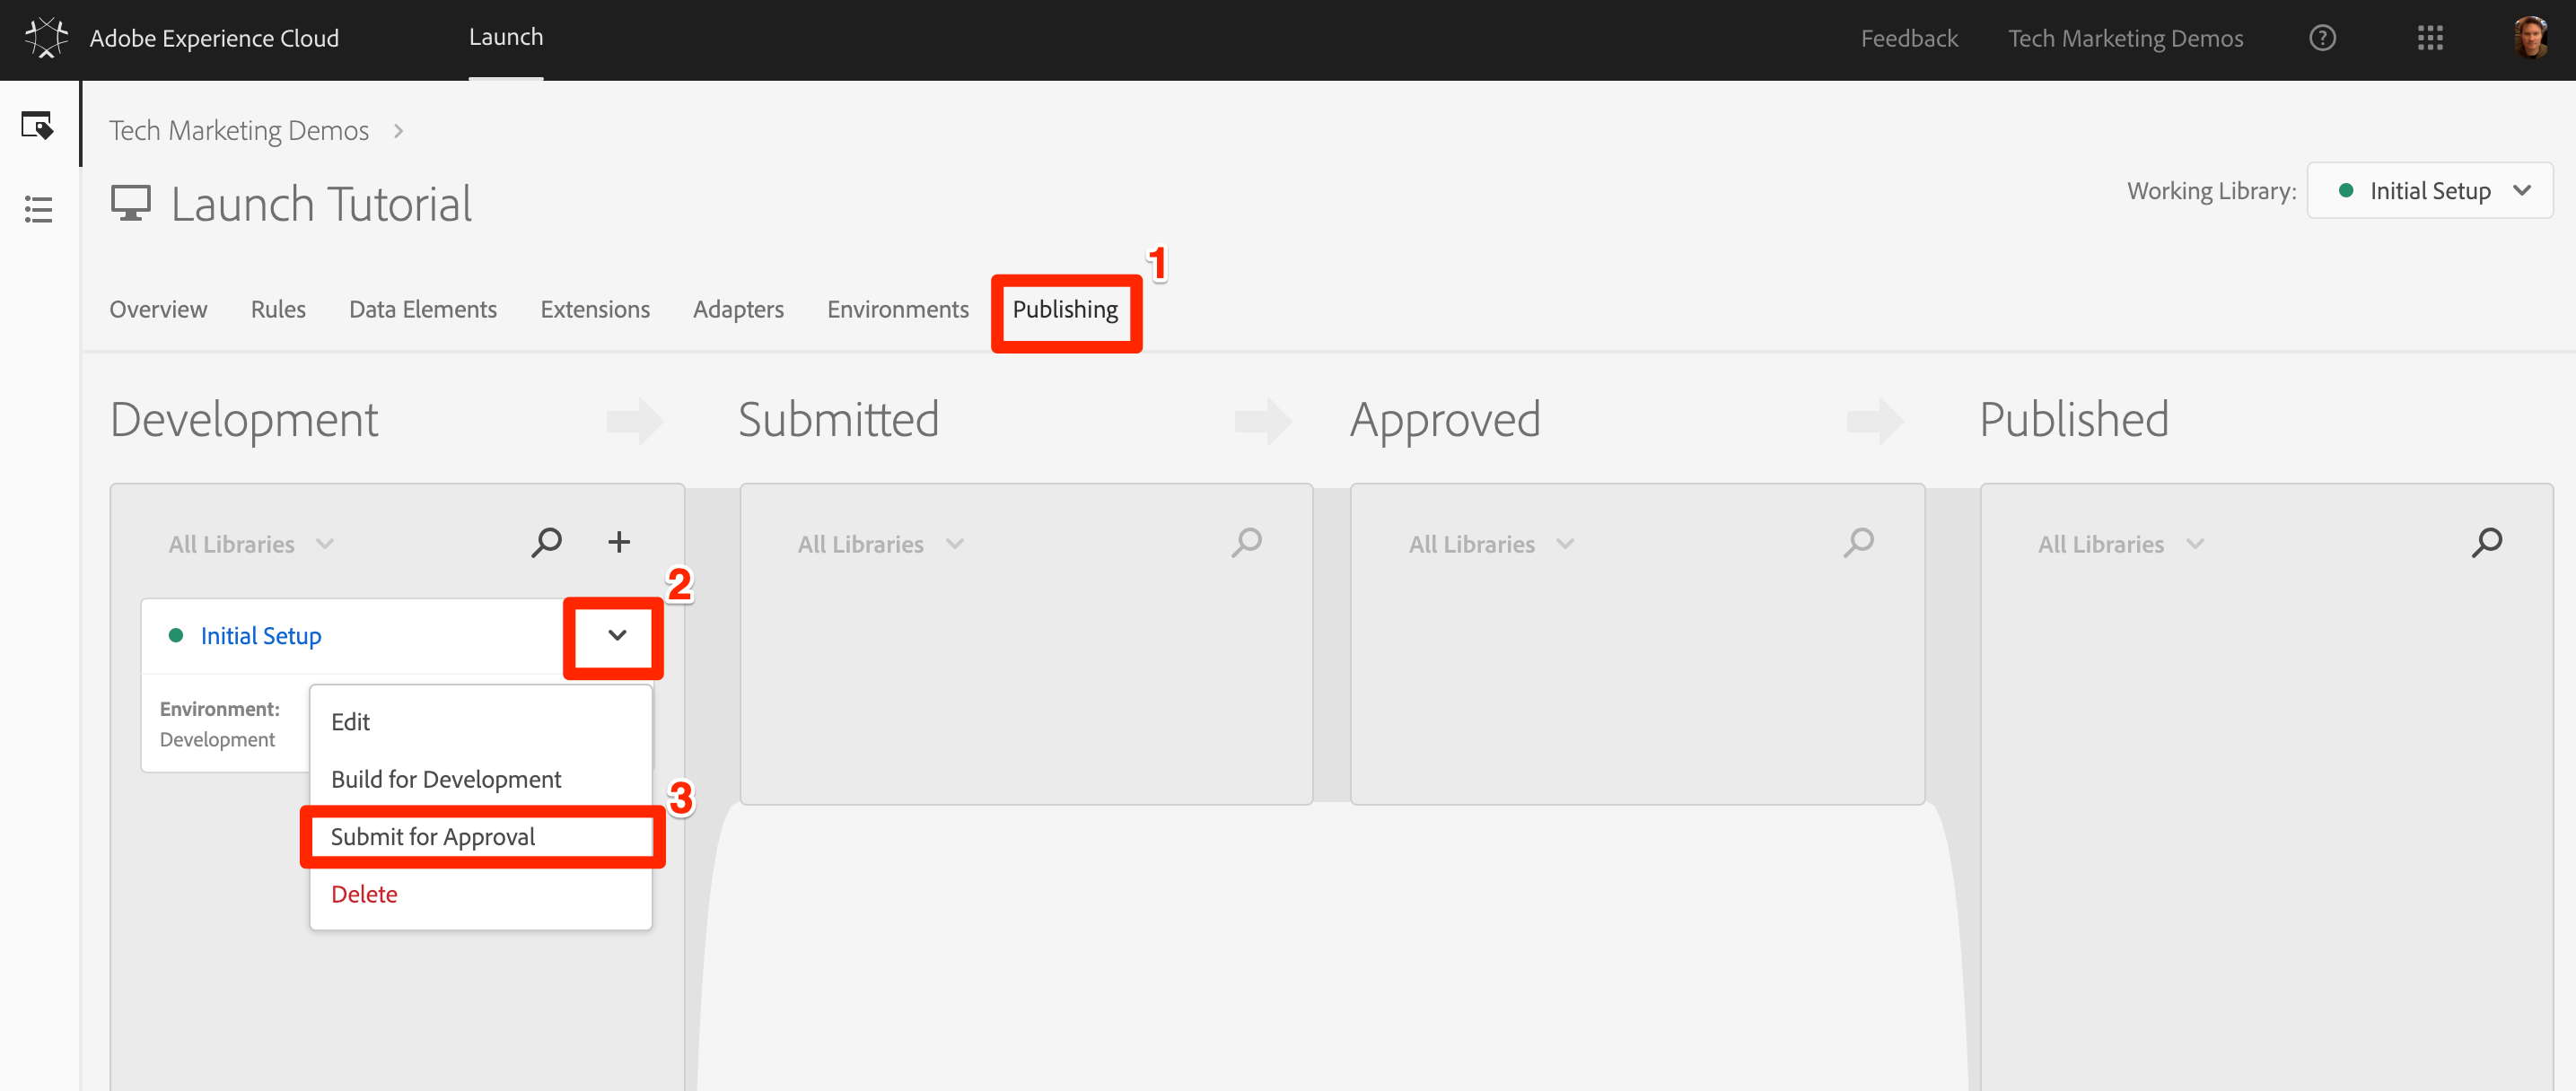
Click the [Submit] button in the dialog:
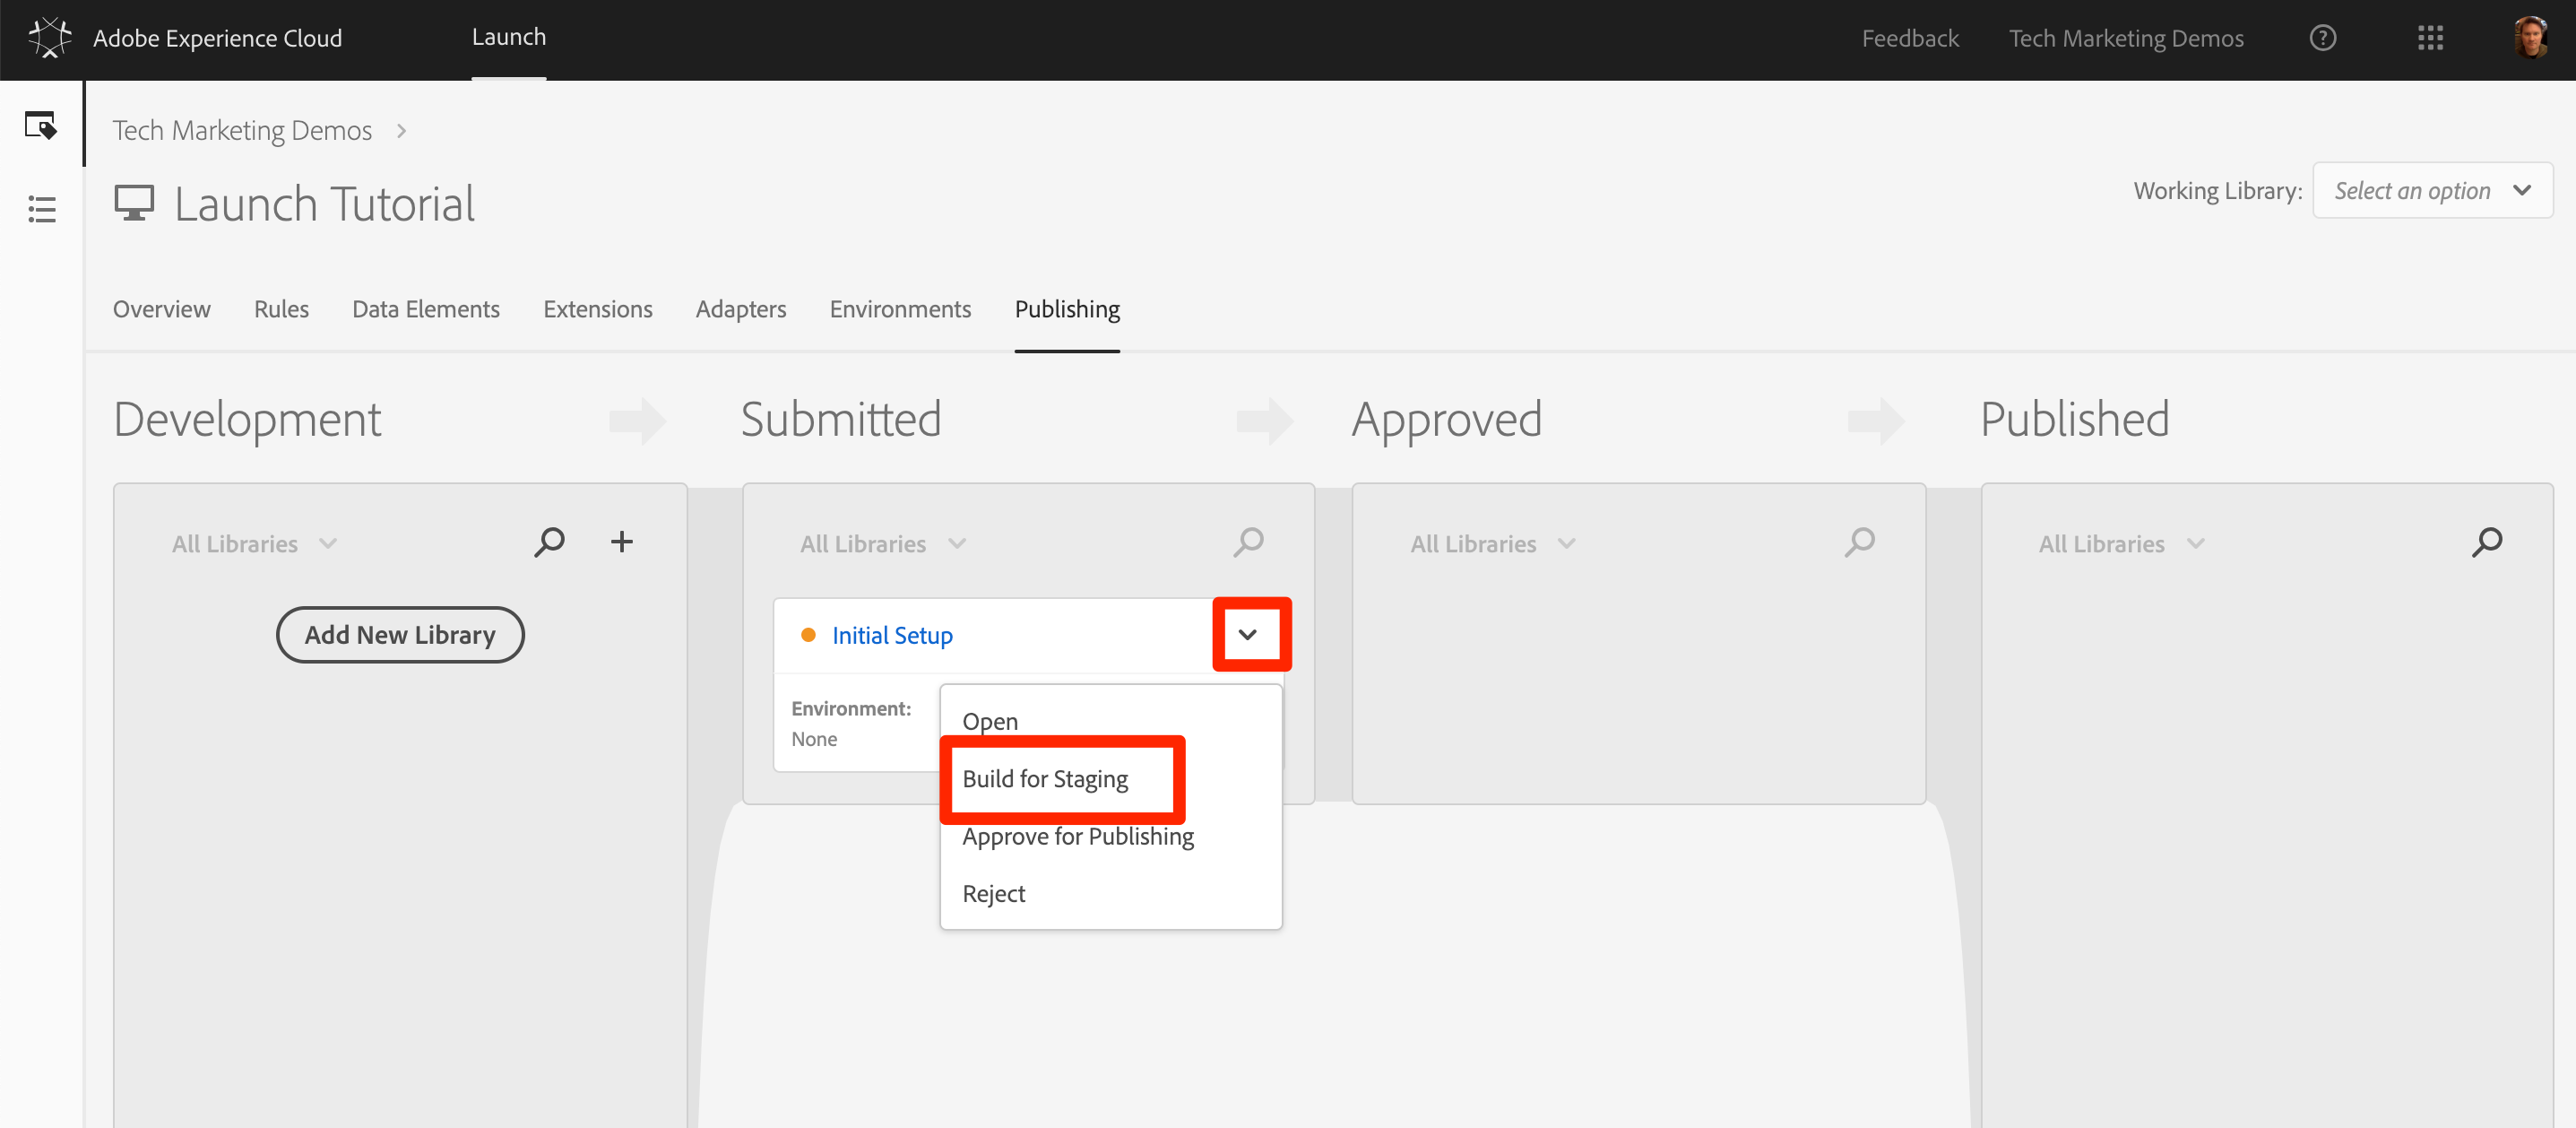
Your library will now appear in the [Submitted] column in an unbuilt state:
Open the dropdown and select [Build for Staging]:
Once the green-dot icon appears, the library can be previewed in the Staging environment.
In a real-life scenario, the next step in the process would typically be to have your QA team validate the changes in the Staging library. They can do this using the Debugger.
In your Launch property, open the [Environments] page
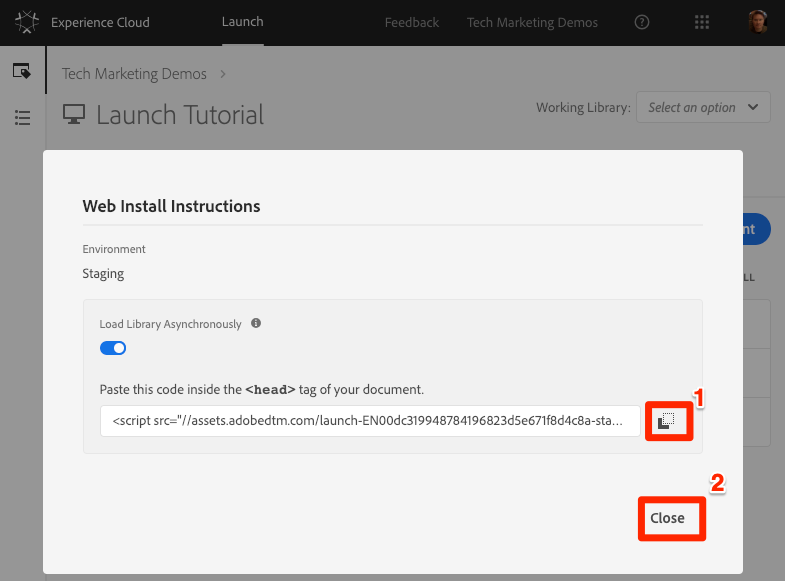
In the [Staging] row, click the Install icon to open the modal

Click the Copy icon to copy the embed code to your clipboard
Click [Close] to close the modal
Open the We.Retail demo site in your Chrome browser
Open the Experience Cloud Debugger extension by clicking the ![]() icon
icon
Go to the Tools Tab
Click [Adobe Launch > Dynamically Insert Launch > Embed Code] button to open the text input field (it might currently have the URL of your Development embed code):
Paste the Staging embed code that is in your clipboard
Click the disk icon to save
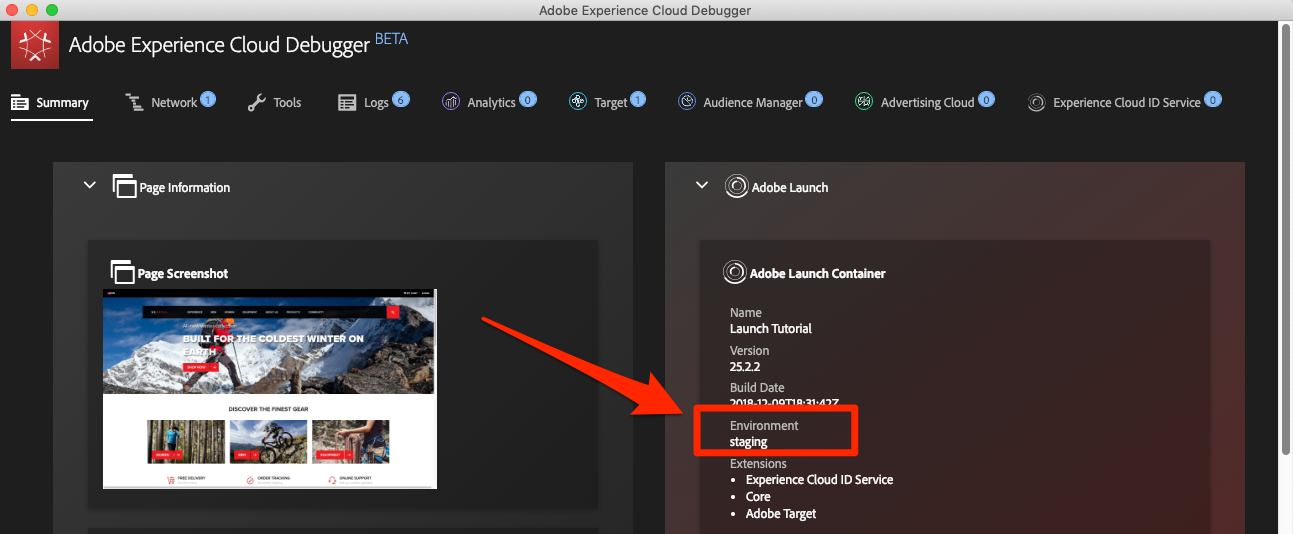
Reload and check the Summary tab of the Debugger. Under the Launch section, you should now see your Staging Property is implemented, showing your property name (I.e. "Launch Tutorial" or whatever you named your property)!
In real-life, once your QA team has signed off by reviewing the changes in the Staging environment it is time to publish to production.
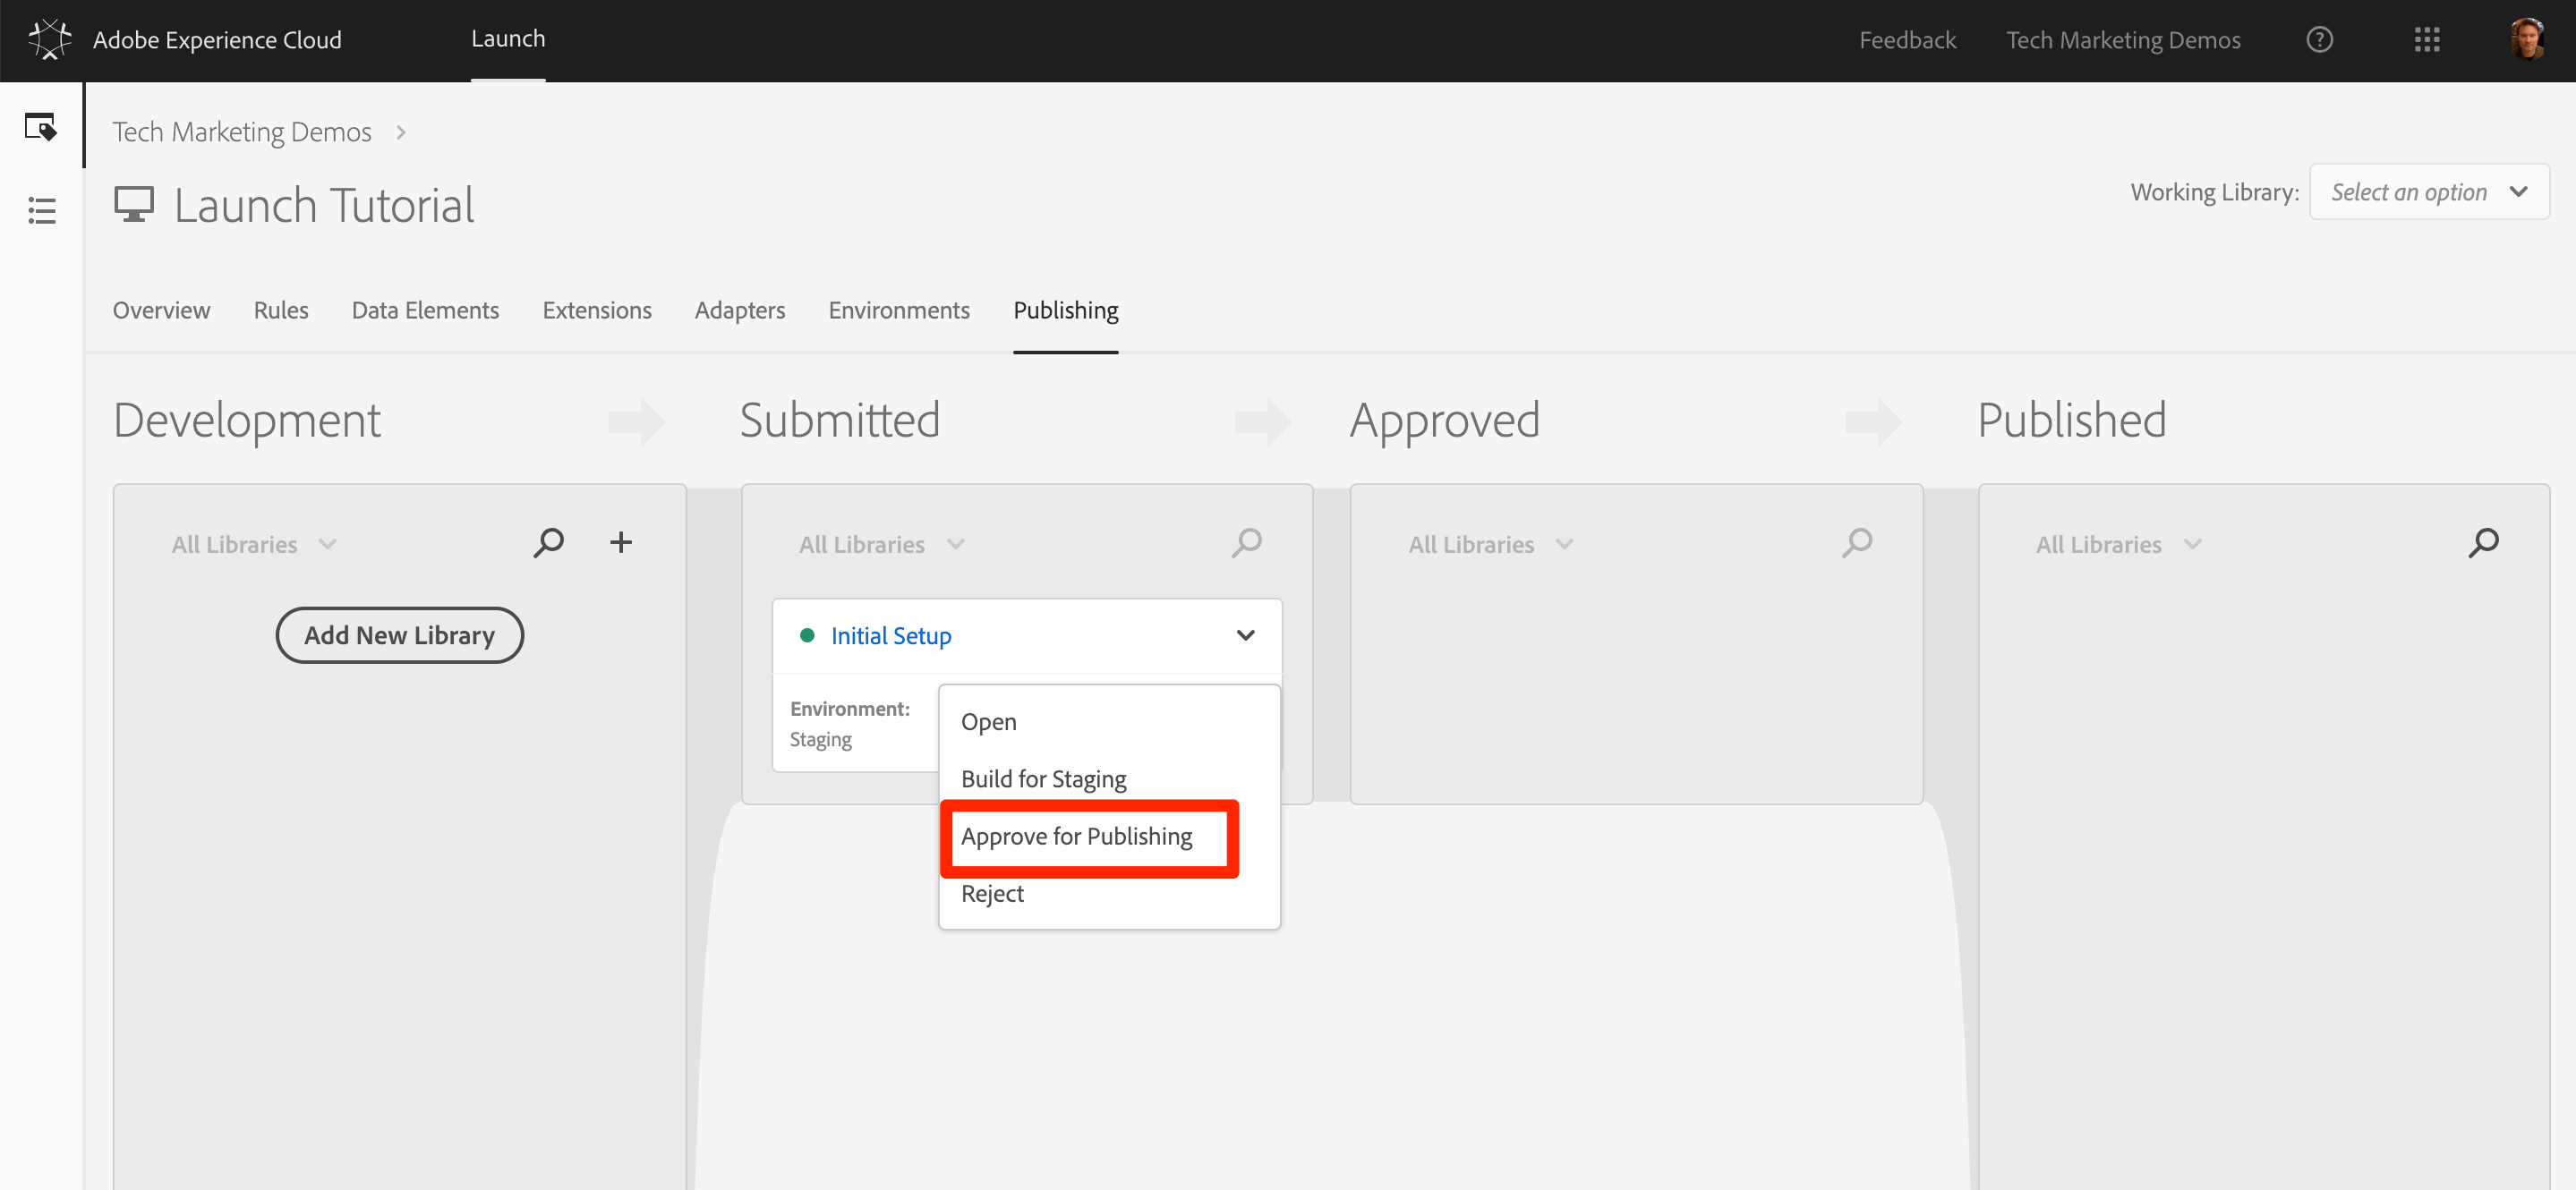
Go to the [Publishing] page
From the dropdown, click [Approve for Publishing]:
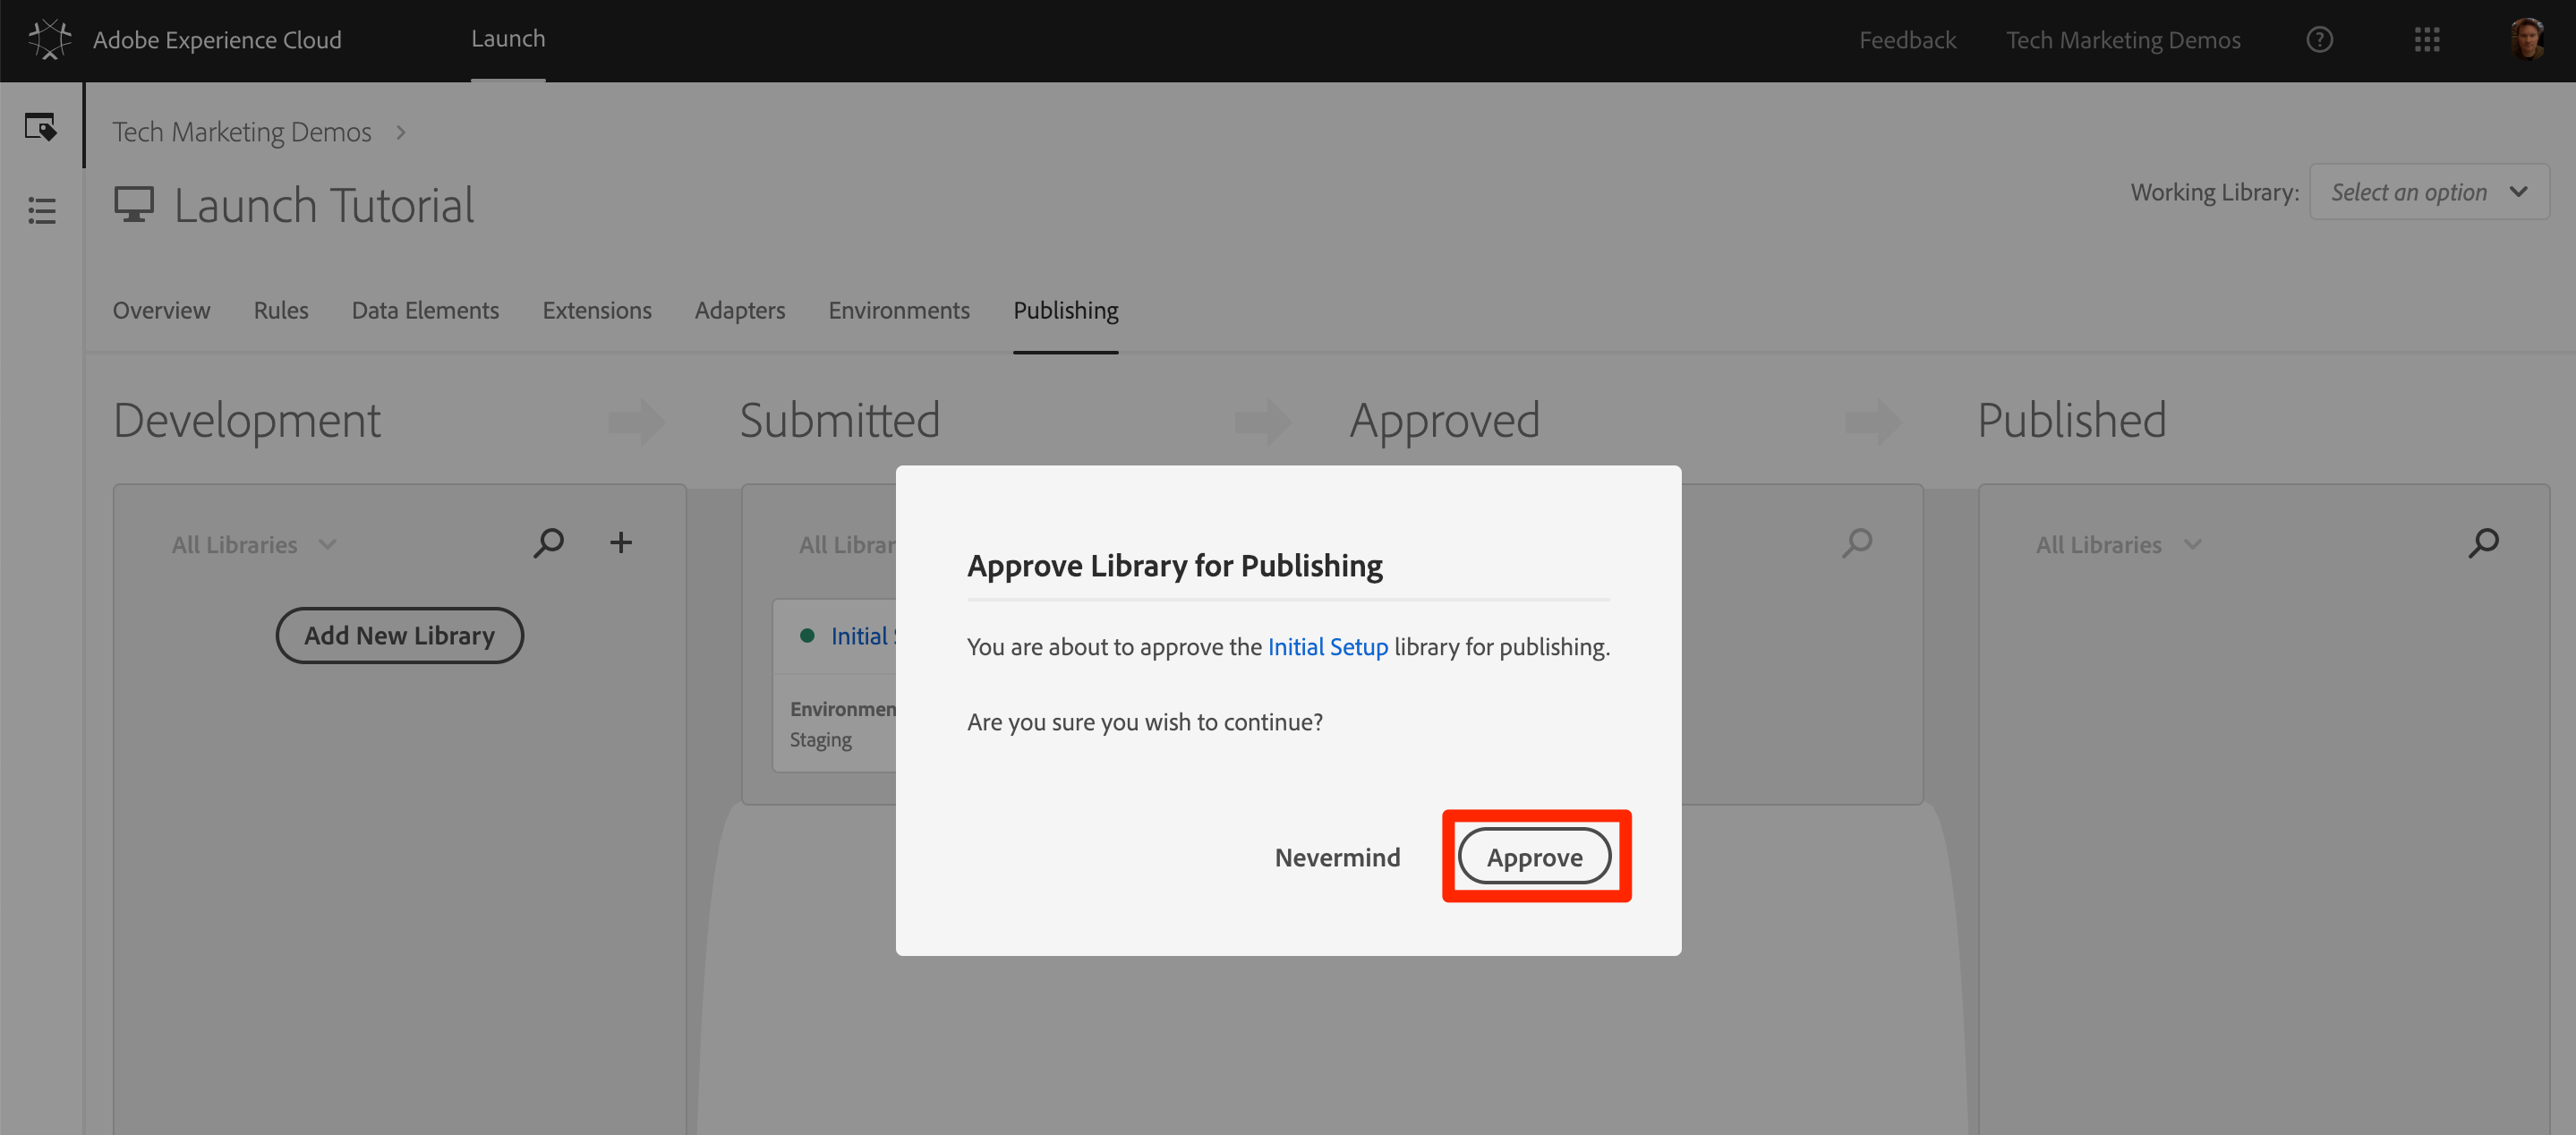
Click the [Approve] button in the dialog box:
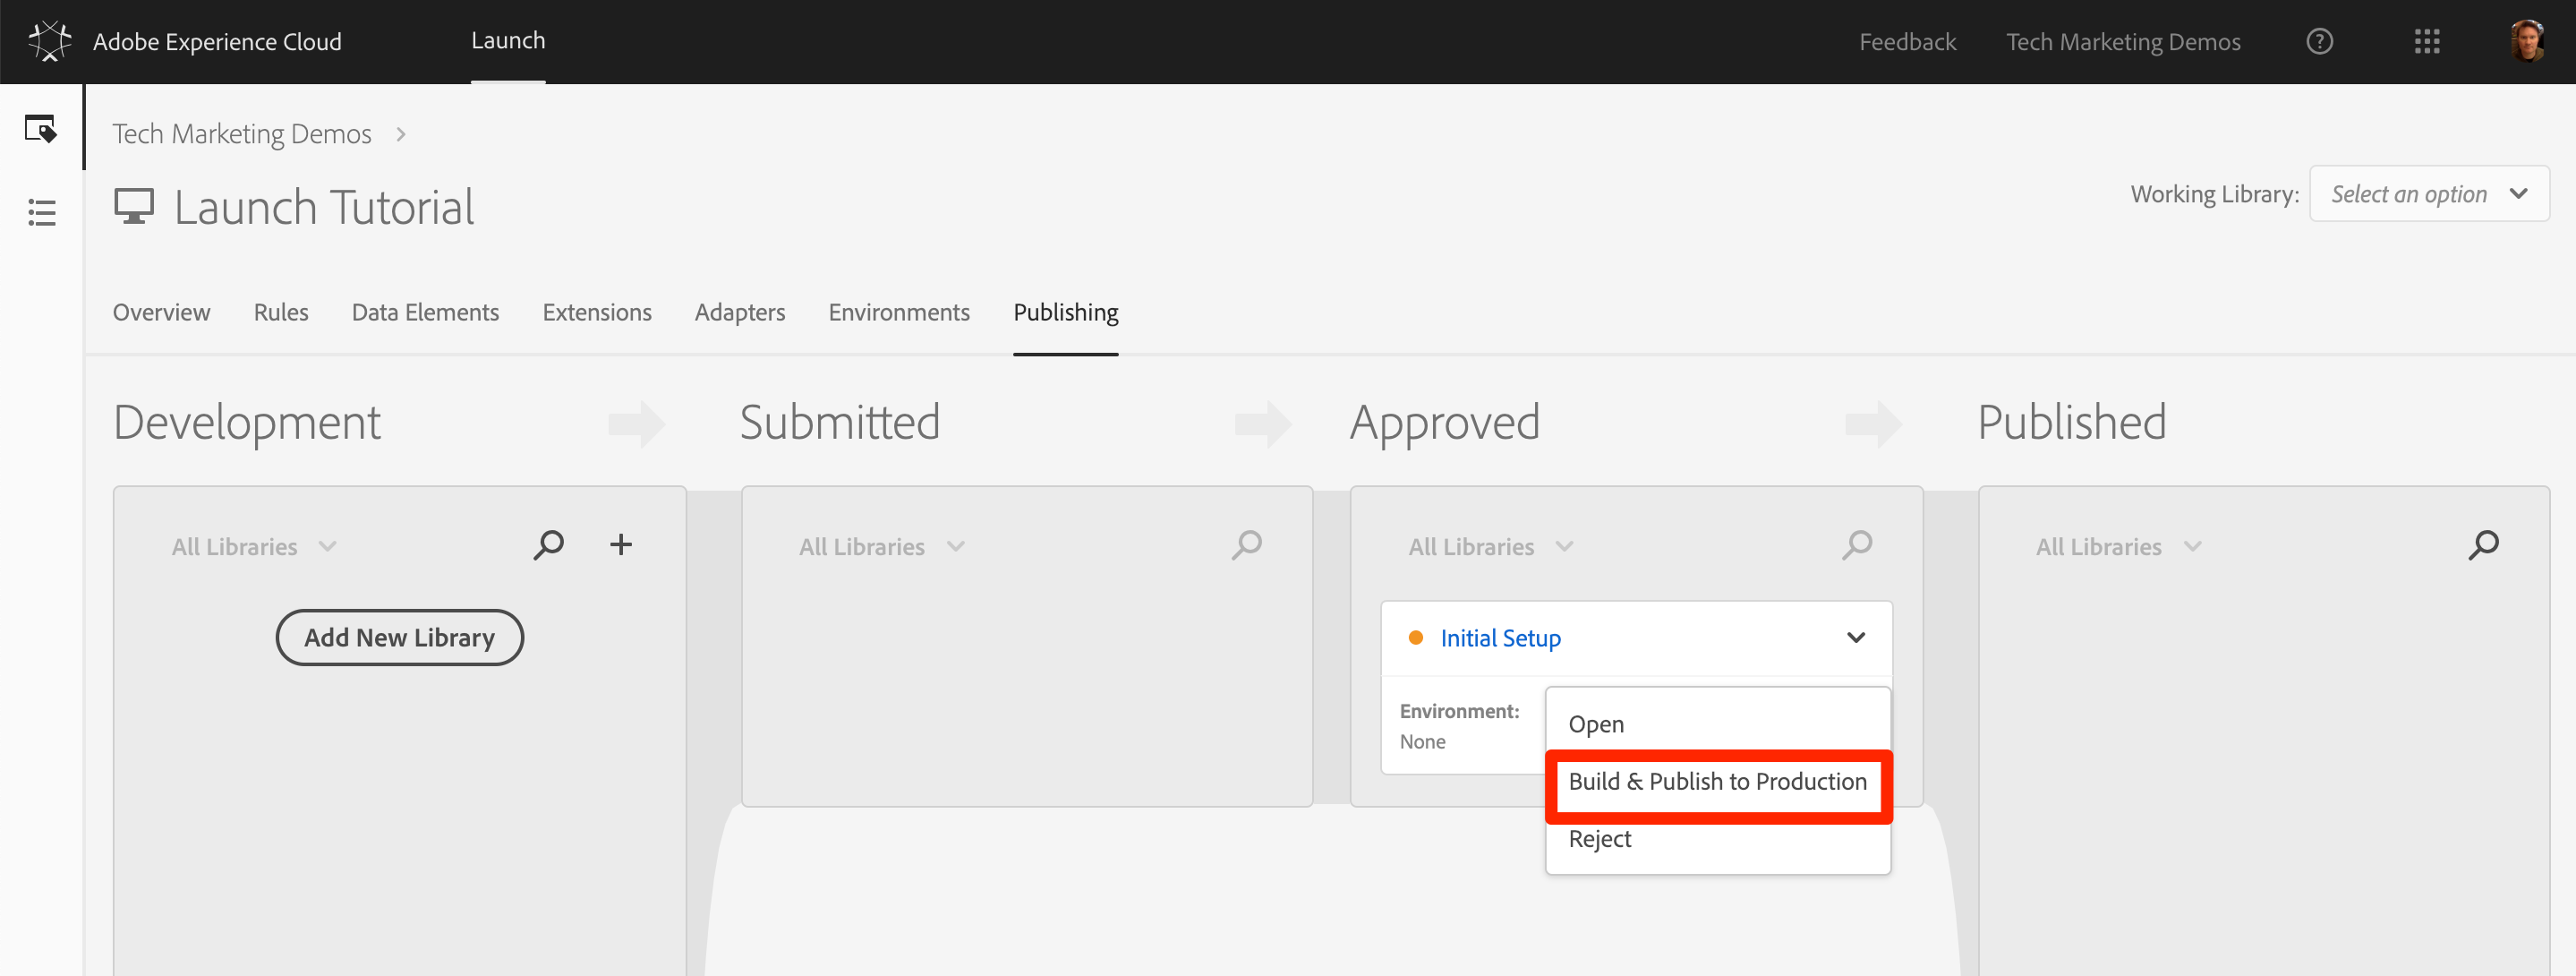
The library will now appear in the [Approved] column in the unbuilt state (yellow dot):
Open the dropdown and select **[Build and Publish to Production]:
Click the [Publish] in the dialog box:
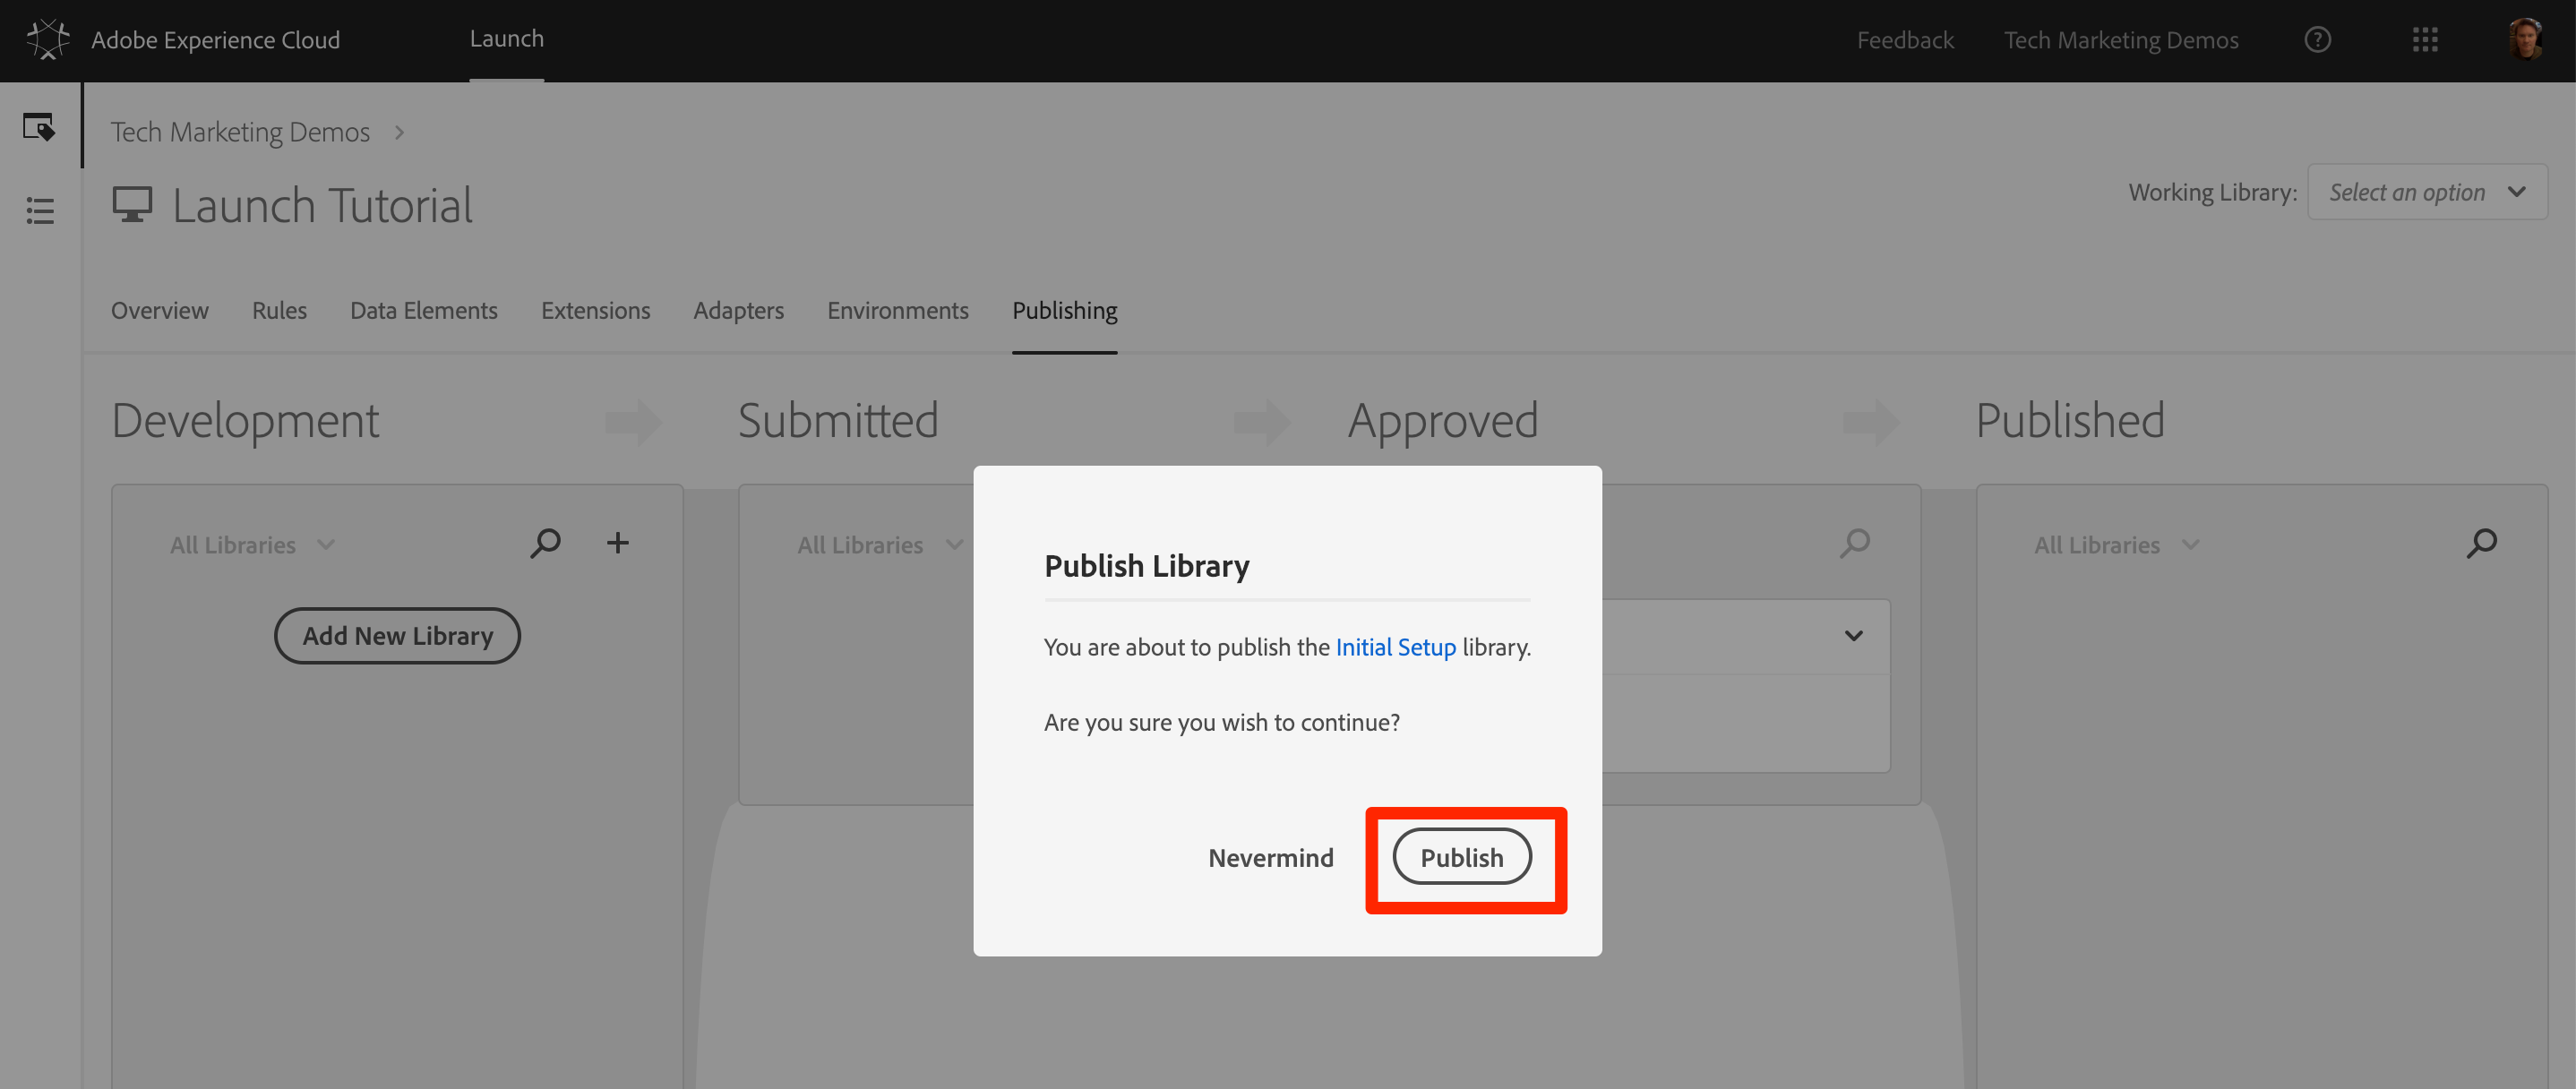
The library will now appear in the [Published] column:
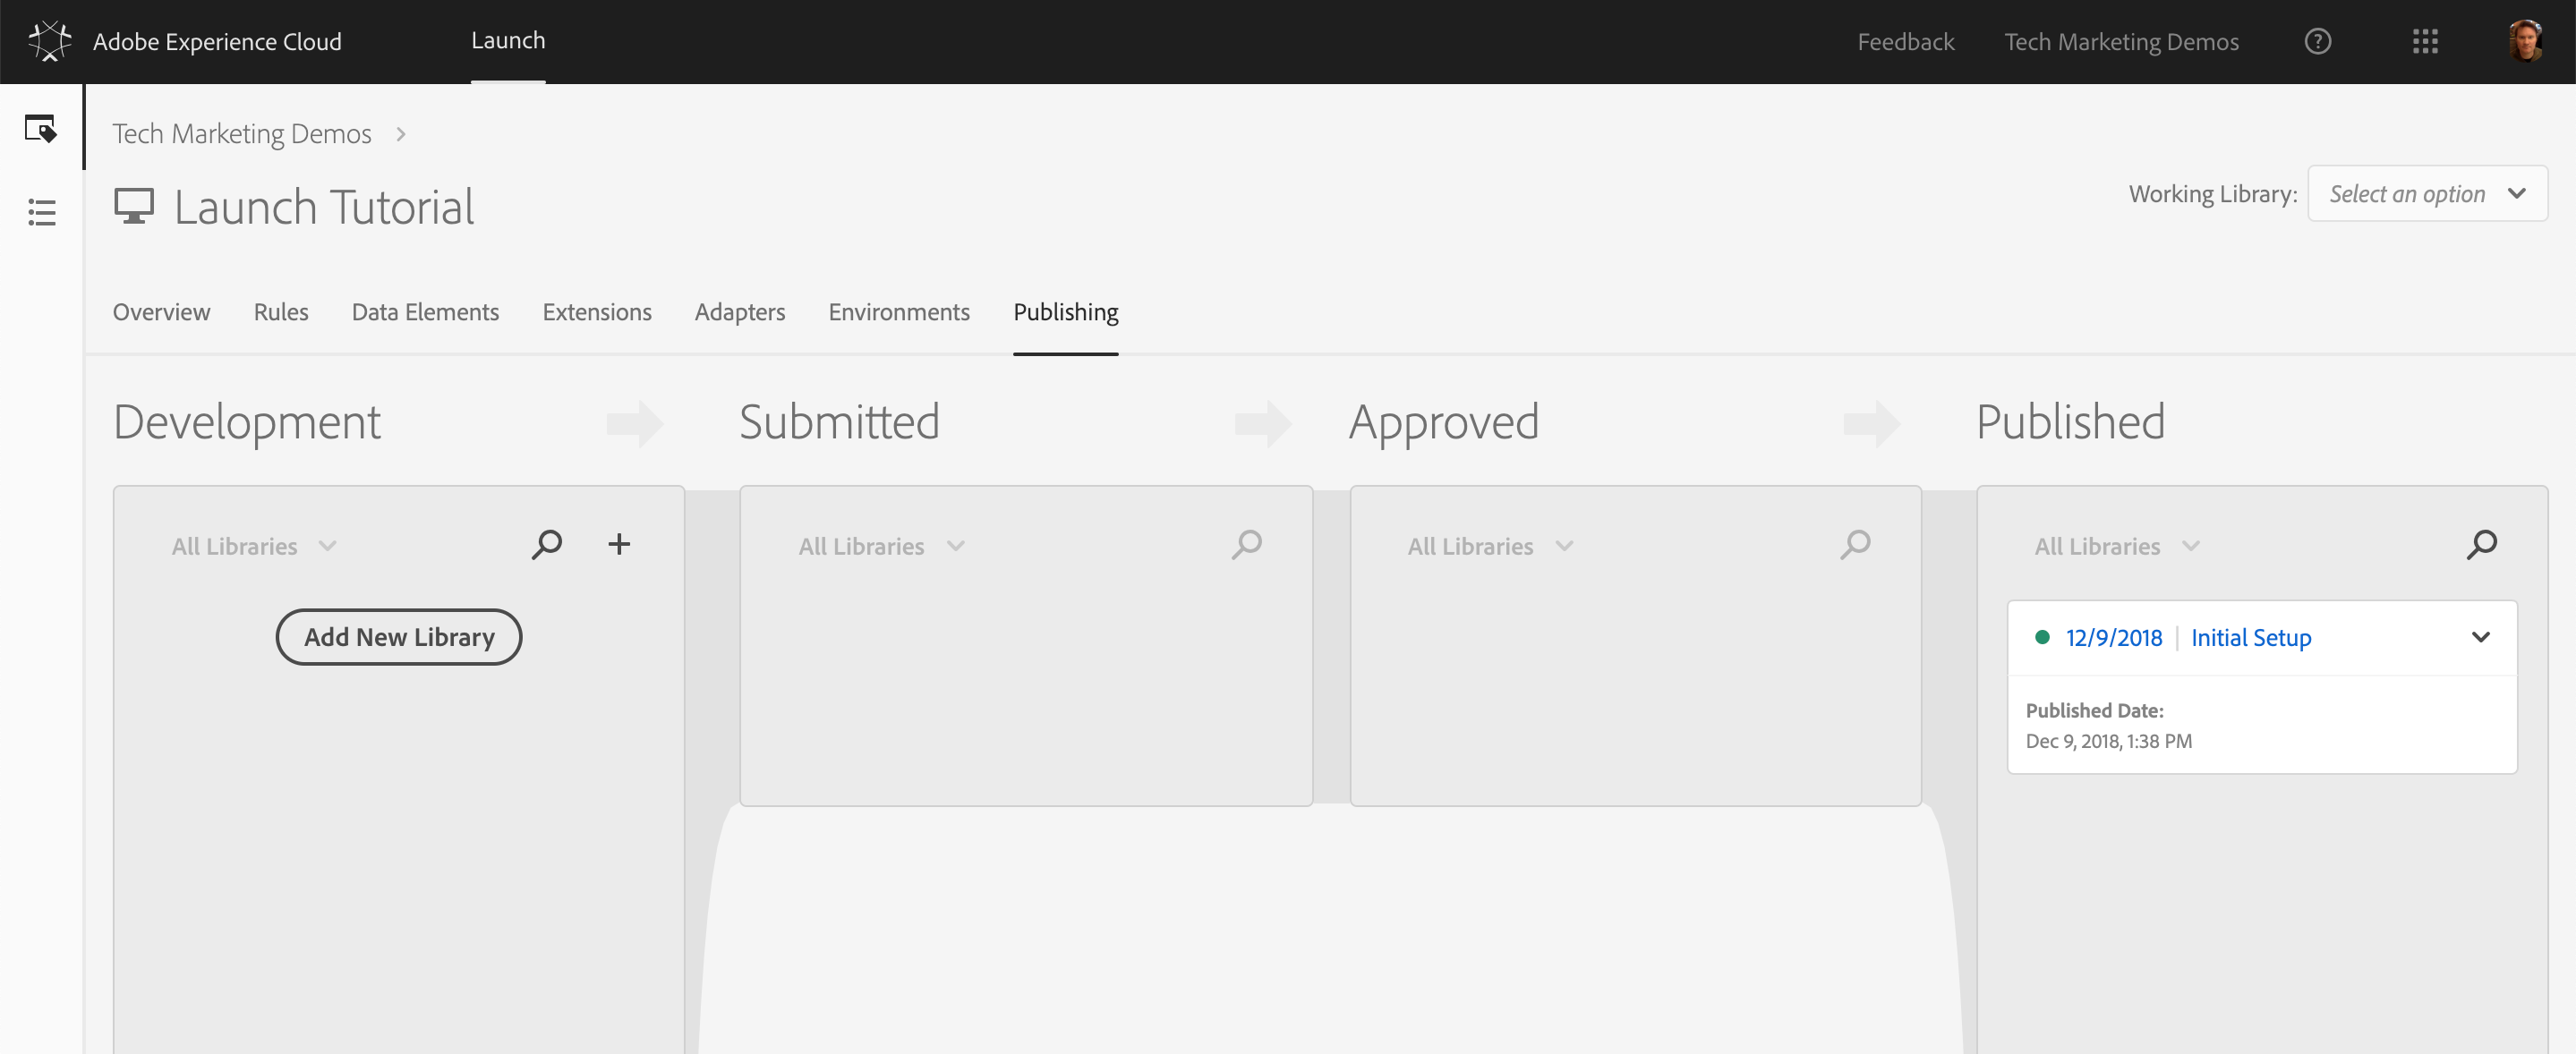
That’s it! You've completed the tutorial and published your first property in Launch!
| Resource | URL |
|---|---|
| Adobe Experience Cloud Login | |
| Adobe Launch Login | |
| Adobe Launch User Documentation | |
| Adobe Launch Developer Docs | |
| Adobe Launch Video Tutorials | |
| Adobe Launch User Forums | |
| Adobe Debugger | |
| Adobe Auditor | |
| Online Version of this Guide | |