You can use Single Page Applications (SPA) built with React or Angular JS seamlessly with AEM.
The session helps you understand, how to edit content of such SPA applications in AEM, how to speed-up front-end development, and how Progressive Web Applications (PWA) can leverage AEM content.
After the session, you will be able to:
Use AEM to drive content for SPAs and PWAs
Consume AEM content fragments natively in PWAs
Aware of the benefits of using AEM Front-end Development
Before you start, ensure have the following software up and running:
AEM 6.4.2.0 or later
Node Package Manager and Node.js
Visual Studio Code or any other IDE
JSON formatter plugin for the browser
AEM Supports both Angular and React. The focus of this lesson is React. You require multiple tools to develop single page applications in reach, such as, Node.js and Node Package Manager. The lesson focuses on installing all such tools.
At the end of the lesson, you will be able to:
Install Node.js and Node Package Manager (NPM)
Create a React App
Understand basics of page model
Node.js is JavaScript runtime. It can execute JavaScript-based programs. NPM is a package manager to install and manage various JavaScript modules. You require both Node.js and NPM to develop React-based applications.
Download and install the latest version of Node.js from https://nodejs.org/en/.
Download and Install Visual Studio code from https://code.visualstudio.com/.
Open Visual Studio Code. Navigate to Terminal > New Terminal. It opens a terminal Window. The default location is bottom-center.
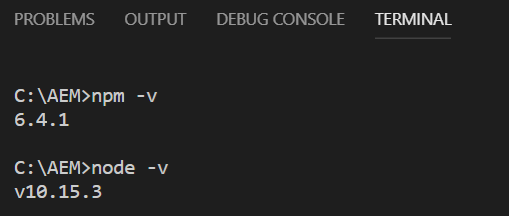
Run the following command:
npm -v
If the command returns a version, Node Package Manager (NPM) is successfully installed
Run the following command:
node -v
If the command returns a version, Node Package Manager (NPM) is successfully installed.
The AEM project is a sample AEM Sites project. It contains all ready-to-use content and code referenced in this workbook. The project is available in the form of an AEM Package. To setup the project:
Run an AEM author instance on port 4502 and corresponding publish instance on port 4503.
Download and extract the ZIP file from <The Resource>. The zip file has the following content.
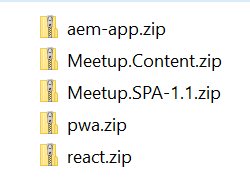
Open the package manager, upload, and install the Meetup.SPA-1.1.zip and Meetup.Content.zip package in aforementioned order.
Go to AEM > Sites > Meetup
Open the Root Page. The root page renders blank with no images or text.
Change the URL of the browser to
Figure 3: AEM Page Model
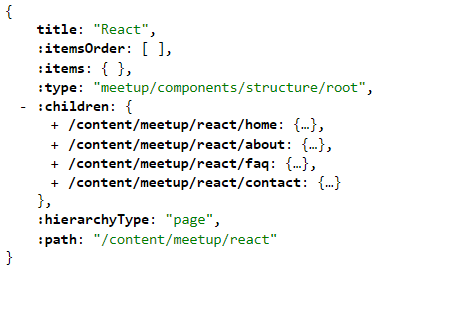
The browser displays the JSON version of the page. This JSON version of the page is called page model. It contains the data which is passed to react app for displaying in a browser. The children nodes in the data help create navigation. The child nodes are child pages of root node. The items node helps identify the components to be displayed on page and itemsOrder node decide the order of the components.
Create a training folder. Open the terminal window and navigate to the training folder.
Extract the react.zip file to the training directory. It is a ready to use React application.
Extract the react ZIP file to this directory. This is a REACT application that is ready for use.
Navigate to the react folder in the terminal window and run the following commands:
cd react
npm install
npm start
Press CTRL+C to close the terminal window
Inspect the react-app at "/training/react-app/*" for .ES6 files. .ES6 files are not compatible with many browsers and Adobe Experience Manager. Run the following command to convert these files into regular JavaScript and CSS files:
npm run build
The command creates a folder named build in the react-project folder
If the build folder is created, you also have a new set of files that are build using the npm build.
You are now ready with the environment and a sample react app.
In this lesson, you learn to connect a React-based app with Adobe Experience Manager, convert JavaScript and CSS (Cascading Style Sheet) files used in frontend development to AEM Client Libraries, and Adobe Experience Manager Front-end development practices.
At the end of the lesson, you will be able to:
Use React CSS & JS files as Client Libraries in AEM
Understand and explore AEM JavaScript SDK
Understand benefits of using AEM Front-end development
AEM JavaScript SDK is a collection of open source JavaScript libraries. It provides a framework for authors to edit the contents of a Single Page Application deployed in AEM. The SDK is for SPA editor. The editor contains many npm modules for different purposes. It has the aem-clientlib-generator module to convert JS and CSS files to AEM Client libraries. To install the aem-clientlib-generator module:
Open the terminal window and navigate to the react-app directory.
Run the following command:
npm install aem-clientlib-generator --save-dev
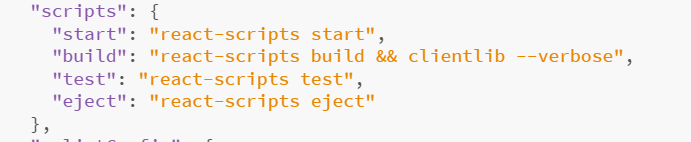
Open the package.json file for editing. The file is in the react folder. Add the following to the file:
"build": "react-scripts build && clientlib --verbose",
After adding the above command, the file looks like the below image:
Figure 4: Extract from package.json
Examine the below code. It instructs the react app to compile JS and CSS files to a AEM Client Library and deploy the Client Library to the to ClientLibroot directory.
Figure 5: Extract from clientlib.config.js
Generate the client library for the AEM project:
Copy the aem-app.zip archive from the <The Resource> folder to the training folder and extract the archive. This archive contains clientlibs folder of the AEM project.
Navigate to path aem-app/jcr_root/apps/meetup/clientlibs. Once you build the react-app, the compiled version of react-app is also generated as a client library in aforementioned folder. Check the client library after running the command in the next step.
Navigate to the react-app folder in the terminal window and run the following npm command:
npm run build
A react folder is generated in at aem-app/jcr_root/apps/meetup/clientlibs.
AEM Front-end developer (AEMFED) is a useful tool for AEM Frontend Developers. It allows front-end developers to deploy code and view the changes immediately in a browser. To install AEM Front-end developer:
Open a terminal window and run the following command:
sudo npm install aemfed --global
Open another terminal window, navigate to the aem-app folder, and run the following command:
aemfed -t "http://admin:admin@localhost:4502" -w "./jcr_root"
-t points to AEM author instance server
-w point to the jcr_root folder of our project
AEMFED monitors the jcr_root folder for changes and deploys the change as soon as it is detected.
NOTE: Keep the AEMFED terminal up and running. It is required to deploy the app.
With the introduction of SPA Editor, roles and responsibilities of SPA developers, AEMFED developers, and AEM developers are clearly segregated:
AEM Developer create components in AEM and provide structure of component and dialog box for Authors. They also provide the logic to export content stored by Authors.
SPA Developer create React components in to render UI and show data. So, no HTL code is required in AEM. All the display related functionality is handled by a SPA Developers in React or Angular.
Install AEM JS SDK:
Open terminal window, navigate to the react-app, and run following command in the listed order to install AEM JS SDK:
npm install @adobe/cq-spa-component-mapping
npm install @adobe/cq-spa-page-model-manager
npm install @adobe/cq-react-editable-components
Open terminal, navigate to the react folder and run the below commands in the listed order to install dependencies:
npm install react-fast-compare
npm install ajv --save-dev
npm install clone --save-dev
Edit Title Component in AEM
Navigate to the /react /src/components/title folder and examine the Title.js and Title.css files.
Open the Title.js file and inspect important parts in each block:
The following code Imports Basic Components and MapTo from cq-react-editable-components:
import React, { Component } from 'react';
import { MapTo } from '@adobe/cq-react-editable-components';
import "./Title.css";
When component is empty, show a placeholder text. The following code-block has condition to check text:
const TitleEditConfig = {
emptyLabel: 'Title - Meetup.SPA',
isEmpty: function (props) {
return !props || !props.text || props.text.trim().length < 1;
}
};
The following code renders access values and returns HTML for display:
class Title extends Component {
render() {
return (
this.props.type ?
<this.props.type className="title">{this.props.text}</this.props.type> :
<h1 className="title">{this.props.text}</h1>
);
}
}
The following code maps Title Component in React to AEM Title Component:
MapTo('meetup/components/content/title')(Title, TitleEditConfig);
Open the Title.js file and inspect how the Title component is added. Authors dynamically add components. You can use the following code to add title component in index.js available at /react-app/src/index.js. The changes are already present in the .zip file. You are not required to make any changes:
require ('./components/title/Title') ;
Run the following command to deploy:
npm run build
Open the following URL. It opens the Home Page in AEM Editor:
Open URL http://localhost:4502/editor.html/content//meetup/react/home.html
Add the Title - Meetup.SPA component to the page and try to change its value. The changes are persistent.
Open the URL http://localhost:3000/editor.html/content//meetup/react/home.html. in your browser. Identical content is visible on AEM author and the proxy application.
Navigate to the react/src/component/title folder and open the Title.css file for editing.
Change the CSS color property to color of your choice.
Navigate to react directory and run the following command
npm run build
AEMFED uses aemsync to deploy changed to AEM and Browsersync refreshes the corresponding browser windows. The color change becomes visible instantly on the AEM page.
Now, you can use the AEM SPA Editor to control and edit the content and SPA application to control the look and feel.
Lesson 3 – Create a Progressive Web App
In this lesson, you will learn to create a simple PWA app , create or register service worker, & access page offline to test PWA capabilities. You will also expose AEM content to PWA app.
Objective
At the end of the lesson, you will be able to:
Create a Progressive Web Application (PWA)
Host a PWA on firebase
Consume AEM content in a PWA
Exercise 3.1 Service Worker Registration/Configuration
Extract the pwa.zip from the <The Resource> to the training folder.
Run following command from the pwa-app:
npm install
npm run build
Open the build folder.
Examine the service-worker.js file to see how service workers are registered, validated, and unregistered by going over various pre-defined methods.
Exercise 3.2 Hosting on firebase
Login to https://console.firebase.google.com/ with your Google account.
Click the Add Project tile to create a firebase project. Specify a project name, accept terms, and click Create Project..
Click Continue. Click the Gear icon of your newly created project. Click Project Settings. Verify the name of the project.
Open terminal window and navigate to the pwa-app folder.
Run the following commands:
npm install -g firebase-tools
firebase login
firebase init
Proceed with Y, when asked.
Select Hosting and press Enter.
Specify build as public directory name. Select Y for single-page app.
Select N for Index.html. Verify if the firebase.json file is created. Proceed, if the file is created.
Run the following command:
firebase deploy
Once the firebase is deployed, a URL similar to the following becomes active:
https://<project-id>.firebaseapp.com
Open the URL. If the URL is accessible, the hosting is successful.
Exercise 3.3 AEM Changes to support PWA
Log in the publish instance of AEM Server. The login URL is http://localhost:4503/
Open the package manager and install the pwa-content-0.1.zip package.
Enable CORS for AEM. The PWA app is on and AEM is on a different domain. You fetch content fragment from AEM and supply to PWA which is running on a different domain. By default browser doesn’t allow such calls as it is against CORS (Cross-origin resource sharing ), So, enable CORS at AEM side to allow the communication between both the domains. To enable CORS on AEM:
Log in to AEM publish instance Felix console configuration. The URL is http://<server>:<port>/system/console/configMgr
Search and open the Adobe Granite Cross-Origin Resource Sharing Policy configuration.
In Allowed Origins, specify and click Save.
Search and open the Apache Sling Main Servlet configuration. Add the following Additional Response headers and click Save.
Access-Control-Allow-Origin=Open the hosting URL of PWA and open the developer tools for your browser. It has contentfragment.json file Network tab. The file is fetched from AEM.
Put the browser in offline mode and reload the page, to verify if the content is cached. If the page loads in offline mode, you have successfully created a PWA with AEM content. Next Steps.
Next Steps
Create custom component and leverage sling models to expose content that can be consumed in PWA app.
Explore ContrentFragmentList core component to see how to expose collection of content fragment as JSON
To understand more about dynamic routing, examine the navigation component in AEM in SPA.
Additional Resources
https://helpx.adobe.com/experience-manager/6-5/sites/developing/using/spa-architecture.html
https://helpx.adobe.com/experience-manager/6-5/sites/developing/using/spa-walkthrough.html
NPM Modules:
https://www.npmjs.com/package/@adobe/cq-spa-page-model-manager
https://www.npmjs.com/package/@adobe/cq-spa-component-mapping
http://npmjs.com/package/@adobe/cq-react-editable-components
Appendix
https://developers.google.com/web/progressive-web-apps/checklist
Glossary
Term Description AEM
Adobe Experience Manager
CRX
Adobe Java Content Repository
OSGI
Open Service Gateway Initiative
JS
JavaScript
ClientLibs
AEM Client library containing JavaScript and CSS
AEMFED
Adobe Experience Manager Front End Development
SPA
Single Page Application
PWA
Progressive Web Application
AEM JS SDK
Adobe Experience Manager JavaScript Software Development Kit
CF
Content Fragment
NPM
Node Package Manager